check transmission fluid DODGE RAM SRT-10 2006 Service Owner's Guide
[x] Cancel search | Manufacturer: DODGE, Model Year: 2006, Model line: RAM SRT-10, Model: DODGE RAM SRT-10 2006Pages: 5267, PDF Size: 68.7 MB
Page 3015 of 5267
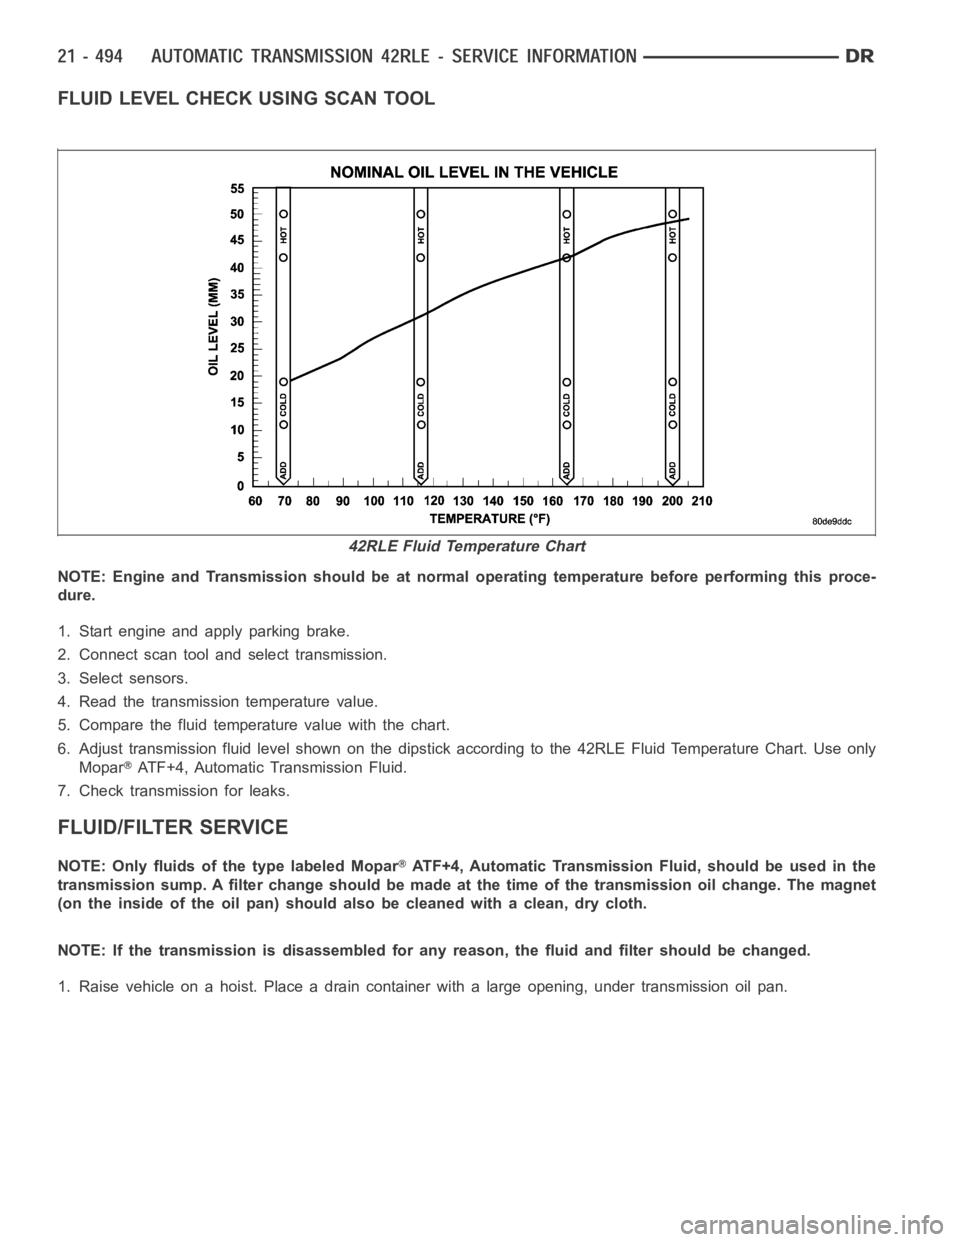
FLUID LEVEL CHECK USING SCAN TOOL
NOTE: Engine and Transmission should be at normal operating temperature before performing this proce-
dure.
1. Start engine and apply parking brake.
2. Connect scan tool and select transmission.
3. Select sensors.
4. Read the transmission temperature value.
5. Compare the fluid temperature value with the chart.
6. Adjust transmission fluid level shown on the dipstick according to the 42RLE Fluid Temperature Chart. Use only
Mopar
ATF+4, Automatic Transmission Fluid.
7. Check transmission for leaks.
FLUID/FILTER SERVICE
NOTE: Only fluids of the type labeled MoparATF+4, Automatic Transmission Fluid, should be used in the
transmission sump. A filter change should be made at the time of the transmission oil change. The magnet
(on the inside of the oil pan) should also be cleaned with a clean, dry cloth.
NOTE: If the transmission is disassembled for any reason, the fluid and filter should be changed.
1. Raise vehicle on a hoist. Place a drain container with a large opening, under transmission oil pan.
42RLE Fluid Temperature Chart
Page 3016 of 5267
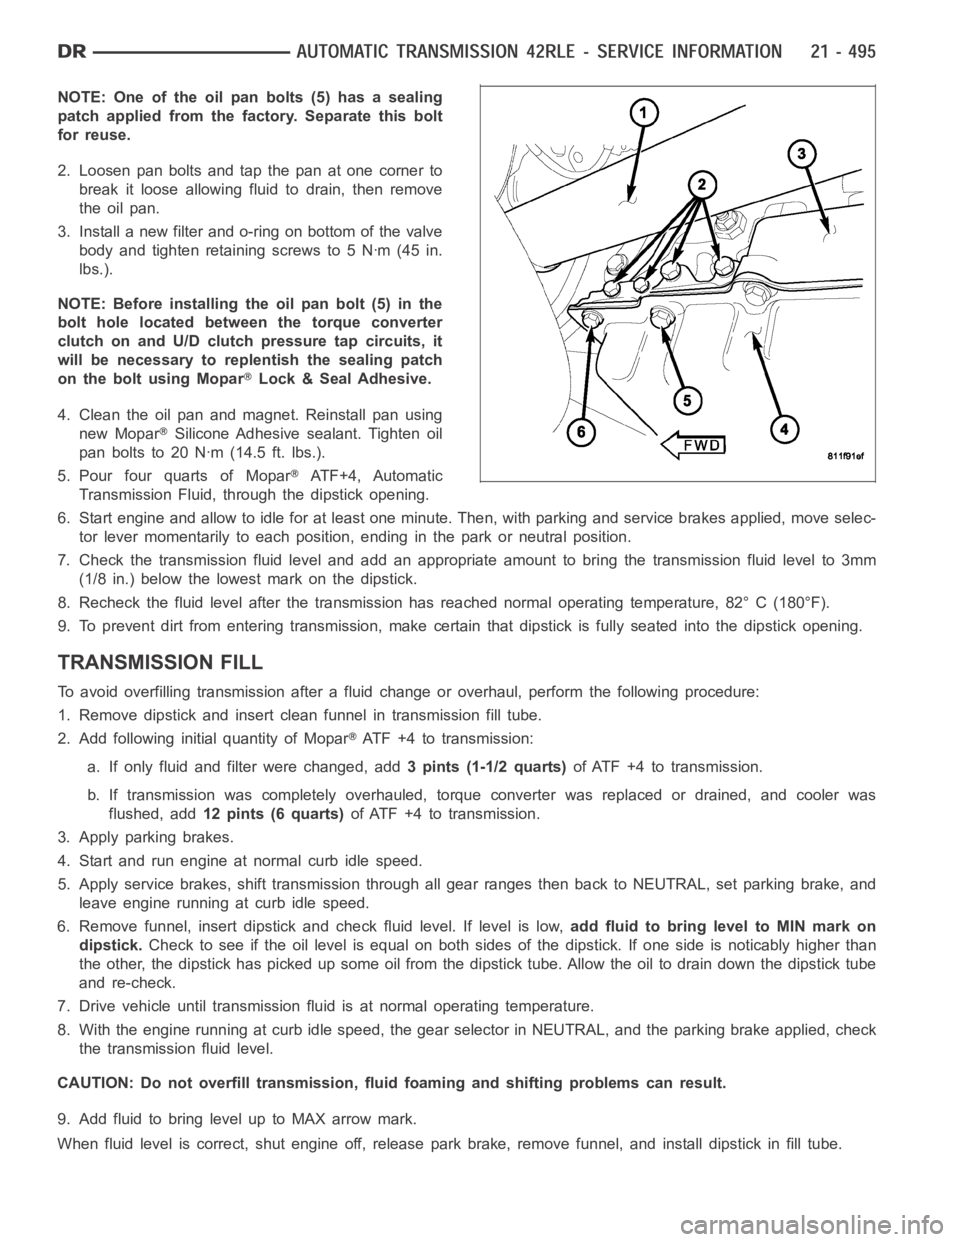
NOTE: One of the oil pan bolts (5) has a sealing
patch applied from the factory. Separate this bolt
for reuse.
2. Loosen pan bolts and tap the pan at one corner to
break it loose allowing fluid to drain, then remove
the oil pan.
3. Install a new filter and o-ring on bottom of the valve
body and tighten retaining screws to 5 Nꞏm (45 in.
lbs.).
NOTE: Before installing the oil pan bolt (5) in the
bolt hole located between the torque converter
clutch on and U/D clutch pressure tap circuits, it
will be necessary to replentish the sealing patch
on the bolt using Mopar
Lock & Seal Adhesive.
4. Clean the oil pan and magnet. Reinstall pan using
new Mopar
Silicone Adhesive sealant. Tighten oil
pan bolts to 20 Nꞏm (14.5 ft. lbs.).
5. Pour four quarts of Mopar
AT F + 4 , A u t o m a t i c
Transmission Fluid, through the dipstick opening.
6. Start engine and allow to idle for at least one minute. Then, with parkingand service brakes applied, move selec-
tor lever momentarily to each position, ending in the park or neutral position.
7. Check the transmission fluid level and add an appropriate amount to bring the transmission fluid level to 3mm
(1/8 in.) below the lowest mark on the dipstick.
8. Recheck the fluid level after the transmission has reached normal operating temperature, 82° C (180°F).
9. To prevent dirt from entering transmission, make certain that dipstickis fully seated into the dipstick opening.
TRANSMISSION FILL
To avoid overfilling transmission after a fluid change or overhaul, perform the following procedure:
1. Remove dipstick and insert clean funnel in transmission fill tube.
2. Add following initial quantity of Mopar
ATF+4totransmission:
a. If only fluid and filter were changed, add3 pints (1-1/2 quarts)of ATF +4 to transmission.
b. If transmission was completely overhauled, torque converter was replaced or drained, and cooler was
flushed, add12 pints (6 quarts)of ATF +4 to transmission.
3. Apply parking brakes.
4. Start and run engine at normal curb idle speed.
5. Apply service brakes, shift transmission through all gear ranges then back to NEUTRAL, set parking brake, and
leave engine running at curb idle speed.
6. Remove funnel, insert dipstick andcheck fluid level. If level is low,add fluid to bring level to MIN mark on
dipstick.Check to see if the oil level is equal on both sides of the dipstick. If one side is noticably higher than
the other, the dipstick has picked up some oil from the dipstick tube. Allowthe oil to drain down the dipstick tube
and re-check.
7. Drive vehicle until transmission fluid is at normal operating temperature.
8. With the engine running at curb idle speed, the gear selector in NEUTRAL,and the parking brake applied, check
the transmission fluid level.
CAUTION: Do not overfill transmission, fluid foaming and shifting problems can result.
9. Add fluid to bring level up to MAX arrow mark.
When fluid level is correct, shut engine off, release park brake, remove funnel, and install dipstick in fill tube.
Page 3070 of 5267
4. Separate the torque converter from the transmission.
INSTALLATION
NOTE: Check converter hub and drive notches for sharp edges, burrs, scratches, or nicks. Polish the hub
and notches with 320/400 grit paper or crocus cloth if necessary. The hub must be smooth to avoid dam-
aging the pump seal at installation.
1. Lubricate oil pump seal lip with transmission fluid.
2. Place torque converter in position on transmission.
CAUTION: Do not damage oil pump seal or bush-
ing while inserting torqueconverterintothefront
of the transmission.
3. Align torque converter to oil pump seal opening.
4. Insert torque converter hub into oil pump.
5. While pushing torque converter inward, rotate con-
verter until converter is fully seated in the oil pump
gears.
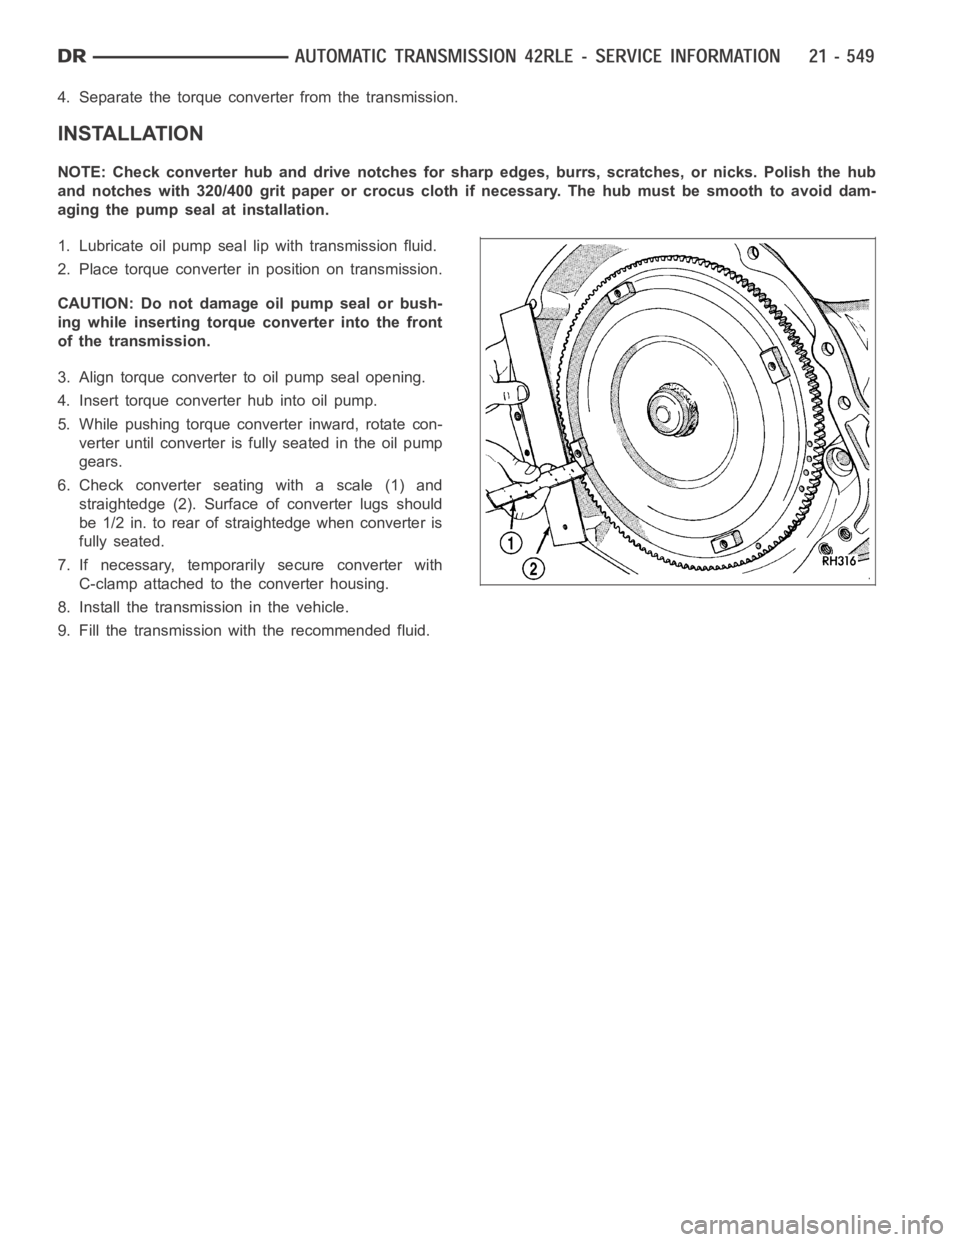
6. Check converter seating with a scale (1) and
straightedge (2). Surface of converter lugs should
be 1/2 in. to rear of straightedge when converter is
fully seated.
7. If necessary, temporarily secure converter with
C-clamp attached to the converter housing.
8. Install the transmission in the vehicle.
9. Fill the transmission with the recommended fluid.
Page 3083 of 5267
CONVERTER CLUTCH CONTROL VALVE
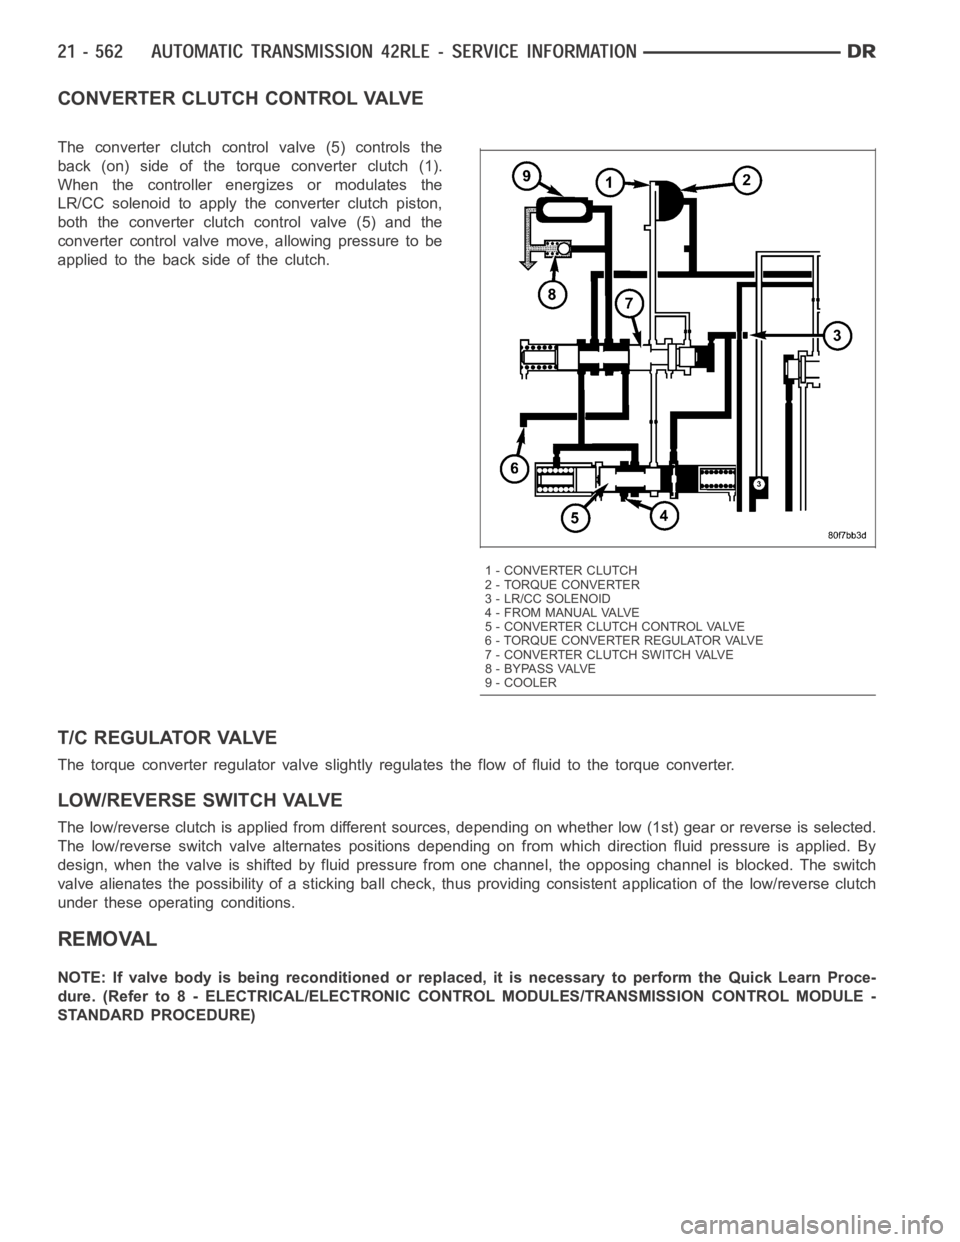
The converter clutch control valve (5) controls the
back (on) side of the torque converter clutch (1).
When the controller energizes or modulates the
LR/CC solenoid to apply the converter clutch piston,
both the converter clutch control valve (5) and the
converter control valve move, allowing pressure to be
applied to the back side of the clutch.
T/C REGULATOR VALVE
The torque converter regulator valve slightly regulates the flow of fluidto the torque converter.
LOW/REVERSE SWITCH VALVE
The low/reverse clutch is applied from different sources, depending on whether low (1st) gear or reverse is selected.
The low/reverse switch valve alternates positions depending on from which direction fluid pressure is applied. By
design, when the valve is shifted by fluid pressure from one channel, the opposing channel is blocked. The switch
valve alienates the possibility of a sticking ball check, thus providing consistent application of the low/reverse clutch
under these operating conditions.
REMOVAL
NOTE: If valve body is being reconditioned or replaced, it is necessary to perform the Quick Learn Proce-
dure. (Refer to 8 - ELECTRICAL/ELECTRONIC CONTROL MODULES/TRANSMISSIONCONTROL MODULE -
STANDARD PROCEDURE)
1 - CONVERTER CLUTCH
2 - TORQUE CONVERTER
3 - LR/CC SOLENOID
4 - FROM MANUAL VALVE
5 - CONVERTER CLUTCH CONTROL VALVE
6 - TORQUE CONVERTER REGULATOR VALVE
7 - CONVERTER CLUTCH SWITCH VALVE
8 - BYPASS VALVE
9 - COOLER
Page 3124 of 5267
When Monitored:
Continuously with the ignition on and engine running.
Set Condition:
This DTC will set when the desired transmission temperature does not reacha normal operating temperature
within a given time frame. Time is variable due to ambient temperature. Approximate times are starting tem-
perature to warm up time: (-40° F / -40° C - 35 min) (-20° F / -28° C - 25 min) (20°F / -6.6° C - 20 min) (60°
F/15.5°C-10min)
Possible Causes
RELATED DTC’S PRESENT
TRANSMISSION TEMPERATURE SENSOR
POWERTRAIN CONTROL MODULE
Always perform the 45RFE/545RFE Pre-Diagnostic Troubleshooting Procedure before proceeding. (Refer to
21 - TRANSMISSION/TRANSAXLE/AUTOMATIC - 45RFE/545RFE - STANDARD PROCEDURE)
Theory of Operation
The Transmission Temperature Sensor is a variable resistor that changes with temperature, or otherwise known as
a thermister. The temperature of the transmission fluid can affect a variety of electronically controlled transmission
operations such as shift quality, torque converter lock-up, and when and/or if certain OBDII or system self-diagnostic
test are performed. The Powertrain Control Module (PCM) substitutes a calculated transmission temperature value
if a fault is detected in the Transmission Temperature Sensor circuit.
Diagnostic Test
1.DETERMINE IF RELATED DTC’S ARE PRESENT
With the scan tool, check Transmission DTC’s.
Are there any other related Transmission Temperature Sensor DTCs present?
Ye s>>
Refer to the Transmission category and perform the appropriate symptom.
No>>
Go To 2
2.CHECK IF DTC IS CURRENT
With the scan tool, Check the STARTS SINCE SET counter for P0711.
NOTE: This counter only applies to the last DTC set.
Is the STARTS SINCE SET counter 2 or less?
Ye s>>
Go To 3
No>>
Go To 4
3.TRANSMISSION TEMPERATURE SENSOR
Turn the ignition off to the lock position.
Remove the Ignition Switch Feed fuse from the TIPM.
CAUTION: Removal of the Ignition Switch Feed fuse from the TIPM will prevent the vehicle from being
startedingear.
WARNING: The Ignition Switch Feed fuse must be removed from the TIPM. Failure to do so can result in
personal injury or death.
Install the Transmission Simulator, Miller tool #8333.
Ignition on, engine not running.
With the Transmission Simulator, turn the Input/Output switch to OFF.
With the scan tool, monitor the TRANS TEMP VOLTS while turning the ThermistorVoltageswitchtoallthreeposi-
tions on the Transmission Simulator.
Page 3127 of 5267
When Monitored:
Continuously with the ignition on and engine running.
Set Condition:
The DTC will set when the monitored Temperature Sensor voltage drops below0.078 volts for the period of
0.45 seconds.
Possible Causes
RELATED DTC’S PRESENT
(T54) TRANSMISSION TEMPERATURE SENSOR SIGNAL CIRCUIT SHORT TO GROUND
TRANSMISSION TEMPERATURE SENSOR
POWERTRAIN CONTROL MODULE
Always perform the 45RFE/545RFE Pre-Diagnostic Troubleshooting Procedure before proceeding. (Refer to
21 - TRANSMISSION/TRANSAXLE/AUTOMATIC - 45RFE/545RFE - STANDARD PROCEDURE)
Theory of Operation
The Transmission Temperature Sensor is a variable resistor that changes with temperature, or otherwise known as
a thermister. The temperature of the transmission fluid can affect a variety of electronically controlled transmission
operations such as shift quality, torque converter lock-up, and when and/or if certain OBDII or system self-diagnostic
test are performed. The Powertrain Control Module (PCM) substitutes a calculated transmission temperature value
if a fault is detected in the Transmission Temperature Sensor circuit.
Diagnostic Test
1.DETERMINE IF RELATED DTC’S ARE PRESENT
With the scan tool, check Transmission DTC’s.
Are there any line pressure sensor or throttle position sensor DTCs present?
Ye s>>
Refer to the Transmission category and perform the appropriate symptom.
No>>
Go To 2
2.CHECK TO SEE IF DTC IS CURRENT
With the scan tool, Check the STARTS SINCE SET counter for P0712.
NOTE: This counter only applies to the last DTC set.
Is the STARTS SINCE SET counter 2 or less?
Ye s>>
Go To 3
No>>
Go To 5
3.TRANSMISSION TEMPERATURE SENSOR
Turn the ignition off to the lock position.
Remove the Ignition Switch Feed fuse from the TIPM.
CAUTION: Removal of the Ignition Switch Feed fuse from the TIPM will prevent the vehicle from being
startedingear.
WARNING: The Ignition Switch Feed fuse must be removed from the TIPM. Failure to do so can result in
personal injury or death.
Install the Transmission Simulator, Miller tool #8333.
Ignition on, engine not running.
With the Transmission Simulator, turn the Input/Output switch to OFF.
With the scan tool, monitor the TRANS TEMP VOLTS while turning the ThermistorVoltageswitchtoallthreeposi-
tions on the Transmission Simulator.
Page 3130 of 5267
When Monitored:
Continuously with the ignition on and engine running.
Set Condition:
The DTC will set when the monitored Temperature Sensor voltage rises above4.94 volts for the period of 0.45
seconds.
Possible Causes
RELATED DTC’S PRESENT
(T54) TRANSMISSION TEMPERATURE SENSOR SIGNAL CIRCUIT SHORT TO OTHER CIRCUITS
TRANSMISSION TEMPERATURE SENSOR
POWERTRAIN CONTROL MODULE
Always perform the 45RFE/545RFE Pre-Diagnostic Troubleshooting Procedure before proceeding. (Refer to
21 - TRANSMISSION/TRANSAXLE/AUTOMATIC - 45RFE/545RFE - STANDARD PROCEDURE)
Theory of Operation
The Transmission Temperature Sensor is a variable resistor that changes with temperature, or otherwise known as
a thermister. The temperature of the transmission fluid can affect a variety of electronically controlled transmission
operations such as shift quality, torque converter lock-up, and when and/or if certain OBDII or system self-diagnostic
test are performed. The Powertrain Control Module (PCM) substitutes a calculated transmission temperature value
if a fault is detected in the Transmission Temperature Sensor circuit.
Diagnostic Test
1.DETERMINE IF RELATED DTC’S ARE PRESENT
With the scan tool, check Transmission DTC’s.
Are there any line pressure sensor or throttle position sensor DTCs present?
Ye s>>
Refer to the Transmission category and perform the appropriate symptom.
No>>
Go To 2
2.CHECK IF DTC IS CURRENT
With the scan tool, check the STARTS SINCE SET counter for P0713.
NOTE: This counter only applies to the last DTC set.
Is the STARTS SINCE SET counter 2 or less?
Ye s>>
Go To 3
No>>
Go To 5
3.TRANSMISSION TEMPERATURE SENSOR
Turn the ignition off to the lock position.
Remove the Ignition Switch Feed fuse from the TIPM.
CAUTION: Removal of the Ignition Switch Feed fuse from the TIPM will prevent the vehicle from being
startedingear.
WARNING: The Ignition Switch Feed fuse must be removed from the TIPM. Failure to do so can result in
personal injury or death.
Install the Transmission Simulator, Miller tool #8333.
Ignition on, engine not running.
With the Transmission Simulator, turn the Input/Output switch to OFF.
With the scan tool, monitor the TRANS TEMP VOLTS while turning the ThermistorVoltageswitchtoallthreeposi-
tions on the Transmission Simulator.
Page 3133 of 5267
When Monitored:
Continuously with the ignition on and engine running.
Set Condition:
The DTC will set when the monitored Temperature Sensor voltage fluctuatesor changes abruptly within a pre-
determined period of time.
Possible Causes
RELATED DTC’S PRESENT
TRANSMISSION TEMPERATURE SENSOR
POWERTRAIN CONTROL MODULE
Always perform the 45RFE/545RFE Pre-Diagnostic Troubleshooting Procedure before proceeding. (Refer to
21 - TRANSMISSION/TRANSAXLE/AUTOMATIC - 45RFE/545RFE - STANDARD PROCEDURE)
Theory of Operation
The Transmission Temperature Sensor is a variable resistor that changes with temperature, or otherwise known as
a thermister. The temperature of the transmission fluid can affect a variety of electronically controlled transmission
operations such as shift quality, torque converter lock-up, and when and/or if certain OBDII or system self-diagnostic
test are performed. The Powertrain Control Module (PCM) substitutes a calculated transmission temperature value
if a fault is detected in the Transmission Temperature Sensor circuit.
Diagnostic Test
1.DETERMINE IF RELATED DTC’S ARE PRESENT
With the scan tool, check Transmission DTC’s.
Are there any line pressure sensor or throttle position sensor DTCs present?
Ye s>> Refer to the Transmission category and perform the appropriate symptom.(Referto21-TRANS-
MISSION/TRANSAXLE/AUTOMATIC - 45RFE/545RFE - DIAGNOSIS AND TESTING)
No>>
Go To 2
2.CHECK TO SEE IF DTC IS CURRENT
With the scan tool, Check the STARTS SINCE SET counter for P0714.
NOTE: This counter only applies to the last DTC set.
Is the STARTS SINCE SET counter 2 or less?
Ye s>>
Go To 3
No>>
Go To 4
3.TRANSMISSION TEMPERATURE SENSOR
Turn the ignition off to the lock position.
Remove the Ignition Switch Feed fuse from the TIPM.
CAUTION: Removal of the Ignition Switch Feed fuse from the TIPM will prevent the vehicle from being
startedingear.
WARNING: The Ignition Switch Feed fuse must be removed from the TIPM. Failure to do so can result in
personal injury or death.
Install the Transmission Simulator, Miller tool #8333.
Ignition on, engine not running.
With the Transmission Simulator, turn the Input/Output switch to OFF.
With the scan tool, monitor the TRANS TEMP VOLTS while turning the ThermistorVoltageswitchtoallthreeposi-
tions on the Transmission Simulator.
Page 3149 of 5267
P0731-GEAR RATIO ERROR IN 1ST
For a complete wiring diagramRefer to Section 8W
When Monitored:
Continuously with the ignition on, engine running, with the transmissionin gear.
Set Condition:
If the ratio of the Input RPM to the Output RPM does not match the current gearratio. This DTC can take up
to five minutes of problem identification before illuminating the MIL
Possible Causes
CUT UD PISTON SEAL
LOW FLUID LEVEL
CRACKED OR MIS-INSTALLED PRIMARY OIL FILTER OR SEAL
STUCK OR STICKING MAIN REGULATOR VALVE
FAILED OVERRUNNING CLUTCH
CUT UD ACCUMULATOR SEAL RING
BROKEN UD ACCUMULATOR PISTON
BROKEN REACTION SHAFT SUPPORT SEAL RING
LOW LINE PRESSURE
BROKEN / MISSING MAIN VALVE BODY BLEED ORIFICE
BROKEN / MISSING DRIBBLER ORIFICE ASSEMBLY IN REACTION SHAFT SUPPORT
POOR MACHINING ON PUMP VALVE BODY FACE
INPUT SPEED SENSOR AND RELATED WIRING
TRANSMISSION SOLENOID/TRS ASSEMBLY
POWERTRAIN CONTROL MODULE
Always perform the 45RFE/545RFE Pre-Diagnostic Troubleshooting procedure before proceeding. (Refer to
21 - TRANSMISSION/TRANSAXLE/AUTOMATIC - 45RFE/545RFE - STANDARD PROCEDURE)
Theory of Operation
The transmission system uses two speed sensors, one to measure input RPM and one to measure output RPM.
These inputs are essential for proper transmission operation. Therefore, the integrity of this data is verified through
the following checks:
1) Once in a particular gear, if the gear ratio varies from the correct gear ratio, the corresponding in-gear trouble
code is set (DTCs P0731–36).
2) An excessive change in input or output speeds indicating signal intermittent may result in the DTCs P0715 and/or
P0720 being set.
3) If the common speed sensor ground circuit is lost, both sensor inputs will read the pulses from the input speed
sensor when at a stop in neutral. Since the input speed sensor reads 60 teethfrom the input clutch hub and the
output speed sensor reads 30 teeth from the park gear, the result is an apparent speed ratio of 1:2 and may cause
the DTC P1794 to set.
Page 3152 of 5267
P0732-GEAR RATIO ERROR IN 2ND
For a complete wiring diagramRefer to Section 8W
When Monitored:
Continuously with the ignition on, engine running, with the transmissionin gear.
Set Condition:
If the ratio of the Input RPM to the Output RPM does not match the current gearratio. This DTC can take up
to five minutes of problem identification before illuminating the MIL
Possible Causes
RELATED DTC’S PRESENT
INPUT SPEED SENSOR OR WIRING
LOW FLUID LEVEL
CRACKED OR MIS-INSTALLED PRIMARY OIL FILTER OR SEAL
WORN SOLENOID SWITCH VALVE OR PLUGS
STUCK OR STICKING MAIN REGULATOR VALVE
BURNED UD OR 2C CLUTCH
CUT 2C OR UD PISTON SEAL
BROKEN 2C PISTON CASTING
BROKEN OR MISSING 2C BLEED ORIFICE
BROKEN OR MISSING UD BLEED ORIFICE
CUT 2C OR UD ACCUMULATOR PISTON SEAL
CRACKED 2C OR UD ACCUMULATOR PISTON
CUT OR MISSING #5 OR #7 CHECK BALL
TRANSMISSION SOLENOID/TRS ASSEMBLY
BROKEN WELD - REACTION CARRIER TO REVERSE SUN GEAR
MISSING TEETH ON INPUT CLUTCH HUB TONE WHEEL
Always perform the 45RFE/545RFE Pre-Diagnostic Troubleshooting Procedure before proceeding. (Refer to
21 - TRANSMISSION/TRANSAXLE/AUTOMATIC - 45RFE/545RFE - STANDARD PROCEDURE)
Theory of Operation
The transmission system uses two speed sensors, one to measure input RPM and one to measure output RPM.
These inputs are essential for proper transmission operation. Therefore, the integrity of this data is verified through
the following checks:
1) Once in a particular gear, if the gear ratio varies from the correct gear ratio, the corresponding in-gear trouble
code is set (DTCs P0731-36).
2) An excessive change in input or output speeds indicating signal intermittent may result in the DTCs P0715 and/or
P0720 being set.
3) If the common speed sensor ground circuit is lost, both sensor inputs will read the pulses from the input speed
sensor when at a stop in neutral. Since the input speed sensor reads 60 teethfrom the input clutch hub and the
output speed sensor reads 30 teeth from the park gear, the result is an apparent speed ratio of 1:2 and may cause
the DTC P1794 to set.