refrigerant type DODGE RAM SRT-10 2006 Service Repair Manual
[x] Cancel search | Manufacturer: DODGE, Model Year: 2006, Model line: RAM SRT-10, Model: DODGE RAM SRT-10 2006Pages: 5267, PDF Size: 68.7 MB
Page 1640 of 5267
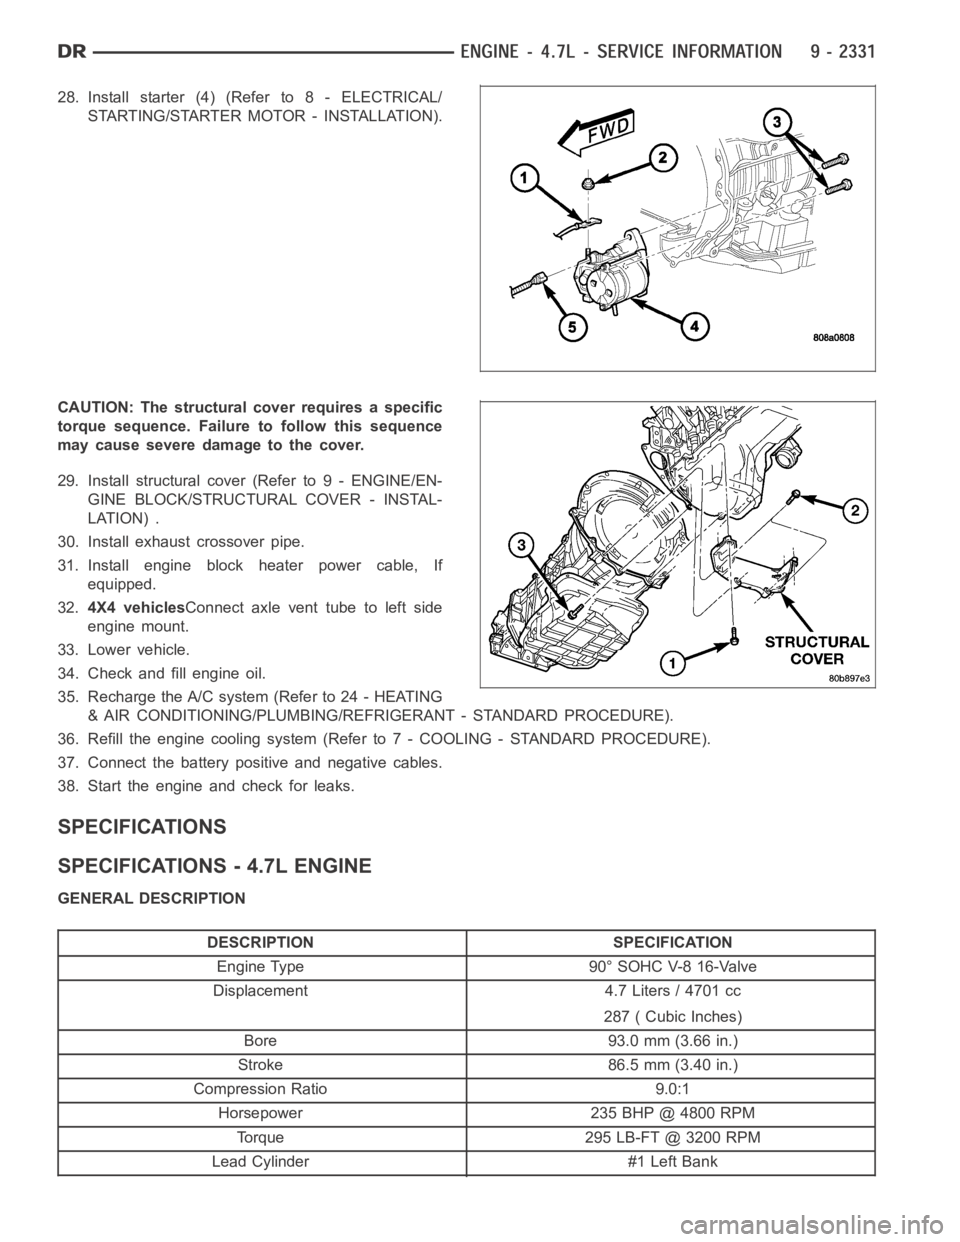
28. Install starter (4) (Refer to 8 - ELECTRICAL/
STARTING/STARTER MOTOR - INSTALLATION).
CAUTION: The structural cover requires a specific
torque sequence. Failure to follow this sequence
may cause severe damage to the cover.
29. Install structural cover (Refer to 9 - ENGINE/EN-
GINE BLOCK/STRUCTURAL COVER - INSTAL-
LATION) .
30. Install exhaust crossover pipe.
31. Install engine block heater power cable, If
equipped.
32.4X4 vehiclesConnect axle vent tube to left side
engine mount.
33. Lower vehicle.
34. Check and fill engine oil.
35. Recharge the A/C system (Refer to 24 - HEATING
& AIR CONDITIONING/PLUMBING/REFRIGERANT - STANDARD PROCEDURE).
36. Refill the engine cooling system (Refer to 7 - COOLING - STANDARD PROCEDURE).
37. Connect the battery positive and negative cables.
38. Start the engine and check for leaks.
SPECIFICATIONS
SPECIFICATIONS - 4.7L ENGINE
GENERAL DESCRIPTION
DESCRIPTION SPECIFICATION
Engine Type 90° SOHC V-8 16-Valve
Displacement 4.7 Liters / 4701 cc
287 ( Cubic Inches)
Bore 93.0 mm (3.66 in.)
Stroke 86.5 mm (3.40 in.)
Compression Ratio 9.0:1
Horsepower 235 BHP @ 4800 RPM
Torque 295 LB-FT @ 3200 RPM
Lead Cylinder #1 Left Bank
Page 1914 of 5267
3. Place a shop towel around the fuel injectors to catch any fluid that may possibly be under pressure in the cyl-
inder head. Remove the fuel injectors (Refer to 14 - FUEL SYSTEM/FUEL INJECTION/FUEL INJECTOR -
REMOVAL).
4. With all injectors removed, rotatethe crankshaft using the crankshaftbarring tool (PN 7471–B).
5. Identify the fluid in the cylinders (coolant, fuel, oil, etc.).
6. Be sure all fluid has been removed from the cylinders.
7. Repair engine or components as necessary to prevent this problem from occurring again.
8. Squirt a small amount of engine oil into the cylinders to lubricate the walls. This will prevent damage on restart.
9. Install fuel injectors (Refer to 14 - FUEL SYSTEM/FUEL INJECTION/FUEL INJECTOR - INSTALLATION).
10. Drain engine oil. Remove and discard the oil filter (Refer to 9 - ENGINE/LUBRICATION/OIL FILTER -
REMOVAL).
11. Installthedrainplug.Tightentheplugto50Nꞏm(37ft.lbs.)torque.
12. Install a new oil filter (Refer to 9 - ENGINE/LUBRICATION/OIL FILTER - INSTALLATION).
13. Fill engine crankcase with the specified amount and grade of oil (Referto LUBRICATION & MAINTENANCE/
FLUID TYPES - SPECIFICATIONS).
14. Connect the negative cable(s) to the battery.
15. Start the engine and check for any leaks.
REMOVAL - ENGINE
1. Disconnect both battery negative cables.
2. Disconnect engine grid heater harness at grid
heater relays.
3. Disconnect electrical connections from rear of alter-
nator.
4. Recover A/C refrigerant. (Refer to 24 - HEATING &
AIR CONDITIONING/PLUMBING - STANDARD
PROCEDURE).
5. Raise vehicle on a hoist.
6. Drain engine coolant (Refer to 7 - COOLING -
STANDARD PROCEDURE).
7. Remove engine oil drain plug and drain engine oil.
8. Reinstall drain plug. Tighten to 50 Nꞏm (37 ft. lbs.)
torque.
9. Lower the vehicle.
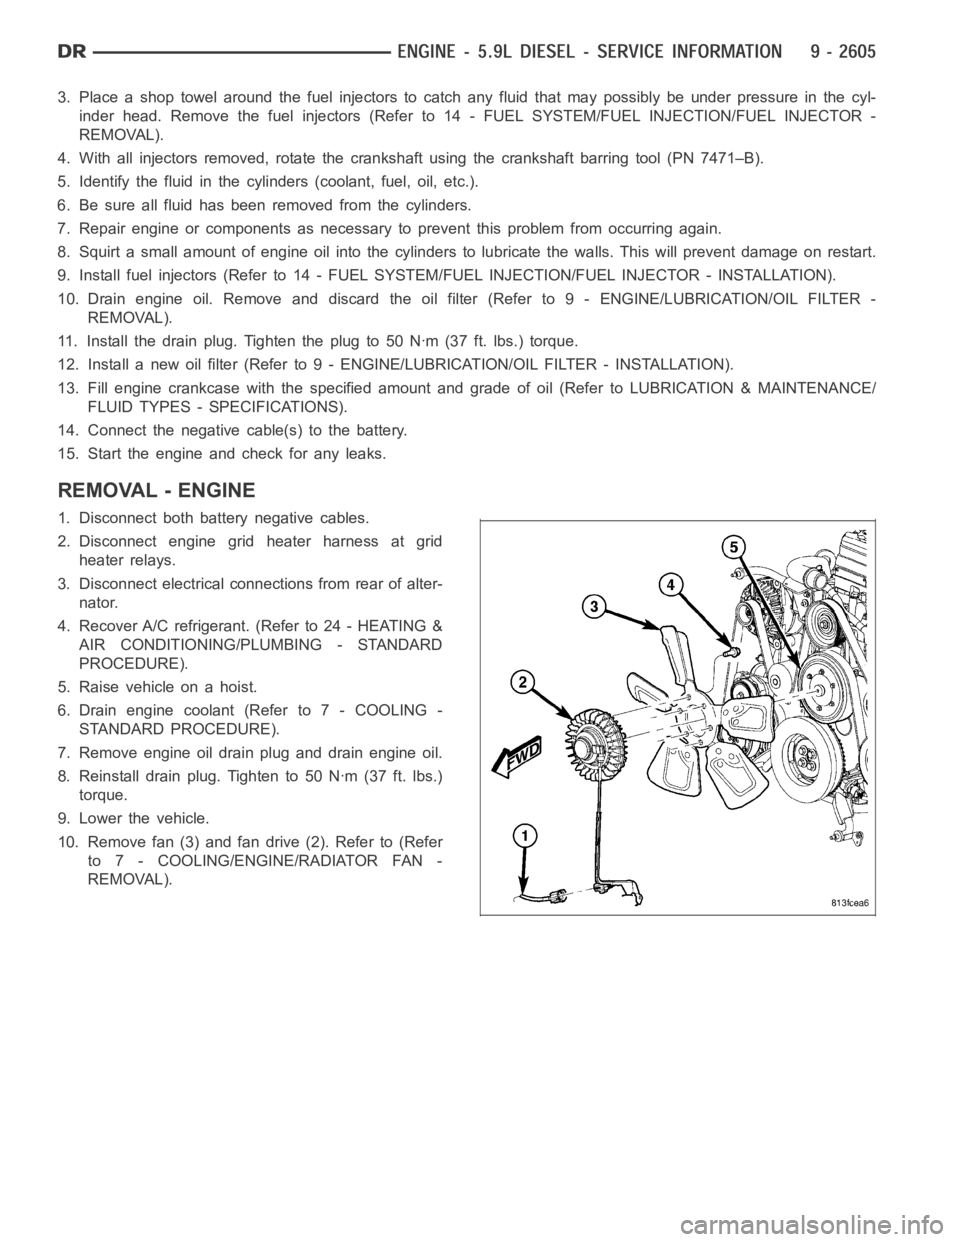
10. Remove fan (3) and fan drive (2). Refer to (Refer
to 7 - COOLING/ENGINE/RADIATOR FAN -
REMOVAL).
Page 5047 of 5267
With the scan tool in HVAC, select System Tests and then select Cooldown test. Allow the test to run to completion.
Does the scan tool display a status message that indicates a fault has occurred?
Yes, Conditions Too Cold - Test Not Run
If running, turn the A/C compressor off. Verify that the work area ambient temperature is above 15.6°C
(60°F). If not, move the vehicle to a warmer work area. Verify that the evaporator temperature is above
13°C (55°F). If not, set the blower to high speed and allow the blower to run for five minutes. Then, run
the Cooldown Test again.
Yes, Blowers Not On High - Test Not Run
Set the blower speed to high speed and then run the Cooldown Test again.
Yes, No Results Stored/Test Not Complete
Verify that power is not interrupted while rerunning the Cooldown Test.
Yes, Refrigerant Temperature Sensor Error
For Dual-Zone HVAC systems, refer to B10B2–A/C COOL DOWN TEST PERFORMANCEfor the diag-
nostic test procedure. For Single-Zone HVAC systems, refer to B1079–CLIMATE CONTROL COOL
DOWN TEST EXCESSIVE TIME for the diagnostic test procedure.
Yes, DTC Set During Routine - Test Not Passed
For Dual-Zone HVAC systems, refer to B10B2–A/C COOL DOWN TEST PERFORMANCEfor the diag-
nostic test procedure. For Single-Zone HVAC systems, refer to B1079–CLIMATE CONTROL COOL
DOWN TEST EXCESSIVE TIME for the diagnostic test procedure.
No>>
Asnecessary,eitherGoTo3,4,or5,or Perform BODY VERIFICATION TEST - VER1. (Refer to 8 -
ELECTRICAL/ELECTRONIC CONTROL MODULES - STANDARD PROCEDURE).
3.MODE SWITCH & DOOR ACTUATOR CIRCUIT TEST
NOTE: If at anytime a DTC becomes active during this test, proceed to the conclusion question.
NOTE: If multiple DTCs are active, diagnose those that relate to a short circuit first.
NOTE: Dual-Zone A/C Heater Controls do not set DTCs for stuck mode switches. Therefore, verify that the
A/C Heater Control is not damaged and that the mode switches and status indicators function properly and
repair as necessary before proceeding.
If not done so previously, start the engine.
Turn the Blower control to the low speed position.
Set the Blend control (single-zone) or Driver Blend control (dual-zone) to the full cold position.
If equipped, set the Passenger Blend control to the full cold position.
Monitor the scan tool for active HVAC DTCs while performing the following test steps.
If equipped, press the A/C mode switch on, wait 30 seconds, and then press itoff.
On Dual-Zone systems, press the Recirc mode switch on, wait 30 seconds, andthen press it off.
If equipped, press the EBL mode switch on, wait 30 seconds, and then press itoff.
Move the Blend control (single-zone) or Driver Blend control (dual-zone)from full cold to full hot, wait 30 seconds,
and then move it back to full cold.
If equipped, move the Passenger Blend control from full cold to full hot, wait 30 seconds, and then moved it back
to full cold.
Turn the Mode select control to the defrost position, wait 30 seconds, and then turn it to the panel position (dual-
zone) or panel / recirc position (single-zone). Wait 30 seconds before proceeding.
Does the scan tool display any active DTCs?
Ye s>>
Diagnose and repair the DTC(s). Refer to the Table of Contents in this Section for a complete list of
HVAC related symptoms.
No>>
If you are here due to a stored DTC, it is possible that a technician may not have erased the DTC
following a repair. If possible, verify if the vehicle was recently in for this type of service. Otherwise,
either Go To 4 or 5, or visually inspect the related wiring harness for chafed, pierced, pinched, and
partially broken wires and the wiring harness connectors for broken, bent, pushed out, and corroded
terminals, and repair as necessary.
Perform BODY VERIFICATION TEST - VER 1. (Refer to 8 - ELECTRICAL/ELECTRONIC CONTROL
MODULES - STANDARD PROCEDURE).
Page 5075 of 5267
REMOVAL
DENSO A/C COMPRESSOR
NOTE: The compressor clutch assembly can be serviced with the refrigerantsystem fully-charged.
NOTE: Typical A/C compressor shown in illustrations.
1. Disconnect and isolate the negative battery cable.
2. Remove the accessory drive belt (Refer to 7 -
COOLING/ACCESSORY DRIVE/BELTS-DRIVE -
REMOVAL).
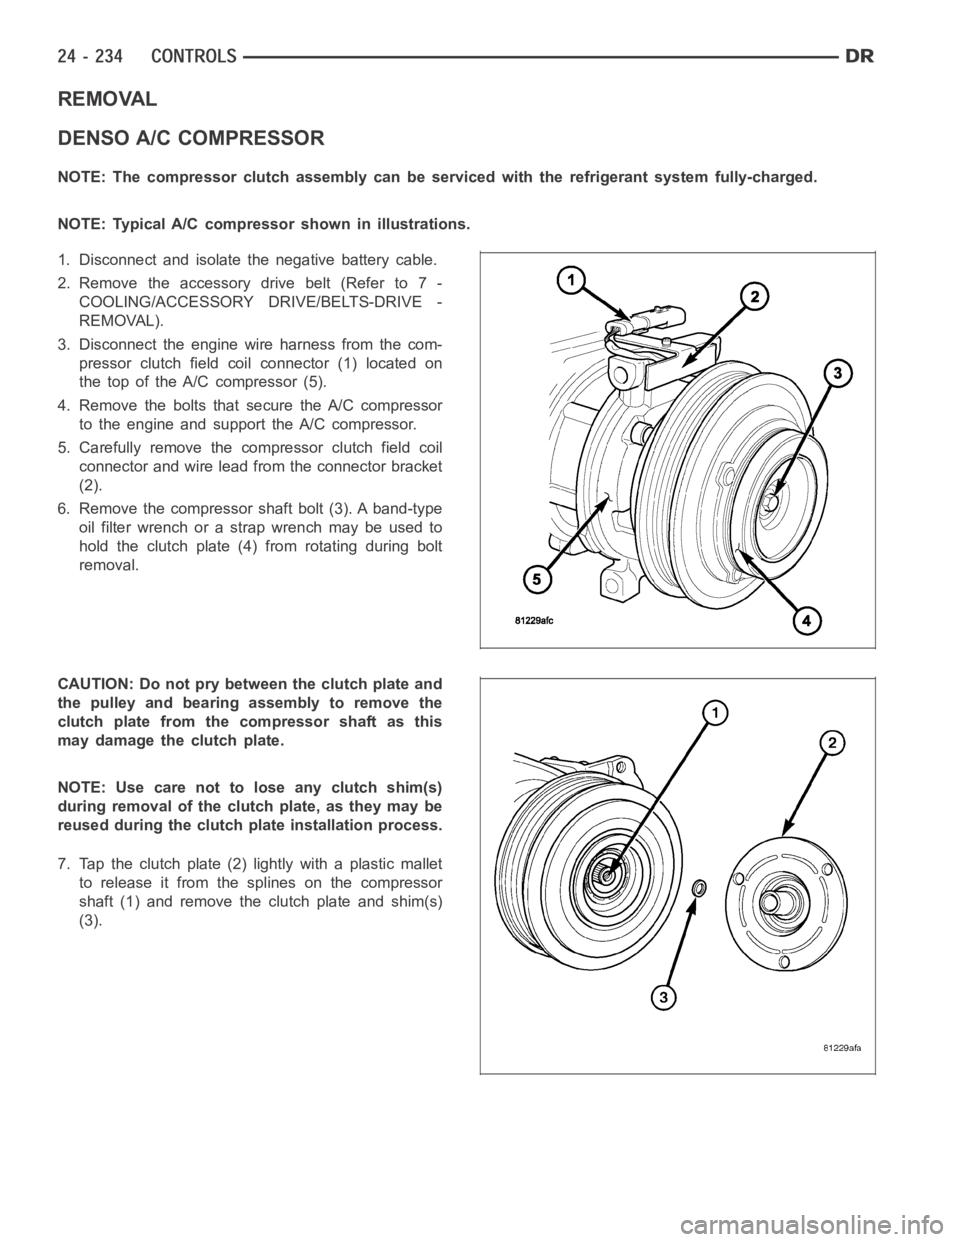
3. Disconnect the engine wire harness from the com-
pressor clutch field coilconnector (1) located on
the top of the A/C compressor (5).
4. Remove the bolts that secure the A/C compressor
to the engine and support the A/C compressor.
5. Carefully remove the compressor clutch field coil
connector and wire lead from the connector bracket
(2).
6. Remove the compressor shaft bolt (3). A band-type
oil filter wrench or a strap wrench may be used to
hold the clutch plate (4) from rotating during bolt
removal.
CAUTION: Do not pry between the clutch plate and
the pulley and bearing assembly to remove the
clutch plate from the compressor shaft as this
may damage the clutch plate.
NOTE: Use care not to lose any clutch shim(s)
during removal of the clutch plate, as they may be
reused during the clutch plate installation process.
7. Tap the clutch plate (2) lightly with a plastic mallet
to release it from the splines on the compressor
shaft (1) and remove the clutch plate and shim(s)
(3).
Page 5092 of 5267
TRANSDUCER-A/C PRESSURE
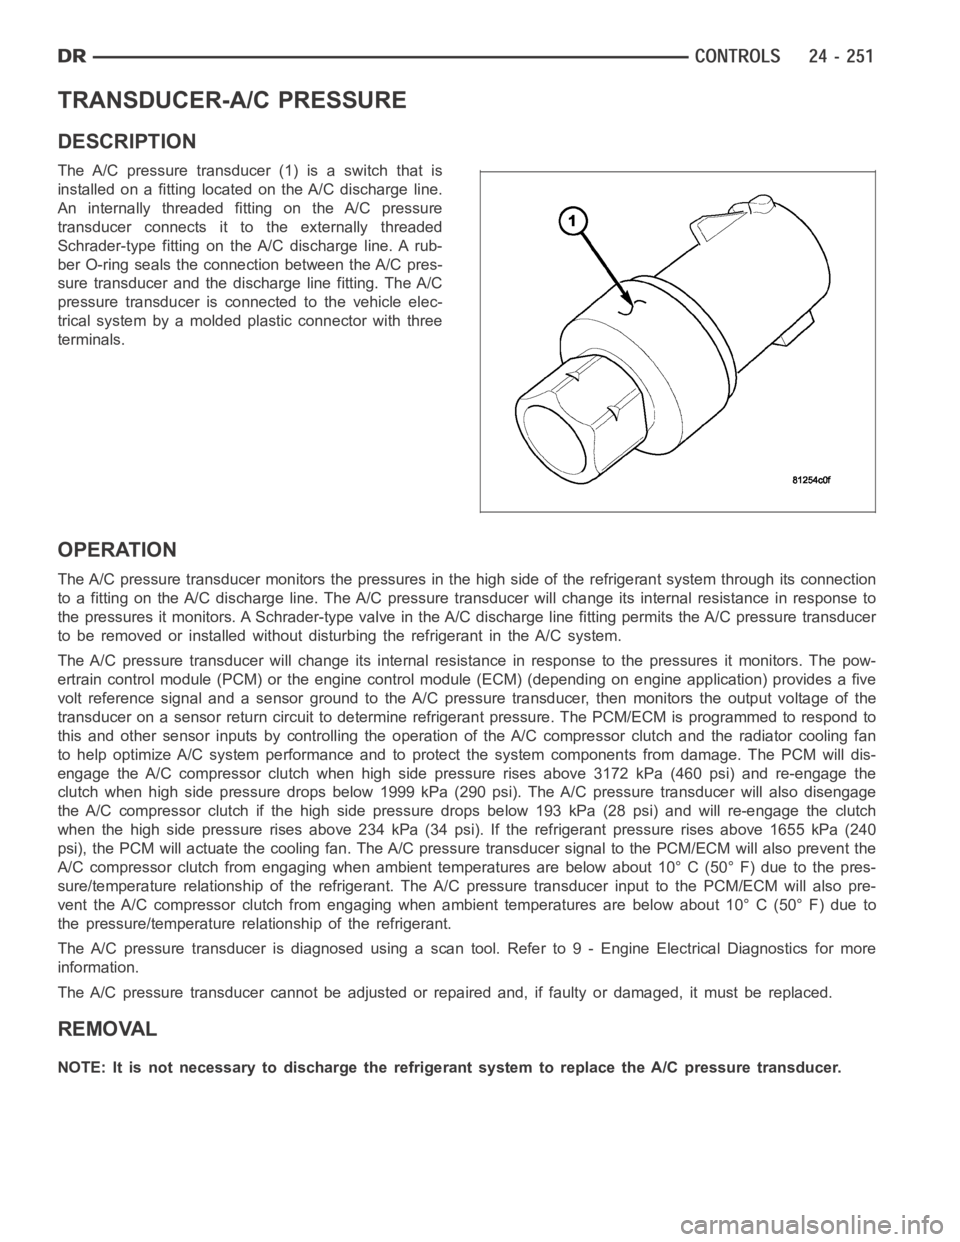
DESCRIPTION
The A/C pressure transducer (1) is a switch that is
installed on a fitting located on the A/C discharge line.
An internally threaded fitting on the A/C pressure
transducer connects it to the externally threaded
Schrader-type fitting on the A/C discharge line. A rub-
ber O-ring seals the connection between the A/C pres-
sure transducer and the discharge line fitting. The A/C
pressure transducer is connected to the vehicle elec-
trical system by a molded plastic connector with three
terminals.
OPERATION
The A/C pressure transducer monitors the pressures in the high side of the refrigerant system through its connection
to a fitting on the A/C discharge line. The A/C pressure transducer will change its internal resistance in response to
the pressures it monitors. A Schrader-type valve in the A/C discharge linefitting permits the A/C pressure transducer
to be removed or installed without disturbing the refrigerant in the A/C system.
The A/C pressure transducer will change its internal resistance in response to the pressures it monitors. The pow-
ertrain control module (PCM) or the engine control module (ECM) (depending on engine application) provides a five
volt reference signal and a sensor ground to the A/C pressure transducer, then monitors the output voltage of the
transducer on a sensor return circuit to determine refrigerant pressure.The PCM/ECM is programmed to respond to
this and other sensor inputs by controlling the operation of the A/C compressor clutch and the radiator cooling fan
to help optimize A/C system performance and to protect the system components from damage. The PCM will dis-
engagetheA/Ccompressorclutchwhenhighsidepressurerisesabove3172kPa (460 psi) and re-engage the
clutch when high side pressure drops below 1999 kPa (290 psi). The A/C pressure transducer will also disengage
the A/C compressor clutch if the high side pressure drops below 193 kPa (28 psi) and will re-engage the clutch
when the high side pressure rises above 234 kPa (34 psi). If the refrigerantpressure rises above 1655 kPa (240
psi), the PCM will actuate the cooling fan. The A/C pressure transducer signal to the PCM/ECM will also prevent the
A/C compressor clutch from engaging when ambient temperatures are below about 10° C (50° F) due to the pres-
sure/temperature relationship of the refrigerant. The A/C pressure transducer input to the PCM/ECM will also pre-
vent the A/C compressor clutch from engaging when ambient temperatures are below about 10° C (50° F) due to
the pressure/temperature relationship of the refrigerant.
The A/C pressure transducer is diagnosed using a scan tool. Refer to 9 - Engine Electrical Diagnostics for more
information.
The A/C pressure transducer cannot be adjusted or repaired and, if faulty or damaged, it must be replaced.
REMOVAL
NOTE: It is not necessary to discharge the refrigerant system to replace the A/C pressure transducer.
Page 5093 of 5267
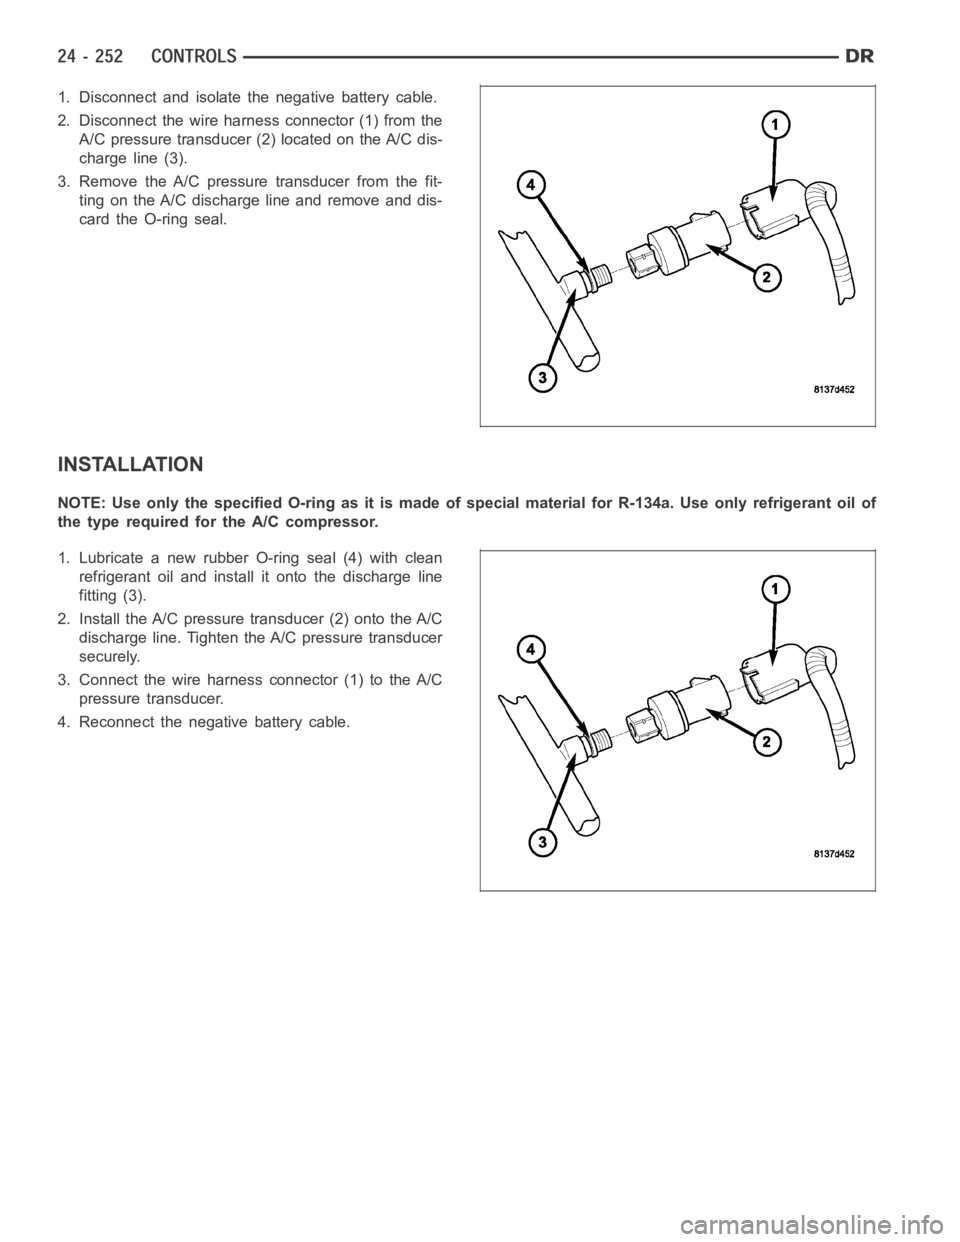
1. Disconnect and isolate the negative battery cable.
2. Disconnect the wire harness connector (1) from the
A/C pressure transducer (2) located on the A/C dis-
charge line (3).
3. Remove the A/C pressure transducer from the fit-
ting on the A/C discharge line and remove and dis-
card the O-ring seal.
INSTALLATION
NOTE:UseonlythespecifiedO-ringasitismadeofspecialmaterialforR-134a. Use only refrigerant oil of
the type required for the A/C compressor.
1. Lubricate a new rubber O-ring seal (4) with clean
refrigerant oil and install it onto the discharge line
fitting (3).
2. Install the A/C pressure transducer (2) onto the A/C
discharge line. Tighten the A/C pressure transducer
securely.
3. Connect the wire harness connector (1) to the A/C
pressure transducer.
4. Reconnect the negative battery cable.
Page 5103 of 5267
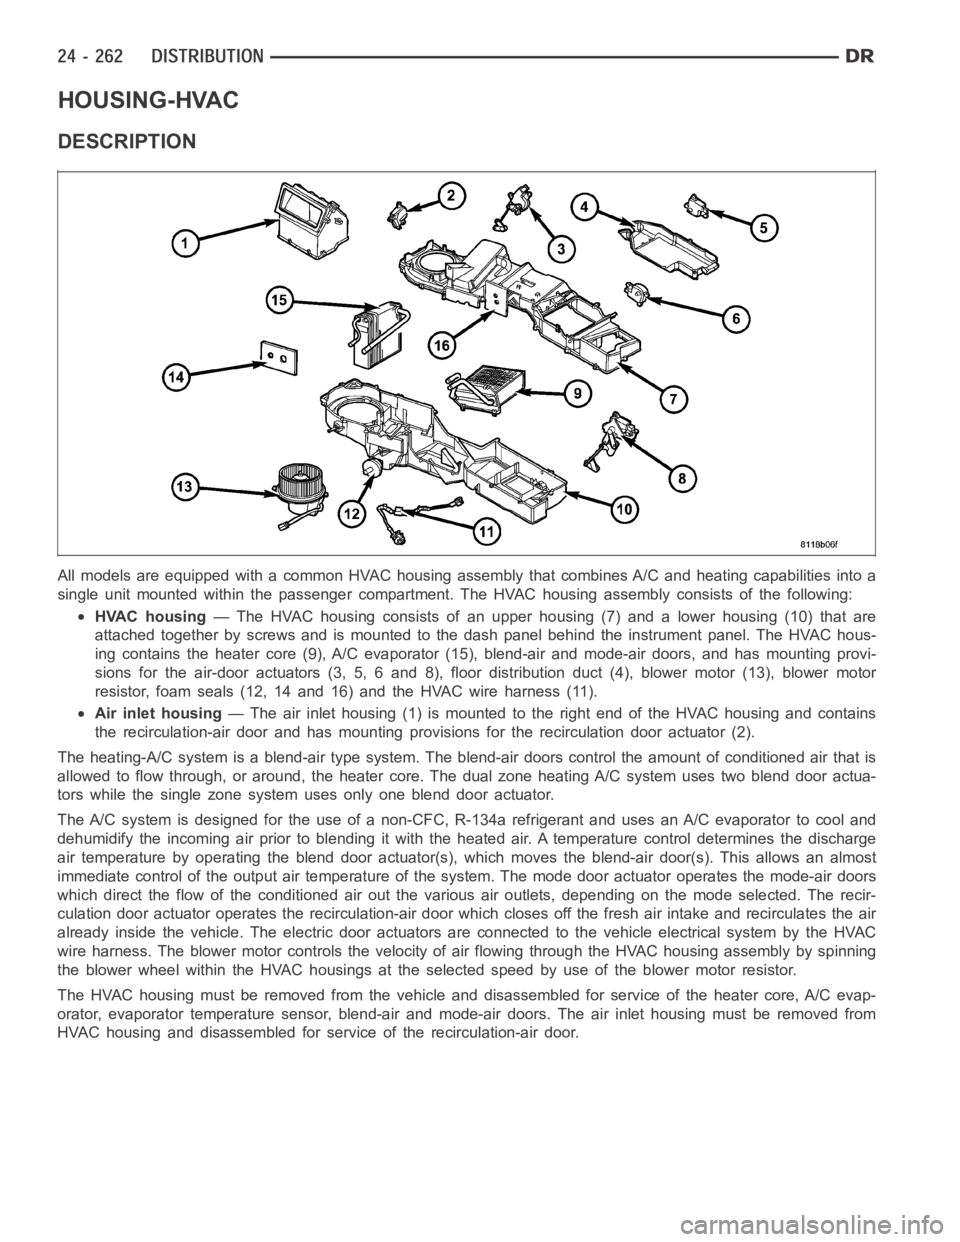
HOUSING-HVAC
DESCRIPTION
All models are equipped with a common HVAC housing assembly that combines A/C and heating capabilities into a
single unit mounted within the passenger compartment. The HVAC housing assembly consists of the following:
HVAC housing— The HVAC housing consists of an upper housing (7) and a lower housing (10) that are
attached together by screws and is mounted to the dash panel behind the instrument panel. The HVAC hous-
ing contains the heater core (9), A/C evaporator (15), blend-air and mode-air doors, and has mounting provi-
sions for the air-door actuators (3, 5, 6 and 8), floor distribution duct (4), blower motor (13), blower motor
resistor, foam seals (12, 14 and 16) and the HVAC wire harness (11).
Air inlet housing— The air inlet housing (1) is mounted to the right end of the HVAC housing andcontains
the recirculation-air door and has mounting provisions for the recirculation door actuator (2).
The heating-A/C system is a blend-air type system. The blend-air doors control the amount of conditioned air that is
allowed to flow through, or around, the heater core. The dual zone heating A/C system uses two blend door actua-
tors while the single zone system uses only one blend door actuator.
The A/C system is designed for the use of a non-CFC, R-134a refrigerant and uses an A/C evaporator to cool and
dehumidify the incoming air prior to blending it with the heated air. A temperature control determines the discharge
air temperature by operating the blend door actuator(s), which moves the blend-air door(s). This allows an almost
immediate control of the output air temperature of the system. The mode door actuator operates the mode-air doors
which direct the flow of the conditioned air out the various air outlets, depending on the mode selected. The recir-
culation door actuator operates the recirculation-air door which closesoff the fresh air intake and recirculates the air
already inside the vehicle. The electric door actuators are connected to the vehicle electrical system by the HVAC
wire harness. The blower motor controls the velocity of air flowing through the HVAC housing assembly by spinning
the blower wheel within the HVAC housings at the selected speed by use of theblower motor resistor.
The HVAC housing must be removed from the vehicle and disassembled for service of the heater core, A/C evap-
orator, evaporator temperature sensor, blend-air and mode-air doors. The air inlet housing must be removed from
HVAC housing and disassembled for service of the recirculation-air door.
Page 5127 of 5267
PLUMBING
DESCRIPTION
The A/C refrigerant lines and hoses are used to carry the refrigerant between the various A/C system components.
The refrigerant lines and hoses for the R-134a system on this vehicle consist of a barrier-hose design with a nylon
tube sandwiched between rubber layers. The nylon tube helps to contain theR-134a refrigerant, which has a
smaller molecular structure than R-12 refrigerant. The ends of the refrigerant lines are made from lightweight alu-
minum or steel, and commonly use braze-less fittings.
Any kinks or sharp bends in the refrigerant lines and hoses will reduce the capacity of the entire A/C system and
can reduce the flow of refrigerant in the system. The radius of all bends in the flexible hose refrigerant lines should
be at least ten times the diameter of the hose and the refrigerant lines should be routed so they are at least 80
millimeters (3 inches) away from the exhaust manifold(s) and exhaust pipe(s).
OPERATION
High pressures are produced in the refrigerant system when the A/C compressor is operating. Extreme care must
be exercised to make sure that each of the refrigerant system connections is pressure-tight and leak free. It is a
good practice to inspect all flexible hose refrigerant lines at least oncea year to make sure they are in good con-
dition and properly routed.
The refrigerant lines and hoses are coupled to other A/C system componentswith block-type fittings. An O-ring seal,
or a flat steel gasket with an integral O-ring (dual plane seal), is used to mate the refrigerant line fittings with A/C
system components to ensure the integrity of the refrigerant system.
The refrigerant lines and hoses cannot be repaired and, if faulty or damaged, they must be replaced.
WARNING
WARNING: The A/C system contains refrigerant under high pressure. Repairs should only be performed by
qualified service personnel. Severe personal injury or death may result from improper service procedures.
WARNING: Avoid breathing the refrigerant and refrigerant oil vapor or mist. Exposure may irritate the eyes,
nose, and/or throat. Wear eye protection when servicing the A/C refrigerant system. Serious eye injury can
result from direct contact with the refrigerant. If eye contact occurs, seek medical attention immediately.
WARNING: Do not expose the refrigerant to open flame. Poisonous gas is createdwhenrefrigerantis
burned. An electronic leak detector is recommended. Severe personal injury or death may result from
improper service procedures.
WARNING: If accidental system discharge occurs, ventilate the work area before resuming service. Large
amounts of refrigerant released in a closed work area will displace the oxygen and cause suffocation and
death.
WARNING: The evaporation rate of R-134a refrigerant at average temperature and altitude is extremely high.
As a result, anything that comes in contact with the refrigerant will freeze. Always protect the skin or del-
icate objects from direct contact with the refrigerant.
WARNING: The R-134a service equipment or the vehicle refrigerant system should not be pressure tested or
leak tested with compressed air. Some mixtures of air and R-134a have been shown to be combustible at
elevated pressures. These mixtures are potentially dangerous, and may result in fire or explosion causing
property damage, personal injury or death.
Page 5133 of 5267
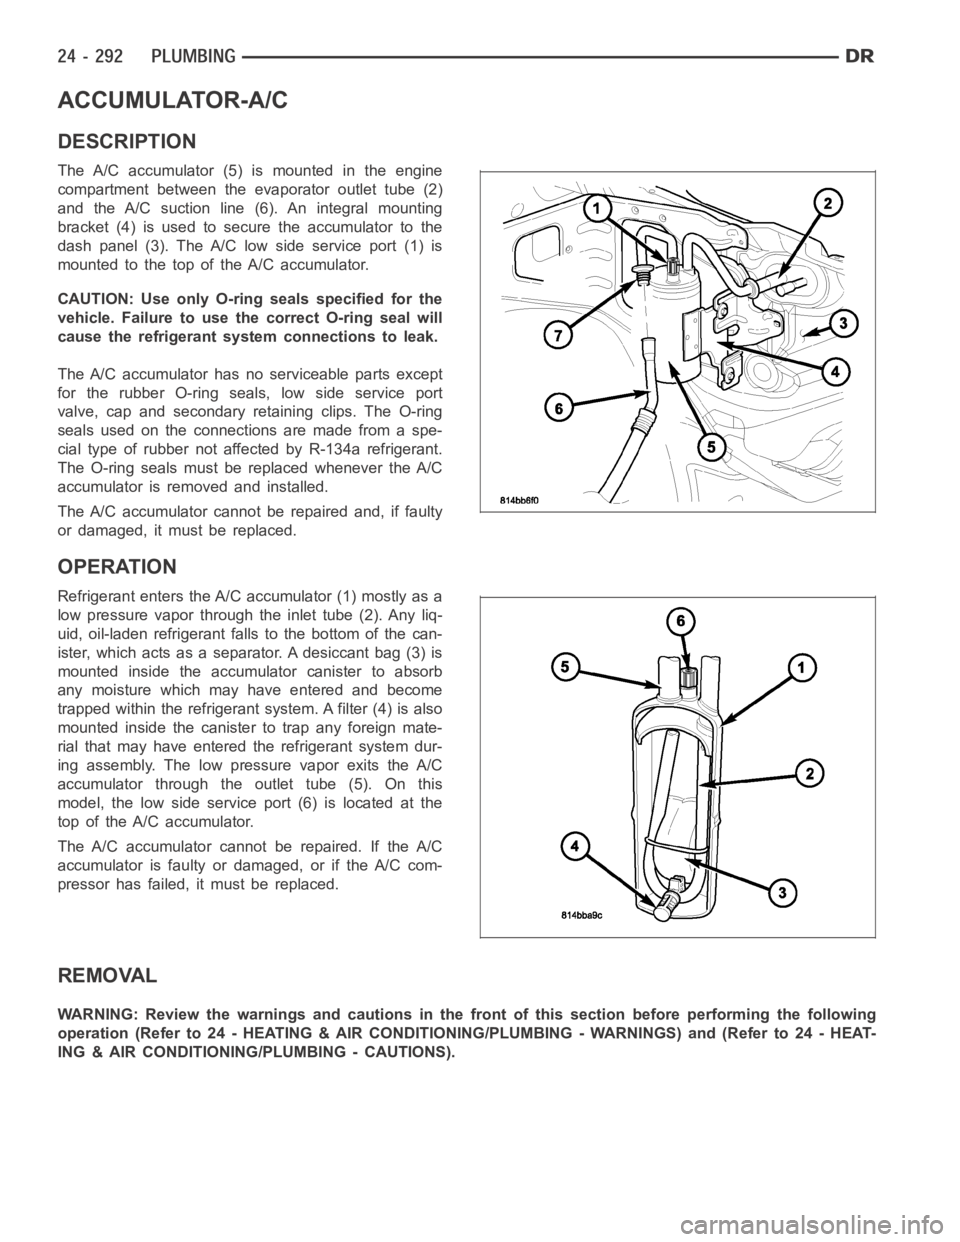
ACCUMULATOR-A/C
DESCRIPTION
The A/C accumulator (5) is mounted in the engine
compartment between the evaporator outlet tube (2)
and the A/C suction line (6). An integral mounting
bracket (4) is used to secure the accumulator to the
dash panel (3). The A/C low side service port (1) is
mountedtothetopoftheA/Caccumulator.
CAUTION: Use only O-ring seals specified for the
vehicle. Failure to use the correct O-ring seal will
cause the refrigerant system connections to leak.
The A/C accumulator has no serviceable parts except
for the rubber O-ring seals, low side service port
valve, cap and secondary retaining clips. The O-ring
seals used on the connections are made from a spe-
cial type of rubber not affected by R-134a refrigerant.
The O-ring seals must be replaced whenever the A/C
accumulator is removed and installed.
The A/C accumulator cannot be repaired and, if faulty
or damaged, it must be replaced.
OPERATION
Refrigerant enters the A/C accumulator (1) mostly as a
low pressure vapor through the inlet tube (2). Any liq-
uid, oil-laden refrigerant falls to the bottom of the can-
ister, which acts as a separator. A desiccant bag (3) is
mounted inside the accumulator canister to absorb
any moisture which may have entered and become
trapped within the refrigerant system. A filter (4) is also
mounted inside the canister to trap any foreign mate-
rial that may have entered the refrigerant system dur-
ing assembly. The low pressure vapor exits the A/C
accumulator through the outlet tube (5). On this
model, the low side service port (6) is located at the
top of the A/C accumulator.
The A/C accumulator cannot be repaired. If the A/C
accumulator is faulty or damaged, or if the A/C com-
pressor has failed, it must be replaced.
REMOVAL
WARNING: Review the warnings and cautions in the front of this section before performing the following
operation (Refer to 24 - HEATING & AIR CONDITIONING/PLUMBING - WARNINGS) and (Refer to 24 - HEAT-
ING & AIR CONDITIONING/PLUMBING - CAUTIONS).
Page 5134 of 5267
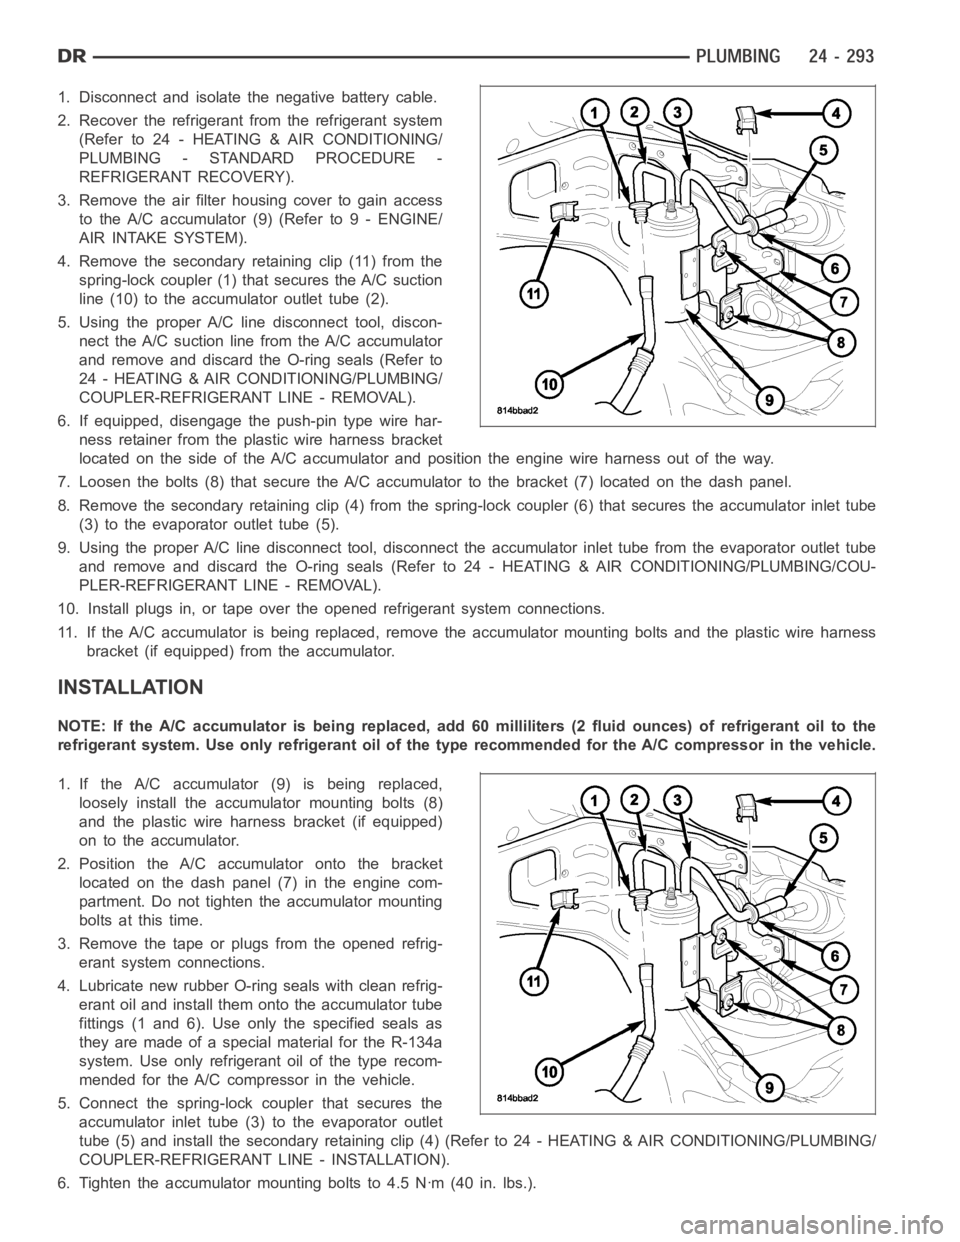
1. Disconnect and isolate the negative battery cable.
2. Recover the refrigerant from the refrigerant system
(Refer to 24 - HEATING & AIR CONDITIONING/
PLUMBING - STANDARD PROCEDURE -
REFRIGERANT RECOVERY).
3. Remove the air filter housing cover to gain access
to the A/C accumulator (9) (Refer to 9 - ENGINE/
AIR INTAKE SYSTEM).
4. Remove the secondary retaining clip (11) from the
spring-lock coupler (1) that secures the A/C suction
line (10) to the accumulator outlet tube (2).
5. Using the proper A/C line disconnect tool, discon-
nect the A/C suction line from the A/C accumulator
and remove and discard the O-ring seals (Refer to
24 - HEATING & AIR CONDITIONING/PLUMBING/
COUPLER-REFRIGERANT LINE - REMOVAL).
6. If equipped, disengage the push-pin type wire har-
ness retainer from the plastic wire harness bracket
located on the side of the A/C accumulator and position the engine wire harness out of the way.
7. Loosen the bolts (8) that secure the A/C accumulator to the bracket (7) located on the dash panel.
8. Remove the secondary retaining clip (4) from the spring-lock coupler (6) that secures the accumulator inlet tube
(3) to the evaporator outlet tube (5).
9. Using the proper A/C line disconnect tool, disconnect the accumulator inlet tube from the evaporator outlet tube
and remove and discard the O-ring seals (Refer to 24 - HEATING & AIR CONDITIONING/PLUMBING/COU-
PLER-REFRIGERANT LINE - REMOVAL).
10. Install plugs in, or tape over the opened refrigerant system connections.
11. If the A/C accumulator is being replaced, remove the accumulator mounting bolts and the plastic wire harness
bracket (if equipped) from the accumulator.
INSTALLATION
NOTE: If the A/C accumulator is being replaced, add 60 milliliters (2 fluidounces) of refrigerant oil to the
refrigerant system. Use only refrigerant oil of the type recommended for the A/C compressor in the vehicle.
1. If the A/C accumulator (9) is being replaced,
loosely install the accumulator mounting bolts (8)
and the plastic wire harness bracket (if equipped)
on to the accumulator.
2. Position the A/C accumulator onto the bracket
located on the dash panel (7) in the engine com-
partment. Do not tighten the accumulator mounting
bolts at this time.
3. Remove the tape or plugs from the opened refrig-
erant system connections.
4. Lubricate new rubber O-ring seals with clean refrig-
erant oil and install them onto the accumulator tube
fittings (1 and 6). Use only the specified seals as
they are made of a special material for the R-134a
system. Use only refrigerant oil of the type recom-
mended for the A/C compressor in the vehicle.
5. Connect the spring-lock coupler that secures the
accumulator inlet tube (3) to the evaporator outlet
tube (5) and install the secondary retaining clip (4) (Refer to 24 - HEATING& AIR CONDITIONING/PLUMBING/
COUPLER-REFRIGERANT LINE - INSTALLATION).
6. Tighten the accumulator mounting bolts to 4.5 Nꞏm (40 in. lbs.).