display DODGE SPRINTER 2007 2.G Service Manual
[x] Cancel search | Manufacturer: DODGE, Model Year: 2007, Model line: SPRINTER, Model: DODGE SPRINTER 2007 2.GPages: 393, PDF Size: 7.61 MB
Page 155 of 393
154 Controls in detailOperating the vehicle
3
\3 Operating the vehicleWhen activated, the operating speed gov-
ernor (ADR) automatically increases the
engine speed to a preset or adjustable
operating speed (\2page 155).Activating / deactivating ADR
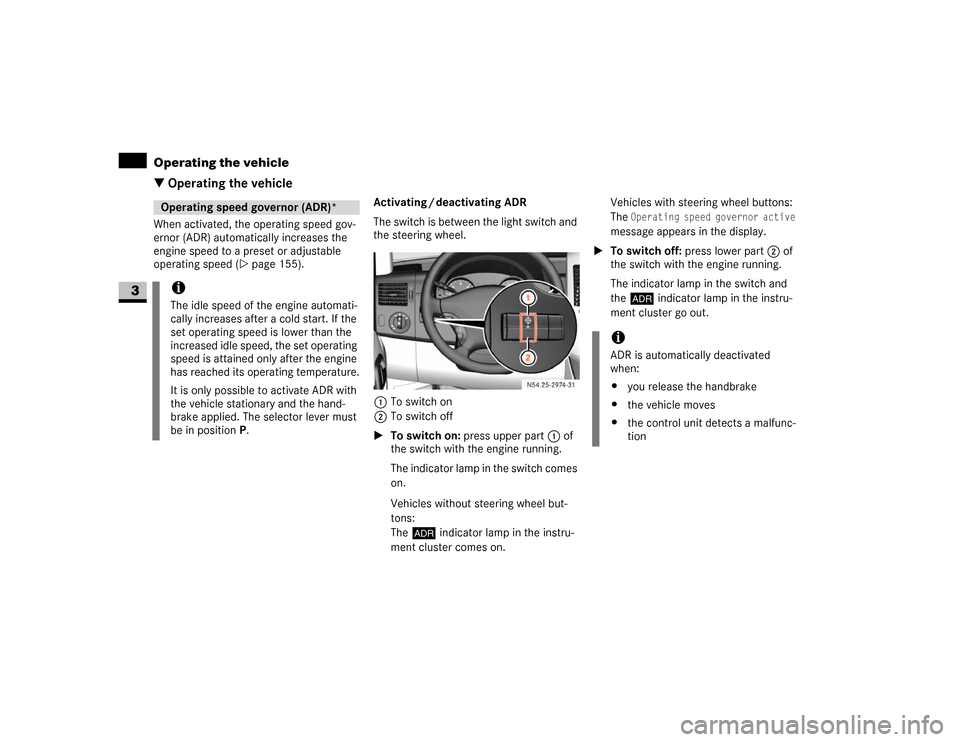
The switch is between the light switch and
the steering wheel.
1To switch on
2To switch off
\1To switch on: press upper part 1 of
the switch with the engine running.
The indicator lamp in the switch comes
on.
Vehicles without steering wheel but-
tons:
The™ indicator lamp in the instru-
ment cluster comes on.Vehicles with steering wheel buttons:
The
Operating speed governor active
message appears in the display.
\1To switch off: press lower part 2 of
the switch with the engine running.
The indicator lamp in the switch and
the™ indicator lamp in the instru-
ment cluster go out.
Operating speed governor (ADR)*iThe idle speed of the engine automati-
cally increases after a cold start. If the
set operating speed is lower than the
increased idle speed, the set operating
speed is attained only after the engine
has reached its operating temperature.
It is only possible to activate ADR with
the vehicle stationary and the hand-
brake applied. The selector lever must
be in position P.
N54.25-2932-31
iADR is automatically deactivated
when:
\4you release the handbrake
\4the vehicle moves
\4the control unit detects a malfunc-
tion
Page 172 of 393
171 Controls in detail
Features
3
Telephones may only be used inside the
vehicle if they are connected to a separate
exterior antenna of a type tested and ap-
proved by the manufacturer.The installation of the antenna must be ap-
proved by a qualified specialist workshop.
Always have maintenance work carried out
at a qualified specialist workshop, e.g. an
authorized Sprinter Dealer.Telephone*Warning
G
You must observe the legal requirements for
the country in which you are driving when
operating a cell phone in the vehicle.
If it is permitted to operate a cell phone
while the vehicle is in motion, you must only
operate it when road and traffic conditions
permit. You may otherwise be distracted
from the traffic conditions, cause an acci-
dent and injure yourself and others.
Cell phones without exterior antennas may
interfere with the vehicle electronics and
thereby jeopardize the operational safety of
the vehicle. You must therefore only use
these devices when they are connected to a
separate exterior antenna.
Warning
G
Only use the telephone when road, weather
and traffic conditions permit you to do so.
You will otherwise be too distracted. If you
are not using the hands-free system, pull
over to make a phone call.
Bear in mind that at a speed of just 30 mph
(approx. 50 km/h), your vehicle is covering
a distance of 44 feet (approx. 14 m) every
second.
Telephones without exterior antennas may
interfere with the vehicle electronics and
thereby jeopardize the operational safety of
the vehicle.
iObserve all legal requirements.iThe cell phone battery will be charged
depending on the charge status and
the position of the key in the ignition
lock. The cell phone display indicates
the charging process.
Page 189 of 393
188 OperationEngine
4
Checking the engine oil level in the dis-
play
In vehicles with diesel engines, you can
view the engine oil level in the display.
When the oil is being checked, the vehicle
must
\4be standing level
\4be at normal operating temperature
\4have been standing with the engine
switched off for at least five minutes\1Switch on the ignition (\2page 67).
The display is activated.
Vehicles without steering wheel buttons
\1Press the menu button on the in-
strument cluster repeatedly until you
see the P symbol in the display.
The
--:--
display flashes during the
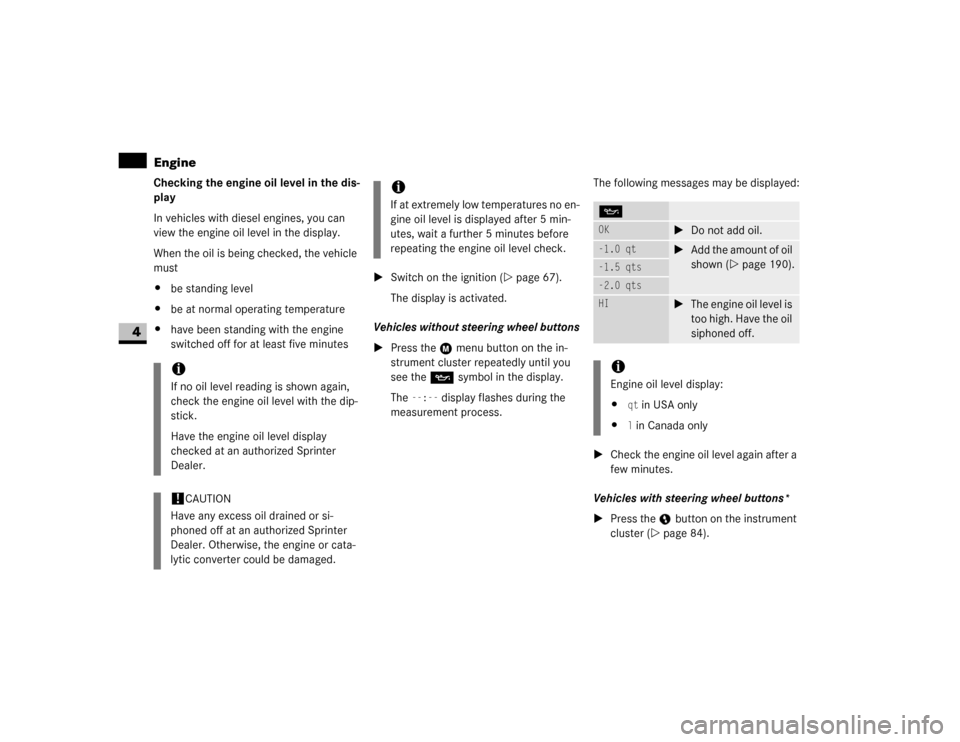
measurement process.The following messages may be displayed:
\1Check the engine oil level again after a
few minutes.
Vehicles with steering wheel buttons*
\1Press the button on the instrument
cluster (\2page 84).
iIf no oil level reading is shown again,
check the engine oil level with the dip-
stick.
Have the engine oil level display
checked at an authorized Sprinter
Dealer.!
CAUTION
Have any excess oil drained or si-
phoned off at an authorized Sprinter
Dealer. Otherwise, the engine or cata-
lytic converter could be damaged.
iIf at extremely low temperatures no en-
gine oil level is displayed after 5 min-
utes, wait a further 5 minutes before
repeating the engine oil level check.
POK
\1Do not add oil.
-1.0 qt
\1Add the amount of oil
shown (\2page 190).
-1.5 qts-2.0 qtsHI
\1The engine oil level is
too high. Have the oil
siphoned off.
iEngine oil level display:
\4
qt in USA only
\4l in Canada only
Page 190 of 393
189 Operation
Engine
4
\1The following message is displayed for
the duration of the measurement pro-
cess:
N
Engine oil level Measuring in
progress
The following messages may be displayed:Checking the engine oil level with the
dipstick
When the oil is being checked, the vehicle
must
\4be at normal operating temperature
\4be standing level
\4have been standing with the engine
switched off for at least five minutes
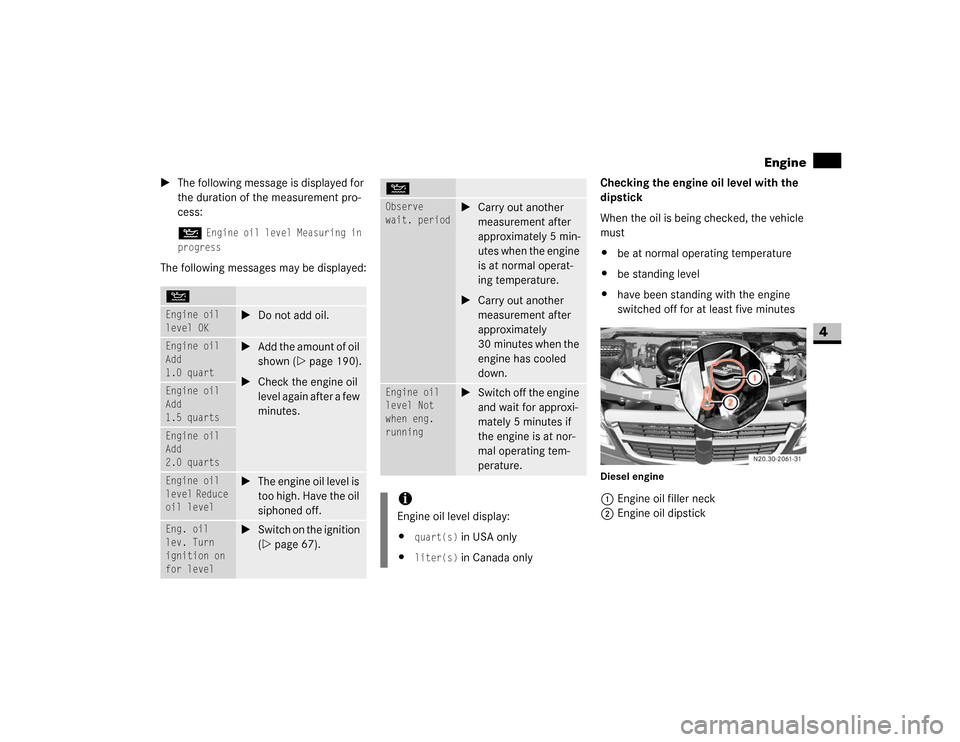
Diesel engine1Engine oil filler neck
2Engine oil dipstick
NEngine oil
level OK
\1Do not add oil.
Engine oil
Add
1.0 quart
\1Add the amount of oil
shown (\2page 190).
\1Check the engine oil
level again after a few
minutes.
Engine oil
Add
1.5 quartsEngine oil
Add
2.0 quartsEngine oil
level Reduce
oil level
\1The engine oil level is
too high. Have the oil
siphoned off.
Eng. oil
lev. Turn
ignition on
for level
\1Switch on the ignition
(\2page 67).
Observe
wait. period
\1Carry out another
measurement after
approximately 5 min-
utes when the engine
is at normal operat-
ing temperature.
\1Carry out another
measurement after
approximately
30 minutes when the
engine has cooled
down.
Engine oil
level Not
when eng.
running
\1Switch off the engine
and wait for approxi-
mately 5 minutes if
the engine is at nor-
mal operating tem-
perature.
iEngine oil level display:
\4
quart(s)
in USA only
\4
liter(s)
in Canada only
N
Page 217 of 393
216 OperationTires and wheels
4
Reactivating the TPMS
The TPMS must be reactivated when you
have adjusted the tire inflation pressure to
a new level (e.g. because of different load
or driving conditions). The TPMS is then
recalibrated to the current tire inflation
pressures.\1Using the tire and loading information
placard on the driver’s door B-pillar
(\2page 206), make sure the tire infla-
tion pressure of all four tires is correct.
\1Switch on the ignition (\2page 67).
\1Press the 5menu button on the instru-
ment cluster until you see the
+CAL TPMS
message in the display.
TPMS malfunctions may occur for a variety
of reasons, including the installation of in-
compatible replacement or alternate tires or
wheels on the vehicle that prevent the TPMS
from functioning properly. Always check the
TPMS malfunction telltale after replacing
one or more tires or wheels on your vehicle
to ensure that the replacement or alternate
tires and wheels allow the TPMS to continue
to function properly.iIf a condition causing the TPMS to mal-
function develops, it may take up to 10
minutes for the system to signal a mal-
function using the TPMS telltale flash-
ing and illumination sequence.
The telltale extinguishes after driving a
few minutes if the malfunction has
been corrected.
iOperating radio transmission equip-
ment (e.g. wireless headsets, two-way
radios) in or near the vehicle could
cause the TPMS to malfunctionWarning
G
It is the driver’s responsibility to calibrate
the TPMS on the recommended cold infla-
tion pressure. Underinflated tires affect the
ability to steer or brake the vehicle. You
might lose control over the vehicle.
iReactivate the TPMS after adjusting
the tire inflation pressure to the infla-
tion pressure recommended for the ve-
hicle operating condition. Tire pressure
should only be adjusted on cold tires.
Observe the recommended tire infla-
tion pressure on the tire and loading in-
formation placard on the driver’s door
B-pillar (\2page 206).
Page 218 of 393
217 Operation
Tires and wheels
4
\1Press the ,menu button on the instru-
ment cluster.
The following message is displayed:
OK TPMSThe tire pressure monitor activation
process has begun.
The tire pressures of the individual
wheels are stored as the new reference
values if they are determined to be
plausible for the tire pressure monitor.
If you wish to cancel the activation pro-
cess:
\1Press the .button or the 5menu button
on the instrument cluster.
The activation process is canceled au-
tomatically if 30 seconds elapse with
no input.Checking tire pressure electronically
with the Tire Pressure Monitoring Sys-
tem (TPMS)* (vehicles with steering
wheel buttons)
Vehicles with steering wheel buttons are
equipped with the Advanced Tire Pressure
Monitoring System.
The TPMS only functions on wheels that
are equipped with the proper electronic
sensors. It monitors the tire inflation pres-
sure, as selected by the driver, in all four
tires. A warning is issued to alert you to a
decrease in pressure in one or more of the
tires.
Tire pressure inquiries are made using the
multifunction display. The present inflation
pressures are displayed only after a few
minutes’ travel time.
iUSA only:
The Tire Pressure Monitoring System
(TPMS) is equipped with a combination
low tire pressure/TPMS malfunction
telltale in the instrument cluster
(\2page 14). Depending on how the
telltale illuminates, it indicates a low
tire pressure condition or a malfunction
in the TPMS system itself:
\4If the telltale illuminates continu-
ously, one or more of your tires is
significantly underinflated. There is
no malfunction in the TPMS.
\4If the telltale flashes for 60 seconds
and then stays illuminated, the
TPMS system itself is not operating
properly.
iCanada only:
The Tire Pressure Monitoring System
(TPMS) is equipped with a low tire pres-
sure telltale in the instrument cluster
(\2page 14). If the telltale illuminates,
one or more of your tires is significantly
underinflated.
Page 219 of 393
218 OperationTires and wheels
4
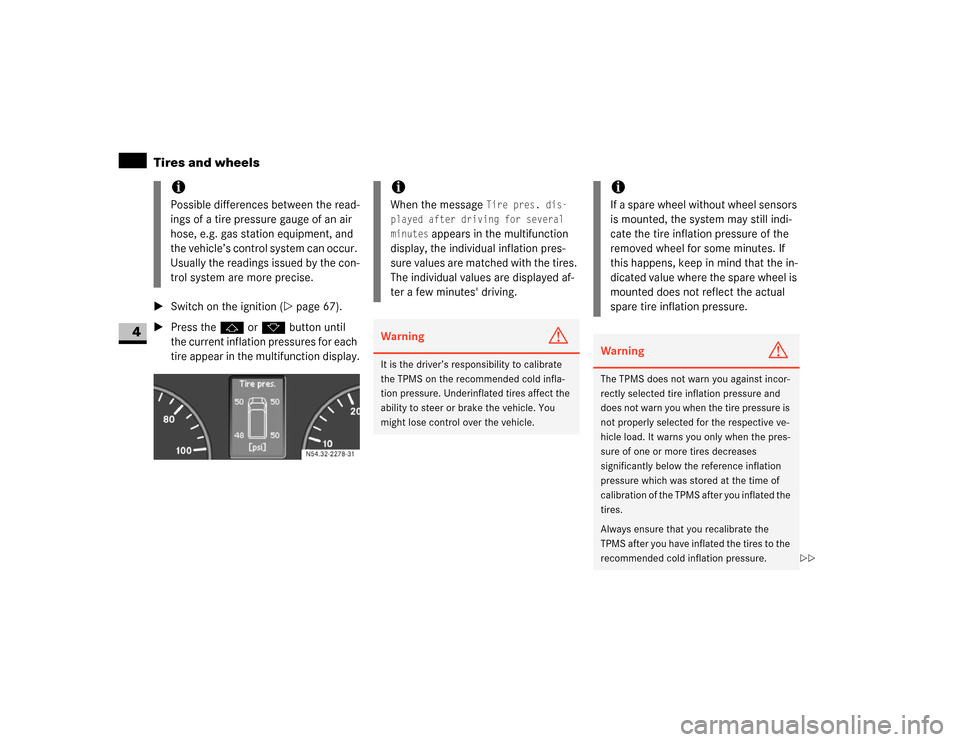
\1Switch on the ignition (\2page 67).
\1Press thej or kbutton until
the current inflation pressures for each
tire appear in the multifunction display.
iPossible differences between the read-
ings of a tire pressure gauge of an air
hose, e.g. gas station equipment, and
the vehicle’s control system can occur.
Usually the readings issued by the con-
trol system are more precise.
54.32-2278-31
iWhen the message
Tire pres. dis-
played after driving for several
minutes
appears in the multifunction
display, the individual inflation pres-
sure values are matched with the tires.
The individual values are displayed af-
ter a few minutes' driving.
Warning
G
It is the driver’s responsibility to calibrate
the TPMS on the recommended cold infla-
tion pressure. Underinflated tires affect the
ability to steer or brake the vehicle. You
might lose control over the vehicle.
iIf a spare wheel without wheel sensors
is mounted, the system may still indi-
cate the tire inflation pressure of the
removed wheel for some minutes. If
this happens, keep in mind that the in-
dicated value where the spare wheel is
mounted does not reflect the actual
spare tire inflation pressure.Warning
G
The TPMS does not warn you against incor-
rectly selected tire inflation pressure and
does not warn you when the tire pressure is
not properly selected for the respective ve-
hicle load. It warns you only when the pres-
sure of one or more tires decreases
significantly below the reference inflation
pressure which was stored at the time of
calibration of the TPMS after you inflated the
tires.
Always ensure that you recalibrate the
TPMS after you have inflated the tires to the
recommended cold inflation pressure.
\2\2
Page 221 of 393
220 OperationTires and wheels
4
Reactivating Advanced TPMS
The TPMS must be reactivated when you
have adjusted the tire inflation pressure to
a new level (e.g. because of different load
or driving conditions). The TPMS is then
recalibrated to the current tire inflation
pressures.\1Using the tire and loading information
placard on the driver’s door B-pillar
(\2page 206), make sure the tire infla-
tion pressure of all four tires is correct.
\1Press buttonè orÿ on the mul-
tifunction steering wheel repeatedly
until the standard display menu ap-
pears in the multifunction display
(\2page 93).
TPMS malfunctions may occur for a variety
of reasons, including the installation of in-
compatible replacement or alternate tires or
wheels on the vehicle that prevent the TPMS
from functioning properly. Always check the
TPMS malfunction telltale after replacing
one or more tires or wheels on your vehicle
to ensure that the replacement or alternate
tires and wheels allow the TPMS to continue
to function properly.iIf a condition causing the TPMS to mal-
function develops, it may take up to 10
minutes for the system to signal a mal-
function using the TPMS telltale flash-
ing and illumination sequence.
The telltale extinguishes after driving a
few minutes if the malfunction has
been corrected.
iOperating radio transmission equip-
ment (e.g. wireless headsets, two-way
radios) in or near the vehicle could
cause the TPMS to malfunctionWarning!
G
It is the driver’s responsibility to calibrate
the TPMS on the recommended cold infla-
tion pressure. Underinflated tires affect the
ability to steer or brake the vehicle. You
might lose control over the vehicle.
iReactivate the TPMS after adjusting
the tire inflation pressure to the infla-
tion pressure recommended for the ve-
hicle operating condition. Tire pressure
should only be adjusted on cold tires.
Observe the recommended tire infla-
tion pressure on the tire and loading in-
formation placard on the driver’s door
B-pillar (\2page 206).
Page 222 of 393
221 Operation
Tires and wheels
4
\1Press thej or kbutton repeat-
edly until you see the current inflation
pressures for each tire appear in the
display or the following message ap-
pears in the display
Tire pres. displayed
after driving
for several minutes
\1Press reset button0 on the instrument
cluster (\2page 14).
The following message will appear in
the multifunction display:
Tire pres.
Adjust pres.
\1Press æbutton.
The following message will appear in
the multifunction display:
Tire pres. monitor
reactivatedAfter a few minutes' driving, the cur-
rent tire inflation pressure values are
accepted as reference values and then
monitored.If you wish to cancel activation:
\1Press çbutton.
Potential problems associated with un-
derinflated and overinflated tires
Proper tire inflation pressure is essential to
the safe and satisfactory operation of your
vehicle. Three primary areas are affected
by improper tire inflation pressure:
1. Safety
2. Economy
Improper inflation pressures can cause un-
even wear patterns to develop across the
tire tread. These abnormal wear patterns
will reduce tread life resulting in a need for
earlier tire replacement. Underinflation
also increases tire rolling resistance and
results in higher fuel consumption.
Warning
G
Follow recommended tire inflation pres-
sures.
Do not underinflate tires. Underinflated tires
wear excessively and/or unevenly, adverse-
ly affect handling and fuel economy, and are
more likely to fail from being overheated.
Do not overinflate tires. Overinflated tires
can adversely affect handling and ride com-
fort, wear unevenly, increase stopping dis-
tance, and result in sudden deflation
(blowout) because they are more likely to
become punctured or damaged by road de-
bris, potholes etc.Warning
G
Improperly inflated tires are dangerous and
can cause accidents.
Unequal tire inflation pressures can cause
steering problems. You could lose control of
your vehicle.
Unequal tire inflation pressures from one
side of the vehicle to the other can cause
the vehicle to drift to the right or left. Always
drive with each tire inflated to the recom-
mended cold tire inflation pressure.
\2\2
Page 239 of 393
238 OperationMaintenance and servicing
4
ASSYST, the A
ctive S
ervice Syst
em, in-
forms you when the next service is due.
A service that is due is displayed about a
month or 1900 miles (3000 km) in ad-
vance. A message is then displayed while
the vehicle is in motion or the ignition is
switched on.
Service due date display
Vehicles with steering wheel buttons
The following messages may be displayed:
\49
Service A in .. days
\49
Service A in .. miles
(km)
\49
Service A due now
The letters
A or
B indicate the type of ser-
vice that is due.
Warning
G
If handled incorrectly, service products can
constitute a health risk for people and an en-
vironmental hazard.
Always observe relevant guidelines for han-
dling, storing and disposing of service prod-
ucts.
Active Service System (ASSYST)*!
CAUTION
Periods when the battery is disconnect-
ed will not be recorded by ASSYST. To
make sure that you have the vehicle
serviced at the correct time, you should
therefore subtract periods when the
battery is disconnected from the days
shown.
The service indicator does not provide
information about the engine oil level.
The service indicator should not, there-
fore, be confused with theP engine
oil level display.
iThe service due date is displayed in
days or kilometers, depending on the
total distance driven.
The time between the individual service
due dates depends on your style of
driving. You can increase this by:
\4driving with care and at a moderate
engine speed
\4avoiding short journeys where the
engine does not reach the operat-
ing temperature