tire size DODGE STRATUS 2004 2.G Owners Manual
[x] Cancel search | Manufacturer: DODGE, Model Year: 2004, Model line: STRATUS, Model: DODGE STRATUS 2004 2.GPages: 273
Page 141 of 273
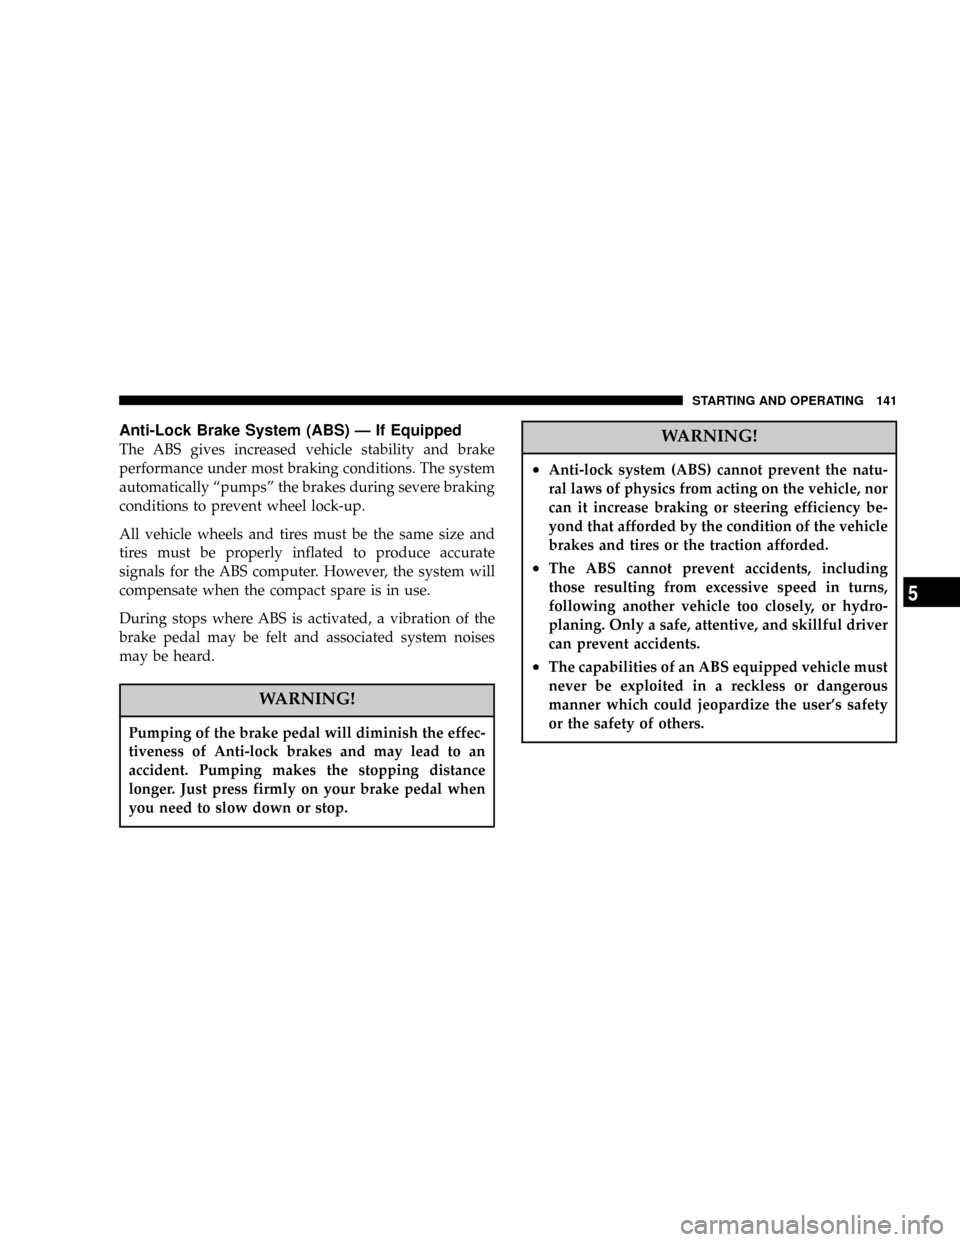
Anti-Lock Brake System (ABS) Ð If Equipped
The ABS gives increased vehicle stability and brake
performance under most braking conditions. The system
automatically ªpumpsº the brakes during severe braking
conditions to prevent wheel lock-up.
All vehicle wheels and tires must be the same size and
tires must be properly inflated to produce accurate
signals for the ABS computer. However, the system will
compensate when the compact spare is in use.
During stops where ABS is activated, a vibration of the
brake pedal may be felt and associated system noises
may be heard.
WARNING!
Pumping of the brake pedal will diminish the effec-
tiveness of Anti-lock brakes and may lead to an
accident. Pumping makes the stopping distance
longer. Just press firmly on your brake pedal when
you need to slow down or stop.
WARNING!
²Anti-lock system (ABS) cannot prevent the natu-
ral laws of physics from acting on the vehicle, nor
can it increase braking or steering efficiency be-
yond that afforded by the condition of the vehicle
brakes and tires or the traction afforded.
²The ABS cannot prevent accidents, including
those resulting from excessive speed in turns,
following another vehicle too closely, or hydro-
planing. Only a safe, attentive, and skillful driver
can prevent accidents.
²The capabilities of an ABS equipped vehicle must
never be exploited in a reckless or dangerous
manner which could jeopardize the user's safety
or the safety of others.
STARTING AND OPERATING 141
5
Page 143 of 273

TIRE SAFETY INFORMATION
Tire Markings
NOTE:
²
P(Passenger)-Metric tire sizing is based on U.S. design
standards. P-Metric tires have the letter ªPº molded
into the sidewall preceding the size designation. Ex-
ample: P215/65R15 95H.
²European Metric tire sizing is based on European
design standards. Tires designed to this standard have
the tire size molded into the sidewall beginning with
the section width. The letter9P9is absent from this tire
size designation. Example: 215/65R15 96H
²LT(Light Truck)-Metric tire sizing is based on U.S.
design standards. The size designation for LT-Metric
tires is the same as for P-Metric tires except for the
letters ªLTº that are molded into the sidewall preced-
ing the size designation. Example: LT235/85R16.
²Temporary Spare tires are high pressure compact
spares designed for temporary emergency use only.
Tires designed to this standard have the letter ªTº
molded into the sidewall preceding the size designa-
tion. Example: T145/80D18 103M.
²High Flotation tire sizing is based on U.S. design
standards and begins with the tire diameter molded
into the sidewall. Example: 31x10.5 R15 LT.
STARTING AND OPERATING 143
5
Page 144 of 273
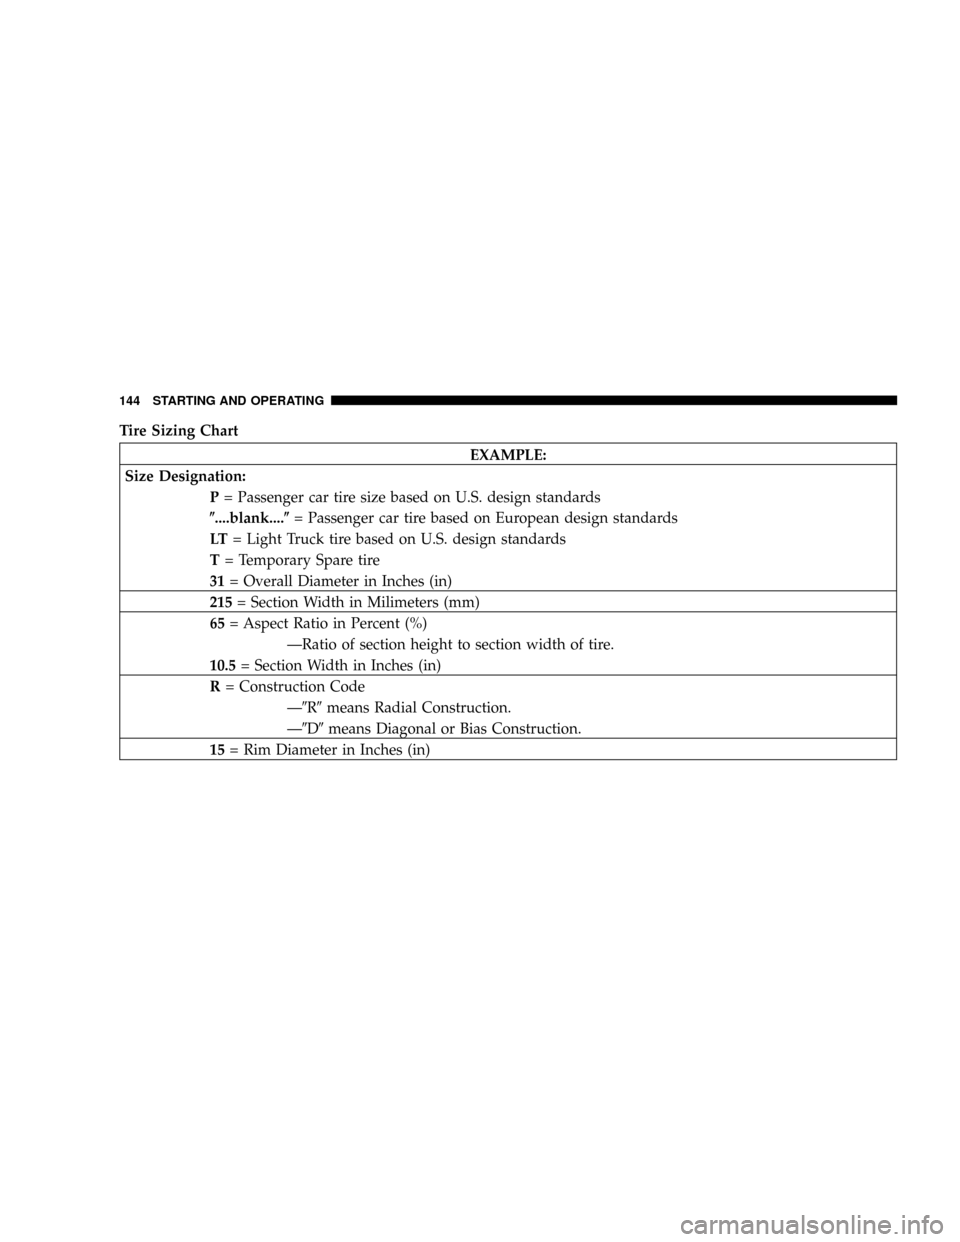
Tire Sizing Chart
EXAMPLE:
Size Designation:
P= Passenger car tire size based on U.S. design standards
(....blank....(= Passenger car tire based on European design standards
LT= Light Truck tire based on U.S. design standards
T= Temporary Spare tire
31= Overall Diameter in Inches (in)
215= Section Width in Milimeters (mm)
65= Aspect Ratio in Percent (%)
ÐRatio of section height to section width of tire.
10.5= Section Width in Inches (in)
R= Construction Code
Ð9R9means Radial Construction.
Ð9D9means Diagonal or Bias Construction.
15= Rim Diameter in Inches (in)
144 STARTING AND OPERATING
Page 146 of 273
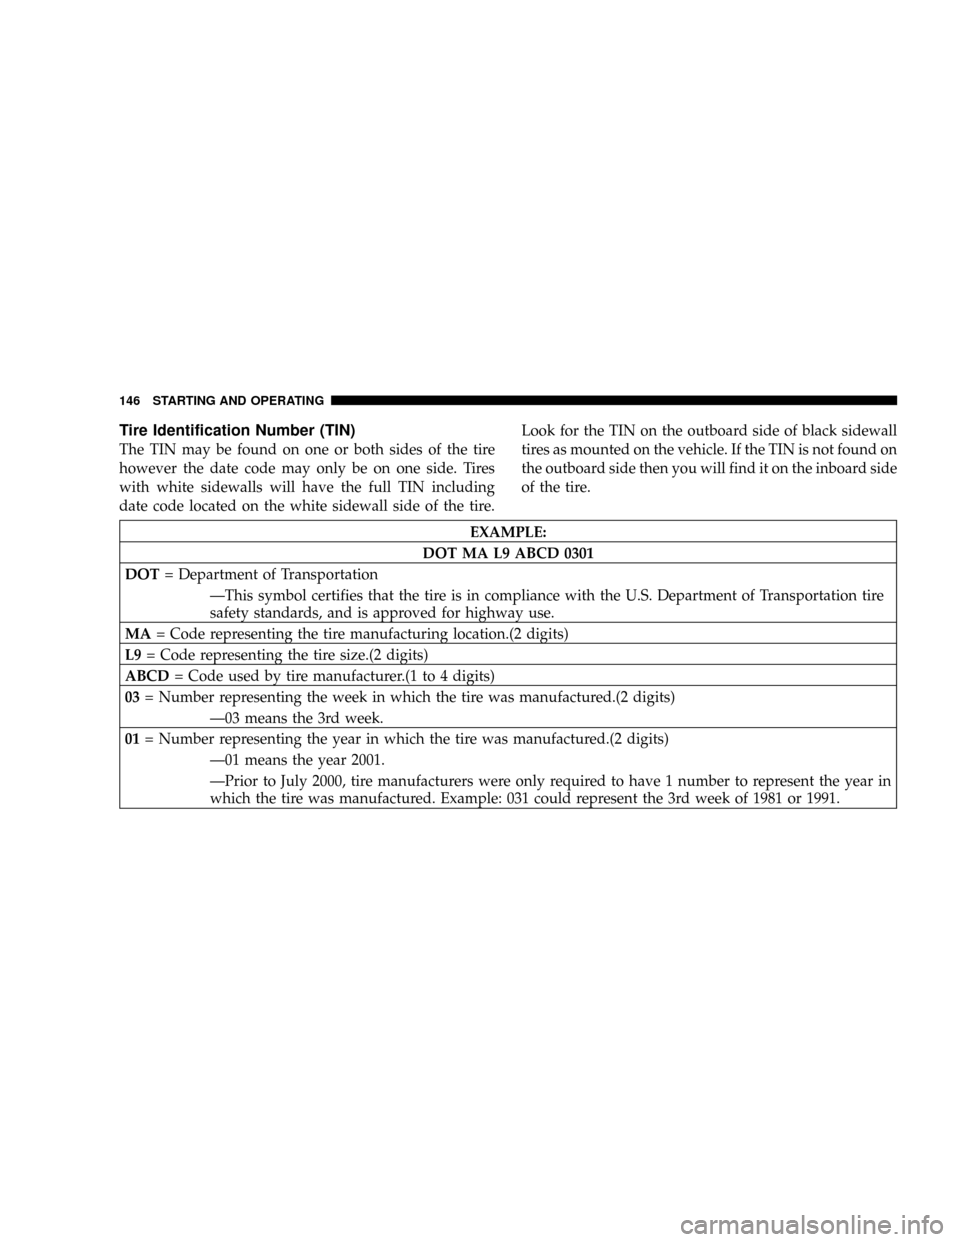
Tire Identification Number (TIN)
The TIN may be found on one or both sides of the tire
however the date code may only be on one side. Tires
with white sidewalls will have the full TIN including
date code located on the white sidewall side of the tire.Look for the TIN on the outboard side of black sidewall
tires as mounted on the vehicle. If the TIN is not found on
the outboard side then you will find it on the inboard side
of the tire.
EXAMPLE:
DOT MA L9 ABCD 0301
DOT= Department of Transportation
ÐThis symbol certifies that the tire is in compliance with the U.S. Department of Transportation tire
safety standards, and is approved for highway use.
MA= Code representing the tire manufacturing location.(2 digits)
L9= Code representing the tire size.(2 digits)
ABCD= Code used by tire manufacturer.(1 to 4 digits)
03= Number representing the week in which the tire was manufactured.(2 digits)
Ð03 means the 3rd week.
01= Number representing the year in which the tire was manufactured.(2 digits)
Ð01 means the year 2001.
ÐPrior to July 2000, tire manufacturers were only required to have 1 number to represent the year in
which the tire was manufactured. Example: 031 could represent the 3rd week of 1981 or 1991.
146 STARTING AND OPERATING
Page 147 of 273

Tire Loading and Tire Pressure
Tire Placard Location
NOTE:
Some vehicles have a ªTire and Loading Infor-
mationº placard located on the driver's side ªBº pillar.
Tire and Loading Information Placard
This placard tells you important information about the,
1) number of people that can be carried in the vehicle
2) the total weight your vehicle can carry
3) the tire size designed for your vehicle
4) the cold tire inflation pressures for the front, rear
and spare tires.
Loading
The vehicle maximum load on the tire must not exceed
the load carrying capacity of the tire on your vehicle. You
will not exceed the tire's load carrying capacity if you
STARTING AND OPERATING 147
5
Page 148 of 273

adhere to the loading conditions, tire size and cold tire
inflation pressures specified on the Tire and Loading
Information placard and the Vehicle Loading section of
this manual.
NOTE:Under a maximum loaded vehicle condition,
gross axle weight ratings (GAWR's) for the front and rear
axles must not be exceeded. For further information on
GAWR's, vehicle loading and trailer towing, see the
Vehicle Loading section of this manual.
To determine the maximum loading conditions of your
vehicle, locate the statement ªThe combined weight of
occupants and cargo should never exceed XXX kg or XXX
lbs.º on the Tire and Loading Information placard. The
combined weight of occupants, cargo/luggage and
trailer tongue weight (if applicable) should never exceed
the weight referenced here.
Steps for Determining Correct Load Limit
1. Locate the statement ªThe combined weight of occu-
pants and cargo should never exceed XXX poundsº on
your vehicle's placard.
2. Determine the combined weight of the driver and
passengers that will be riding in your vehicle.3. Subtract the combined weight of the driver and pas-
sengers from XXX kilograms or XXX pounds.
4.
The resulting figure equals the available amount of cargo
and luggage load capacity. For example, if ªXXXº amount
equals 1400 lbs. and there will be five 150 lb. passengers in
your vehicle, the amount of available cargo and luggage
load capacity is 650 lb. (1400±750 (5 x 150) = 650 lb.)
5. Determine the combined weight of luggage and cargo
being loaded on the vehicle. That weight may not safely
exceed the available cargo and luggage load capacity
calculated in step 4.
6. If your vehicle will be towing a trailer, load from your
trailer will be transferred to your vehicle. Consult this
manual to determine how this reduces the available
cargo and luggage load capacity of your vehicle.
NOTE:The following table shows examples on how to
calculate total load, cargo/luggage and towing capacities
of your vehicle with varying seating configurations and
number and size of occupants. This table is for illustra-
tion purposes only and may not be accurate for the
seating and load carry capacity of your vehicle.
148 STARTING AND OPERATING
Page 155 of 273

Tread Wear Indicators
Tread wear indicators are in the original equipment tires
to help you in determining when your tires should be
replaced.
These indicators are molded into the bottom of the tread
grooves and will appear as bands when the tread depth
becomes 1/16 inch (2 mm). When the indicators appear
in 2 or more adjacent grooves, the tire should be replaced.
Many states have laws requiring tire replacement at this
point.
Replacement Tires
The tires on your new vehicle provide a balance of many
characteristics. They should be inspected regularly for
wear and correct cold tire inflation pressure. The manu-
facturer strongly recommends that you use tires equiva-
lent to the originals in size, quality and performance
when replacement is needed (see the paragraph on tread
wear indicators). Refer to the Tire and Loading Informa-
tion placard for the size designation of your tire. The
service description and load identification will be found
on the original equipment tire. Failure to use equivalent
replacement tires may adversely affect the safety, han-
dling, and ride of your vehicle. We recommend that you
contact your original equipment or an authorized tire
dealer with any questions you may have on tire specifi-
cations or capability.
STARTING AND OPERATING 155
5
Page 156 of 273
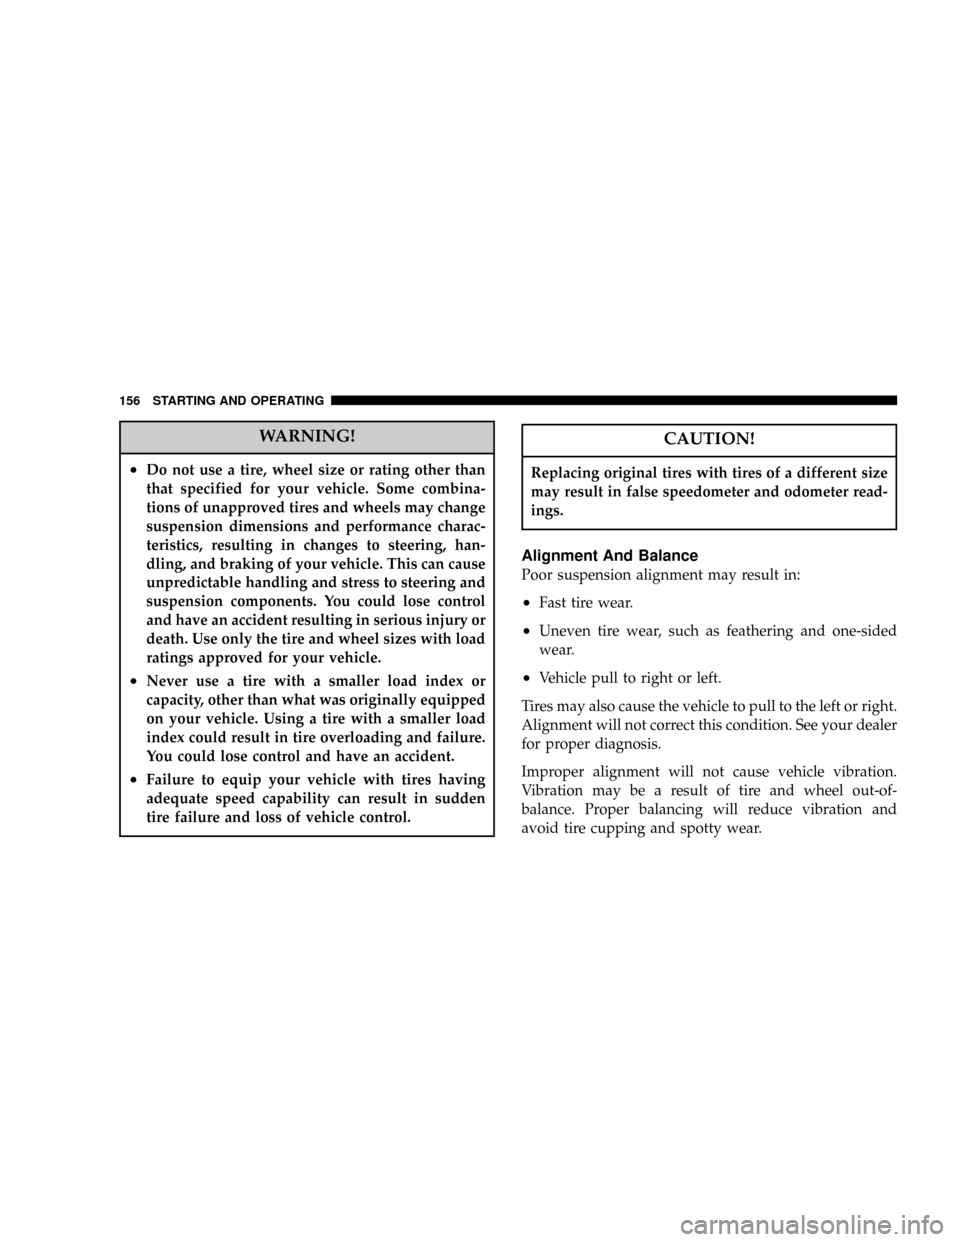
WARNING!
²Do not use a tire, wheel size or rating other than
that specified for your vehicle. Some combina-
tions of unapproved tires and wheels may change
suspension dimensions and performance charac-
teristics, resulting in changes to steering, han-
dling, and braking of your vehicle. This can cause
unpredictable handling and stress to steering and
suspension components. You could lose control
and have an accident resulting in serious injury or
death. Use only the tire and wheel sizes with load
ratings approved for your vehicle.
²Never use a tire with a smaller load index or
capacity, other than what was originally equipped
on your vehicle. Using a tire with a smaller load
index could result in tire overloading and failure.
You could lose control and have an accident.
²Failure to equip your vehicle with tires having
adequate speed capability can result in sudden
tire failure and loss of vehicle control.
CAUTION!
Replacing original tires with tires of a different size
may result in false speedometer and odometer read-
ings.
Alignment And Balance
Poor suspension alignment may result in:
²Fast tire wear.
²Uneven tire wear, such as feathering and one-sided
wear.
²Vehicle pull to right or left.
Tires may also cause the vehicle to pull to the left or right.
Alignment will not correct this condition. See your dealer
for proper diagnosis.
Improper alignment will not cause vehicle vibration.
Vibration may be a result of tire and wheel out-of-
balance. Proper balancing will reduce vibration and
avoid tire cupping and spotty wear.
156 STARTING AND OPERATING
Page 157 of 273

TIRE CHAINS
Due to limited clearance, tire chains are not recom-
mended.
CAUTION!
Damage to the vehicle may result if tire chains are
used.
SNOW TIRES
Some areas of the country require the use of snow tires
during winter. Standard tires are of the all season type
and satisfy this requirement as indicated by the M+S
designation on the tire side wall.
If you need snow tires, select tires equivalent in size and
type to the original equipment tires. Use snow tires only
in sets of 4, failure to do so may adversely affect the
safety and handling of your vehicle.Snow tires generally have lower speed ratings than what
was originally equipped with your vehicle and should
not be operated at sustained speeds over 75 mph (120
km/h).
Tire Rotation Recommendations
Tires on the front and rear axles of vehicles operate at
different loads and perform different steering, driving
and braking functions. For these reasons, they wear at
unequal rates, and tend to develop irregular wear pat-
terns.
These effects can be reduced by timely rotation of tires.
The benefits of rotation are especially worthwhile with
aggressive tread designs such as those on all season type
tires. Rotation will increase tread life, help to maintain
mud, snow and wet traction levels, and contribute to a
smooth, quiet ride.
STARTING AND OPERATING 157
5
Page 165 of 273
²The ªDº range can be selected when towing. However,
if frquent shifting occurs while in this range, the ª3º
range must be selected.
NOTE:Using the ª3º range while operating the vehicle
under heavy operating conditions will improve perfor-
mance and extend tranaxle life by reducing excessive
shifting and heat build up.
WARNING!
Connecting trailer brakes to your vehicle's hydraulic
brake lines can overload your brake system and
cause it to fail. You might not have brakes when you
need them and could have an accident.
²Do not attempt to tow a trailer while using a compact
spare tire.
²Whenever you pull a trailer, regardless of the trailer
size, stop lights and turn signals on the trailer are
recommended for motoring safety.
²The automatic transaxle fluid and filter should be
changed if you REGULARLY tow a trailer for more
than 45 minutes of continuous operation. See Schedule
ªBº in section 8 of this manual for transaxle fluid
change intervals.
NOTE:Check the automatic transaxle fluid level before
towing. Fluid discoloration, or a burnt odor, shows the
need for a transmission fluid and filter change.
NOTE:For vehicles equipped with Autostick. By using
the Autostick modes, and slecting a specific gear range,
frequent shifting can be avoided. The highest gear range
should be selected that allows for adequate performance.
For example, choose ª4º if the desired speed can be
maintaned. Choose ª3º or ª2º if needed to maintain the
desired speed.
NOTE:Extended driving at high RPM should be
avoided to prevent excess heat generation. A reduction in
vehicle speed may be required to avoid extended driving
at high RPM. Return to a higher gear range or vehicle
speed when road conditions and RPM level allows.
STARTING AND OPERATING 165
5