headlamp DODGE TOWN AND COUNTRY 2003 Owner's Manual
[x] Cancel search | Manufacturer: DODGE, Model Year: 2003, Model line: TOWN AND COUNTRY, Model: DODGE TOWN AND COUNTRY 2003Pages: 2177, PDF Size: 59.81 MB
Page 429 of 2177
HEADLAMP LEVELING MOTOR
- EXPORT
DIAGNOSIS AND TESTING - HEADLAMP
LEVELING MOTOR - EXPORT
HEADLAMP LEVELING MOTOR DIAGNOSIS
CONDITION POSSIBLE CAUSES CORRECTION
ONE MOTOR DOES NOT
OPERATE.1. Poor electrical connection at
motor1. Check for proper electrical connection at
motor
2. No voltage at motor 2. Repair no voltage condition. Refer to
Wiring Diagrams
3. No ground at motor 3. Repair no ground condition. Refer to
Wiring Diagrams
4. Defective motor 4. Replace leveling motor
BOTH MOTORS DO NOT
OPERATE1. No voltage at or from headlamp
leveling switch1. Repair no voltage condition. Check for
proper headlamp leveling switch operation
2. No voltage at leveling motors 2. Repair no voltage condition. Refer to
Wiring Diagrams
3. No ground at leveling motors 3. Repair no ground condition. Refer to
Wiring Diagrams
4. Both motors defective 4. Replace both motors
REMOVAL
(1) Disconnect and isolate the battery negative
cable.
(2) Remove headlamp unit.(3) Disconnect electrical connector from headlamp
leveling motor.
(4) Remove the two mounting screws.
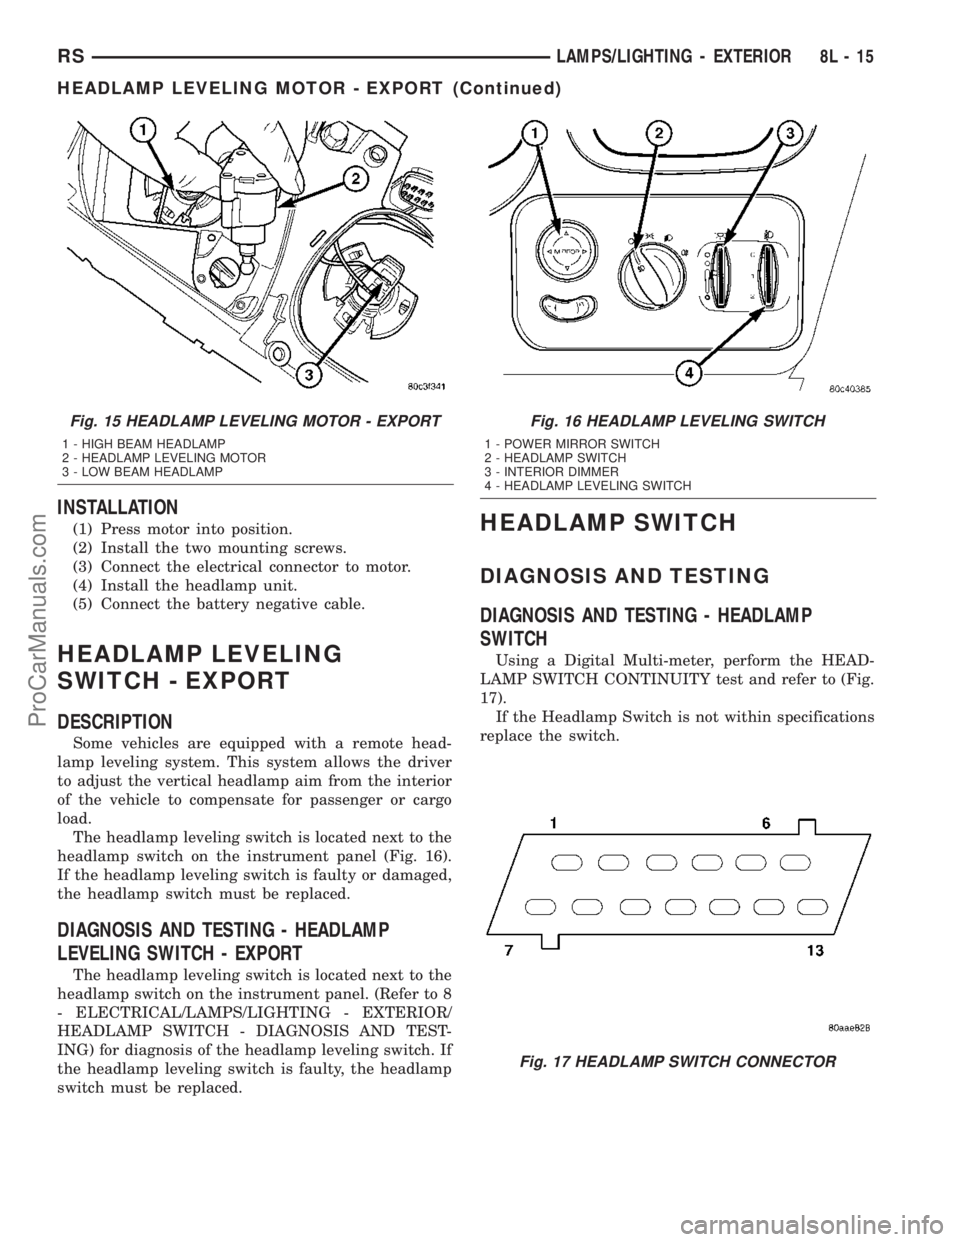
(5) Gently pry motor from headlamp unit (Fig. 15).
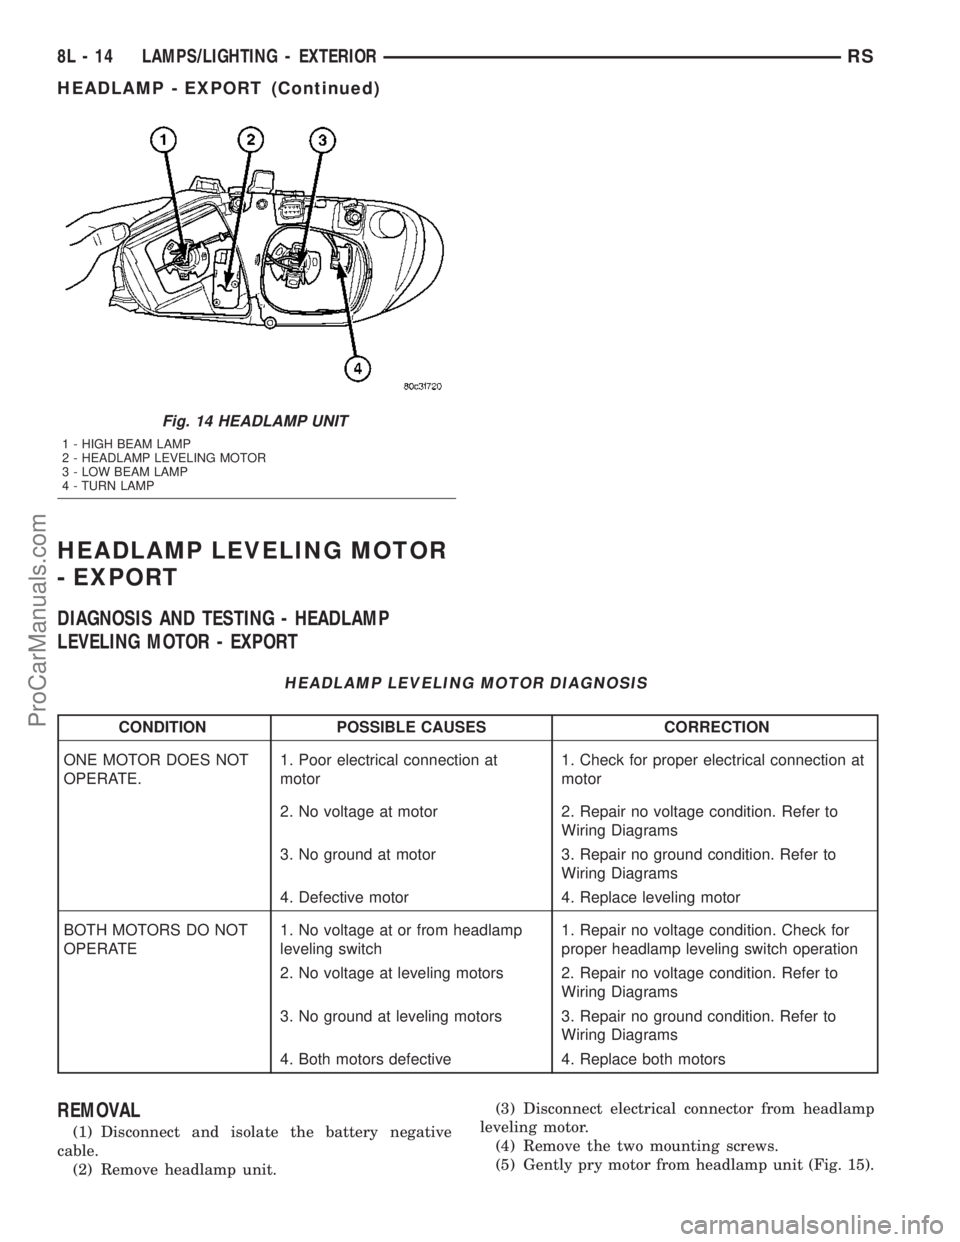
Fig. 14 HEADLAMP UNIT
1 - HIGH BEAM LAMP
2 - HEADLAMP LEVELING MOTOR
3 - LOW BEAM LAMP
4 - TURN LAMP
8L - 14 LAMPS/LIGHTING - EXTERIORRS
HEADLAMP - EXPORT (Continued)
ProCarManuals.com
Page 430 of 2177
INSTALLATION
(1) Press motor into position.
(2) Install the two mounting screws.
(3) Connect the electrical connector to motor.
(4) Install the headlamp unit.
(5) Connect the battery negative cable.
HEADLAMP LEVELING
SWITCH - EXPORT
DESCRIPTION
Some vehicles are equipped with a remote head-
lamp leveling system. This system allows the driver
to adjust the vertical headlamp aim from the interior
of the vehicle to compensate for passenger or cargo
load.
The headlamp leveling switch is located next to the
headlamp switch on the instrument panel (Fig. 16).
If the headlamp leveling switch is faulty or damaged,
the headlamp switch must be replaced.
DIAGNOSIS AND TESTING - HEADLAMP
LEVELING SWITCH - EXPORT
The headlamp leveling switch is located next to the
headlamp switch on the instrument panel. (Refer to 8
- ELECTRICAL/LAMPS/LIGHTING - EXTERIOR/
HEADLAMP SWITCH - DIAGNOSIS AND TEST-
ING) for diagnosis of the headlamp leveling switch. If
the headlamp leveling switch is faulty, the headlamp
switch must be replaced.
HEADLAMP SWITCH
DIAGNOSIS AND TESTING
DIAGNOSIS AND TESTING - HEADLAMP
SWITCH
Using a Digital Multi-meter, perform the HEAD-
LAMP SWITCH CONTINUITY test and refer to (Fig.
17).
If the Headlamp Switch is not within specifications
replace the switch.
Fig. 15 HEADLAMP LEVELING MOTOR - EXPORT
1 - HIGH BEAM HEADLAMP
2 - HEADLAMP LEVELING MOTOR
3 - LOW BEAM HEADLAMP
Fig. 16 HEADLAMP LEVELING SWITCH
1 - POWER MIRROR SWITCH
2 - HEADLAMP SWITCH
3 - INTERIOR DIMMER
4 - HEADLAMP LEVELING SWITCH
Fig. 17 HEADLAMP SWITCH CONNECTOR
RSLAMPS/LIGHTING - EXTERIOR8L-15
HEADLAMP LEVELING MOTOR - EXPORT (Continued)
ProCarManuals.com
Page 431 of 2177
HEADLAMP SWITCH CONTINUITY
HEADLAMP
SWITCH
POSITION13-WAY
CONNECTOR
TERMINALRESISTANCE
OFF 11 TO 6 3651 - 3729V
PARKING
LAMPS ON11 TO 6 1697 - 2517V
PARKING
LAMPS WITH
FRONT FOG
LAMPS ON11 TO 6 5765 - 5886V
HEADLAMPS
ON11 TO 6 788 - 809V
AUTO ON 11 TO 6 10056 - 10264V
HEADLAMPS
ON WITH
FRONT FOG
LAMPS11 TO 6 1171 - 1200V
AUTO ON WITH
FRONT FOG
LAMPS ON11 TO 6 24278 - 24773V
DIMMER
POSITION13-WAY
CONNECTOR
TERMINALRESISTANCE
DOME 12 TO 6 15568 - 23357V
PARADE 12 TO 6 5168 - 7757V
DIM HIGH 12 TO 6 2288 - 3437V
DIM LOW 12 TO 6 688 - 1037V
OFF 12 TO 6 240 - 365V
DIAGNOSIS AND TESTING - HEADLAMP
SWITCH - EXPORT
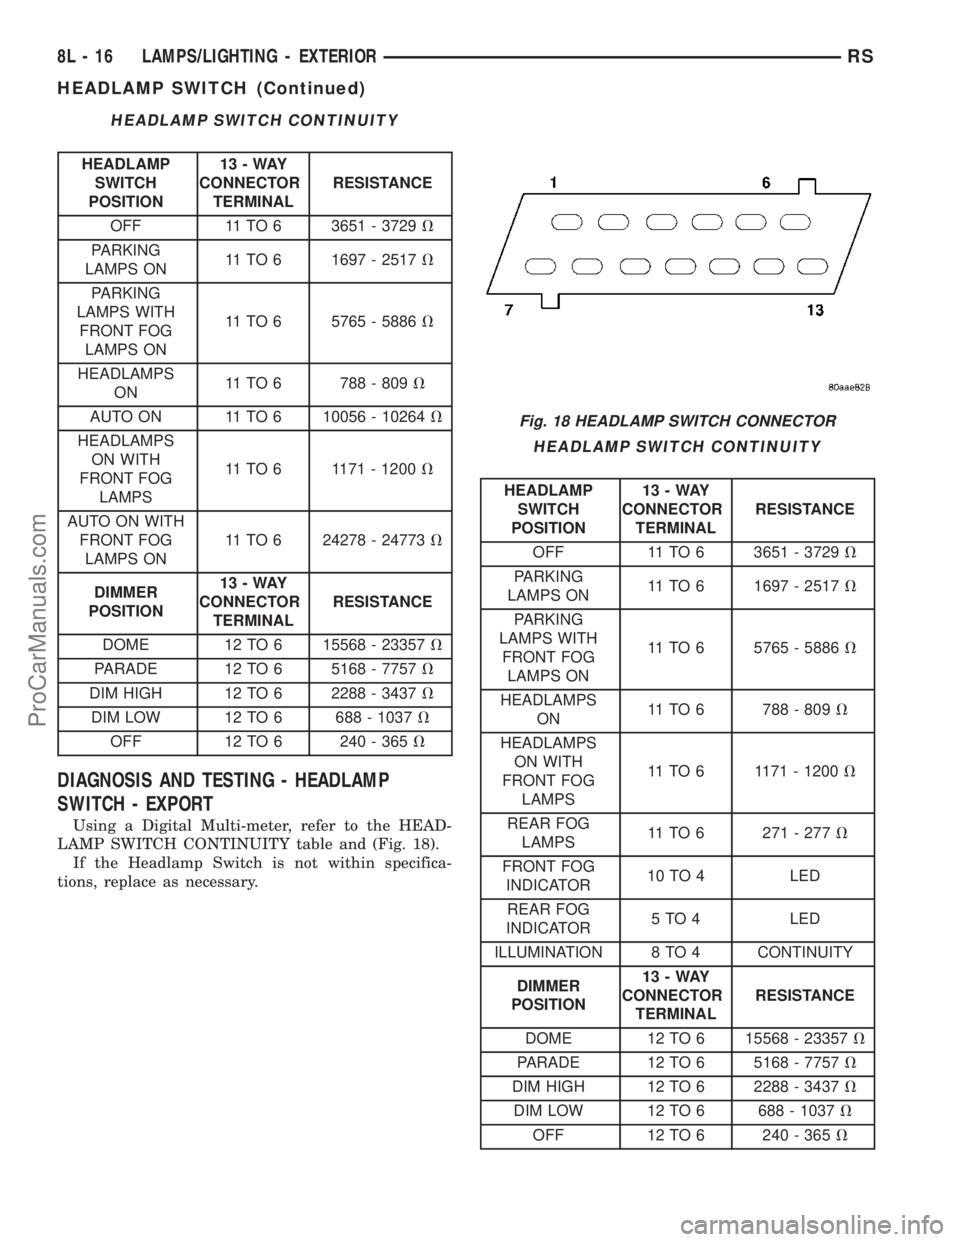
Using a Digital Multi-meter, refer to the HEAD-
LAMP SWITCH CONTINUITY table and (Fig. 18).
If the Headlamp Switch is not within specifica-
tions, replace as necessary.
HEADLAMP SWITCH CONTINUITY
HEADLAMP
SWITCH
POSITION13-WAY
CONNECTOR
TERMINALRESISTANCE
OFF 11 TO 6 3651 - 3729V
PARKING
LAMPS ON11 TO 6 1697 - 2517V
PARKING
LAMPS WITH
FRONT FOG
LAMPS ON11 TO 6 5765 - 5886V
HEADLAMPS
ON11 TO 6 788 - 809V
HEADLAMPS
ON WITH
FRONT FOG
LAMPS11 TO 6 1171 - 1200V
REAR FOG
LAMPS11 TO 6 271 - 277V
FRONT FOG
INDICATOR10 TO 4 LED
REAR FOG
INDICATOR5 TO 4 LED
ILLUMINATION 8 TO 4 CONTINUITY
DIMMER
POSITION13-WAY
CONNECTOR
TERMINALRESISTANCE
DOME 12 TO 6 15568 - 23357V
PARADE 12 TO 6 5168 - 7757V
DIM HIGH 12 TO 6 2288 - 3437V
DIM LOW 12 TO 6 688 - 1037V
OFF 12 TO 6 240 - 365V
Fig. 18 HEADLAMP SWITCH CONNECTOR
8L - 16 LAMPS/LIGHTING - EXTERIORRS
HEADLAMP SWITCH (Continued)
ProCarManuals.com
Page 432 of 2177
HEADLAMP
SWITCH
POSITION13-WAY
CONNECTOR
TERMINALRESISTANCE
HEADLAMP
LEVELING
SWITCH
POSITION13-WAY
CONNECTOR
TERMINALRESISTANCE
01 TO 7 3238 - 3456V
1 TO 2 3181 - 3400V
1 1 TO 7 1195 - 1225V
2 1 TO 7 746 - 765V
REMOVAL
(1) Disconnect and isolate the battery negative
cable.
(2) Remove the Instrument Panel Lower Steering
Column Cover. Refer to Body, Instrument Panel,
Lower Steering Column Cover, Removal.
(3) Reach up behind the left side of the instrument
panel and depress spring clip on top or bottom of
headlamp switch. Firmly push out on the headlamp
switch assembly.
(4) Disconnect the wiring connectors.
(5) Remove switch from vehicle.
INSTALLATION
(1) Connect the wiring connectors.
(2) Place headlamp switch assembly into position
and firmly snap into place.
(3) Install the Instrument Panel Lower Steering
Column Cover. Refer to Body, Instrument Panel,
Lower Steering Column Cover, Installation.
(4) Connect the battery negative cable.
HEADLAMP UNIT
STANDARD PROCEDURE
STANDARD PROCEDURE - HEADLAMP UNIT
ALIGNMENT
HEADLAMP UNIT ALIGNMENT PREPARATION
(1) Verify headlamp dimmer switch and high beam
indicator operation.
(2) Inspect and correct damaged or defective com-
ponents that could interfere with proper headlamp
alignment.
(3) Verify proper tire inflation.
(4) Clean headlamp lenses.
(5) Verify that luggage area is loaded as the vehi-
cle is routinely used.(6) Vehicles equipped with automatic load leveling
suspension should be driven normally for approxi-
mately 5 km (3 miles) before attempting a proper
headlamp unit alignment.
(7) Fuel tank should be FULL. Add 2.94 kg (6.5
lbs.) of weight over the fuel tank for each estimated
gallon of missing fuel.
ALIGNMENT SCREEN PREPARATION
(1) Position vehicle on a level surface perpendicu-
lar to a flat wall 7.62 meters (25 ft.) away from front
of headlamp lens (Fig. 19).
(2) If necessary, tape a line on the floor 7.62
meters (25 ft.) away from and parallel to the wall.
(3) Rock vehicle side-to-side three times and allow
suspension to stabilize.
(4) Jounce front suspension three times by pushing
downward on front bumper and releasing.
(5) Measure the distance from the center of head-
lamp lens to the floor. Transfer measurement to the
alignment screen (with tape). Use this line for
up/down adjustment reference.
HEADLAMP UNIT ADJUSTMENT
The low beam headlamp will project on the screen
upper edge of the beam (cut-off) at the horizontal
lamp centerline 50 mm (2 in.). Horizontal aim is
preset and can not be adjusted. The high beam pat-
tern should be correct when the low beams are
aligned properly (Fig. 20). To adjust headlamp verti-
cal alignment, rotate adjustment screw to achieve the
specified low beam cut-off location.
STANDARD PROCEDURE - HEADLAMP UNIT
ALIGNMENT - EXPORT
HEADLAMP UNIT ALIGNMENT PREPARATION
(1) Verify that the headlamp leveling switch is in
the ª0º position.
(2) Inspect and correct damaged or defective com-
ponents that could interfere with proper headlamp
alignment.
(3) Verify proper tire inflation.
(4) Clean headlamp lenses.
(5) Verify that luggage area is loaded as the vehi-
cle is routinely used.
(6) Vehicles equipped with automatic load leveling
suspension should be driven normally for approxi-
mately 5 km (3 miles) before attempting a proper
headlamp unit alignment.
(7) Fuel tank should be FULL. Add 2.94 kg (6.5
lbs.) of weight over the fuel tank for each estimated
gallon of missing fuel.
RSLAMPS/LIGHTING - EXTERIOR8L-17
HEADLAMP SWITCH (Continued)
ProCarManuals.com
Page 433 of 2177
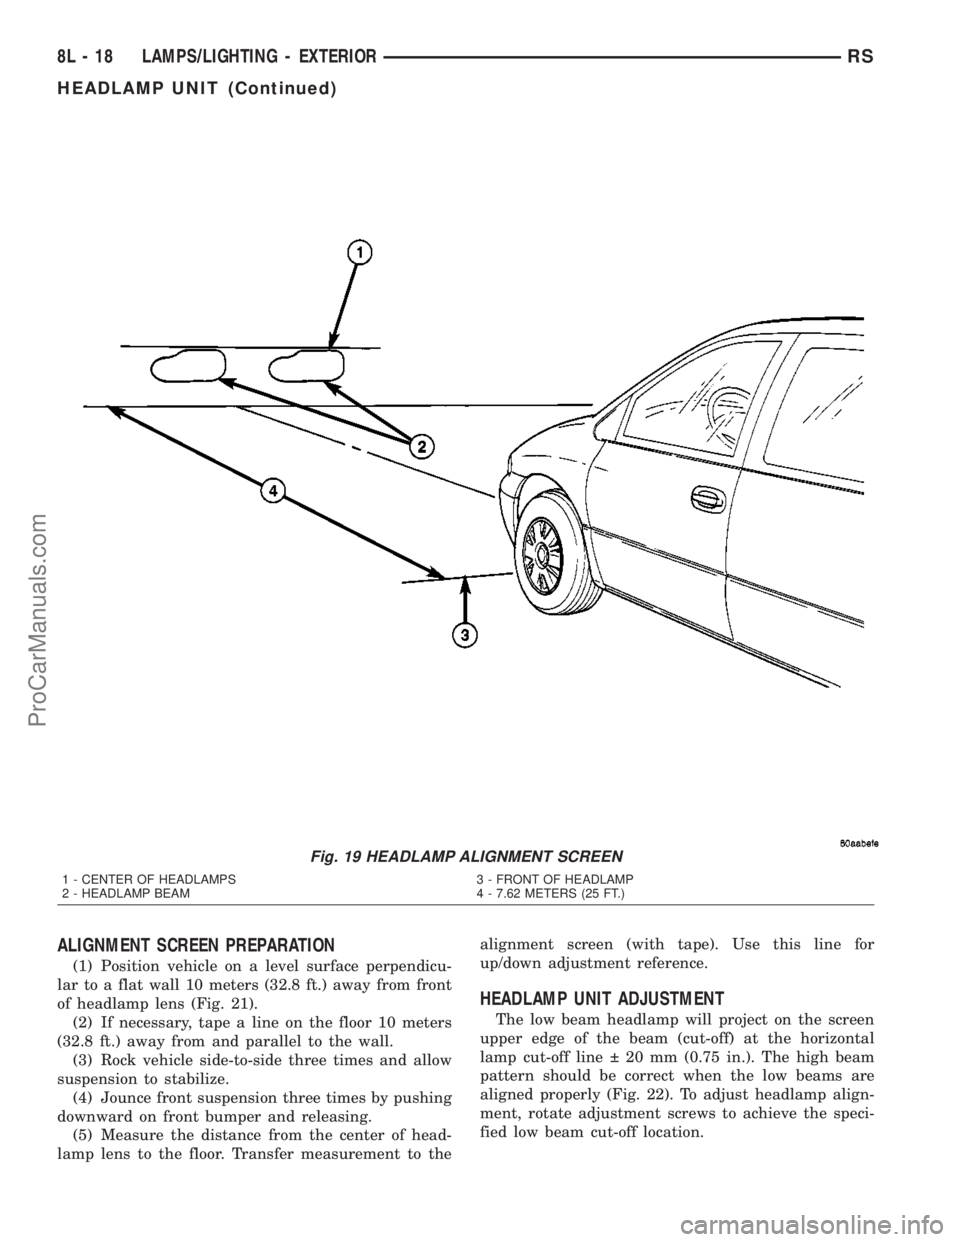
ALIGNMENT SCREEN PREPARATION
(1) Position vehicle on a level surface perpendicu-
lar to a flat wall 10 meters (32.8 ft.) away from front
of headlamp lens (Fig. 21).
(2) If necessary, tape a line on the floor 10 meters
(32.8 ft.) away from and parallel to the wall.
(3) Rock vehicle side-to-side three times and allow
suspension to stabilize.
(4) Jounce front suspension three times by pushing
downward on front bumper and releasing.
(5) Measure the distance from the center of head-
lamp lens to the floor. Transfer measurement to thealignment screen (with tape). Use this line for
up/down adjustment reference.
HEADLAMP UNIT ADJUSTMENT
The low beam headlamp will project on the screen
upper edge of the beam (cut-off) at the horizontal
lamp cut-off line 20 mm (0.75 in.). The high beam
pattern should be correct when the low beams are
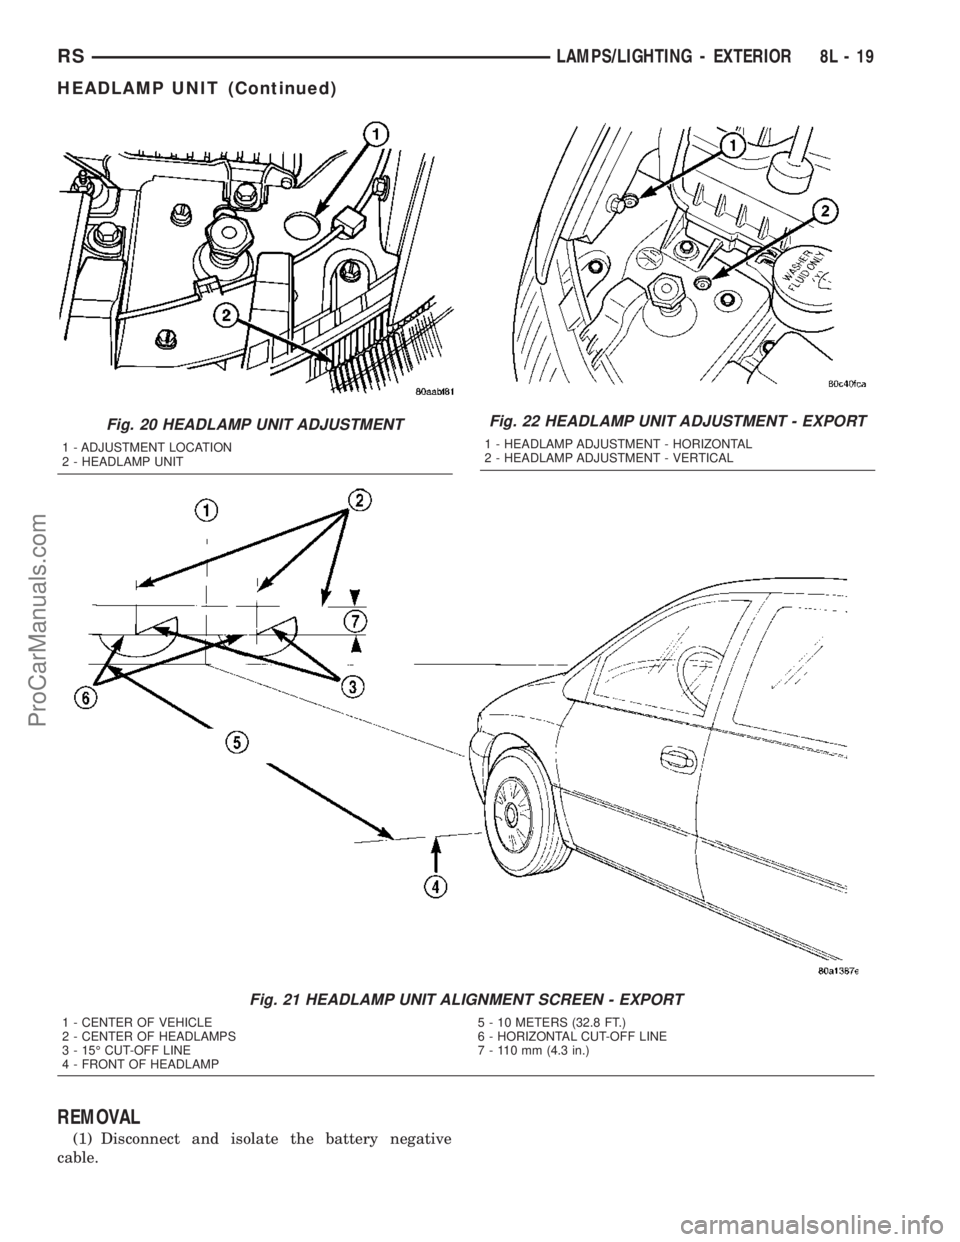
aligned properly (Fig. 22). To adjust headlamp align-
ment, rotate adjustment screws to achieve the speci-
fied low beam cut-off location.
Fig. 19 HEADLAMP ALIGNMENT SCREEN
1 - CENTER OF HEADLAMPS 3 - FRONT OF HEADLAMP
2 - HEADLAMP BEAM 4 - 7.62 METERS (25 FT.)
8L - 18 LAMPS/LIGHTING - EXTERIORRS
HEADLAMP UNIT (Continued)
ProCarManuals.com
Page 434 of 2177
REMOVAL
(1) Disconnect and isolate the battery negative
cable.
Fig. 20 HEADLAMP UNIT ADJUSTMENT
1 - ADJUSTMENT LOCATION
2 - HEADLAMP UNIT
Fig. 21 HEADLAMP UNIT ALIGNMENT SCREEN - EXPORT
1 - CENTER OF VEHICLE 5 - 10 METERS (32.8 FT.)
2 - CENTER OF HEADLAMPS 6 - HORIZONTAL CUT-OFF LINE
3 - 15É CUT-OFF LINE 7 - 110 mm (4.3 in.)
4 - FRONT OF HEADLAMP
Fig. 22 HEADLAMP UNIT ADJUSTMENT - EXPORT
1 - HEADLAMP ADJUSTMENT - HORIZONTAL
2 - HEADLAMP ADJUSTMENT - VERTICAL
RSLAMPS/LIGHTING - EXTERIOR8L-19
HEADLAMP UNIT (Continued)
ProCarManuals.com
Page 435 of 2177
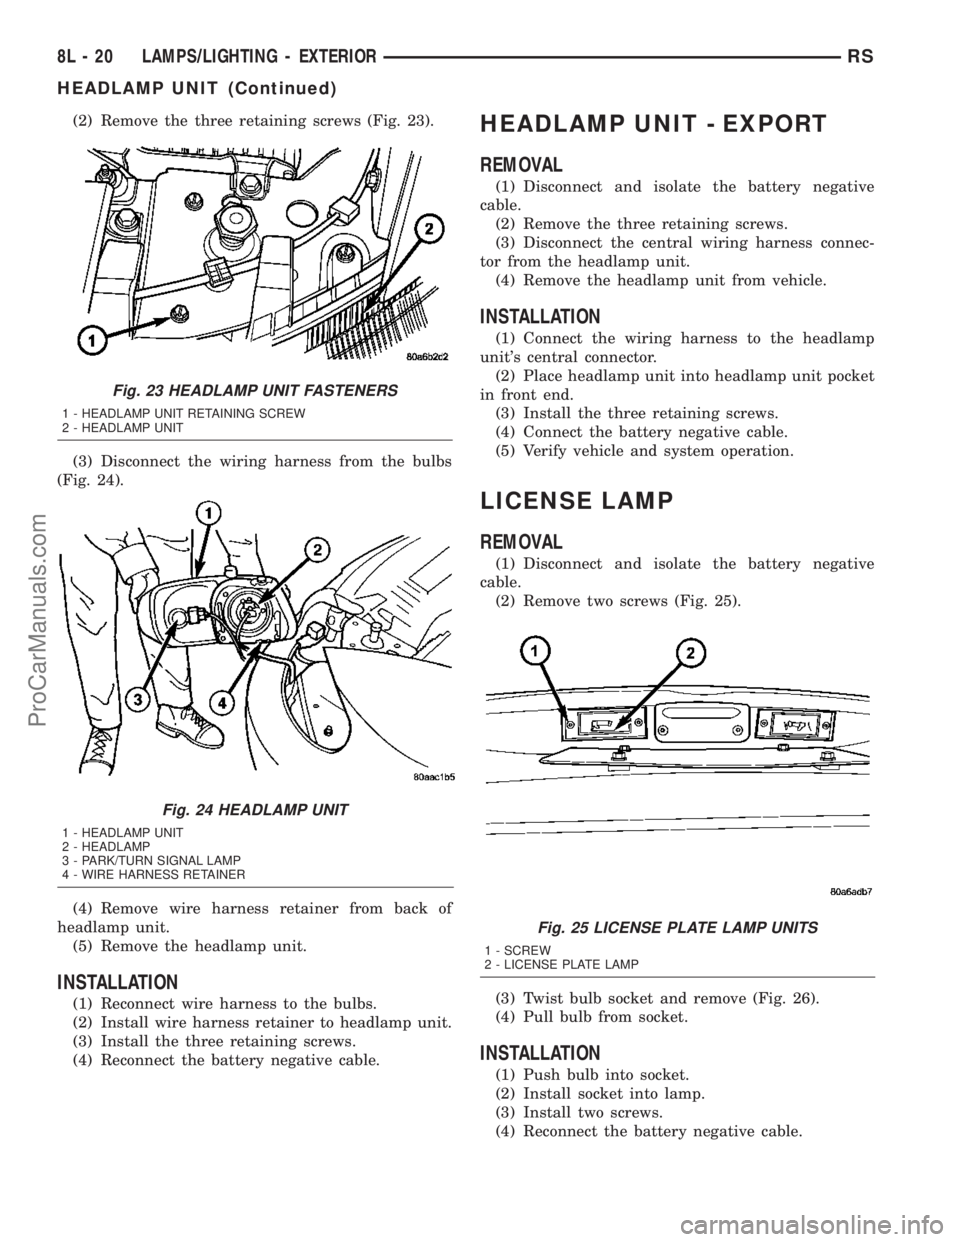
(2) Remove the three retaining screws (Fig. 23).
(3) Disconnect the wiring harness from the bulbs
(Fig. 24).
(4) Remove wire harness retainer from back of
headlamp unit.
(5) Remove the headlamp unit.
INSTALLATION
(1) Reconnect wire harness to the bulbs.
(2) Install wire harness retainer to headlamp unit.
(3) Install the three retaining screws.
(4) Reconnect the battery negative cable.
HEADLAMP UNIT - EXPORT
REMOVAL
(1) Disconnect and isolate the battery negative
cable.
(2) Remove the three retaining screws.
(3) Disconnect the central wiring harness connec-
tor from the headlamp unit.
(4) Remove the headlamp unit from vehicle.
INSTALLATION
(1) Connect the wiring harness to the headlamp
unit's central connector.
(2) Place headlamp unit into headlamp unit pocket
in front end.
(3) Install the three retaining screws.
(4) Connect the battery negative cable.
(5) Verify vehicle and system operation.
LICENSE LAMP
REMOVAL
(1) Disconnect and isolate the battery negative
cable.
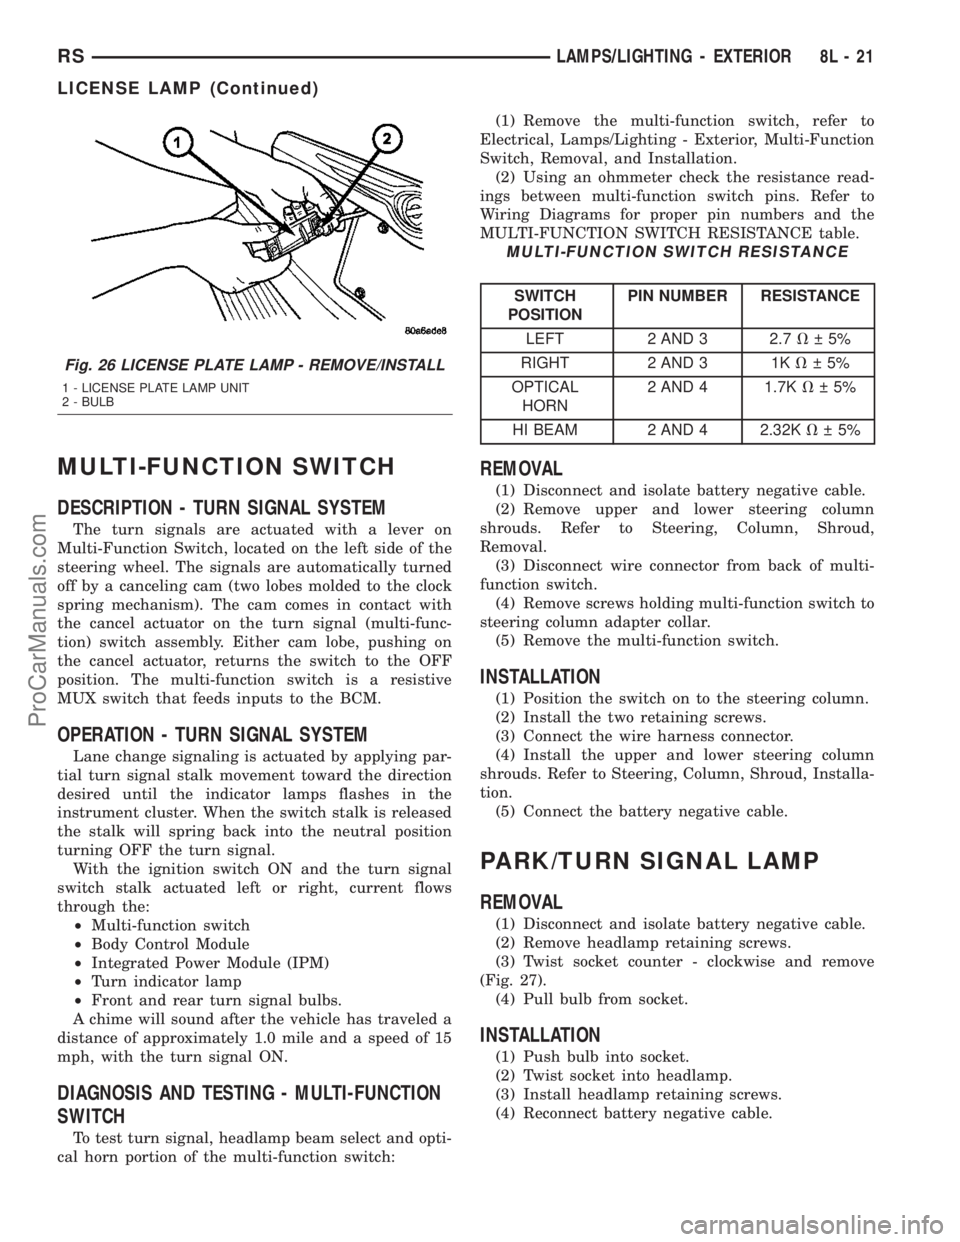
(2) Remove two screws (Fig. 25).
(3) Twist bulb socket and remove (Fig. 26).
(4) Pull bulb from socket.
INSTALLATION
(1) Push bulb into socket.
(2) Install socket into lamp.
(3) Install two screws.
(4) Reconnect the battery negative cable.
Fig. 23 HEADLAMP UNIT FASTENERS
1 - HEADLAMP UNIT RETAINING SCREW
2 - HEADLAMP UNIT
Fig. 24 HEADLAMP UNIT
1 - HEADLAMP UNIT
2 - HEADLAMP
3 - PARK/TURN SIGNAL LAMP
4 - WIRE HARNESS RETAINER
Fig. 25 LICENSE PLATE LAMP UNITS
1 - SCREW
2 - LICENSE PLATE LAMP
8L - 20 LAMPS/LIGHTING - EXTERIORRS
HEADLAMP UNIT (Continued)
ProCarManuals.com
Page 436 of 2177
MULTI-FUNCTION SWITCH
DESCRIPTION - TURN SIGNAL SYSTEM
The turn signals are actuated with a lever on
Multi-Function Switch, located on the left side of the
steering wheel. The signals are automatically turned
off by a canceling cam (two lobes molded to the clock
spring mechanism). The cam comes in contact with
the cancel actuator on the turn signal (multi-func-
tion) switch assembly. Either cam lobe, pushing on
the cancel actuator, returns the switch to the OFF
position. The multi-function switch is a resistive
MUX switch that feeds inputs to the BCM.
OPERATION - TURN SIGNAL SYSTEM
Lane change signaling is actuated by applying par-
tial turn signal stalk movement toward the direction
desired until the indicator lamps flashes in the
instrument cluster. When the switch stalk is released
the stalk will spring back into the neutral position
turning OFF the turn signal.
With the ignition switch ON and the turn signal
switch stalk actuated left or right, current flows
through the:
²Multi-function switch
²Body Control Module
²Integrated Power Module (IPM)
²Turn indicator lamp
²Front and rear turn signal bulbs.
A chime will sound after the vehicle has traveled a
distance of approximately 1.0 mile and a speed of 15
mph, with the turn signal ON.
DIAGNOSIS AND TESTING - MULTI-FUNCTION
SWITCH
To test turn signal, headlamp beam select and opti-
cal horn portion of the multi-function switch:(1) Remove the multi-function switch, refer to
Electrical, Lamps/Lighting - Exterior, Multi-Function
Switch, Removal, and Installation.
(2) Using an ohmmeter check the resistance read-
ings between multi-function switch pins. Refer to
Wiring Diagrams for proper pin numbers and the
MULTI-FUNCTION SWITCH RESISTANCE table.
MULTI-FUNCTION SWITCH RESISTANCE
SWITCH
POSITIONPIN NUMBER RESISTANCE
LEFT 2 AND 3 2.7V 5%
RIGHT 2 AND 3 1KV 5%
OPTICAL
HORN2 AND 4 1.7KV 5%
HI BEAM 2 AND 4 2.32KV 5%
REMOVAL
(1) Disconnect and isolate battery negative cable.
(2) Remove upper and lower steering column
shrouds. Refer to Steering, Column, Shroud,
Removal.
(3) Disconnect wire connector from back of multi-
function switch.
(4) Remove screws holding multi-function switch to
steering column adapter collar.
(5) Remove the multi-function switch.
INSTALLATION
(1) Position the switch on to the steering column.
(2) Install the two retaining screws.
(3) Connect the wire harness connector.
(4) Install the upper and lower steering column
shrouds. Refer to Steering, Column, Shroud, Installa-
tion.
(5) Connect the battery negative cable.
PARK/TURN SIGNAL LAMP
REMOVAL
(1) Disconnect and isolate battery negative cable.
(2) Remove headlamp retaining screws.
(3) Twist socket counter - clockwise and remove
(Fig. 27).
(4) Pull bulb from socket.
INSTALLATION
(1) Push bulb into socket.
(2) Twist socket into headlamp.
(3) Install headlamp retaining screws.
(4) Reconnect battery negative cable.
Fig. 26 LICENSE PLATE LAMP - REMOVE/INSTALL
1 - LICENSE PLATE LAMP UNIT
2 - BULB
RSLAMPS/LIGHTING - EXTERIOR8L-21
LICENSE LAMP (Continued)
ProCarManuals.com
Page 437 of 2177
PARK/TURN SIGNAL LAMP -
EXPORT
REMOVAL
(1) Disconnect and isolate the battery negative
cable.
(2) Remove the headlamp unit (Refer to 8 - ELEC-
TRICAL/LAMPS/LIGHTING - EXTERIOR/HEAD-
LAMP UNIT - EXPORT - REMOVAL).
(3) Remove the rubber boot cover.
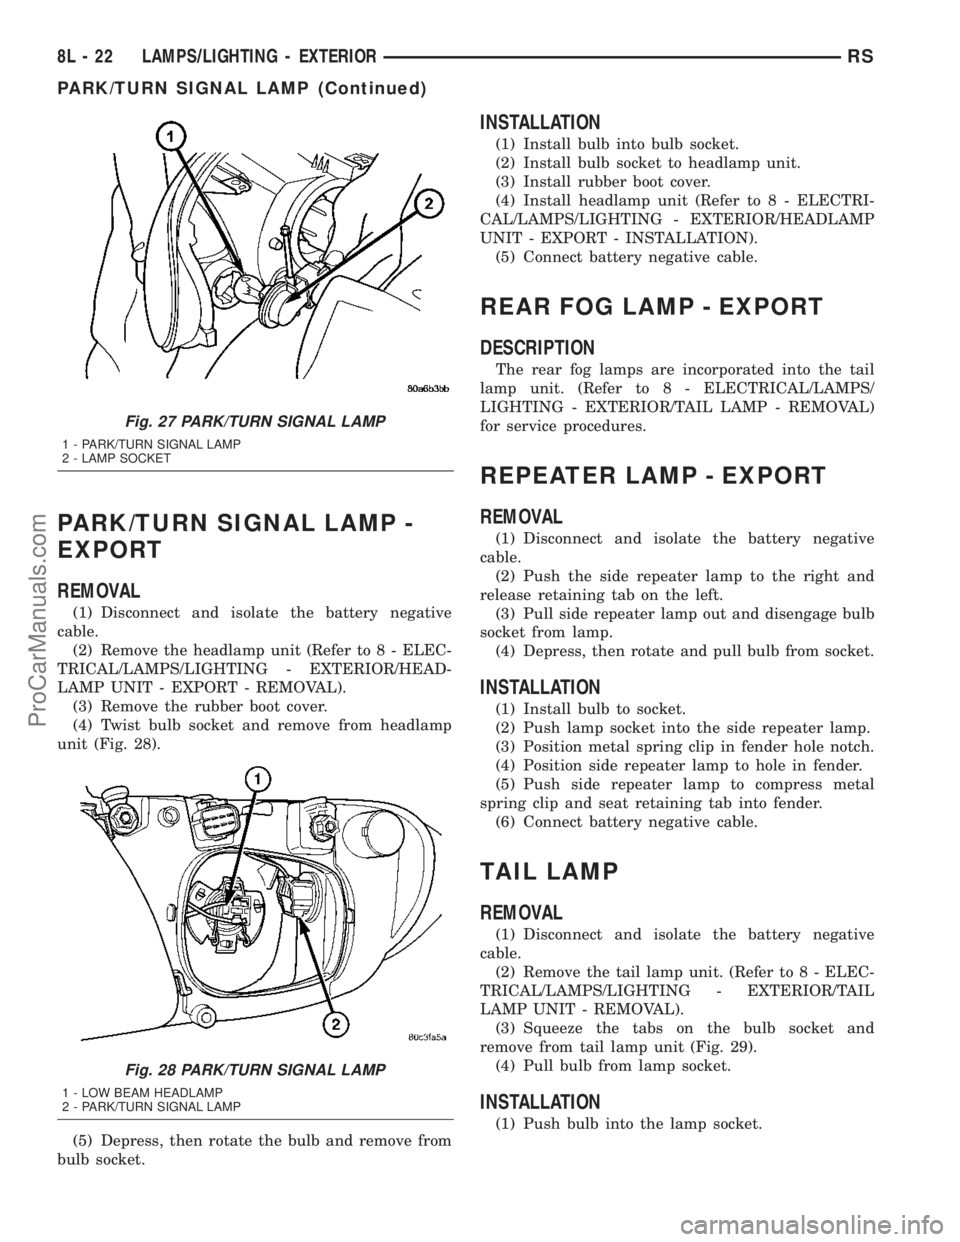
(4) Twist bulb socket and remove from headlamp
unit (Fig. 28).
(5) Depress, then rotate the bulb and remove from
bulb socket.
INSTALLATION
(1) Install bulb into bulb socket.
(2) Install bulb socket to headlamp unit.
(3) Install rubber boot cover.
(4) Install headlamp unit (Refer to 8 - ELECTRI-
CAL/LAMPS/LIGHTING - EXTERIOR/HEADLAMP
UNIT - EXPORT - INSTALLATION).
(5) Connect battery negative cable.
REAR FOG LAMP - EXPORT
DESCRIPTION
The rear fog lamps are incorporated into the tail
lamp unit. (Refer to 8 - ELECTRICAL/LAMPS/
LIGHTING - EXTERIOR/TAIL LAMP - REMOVAL)
for service procedures.
REPEATER LAMP - EXPORT
REMOVAL
(1) Disconnect and isolate the battery negative
cable.
(2) Push the side repeater lamp to the right and
release retaining tab on the left.
(3) Pull side repeater lamp out and disengage bulb
socket from lamp.
(4) Depress, then rotate and pull bulb from socket.
INSTALLATION
(1) Install bulb to socket.
(2) Push lamp socket into the side repeater lamp.
(3) Position metal spring clip in fender hole notch.
(4) Position side repeater lamp to hole in fender.
(5) Push side repeater lamp to compress metal
spring clip and seat retaining tab into fender.
(6) Connect battery negative cable.
TAIL LAMP
REMOVAL
(1) Disconnect and isolate the battery negative
cable.
(2) Remove the tail lamp unit. (Refer to 8 - ELEC-
TRICAL/LAMPS/LIGHTING - EXTERIOR/TAIL
LAMP UNIT - REMOVAL).
(3) Squeeze the tabs on the bulb socket and
remove from tail lamp unit (Fig. 29).
(4) Pull bulb from lamp socket.
INSTALLATION
(1) Push bulb into the lamp socket.
Fig. 27 PARK/TURN SIGNAL LAMP
1 - PARK/TURN SIGNAL LAMP
2 - LAMP SOCKET
Fig. 28 PARK/TURN SIGNAL LAMP
1 - LOW BEAM HEADLAMP
2 - PARK/TURN SIGNAL LAMP
8L - 22 LAMPS/LIGHTING - EXTERIORRS
PARK/TURN SIGNAL LAMP (Continued)
ProCarManuals.com
Page 451 of 2177
PROGRAMMABLE FEATURES
NOTE: Tire pressure monitoring (TPM) system infor-
mation is not covered in this section of the service
manual. Refer to the tires/wheels section of this
manual for detailed tire pressure monitoring system
information.
²LANGUAGE?- The options include English,
Francaise, Deutsch, Italiana, or Espanol. The default
is English. All EVIC display nomenclature, including
the trip computer functions, warning messages and
the programmable features appear in the selected
language.
²DISPLAY U.S. OR METRIC?- The options
include U.S. and M. The default is U.S. This feature
toggles the trip computer temperature, fuel economy
and odometer display readings between U.S. and
metric units of measure. It also changes the odome-
ter display in the instrument cluster.
²SERVICE INTV. =- The options include from
1000 to 12000 kilometers in 1000 kilometer incre-
ments (2000 to 7500 miles in 500 mile increments).
The default is 12000 kilometers (7500 miles). The
selected distance becomes the interval at which the
Perform Service warning message will be displayed
by the EVIC. If a new distance is selected, a second
programmable feature appears,RESET SERVICE
DISTANCE?- The options include No and Yes. The
default is Yes. When Yes is selected, the accumulated
distance since the last previous Perform Service
warning message will be reset to zero because the
service interval has been changed. When No is
selected, the distance until the next Perform Service
warning message is reduced by the accumulated dis-
tance since the last previous message.
²USE FACTORY SETTINGS?- The options
include Yes and No. The default is Yes. When yes is
selected all the programmable features will return to
there defaults and the rest of the programmable fea-
tures will not be displayed. If No is selected the rest
of the programmable features will be displayed at
there default values. This feature will automatically
return to the Yes default under two conditions. First,
if no programmable features are changed from there
defaults. Second, if all the programmable features
equal there defaults.
²AUTO DOOR LOCKS?- The options include
Yes and No. The default is Yes. When Yes is selected,
all doors and the liftgate lock automatically when
vehicle speed reaches 25 kilometers-per-hour (15
miles-per-hour). If YES is selected, a second program-
mable feature appears,AUTO UNLOCK ON EXIT?
- The options again include Yes and No. The default
is No. When Yes is selected, following each Auto Door
Lock event all doors and the liftgate will automati-
cally unlock when the driver door is opened, if thevehicle is stopped and the transmission gear selector
is in Park or Neutral. The Auto Door Unlock event
will only occur once following each Auto Door Lock
event.
²REMOTE UNLOCK- The options include
Driver Door 1st and All Doors. The default is Driver
Door 1st. When Diver Door 1st is selected, only the
driver door unlocks when the Unlock button of the
Remote Keyless Entry (RKE) transmitter is
depressed once. The Unlock button of the RKE trans-
mitter must be depressed twice to unlock all doors.
When All Doors is selected, all doors unlock when the
Unlock button of the RKE transmitter is depressed
once.
²REMOTE LINKED TO MEMORY?- This pro-
grammable feature only applies to vehicles equipped
with the optional memory / heated system. The
options include Yes and No. The default is No. When
Yes is selected, the memory system will recall the
Driver 1 or Driver 2 memory settings assigned to the
RKE transmitter being used to unlock the vehicle.
When No is selected, the memory system will only
recall memory settings when the Driver 1 or Driver 2
push buttons of the memory switch on the driver side
front door trim panel are depressed.
²SOUND HORN ON LOCK?- The options
include Yes and No. The default is No. When Yes is
selected, a short horn chirp will provide an audible
confirmation when the RKE receiver recognizes a
valid Lock signal from an RKE transmitter. When No
is selected, no horn chirp will occur with the RKE
Lock event. This feature may be selected indepen-
dent of theFLASH LIGHTS WITH LOCKS?pro-
grammable feature.
²FLASH LIGHTS WITH LOCKS?- The options
include Yes and No. The default is Yes. When Yes is
selected, a single flash of the hazard warning lamps
will provide an optical confirmation when the RKE
receiver recognizes a valid Lock signal from an RKE
transmitter, and two flashes of the same lamps will
occur when the RKE receiver recognizes a valid
Unlock signal from an RKE transmitter. When No is
selected, no lamp flash will occur with the RKE Lock
or Unlock event. This feature may be selected inde-
pendent of theSOUND HORN ON LOCK?pro-
grammable feature.
²HEADLAMP DELAY =- The options include
Off, 30 Sec, 60 Sec, and 90 Sec. The default is 90 Sec.
When a time interval is selected, the headlamps will
remain on for that length of time when the head-
lamps are turned off after the ignition is turned off,
or if the Auto mode is selected on vehicles with the
Auto Headlamps option. When Off is selected, the
headlamp delay feature is disabled.
²HEADLAMPS ON WITH WIPERS?- This pro-
grammable feature only applies to vehicles equipped
8M - 8 MESSAGE SYSTEMSRS
ELECTRONIC VEHICLE INFO CENTER (Continued)
ProCarManuals.com