check engine DODGE VIPER 2008 ZB II / 2.G User Guide
[x] Cancel search | Manufacturer: DODGE, Model Year: 2008, Model line: VIPER, Model: DODGE VIPER 2008 ZB II / 2.GPages: 303, PDF Size: 2.65 MB
Page 197 of 303
EMISSIONS INSPECTION AND MAINTENANCE
PROGRAMS
In some localities, it may be a legal requirement to pass
an inspection of your vehicle's emissions control system.
Failure to pass could prevent vehicle registration.
For states, which have an I/M (Inspection and
Maintenance) requirement, this check verifies the
following: the MIL (Malfunction Indicator Light)
is functioning and is not on when the engine is running,
and that the OBD (On Board Diagnostic) system is ready
for testing.
Normally, the OBD system will be ready. The OBD
system maynotbe ready if your vehicle was recently
serviced, if you recently had a dead battery, or a battery
replacement. If the OBD system should be determined
not ready for the I/M test, your vehicle may fail the test.Your vehicle has a simple ignition key-actuated test,
which you can use prior to going to the test station. To
check if your vehicle's OBD system is ready, you must do
the following:
1. Insert your ignition key into the ignition switch.
2. Turn the ignition to the ON position, but do not crank
or start the engine.
3. If you crank or start the engine, you will have to start
this test over.
4. As soon as you turn your key to the ON position, you
will see your MIL symbol come on as part of a normal
bulb check.
196 MAINTAINING YOUR VEHICLE
Page 198 of 303
5. Approximately 15 seconds later, one of two things will
happen:
a. The MIL will flash for about 10 seconds and then
return to being fully illuminated until you turn off the
ignition key or start the engine. This means that your
vehicle's OBD system isnot readyand you shouldnot
proceed to the I/M station.
b. The MIL will not flash at all and will remain fully
illuminated until you turn OFF the ignition key or start
the engine. This means that your vehicle's OBD system
isreadyand you can proceed to the I/M station.
If your OBD system isnot ready,you should see your
authorized dealer or repair facility. If your vehicle was
recently serviced or had a battery failure or replacement,
you may need to do nothing more than drive your
vehicle as you normally would in order for your OBD
system to update. A recheck with the above test routine
may then indicate that the system is now ready.Regardless of whether your vehicle's OBD system is
ready or not ready, if the MIL symbol is illuminated
during normal vehicle operation, you should have your
vehicle serviced before going to the I/M station. The I/M
station can fail your vehicle because the MIL symbol is on
with the engine running.
REPLACEMENT PARTS
Use of genuine Mopartparts for normal/scheduled
maintenance and repairs is highly recommended to en-
sure the designed performance. Damage or failures
caused by the use of non-Mopartparts for maintenance
and repairs will not be covered by the manufacturer's
warranty.
MAINTAINING YOUR VEHICLE 197
7
Page 199 of 303
DEALER SERVICE
Your authorized dealer has the qualified service person-
nel, special tools, and equipment to perform all service
operations in an expert manner. Service Manuals are
available which include detailed service information for
your vehicle. Refer to these manuals before attempting
any procedure yourself.
NOTE:Intentional tampering with emissions control
systems can result in civil penalties being assessed
against you.
WARNING!
You can be badly injured working on or around a
motor vehicle. Only do service work for which you
have the knowledge and the proper equipment. If you
have any doubt about your ability to perform a service
job, take your vehicle to a competent mechanic.
MAINTENANCE PROCEDURES
The pages that follow contain the maintenance service
recommendations by the engineers who designed your
vehicle.
Besides the maintenance items for which there are fixed
maintenance intervals, there are other items, which
should operate satisfactorily without periodic mainte-
nance. However, if a malfunction of these items does
occur, it could adversely affect the engine or vehicle
performance. These items should be inspected if a mal-
function is observed or suspected.
Engine Oil
Checking Oil Level
To assure proper engine lubrication, the engine oil must
be maintained at the correct level. Check the oil level at
regular intervals, such as every fuel stop.
198 MAINTAINING YOUR VEHICLE
Page 200 of 303
The best time to check the oil level is approximately 5
minutes after a fully warmed engine is turned off or
before starting the engine after it has sat overnight.
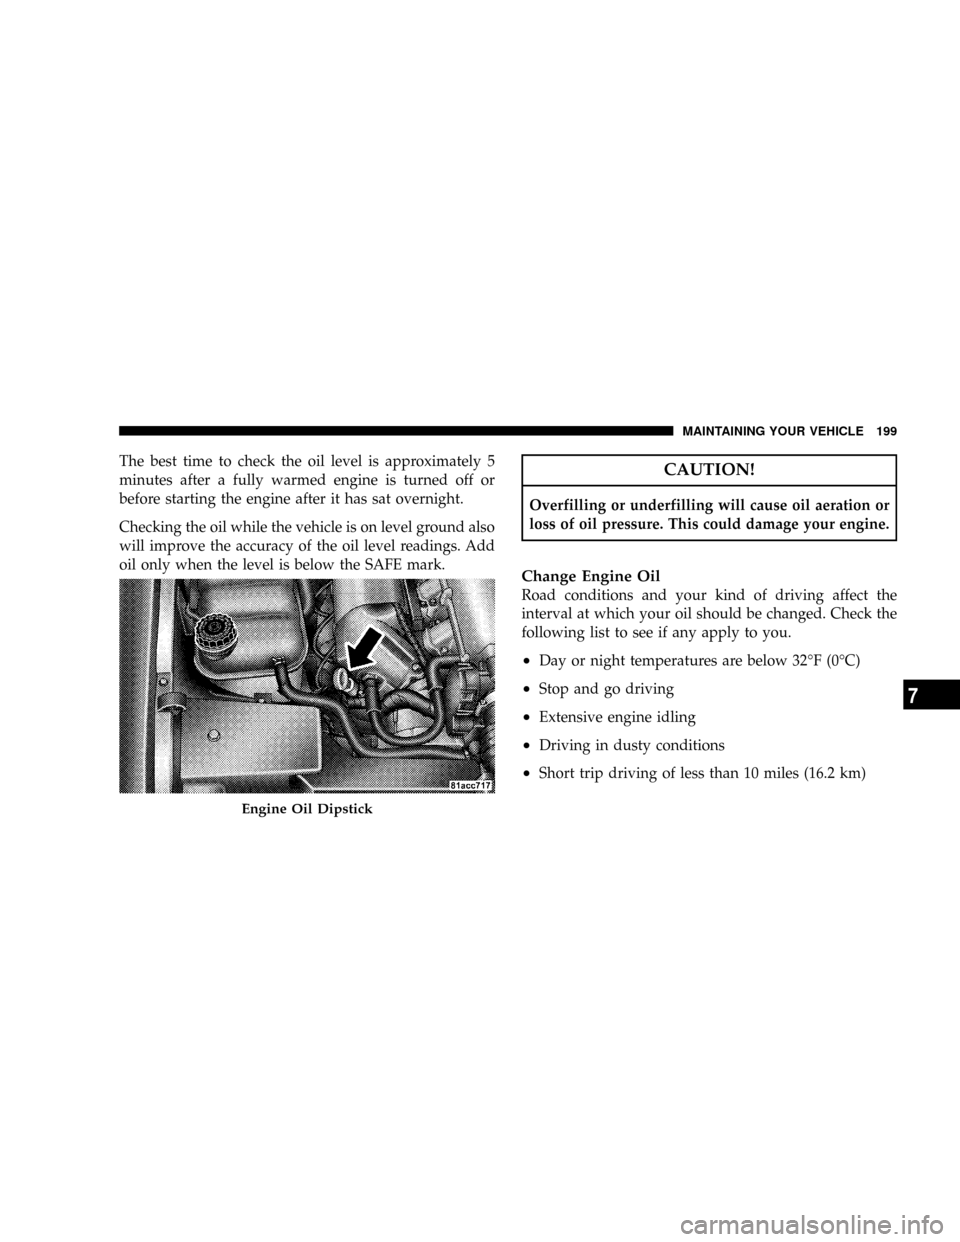
Checking the oil while the vehicle is on level ground also
will improve the accuracy of the oil level readings. Add
oil only when the level is below the SAFE mark.CAUTION!
Overfilling or underfilling will cause oil aeration or
loss of oil pressure. This could damage your engine.
Change Engine Oil
Road conditions and your kind of driving affect the
interval at which your oil should be changed. Check the
following list to see if any apply to you.
²Day or night temperatures are below 32ÉF (0ÉC)
²Stop and go driving
²Extensive engine idling
²Driving in dusty conditions
²Short trip driving of less than 10 miles (16.2 km)
Engine Oil Dipstick
MAINTAINING YOUR VEHICLE 199
7
Page 203 of 303
quality filters should be used to assure most efficient
service. MopartEngine Oil Filters are a high quality oil
filter and are recommended.
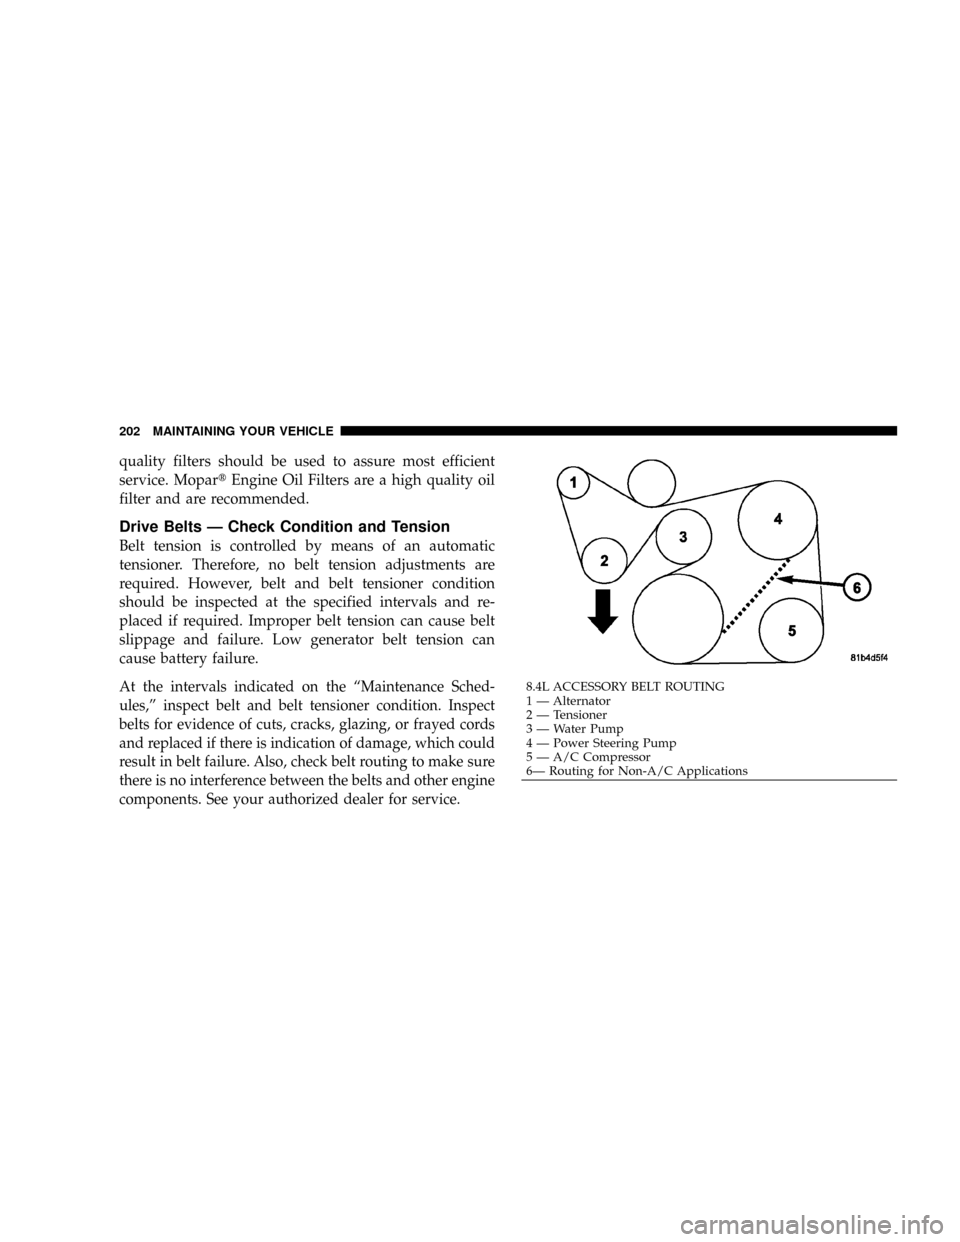
Drive Belts Ð Check Condition and Tension
Belt tension is controlled by means of an automatic
tensioner. Therefore, no belt tension adjustments are
required. However, belt and belt tensioner condition
should be inspected at the specified intervals and re-
placed if required. Improper belt tension can cause belt
slippage and failure. Low generator belt tension can
cause battery failure.
At the intervals indicated on the ªMaintenance Sched-
ules,º inspect belt and belt tensioner condition. Inspect
belts for evidence of cuts, cracks, glazing, or frayed cords
and replaced if there is indication of damage, which could
result in belt failure. Also, check belt routing to make sure
there is no interference between the belts and other engine
components. See your authorized dealer for service.8.4L ACCESSORY BELT ROUTING
1 Ð Alternator
2 Ð Tensioner
3 Ð Water Pump
4 Ð Power Steering Pump
5 Ð A/C Compressor
6Ð Routing for Non-A/C Applications 202 MAINTAINING YOUR VEHICLE
Page 207 of 303
NOTE:
²Because of the plastic body shell on your vehicle,
ignition cables should be replaced with the specially
designed RFI cables available at your dealer.
²The ignition timing cannot be set on this engine.
Crankcase Emission Control System
Proper operation of this system depends on freedom
from plugging due to deposits. As vehicle mileage builds
up, the Crankcase Ventilation Valve orifice may accumu-
late deposits. If a valve is not working properly, it should
be replaced with a new orifice. DO NOT ATTEMPT TO
CLEAN THE OLD ORIFICE!
Check the ventilation hose for indication of damage or
plugging deposits and replace if necessary. See your
authorized dealer for service.
Maintenance-Free Battery
The top of the MAINTENANCE-FREE battery is perma-
nently sealed. You will never have to add water, nor is
periodic maintenance required.
The battery is located underneath an access panel inside
the rear compartment on the left side of the vehicle. A
remote battery terminal is located in the engine compart-
ment for jump-starting.
To gain access to the battery, remove the floor portion of
the rear compartment carpet.
206 MAINTAINING YOUR VEHICLE
Page 213 of 303
Air Conditioner Maintenance
For best possible performance, your air conditioner
should be checked and serviced by an Authorized Dealer
at the start of each warm season. This service should
include cleaning of the condenser fins and a performance
test. Drive belt tension should also be checked at this
time.
NOTE:If A/C performance seems less then normal,
check the front of the A/C condenser (located in front of
the radiator) for dirt and insect accumulation. Clean with
a gentle water spray as required. Front end fascia protec-
tors may reduce air flow to the condenser and radiator,
reducing A/C and engine cooling performance.WARNING!
²Use only refrigerants and compressor lubricants
approved by the manufacturer for your air condi-
tioning system. Some unapproved refrigerants are
flammable and can explode, injuring you. Other
unapproved refrigerants or lubricants can cause
the system to fail, requiring costly repairs. Refer to
Section 3 of the Warranty Information book for
further warranty information.
²The air conditioning system contains refrigerant
under high pressure. To avoid risk of personal
injury or damage to the system, adding refrigerant
or any repair requiring lines to be disconnected
should be done by an experienced technician.
212 MAINTAINING YOUR VEHICLE
Page 214 of 303
Refrigerant Recovery and Recycling
R-134a Air Conditioning Refrigerant is a hydrofluorocar-
bon (HFC) that is endorsed by the Environmental Pro-
tection Agency and is an ozone-saving product. How-
ever, the manufacturer recommends that air conditioning
service be performed by dealers or other service facilities
using recovery and recycling equipment.
NOTE:Use only manufacturer approved A/C System
Sealers, Stop Leak Products, Seal Conditioners, Compres-
sor Oil, and Refrigerants.
Power Steering Ð Fluid Check
Check the fluid level in the power steering fluid reservoir
at the specified intervals. Refer to ªMaintenance Sched-
ulesº in this manual.
Check the fluid HOT with the engine OFF.
WARNING!
Fluid level should be checked with the engine off to
prevent injury from moving parts and on a level
surface to insure accurate fluid level reading.
If adding fluid, use only the manufacturer's recom-
mended fluid as it is specially formulated for minimum
effect on the rubber hoses in the power steering system.
Refer to ªFluids, Lubricants and Genuine Partsº in this
section for the correct fluid type.
Before removing the reservoir cap, wipe the outside of
the cap and reservoir so that no dirt can fall into the
reservoir
Add fluid to bring the level up to the requirements
described on the reservoir. Do not overfill. Wipe any
spilled fluid from all surfaces with a clean cloth.
MAINTAINING YOUR VEHICLE 213
7
Page 218 of 303
²Rubber bushings
²Starter bearing
²Throttle control cable
²Water pump bearings
Windshield Wiper Blades
The rubber edges of the wiper blades and the windshield
should be cleaned periodically with a sponge or soft cloth
and a mild nonabrasive cleaner. This will remove accu-
mulations of salt or road film.
Operation of the wipers on dry glass for long periods
may cause deterioration of the wiper blades. Always use
washer fluid when using the wipers to remove salt or dirt
from a dry windshield.
Avoid using the wiper blades to remove frost or ice from
the windshield. Keep the blade rubber out of contact with
petroleum products such as engine oil, gasoline, etc.
Windshield Washers
The windshield washer fluid reservoir is located in the
front of the engine compartment on the passenger side of
the vehicle. Be sure to check the fluid level in the
reservoir at regular intervals. Fill the reservoir with
windshield washer solvent (not radiator antifreeze) and
operate the system for a few seconds to flush out the
residual water.
WARNING!
Commercially available windshield washer solvents
are flammable. They could ignite and burn you. Care
must be exercised when filling or working around
the washer solution.
MAINTAINING YOUR VEHICLE 217
7
Page 220 of 303
Cooling System
WARNING!
²When working near the radiator cooling fans,
disconnect each fan motor lead or turn the ignition
switch to the OFF position. The fans are tempera-
ture controlled and can start any time the ignition
switch is in the ON position.
²You or others can be badly burned by hot coolant
or steam from your radiator. If you see or hear
steam coming from under the hood, don't open the
hood until the radiator has had time to cool. Never
try to open a cooling system pressure cap when the
radiator is hot.
Coolant Checks
Check engine coolant (antifreeze) protection every 12
months (before the onset of freezing weather, where
applicable). If coolant is dirty or rusty in appearance, the
system should be drained, flushed, and refilled with
fresh coolant. Check the front of the A/C condenser/
radiator for any accumulation of bugs, leaves, etc. If dirty,
clean by gently spraying water from a garden hose
vertically down the face of the condenser/radiator.
Check the coolant recovery bottle tubing for brittle rub-
ber, cracking, tears, cuts, and tightness of the connection
at the bottle and radiator. Inspect the entire system for
leaks.
With the engine at normal operating temperature (but
not running), check the cooling system pressure cap for
proper vacuum sealing by draining a small amount of
coolant from the radiator drain cock. If the cap is sealing
properly, the engine coolant (antifreeze) will begin to
MAINTAINING YOUR VEHICLE 219
7