child lock DODGE VIPER 2008 ZB II / 2.G Owners Manual
[x] Cancel search | Manufacturer: DODGE, Model Year: 2008, Model line: VIPER, Model: DODGE VIPER 2008 ZB II / 2.GPages: 303, PDF Size: 2.65 MB
Page 11 of 303
mDoor Locks............................23
NManual Door Lock.....................24
NPower Door Locks.....................24
mWindows.............................26
NPower Windows.......................26
NAuto Down Feature....................27
NWind Buffeting........................27
mLiftgate Ð Coupe Models Only..............28
mTrunk Lock And Release Ð Convertible
Models Only...........................29
mTrunk Safety Warning Ð Convertible
Models Only...........................30
NTrunk Emergency Release................30mOccupant Restraints......................31
NLap/Shoulder Belts.....................31
NLap/Shoulder Belt Untwisting Procedure.....35
NEnhanced Seat Belt Reminder System
(BeltAlertt) ..........................36
NAutomatic Locking Mode................37
NSix-Point Belt System - If Equipped.........38
NSeat Belts And Pregnant Women............39
NSeat Belt Extender......................39
NDriver And Passenger Supplemental Restraint
System (SRS) - Airbag...................40
NChild Restraint........................50
10 THINGS TO KNOW BEFORE STARTING YOUR VEHICLE
Page 24 of 303
DOOR LOCKS
WARNING!
Do not touch the exhaust pipe sill covers when
entering or exiting your Viper. They can be hot
enough to burn you. Observe the warning labels on
each door closure panel.
WARNING!
²For personal security and safety in the event of an
accident, lock the vehicle doors as you drive as
well as when you park and leave the vehicle.
²When leaving the vehicle always remove the key
from the ignition lock, and lock your vehicle.
Unsupervised use of vehicle equipment may cause
severe personal injuries and death.
²Never leave children alone in a vehicle. Leaving
children in a vehicle unattended is dangerous for a
number of reasons. A child or others could be
injured seriously or fatally. Don't leave the keys in
the ignition. A child could operate power win-
dows, other controls, or move the vehicle.
THINGS TO KNOW BEFORE STARTING YOUR VEHICLE 23
2
Page 38 of 303
NOTE:Watch for the Seat Belt Reminder light to turn on
while unbuckling the seat belt and turn off while re-
buckling the seat belt. It may be necessary to retract the
seat belt.
6. Turn the ignition switch to the OFF/LOCK position. A
single chime will sound to signify that you have com-
pleted the programming successfully.
The Enhanced Warning System (BeltAlertt) can be reac-
tivated by repeating this procedure.
NOTE:When the Enhanced Warning System
(BeltAlertt) is deactivated, the Seat Belt Reminder light
will continue to illuminate as long as the driver's seat belt
or the passenger's seat belt is unbuckled.Automatic Locking Mode
The seat belts for both occupants are equipped with
emergency locking retractors for normal use. Emergency
locking retractors activate during very sudden stops or
impacts. The passenger seat belt in your vehicle can also
be converted to an automatic locking retractor to secure
child restraint systems. Seat belts equipped with auto-
matic locking retractors have a distinctive label on the
webbing.
How To Engage The Automatic Locking Mode
To convert the passenger seat belt from emergency lock-
ing mode to automatic locking mode, grasp the shoulder
portion of the belt and pull all of the webbing out of the
retractor. Then, allow some of the webbing to retract back
into the retractor. As the belt retracts, you will hear a
clicking sound indicating that the belt is now in auto-
matic locking mode.
THINGS TO KNOW BEFORE STARTING YOUR VEHICLE 37
2
Page 39 of 303
NOTE:Once the belt is in automatic locking mode, you
will not be able to pull any more of the webbing out of
the retractor. In this mode, you will only be able to retract
excess webbing into the retractor to secure the child
restraint.
How To Disengage The Automatic Locking Mode
Simply allow all of the webbing to retract back into the
retractor to disengage the automatic locking mode. This
will return the retractor to the emergency locking mode
for normal use.
Six-Point Belt System - If equipped
This six-point belt system meets SCCA standards and it
should only be used when engaging in performance
related driving events. In turn, the standard lap/
shoulder belt should be used whenever the vehicle is
operated on the street.
Six-Point Belt Operating Instructions
1. Place the anti-submarining belt on the seat so that it
points upward.
2. Buckle the left and right lap belts and strap both legs.
3. Buckle the left and right shoulder belts.
4. Adjust the belts by pulling on the web ends and/or
repositioning the web clips and straps as required.
5. To release the belts, turn the belt latch mechanism
1¤4
turn in either the clockwise or the counter-clockwise
direction.
NOTE:The anti-submarining belt and the shoulder belt
are attached to eye bolts at designated locations and they
should be removed from the vehicle when not in use. The
lap belts and straps can be stored behind or to the side of
the seat after removal.
38 THINGS TO KNOW BEFORE STARTING YOUR VEHICLE
Page 56 of 303
7. Return the seatback to an upright position.
8. Install the child restraint according to the manufactur-
er's directions.
9. Remove slack from the tether strap according to the
child restraint manufacturer's directions.
WARNING!
An incorrectly anchored tether strap could lead to
increased head motion and possible injury to the
child. Use only the anchor position directly behind
the child seat to secure a child restraint top tether
strap.Installing Child Restraints Using the Vehicle Seat belt
The passenger seat belt is equipped with an automatic
locking retractor for child restraint system installation. It
is designed to keep the lap portion of the restraint held
tightly to the passenger seat. Seat belts equipped with
automatic locking retractors have a distinctive label on
the webbing. (Refer to ªAutomatic Locking Modeº in this
section for additional information).
To restrain the child seat:
1. Pull enough webbing from the retractor to allow the
belt to pass through the child restraint and insert the latch
plate into the buckle until you hear a ªclick.º
2. Grasp the shoulder portion of the belt and pull all of
the webbing out of the retractor.
3. Allow some of the webbing to retract back into the
retractor. As the belt retracts, you will hear a clicking
sound indicating that the belt is now in automatic locking
mode.
THINGS TO KNOW BEFORE STARTING YOUR VEHICLE 55
2
Page 57 of 303
4. Tighten the lap portion of the belt and allow the excess
webbing to retract back to the retractor. If it still does not
make the child restraint secure, then secure the child
restraint with the Child Restraint Tether Anchor.
NOTE:Once the belt is in automatic locking mode, you
will not be able to pull any more of the webbing out of
the retractor. In this mode, you will only be able to retract
excess webbing into the retractor to secure the child
restraint.
Transporting Pets
Deploying airbags could harm your pet. An unrestrained
pet will be thrown about and possibly injured, or injure a
passenger during panic braking or in a collision.
Pets should be restrained in pet harnesses or pet carriers
that are secured by seat belts.
BREAK-IN RECOMMENDATIONS
A long break-in period is not required for the drivetrain
(engine, transmission, and rear axle) in your new vehicle.
Following these few simple guidelines is all that is
necessary for a good break-in:
For the first 500 miles (800 km):
²Keep your vehicle speed below the legal, posted speed
limit and your engine speed below 4,000 rpm.
²Avoid driving at a constant speed, either fast or slow,
for long periods.
²Do not make any full throttle starts and avoid full
throttle acceleration.
²Use the proper gear for your speed range.
²Wait until the engine has reached normal operating
temperature before driving at the recommended maxi-
mum break-in speed.
56 THINGS TO KNOW BEFORE STARTING YOUR VEHICLE
Page 144 of 303
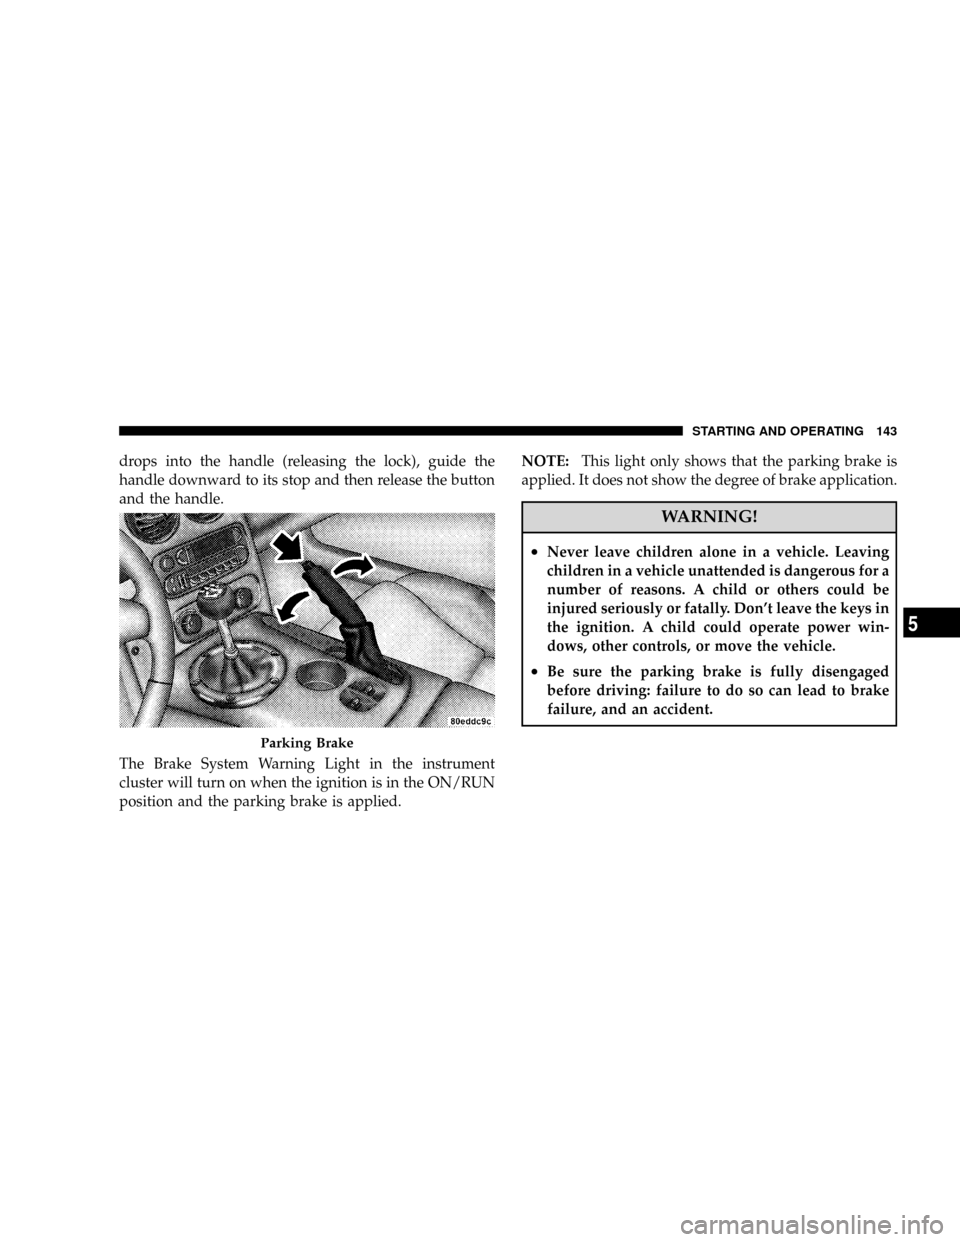
drops into the handle (releasing the lock), guide the
handle downward to its stop and then release the button
and the handle.
The Brake System Warning Light in the instrument
cluster will turn on when the ignition is in the ON/RUN
position and the parking brake is applied.NOTE:This light only shows that the parking brake is
applied. It does not show the degree of brake application.
WARNING!
²Never leave children alone in a vehicle. Leaving
children in a vehicle unattended is dangerous for a
number of reasons. A child or others could be
injured seriously or fatally. Don't leave the keys in
the ignition. A child could operate power win-
dows, other controls, or move the vehicle.
²Be sure the parking brake is fully disengaged
before driving: failure to do so can lead to brake
failure, and an accident.
Parking Brake
STARTING AND OPERATING 143
5
Page 289 of 303
Carpeting............................. 233
Catalytic Converter...................... 204
CD (Compact Disc) Changer................ 114
CD (Compact Disc) Player...............108,112
Chains, Tire............................ 164
Charging System Light.................... 106
Chart, Tire Sizing........................ 150
Check Engine Light
(Malfunction Indicator Light)............... 196
Checks, Safety........................... 57
Child Restraint....................50,51,52,55
Child Restraint Tether Anchors............... 53
Circuit Breakers......................... 234
Clean Air Gasoline....................... 168
Climate Control......................... 122
Clock................................ 106
Clutch Fluid........................... 228
Compact Disc (CD) Maintenance............. 122
Console............................... 92Console, Floor........................... 92
Contract, Service........................ 279
Converter, Catalytic...................... 204
Convertible............................. 63
Convertible Boot.......................67,72
Convertible Top.......................63,232
Convertible Top Maintenance............... 232
Coolant Pressure Cap (Radiator Cap).......... 221
Cooling System......................... 219
Adding Coolant (Antifreeze).............. 221
Coolant Capacity...................... 251
Coolant Level......................219,222
Disposal of Used Coolant................ 222
Drain, Flush, and Refill.................. 220
Inspection........................... 222
Points to Remember.................... 223
Pressure Cap......................... 221
Radiator Cap......................... 221
Rubber and Plastic Components............ 224
288 INDEX