lock DODGE VIPER 2010 ZB II / 2.G Owner's Manual
[x] Cancel search | Manufacturer: DODGE, Model Year: 2010, Model line: VIPER, Model: DODGE VIPER 2010 ZB II / 2.GPages: 80, PDF Size: 8.08 MB
Page 53 of 80
TIREFIT TIRE REPAIR
WARNING!
• Do not attempt to seal a tire on the side of the vehicle close to moving traffic. Pullfar enough off the road to avoid the danger of being hit while using the TIREFIT kit.
• Replace (or repair) the original tire at the first opportunity and reinstall it on your vehicle. Failure to do so could result in loss of vehicle control.
• A loose TIREFIT kit thrown forward in an accident or hard stop, could endanger the occupants of the vehicle. Always stow the TIREFIT kit in the place provided.
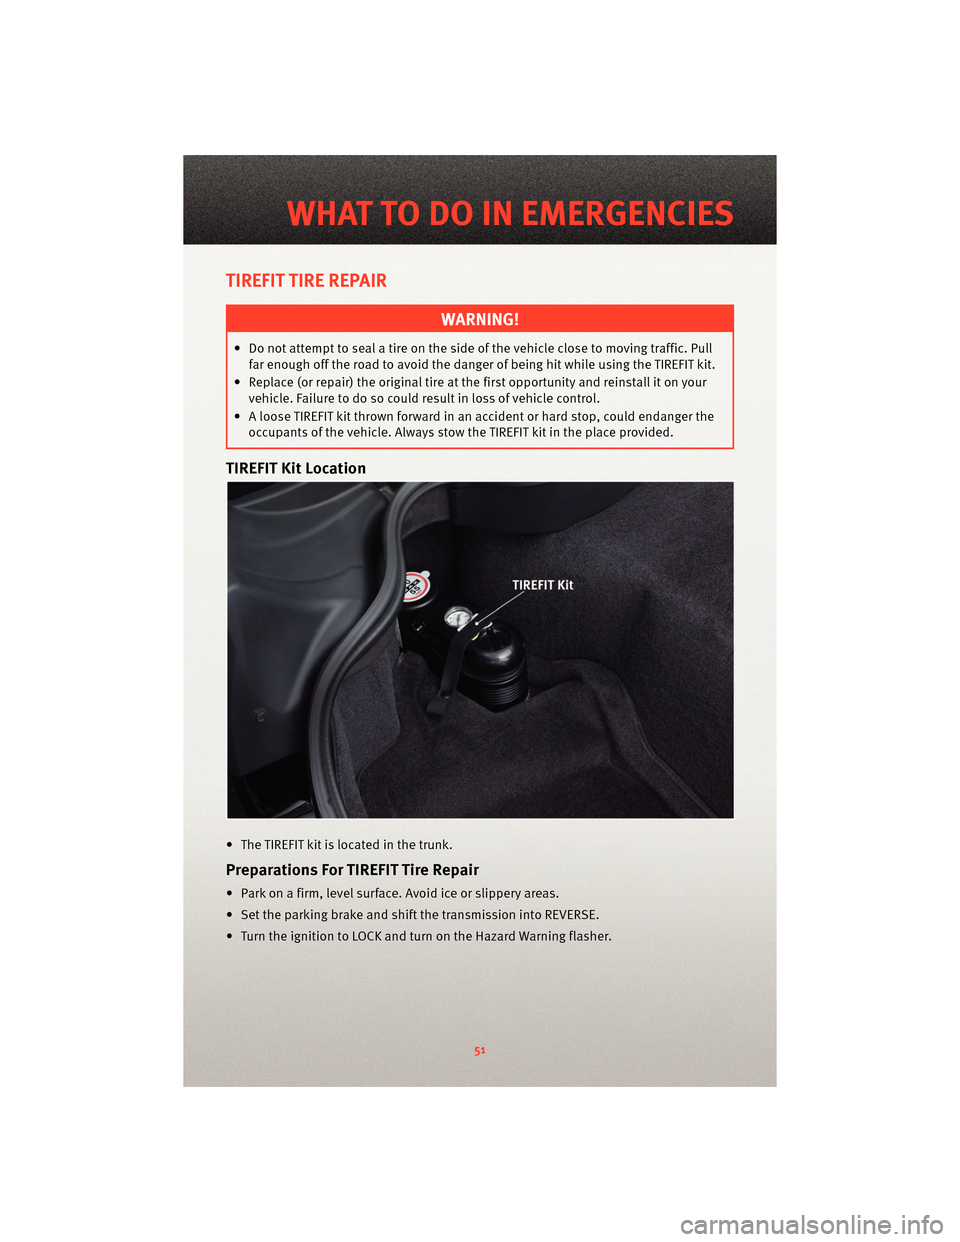
TIREFIT Kit Location
• The TIREFIT kit is located in the trunk.
Preparations For TIREFIT Tire Repair
• Park on a firm, level surface. Avoid ice or slippery areas.
• Set the parking brake and shif t the transmission into REVERSE.
• Turn the ignition to LOCK and turn on the Hazard Warning flasher.
51
WHAT TO DO IN EMERGENCIES
Page 57 of 80
WARNING!
• Take care to avoid the radiator cooling fan whenever the hood is raised. It can start
anytime the ignition switch is in the ON/RUN position. You can be hurt by the fan.
• Battery fluid is a corrosive acid solution; do not allow battery fluid to contact eyes, skin or clothing. Do not lean over a battery when attaching clamps or allow the
clamps to touch each other. If acid splashes in your eyes or on skin, flush the
contaminated area immediately w ith large quantities of water.
• A battery generates hydrogen gas which is flammable and explosive. Keep flames or sparks away from the battery vent holes. Don’t lean over the battery when
attaching clamps or allow the clamps to touch each other.
• If the vehicle has a discharged battery, booster cables may be used to obtain a start from another vehicle. This type of start can be dangerous if done improperly, so
follow this procedure carefully.
• Do not use a booster battery or any other booster source with an output that exceeds 12-volts (i.e., do not use a 24-volt power source).
• The battery is located underneath an acce ss panel inside the rear compartment on the
left side of the vehicle. A remote batt ery terminal is located in the engine
compartment for jump-starting.
• Remove all metal jewelry, such as watch bands or bracelets, which might make an unintended electrical contact.
WARNING!
Do not permit vehicles to touch each other as this could establish a ground
connection and personal injury could result.
• Park the booster vehicle within cable reach but without letting the vehicles touch. Set the parking brake on both vehicles, shif t the transmissioninto NEUTRAL, and turn the
ignition to LOCK.
• Turn off the heater, radio, and all unnecessary electrical loads.
• Remove the plastic cover from the remote jump-start positive post (+) in the engine compartment.
If You Are Jump-Starting Your Vehicle:
• Connect one end of a jumper cable to the positive (+) terminal on the boosterbattery. Connect the other end of the same cable to the remote jump-start positive
post (+).
• Connect the other cable to the negative terminal on the booster battery. Connect the other end of the same cable to the ear of the thermostat housing on the engine
in your vehicle. Make sure you have a good contact.
55
WHAT TO DO IN EMERGENCIES
Page 61 of 80
OPENING THE HOOD
• Reach into the lower right grille opening and pull the primary hood latch forward.
• Raise the front of the hood slightly and push the safety catch handle to the right. Thesafety catch handle is located under the front edge of the hood.
• Assist props will ra ise the hood to a normal usage p osition. If greater access is
required, the hood may be pushed up at the front, raising the hood beyond the initial
opening height.
• To close, lower the hood until it is open ap proximately 6 in (15 cm) and then drop it.
This should secure both latches.
WARNING!
Be sure the hood is fully latched before driving your vehicle. If the hood is not fully
latched, it could open when the vehicle is in motion and block your vision. Failure to
follow this warning could result in serious injury or death.
59
MAINTAINING YOUR VEHICLE
Page 66 of 80
FUSES
Power Distribution Center (PDC)
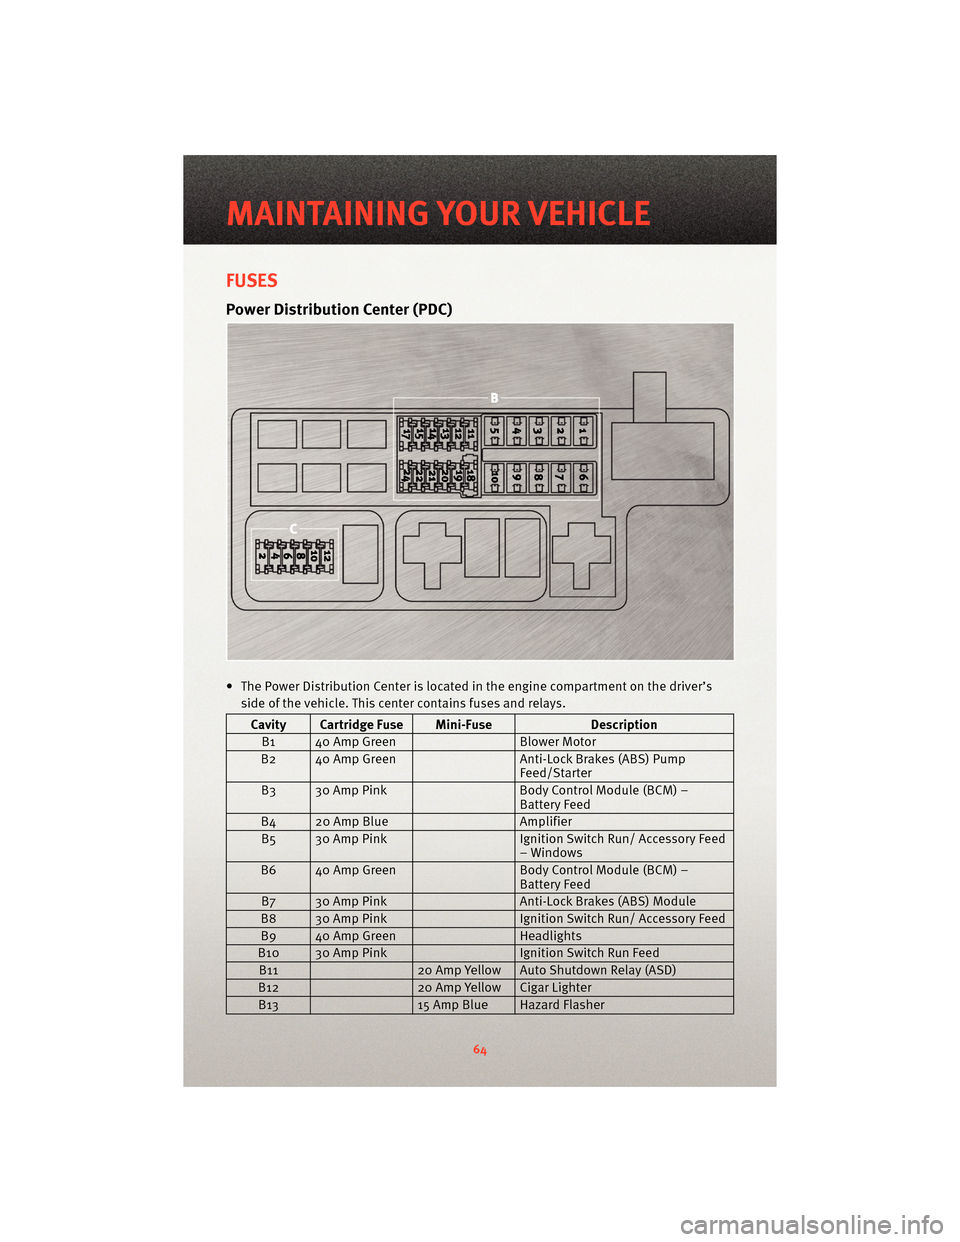
• The Power Distribution Center is located in the engine compartment on the driver’s
side of the vehicle. This center contains fuses and relays.
Cavity Cartridge Fuse Mini-Fuse Description
B1 40 Amp Green Blower Motor
B2 40 Amp Green Anti-Lock Brakes (ABS) Pump
Feed/Starter
B3 30 Amp Pink Body Control Module (BCM) –
Battery Feed
B4 20 Amp Blue Amplifier
B5 30 Amp Pink Ignition Switch Run/ Accessory Feed
– Windows
B6 40 Amp Green Body Control Module (BCM) –
Battery Feed
B7 30 Amp Pink Anti-Lock Brakes (ABS) Module
B8 30 Amp Pink Ignition Switch Run/ Accessory Feed
B9 40 Amp Green Headlights
B10 30 Amp Pink Ignition Switch Run Feed
B11 20 Amp Yellow Auto Shutdown Relay (ASD)
B12 20 Amp Yellow Cigar Lighter
B13 15 Amp Blue Hazard Flasher
MAINTAINING YOUR VEHICLE
64
Page 69 of 80
VEHICLE STORAGE
We recommend that you follow these guidelines for storing your vehicle for extended
periods.
• Fill the fuel tank. This will prevent water condensation inside the tank. If you plan to store your vehicle more than two months, add an anti-oxidant fuel stabilizer to the
fuel tank.
• Change the oil to remove any corrosive combustion related acids in the crankcase.
• Check that the radiator coolant level of protection is to at least -20°F (-29°C).
• Make sure that all tires are inflated to the optimum pressure.
• Wash and wax the vehicle to protect the finish.
• Store the vehicle in a dry, well-ventilated location.
• Move the wiper blades away from the windshield.
• Block the wheels. Do not apply the parking brake.
• Cut blocks of plywood about the same size of the tires. Cover each block with indoor/outdoor carpeting and place them between the tires and concrete. This will
prevent tire flat spotting.
• For long-term storage, remove the tires and put the vehicle up on blocks. Stack the tires on plywood and cover wit h a tarp to prevent flat spotting.
• If the vehicle will be subjected to freezin g temperatures, either remove the battery and
store it in a dry, well ventilated area or connect a trickle charger (1.5 Amp) with
automatic shutdown / overcharge protection to the battery. However, do not leave the
trickle charger hooked up to the battery without being plugged in to a 110 Volt AC
outlet, as this will result in further drain on the vehicle's battery. If the vehicle is not
going to be driven in the next three weeks, per form the battery recharge procedure in
the Service Manual. Then, either disconnect the b attery at the negative terminal or use
the “Battery Save Feature” to conserve battery power.
NOTE: Disconnecting the battery causes the en gine control system to lose memory of
some “learned” functions. After reconnecting the b attery, the engine may run rough until
the control module “relearns” these functions. Using the Battery Save Feature will
prevent the engine controller from loosing its memory.
CAUTION!
Use care when disconnecting the remote positive cable. It is connected to the battery
and can short out to any metal on the vehicle. Always tape or wrap the exposed cable
end to prevent electrical shorts.
• Check the battery every four to six weeks to ensure that the voltage is above 12.40 Volts. The voltage will drop more rapidly in hot temperatures. If battery voltage
drops below 12.40 Volts, follow the battery r echarge procedure in the Service Manual.
67
MAINTAINING YOUR VEHICLE
Page 75 of 80
MOPAR®ACCESSORIES
• The following highlights just some of the authentic Dodge Accessories by MOPAR®
that have been engineered to customize your Dodge Viper.
• To see the full line of accessories, stop by your dealeror visitMOPAR.com.
WHEELS:
• 18” x 10” polished, five spoke, aluminum front
wheel • 19” x 13” polished, five
spoke, aluminum rear
wheel • Wheel Locks
EXTERIOR:
• Rear accent panels, black paintable • Soft-Top tonneau for
SRT-10 roadster • Convertible vehicle cover
with Viper logo
• Coupe vehicle cover with Viper logo • Front end cover with
stitched Viper logo
INTERIOR:
• Katzkin – leather interior, premium or tuscany
leather • Centerstack/shifter
surrounding, black • Centerstack/shifter
surrounding, carbon fiber
pattern
• Centerstack/shifter surrounding, silver • Door sill guards
ELECTRONICS:
• Ipod
®Interface Kit • Portable Navigation – Garmin®Model 1250• Portable Navigation –
Garmin®Model 1350
• Portable Navigation – Garmin
®Model 1490T • RB1 Navigation Radio
iPod
®is a registered trademark of
Apple, Inc. Garmin®is a registered trademark of
Garmin Ltd. or its subsidiaries.
73
MOPAR ACCESSORIES