light DODGE VIPER 2010 ZB II / 2.G User Guide
[x] Cancel search | Manufacturer: DODGE, Model Year: 2010, Model line: VIPER, Model: DODGE VIPER 2010 ZB II / 2.GPages: 80, PDF Size: 8.08 MB
Page 3 of 80
INTRODUCTION/WELCOME
WELCOME FROM CHRYSLER GROUP
LLC ..................... 2
CONTROLS AT A GLANCE
DRIVER COCKPIT.............. 4
INSTRUMENT CLUSTER ..........6
GETTING STARTED
KEYFOB...................8
MANUAL DOOR LOCK........... 9
THEFT ALARM ................ 9
ENGINE START BUTTON ..........10
SEATBELT .................11
CHILD RESTRAINTS .............11
FRONTSEATS................13
TILT STEERING COLUMN ..........14
ADJUSTABLEPEDALS ...........15
PROGRAMMABLEFEATURES .......16
OPERATING YOUR VEHICLE
TURN SIGNAL/LIGHTS LEVER .......17
WIPER/WASHER LEVER ..........18
MANUAL TRANSMISS ION 1 TO 4 SKIP
SHIFT ....................18
MANUAL CLIMATE CONTROLS .......19
CONVERTIBLE TOP OPERATION ..... 20
WIND BUFFETING ..............21
ELECTRONICS
NON-TOUCH-SCREENRADIO....... 22
NON-TOUCH-SCREENRADIO....... 24
POWER OUTLET..............27
PERFORMANCE/ACR
OVERVIEW ................ 28
AERODYNAMICS............. 29
TWO PIECE BRAKE ROTORS ........34
PILOTSPORTCUPTIRES......... 36
ADJUSTABLE DAMPERS ..........37
HARDCOREPACKAGE ...........43 TUNINGRECORD ..............44
LIMITED WARRANTY
............45
ACKNOWLEDGEMENT .......... 46
WHAT TO DO IN EMERGENCIES
24-HOUR TOWINGASSISTANCE -
U.S. ONLY .................47
INSTRUMENT CLUSTER WARNING
LIGHTS ...................47
IF YOUR ENGINE OVERHEATS .......50
TIREFIT TIRE REPAIR ............51
JUMP-STARTING ..............54
TOWINGADISABLEDVEHICLE.......56
FREEING A STUCK VEHICLE ........57
EVENT DATA RECORDER (EDR) ......58
MAINTAINING YOUR VEHICLE
OPENING THE HOOD............59
ENGINE COMPARTMENT ......... 60
FLUIDS AND CAPACITIES ..........61
MAINTENANCE CHART B ......... 62
FUSES................... 64
TIREPRESSURES..............65
WHEEL AND WHEEL TRIM CARE ..... 66
EXTERIOR BULBS ............. 66
VEHICLESTORAGE .............67
CONSUMER ASSISTANCE
CHRYSLER GROUP LLC CUSTOMER
CENTER.................. 69
CHRYSLER CANADA INC. CUSTOMER
CENTER.................. 69
ASSISTANCE F OR THE HEARING
IMPAIRED................. 69
PUBLICATIONS ORDERING ........ 69
REPORTING SAFETY DEFECTS IN
THE 50 UNITED STATES AND
WASHINGTON, D.C. ............70
TIRE WARRANTY ..............70
MOPAR ACCESSORIES
MOPAR®ACCESSORIES..........73
TABLE OF CONTENTS
Page 8 of 80
INSTRUMENT CLUSTER
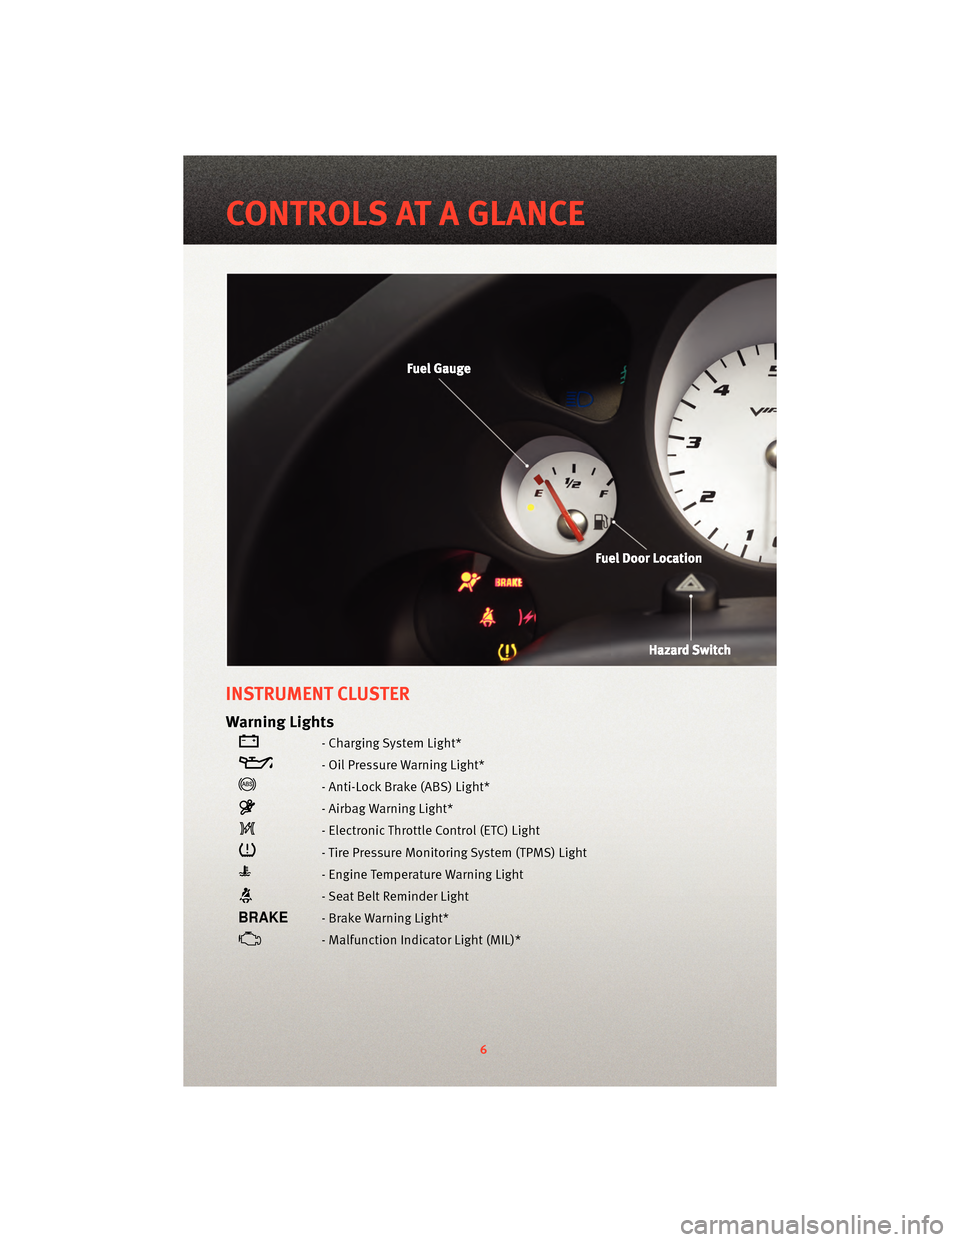
Warning Lights
- Charging System Light*
- Oil Pressure Warning Light*
- Anti-Lock Brake (ABS) Light*
- Airbag Warning Light*
- Electronic Throttle Control (ETC) Light
- Tire Pressure Monitoring System (TPMS) Light
- Engine Temperature Warning Light
- Seat Belt Reminder Light
- Brake Warning Light*
- Malfunction Indicator Light (MIL)*
6
CONTROLS AT A GLANCE
Page 9 of 80
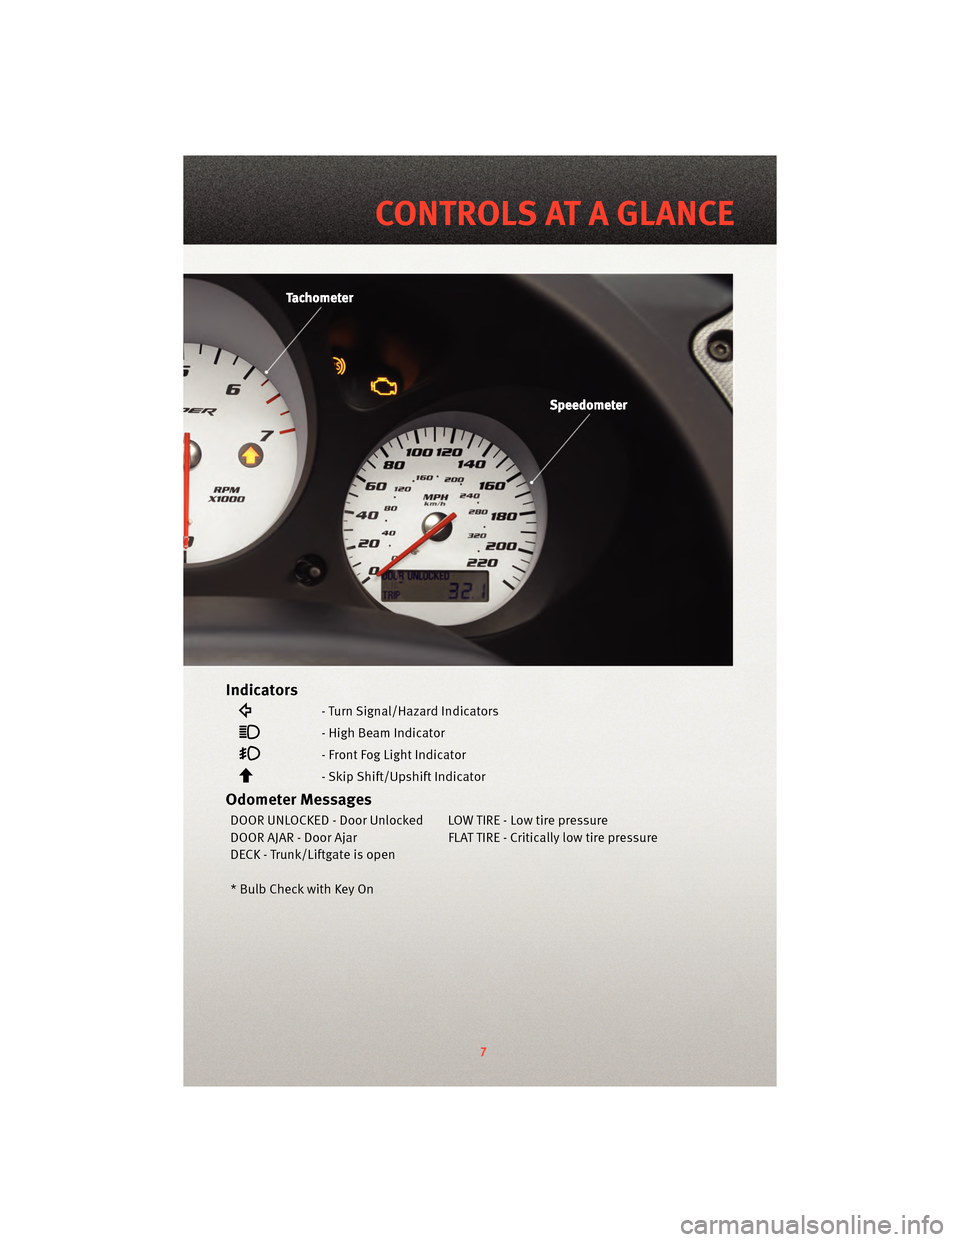
Indicators
- Turn Signal/Hazard Indicators
- High Beam Indicator
- Front Fog Light Indicator
- Skip Shift/Upshift Indicator
Odometer Messages
DOOR UNLOCKED - Door Unlocked LOW TIRE - Low tire pressure
DOOR AJAR - Door Ajar FLAT TIRE - Critically low tire pressure
DECK - Trunk/Liftgate is open
* Bulb Check with Key On
7
CONTROLS AT A GLANCE
Page 11 of 80
MANUAL DOOR LOCK
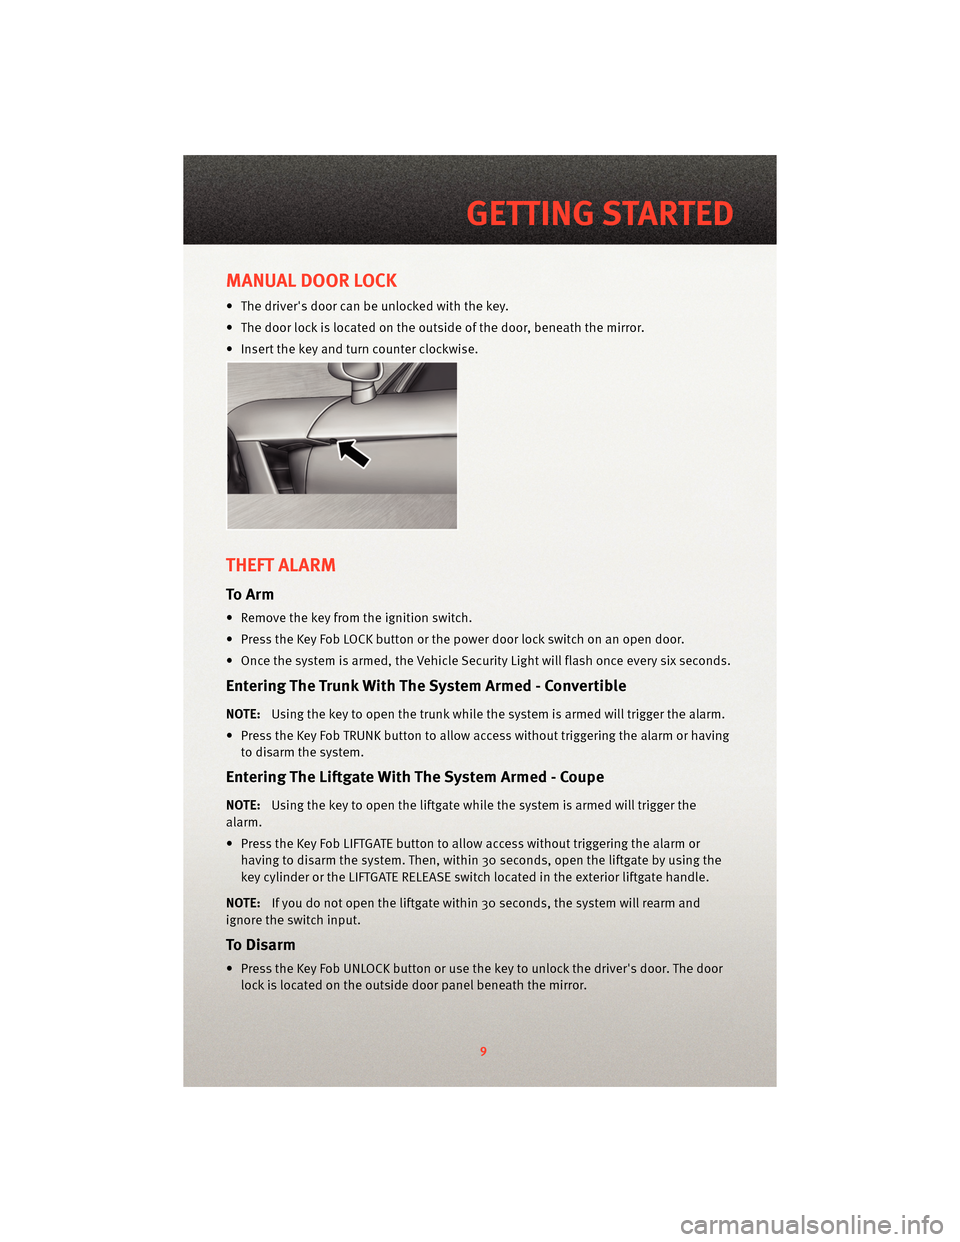
• The driver's door can be unlocked with the key.
• The door lock is located on the outside of the door, beneath the mirror.
• Insert the key and turn counter clockwise.
THEFT ALARM
To Arm
• Remove the key from the ignition switch.
• Press the Key Fob LOCK button or the power door lock switch on an open door.
• Once the system is armed, the Vehicle Security Light will flash once every six seconds.
Entering The Trunk With The System Armed - Convertible
NOTE:Using the key to open the trunk while the system is armed will trigger the alarm.
• Press the Key Fob TRUNK button to allow access without triggering the alarm or having to disarm the system.
Entering The Liftgate With The System Armed - Coupe
NOTE: Using the key to open the liftgate while the system is armed will trigger the
alarm.
• Press the Key Fob LIFTGATE button to allow access without triggering the alarm or having to disarm the system. Then, within 30 seconds, open the liftgate by using the
key cylinder or the LIFTGATE RELEASE switch located in the exterior liftgate handle.
NOTE: If you do not open the liftgate within 30 seconds, the system will rearm and
ignore the switch input.
To Disarm
• Press the Key Fob UNLOCK button or use the key to unlock the driver's door. The door lock is located on the outside door panel beneath the mirror.
9
GETTING STARTED
Page 12 of 80
Electronic Immobilization System - Canada Only
• The Electronic Immobilization system prevents unauthorized vehicle operation bydisabling the engine.
• Operation is automatic, regardless of whether the vehicle is locked or unlocked.
• The system will passi vely arm 30 seconds after the key is removed from the vehicle.
• When the system is armed the Vehicle Security Light will flash at a rate of a half-second ON, a half-second OFF, a half-second ON, followed by a 10–second pause
and the vehicle will not start.
• Pressing the Key Fob UNLOCK button will allow the driver 60 seconds to start the
vehicle. Failure to complete the process within 60 seconds will cause the system to
passively re-arm. The driver must repeat the pr ocess again by pressingthe UNLOCK
button on the Key Fob to start the vehicle.
NOTE: Pressing the Key Fob UNLOCK button during the 30 second Electronic
Immobilization arming process will allow the driver 60 seconds to start the vehicle.
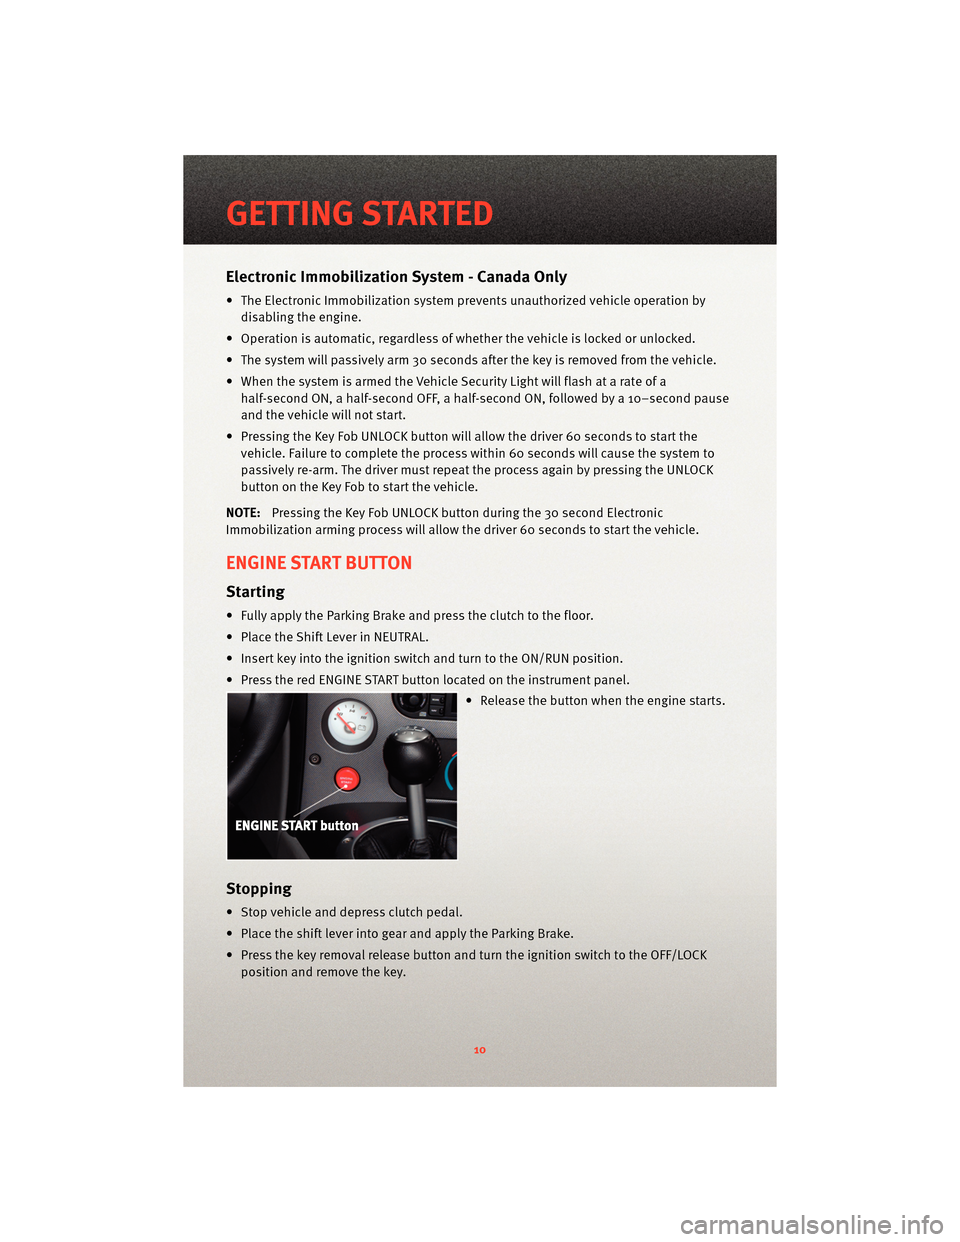
ENGINE START BUTTON
Starting
• Fully apply the Parking Brake and press the clutch to the floor.
• Place the Shift Lever in NEUTRAL.
• Insert key into the ignition switch and turn to the ON/RUN position.
• Press the red ENGINE START button located on the instrument panel.
• Release the button when the engine starts.
Stopping
• Stop vehicle and depress clutch pedal.
• Place the shift lever into gear and apply the Parking Brake.
• Press the key removal release button and turn the ignition switch to the OFF/LOCKposition and remove the key.
GETTING STARTED
10
Page 18 of 80
PROGRAMMABLE FEATURES
• The following features may be programmed using the Key Fob transmitter.
NOTE:Pressing the LOCK button while you are inside the vehicle will activate the
Vehicle Security Alarm. Opening a door with the Vehicle Security Alarm activated will
cause the alarm to sound. Press the UNLOCK button to deactivate the Vehicle Security
Alarm.
Unlock On First Press
• To unlock either the driver's side, or both doors, on the first press of the UNLOCK button:
• Press and hold the Key Fob UNLOCK button for at least 4 seconds, but no longer than 10 seconds. Then, press and hold the Key Fob LOCK button while still holding
the UNLOCK button.
• Release both buttons at the same time.
Sound Horn With Remote Lock
• To turn the horn chirp on or off when the doors are locked: • Press the Key Fob LOCK button for at least 4 seconds, but no longer than10 seconds. Then, press the Key Fob UNLOCK button while still holding the LOCK
button.
• Release both buttons at the same time.
Flashing Lights With Lock
• The park lights and turn signal lights flashing, when the doors are locked or unlocked, feature can be turned on or off. To turn this feature on or off:
• Press and hold the Key Fob LOCK button for at least 4 seconds, but no longer than 10 seconds. Then, press and hold the TRUNK/LIFTGATE button while still holding the
LOCK button.
• Release both buttons at the same time.
GETTING STARTED
16
Page 19 of 80
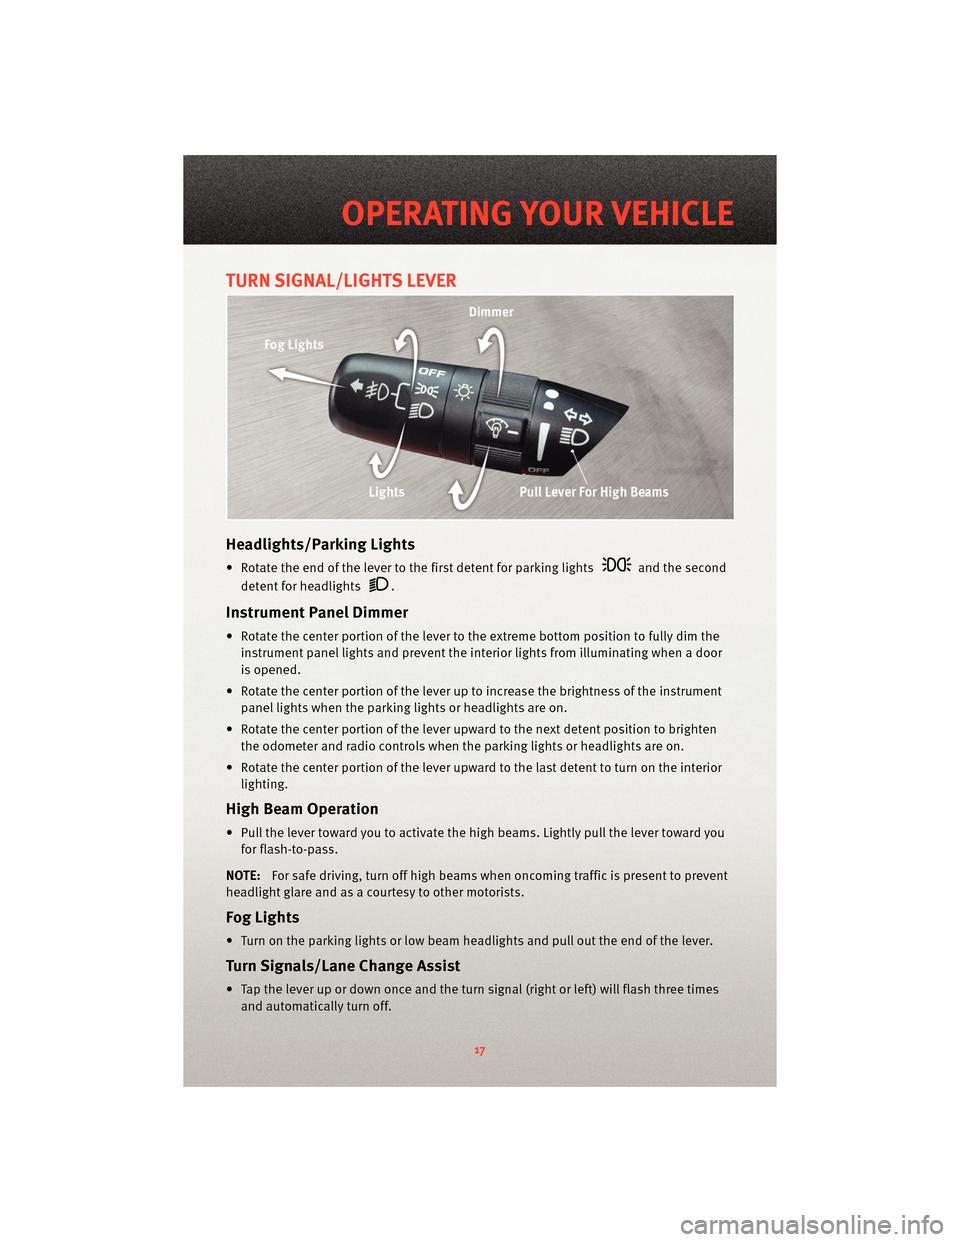
TURN SIGNAL/LIGHTS LEVER
Headlights/Parking Lights
• Rotate the end of the lever to the first detent for parking lightsand the second
detent for headlights
.
Instrument Panel Dimmer
• Rotate the center portion of the lever t o the extreme bottom position to fully dim the
instrument panel lights and prevent the int erior lights from illuminating when a door
is opened.
• Rotate the center portion of the lever up to increase the brightness of the instrument panel lights when the parking lights or headlights are on.
• Rotate the center portion of the lever u pward to the next detent position to brighten
the odometer and radio controls when the parking lights or headlights are on.
• Rotate the center portion of the lever upward to the last detent to turn on the interior lighting.
High Beam Operation
• Pull the lever toward you to activate the high beams. Lightly pull the lever toward youfor flash-to-pass.
NOTE: For safe driving, turn off high beams when oncoming traffic is present to prevent
headlight glare and as a courtesy to other motorists.
Fog Lights
• Turn on the parking lights or low beam headlights and pull out the end of the lever.
Turn Signal s/Lane Change Assist
• Tap the lever up or down once and the turn signal (right or left) will flash three times
and automatically turn off.
17
OPERATING YOUR VEHICLE
Page 20 of 80
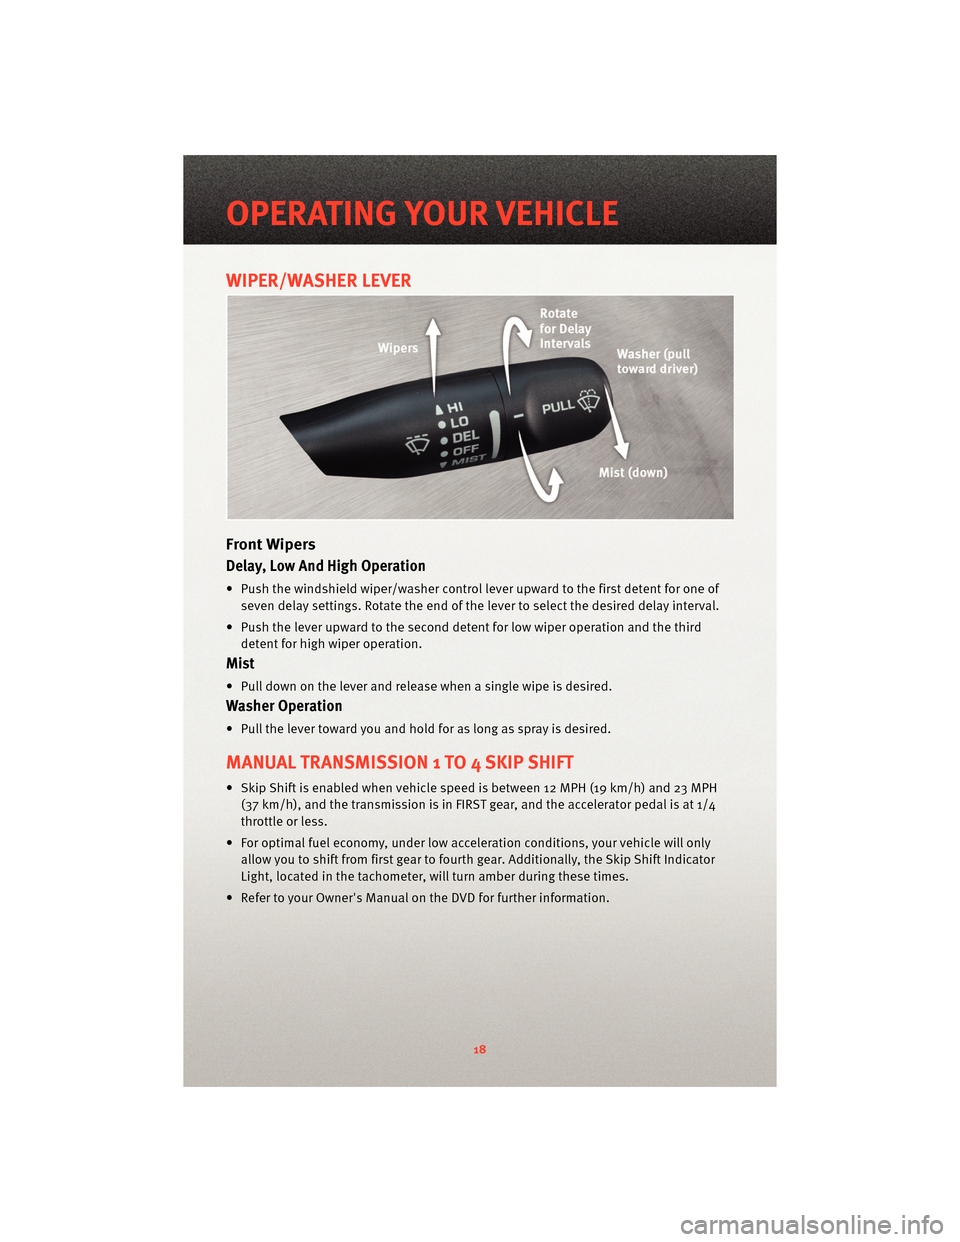
WIPER/WASHER LEVER
Front Wipers
Delay, Low And High Operation
• Push the windshield wiper/washer control lever upward to the first detent for one ofseven delay settings. Rotate the end of the lever to select the desired delay interval.
• Push the lever upward to the second detent for low wiper operation and the third detent for high wiper operation.
Mist
• Pull down on the lever and release when a single wipe is desired.
Washer Operation
• Pull the lever toward you and hold for as long as spray is desired.
MANUAL TRANSMISSION 1 TO 4 SKIP SHIFT
• Skip Shift is enabled when vehicle speed is between 12 MPH (19 km/h) and 23 MPH(37 km/h), and the transm ission is in FIRST gear, and the a ccelerator pedal is at 1/4
throttle or less.
• For optimal fuel economy, under low acceleration conditions, your vehicle will only allow you to shift from first gear to fourth gear. Additionally, the Skip Shift Indicator
Light, located in the tachometer, w ill turn amber during these times.
• Refer to your Owner's Manual on the DVD for further information.
OPERATING YOUR VEHICLE
18
Page 23 of 80
To L o w e r T h e To p
• Lower both windows 1 in (2.5 cm).
• Lower both sun visors.
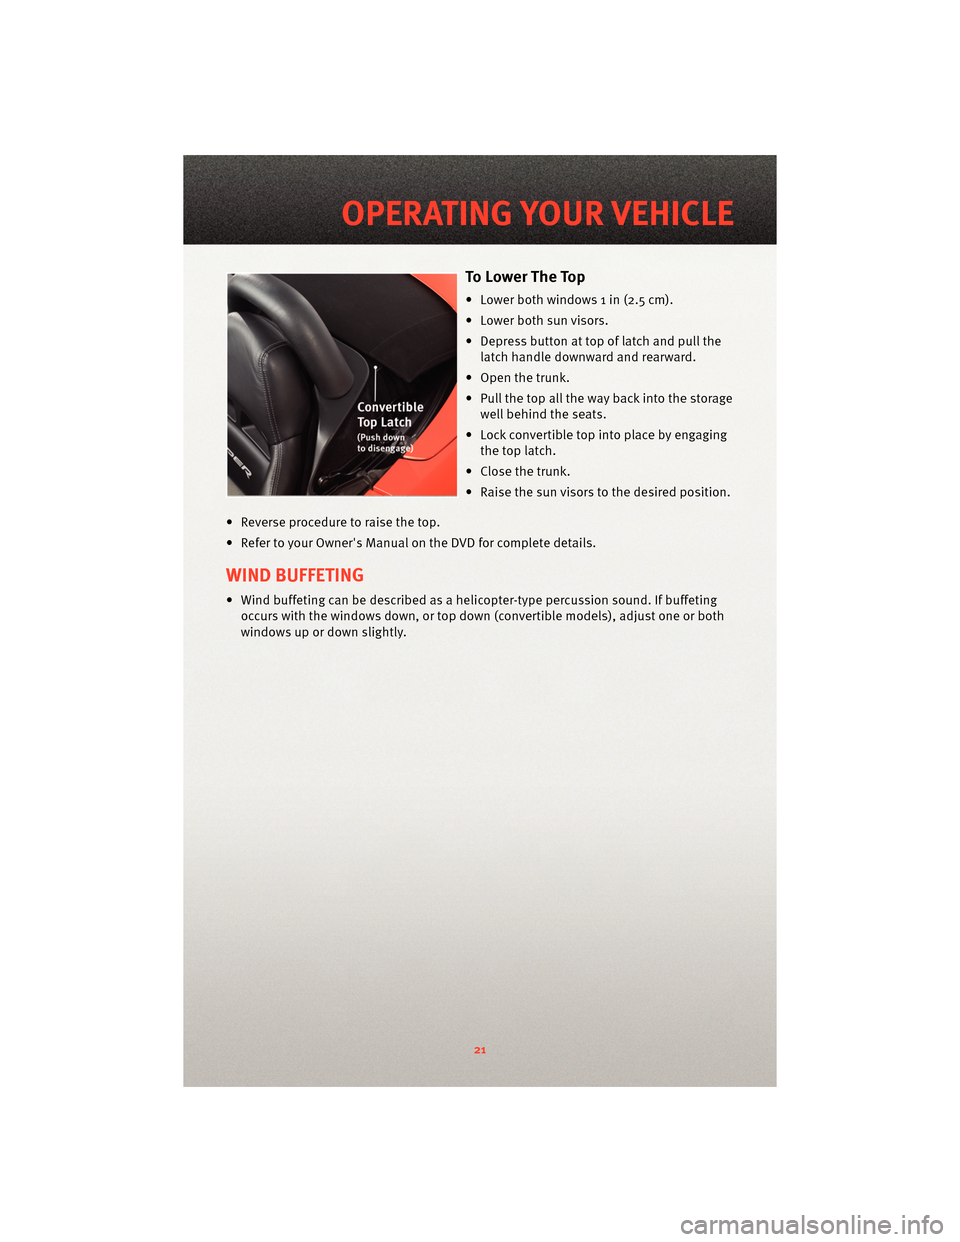
• Depress button at top of latch and pull thelatch handle downward and rearward.
• Open the trunk.
• Pull the top all the way back into the storage well behind the seats.
• Lock convertible top into place by engaging the top latch.
• Close the trunk.
• Raise the sun visors to the desired position.
• Reverse procedure to raise the top.
• Refer to your Owner's Manual on the DVD for complete details.
WIND BUFFETING
• Wind buffeting can be described as a helicopter-type percussion sound. If buffeting occurs with the windows down, or top down (convertible models), adjust one or both
windows up or down slightly.
21
OPERATING YOUR VEHICLE
Page 26 of 80
NON-TOUCH-SCREEN RADIO
Navigation Radio – RB1
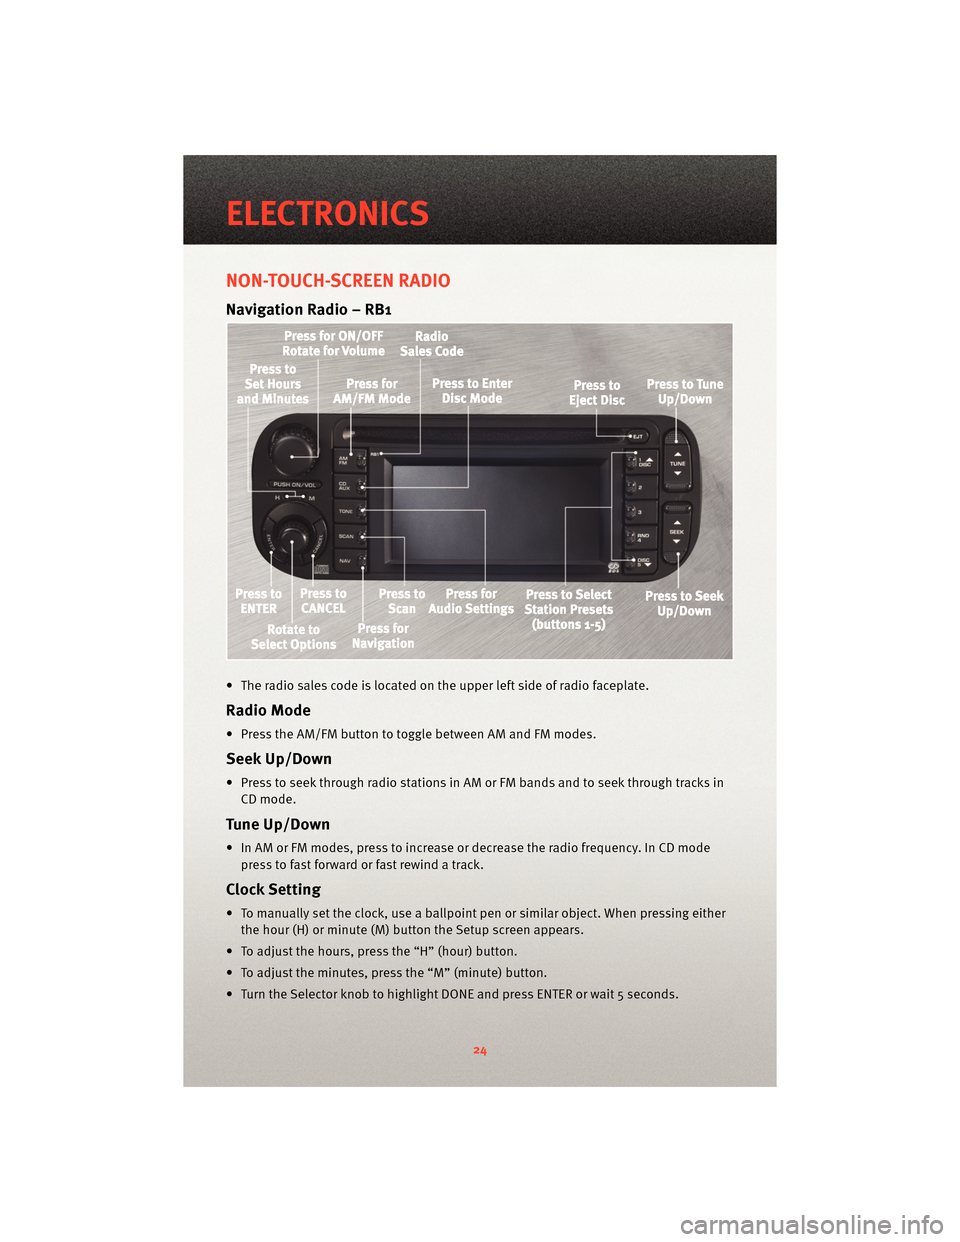
• The radio sales code is located on the upper left side of radio faceplate.
Radio Mode
• Press the AM/FM button to toggle between AM and FM modes.
Seek Up/Down
• Press to seek through radio stations in AM or FM bands and to seek through tracks inCD mode.
Tune Up/Down
• In AM or FM modes, press to increase or decrease the radio frequency. In CD modepress to fast forward or fast rewind a track.
Clock Setting
• To manually set the clock, use a ballpoint pen or similar object. When pressing eitherthe hour (H) or minute (M) button the Setup screen appears.
• To adjust the hours, press the “H” (hour) button.
• To adjust the minutes, press the “M” (minute) button.
• Turn the Selector knob to highlight DONE and press ENTER or wait 5 seconds.
ELECTRONICS
24