wheel DODGE VIPER 2013 VX / 3.G Owner's Manual
[x] Cancel search | Manufacturer: DODGE, Model Year: 2013, Model line: VIPER, Model: DODGE VIPER 2013 VX / 3.GPages: 100, PDF Size: 3.1 MB
Page 69 of 100
PERFORMANCE FEATURES
Electronic Vehicle Information Center (EVIC)
• The EVIC can be used to program thefollowing Performance Features. Press
the UP or DOWN button until Perfor-
mance Features displays, then press the
RIGHT arrow button. Scroll through the
settings using the UP or DOWN buttons.
Press the RIGHT arrow button to change
the setting. Press the Left arrow button to
scroll back to a previous menu or sub
menu.
• 0-60 mph (0-100 km/h) •
Current G-Force
• Braking Distance •
Peak G-Force
• 1/8 Mile •
Digital Speedometer
• 1/4 Mile
SUMMER/THREE-SEASON TIRES
• This vehicle may be equipped with wheels and tires to enhance traction in both wet and
dry conditions.
• Summer tires are not intended to be driven in snow or on ice.
• Use summer tires only in sets of four.
NOTE:
Summer tires will not contain the all season designation or mountain/snowflake symbol on
the sidewall of the tire.
WARNING!
Do not use summer tires in snow/ice conditions. You could lose control, resulting in
severe injury or death.
SRT
67
Page 70 of 100
INSTRUMENT CLUSTER WARNING LIGHTS
- Electronic Stability Control (ESC) Activation/Malfunction Indicator Light
• The “ESC Activation/Malfunction Indicator Light” in the instrument cluster will comeon when the ignition switch is turned to the ON/RUN position. It should go out with the
engine running. If the “ESC Activation/Malfunction Indicator Light” comes on continu-
ously with the engine running, a malfunction has been detected in the ESC system.
• If this light remains on after several ignition cycles, and the vehicle has been driven several miles (kilometers) at speeds greater than 30 mph (48 km/h), we recommend
you drive to the nearest service center and have the vehicle serviced immediately.
- Tire Pressure Monitoring System (TPMS) Light
• Each tire, including the spare (if provided), should be checked monthly, when cold andinflated to the inflation pressure recommended by the vehicle manufacturer on the
vehicle placard or tire inflation pressure label. (If your vehicle has tires of a different
size than the size indicated on the vehicle placard or tire inflation pressure label, you
should determine the proper tire inflation pressure for those tires.)
• As an added safety feature, your vehicle has been equipped with a Tire Pressure Monitoring System (TPMS) that illuminates a low tire pressure telltale when one or
more of your tires is significantly under-inflated. Accordingly, when the low tire pressure
telltale illuminates, you should stop and check your tires as soon as possible, and
inflate them to the proper pressure. Driving on a significantly under-inflated tire causes
the tire to overheat and can lead to tire failure. Under-inflation also reduces fuel
efficiency and tire tread life, and may affect the vehicle’s handling and stopping ability.
• IF THE LIGHT STARTS FLASHING INDICATING A LOW TIRE PRESSURE, ADJUST THE AIR
PRESSURE IN THE LOW TIRE TO THE AIR PRESSURE SHOWN ON THE VEHICLE PLACARD
OR TIRE INFLATION PRESSURE LABEL LOCATED ON THE DRIVER'S DOOR.
NOTE:
AFTER INFLATION, THE VEHICLE MAY NEED TO BE DRIVEN FOR 20 MINUTES BEFORE
THE FLASHING LIGHT WILL TURN OFF.
• Please note that the TPMS is not a substitute for proper tire maintenance, and it is the driver’s responsibility to maintain correct tire pressure, even if under-inflation has not
reached the level to trigger illumination of the TPMS low tire pressure telltale.
• Your vehicle has also been equipped with a TPMS malfunction indicator to indicate when the system is not operating properly. The TPMS malfunction indicator is
combined with the low tire pressure telltale. When the system detects a malfunction,
the telltale will flash for approximately one minute and then remain continuously
illuminated. This sequence will continue each time the vehicle is restarted as long as
the malfunction exists.
• When the malfunction indicator is illuminated, the system may not be able to detect or signal low tire pressure as intended. TPMS malfunctions may occur for a variety of
reasons, including the installation of replacement or alternate tires or wheels on the
vehicle that prevent the TPMS from functioning properly. Always check the TPMS
WHAT TO DO IN EMERGENCIES
68
Page 71 of 100
malfunction telltale after replacing one or more tires or wheels on your vehicle, to
ensure that the replacement or alternate tires and wheels allow the TPMS to continue
to function properly.
NOTE:
Tire pressures change by approximately 1 psi (7 kPa) per 12° F (7° C) of air temperature
change. Keep this in mind when checking tire pressure inside a garage, especially in the
Winter. Example: If garage temperature is 68°F (20°C) and the outside temperature is
32°F (0°C), then the cold tire inflation pressure should be increased by 3 psi (21 kPa),
which equals 1 psi (7 kPa) for every 12°F (7°C) for this outside temperature condition.
CAUTION!
The TPMS has been optimized for the original equipment tires and wheels. TPMS
pressures and warning have been established for the tire size equipped on your vehicle.
Undesirable system operation or sensor damage may result when using replacement
equipment that is not of the same size, type, and/or style. Aftermarket wheels can
cause sensor damage. Do not use tire sealant from a can, or balance beads if your
vehicle is equipped with a TPMS, as damage to the sensors may result.
- Engine Temperature Warning Light
• This light warns of an overheated engine condition.
• If the light turns on or flashes continuously while driving, safely pull over and stop the vehicle. If the A/C system is on, turn it off. Also, shift the transmission into NEUTRAL
and idle the vehicle. If the temperature reading does not return to normal, turn the
engine off immediately.
• We recommend that you do not operate the vehicle or engine damage will occur. Have the vehicle serviced immediately.
WARNING!
A hot engine cooling system is dangerous. You or others could be badly burned by
steam or boiling coolant. You may want to call an authorized dealer for service if your
vehicle overheats.
BRAKE- Brake Warning Light
• The Brake Warning light illuminates when there is either a system malfunction or theparking brake is applied. If the light is on and the parking brake is not applied, it
indicates a possible brake hydraulic malfunction, brake booster problem or an Anti-
Lock Brake System problem.
• Please have your vehicle serviced immediately.
WHAT TO DO IN EMERGENCIES
69
Page 75 of 100
Using The Deflation Button
• Press the Deflation Button (2) to reduce the air pressure in the tire if it becomes over-inflated.
TIREFIT Usage Precautions
• Replace the TIREFIT Sealant Bottle (1) and Sealant Hose (6) prior to the expirationdate (printed on the bottle label) to assure optimum operation of the system. Refer to
“Sealing a Tire with TIREFIT” section (F) “Sealant Bottle and Hose Replacement”.
• The Sealant Bottle (1) and Sealant Hose (6) are a one tire application use. After each use, always replace these components immediately at an authorized dealer.
• When the TIREFIT sealant is in a liquid form, clean water, and a damp cloth will remove the material from the vehicle or tire and wheel components. Once the sealant dries, it
can easily be peeled off and properly discarded.
• For optimum performance, make sure the valve stem on the wheel is free of debris before connecting the TIREFIT kit.
• You can use the TIREFIT air pump to inflate bicycle tires. The kit also comes with two needles, located in the Accessory Storage Compartment (on the bottom of the air
pump) for inflating sport balls, rafts, or similar inflatable items. However, use only the
Air Pump Hose (7) and make sure the Mode Select Knob (5) is in the Air Mode when
inflating such items to avoid injecting sealant into them. The TIREFIT Sealant is only
intended to seal punctures less than 1/4 in (6 mm) diameter in the tread of your
vehicle.
• Do not lift or carry the TIREFIT kit by the hoses.
Sealing A Tire With TIREFIT
(A) Whenever You Stop To Use TIREFIT:
1. Pull over to a safe location and turn on the vehicle’s Hazard Warning flashers.
2. Verify that the valve stem (on the wheel with the deflated tire) is in a position that is near to the ground. This will allow the TIREFIT Hoses (6) and (7) to reach the valve
stem and keep the TIREFIT kit flat on the ground. This will provide the best positioning
of the kit when injecting the sealant into the deflated tire and running the air pump.
Move the vehicle as necessary to place the valve stem in this position before
proceeding.
3. Place the transmission in PARK (auto transmission) or in Gear (manual transmission) and turn Off the ignition.
4. Set the parking brake.
(B) Setting Up To Use TIREFIT:
1. Turn the Mode Select Knob (5) to the Sealant Mode position.
2. Uncoil the Sealant Hose (6) and then remove the cap from the fitting at the end of the hose.
WHAT TO DO IN EMERGENCIES
73
Page 79 of 100
WARNING!
• Do not attempt to seal a tire on the side of the vehicle closest to traffic. Pull farenough off the road to avoid the danger of being hit when using the TIREFIT kit.
• Do not use TIREFIT or drive the vehicle under the following circumstances:
• If the puncture in the tire tread is approximately 1/4 in. (6 mm) or larger.
• If the tire has any sidewall damage.
• If the tire has any damage from driving with extremely low tire pressure.
• If the tire has any damage from driving on a flat tire.
• If the wheel has any damage.
• If you are unsure of the condition of the tire or the wheel.
• Keep TIREFIT away from open flames or heat source.
• A loose TIREFIT kit thrown forward in a collision or hard stop could endanger the
occupants of the vehicle. Always stow the TIREFIT kit in the place provided. Failure
to follow these warnings can result in injuries that are serious or fatal to you, your
passengers, and others around you.
• Take care not to allow the contents of TIREFIT to come in contact with hair, eyes,
or clothing. TIREFIT is harmful if inhaled, swallowed, or absorbed through the skin.
It causes skin, eye, and respiratory irritation. Flush immediately with plenty of water
if there is any contact with eyes or skin. Change clothing as soon as possible, if there
is any contact with clothing.
• TIREFIT Sealant solution contains latex. In case of an allergic reaction or rash,
consult a physician immediately. Keep TIREFIT out of reach of children. If
swallowed, rinse mouth immediately with plenty of water and drink plenty of water.
Do not induce vomiting! Consult a physician immediately.
• TIREFIT is not a permanent flat tire repair. Have the tire inspected and repaired or
replaced after using TIREFIT. Do not exceed 55 mph (88 km/h) until the tire is
repaired or replaced. Failure to follow this warning can result in injuries that are
serious or fatal to you, your passengers, and others around you.
WHAT TO DO IN EMERGENCIES
77
Page 82 of 100
TOWING A DISABLED VEHICLE
Do not tow with sling-type equipment. Only use flatbed equipment. Always comply with
applicable state or local towing ordinances.
CAUTION!
• Failure to follow these towing methods can cause severe transmission damage.Such damage is not covered by the New Vehicle Limited Warranty.
• If the vehicle being towed requires steering, the ignition switch must be in the
ON/RUN position.
• Do not attempt to use sling-type equipment when towing. When securing the
vehicle to a flatbed truck, do not attach to front or rear suspension components.
Damage to your vehicle may result from improper towing.
FREEING A STUCK VEHICLE
• If your vehicle becomes stuck in mud, sand or snow, it can often be moved by a rockingmotion. Turn your steering wheel right and left to clear the area around the front wheels.
Then shift back and forth between 2nd gear and REVERSE. Using minimal accelerator
pedal pressure to maintain the rocking motion, without spinning the wheels, is most
effective.
WARNING!
Fast spinning tires can be dangerous. Forces generated by excessive wheel speeds may
cause tire damage or failure. A tire could explode and injure someone. Do not spin your
vehicle's wheels faster than 30 mph (48 km/h) when you are stuck. Do not let anyone
near a spinning wheel, no matter what the speed.
WHAT TO DO IN EMERGENCIES
80
Page 86 of 100
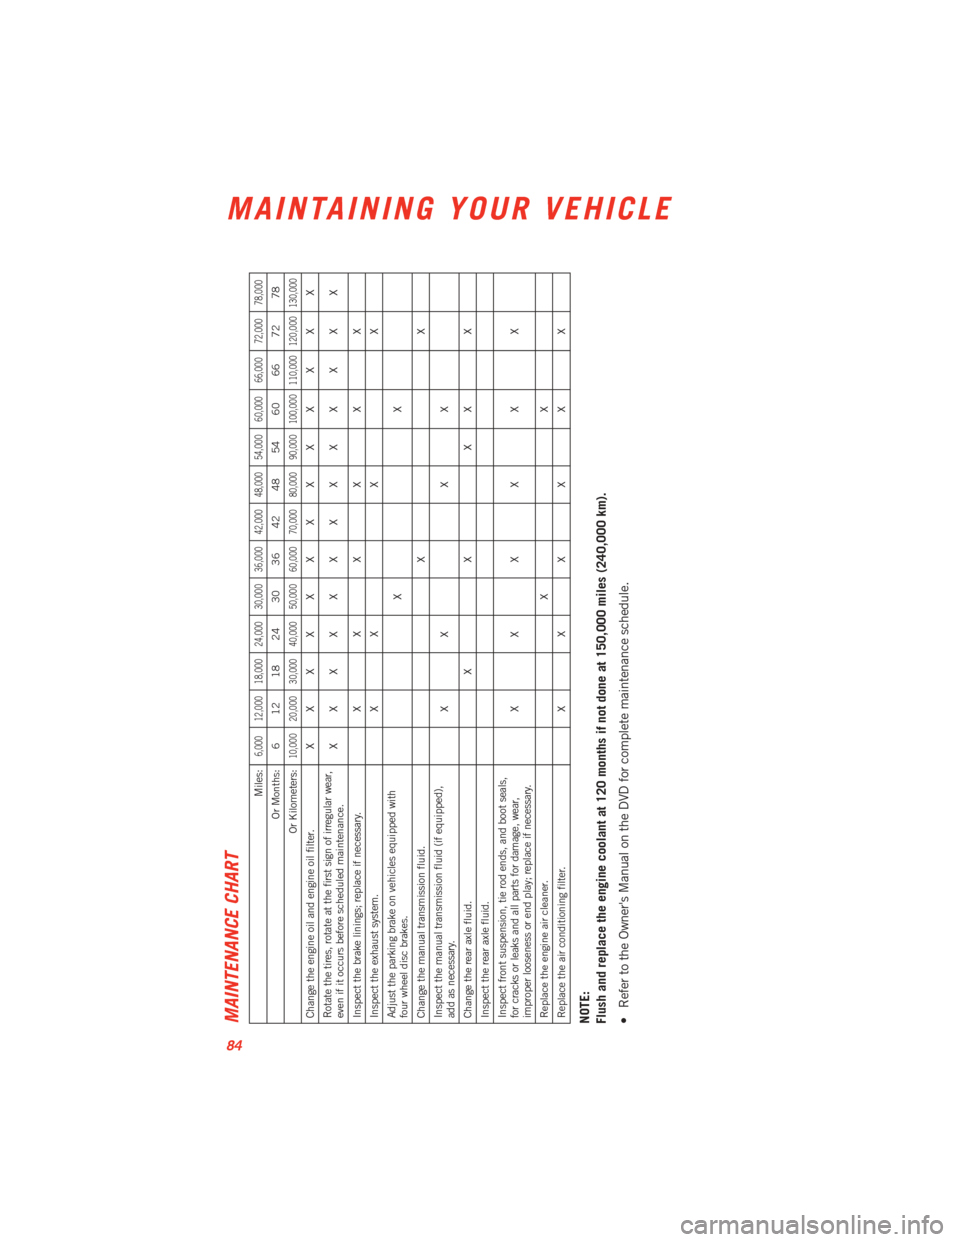
MAINTENANCE CHART
Miles:
6,000 12,000 18,000 24,000 30,000 36,000 42,000 48,000 54,000 60,000 66,000 72,000 78,000
Or Months: 6 12 18 24 30 36 42 48 54 60 66 72 78
Or Kilometers:
10,000 20,000 30,000 40,000 50,000 60,000 70,000 80,000 90,000 100,000 110,000 120,000 130,000
Change the engine oil and engine oil filter. XXXXXXXXX X X X X
Rotate the tires, rotate at the first sign of irregular wear,
even if it occurs before scheduled maintenance. XXXXXXXXX X X X X
Inspect the brake linings; replace if necessary. X X X X X X
Inspect the exhaust system. X X X X
Adjust the parking brake on vehicles equipped with
four wheel disc brakes. XX
Change the manual transmission fluid. X X
Inspect the manual transmission fluid (if equipped),
add as necessary. XX X X
Change the rear axle fluid. X X X X X
Inspect the rear axle fluid.
Inspect front suspension, tie rod ends, and boot seals,
for cracks or leaks and all parts for damage, wear,
improper looseness or end play; replace if necessary. XXXX X X
Replace the engine air cleaner. X X
Replace the air conditioning filter. X X X X X XNOTE:
Flush and replace the engine coolant at 120 months if not done at 150,000 miles (240,000 km).
• Refer to the Owner's Manual on the DVD for complete maintenance schedule.
MAINTAINING YOUR VEHICLE
84
Page 92 of 100
WHEEL AND WHEEL TRIM CARE
• All wheels and wheel trim, especially aluminum and chrome plated wheels, should becleaned regularly with a mild soap and water to prevent corrosion.
• To remove heavy soil and/or excessive brake dust, use MOPAR
®Wheel Cleaner or
equivalent or select a non-abrasive, non-acidic cleaner.
CAUTION!
Do not use scouring pads, steel wool, a bristle brush, or metal polishes. Do not use oven
cleaner. These products may damage the wheel's protective finish. Avoid automatic car
washes that use acidic solutions or harsh brushes that may damage the wheel's
protective finish. Only MOPAR
®Wheel Cleaner or equivalent is recommended.
EXTERIOR BULBS
LIGHT BULBS – Exterior Bulb Number
Low/High Beam Headlamp LED (Serviced at Authorized Dealer)
Front Park/Turn Signal Lamp LED (Serviced at Authorized Dealer)
Front Side Marker Lamp 2886X
Center High-Mounted Stop Lamp (CHMSL) LED (Serviced at Authorized Dealer)
Tail/Stop/Turn Signal Lamp LED (Serviced at Authorized Dealer)
Rear Marker Lamp 194
Backup Lamp 3157
License Lamp LED (Serviced at Authorized Dealer)
MAINTAINING YOUR VEHICLE
90
Page 95 of 100
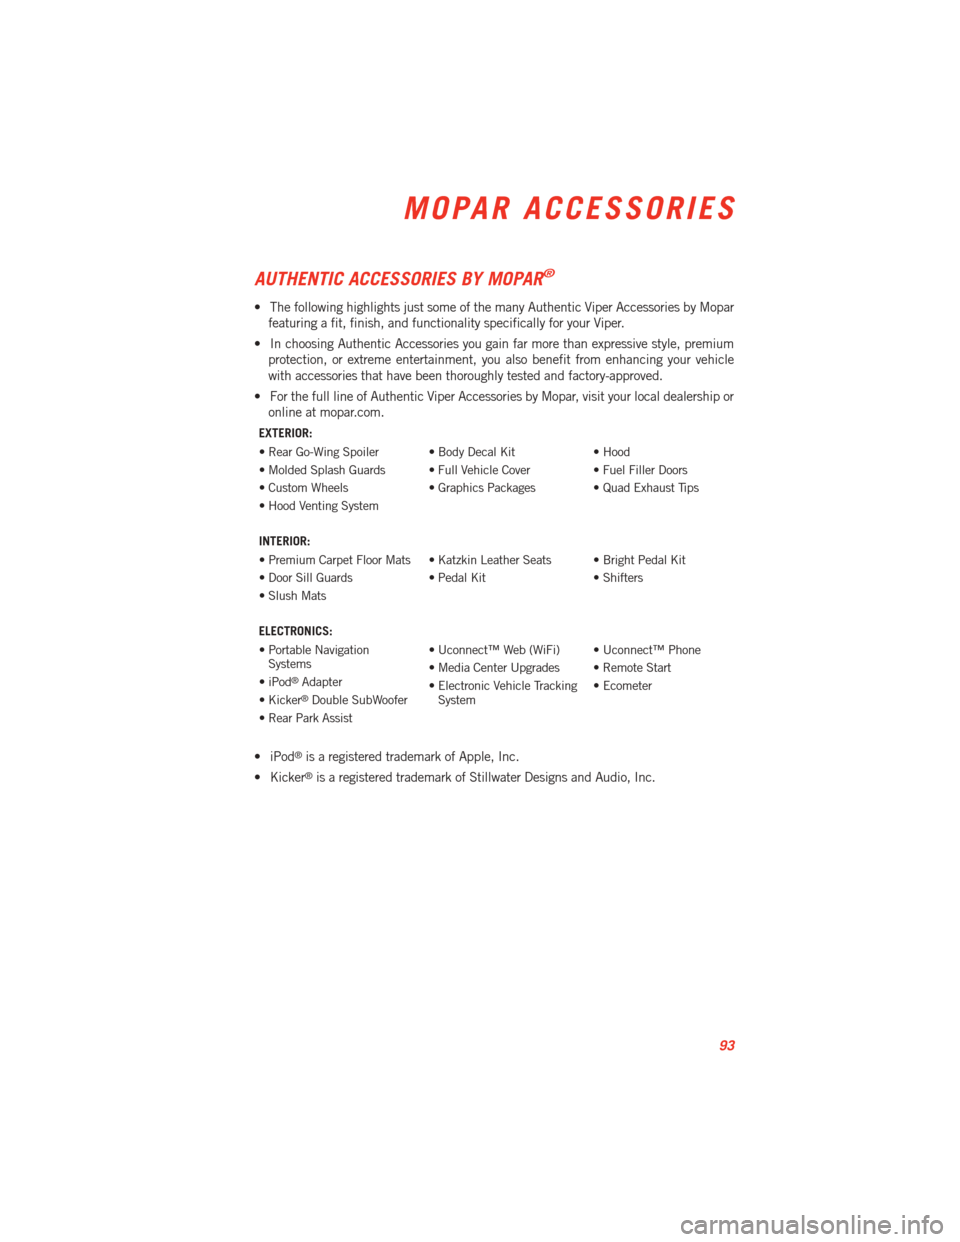
AUTHENTIC ACCESSORIES BY MOPAR®
• The following highlights just some of the many Authentic Viper Accessories by Moparfeaturing a fit, finish, and functionality specifically for your Viper.
• In choosing Authentic Accessories you gain far more than expressive style, premium protection, or extreme entertainment, you also benefit from enhancing your vehicle
with accessories that have been thoroughly tested and factory-approved.
• For the full line of Authentic Viper Accessories by Mopar, visit your local dealership or online at mopar.com.
EXTERIOR:
• Rear Go-Wing Spoiler • Body Decal Kit • Hood
• Molded Splash Guards • Full Vehicle Cover • Fuel Filler Doors
• Custom Wheels • Graphics Packages • Quad Exhaust Tips
• Hood Venting System
INTERIOR:
• Premium Carpet Floor Mats • Katzkin Leather Seats • Bright Pedal Kit
• Door Sill Guards • Pedal Kit • Shifters
• Slush Mats
ELECTRONICS:
• Portable NavigationSystems • Uconnect™ Web (WiFi) • Uconnect™ Phone
• iPod
®Adapter • Media Center Upgrades • Remote Start
• Kicker®Double SubWoofer • Electronic Vehicle Tracking
System • Ecometer
• Rear Park Assist
• iPod®is a registered trademark of Apple, Inc.
• Kicker
®is a registered trademark of Stillwater Designs and Audio, Inc.
MOPAR ACCESSORIES
93
Page 97 of 100
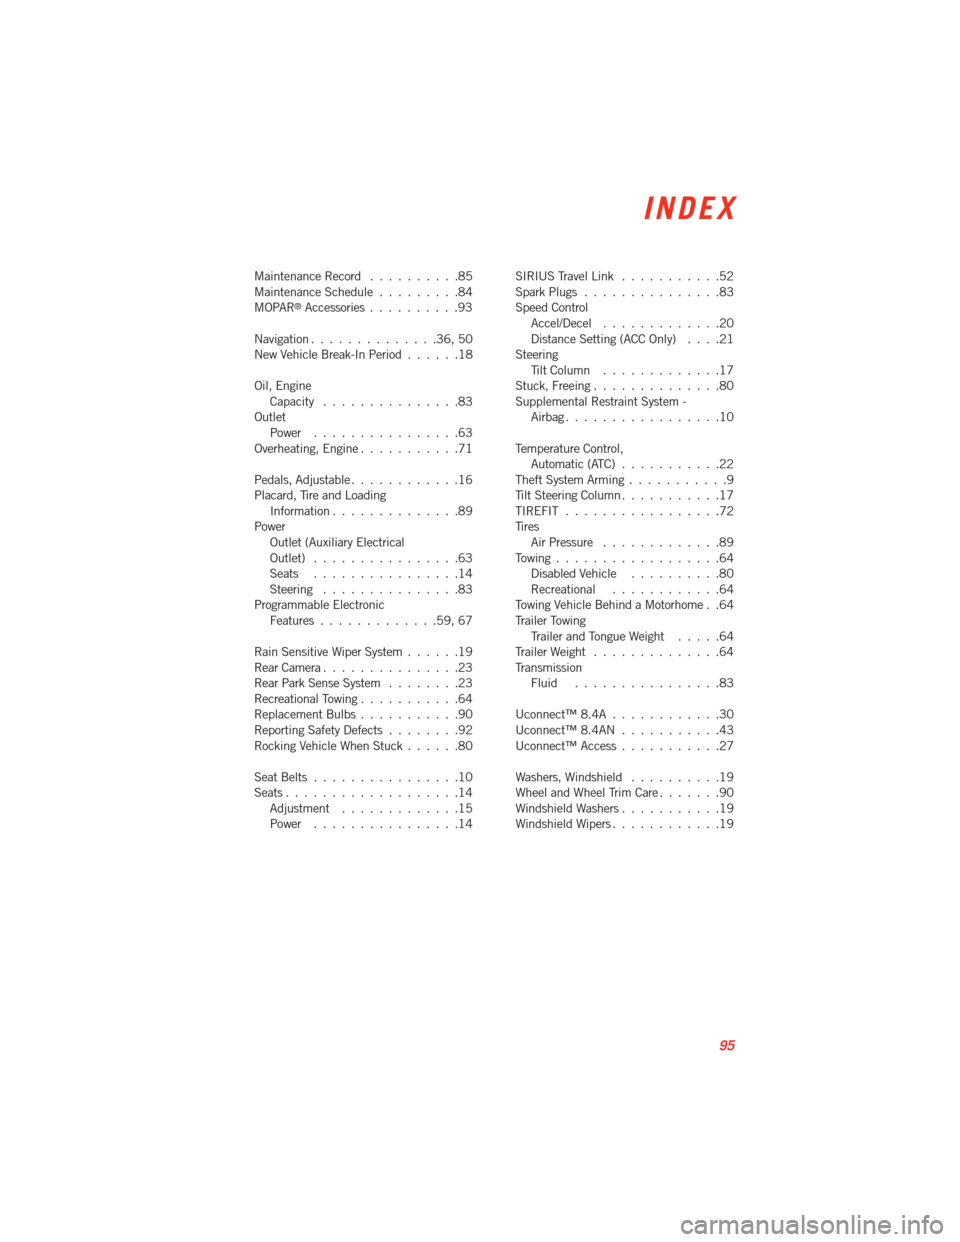
Maintenance Record..........85
Maintenance Schedule .........84
MOPAR
®Accessories ..........93
Navigation..............36,50
NewVehicleBreak-InPeriod......18
Oil, Engine Capacity ...............83
Outlet Power ................63
Overheating, Engine ...........71
Pedals,Adjustable............16
Placard, Tire and Loading Information..............89
Power Outlet (Auxiliary Electrical
Outlet) ................63
Seats ................14
Steering ...............83
Programmable Electronic Features.............59,67
Rain Sensitive Wiper System ......19
Rear Camera ...............23
Rear Park Sense System ........23
Recreational Towing ...........64
Replacement Bulbs ...........90
Reporting Safety Defects ........92
Rocking Vehicle When Stuck ......80
SeatBelts................10
Seats...................14 Adjustment .............15
Power ................14 SIRIUSTravelLink ...........52
Spark Plugs
...............83
Speed Control Accel/Decel .............20
Distance Setting (ACC Only) ....21
Steering TiltColumn .............17
Stuck, Freeing ..............80
Supplemental Restraint System - Airbag.................10
Temperature Control, Automatic(ATC)...........22
Theft System Arming ...........9
TiltSteeringColumn...........17
TIREFIT .................72
Tires AirPressure .............89
Towing..................64 DisabledVehicle ..........80
Recreational ............64
Towing Vehicle Behind a Motorhome . .64
Trailer Towing Trailer and Tongue Weight .....64
TrailerWeight ..............64
Transmission Fluid ................83
Uconnect™ 8.4A ............30
Uconnect™ 8.4AN ...........43
Uconnect™ Access ...........27
Washers,Windshield ..........19
Wheel and Wheel Trim Care .......90
Windshield Washers ...........19
WindshieldWipers............19
INDEX
95