brake DODGE VIPER 2015 VX / 3.G Owner's Manual
[x] Cancel search | Manufacturer: DODGE, Model Year: 2015, Model line: VIPER, Model: DODGE VIPER 2015 VX / 3.GPages: 148, PDF Size: 21.7 MB
Page 109 of 148
4. Remove the cap from the valve stem and then screw the fitting at the end of the
Sealant Hose (6) onto the valve stem.
5. Uncoil the Power Plug (8) and insert the plug into the vehicle’s 12 Volt power outlet.
6. Do not remove foreign objects (e.g., screws or nails) from the tire.
(C) Injecting Tire Service Kit Sealant Into The Deflated Tire:
Always start the engine before turning ON the Tire Service Kit.
NOTE:
Manual transmission vehicles must have the parking brake engaged and the shift lever in
NEUTRAL.
After pushing the Power Button (4), the sealant (white fluid) will flow from the Sealant
Bottle (1) through the Sealant Hose (6) and into the tire.
NOTE:
Sealant may leak out through the puncture in the tire.
If the sealant (white fluid) does not flow within0–10seconds through the Sealant Hose (6):
1. Push the Power Button (4) to turn Off the Tire Service Kit. Disconnect the Sealant Hose
(6) from the valve stem. Make sure the valve stem is free of debris. Reconnect the
Sealant Hose (6) to the valve stem. Check that the Mode Select Knob (5) is in the
Sealant Mode position and not Air Mode. Push the Power Button (4) to turn On the Tire
Service Kit.
2. Connect the Power Plug (8) to a different 12 Volt power outlet in your vehicle or
another vehicle, if available. Make sure the engine is running before turning ON the
Ti r e S e r v i c e K i t .
3. The Sealant Bottle (1) may be empty due to previous use. Call for assistance.
NOTE:
If the Mode Select Knob (5) is on Air Mode and the pump is operating, air will dispense
from the Air Pump Hose (7) only, not the Sealant Hose (6).
If the sealant (white fluid) does flow through the Sealant Hose (6):
1. Continue to operate the pump until sealant is no longer flowing through the hose
(typically takes 30 - 70 seconds). As the sealant flows through the Sealant Hose (6),
the Pressure Gauge (3) can read as high as 70 psi (4.8 Bar). The Pressure Gauge (3)
will decrease quickly from approximately 70 psi (4.8 Bar) to the actual tire pressure
when the Sealant Bottle (1) is empty.
2. The pump will start to inject air into the tire immediately after the Sealant Bottle (1)
is empty. Continue to operate the pump and inflate the tire to the pressure indicated
on the tire pressure label on the driver-side latch pillar (recommended pressure).
Check the tire pressure by looking at the Pressure Gauge (3).
WHAT TO DO IN EMERGENCIES
107
Page 113 of 148
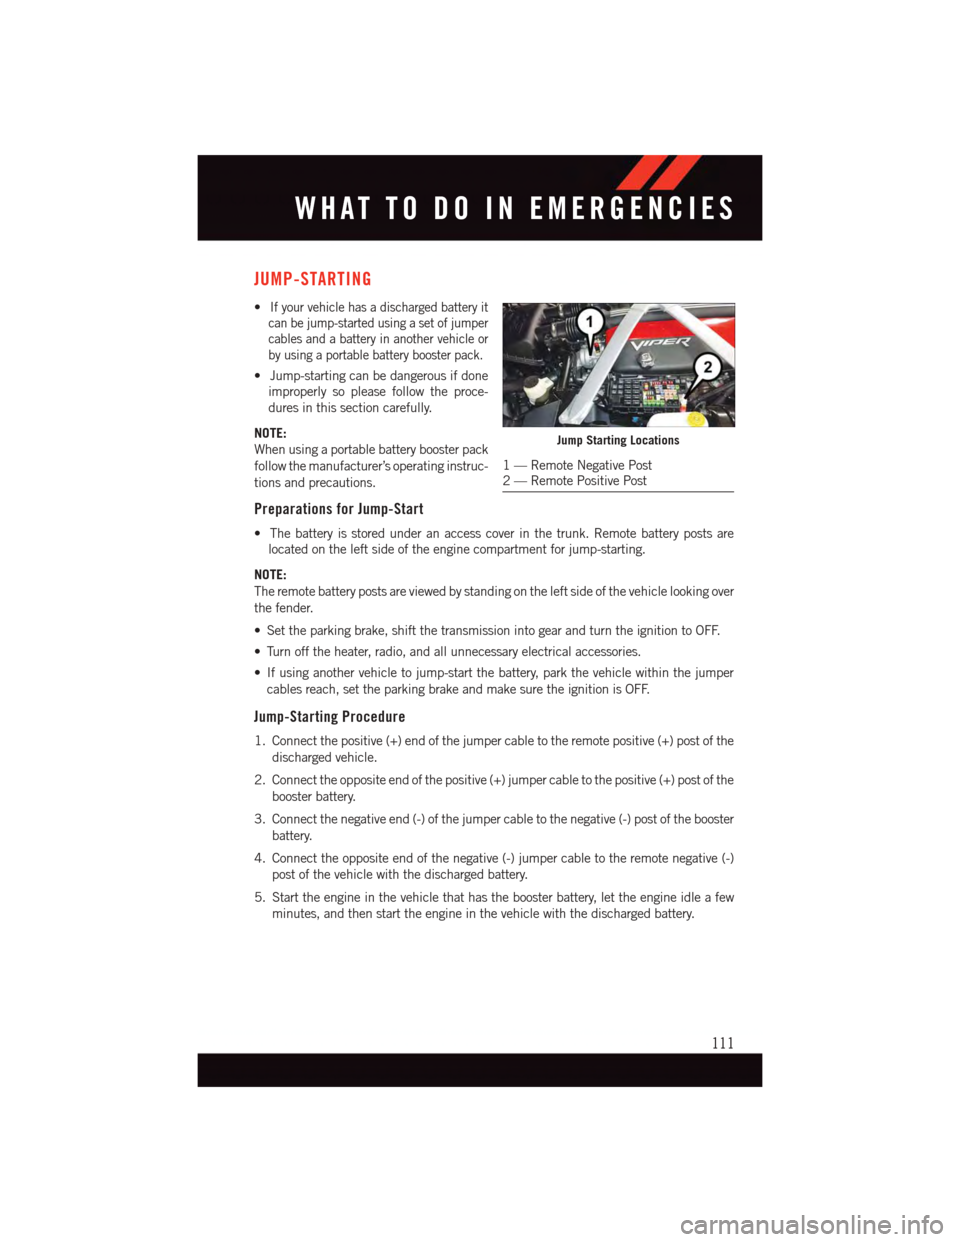
JUMP-STARTING
•If your vehicle has a discharged battery it
can be jump-started using a set of jumper
cables and a battery in another vehicle or
by using a portable battery booster pack.
•Jump-startingcanbedangerousifdone
improperly so please follow the proce-
dures in this section carefully.
NOTE:
When using a portable battery booster pack
follow the manufacturer’s operating instruc-
tions and precautions.
Preparations for Jump-Start
•Thebatteryisstoredunderanaccesscoverinthetrunk.Remotebatterypostsare
located on the left side of the engine compartment for jump-starting.
NOTE:
The remote battery posts are viewed by standing on the left side of the vehicle looking over
the fender.
•Settheparkingbrake,shiftthetransmissionintogearandturntheignitiontoOFF.
•Turnofftheheater,radio,andallunnecessaryelectricalaccessories.
•Ifusinganothervehicletojump-startthebattery,parkthevehiclewithinthejumper
cables reach, set the parking brake and make sure the ignition is OFF.
Jump-Starting Procedure
1. Connect the positive (+) end of the jumper cable to the remote positive (+) post of the
discharged vehicle.
2. Connect the opposite end of the positive (+) jumper cable to the positive (+) post of the
booster battery.
3. Connect the negative end (-) of the jumper cable to the negative (-) post of the booster
battery.
4. Connect the opposite end of the negative (-) jumper cable to the remote negative (-)
post of the vehicle with the discharged battery.
5. Start the engine in the vehicle that has the booster battery, let the engine idle a few
minutes, and then start the engine in the vehicle with the discharged battery.
Jump Starting Locations
1—RemoteNegativePost2—RemotePositivePost
WHAT TO DO IN EMERGENCIES
111
Page 116 of 148
EVENT DATA RECORDER (EDR)
This vehicle is equipped with an Event Data Recorder (EDR). The main purpose of an EDR
is to record, in certain crash or near crash-like situations, such as an air bag deployment
or hitting a road obstacle, data that will assist in understanding how a vehicle’s systems
performed. The EDR is designed to record data related to vehicle dynamics and safety
systems for a short period of time, typically 30 seconds or less. The EDR in this vehicle is
designed to record such data as:
•Howvarioussystemsinyourvehiclewereoperating.
•Whetherornotthedriverandpassengersafetybeltswerebuckled/fastened.
•Howfar(ifatall)thedriverwasdepressingtheacceleratorand/orbrakepedal.
•Howfastthevehiclewastraveling.
These data can help provide a better understanding of the circumstances in which crashes
and injuries occur.
NOTE:
EDR data is recorded by your vehicle only if a non-trivial crash situation occurs; no data is
recorded by the EDR under normal driving conditions and no personal data (e.g. name,
gender, age, and crash location) is recorded. However, other parties, such as law
enforcement, could combine the EDR data with the type of personally identifying data
routinely acquired during a crash investigation.
To r e a d d a t a r e c o r d e d b y a n E D R , s p e c i a l e q u i p m e n t i s r e q u i r e d , a n d a c c e s s t o t h e v e h i c l e
or the EDR is needed. In addition to the vehicle manufacturer, other parties such as law
enforcement, that have the special equipment, can read the information if they have
access to the vehicle or the EDR.
WHAT TO DO IN EMERGENCIES
114
Page 118 of 148
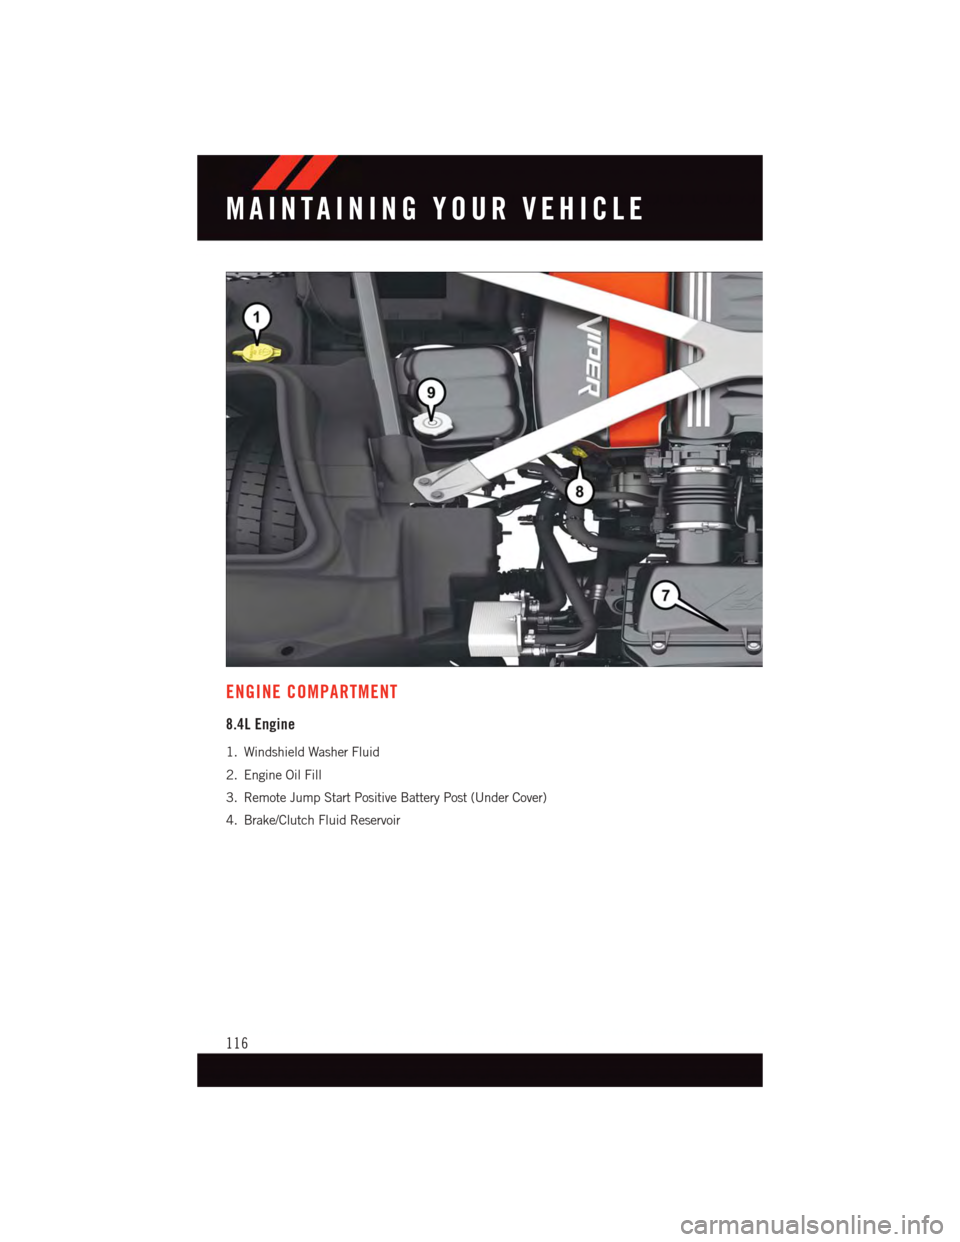
ENGINE COMPARTMENT
8.4L Engine
1. Windshield Washer Fluid
2. Engine Oil Fill
3. Remote Jump Start Positive Battery Post (Under Cover)
4. Brake/Clutch Fluid Reservoir
MAINTAINING YOUR VEHICLE
116
Page 121 of 148
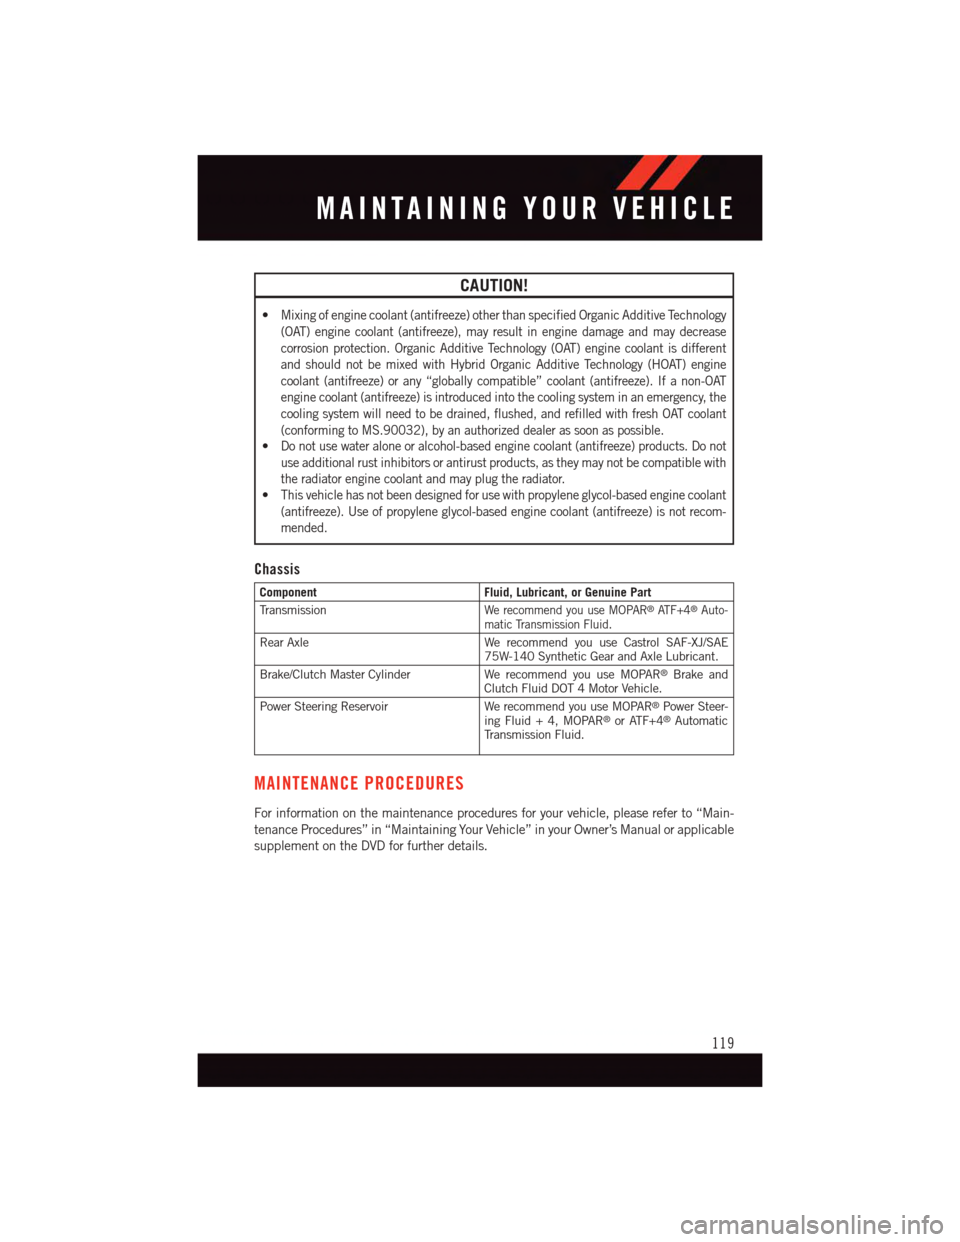
CAUTION!
•Mixing of engine coolant (antifreeze) other than specified Organic Additive Technology
(OAT) engine coolant (antifreeze), may result in engine damage and may decrease
corrosion protection. Organic Additive Technology (OAT) engine coolant is different
and should not be mixed with Hybrid Organic Additive Technology (HOAT) engine
coolant (antifreeze) or any “globally compatible” coolant (antifreeze). If a non-OAT
engine coolant (antifreeze) is introduced into the cooling system in an emergency, the
cooling system will need to be drained, flushed, and refilled with fresh OAT coolant
(conforming to MS.90032), by an authorized dealer as soon as possible.
•Do not use water alone or alcohol-based engine coolant (antifreeze) products. Do not
use additional rust inhibitors or antirust products, as they may not be compatible with
the radiator engine coolant and may plug the radiator.
•This vehicle has not been designed for use with propylene glycol-based engine coolant
(antifreeze). Use of propylene glycol-based engine coolant (antifreeze) is not recom-
mended.
Chassis
ComponentFluid, Lubricant, or Genuine Part
Tr a n s m i s s i o nWe recommend you use MOPAR®AT F + 4®Auto-matic Transmission Fluid.
Rear AxleWe recommend you use Castrol SAF-XJ/SAE75W-140 Synthetic Gear and Axle Lubricant.
Brake/Clutch Master CylinderWe recommend you use MOPAR®Brake andClutch Fluid DOT 4 Motor Vehicle.
Power Steering Reservoir We recommend you use MOPAR®Power Steer-ing Fluid + 4, MOPAR®or ATF+4®AutomaticTr a n s m i s s i o n F l u i d .
MAINTENANCE PROCEDURES
For information on the maintenance procedures for your vehicle, please refer to “Main-
tenance Procedures” in “Maintaining Your Vehicle” in your Owner’s Manual or applicable
supplement on the DVD for further details.
MAINTAINING YOUR VEHICLE
119
Page 122 of 148
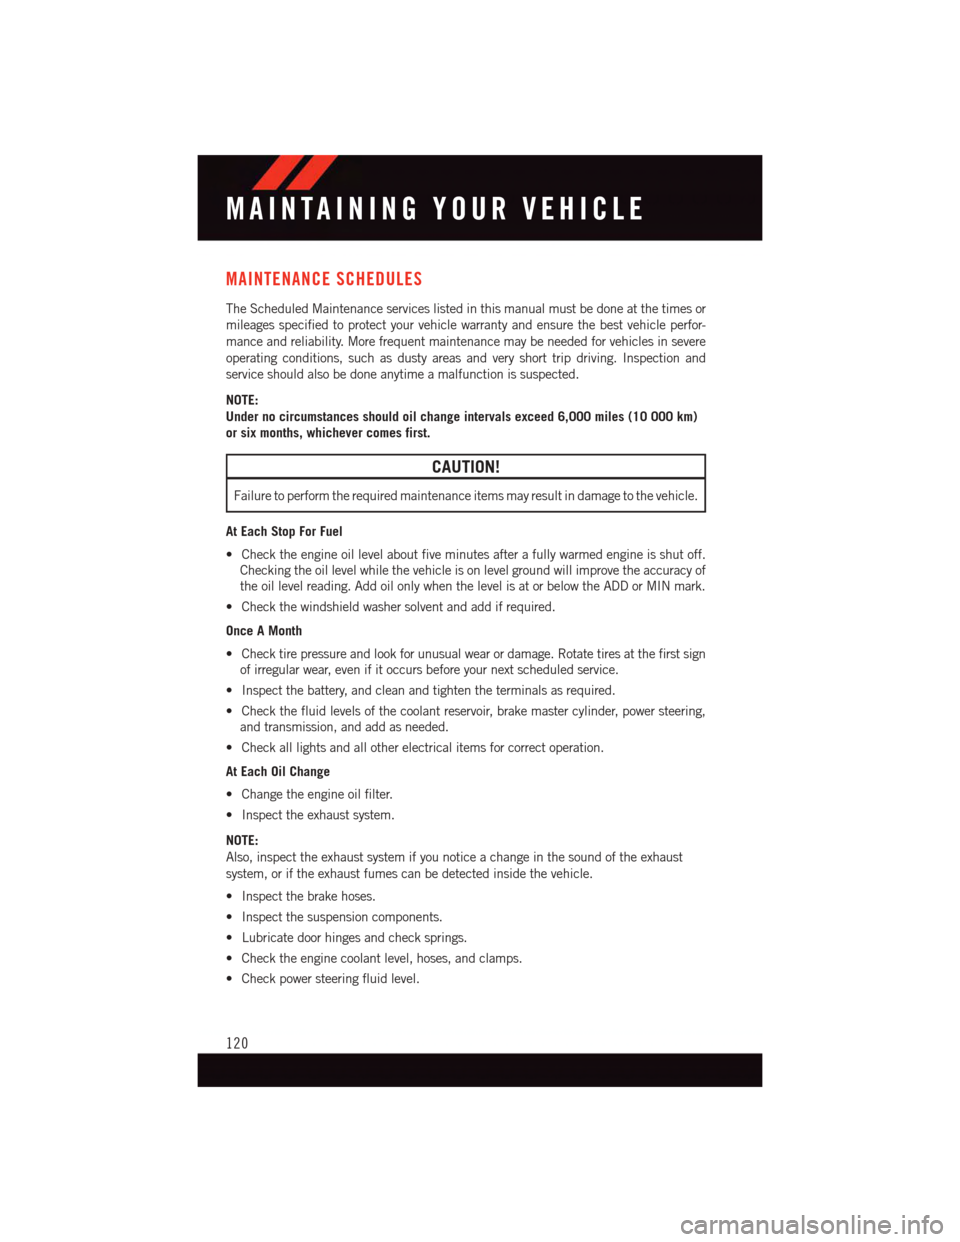
MAINTENANCE SCHEDULES
The Scheduled Maintenance services listed in this manual must be done at the times or
mileages specified to protect your vehicle warranty and ensure the best vehicle perfor-
mance and reliability. More frequent maintenance may be needed for vehicles in severe
operating conditions, such as dusty areas and very short trip driving. Inspection and
service should also be done anytime a malfunction is suspected.
NOTE:
Under no circumstances should oil change intervals exceed 6,000 miles (10 000 km)
or six months, whichever comes first.
CAUTION!
Failure to perform the required maintenance items may result in damage to the vehicle.
At Each Stop For Fuel
•Checktheengineoillevelaboutfiveminutesafterafullywarmedengineisshutoff.
Checking the oil level while the vehicle is on level ground will improve the accuracy of
the oil level reading. Add oil only when the level is at or below the ADD or MIN mark.
•Checkthewindshieldwashersolventandaddifrequired.
Once A Month
•Checktirepressureandlookforunusualwearordamage.Rotatetiresatthefirstsign
of irregular wear, even if it occurs before your next scheduled service.
•Inspectthebattery,andcleanandtightentheterminalsasrequired.
•Checkthefluidlevelsofthecoolantreservoir,brakemastercylinder,powersteering,
and transmission, and add as needed.
•Checkalllightsandallotherelectricalitemsforcorrectoperation.
At Each Oil Change
•Changetheengineoilfilter.
•Inspecttheexhaustsystem.
NOTE:
Also, inspect the exhaust system if you notice a change in the sound of the exhaust
system, or if the exhaust fumes can be detected inside the vehicle.
•Inspectthebrakehoses.
•Inspectthesuspensioncomponents.
•Lubricatedoorhingesandchecksprings.
•Checktheenginecoolantlevel,hoses,andclamps.
•Checkpowersteeringfluidlevel.
MAINTAINING YOUR VEHICLE
120
Page 123 of 148
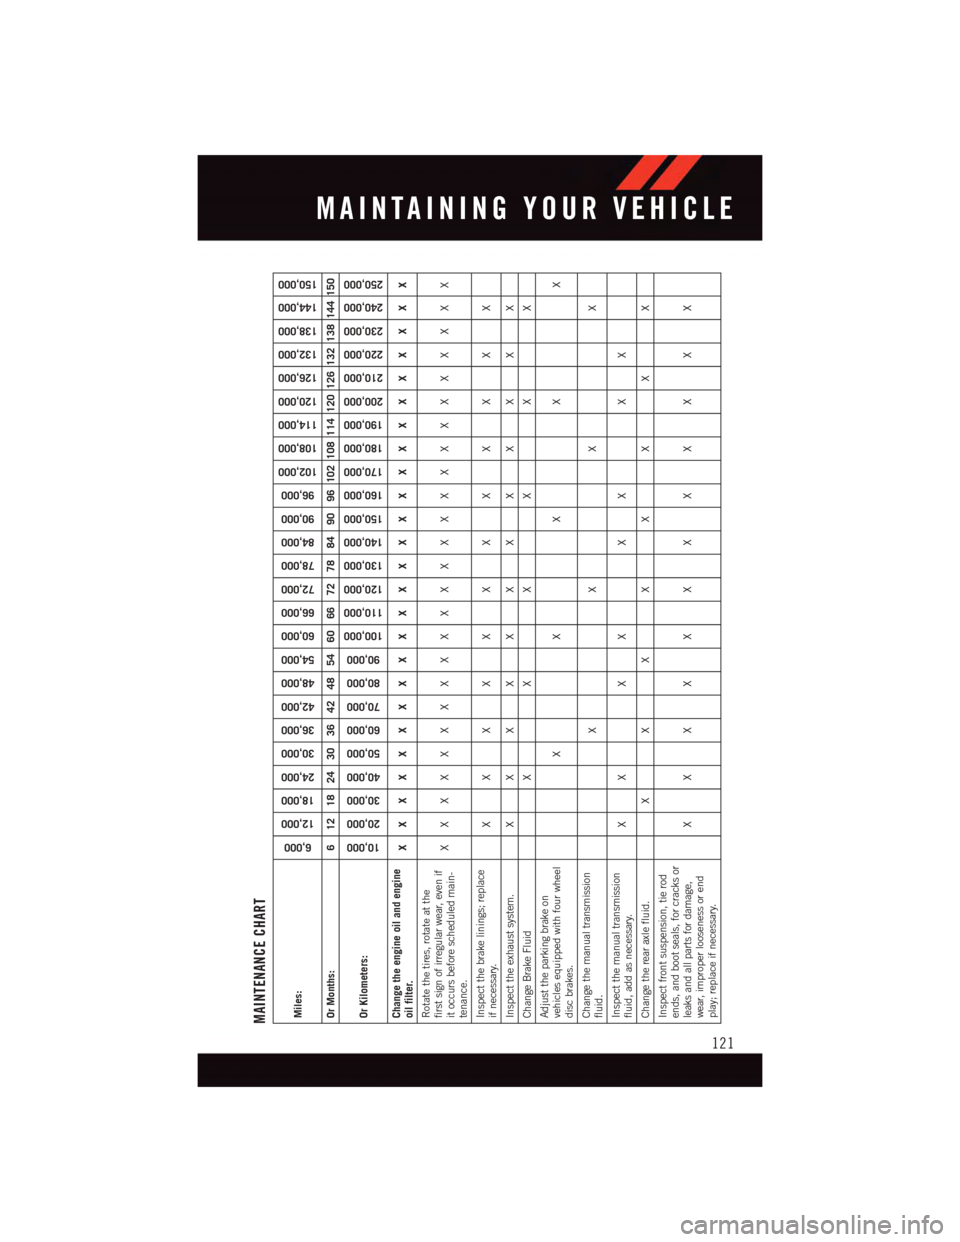
MAINTENANCE CHARTMiles:
6,000
12,000
18,000
24,000
30,000
36,000
42,000
48,000
54,000
60,000
66,000
72,000
78,000
84,000
90,000
96,000
102,000
108,000
114,000
120,000
126,000
132,000
138,000
144,000
150,000
Or Months:
6 12 18 24 30 36 42 48 54 60 66 72 78 84 90 96 102 108 114 120 126 132 138 144 150
Or Kilometers:
10,000
20,000
30,000
40,000
50,000
60,000
70,000
80,000
90,000
100,000
110,000
120,000
130,000
140,000
150,000
160,000
170,000
180,000
190,000
200,000
210,000
220,000
230,000
240,000
250,000
Change the engine oil and engineoil filter.
XXXXXXXXXXXXXXXXXXXXXXXXX
Rotate the tires, rotate at thefirst sign of irregular wear, even ifit occurs before scheduled main-tenance.
XXXXXXXXXXXXXXXXXXXXXXXXX
Inspect the brake linings; replaceif necessary.
XXXXXXXXXXXX
Inspect the exhaust system.
XXXXXXXXXXXX
Change Brake Fluid
XXXXXX
Adjust the parking brake onvehicles equipped with four wheeldisc brakes.
XXXXX
Change the manual transmissionfluid.
XXXX
Inspect the manual transmissionfluid, add as necessary.
XX XX XX XX
Change the rear axle fluid.
XXXXXXXX
Inspect front suspension, tie rodends, and boot seals, for cracks orleaks and all parts for damage,wear, improper looseness or endplay; replace if necessary.
XXXXXXXXXXXX
MAINTAINING YOUR VEHICLE
121
Page 134 of 148
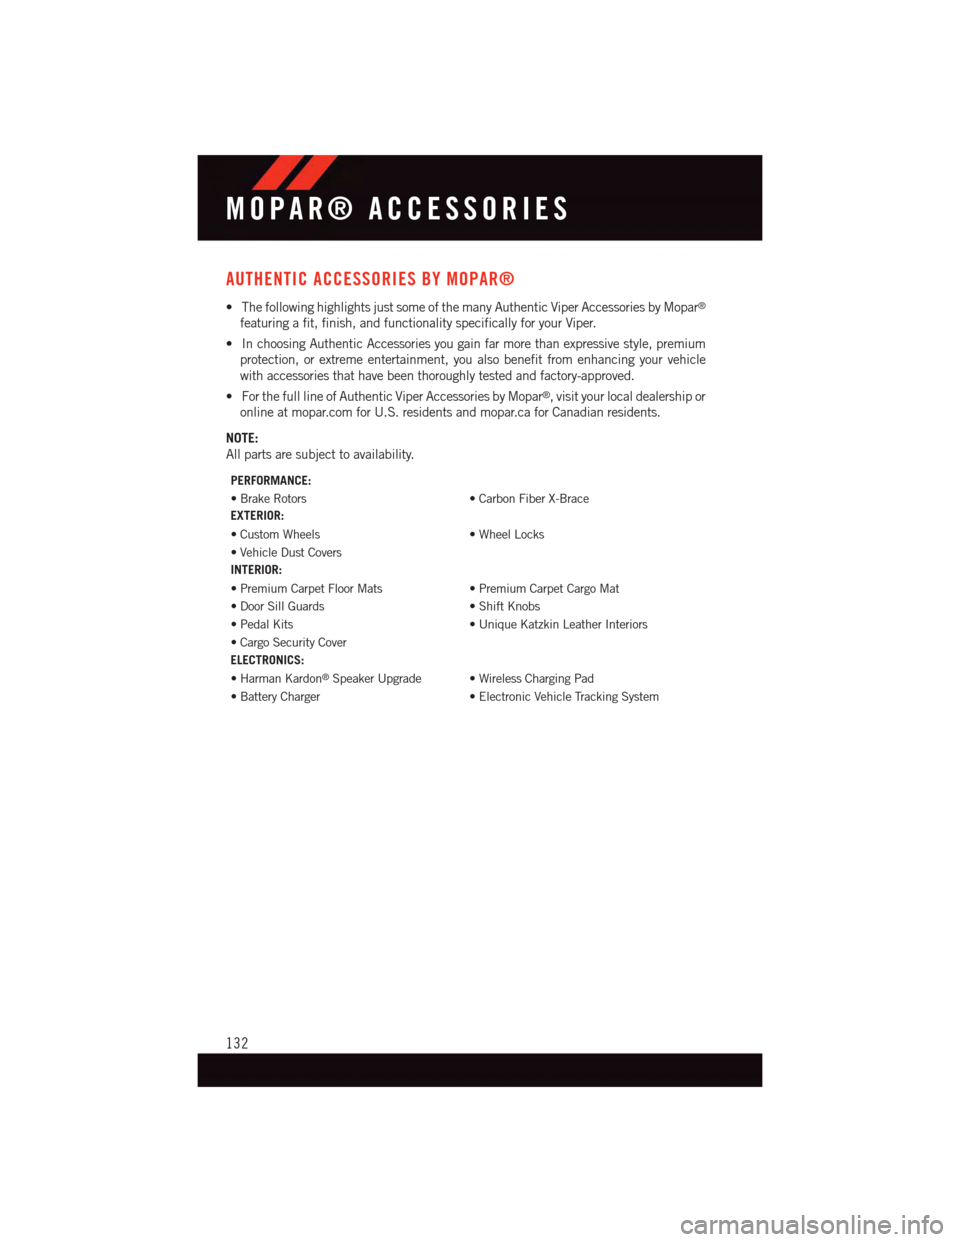
AUTHENTIC ACCESSORIES BY MOPAR®
•ThefollowinghighlightsjustsomeofthemanyAuthenticViperAccessoriesbyMopar®
featuring a fit, finish, and functionality specifically for your Viper.
•InchoosingAuthenticAccessoriesyougainfarmorethanexpressivestyle,premium
protection, or extreme entertainment, you also benefit from enhancing your vehicle
with accessories that have been thoroughly tested and factory-approved.
•ForthefulllineofAuthenticViperAccessoriesbyMopar®,visityourlocaldealershipor
online at mopar.com for U.S. residents and mopar.ca for Canadian residents.
NOTE:
All parts are subject to availability.
PERFORMANCE:
•BrakeRotors•CarbonFiberX-Brace
EXTERIOR:
•CustomWheels•WheelLocks
•VehicleDustCovers
INTERIOR:
•PremiumCarpetFloorMats•PremiumCarpetCargoMat
•DoorSillGuards•ShiftKnobs
•PedalKits•UniqueKatzkinLeatherInteriors
•CargoSecurityCover
ELECTRONICS:
•HarmanKardon®Speaker Upgrade • Wireless Charging Pad
•BatteryCharger•ElectronicVehicleTrackingSystem
MOPAR® ACCESSORIES
132
Page 136 of 148
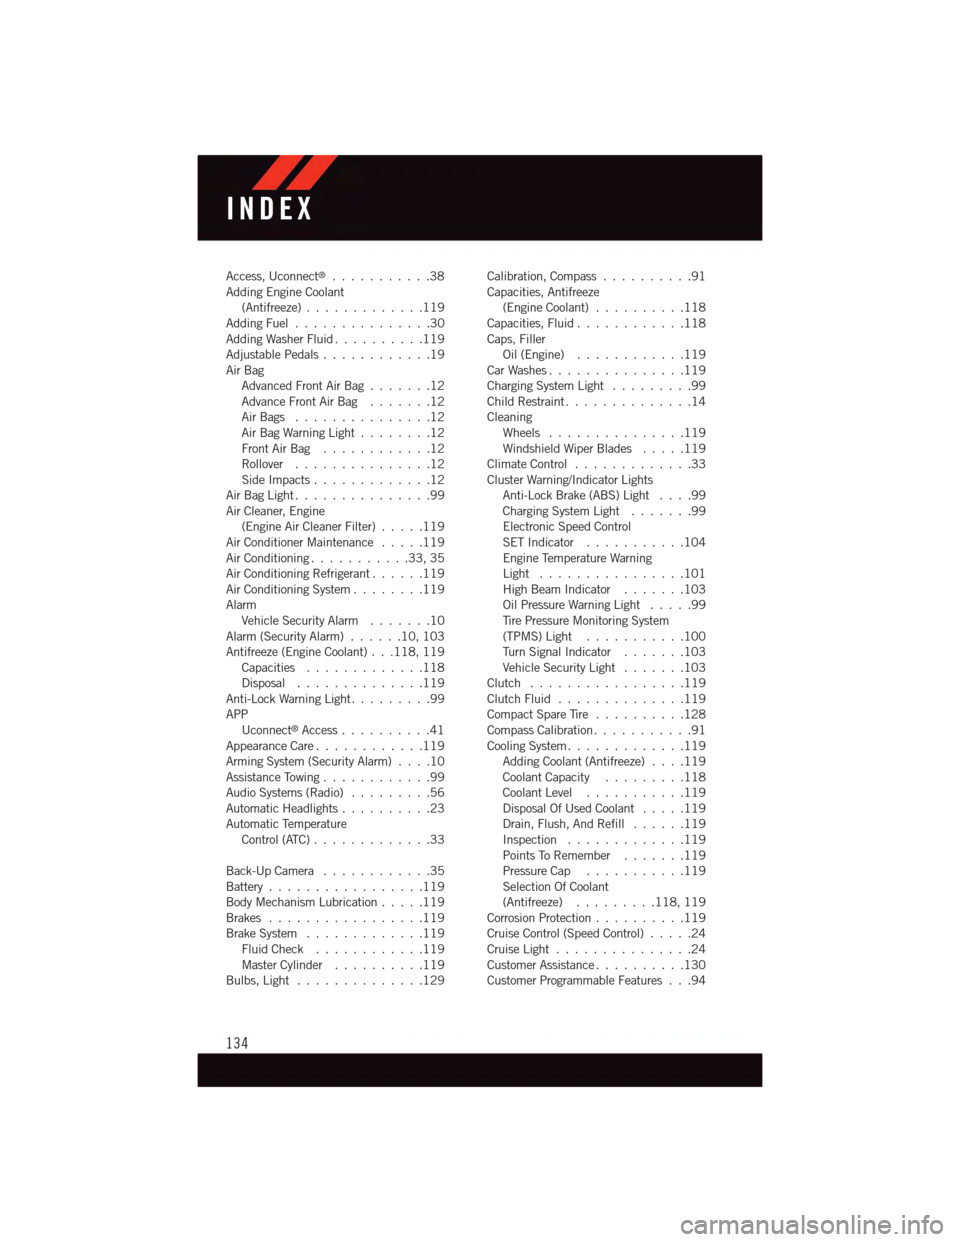
Access, Uconnect®...........38Adding Engine Coolant(Antifreeze).............119Adding Fuel...............30Adding Washer Fluid..........119Adjustable Pedals............19Air BagAdvanced Front Air Bag.......12Advance Front Air Bag.......12Air Bags . . . . . . . . . . . . . . .12Air Bag Warning Light . . . . . . . .12Front Air Bag . . . . . . . . . . . .12Rollover . . . . . . . . . . . . . . .12Side Impacts.............12Air Bag Light . . . . . . . . . . . . . . .99Air Cleaner, Engine(Engine Air Cleaner Filter).....119Air Conditioner Maintenance.....119Air Conditioning...........33,35Air Conditioning Refrigerant......119Air Conditioning System........119AlarmVehicle Security Alarm.......10Alarm (Security Alarm)......10,103Antifreeze (Engine Coolant) . . .118, 119Capacities.............118Disposal . . . . . . . . . . . . . .119Anti-Lock Warning Light.........99APPUconnect®Access..........41Appearance Care............119Arming System (Security Alarm)....10Assistance Towing............99Audio Systems (Radio).........56Automatic Headlights..........23Automatic TemperatureControl (ATC) . . . . . . . . . . . . .33
Back-Up Camera............35Battery.................119Body Mechanism Lubrication.....119Brakes . . . . . . . . . . . . . . . . .119Brake System.............119Fluid Check............119Master Cylinder..........119Bulbs, Light . . . . . . . . . . . . . .129
Calibration, Compass..........91Capacities, Antifreeze(Engine Coolant)..........118Capacities, Fluid............118Caps, FillerOil (Engine)............119Car Washes . . . . . . . . . . . . . . .119Charging System Light.........99Child Restraint..............14CleaningWheels...............119Windshield Wiper Blades.....119Climate Control . . . . . . . . . . . . .33Cluster Warning/Indicator LightsAnti-Lock Brake (ABS) Light....99Charging System Light.......99Electronic Speed ControlSET Indicator . . . . . . . . . . .104Engine Temperature WarningLight . . . . . . . . . . . . . . . .101High Beam Indicator.......103Oil Pressure Warning Light . . . . .99Ti r e P r e s s u r e M o n i t o r i n g S y s t e m(TPMS) Light...........100Tu r n S i g n a l I n d i c a t o r.......103Vehicle Security Light.......103Clutch . . . . . . . . . . . . . . . . .119Clutch Fluid . . . . . . . . . . . . . .119Compact Spare Tire..........128Compass Calibration...........91Cooling System . . . . . . . . . . . . .119Adding Coolant (Antifreeze)....119Coolant Capacity.........118Coolant Level...........119Disposal Of Used Coolant.....119Drain, Flush, And Refill......119Inspection . . . . . . . . . . . . .119Points To Remember.......119Pressure Cap . . . . . . . . . . .119Selection Of Coolant(Antifreeze).........118, 119Corrosion Protection . . . . . . . . . .119Cruise Control (Speed Control).....24Cruise Light . . . . . . . . . . . . . . .24Customer Assistance..........130Customer Programmable Features . . .94
INDEX
134
Page 137 of 148
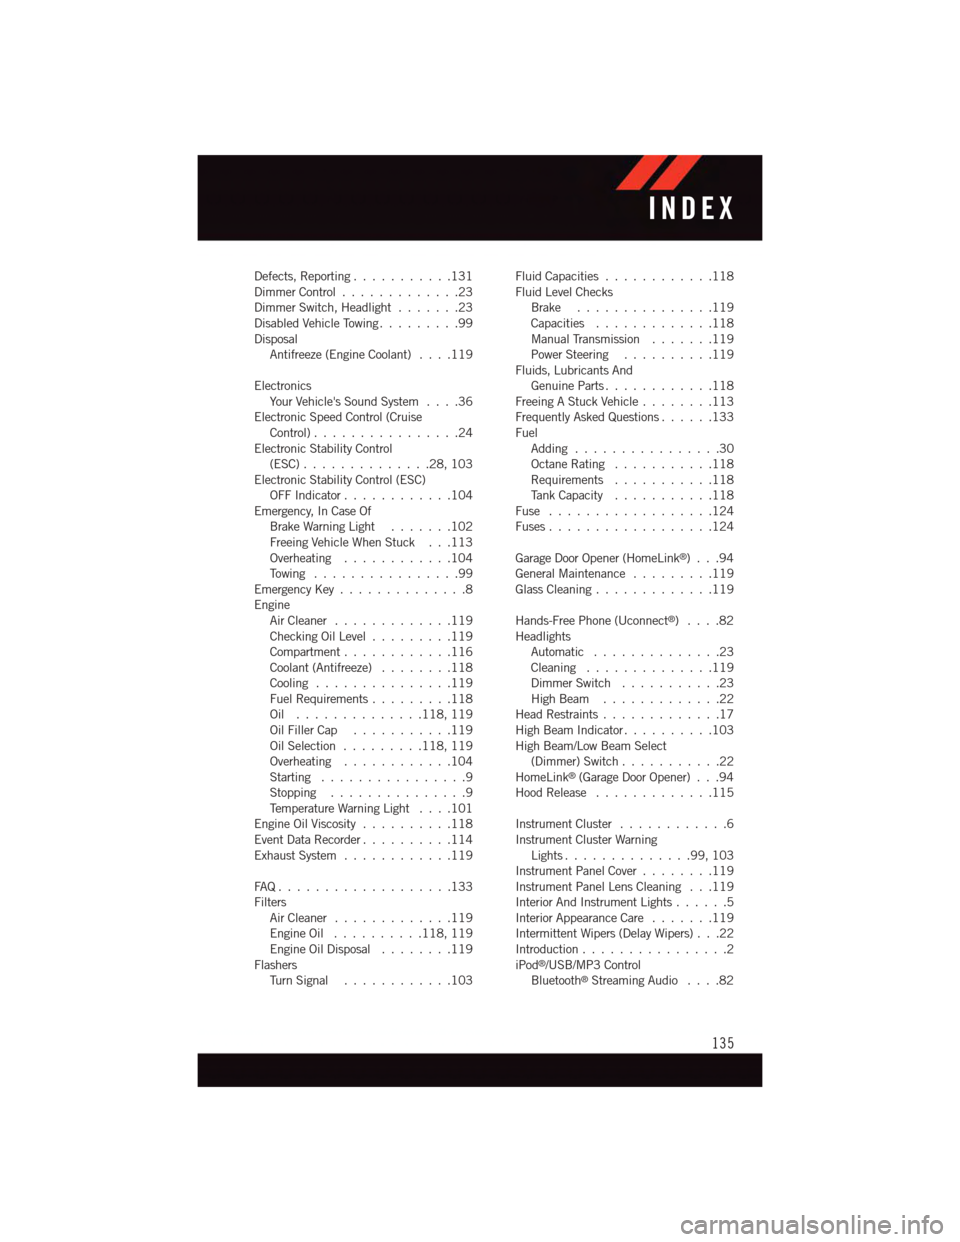
Defects, Reporting...........131Dimmer Control.............23Dimmer Switch, Headlight.......23Disabled Vehicle Towing . . . . . . . . .99DisposalAntifreeze (Engine Coolant)....119
ElectronicsYo u r Ve h i c l e ' s S o u n d S y s t e m....36Electronic Speed Control (CruiseControl) . . . . . . . . . . . . . . . .24Electronic Stability Control(ESC)..............28,103Electronic Stability Control (ESC)OFF Indicator . . . . . . . . . . . .104Emergency, In Case OfBrake Warning Light . . . . . . .102Freeing Vehicle When Stuck . . .113Overheating . . . . . . . . . . . .104To w i n g . . . . . . . . . . . . . . . . 9 9Emergency Key..............8EngineAir Cleaner.............119Checking Oil Level.........119Compartment............116Coolant (Antifreeze)........118Cooling . . . . . . . . . . . . . . .119Fuel Requirements.........118Oil . . . . . . . . . . . . . .118, 119Oil Filler Cap...........119Oil Selection . . . . . . . . .118, 119Overheating . . . . . . . . . . . .104Starting................9Stopping...............9Te m p e r a t u r e W a r n i n g L i g h t....101Engine Oil Viscosity..........118Event Data Recorder..........114Exhaust System............119
FA Q . . . . . . . . . . . . . . . . . . . 1 3 3FiltersAir Cleaner.............119Engine Oil..........118, 119Engine Oil Disposal........119FlashersTu r n S i g n a l............103
Fluid Capacities............118Fluid Level ChecksBrake . . . . . . . . . . . . . . .119Capacities.............118Manual Transmission.......119Power Steering..........119Fluids, Lubricants AndGenuine Parts............118Freeing A Stuck Vehicle . . . . . . . .113Frequently Asked Questions......133FuelAdding................30Octane Rating . . . . . . . . . . .118Requirements...........118Ta n k C a p a c i t y...........118Fuse . . . . . . . . . . . . . . . . . .124Fuses . . . . . . . . . . . . . . . . . .124
Garage Door Opener (HomeLink®)...94General Maintenance.........119Glass Cleaning.............119
Hands-Free Phone (Uconnect®)....82HeadlightsAutomatic . . . . . . . . . . . . . .23Cleaning..............119Dimmer Switch...........23High Beam.............22Head Restraints.............17High Beam Indicator..........103High Beam/Low Beam Select(Dimmer) Switch...........22HomeLink®(Garage Door Opener) . . .94Hood Release.............115
Instrument Cluster............6Instrument Cluster WarningLights . . . . . . . . . . . . . .99, 103Instrument Panel Cover........119Instrument Panel Lens Cleaning . . .119Interior And Instrument Lights......5Interior Appearance Care.......119Intermittent Wipers (Delay Wipers) . . .22Introduction................2iPod®/USB/MP3 ControlBluetooth®Streaming Audio....82
INDEX
135