buttons DODGE VIPER 2015 VX / 3.G Owner's Manual
[x] Cancel search | Manufacturer: DODGE, Model Year: 2015, Model line: VIPER, Model: DODGE VIPER 2015 VX / 3.GPages: 148, PDF Size: 21.7 MB
Page 70 of 148
Get Started
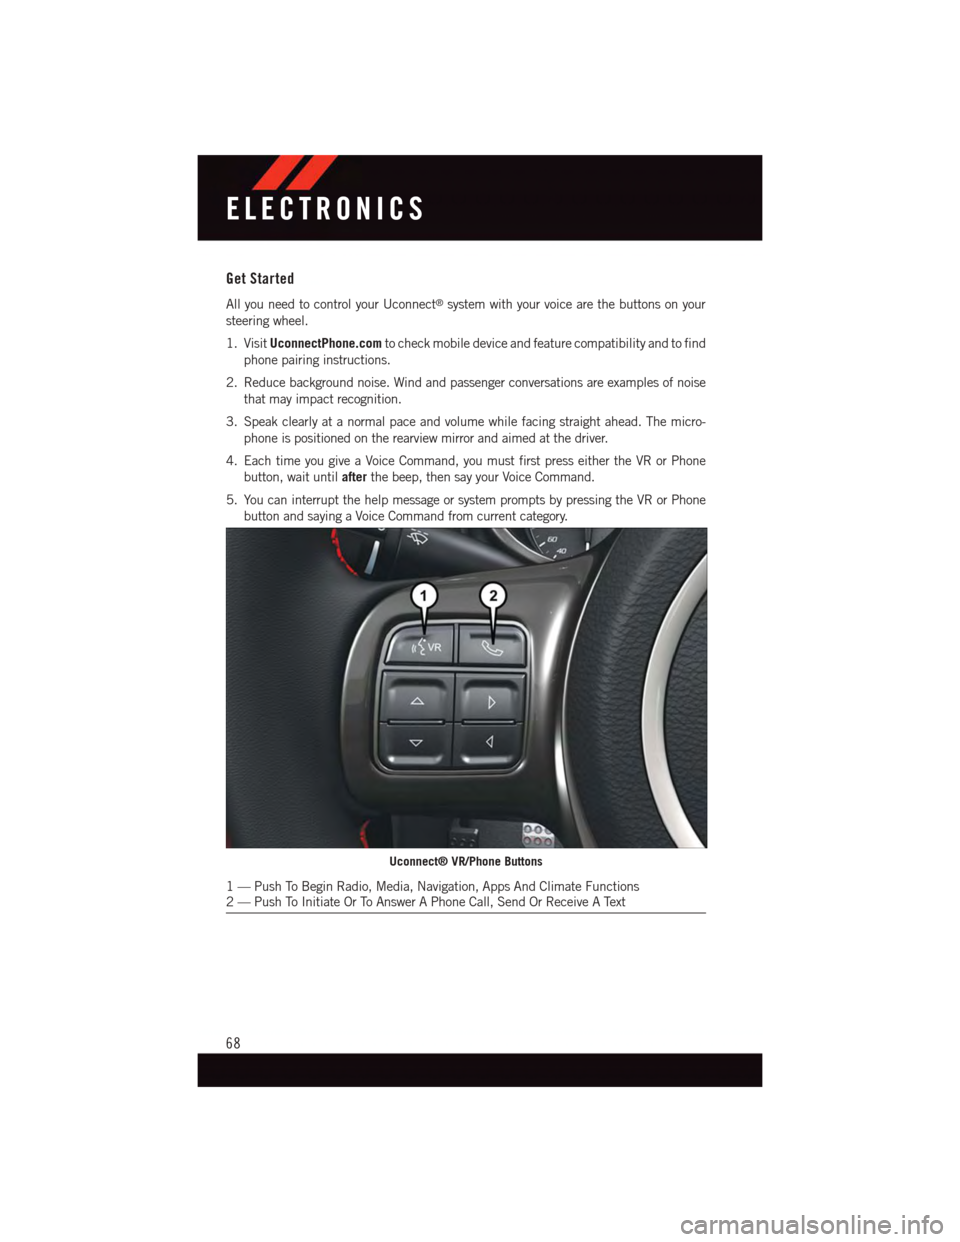
All you need to control your Uconnect®system with your voice are the buttons on your
steering wheel.
1. VisitUconnectPhone.comto check mobile device and feature compatibility and to find
phone pairing instructions.
2. Reduce background noise. Wind and passenger conversations are examples of noise
that may impact recognition.
3. Speak clearly at a normal pace and volume while facing straight ahead. The micro-
phone is positioned on the rearview mirror and aimed at the driver.
4. Each time you give a Voice Command, you must first press either the VR or Phone
button, wait untilafterthe beep, then say your Voice Command.
5. You can interrupt the help message or system prompts by pressing the VR or Phone
button and saying a Voice Command from current category.
Uconnect® VR/Phone Buttons
1—PushToBeginRadio,Media,Navigation,AppsAndClimateFunctions2—PushToInitiateOrToAnswerAPhoneCall,SendOrReceiveAText
ELECTRONICS
68
Page 84 of 148
Uconnect® PHONE
Uconnect® Phone (Bluetooth® Hands Free Calling)
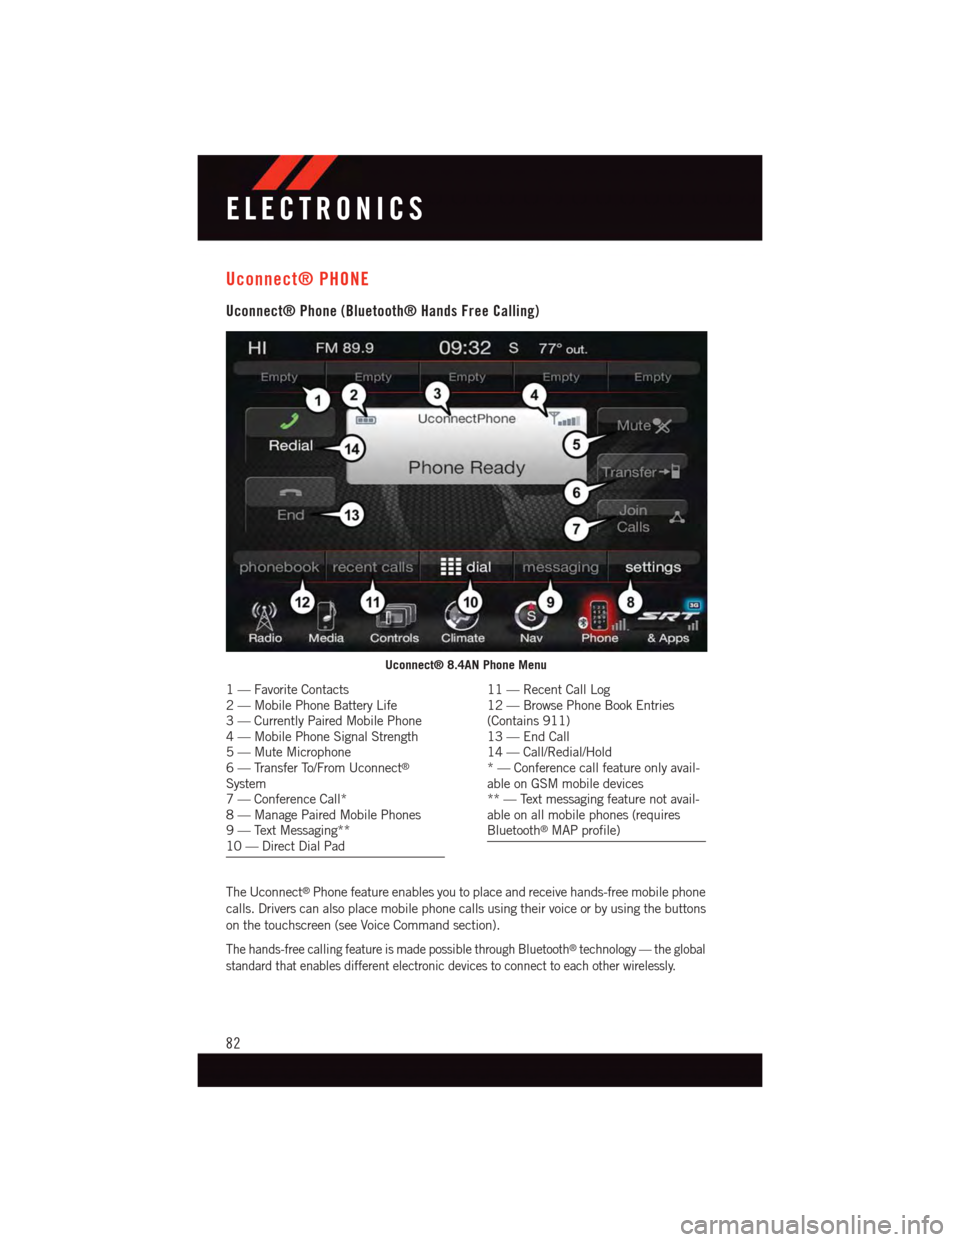
The Uconnect®Phone feature enables you to place and receive hands-free mobile phone
calls. Drivers can also place mobile phone calls using their voice or by using the buttons
on the touchscreen (see Voice Command section).
The hands-free calling feature is made possible through Bluetooth®technology — the global
standard that enables different electronic devices to connect to each other wirelessly.
Uconnect® 8.4AN Phone Menu
1—FavoriteContacts2—MobilePhoneBatteryLife3—CurrentlyPairedMobilePhone4—MobilePhoneSignalStrength5—MuteMicrophone6—TransferTo/FromUconnect®
System7—ConferenceCall*8—ManagePairedMobilePhones9—TextMessaging**10 — Direct Dial Pad
11 — Recent Call Log12 — Browse Phone Book Entries(Contains 911)13 — End Call14 — Call/Redial/Hold*—Conferencecallfeatureonlyavail-able on GSM mobile devices** — Text messaging feature not avail-able on all mobile phones (requiresBluetooth®MAP profile)
ELECTRONICS
82
Page 94 of 148
DID Selectable Menu Items
•TheDIDcanbeusedtoselectandconfigurewhichvehicleinformationisdisplayed.
To s t e p t o e a c h m a i n m e n u f e a t u r e p u s h t h e U Por DOWNbutton once for
each step. A step from the last item in the list will cause the first item in the feature list
to be displayed. The following features are in the Main menu:
•Tach•Audio
•Mph/Kmh•StoredMessages
•VehicleInfo•ScreenSetUp
•FuelEconomy•Performance
•TripA•Hibernate
•TripB
NOTE:
For features in the DID that can be reset (Average Fuel Economy), the DID prompts a
reset with a RIGHT arrow button graphic and the word RESET next to it.
Key Fob Programmable Features
The following features may also be programmed by using the Key Fob transmitter or the
ignition and driver's door lock switch.
NOTE:
Pushing the LOCK button while you are inside the vehicle will activate the Vehicle Security
Alarm. Opening a door with the Vehicle Security Alarm activated will cause the alarm to
sound. Push the UNLOCK button to deactivate the Vehicle Security Alarm.
Unlock On First Press
To u n l o c k e i t h e r t h e d r i v e r ' s s i d e , o r a l l d o o r s , o n t h e f i r s t p u s h o f t h e U N L O C K b u t t o n :
•Push and hold the LOCK button for at least four seconds, but no longer than 10 seconds.
Then, push and hold the UNLOCK button while still holding the LOCK button.
•Releasebothbuttonsatthesametime.
Auto Unlock Doors On Exit
To h a v e a l l o f t h e v e h i c l e d o o r s u n l o c k w h e n a n y d o o r i s o p e n e d :
•Enteryourvehicleandcloseallthedoors,andfastenyourseatbelt.
•CycletheignitionswitchbetweentheLOCKandONpositionfourtimes,endinginthe
LOCK position (do not start the engine).
•PushthepowerdoorUNLOCKswitchtounlockthedoors.Asinglechimewillindicate
that programming is complete.
Sound Horn With Lock
To t u r n t h e h o r n c h i r p o n o r o f f w h e n t h e d o o r s a r e l o c k e d :
•PushtheLOCKbuttonandPANICbuttonatthesametimeforatleastfourseconds,
but no longer than 10 seconds.
•Releasebothbuttonsatthesametime.
ELECTRONICS
92
Page 95 of 148
Flashing Lights With Lock
The turn signal lights flash when the doors are locked, which can be turned on or off.
To t u r n t h i s f e a t u r e o n o r o f f :
•PushandholdtheUNLOCKbuttonandtheLOCKbuttonatthesametimeforatleast
four seconds, but no longer than 10 seconds.
•Releasebothbuttonsatthesametime.
PERFORMANCE PAGES
DID Performance Features
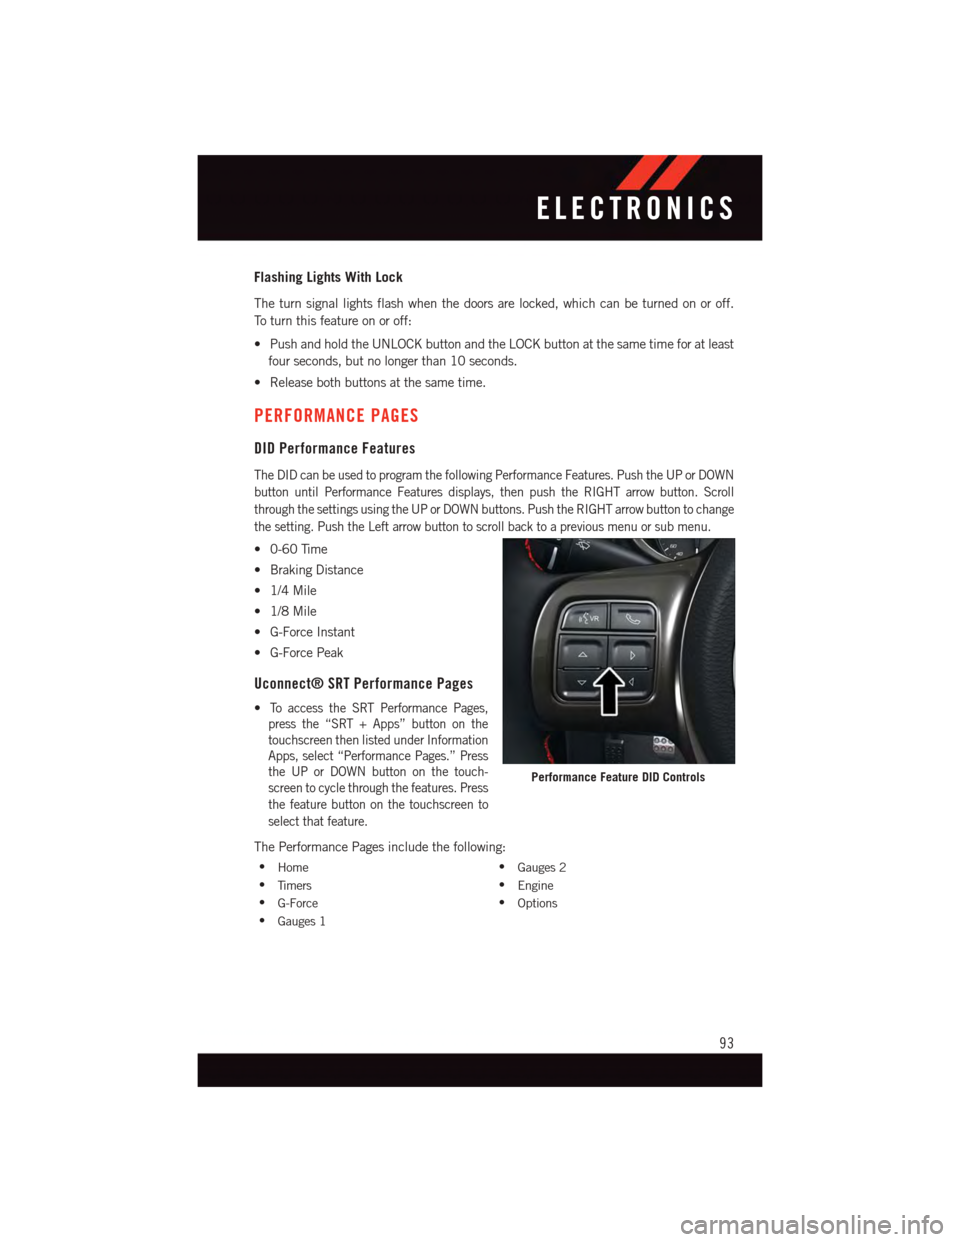
The DID can be used to program the following Performance Features. Push the UP or DOWN
button until Performance Features displays, then push the RIGHT arrow button. Scroll
through the settings using the UP or DOWN buttons. Push the RIGHT arrow button to change
the setting. Push the Left arrow button to scroll back to a previous menu or sub menu.
•0-60Time
•BrakingDistance
•1/4Mile
•1/8Mile
•G-ForceInstant
•G-ForcePeak
Uconnect® SRT Performance Pages
•To a c c e s s t h e S R T P e r f o r m a n c e P a g e s ,
press the “SRT + Apps” button on the
touchscreen then listed under Information
Apps, select “Performance Pages.” Press
the UP or DOWN button on the touch-
screen to cycle through the features. Press
the feature button on the touchscreen to
select that feature.
The Performance Pages include the following:
•Home•Gauges 2
•Ti m e r s•Engine
•G-Force•Options
•Gauges 1
Performance Feature DID Controls
ELECTRONICS
93
Page 96 of 148
PROGRAMMABLE FEATURES
Uconnect® Customer Programmable Features
The Uconnect®system allows you to access Customer Programmable feature settings
such as Display, Voice, Clock, Safety & Driving Assistance, Lights, Doors & Locks, Engine
Off Options, Audio, Phone / Bluetooth, SiriusXM Setup, Restore Settings, Clear Personal
Data, and System Information through buttons on the touchscreen.
•Pressthe“SRT&Apps”buttononthetouchscreen,thenpressthe“Settings”button
on the touchscreen to access the Settings screen. When making a selection, scroll up
or down until the preferred setting is highlighted, then press and release the preferred
setting until a check-mark appears next to the setting, showing that setting has been
selected. The following feature settings are available:
•Display•Audio
•Voice•Phone/Bluetooth
•Clock•SiriusXMSetup
•Safety&DrivingAssistance•RestoreSettings
•Lights•ClearPersonalData
•Doors&Locks•SystemInformation
•EngineOffOptions
UNIVERSAL GARAGE DOOR OPENER (HomeLink®)
HomeLink®replaces up to three hand-held transmitters that operate devices such as
garage door openers, motorized gates, lighting or home security systems. The HomeLink®
unit is powered by your vehicles 12 Volt battery.
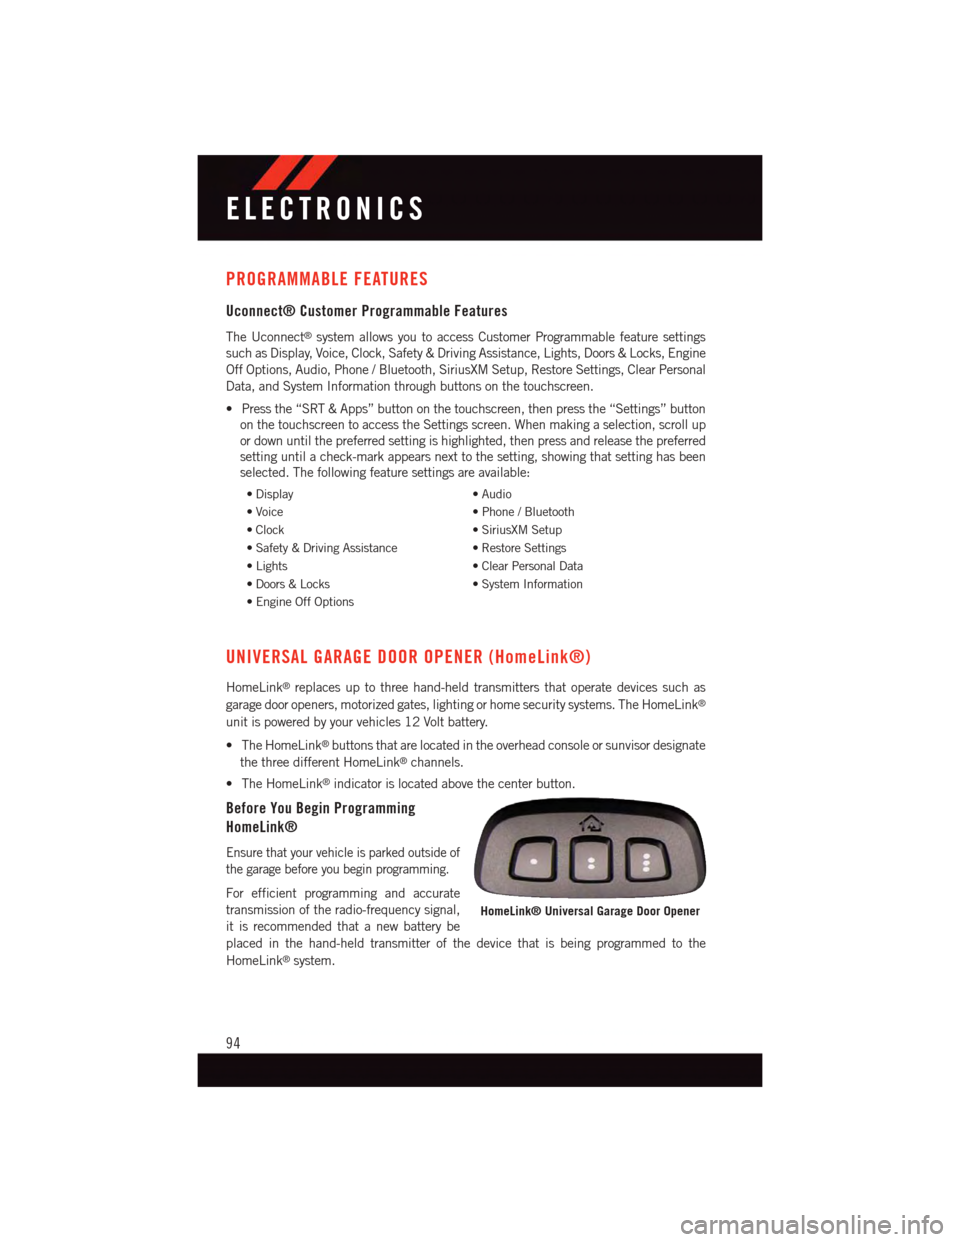
•TheHomeLink®buttons that are located in the overhead console or sunvisor designate
the three different HomeLink®channels.
•TheHomeLink®indicator is located above the center button.
Before You Begin Programming
HomeLink®
Ensure that your vehicle is parked outside of
the garage before you begin programming.
For efficient programming and accurate
transmission of the radio-frequency signal,
it is recommended that a new battery be
placed in the hand-held transmitter of the device that is being programmed to the
HomeLink®system.
HomeLink® Universal Garage Door Opener
ELECTRONICS
94
Page 97 of 148
To e r a s e t h e c h a n n e l s , p l a c e t h e i g n i t i o n s w i t c h i n t o t h e O N / R U N p o s i t i o n , t h e n p u s h a n d
hold the two outside HomeLink®buttons (I and III) for up to 20 seconds or until the red
indicator flashes.
NOTE:
Erasing all channels should only be performed when programming HomeLink®for the first
time. Do not erase channels when programming additional buttons.
If you have any problems, or require assistance, please call toll-free 1-800-355-3515 or,
on the Internet at HomeLink.com for information or assistance.
Programming A Rolling Code
NOTE:
For programming Garage Door Openers that were manufactured after 1995. These Garage
Door Openers can be identified by the “LEARN” or “TRAIN” button located where the
hanging antenna is attached to the Garage Door Opener. It is NOT the button that is
normally used to open and close the door. The name and color of the button may vary by
manufacturer.
1. Place the ignition switch into the ON/RUN position.
2. Place the hand-held transmitter 1 to 3 inches (3 to 8 cm) away from the HomeLink®
button you wish to program while keeping the HomeLink®indicator light in view.
3. Push and hold the HomeLink®button you want to program while you push and hold
the hand-held transmitter button.
4. Continue to hold both buttons and observe the indicator light. The HomeLink®
indicator will flash slowly and then rapidly after HomeLink®has received the fre-
quency signal from the hand-held transmitter. Release both buttons after the indicator
light changes from slow to rapid.
5. At the garage door opener motor (in the garage), locate the “LEARN” or “TRAINING”
button. This can usually be found where the hanging antenna wire is attached to the
garage door opener motor. Firmly push and release the “LEARN” or “TRAINING”
button.
NOTE:
Yo u h a v e 3 0 s e c o n d s i n w h i c h t o i n i t i a t e t h e n e x t s t e p a f t e r t h e L E A R N b u t t o n h a s b e e n
pushed.
6.Return to the vehicle and push the programmed HomeLink®button twice (holding the
button for two seconds each time). If the device is plugged in and activates, programming
is complete.
NOTE:
If the device does not activate, push the button a third time (for two seconds) to complete
the training.
7. To program the remaining two HomeLink®buttons, repeat each step for each
remaining button. DO NOT erase the channels.
ELECTRONICS
95
Page 98 of 148
Programming A Non-Rolling Code
NOTE:
For programming Garage Door Openers manufactured before 1995.
1. Turn the ignition switch to the ON/RUN position.
2. Place the hand-held transmitter 1 to 3 inches (3 to 8 cm) away from the HomeLink®
button you wish to program while keeping the HomeLink®indicator light in view.
3. Push and hold the HomeLink®button you want to program while you push and hold
the hand-held transmitter button.
4. Continue to hold both buttons and observe the indicator light. The HomeLink®
indicator will flash slowly and then rapidly after HomeLink®has received the fre-
quency signal from the hand-held transmitter. Release both buttons after the indicator
light changes from slow to rapid.
5. Push and hold the programmed HomeLink®button and observe the indicator light.
If the indicator light stays on constantly, programming is complete and the garage door
(or device) should activate when the HomeLink®button is pushed.
6. To program the two remaining HomeLink®buttons, repeat each step for each
remaining button. DO NOT erase the channels.
Using HomeLink®
To o p e r a t e , p u s h a n d r e l e a s e t h e p r o g r a m m e d H o m e L i n k®button. Activation will now
occur for the programmed device (i.e., garage door opener, gate operator, security system,
entry door lock, home/office lighting, etc.,). The hand-held transmitter of the device may
also be used at any time.
WARNING!
•Yourmotorizeddoororgatewillopenandclosewhileyouareprogrammingthe
universal transceiver. Do not program the transceiver if people or pets are in the
path of the door or gate.
•Donotrunyourvehicleinaclosedgarageorconfinedareawhileprogrammingthe
transceiver. Exhaust gas from your vehicle contains Carbon Monoxide (CO) which is
odorless and colorless. Carbon Monoxide is poisonous when inhaled and can cause
you and others to be severely injured or killed.
ELECTRONICS
96