buttons DODGE VIPER 2015 VX / 3.G User Guide
[x] Cancel search | Manufacturer: DODGE, Model Year: 2015, Model line: VIPER, Model: DODGE VIPER 2015 VX / 3.GPages: 148, PDF Size: 21.7 MB
Page 29 of 148
ELECTRONIC CONTROL DAMPING SYSTEM
•Thisvehiclemaybeequippedwithanelectroniccontrolleddampeningsystem.This
system reduces body roll and pitch in many driving situations including cornering,
acceleration and braking.
•Thissystemallowsforastreetsuspensiondampingsettingorafirmerracesuspension
damping setting. There are two modes of operation:
STREET MODE
•Thismodewillgiveasporty,butcomfort-
able ride.
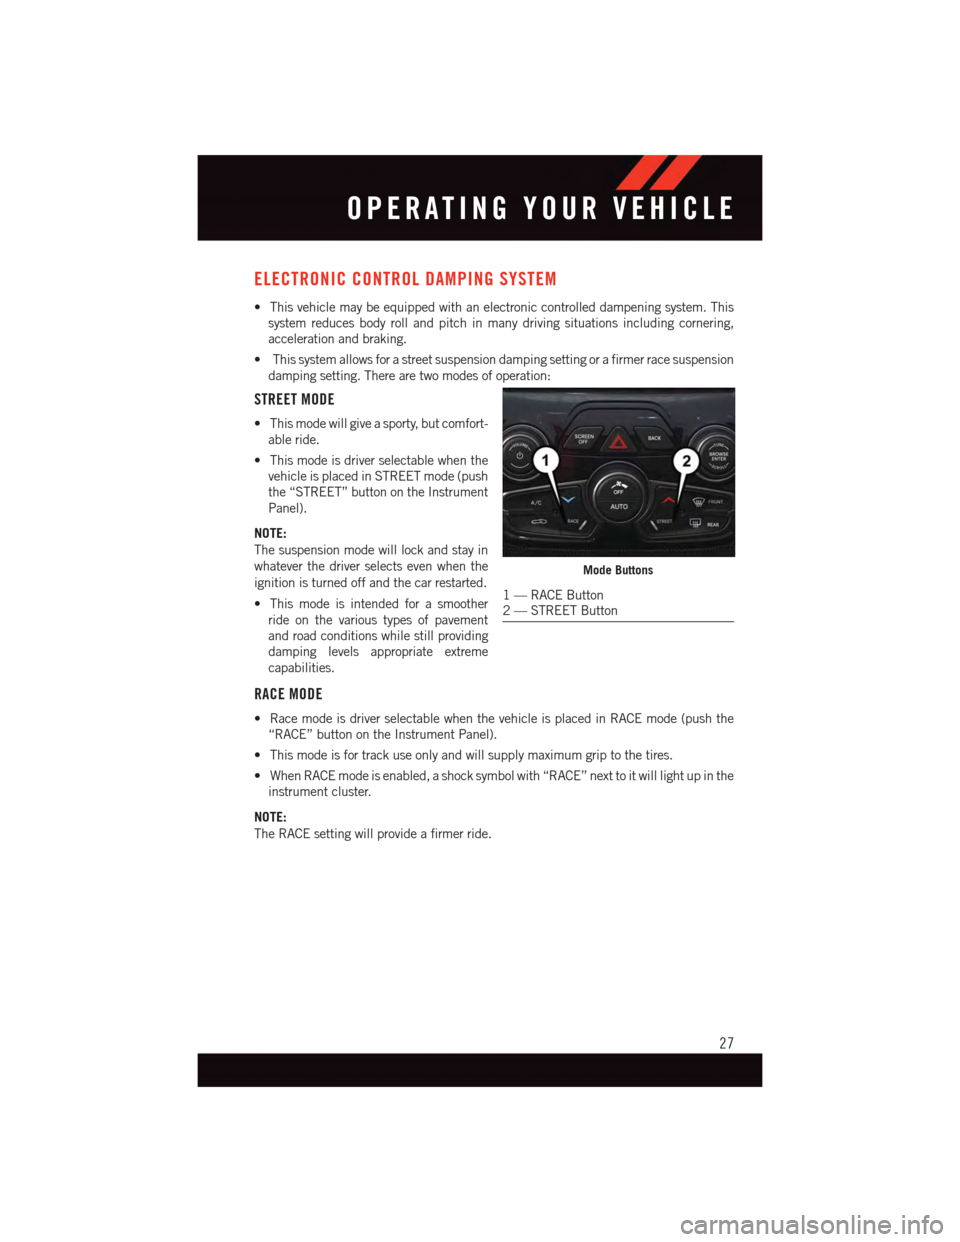
•Thismodeisdriverselectablewhenthe
vehicle is placed in STREET mode (push
the “STREET” button on the Instrument
Panel).
NOTE:
The suspension mode will lock and stay in
whatever the driver selects even when the
ignition is turned off and the car restarted.
•Thismodeisintendedforasmoother
ride on the various types of pavement
and road conditions while still providing
damping levels appropriate extreme
capabilities.
RACE MODE
•RacemodeisdriverselectablewhenthevehicleisplacedinRACEmode(pushthe
“RACE” button on the Instrument Panel).
•Thismodeisfortrackuseonlyandwillsupplymaximumgriptothetires.
•WhenRACEmodeisenabled,ashocksymbolwith“RACE”nexttoitwilllightupinthe
instrument cluster.
NOTE:
The RACE setting will provide a firmer ride.
Mode Buttons
1—RACEButton2—STREETButton
OPERATING YOUR VEHICLE
27
Page 35 of 148
AUTOMATIC TEMPERATURE CONTROL (ATC)
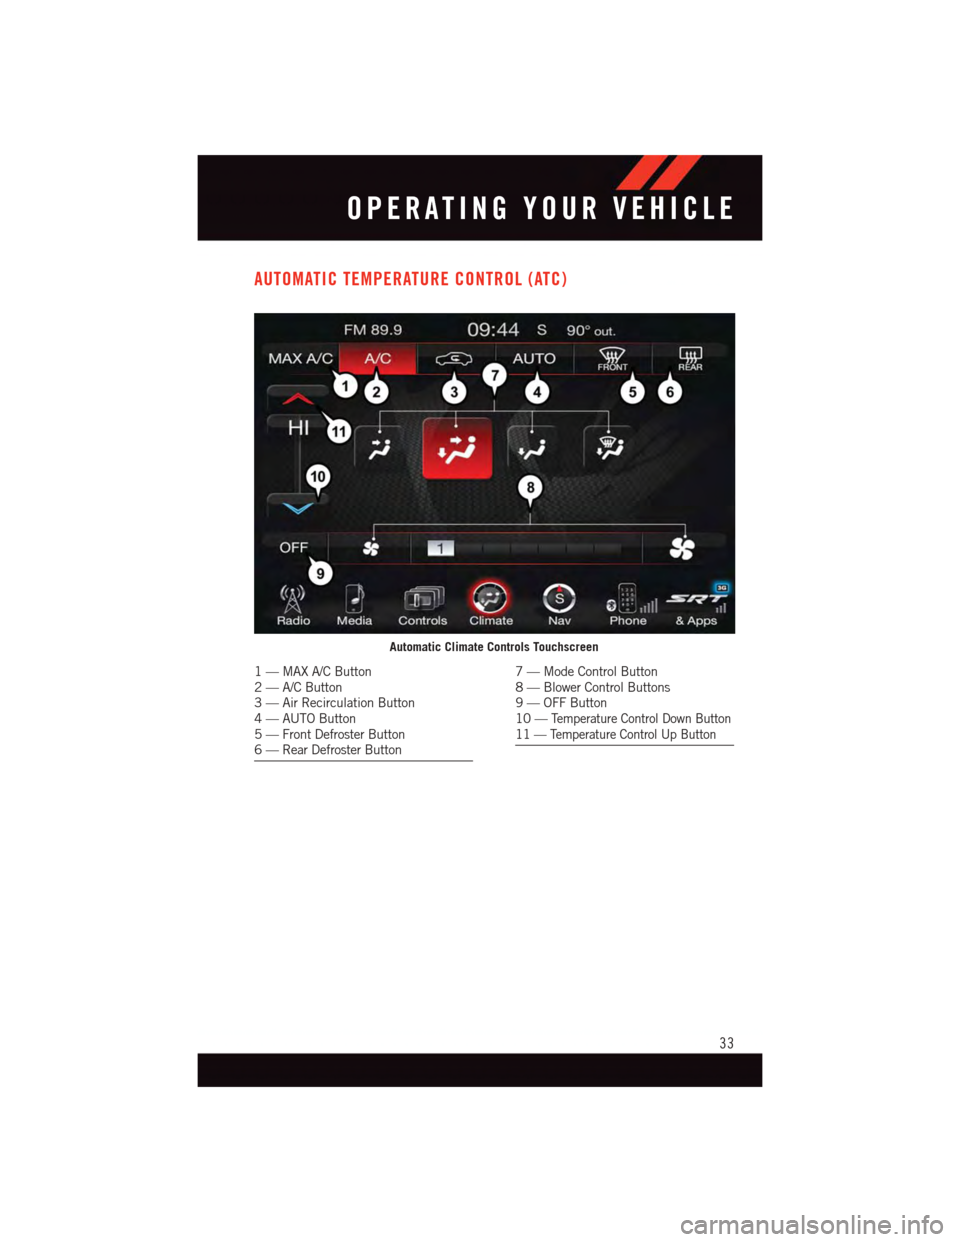
Automatic Climate Controls Touchscreen
1—MAXA/CButton2—A/CButton3—AirRecirculationButton4—AUTOButton5—FrontDefrosterButton6—RearDefrosterButton
7—ModeControlButton8—BlowerControlButtons9—OFFButton10 —Te m p e r a t u r e C o n t r o l D o w n B u t t o n11 — Temperature Control Up Button
OPERATING YOUR VEHICLE
33
Page 36 of 148
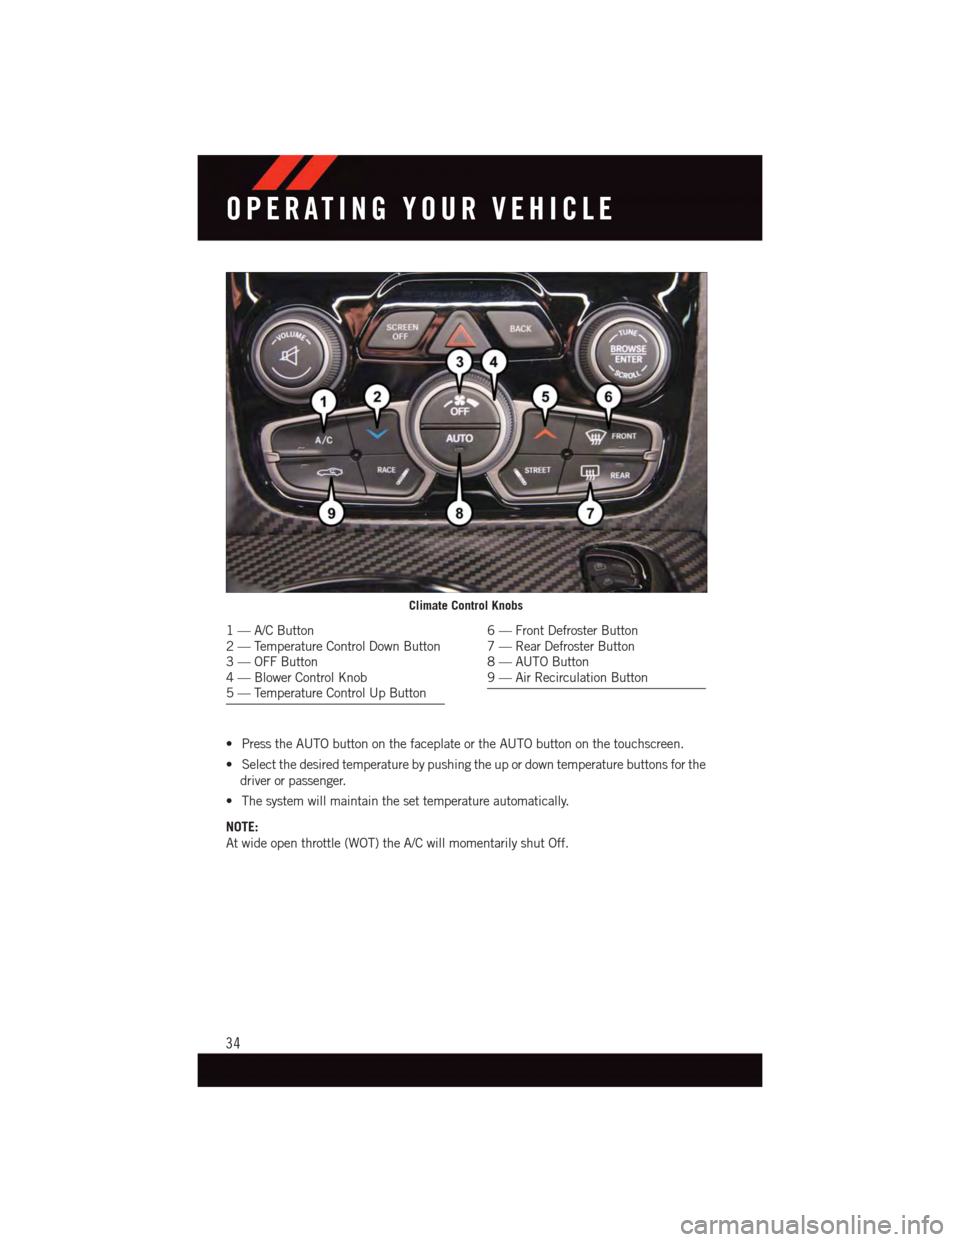
•PresstheAUTObuttononthefaceplateortheAUTObuttononthetouchscreen.
•Selectthedesiredtemperaturebypushingtheupordowntemperaturebuttonsforthe
driver or passenger.
•Thesystemwillmaintainthesettemperatureautomatically.
NOTE:
At wide open throttle (WOT) the A/C will momentarily shut Off.
Climate Control Knobs
1—A/CButton2—TemperatureControlDownButton3—OFFButton4—BlowerControlKnob5—TemperatureControlUpButton
6—FrontDefrosterButton7—RearDefrosterButton8—AUTOButton9—AirRecirculationButton
OPERATING YOUR VEHICLE
34
Page 41 of 148
Before You Drive, Familiarize Yourself With The Easy-To-Use Uconnect® System.
1. The ASSIST and 9-1-1 buttons are located on your rearview mirror. The ASSIST button
is used for contacting Roadside Assistance, Vehicle Care and Uconnect®Care. The
9-1-1 button connects you directly to emergency assistance.
NOTE:
Vehicles sold in Canada and Mexico DO NOT have 9-1-1 Call system capabilities. 9-1-1
or other emergency line operators in Canada and Mexico may not answer or respond to
9-1-1 system calls.
2. The Uconnect®“Apps” button on the touchscreen is where you should begin the
registration process for your included trial of Uconnect®Access. From here, you can
also manage your Apps and purchase WiFi.
3. The Uconnect®Voice Command and Uconnect®Phone buttons are located on the left
side of your steering wheel. These buttons allow you to use your voice to make phone
calls, send and receive text messages, control your media, enter navigation destina-
tions and more all without taking your hands off the steering wheel.
Included Trial Period For New Vehicles
Yo u r n e w v e h i c l e m a y c o m e w i t h a n i n c l u d e d t r i a l p e r i o d f o r u s e o f t h e U c o n n e c t®Access
Services starting at the date of vehicle purchase (date based on vehicle sales notification
from your dealer). To activate the trial, you must first register with Uconnect®Access.
Once registered, Uconnect®Access customers can purchase additional Services and
Apps over the lifetime of their vehicle ownership.
Features And Packages
After the trial period, you can subscribe to continue your service by visiting the Uconnect®
Store located within the Mopar Owner Connect website (moparownerconnect.com).
If you need assistance, U.S. residents can call Uconnect®Care at 855-792-4241.
For the latest information on packages and pricing information: U.S. residents visit
DriveUconnect.com.
Uconnect® Access Registration (Uconnect® 8.4AN, U.S. 48 Contiguous States,
Alaska And Hawaii)
To u n l o c k t h e f u l l p o t e n t i a l o f U c o n n e c t®Access in your vehicle, you first need to register
with Uconnect®Access.
1. From the parked vehicle with the radio touchscreen powered on, select the “Apps”
button located near the bottom right-hand corner of the radio touchscreen.
NOTE:
Should you require assistance anytime during the registration process, simply call
Uconnect®Care at 1-855-792-4241.
ELECTRONICS
39
Page 57 of 148
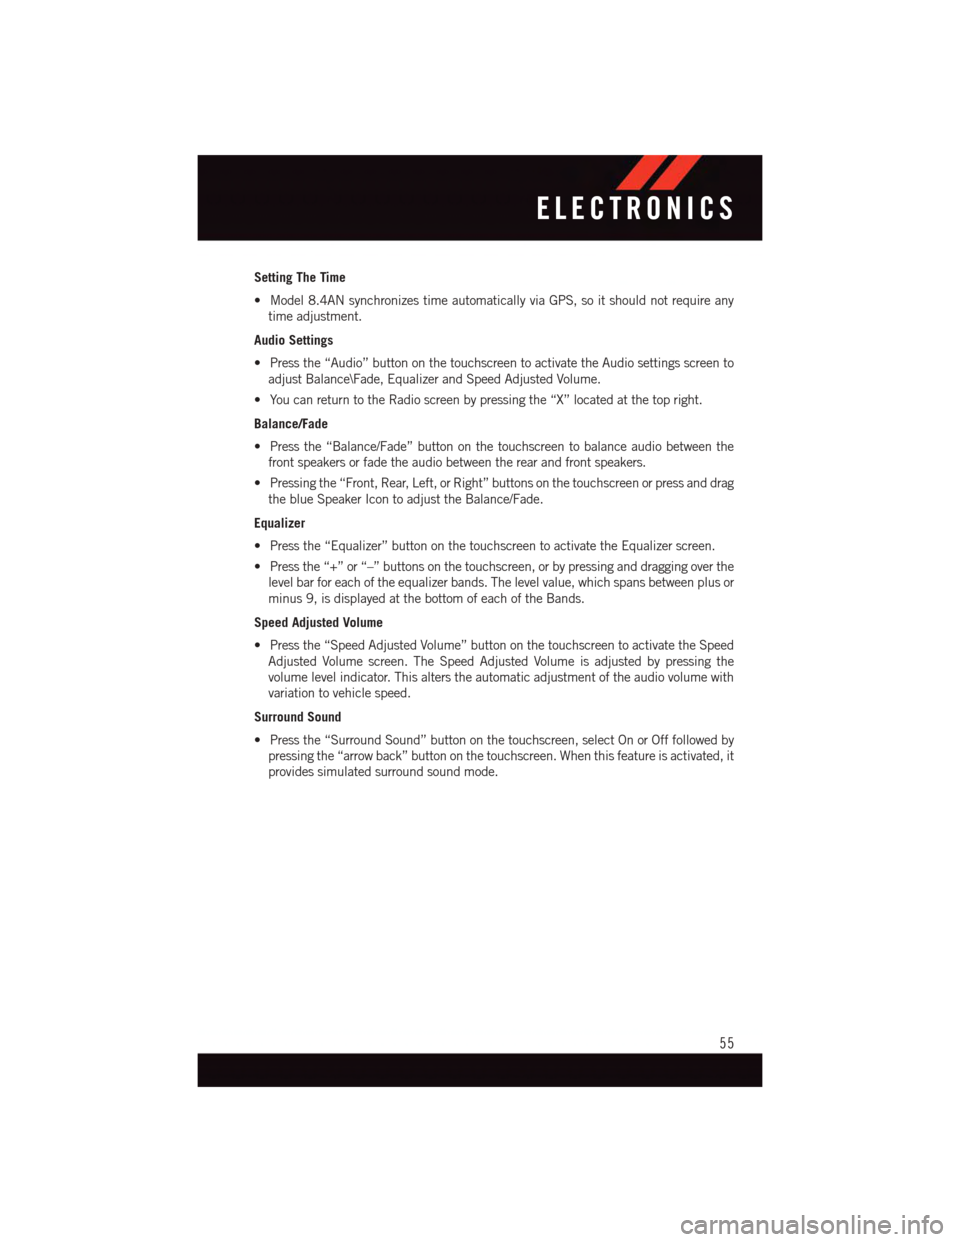
Setting The Time
•Model8.4ANsynchronizestimeautomaticallyviaGPS,soitshouldnotrequireany
time adjustment.
Audio Settings
•Pressthe“Audio”buttononthetouchscreentoactivatetheAudiosettingsscreento
adjust Balance\Fade, Equalizer and Speed Adjusted Volume.
•YoucanreturntotheRadioscreenbypressingthe“X”locatedatthetopright.
Balance/Fade
•Pressthe“Balance/Fade”buttononthetouchscreentobalanceaudiobetweenthe
front speakers or fade the audio between the rear and front speakers.
•Pressingthe“Front,Rear,Left,orRight”buttonsonthetouchscreenorpressanddrag
the blue Speaker Icon to adjust the Balance/Fade.
Equalizer
•Pressthe“Equalizer”buttononthetouchscreentoactivatetheEqualizerscreen.
•Pressthe“+”or“–”buttonsonthetouchscreen,orbypressinganddraggingoverthe
level bar for each of the equalizer bands. The level value, which spans between plus or
minus 9, is displayed at the bottom of each of the Bands.
Speed Adjusted Volume
•Pressthe“SpeedAdjustedVolume”buttononthetouchscreentoactivatetheSpeed
Adjusted Volume screen. The Speed Adjusted Volume is adjusted by pressing the
volume level indicator. This alters the automatic adjustment of the audio volume with
variation to vehicle speed.
Surround Sound
•Pressthe“SurroundSound”buttononthetouchscreen,selectOnorOfffollowedby
pressing the “arrow back” button on the touchscreen. When this feature is activated, it
provides simulated surround sound mode.
ELECTRONICS
55
Page 58 of 148
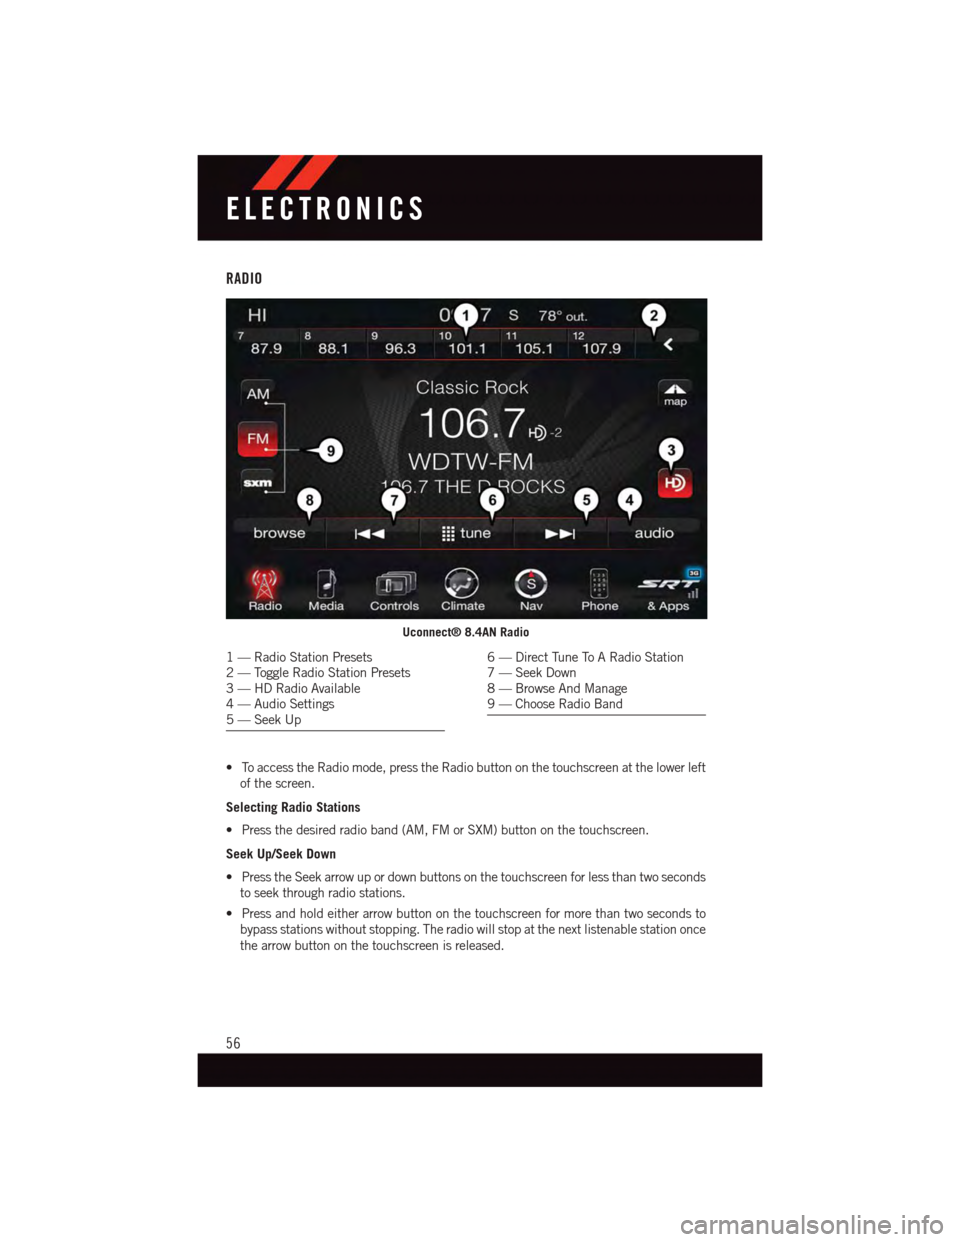
RADIO
•ToaccesstheRadiomode,presstheRadiobuttononthetouchscreenatthelowerleft
of the screen.
Selecting Radio Stations
•Pressthedesiredradioband(AM,FMorSXM)buttononthetouchscreen.
Seek Up/Seek Down
•PresstheSeekarrowupordownbuttonsonthetouchscreenforlessthantwoseconds
to seek through radio stations.
•Pressandholdeitherarrowbuttononthetouchscreenformorethantwosecondsto
bypass stations without stopping. The radio will stop at the next listenable station once
the arrow button on the touchscreen is released.
Uconnect® 8.4AN Radio
1—RadioStationPresets2—ToggleRadioStationPresets3—HDRadioAvailable4—AudioSettings5—SeekUp
6—DirectTuneToARadioStation7—SeekDown8—BrowseAndManage9—ChooseRadioBand
ELECTRONICS
56
Page 59 of 148
Direct Tune
•Tunedirectlytoaradiostationbypressingthe“Tune”buttononthescreen,and
entering the desired station number.
Store Radio Presets Manually
Yo u r r a d i o c a n s t o r e 3 6 t o t a l p r e s e t s t a t i o n s , 1 2 p r e s e t s p e r b a n d ( A M , F M a n d S X M ) .
They are shown at the top of your radio screen. To see the 12 preset stations per band,
press the arrow button on the touchscreen at the top right of the screen to toggle between
the two sets of six presets.
To s t o r e a r a d i o p r e s e t m a n u a l l y, f o l l o w t h e s t e p s b e l o w :
1. Tune to the desired station.
2. Press and hold the desired numbered button on the touchscreen for more than two
seconds or until you hear a confirmation beep.
HD Radio
•HDRadiotechnology(availableonUconnect®8.4AN) allows broadcasters to transmit
ahigh-qualitydigitalsignal.
•WithanHDradioreceiver,thelistenerisprovidedwithaclearsoundthatenhancesthe
listening experience. HD radio can also transmit data such as song title or artist.
SiriusXM PREMIER OVER 160 CHANNELS
Get every channel available on your satellite radio, and enjoy all you want, all in one place.
Hear commercial-free music plus sports, news, talk and entertainment. Get all the
premium programming, including Howard Stern, every NFL game, Oprah Radio®,every
MLB®and NHL®game, every NASCAR®race, Martha Stewart and more. And get 20+
extra channels, including SiriusXM Latino, offering 20 channels of commercial free
music, news, talk, comedy, sports and more dedicated to Spanish language programming.
•ToaccessSiriusXMSatelliteRadio,pressthe“SXM”buttononthetouchscreenonthe
main Radio screen.
The following describes features that are available when in SiriusXM Satellite Radio mode:
Seek Up/Seek Down
•PresstheSeekarrowbuttonsonthetouchscreenforlessthantwosecondstoseek
through channels in SXM mode.
•Pressandholdeitherarrowbuttononthetouchscreenformorethantwosecondsto
bypass channels without stopping. The radio will stop at the next listenable channel
once the arrow button on the touchscreen is released.
Direct Tune
•TunedirectlytoaSXMchannelbypressingthe“Tune”buttononthetouchscreenon
the screen, and entering the desired station number.
ELECTRONICS
57
Page 61 of 148
Replay
Lets you replay up to 44 minutes of the content of the current SiriusXM channel.
Replay Option Option Description
Play/Pause Press to Pause content playback. Press Pause/Play again to resumeplayback.
Rewind/RW Rewinds the channel content in steps of five seconds. Press and hold torewind continuously, then release to begin playing content at that point.
Fast Forward/FW Forwards the content, and works similarly to Rewind/RW. However, FastForward/FW can only be used when content has been previouslyrewound.
Replay Time Displays the amount of time in the upper center of the screen by whichyour content lags the Live channel.
Live Resumes playback of Live content at any time while replaying rewoundcontent.
•SiriusXMservicesrequiresubscriptions,soldseparatelyafterthe12-monthtrial
included with the new vehicle purchase.If you decide to continue your service at the
end of your trial subscription, the plan you choose will automatically renew and bill at
then-current rates until you call SiriusXM at 1-866-635-2349 for U.S. residents and
1-888-539-7474 for Canadian residents to cancel. See SiriusXM Customer Agreement
for complete terms at www.siriusxm.com (US residents) or siriusxm.ca (Canadian
residents).All fees and programming subject to change. Our satellite service is
available only to those at least 18 and older in the 48 contiguous USA and D.C. Our
Sirius satellite service is also available in PR (with coverage limitations). Our Internet
radio service is available throughout our satellite service area and in AK and HI. ©2014
Sirius XM Radio Inc. Sirius, XM and all related marks and logos are trademarks of Sirius
XM Radio Inc.
Disc Operation (If Equipped)
•YourvehiclemayhavearemoteCDplayerlocatedinthelowercenterconsolestorage
bin, or in the lower center bench seat bin.
•CD/DiscModeisenteredbyeitherinsertingaCD/DiscorbypressingtheMEDIAbutton
located on the side of the display. Once in Media Mode, select “Disc.”
•GentlyinsertoneCDintotheCDplayerwiththeCDlabelfacingasindicatedonthe
illustration located on the Disc player.
Seek Up/Down Buttons
•PresstoseekthroughDisctracks.
•Holdeitherbuttontobypasstrackswithoutstopping.
Browse
•Pressthe“Browse”buttononthetouchscreentoscrollthroughandselectadesired
track on the Disc. Press the “Exit” button on the touchscreen if you wish to cancel the
browse function.
ELECTRONICS
59
Page 62 of 148
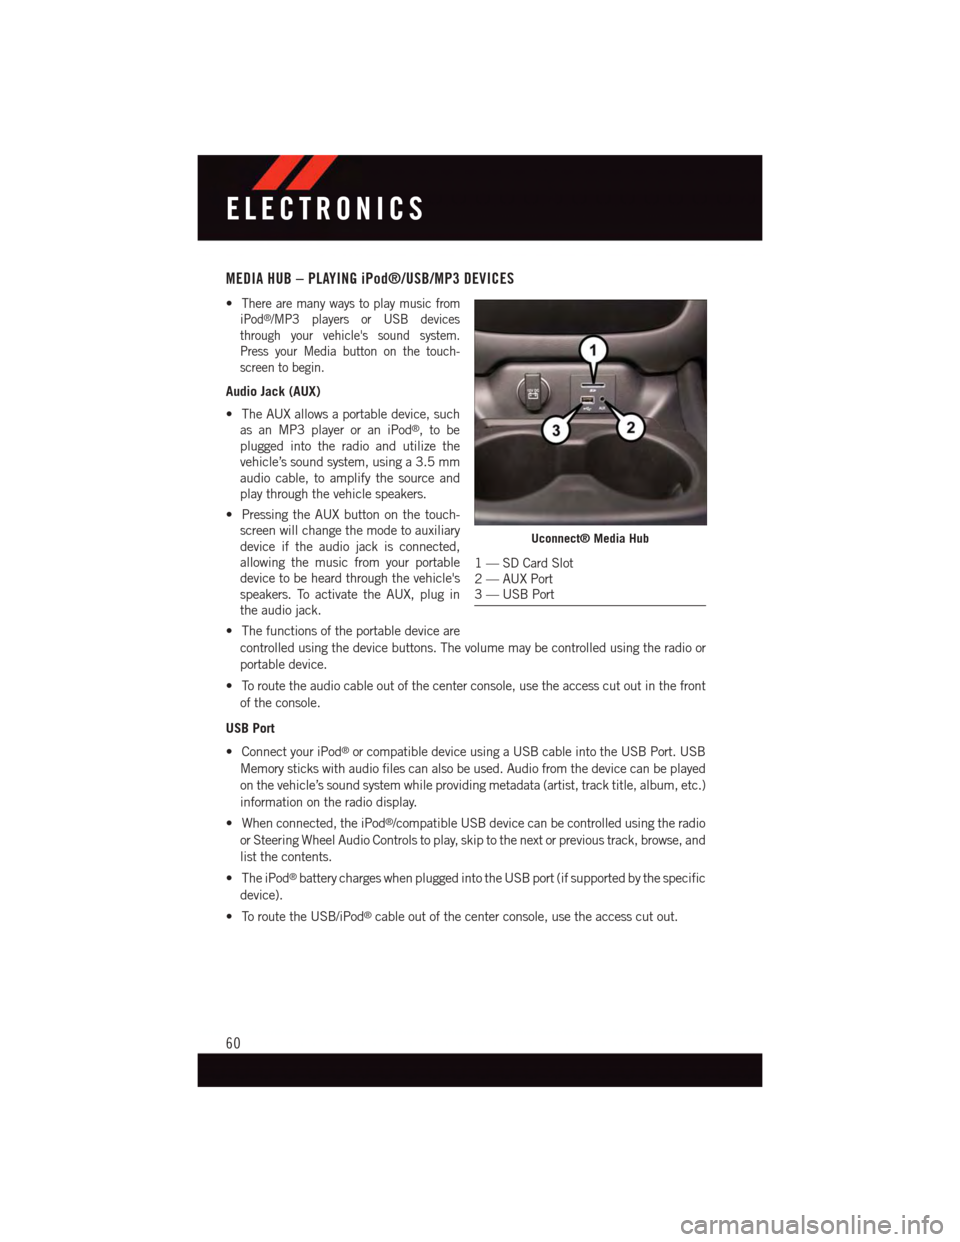
MEDIA HUB – PLAYING iPod®/USB/MP3 DEVICES
•There are many ways to play music from
iPod®/MP3 players or USB devices
through your vehicle's sound system.
Press your Media button on the touch-
screen to begin.
Audio Jack (AUX)
•TheAUXallowsaportabledevice,such
as an MP3 player or an iPod®,tobe
plugged into the radio and utilize the
vehicle’s sound system, using a 3.5 mm
audio cable, to amplify the source and
play through the vehicle speakers.
•PressingtheAUXbuttononthetouch-
screen will change the mode to auxiliary
device if the audio jack is connected,
allowing the music from your portable
device to be heard through the vehicle's
speakers. To activate the AUX, plug in
the audio jack.
•Thefunctionsoftheportabledeviceare
controlled using the device buttons. The volume may be controlled using the radio or
portable device.
•Toroutetheaudiocableoutofthecenterconsole,usetheaccesscutoutinthefront
of the console.
USB Port
•ConnectyouriPod®or compatible device using a USB cable into the USB Port. USB
Memory sticks with audio files can also be used. Audio from the device can be played
on the vehicle’s sound system while providing metadata (artist, track title, album, etc.)
information on the radio display.
•Whenconnected,theiPod®/compatible USB device can be controlled using the radio
or Steering Wheel Audio Controls to play, skip to the next or previous track, browse, and
list the contents.
•TheiPod®battery charges when plugged into the USB port (if supported by the specific
device).
•ToroutetheUSB/iPod®cable out of the center console, use the access cut out.
Uconnect® Media Hub
1—SDCardSlot2—AUXPort3—USBPort
ELECTRONICS
60
Page 65 of 148
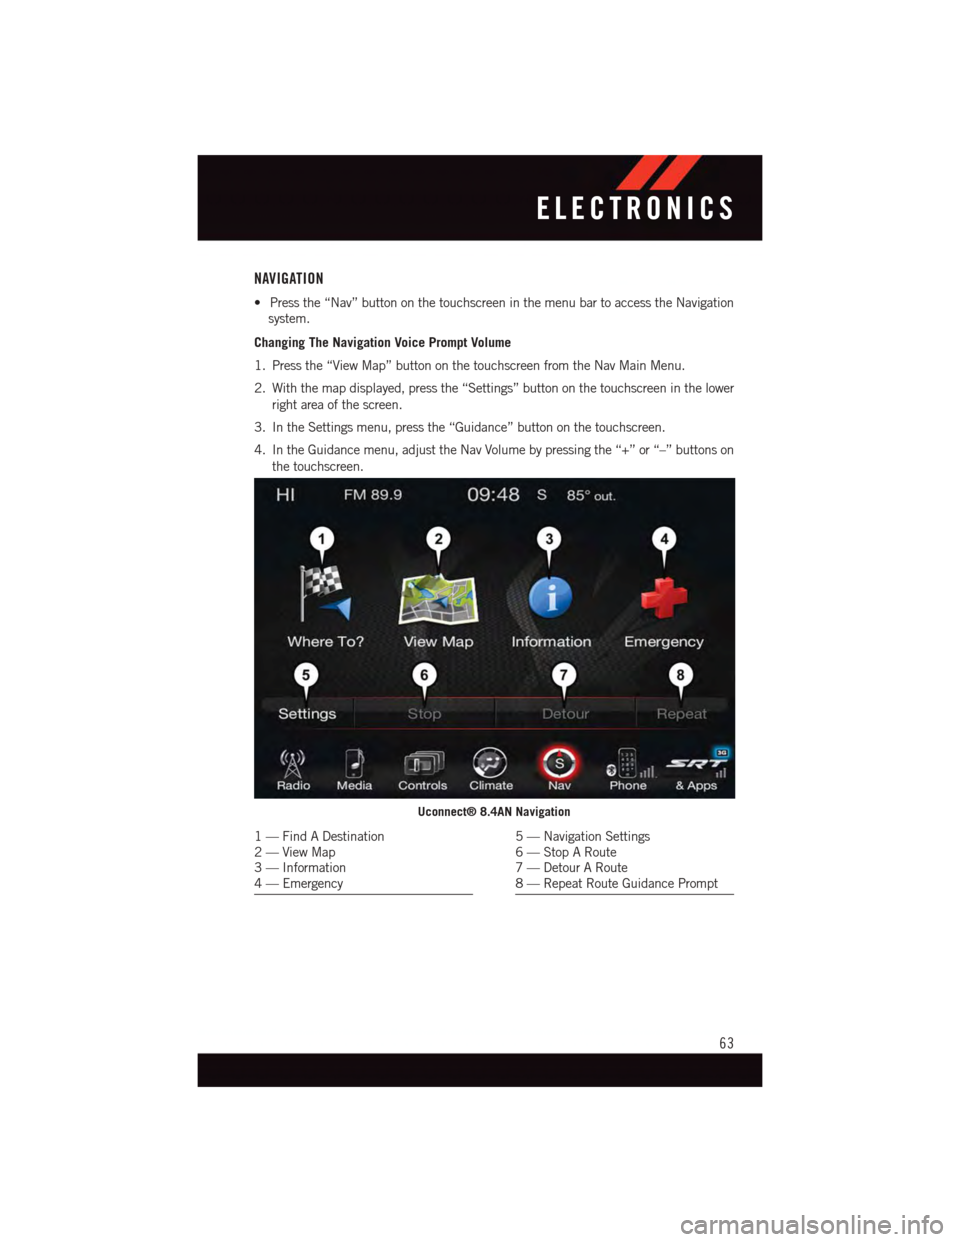
NAVIGATION
•Pressthe“Nav”buttononthetouchscreeninthemenubartoaccesstheNavigation
system.
Changing The Navigation Voice Prompt Volume
1. Press the “View Map” button on the touchscreen from the Nav Main Menu.
2. With the map displayed, press the “Settings” button on the touchscreen in the lower
right area of the screen.
3. In the Settings menu, press the “Guidance” button on the touchscreen.
4. In the Guidance menu, adjust the Nav Volume by pressing the “+” or “–” buttons on
the touchscreen.
Uconnect® 8.4AN Navigation
1—FindADestination2—ViewMap3—Information4—Emergency
5—NavigationSettings6—StopARoute7—DetourARoute8—RepeatRouteGuidancePrompt
ELECTRONICS
63