door lock FIAT 124 SPIDER 2019 Owner handbook (in English)
[x] Cancel search | Manufacturer: FIAT, Model Year: 2019, Model line: 124 SPIDER, Model: FIAT 124 SPIDER 2019Pages: 228, PDF Size: 5.08 MB
Page 130 of 228
REFUELLING THE
VEHICLE
162) 163) 164) 165) 166) 167)
Always stop the engine before
refuelling.
FUEL REQUIREMENTS
Only use premium unleaded fuel
(conforming to EN 228 specification
within E10) with a number of octanes
not lower than 95.
IMPORTANT USE ONLY UNLEADED
FUEL. Leaded fuel is harmful to the
catalytic converter and oxygen sensors
and will lead to deterioration of the
emission control system and or failures.
IMPORTANT The use of E10 fuel with
10% ethanol in Europe is safe for your
vehicle. Damage to your vehicle may
occur when ethanol exceeds this
recommendation.
IMPORTANT Never add fuel system
additives, otherwise the emission
control system could be damaged.
Contact a Fiat Dealership for details.
REFUELLING
PROCEDURE
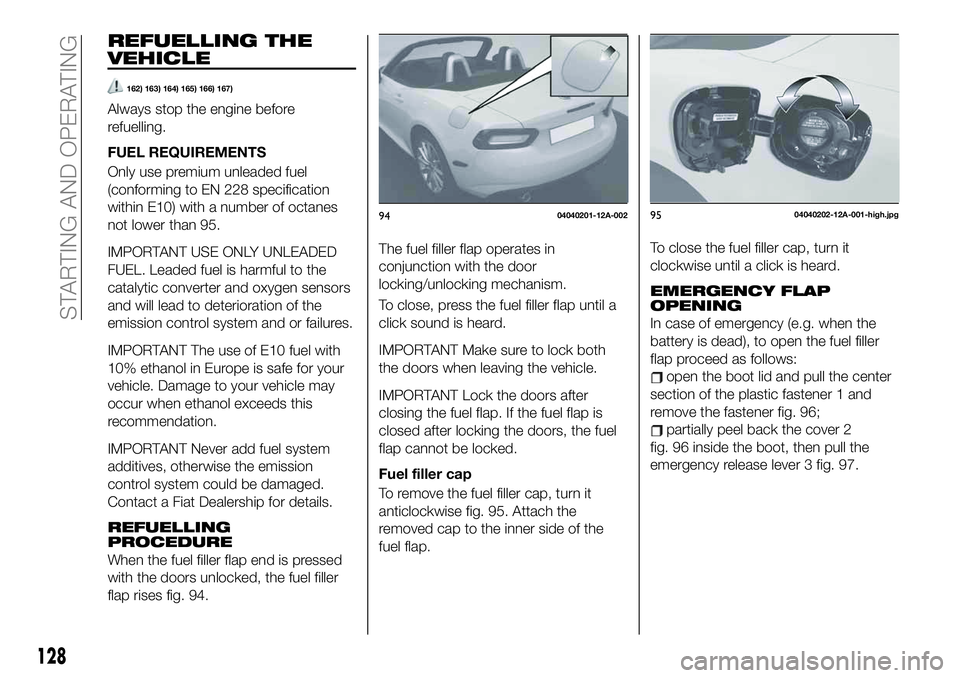
When the fuel filler flap end is pressed
with the doors unlocked, the fuel filler
flap rises fig. 94.The fuel filler flap operates in
conjunction with the door
locking/unlocking mechanism.
To close, press the fuel filler flap until a
click sound is heard.
IMPORTANT Make sure to lock both
the doors when leaving the vehicle.
IMPORTANT Lock the doors after
closing the fuel flap. If the fuel flap is
closed after locking the doors, the fuel
flap cannot be locked.
Fuel filler cap
To remove the fuel filler cap, turn it
anticlockwise fig. 95. Attach the
removed cap to the inner side of the
fuel flap.To close the fuel filler cap, turn it
clockwise until a click is heard.
EMERGENCY FLAP
OPENING
In case of emergency (e.g. when the
battery is dead), to open the fuel filler
flap proceed as follows:
open the boot lid and pull the center
section of the plastic fastener 1 and
remove the fastener fig. 96;
partially peel back the cover 2
fig. 96 inside the boot, then pull the
emergency release lever 3 fig. 97.
9404040201-12A-0029504040202-12A-001-high.jpg
128
STARTING AND OPERATING
Page 146 of 228
172)Halogen bulbs contain pressurised
gas, in the case of breakage they may
burst causing glass fragments to be
projected outwards.
173)Only replace bulbs when the engine is
off. Also ensure that the engine is cold, to
prevent the risk of burns.
174)Only replace the bulb when the
engine is off and the vehicle is in a safe
position that does not cause danger to the
traffic and allows for a safe replacement
(refer to “Parking” paragraph in “Starting
and operating” chapter). Also ensure that
the engine is cold, to prevent the risk of
burns.
IMPORTANT
30)Where possible, it is advisable to have
bulbs changed at a Fiat Dealership. Proper
operation and direction of the external
lights are essential for driving in safety and
comply with law.
31)Halogen bulbs must be handled
holding the metallic part only. Touching the
transparent part of the bulb with your
fingers may reduce the intensity of the
emitted light and even reduce the lifespan
of the bulb. In the event of accidental
contact, wipe the bulb with a cloth
moistened with alcohol and let the bulb dry
REPLACING FUSES
GENERAL INFORMATION
175) 176) 177) 178) 179)
32) 33)
Fuse location
Fuses are grouped together in two fuse
boxes located on the left side of the
vehicle and under the bonnet.
FUSES ON THE LEFT
SIDE OF THE VEHICLE
Proceed as follows:
make sure the ignition is switched
off, and other switches are off;
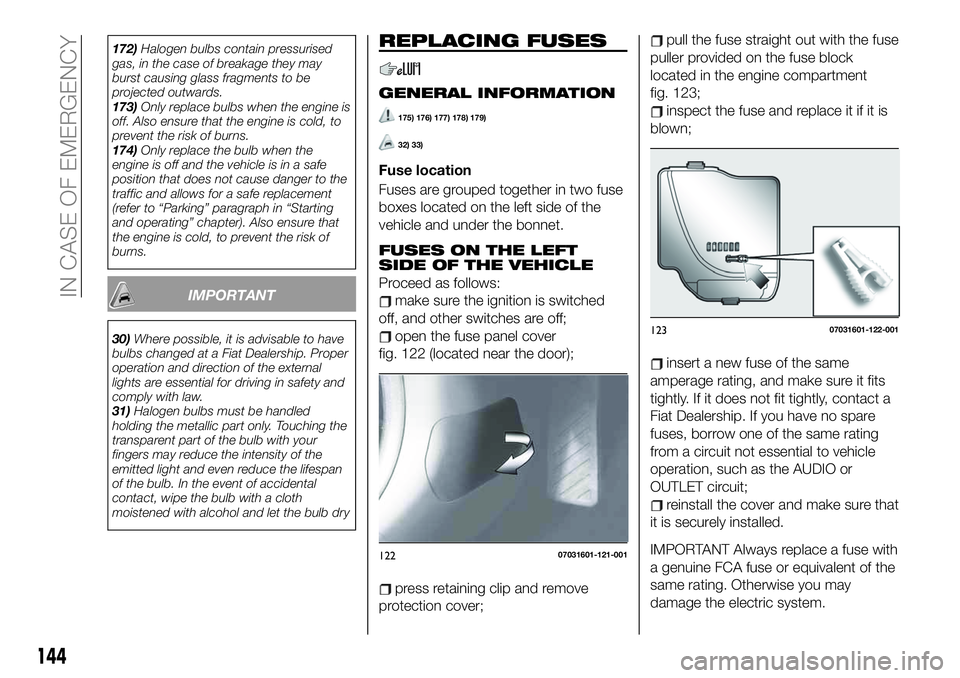
open the fuse panel cover
fig. 122 (located near the door);
press retaining clip and remove
protection cover;
pull the fuse straight out with the fuse
puller provided on the fuse block
located in the engine compartment
fig. 123;
inspect the fuse and replace it if it is
blown;
insert a new fuse of the same
amperage rating, and make sure it fits
tightly. If it does not fit tightly, contact a
Fiat Dealership. If you have no spare
fuses, borrow one of the same rating
from a circuit not essential to vehicle
operation, such as the AUDIO or
OUTLET circuit;
reinstall the cover and make sure that
it is securely installed.
IMPORTANT Always replace a fuse with
a genuine FCA fuse or equivalent of the
same rating. Otherwise you may
damage the electric system.12207031601-121-001
12307031601-122-001
144
IN CASE OF EMERGENCY
Page 149 of 228
147
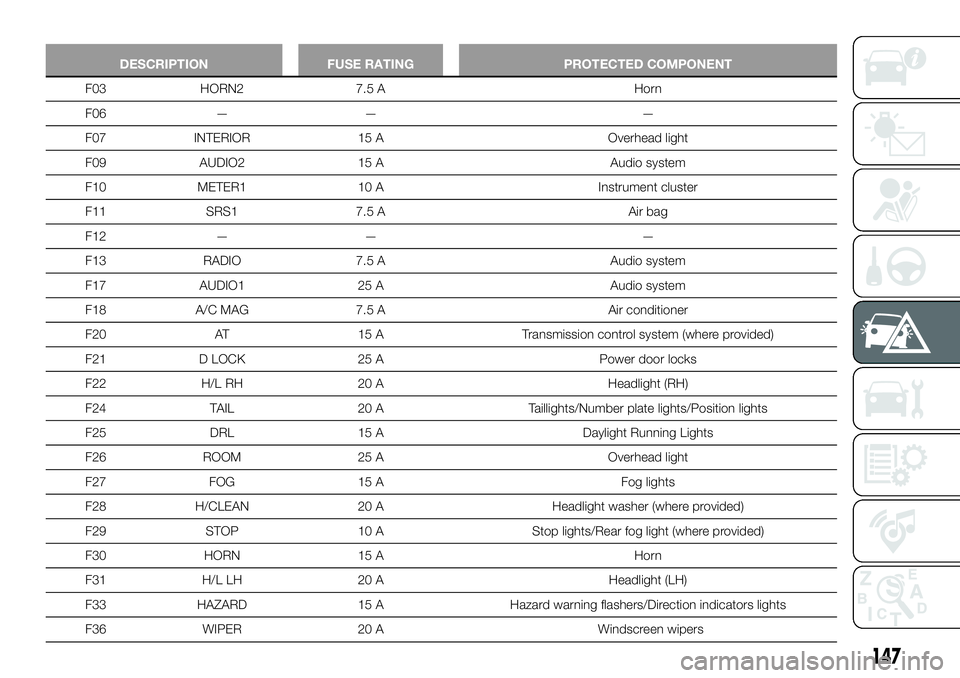
DESCRIPTION FUSE RATING PROTECTED COMPONENT
F03 HORN2 7.5 A Horn
F06 — — —
F07 INTERIOR 15 A Overhead light
F09 AUDIO2 15 A Audio system
F10 METER1 10 A Instrument cluster
F11 SRS1 7.5 A Air bag
F12 — — —
F13 RADIO 7.5 A Audio system
F17 AUDIO1 25 A Audio system
F18 A/C MAG 7.5 A Air conditioner
F20 AT 15 A Transmission control system (where provided)
F21 D LOCK 25 A Power door locks
F22 H/L RH 20 A Headlight (RH)
F24 TAIL 20 A Taillights/Number plate lights/Position lights
F25 DRL 15 A Daylight Running Lights
F26 ROOM 25 A Overhead light
F27 FOG 15 A Fog lights
F28 H/CLEAN 20 A Headlight washer (where provided)
F29 STOP 10 A Stop lights/Rear fog light (where provided)
F30 HORN 15 A Horn
F31 H/L LH 20 A Headlight (LH)
F33 HAZARD 15 A Hazard warning flashers/Direction indicators lights
F36 WIPER 20 A Windscreen wipers
Page 180 of 228
left in the sun or with the bonnet hot:
this may alter the shine of the
paintwork.
Exterior plastic parts must be cleaned
in the same way as the rest of the
vehicle.
IMPORTANT Avoid parking under trees;
the resin dropped by trees makes the
paintwork go opaque and increases the
possibility of corrosion.
IMPORTANT Bird droppings must be
washed off immediately and thoroughly
as the acid they contain is particularly
aggressive.
Paint chipping
Paint chipping occurs when gravel
thrown in the air by another vehicle's
tires hits your vehicle.
Keeping a safe distance between you
and the vehicle ahead reduces the
chances of having your paint chipped
by flying gravel.
IMPORTANT In low temperatures a
vehicle's finish hardens. This increases
the chance of paint chipping.
IMPORTANT Chipped paint can lead to
rust forming on your vehicle. Before this
happens, repair the damage by using
FCA touch-up paint according to the
instructions in this section. Failure torepair the affected area could lead to
serious rusting and expensive repairs.
Versions with opaque paint
(where provided)
Your vehicle could be equipped with an
exclusive opaque paint needing special
care for its preservation.
To correctly wash the vehicle, proceed
as follows:
wash the body using a low pressure
jet of water. Remember that the build
up of water can damage the car over a
period of time;
wipe a sponge with a slightly soapy
solution over the bodywork, frequently
rinsing the sponge;
rinse well with water and dry with a
jet of air or chamois leather, without
wiping localised areas repeatedly.
MAINTAINING THE
FINISH
Washing
To help protect the finish from rust and
deterioration, wash your vehicle
thoroughly and frequently, at least once
a month, with lukewarm or cold water.
IMPORTANT FCA is not responsible for
scratches caused by automatic car
washes or improper washing.
Scratches are more noticeable on
vehicles with darker paint finishes.IMPORTANT Keep hands and scrapers
clear of the windscreen when the wiper
lever is in the AUTO position and the
ignition is switched ON as fingers could
be pinched or the wipers and wiper
blades damaged when the wipers
activate automatically. If you are going
to clean the windscreen, be sure the
wipers are turned off completely (when
it is most likely that the engine is left
running) this is particularly important
when clearing ice and snow.
IMPORTANT Do not spray water in the
engine compartment. Otherwise, it
could result in engine-starting problems
or damage to electrical parts.
IMPORTANT When washing and
waxing the vehicle, be careful not to
apply excessive force to any single area
of the vehicle bonnet. Otherwise, you
could dent the vehicle.
IMPORTANT Do not use automatic car
washing machines and car washing
devices using high water pressure.
IMPORTANT Make sure that the fuel
flap is closed and lock the doors.
Otherwise, the fuel flap may be
forcefully opened by water pressure
causing damage to the vehicle or fuel
flap.
178
MAINTENANCE AND CARE
Page 207 of 228
Displays the FM settings screen
(FM only). On/Off of Alternative
frequency and Region lock can be
set.
Displays sound settings to adjust
audio quality level.
NOTE When theoricon is
selected while FM is selected, each
programme is selected.
Digital Audio Broadcasting (DAB)
Radio
(where provided)
Select the icon
on the home screen
to display the “Entertainment” screen.
SelectDABthe following icons are
displayed at the bottom of the screen:
Displays the “Entertainment”
menu. Use to switch to a
different audio source.
Displays the station list (ensemble
and station). Select “Update List”
to update the station list. Select
“Select Ensemble” to select the
ensemble you want to display.
Displays the favorites list. Press
and hold to store the currently
tuned station to the favorites list.
Searches your desired station
from the station list. Tunes to
each station in the station list for
10 seconds. Select again when
your desired station is tuned. If
the station list is not available, it
switches to the station list update
screen. Perform the station list
updating.
Switches the TA mode on and
off.
/Returns to the
previous/goes to the next
station. Touch and hold to
return to the top station in
the previous/next ensemble.
Displays the DAB radio setting
screen.
Displays sound settings to adjust
audio quality level.SETTINGS
NOTE Depending on the grade and
specification, the screen display may
differ.
Select the
icon on the home screen
to display the Settings screen. Switch
the tab and select the setting item you
want to change.
You can customize settings in the setup
display as follows:
“Display”: refer to “Volume/Display/
Sound controls” paragraph in Radio 7”
supplement;
“Sound”: refer to “Volume/Display/
Sound controls” paragraph in Radio 7”
supplement;
“Clock”: “Adjust Time”, “GPS Sync”,
“Time Format”, “Time Zone Select”,
“Daylight Savings Time”;
“Vehicle”: rain sensing Wiper/Door
Lock/Other;
“Devices”: selectBluetooth®
or
“Network Management”;
“System”: “Tool Tips”, “Language”,
“Temperature”, “Distance”, “Music
Database Update”, “Factory Reset”,
“About (agreements and disclaimers)”,
“About (version Information)”
205
Page 223 of 228
INDEX
ABS system................73
Accessory socket.............39
Active bonnet precautions........74
Active safety systems...........73
Advanced Keyless Entry System....14
AFS (Adaptive Front Lighting
System)..................27
Attaching the tow hooks........159
Auto-wiper control............31
Automatic climate control system.......................36
Automatic lighting.............25
Automatic transmission.........119
Auxiliary driving systems.........77
Battery (maintenance).........172
Battery recharging............174
Bodywork (care and
maintenance).............177
Bonnet....................42
Boot lid...................40
Boot lid (opening).............40
Brake Assist................117
Brake/clutch fluid (level check). . . .171
Checking levels.............169
Child restraint system suitability
for various seat position.......91
Child seat installation position.....90
Child-restraint precautions.......86
Child-restraint system types......89Climate control system..........33
Coming Home light system.......25
Constant monitoring..........114
Control panel and instruments.....49
Convertible Top (lowering)........44
Convertible Top (Soft Top)........44
Cruise Control..............122
Dashboard..................8
Dead lock device.............16
Dimensions................187
Doors.....................16
Driver Air Bag...............102
DRL (Daytime Running Lights).....25
DSC system................73
Emergency flap opening.......128
Emergency stop signal system. . . .135
Emergency towing............161
Engine...................183
Engine compartment..........169
Engine coolant (level check)......170
Engine oil (level check).........170
Essential information............3
Exterior lights................24
Flash to pass...............25
Fluid capacities..............188
Fluids and lubricants..........189
Front fog lights...............25Fuel filler cap...............128
Fuse block (engine compartment)......................146
Fuse block (left side of the vehicle)......................149
Fuses (under the bonnet)........145
Fuses (vehicle's left side)........144
Gear lever positions..........119
Gear Shift Indicator............53
Hazard warning lights.........135
Hazard warning lights (control). . . .135
Head restraints...............21
Headlight washer.............32
Headlights..................24
Heated seats................19
Heavy-dute use of the vehicle
(scheduled servicing)........164
High beams.................25
HLA function................80
How the SRS Air bags work......102
How to use this manual..........3
Identification data............182
Ignition switch...............11
Immobilizer system............15
INFO switch.................52
Installing child restraint systems....95
Interiors..................180
Internal equipment............39
Jump starting..............157
Jump starting (procedure).......157
Fuel consumption and
CO2 emissions............192