buttons FIAT 124 SPIDER ABARTH 2017 2.G Owners Manual
[x] Cancel search | Manufacturer: FIAT, Model Year: 2017, Model line: 124 SPIDER ABARTH, Model: FIAT 124 SPIDER ABARTH 2017 2.GPages: 292, PDF Size: 121.25 MB
Page 13 of 292
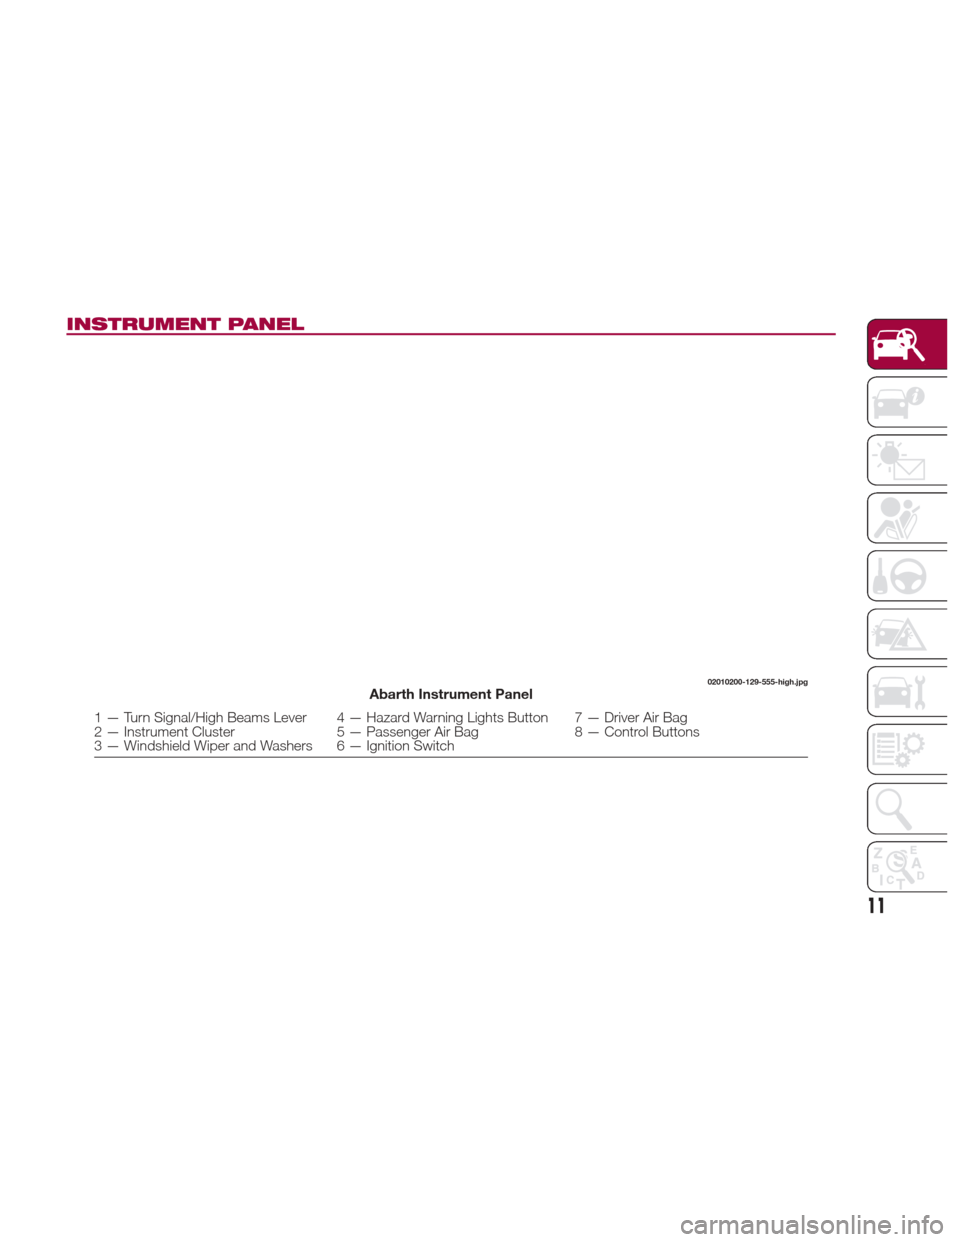
INSTRUMENT PANEL
02010200-129-555-high.jpgAbarth Instrument Panel
1 — Turn Signal/High Beams Lever 4 — Hazard Warning Lights Button 7 — Driver Air Bag
2 — Instrument Cluster 5 — Passenger Air Bag 8 — Control Buttons
3 — Windshield Wiper and Washers 6 — Ignition Switch
11
Page 16 of 292
KEYS
Key Fob
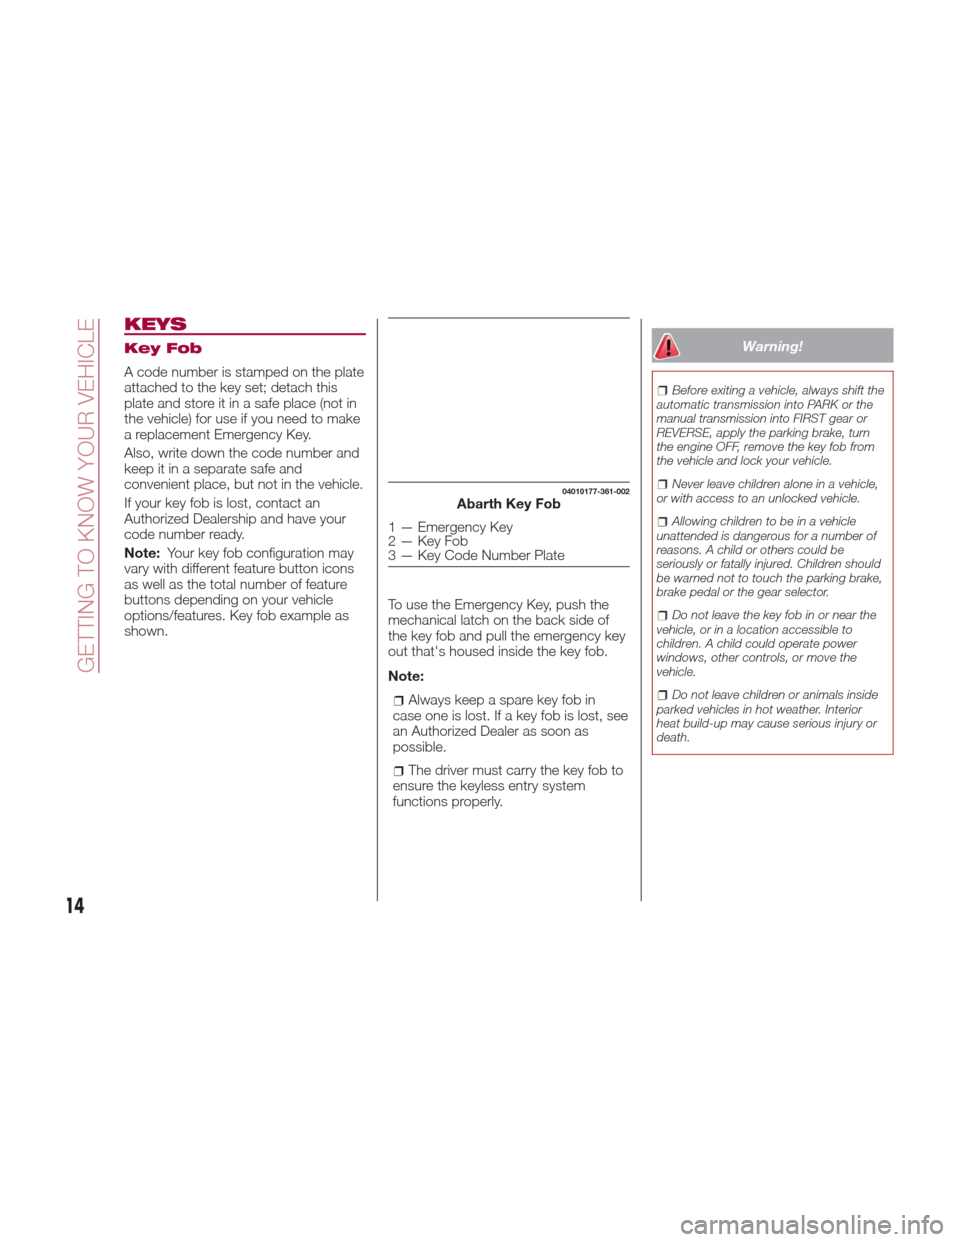
A code number is stamped on the plate
attached to the key set; detach this
plate and store it in a safe place (not in
the vehicle) for use if you need to make
a replacement Emergency Key.
Also, write down the code number and
keep it in a separate safe and
convenient place, but not in the vehicle.
If your key fob is lost, contact an
Authorized Dealership and have your
code number ready.
Note:Your key fob configuration may
vary with different feature button icons
as well as the total number of feature
buttons depending on your vehicle
options/features. Key fob example as
shown. To use the Emergency Key, push the
mechanical latch on the back side of
the key fob and pull the emergency key
out that's housed inside the key fob.
Note:
Always keep a spare key fob in
case one is lost. If a key fob is lost, see
an Authorized Dealer as soon as
possible.
The driver must carry the key fob to
ensure the keyless entry system
functions properly.
Warning!
Before exiting a vehicle, always shift the
automatic transmission into PARK or the
manual transmission into FIRST gear or
REVERSE, apply the parking brake, turn
the engine OFF, remove the key fob from
the vehicle and lock your vehicle.
Never leave children alone in a vehicle,
or with access to an unlocked vehicle.
Allowing children to be in a vehicle
unattended is dangerous for a number of
reasons. A child or others could be
seriously or fatally injured. Children should
be warned not to touch the parking brake,
brake pedal or the gear selector.
Do not leave the key fob in or near the
vehicle, or in a location accessible to
children. A child could operate power
windows, other controls, or move the
vehicle.
Do not leave children or animals inside
parked vehicles in hot weather. Interior
heat build-up may cause serious injury or
death.
04010177-361-002Abarth Key Fob
1 — Emergency Key
2 — Key Fob
3 — Key Code Number Plate
14
GETTING TO KNOW YOUR VEHICLE
Page 18 of 292
The setting changes each time the
lockbutton on the key fob is pushed
and the beep sound activates at the
set volume (if the beep sound has
been set to not activate, it will not
activate).
Setting change is completed by doing
any one of the following:
Placing the ignition to ACC or ON
position.
Closing the driver's door.
Opening the trunk lid.
Not operating the key fob for
10 seconds.
Pushing any button, except the lock
button on the key fob.
Pushing a request switch on the
exterior door handle.
Note:
Refer to “Lock/Unlock With Advanced
Keyless Entry Function — If Equipped”
in “Doors” for further information.
The operation indicator light flashes
when the buttons are pushed.
Key Fob Buttons
Lock Button
To lock the doors, trunk lid, and the fuel
filler door, push the lock
button and
the hazard warning lights will flash once
and a beep will be heard.
With The Advanced Keyless
Function
To lock the doors and the fuel filler door,
push the lock
button and the hazard
warning lights will flash once.
To confirm that both doors and the fuel
filler door have been locked, push the
lock
button again within five seconds.
If they are closed and locked, the horn
will sound.
Note:
The doors and the fuel filler door
can be locked by pushing the lock
button while either door or the trunk
lid is open, the hazard warning lights
will not flash. When the lock
button
is pushed while any door is open and
then the door is closed, both the doors
and the fuel filler door are locked.
Confirm that both doors and the
fuel filler door are locked visually or
audibly by double-clicking the lock
button on the key fob.
If the vehicle is equipped with a
Vehicle Security Alarm System, the
hazard warning lights will flash once to
indicate that the system is armed when
the doors are locked using the key fob.
Unlock Button
To unlock the doors and the trunk lid,
push the unlock
button and the
hazard warning lights will flash twice.
Note:
With the Advanced Keyless function: a
beep will be heard twice.
To unlock the driver's door and the fuel
filler door, push the unlock
button
and the hazard warning lights will flash
twice.
Note:
With the Advanced Keyless function: a
beep will be heard twice.
To unlock both doors and the fuel door,
push the unlock
button again within
three seconds and two more beeps will
be heard.
The system can be set to unlock both
doors. Use the following procedure to
change the setting:
1. Place the ignition in the OFF position
and close both of the doors and the
trunk lid.
16
GETTING TO KNOW YOUR VEHICLE
Page 21 of 292
Key Suspend Function
If a key fob is left in the vehicle, the
functions of the key fob left in the
vehicle are temporarily suspended to
prevent unlawful use of the vehicle.
To restore the functions, push the
unlock button on the functions-
suspended key fob left in the vehicle.
Key Fob Battery
Replacement
If the buttons on the key fob are
inoperable and the indicator light does
not flash, the battery power level may
be low or discharged.
Replace with a new battery
(CR2025 type) before the key fob
becomes unusable.
The following conditions indicate that
the battery power is low:
Indicator light (green) flashes in
the instrument cluster for about
30 seconds after the engine is placed in
the OFF position.
The system does not operate and
the operation indicator light on the key
fob does not flash when the buttons are
pushed.
The system's operational range is
reduced.
Note: Replacing the battery at an
Authorized Dealership is recommended
to prevent damage to the key fob. If
replacing the battery by yourself, follow
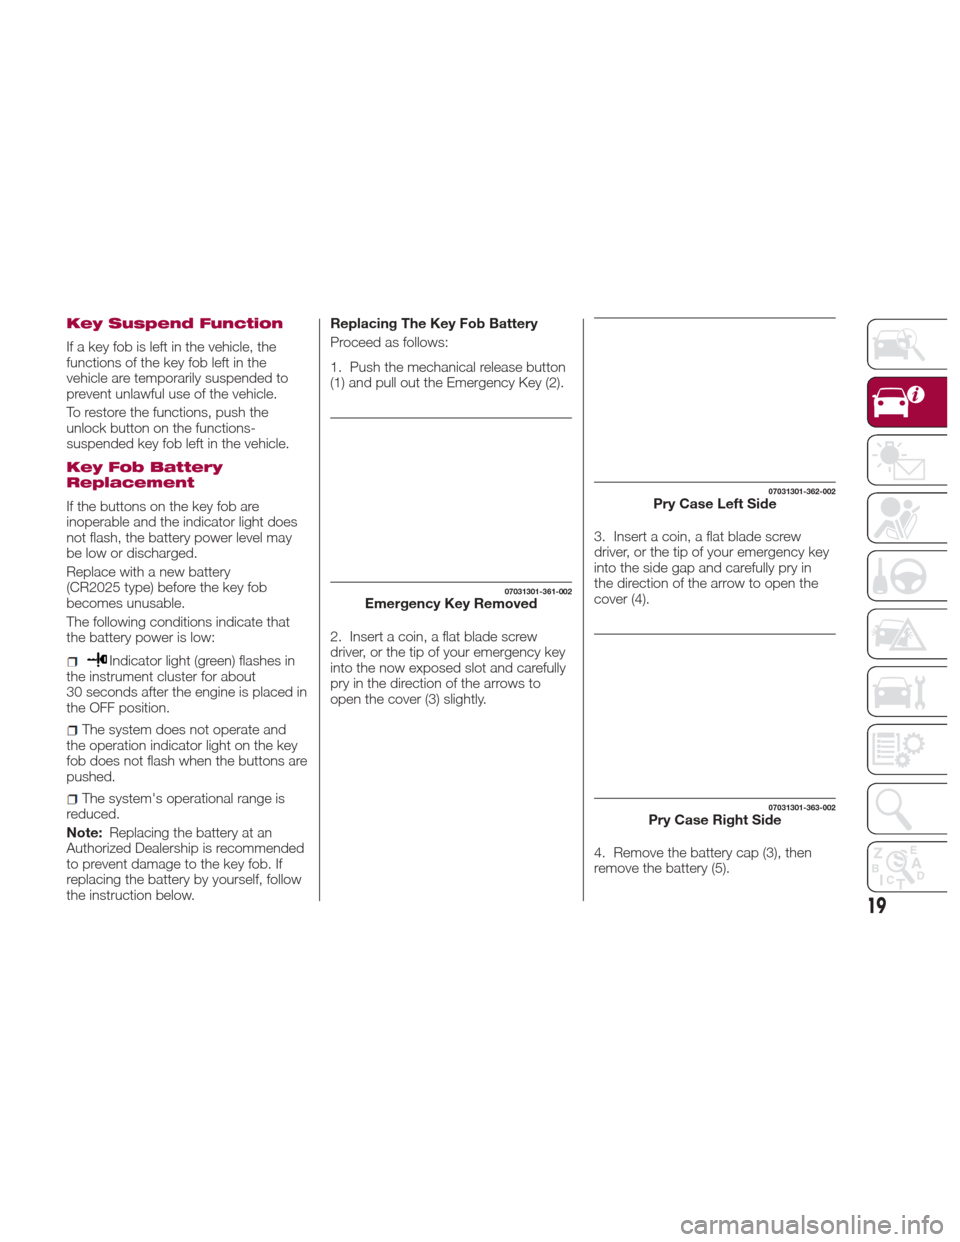
the instruction below. Replacing The Key Fob Battery
Proceed as follows:
1. Push the mechanical release button
(1) and pull out the Emergency Key (2).
2. Insert a coin, a flat blade screw
driver, or the tip of your emergency key
into the now exposed slot and carefully
pry in the direction of the arrows to
open the cover (3) slightly.
3. Insert a coin, a flat blade screw
driver, or the tip of your emergency key
into the side gap and carefully pry in
the direction of the arrow to open the
cover (4).
4. Remove the battery cap (3), then
remove the battery (5).
07031301-361-002Emergency Key Removed
07031301-362-002Pry Case Left Side
07031301-363-002Pry Case Right Side
19
Page 39 of 292
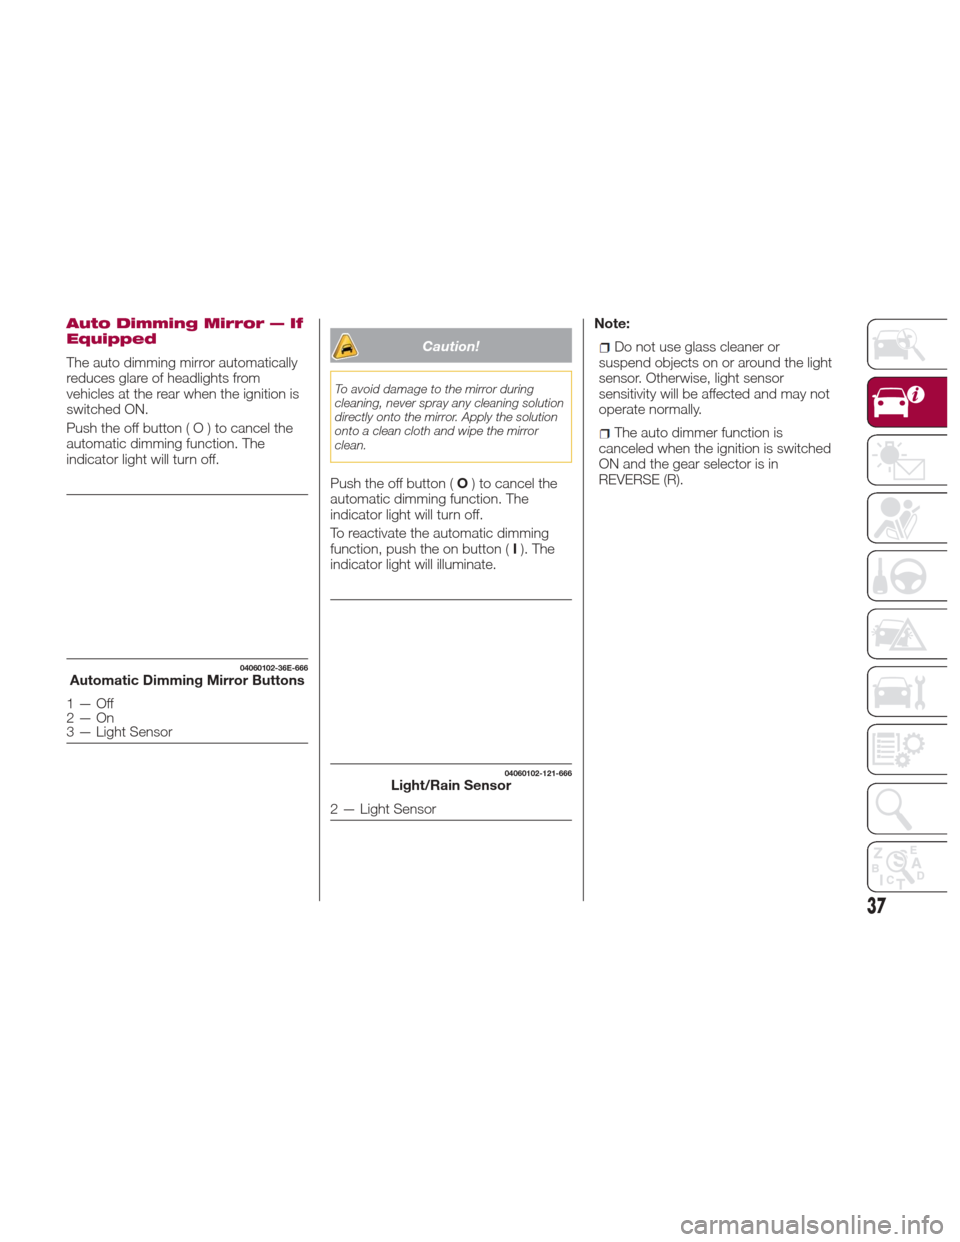
Auto Dimming Mirror — If
Equipped
The auto dimming mirror automatically
reduces glare of headlights from
vehicles at the rear when the ignition is
switched ON.
Push the off button(O)tocancelthe
automatic dimming function. The
indicator light will turn off.
Caution!
To avoid damage to the mirror during
cleaning, never spray any cleaning solution
directly onto the mirror. Apply the solution
onto a clean cloth and wipe the mirror
clean.
Push the off button ( O) to cancel the
automatic dimming function. The
indicator light will turn off.
To reactivate the automatic dimming
function, push the on button ( I). The
indicator light will illuminate. Note:
Do not use glass cleaner or
suspend objects on or around the light
sensor. Otherwise, light sensor
sensitivity will be affected and may not
operate normally.
The auto dimmer function is
canceled when the ignition is switched
ON and the gear selector is in
REVERSE (R).
04060102-36E-666Automatic Dimming Mirror Buttons
1—Off
2—On
3 — Light Sensor
04060102-121-666Light/Rain Sensor
2 — Light Sensor
37
Page 61 of 292
HOMELINK — IF
EQUIPPED
General Information
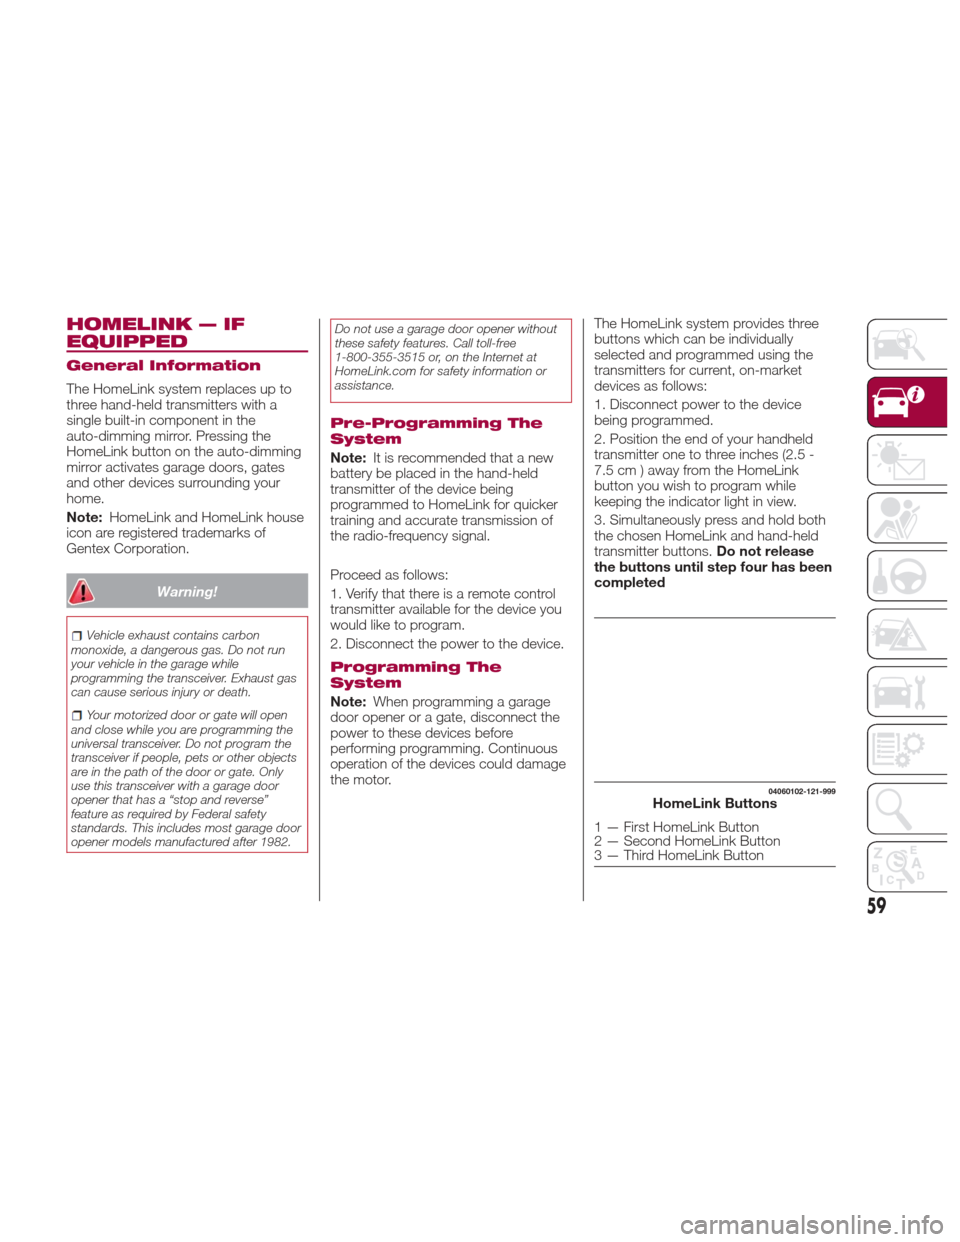
The HomeLink system replaces up to
three hand-held transmitters with a
single built-in component in the
auto-dimming mirror. Pressing the
HomeLink button on the auto-dimming
mirror activates garage doors, gates
and other devices surrounding your
home.
Note:HomeLink and HomeLink house
icon are registered trademarks of
Gentex Corporation.
Warning!
Vehicle exhaust contains carbon
monoxide, a dangerous gas. Do not run
your vehicle in the garage while
programming the transceiver. Exhaust gas
can cause serious injury or death.
Your motorized door or gate will open
and close while you are programming the
universal transceiver. Do not program the
transceiver if people, pets or other objects
are in the path of the door or gate. Only
use this transceiver with a garage door
opener that has a “stop and reverse”
feature as required by Federal safety
standards. This includes most garage door
opener models manufactured after 1982. Do not use a garage door opener without
these safety features. Call toll-free
1-800-355-3515 or, on the Internet at
HomeLink.com for safety information or
assistance.
Pre-Programming The
System
Note:
It is recommended that a new
battery be placed in the hand-held
transmitter of the device being
programmed to HomeLink for quicker
training and accurate transmission of
the radio-frequency signal.
Proceed as follows:
1. Verify that there is a remote control
transmitter available for the device you
would like to program.
2. Disconnect the power to the device.
Programming The
System
Note: When programming a garage
door opener or a gate, disconnect the
power to these devices before
performing programming. Continuous
operation of the devices could damage
the motor. The HomeLink system provides three
buttons which can be individually
selected and programmed using the
transmitters for current, on-market
devices as follows:
1. Disconnect power to the device
being programmed.
2. Position the end of your handheld
transmitter one to three inches (2.5 -
7.5 cm ) away from the HomeLink
button you wish to program while
keeping the indicator light in view.
3. Simultaneously press and hold both
the chosen HomeLink and hand-held
transmitter buttons.
Do not release
the buttons until step four has been
completed
04060102-121-999HomeLink Buttons
1 — First HomeLink Button
2 — Second HomeLink Button
3 — Third HomeLink Button
59
Page 62 of 292
4. After the HomeLink indicator light
changesfromaslowtoarapidly
blinking light, release both the
HomeLink and hand-held transmitter
buttons.
5. Connect power to the device being
programmed.
6. Firmly press and hold the
programmed HomeLink button for five
seconds, and then release it. Perform
this operation two times to activate the
door or gate. If the door or gate does
not activate, press and hold the
just-trained HomeLink button and
observe the indicator light. If the
indicator light stays on constantly,
programming is complete and your
device should activate when the
HomeLink button is pressed and
released;
Note:To program the remaining two
HomeLink buttons, begin with
“Programming” - step one.
7. If the indicator light blinks rapidly for
two seconds and then turns to a
constant light, continue with
“Programming” steps (see below) to
complete the programming of a rolling
code equipped device (most commonly
a garage door opener). 8. At the garage door opener receiver
(motor-head unit) in the garage, locate
the “learn” or “smart” button. This can
usually be found where the hanging
antenna wire is attached to the
motorhead unit.
9. Firmly press and release the “learn”
or “smart” button (the name and color
of the button may vary by
manufacturer).
Note:
Complete the programming
within 30 seconds.
10. Return to the vehicle and firmly
press, hold for two seconds and
release the programmed HomeLink
button. Repeat the “ press/hold/
release” sequence a second time, and,
depending on the brand of the garage
door opener (or other rolling code
equipped device), repeat this sequence
a third time to complete the
programming process. HomeLink
should now activate your rolling code
equipped device.
Note:
To program the remaining two
HomeLink buttons, begin with
“Programming” - step one.
For questions or comments, please
contact HomeLink at
www.homelink.com or
1-800-355-3515 .Gate Operator/Canadian
Programming
Canadian radio-frequency laws require
transmitter signals to “time-out” (or quit)
after several seconds of transmission -
which may not be long enough for
HomeLink to pick up the signal during
programming.
Similar to this Canadian law, some U.S.
gate operators are designed to
“time-out” in the same manner.
If you live in Canada or you are having
difficulties programming a gate operator
by using the “Programming”
procedures (regardless of where you
live), replace “Programming HomeLink”
step three with the following:
Note:If programming a garage door
opener or gate operator, it is advised to
unplug the device during the “cycling”
process to prevent possible
overheating.
1. Continue to press and hold the
HomeLink button while you press and
release -every two seconds (“cycle”)
your hand-held transmitter until the
frequency signal has successfully been
accepted by HomeLink (the indicator
light will flash slowly and then rapidly).
2. Proceed with the “Programming”
steps to complete.
60
GETTING TO KNOW YOUR VEHICLE
Page 63 of 292
Operating The System
Press the programmed HomeLink
button to operate a programmed
device.
The code will continue being
transmitted for a maximum of
20 seconds.
Reprogramming The
System
To program a device to HomeLink using
a HomeLink button previously trained,
follow these steps:
1. Press and hold the desired
HomeLink button.DO NOTrelease the
button;
2. The indicator light will begin to flash
after 20 seconds. Without releasing the
HomeLink button, proceed with
“Programming” - step one.
Erasing Programmed
Homelink Buttons
To erase the existing programming from
all three operating channels, press and
hold the two outside buttons 1 and
3 on the auto-dimming mirror until the
HomeLink indicator light begins to flash
after approximately 10 seconds.
Verify that the programming has been
erased when you resell the vehicle.
INTERNAL
EQUIPMENT
Storage Compartments
Center Console
The center console is located between
the driver and passenger seats.
Warning!
Keep storage compartments closed when
driving. Driving with the storage
compartments open is dangerous. To
reduce the possibility of injury in an
accident or a sudden stop, keep the
storage compartments closed when
driving.
Caution!
Do not leave lighters or eyeglasses in the
storage compartments while parked under
the sun. A lighter could explode or the
plastic material in eyeglasses could deform
and crack from high temperature.
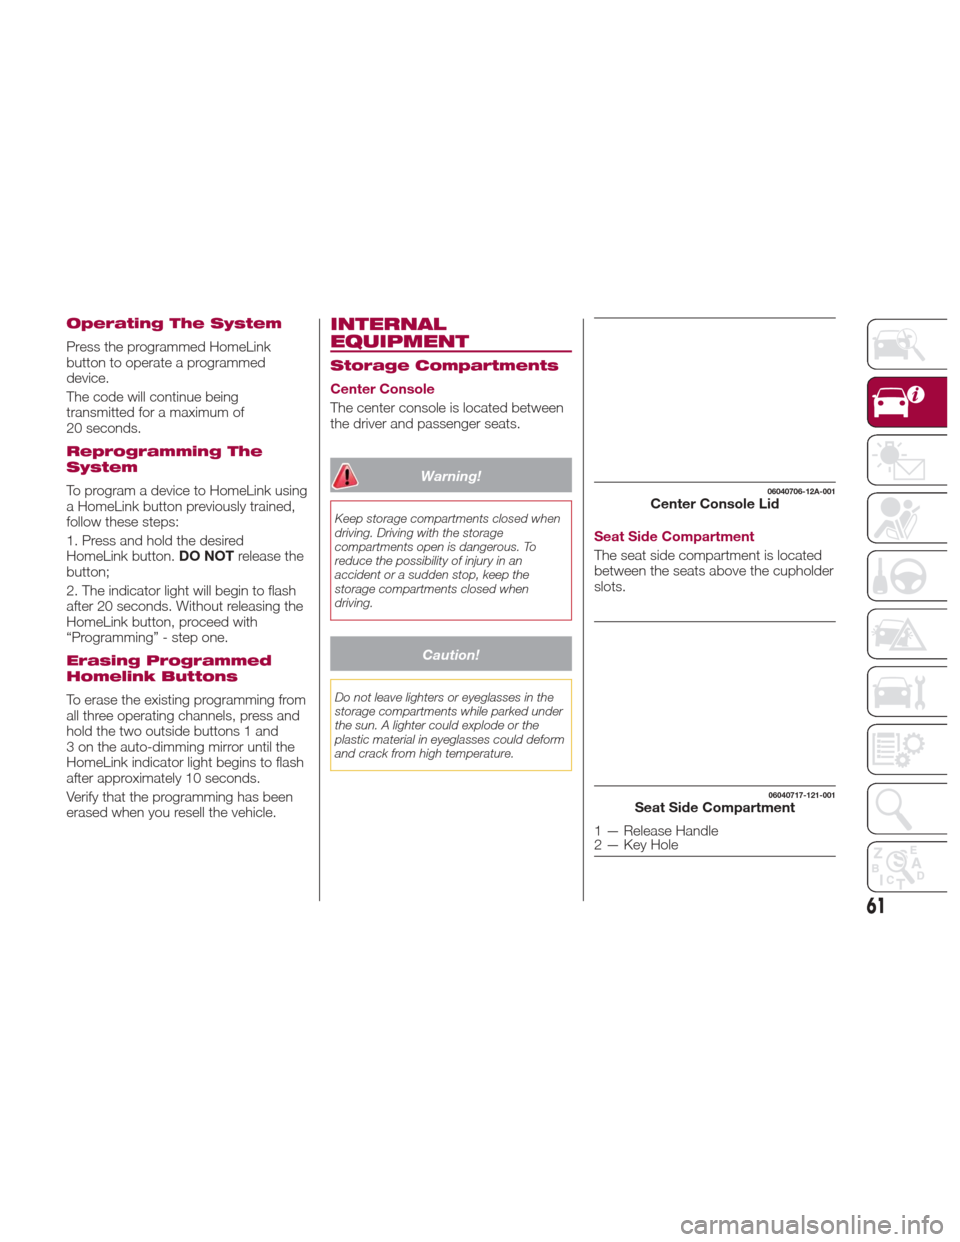
Seat Side Compartment
The seat side compartment is located
between the seats above the cupholder
slots.
06040706-12A-001Center Console Lid
06040717-121-001Seat Side Compartment
1 — Release Handle
2 — Key Hole
61
Page 160 of 292
Activation / Deactivation
Note:When the ignition is placed in
the OFF position, the system status
before it was turned off is stored. For
example, if the ignition is placed in the
OFF position while the cruise control is
operating, the system will be operable
when the ignition is placed in the ON
position the next time.
Activating Electronic Speed Control
With Speed limiter : push the mode
button. The
warning light (amber)
turns on. Note:
When the speed limiter is
operating after pushing the mode
button, push the mode button again to
switch to the cruise control.
Without Speed limiter : push the ON
button. The warning light (amber) turns
on.
Warning!
Leaving the Speed Control system on
when not in use is dangerous. You could
accidentally set the system or cause it to
go faster than you want. You could lose
control and have an accident. Always leave
the system OFF when you are not using it.
Deactivating Electronic Speed
Control
Note: When the mode button is
pushed during cruise control system
operation, the system switches to the
adjustable speed limiter.
Push the OFF/CAN button. The
warning light (amber) turns off.
When a cruising speed has been
set:the
warning light (green) turns
on, push and hold the OFF/CAN button
or push the OFF/CAN button 2 times.
When a cruising speed has not
been set:the
warning light (amber)
turns on push the OFF/CAN button.
Setting A Desired Speed
Proceed as follows:
With Speed limiter : activate the
cruise control device by pushing the
mode button. The cruise warning light
(amber) turns on.
Without Speed limiter : activate the
cruise control device by pushing the ON
button. The cruise warning light (amber)
turns on.
1. Accelerate to the desired speed,
whichmustbemorethan25mph
(40 km/h).
2. Set the cruise control by pushing the
SET/- button at the desired speed. The
cruise control is set at the moment the
SET/- button is pushed. Release the
accelerator pedal simultaneously. The
warning light (green) turns on.
Note: The cruise control speed setting
cannot be performed under the
following conditions:
Automatic transmission : the gear
selector is in the PARK (P) or
NEUTRAL (N) position.
Manual transmission : the gear
selector is in the NEUTRAL (N) position
or when the clutch is disengaged
(clutch is depressed).
The parking brake is applied.
05100101-121-003Electronic Speed Control Buttons158
STARTING AND OPERATING
Page 161 of 292
Vehicles with Speed limiter:the
mode button for the adjustable speed
limiter is pushed.
Release the SET/- button at the desired
speed, otherwise the speed will
continue decreasing while the SET/-
button is pushed and held (except
when the accelerator pedal is
depressed).
Note:
Release the SET/- button at the
desired speed, otherwise the speed
will continue decreasing while the
SET/- button is pushed and held
(except when the accelerator pedal is
depressed).
On a steep grade, the vehicle may
momentarily slow down while
ascending, or speed up while
descending.
The cruise control will cancel if the
vehicle speed decreases below
16 mph (25 km/h) when climbing a
steep incline.
The cruise control may cancel at
about 9 mph (15 km/h) below the
preset speed such as when climbing a
long, steep incline.
The vehicle’s set speed is displayed in
the instrument cluster.
Increasing Speed
To increase speed using cruise
control button:
Push the RES/+ button and hold it
your vehicle will accelerate. Release the
button at the desired speed.
Push the RES/+ button and release it
immediately to adjust the set speed.
Multiple activations will increase the set
speed according to the number of
times it is pushed.
Increasing speed with a single
RES/+ button operation:
Instrument cluster display for vehicle
speed is indicated in mph: 1 mph
Instrument cluster display for vehicle
speed is indicated in km/h: 1 km/h
To increase speed using
accelerator pedal:
Press the accelerator pedal to
accelerate to the desired speed.
Push the SET/- button and release it
immediately.
Note: Accelerate the vehicle to speed
up temporarily with the accelerator
pedal when the cruise control is on.
Greater speed will not interfere with or
change the set speed. Take your foot
off the accelerator to return to the set
speed.
Decreasing Speed
To decrease speed using cruise
control buttons:
Push the SET/- button and hold it the
vehicle will gradually slow down.
Release the button at the desired
speed.
Push the SET/- button and release it
immediately to adjust the set speed.
Multiple activations will decrease the set
speed according to the number of
times it is pushed.
Decreasing speed with a single
SET/- button operation:
Instrument cluster display for vehicle
speed is indicated in mph: 1 mph
Instrument cluster display for vehicle
speed is indicated in km/h: 1 km/h
Resume Speed
If any other method besides the
OFF/CAN button was used to cancel
cruising speed (such as applying the
brake pedal or pressing in the clutch
pedal) and the system is still activated,
the most recent set speed will
automatically resume when the RES/+
button is pushed.
If vehicle speed is below 25 mph
(40 km/h), increase the vehicle speed
up to 16 mph (25 km/h) or more and
push RES/+ button.
159