Generator FIAT 500 1968 1.G Owner's Manual
[x] Cancel search | Manufacturer: FIAT, Model Year: 1968, Model line: 500, Model: FIAT 500 1968 1.GPages: 128, PDF Size: 9.01 MB
Page 107 of 128
1
791011 8 234
11
10
16,15
14 13
1265
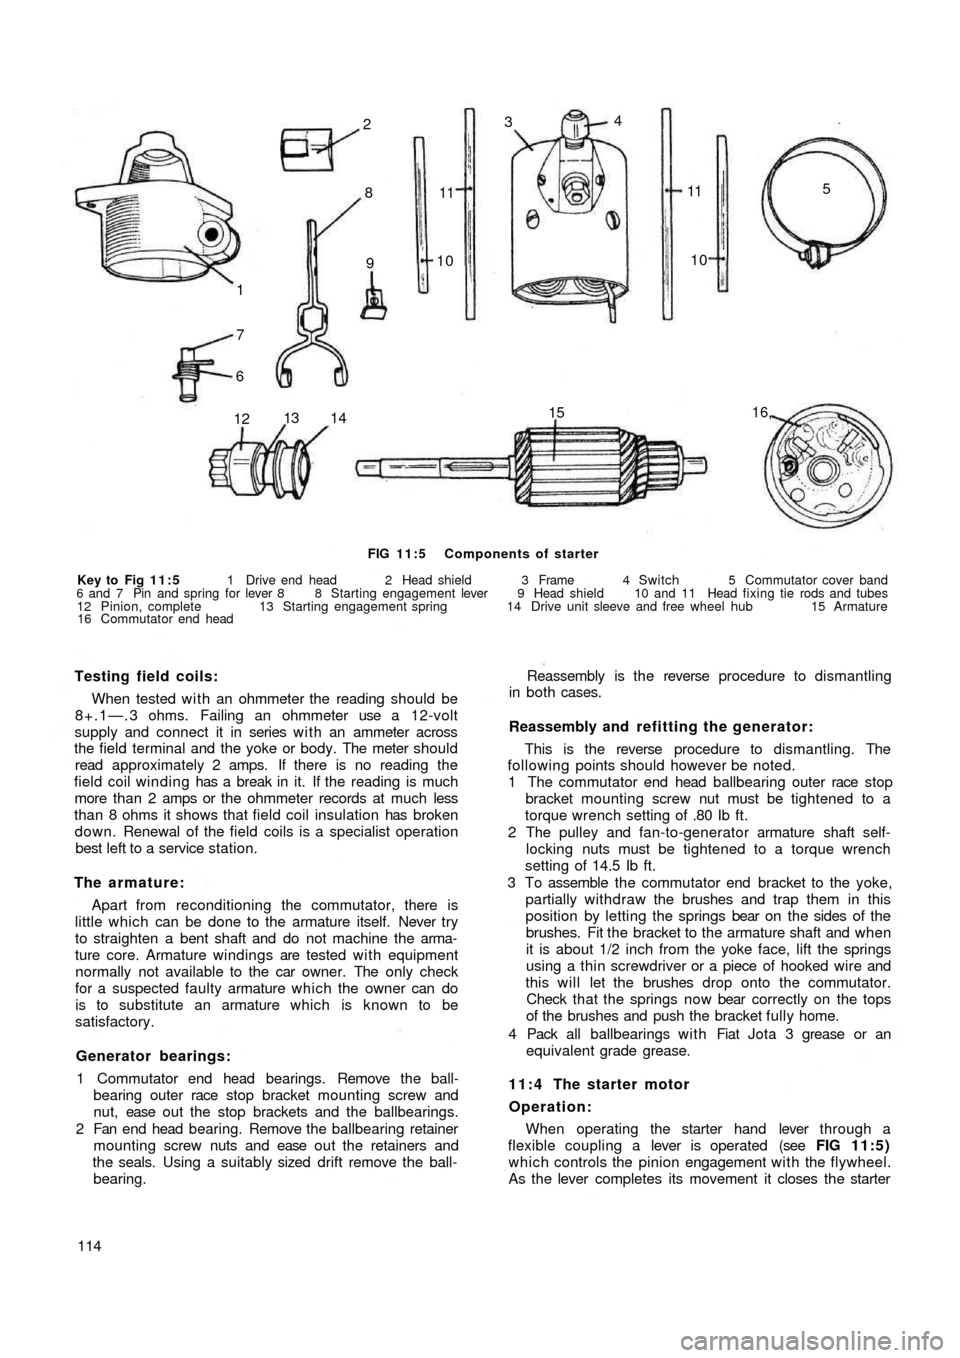
FIG 11:5 Components of starter
Key to Fig 11:5 1 Drive end head 2 Head shield 3 Frame 4 Switch 5 Commutator cover band
6 and 7 Pin and spring for lever 8 8 Starting engagement lever 9 Head shield 10 and 11 Head fixing tie rods and tubes
12 Pinion, complete 13 Starting engagement spring 14 Drive unit sleeve and free wheel hub 15 Armature
16 Commutator end head
Testing field coils:
When tested w i t h an ohmmeter the reading should be
8+.1—.3 ohms. Failing an ohmmeter use a 12-volt
supply and connect it in series w i t h an ammeter across
the field terminal and the yoke or body. The meter should
read approximately 2 amps. If there is no reading the
field coil winding has a break in it. If the reading is much
more than 2 amps or the ohmmeter records at much less
than 8 ohms it shows that field coil insulation has broken
down. Renewal of the field coils is a specialist operation
best left to a service station.
The armature:
Apart from reconditioning the commutator, there is
little which can be done to the armature itself. Never try
to straighten a bent shaft and do not machine the arma-
ture core. Armature windings are tested w i t h equipment
normally not available to the car owner. The only check
for a suspected faulty armature which the owner can do
is to substitute an armature which is known to be
satisfactory.
Generator bearings:
1 Commutator end head bearings. Remove the ball-
bearing outer race stop bracket mounting screw and
nut, ease o u t t h e stop brackets and the ballbearings.
2 Fan end head bearing. Remove the ballbearing retainer
mounting screw nuts and ease o u t t h e retainers and
the seals. Using a suitably sized drift remove the ball-
bearing.
114Reassembly is the reverse procedure to dismantling
in both cases.
Reassembly and refitting the generator:
This is the reverse procedure to dismantling. The
following points should however be noted.
1 The commutator end head ballbearing outer race stop
bracket mounting screw nut must be tightened to a
torque wrench setting of .80 Ib ft.
2 The pulley and fan-to-generator armature shaft self-
locking nuts must be tightened to a torque wrench
setting of 14.5 Ib ft.
3 To assemble the commutator end bracket to the yoke,
partially withdraw the brushes and trap them in this
position by letting the springs bear on the sides of the
brushes. Fit the bracket to the armature shaft and when
it is about 1/2 inch from the yoke face, lift the springs
using a thin screwdriver or a piece of hooked wire and
this will let the brushes drop onto the commutator.
Check that the springs now bear correctly on the tops
of the brushes and push the bracket fully home.
4 Pack all ballbearings with Fiat Jota 3 grease or an
equivalent grade grease.
11:4 The starter motor
Operation:
When operating the starter hand lever through a
flexible coupling a lever is operated (see FIG 11:5)
which controls the pinion engagement with the flywheel.
As the lever completes its movement it closes the starter
Page 109 of 128
4
53 2 1
7
6
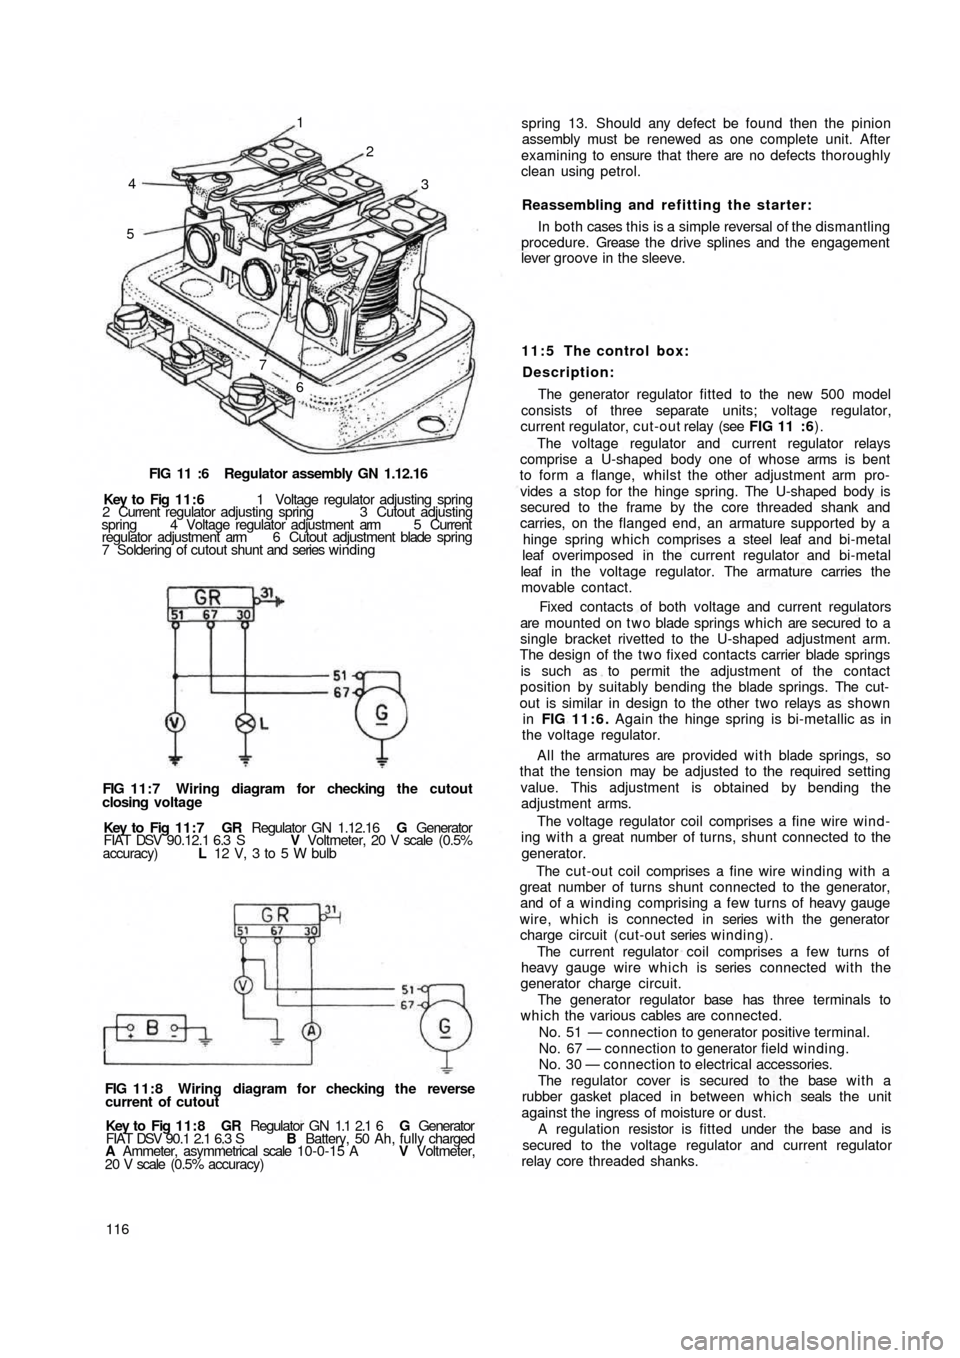
FIG 11 :6 Regulator assembly GN 1.12.16
Key to Fig 11:6 1 Voltage regulator adjusting spring
2 Current regulator adjusting spring 3 Cutout adjusting
spring 4 Voltage regulator adjustment arm 5 Current
regulator adjustment arm 6 Cutout adjustment blade spring
7 Soldering of cutout shunt and series winding
FIG 11:7 Wiring diagram for checking the cutout
closing voltage
Key to Fig 1 1 : 7 GR Regulator GN 1.12.16 G Generator
FIAT DSV 90.12.1 6.3 S V Voltmeter, 20 V scale (0.5%
accuracy) L 12 V, 3 to 5 W bulb
FIG 11:8 Wiring diagram for checking the reverse
current of cutout
Key to Fig 11:8 GR Regulator GN 1.1 2.1 6 G Generator
FIAT DSV 90.1 2.1 6.3 S B Battery, 50 Ah, fully charged
A Ammeter, asymmetrical scale 10-0-15 A V Voltmeter,
20 V scale (0.5% accuracy)
116spring 13. Should any defect be found then the pinion
assembly must be renewed as one complete unit. After
examining to ensure that there are no defects thoroughly
clean using petrol.
Reassembling and refitting the starter:
In both cases this is a simple reversal of the dismantling
procedure. Grease t h e drive splines and the engagement
lever groove in the sleeve.
11:5 The control box:
Description:
The generator regulator fitted to the new 500 model
consists of three separate
units; voltage regulator,
current regulator, cut-out relay (see FIG 11 :6).
The voltage regulator and current regulator relays
comprise a U-shaped body one of whose arms is bent
to form a flange, whilst the other adjustment arm pro-
vides a stop for the hinge spring. The U-shaped body is
secured to the frame by the core threaded shank and
carries, on the flanged end, an armature supported by a
hinge spring which comprises a steel leaf and bi-metal
leaf overimposed in the current regulator and bi-metal
leaf in the voltage regulator. The armature carries the
movable contact.
Fixed contacts of both voltage and current regulators
are mounted on t w o blade springs which are secured to a
single bracket rivetted to the U-shaped adjustment arm.
The design of the t w o fixed contacts carrier blade springs
is such as to permit the adjustment of the contact
position by suitably bending the blade springs. The cut-
out is similar in design to the other two relays as shown
in FIG 11:6. Again the hinge spring is bi-metallic as in
the voltage regulator.
All the armatures are provided w i t h blade springs, so
that the tension may be adjusted to the required setting
value. This adjustment is obtained by bending the
adjustment arms.
The voltage regulator coil comprises a fine wire wind-
ing w i t h a great number of turns, shunt connected to the
generator.
The cut-out coil comprises a fine wire winding with a
great number of turns shunt connected to the generator,
and of a winding comprising a few turns of heavy gauge
wire, which is connected in series w i t h the generator
charge circuit (cut-out series winding).
The current regulator coil comprises a few turns of
heavy gauge wire which is series connected with the
generator charge circuit.
The generator regulator base has three terminals to
which the various cables are connected.
No. 51 — connection to generator positive terminal.
No. 67 — connection to generator field winding.
No. 30 — connection to electrical accessories.
The regulator cover is secured to the base w i t h a
rubber gasket placed in between which seals the unit
against the ingress of moisture or dust.
A regulation resistor is fitted under the base and is
secured to the voltage regulator and current regulator
relay core threaded shanks.
Page 110 of 128
Checking cut-out:
1 Closing voltage:
This test should be carried out at a temperature of
25°±10°C and the regulator should be connected to a
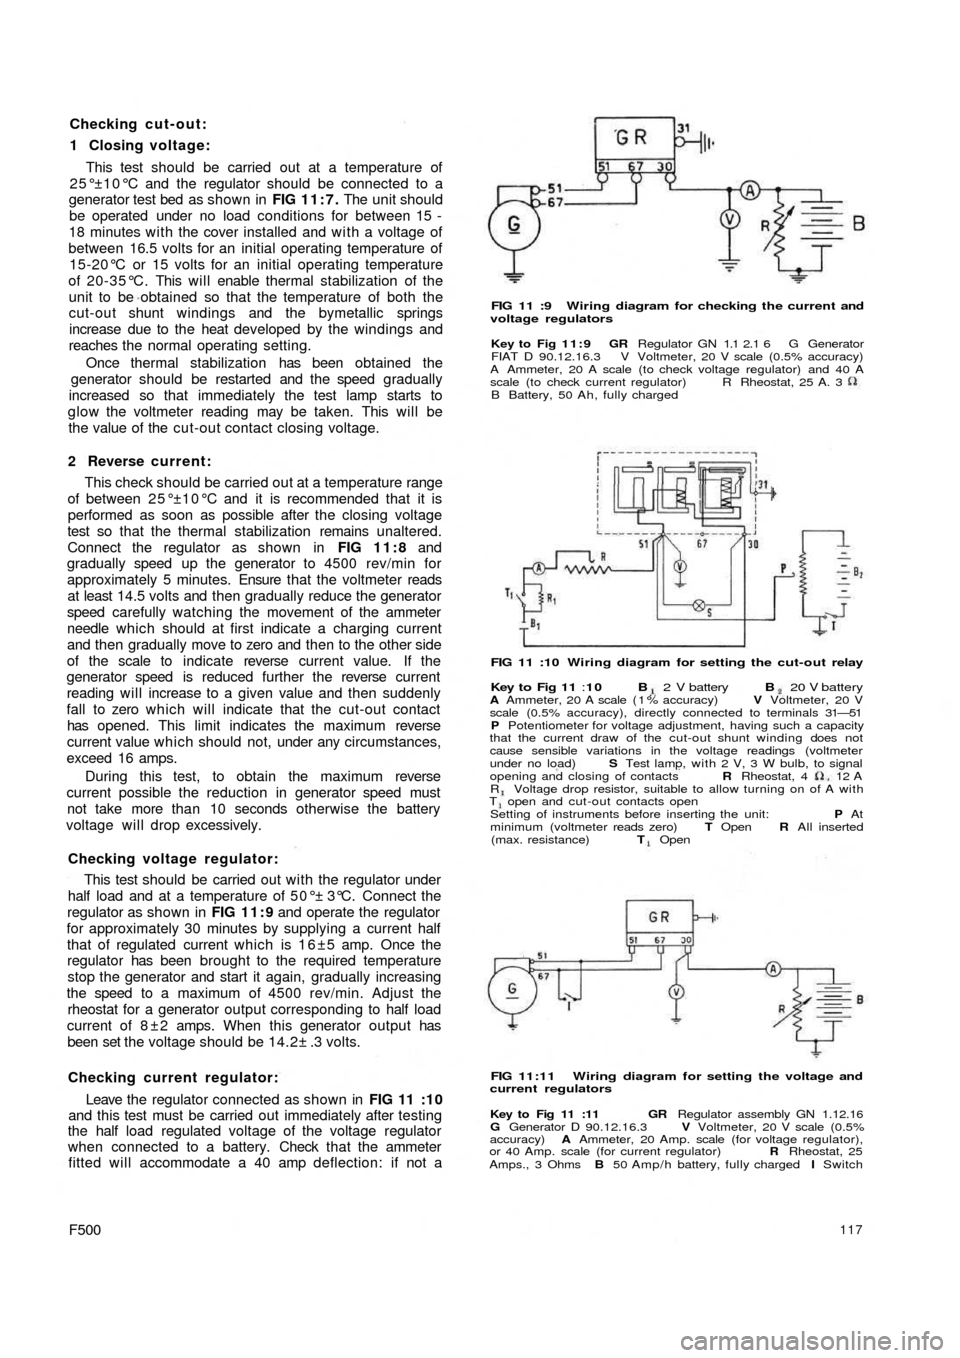
generator test bed as shown in FIG 11:7. The unit should
be operated under no load conditions for between 15 -
18 minutes with the cover installed and w i t h a voltage of
between 16.5 volts for an initial operating temperature of
15-20°C or 15 volts for an initial operating temperature
of 20-35°C. This will enable thermal stabilization of the
unit to be obtained so that the temperature of both the
cut-out shunt windings and the bymetallic springs
increase due to the heat developed by the windings and
reaches the normal operating setting.
Once thermal stabilization has been obtained the
generator should be restarted and the speed gradually
increased so that immediately the test lamp starts to
glow the voltmeter reading may be taken. This will be
the value of the cut-out contact closing voltage.
2 Reverse current:
This check should be carried out at a temperature range
of between 25°±10°C and it is recommended that it is
performed as soon as possible after the closing voltage
test so that the thermal stabilization remains unaltered.
Connect the regulator as shown in FIG 11:8 and
gradually speed up the generator to 4500 rev/min for
approximately 5 minutes. Ensure that the voltmeter reads
at least 14.5 volts and then gradually reduce the generator
speed carefully watching the movement of the ammeter
needle which should at first indicate a charging current
and then gradually move to zero and then to the other side
of the scale to indicate reverse current value. If the
generator speed is reduced further the reverse current
reading will increase to a given value and then suddenly
fall to zero which will indicate that the cut-out contact
has opened. This limit indicates the maximum reverse
current value which should not, under any circumstances,
exceed 16 amps.
During this test, to obtain the maximum reverse
current possible the reduction in generator speed must
not take more than 10 seconds otherwise the battery
voltage will drop excessively.
Checking voltage regulator:
This test should be carried out w i t h the regulator under
half load and at a temperature of 50°± 3°C. Connect the
regulator as shown in FIG 11:9 and operate the regulator
for approximately 30 minutes by supplying a current half
that of regulated current which is 1 6 ±5 amp. Once the
regulator has been brought to the required temperature
stop the generator and start it again, gradually increasing
the speed to a maximum of 4500 rev/min. Adjust the
rheostat for a generator output corresponding to half load
current of 8 ± 2 amps. When this generator output has
been set the voltage should be 14.2± .3 volts.
Checking current regulator:
Leave the regulator connected as shown in
FIG 11 :10
and this test must be carried out immediately after testing
the half load regulated voltage of the voltage regulator
when connected to a battery. Check that the ammeter
fitted will accommodate a 40 amp deflection: if not a
F500117
FIG 11 :9 Wiring diagram for checking the current and
voltage regulators
Key to Fig 11:9 GR Regulator GN 1.1 2.1 6 G Generator
FIAT D 90.12.16.3 V Voltmeter, 20 V scale (0.5% accuracy)
A Ammeter, 20 A scale (to check voltage regulator) and 40 A
scale (to check current regulator)
B Battery, 50 Ah, fully chargedR Rheostat, 25 A. 3
FIG 11 :10 Wiring diagram for setting the cut-out relay
Key to Fig 11 :10 B 2 V battery B 20 V batteryA Ammeter, 20 A scale ( 1 % accuracy) V Voltmeter, 20 V
scale (0.5% accuracy), directly connected to terminals 31—51
P Potentiometer for voltage adjustment, having such a capacity
that the current draw of the cut-out shunt winding does not
cause sensible variations in the voltage readings (voltmeter
under no load) S Test lamp, with 2 V, 3 W bulb, to signal
opening and closing of contacts R Rheostat, 4 12
AR Voltage drop resistor, suitable to allow turning on of A withT open and cut-out contacts open
Setting of instruments before inserting the unit: P At
minimum (voltmeter reads zero) T Open R All inserted
(max. resistance) T Open
FIG 11:11 Wiring diagram for setting the voltage and
current regulators
Key to Fig 11 :11 GR Regulator assembly GN 1.12.16
G Generator D 90.12.16.3 V Voltmeter, 20 V scale (0.5%
accuracy) A Ammeter, 20 Amp. scale (for voltage regulator),
or 40 Amp. scale (for current regulator) R Rheostat, 25
Amps., 3 Ohms B 50 Amp/h battery, fully charged I Switch
Page 111 of 128
Checking cut-out:
1 Closing voltage:
This test should be carried out at a temperature of
25°±10°C and the regulator should be connected to a
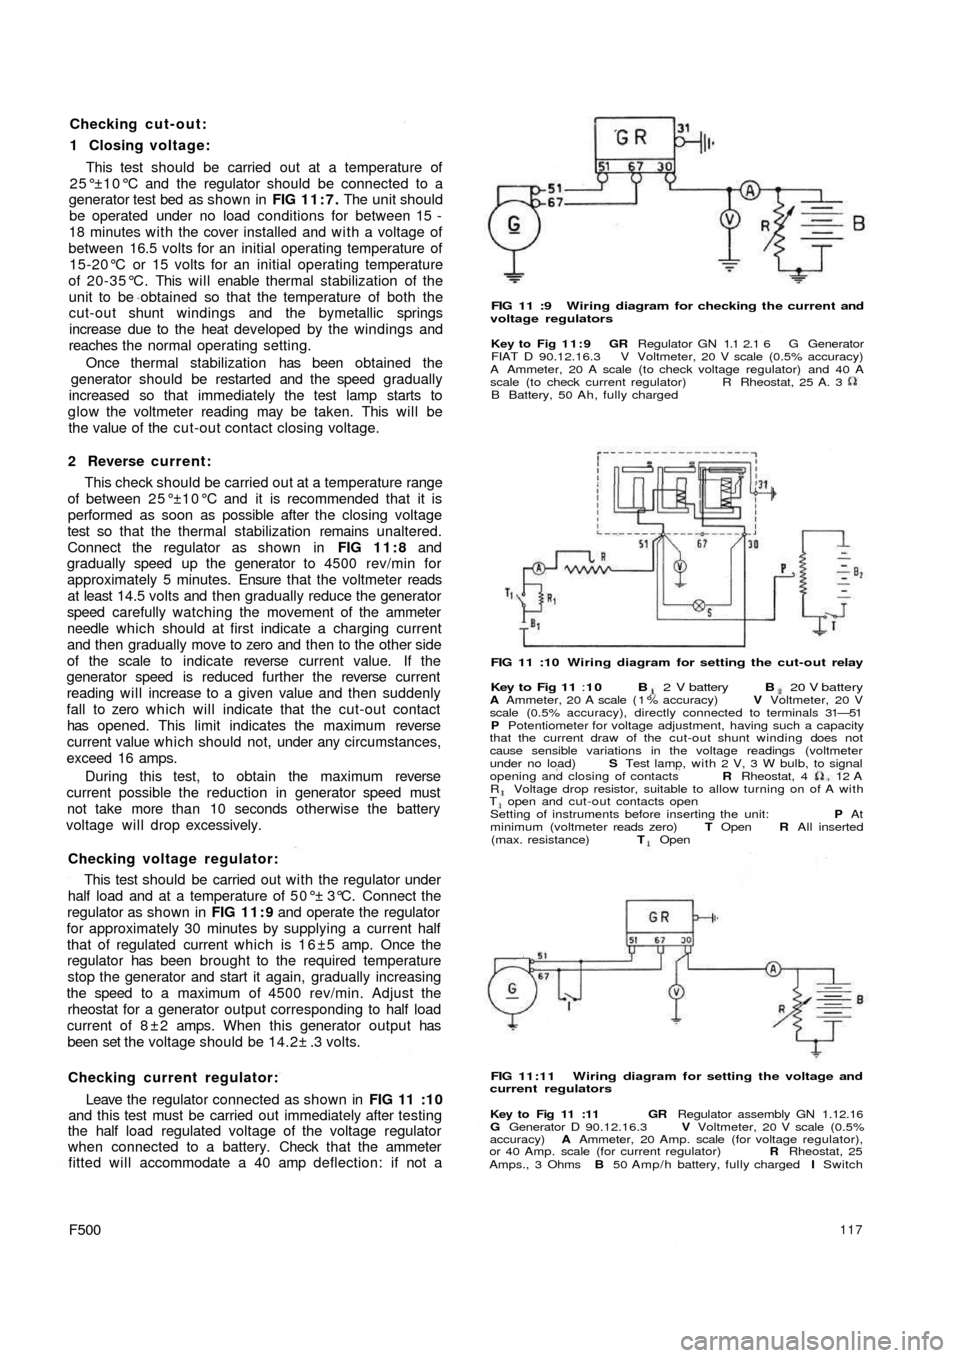
generator test bed as shown in FIG 11:7. The unit should
be operated under no load conditions for between 15 -
18 minutes with the cover installed and w i t h a voltage of
between 16.5 volts for an initial operating temperature of
15-20°C or 15 volts for an initial operating temperature
of 20-35°C. This will enable thermal stabilization of the
unit to be obtained so that the temperature of both the
cut-out shunt windings and the bymetallic springs
increase due to the heat developed by the windings and
reaches the normal operating setting.
Once thermal stabilization has been obtained the
generator should be restarted and the speed gradually
increased so that immediately the test lamp starts to
glow the voltmeter reading may be taken. This will be
the value of the cut-out contact closing voltage.
2 Reverse current:
This check should be carried out at a temperature range
of between 25°±10°C and it is recommended that it is
performed as soon as possible after the closing voltage
test so that the thermal stabilization remains unaltered.
Connect the regulator as shown in FIG 11:8 and
gradually speed up the generator to 4500 rev/min for
approximately 5 minutes. Ensure that the voltmeter reads
at least 14.5 volts and then gradually reduce the generator
speed carefully watching the movement of the ammeter
needle which should at first indicate a charging current
and then gradually move to zero and then to the other side
of the scale to indicate reverse current value. If the
generator speed is reduced further the reverse current
reading will increase to a given value and then suddenly
fall to zero which will indicate that the cut-out contact
has opened. This limit indicates the maximum reverse
current value which should not, under any circumstances,
exceed 16 amps.
During this test, to obtain the maximum reverse
current possible the reduction in generator speed must
not take more than 10 seconds otherwise the battery
voltage will drop excessively.
Checking voltage regulator:
This test should be carried out w i t h the regulator under
half load and at a temperature of 50°± 3°C. Connect the
regulator as shown in FIG 11:9 and operate the regulator
for approximately 30 minutes by supplying a current half
that of regulated current which is 1 6 ±5 amp. Once the
regulator has been brought to the required temperature
stop the generator and start it again, gradually increasing
the speed to a maximum of 4500 rev/min. Adjust the
rheostat for a generator output corresponding to half load
current of 8 ± 2 amps. When this generator output has
been set the voltage should be 14.2± .3 volts.
Checking current regulator:
Leave the regulator connected as shown in
FIG 11 :10
and this test must be carried out immediately after testing
the half load regulated voltage of the voltage regulator
when connected to a battery. Check that the ammeter
fitted will accommodate a 40 amp deflection: if not a
F500117
FIG 11 :9 Wiring diagram for checking the current and
voltage regulators
Key to Fig 11:9 GR Regulator GN 1.1 2.1 6 G Generator
FIAT D 90.12.16.3 V Voltmeter, 20 V scale (0.5% accuracy)
A Ammeter, 20 A scale (to check voltage regulator) and 40 A
scale (to check current regulator)
B Battery, 50 Ah, fully chargedR Rheostat, 25 A. 3
FIG 11 :10 Wiring diagram for setting the cut-out relay
Key to Fig 11 :10 B 2 V battery B 20 V batteryA Ammeter, 20 A scale ( 1 % accuracy) V Voltmeter, 20 V
scale (0.5% accuracy), directly connected to terminals 31—51
P Potentiometer for voltage adjustment, having such a capacity
that the current draw of the cut-out shunt winding does not
cause sensible variations in the voltage readings (voltmeter
under no load) S Test lamp, with 2 V, 3 W bulb, to signal
opening and closing of contacts R Rheostat, 4 12
AR Voltage drop resistor, suitable to allow turning on of A withT open and cut-out contacts open
Setting of instruments before inserting the unit: P At
minimum (voltmeter reads zero) T Open R All inserted
(max. resistance) T Open
FIG 11:11 Wiring diagram for setting the voltage and
current regulators
Key to Fig 11 :11 GR Regulator assembly GN 1.12.16
G Generator D 90.12.16.3 V Voltmeter, 20 V scale (0.5%
accuracy) A Ammeter, 20 Amp. scale (for voltage regulator),
or 40 Amp. scale (for current regulator) R Rheostat, 25
Amps., 3 Ohms B 50 Amp/h battery, fully charged I Switch
Page 112 of 128
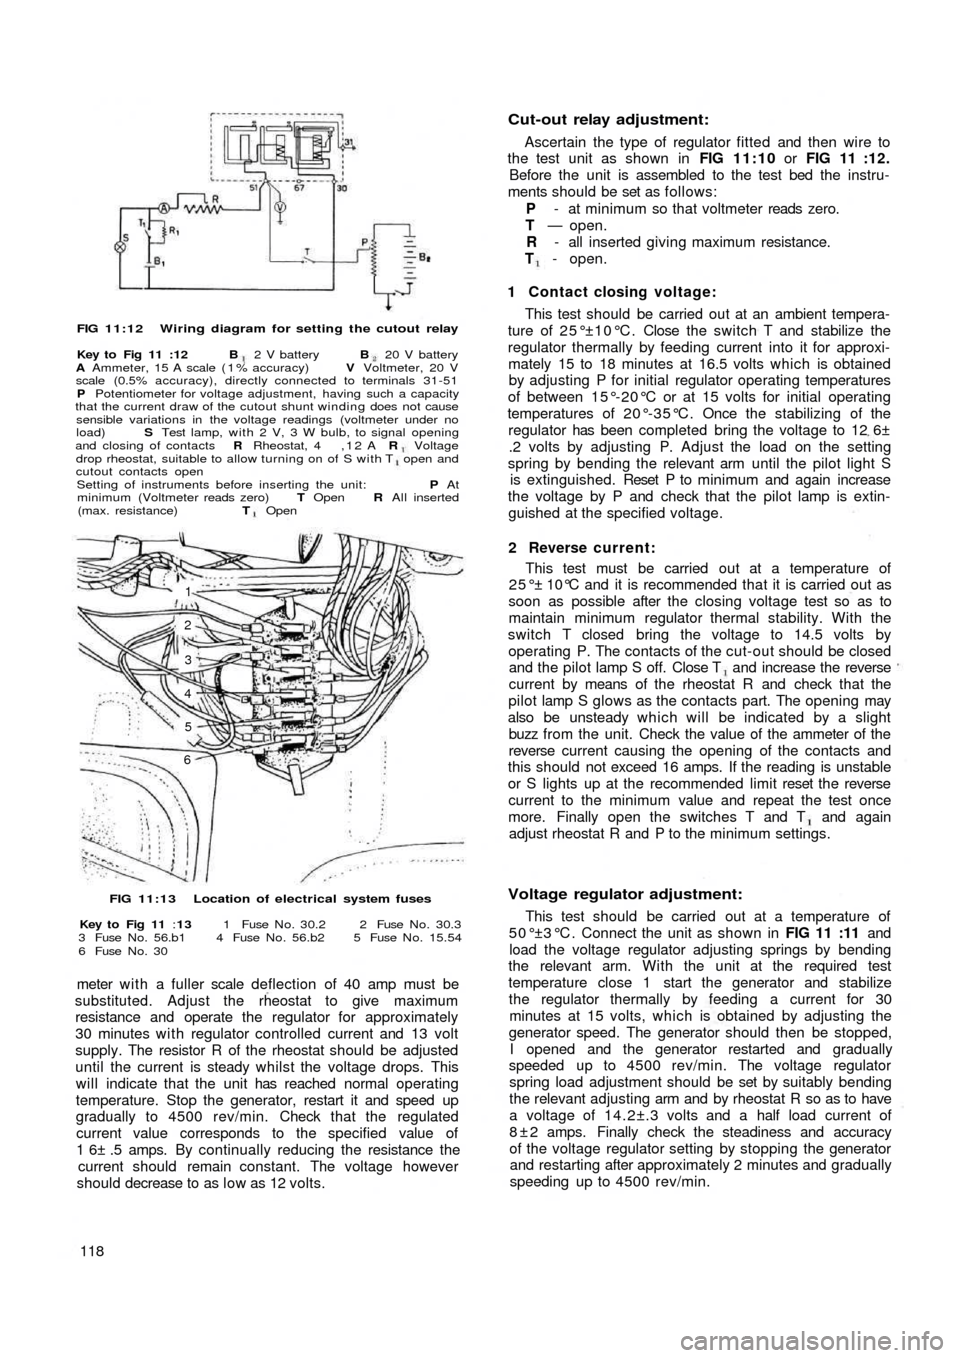
FIG 11:12 Wiring diagram for setting the cutout relay
Key to Fig 11 :12 B 2 V battery B 20 V battery
A Ammeter, 15 A scale ( 1 % accuracy) V Voltmeter, 20 V
scale (0.5% accuracy), directly connected to terminals 31-51
P Potentiometer for voltage adjustment, having such a capacity
that the current draw of the cutout shunt winding does not cause
sensible variations in the voltage readings (voltmeter under no
load) S Test lamp, with 2 V, 3 W bulb, to signal opening
and closing of contacts R Rheostat, 4 , 1 2 A R Voltagedrop rheostat, suitable to allow turning on of S with T open and
cutout contacts open
Setting of instruments before inserting the unit: P At
minimum (Voltmeter reads zero) T Open R All inserted
(max. resistance) T Open
1
2
3
4
5
6
FIG 11:13 Location of electrical system fuses
Key to Fig 11 :13 1 Fuse N o . 30.2 2 Fuse N o . 30.3
3 Fuse N o . 56.b1 4 Fuse N o . 56.b2 5 Fuse N o . 15.54
6 Fuse N o . 30
meter w i t h a fuller scale deflection of 40 amp must be
substituted. Adjust the rheostat to give maximum
resistance and operate the regulator for approximately
30 minutes with regulator controlled current and 13 volt
supply. The resistor R of the rheostat should be adjusted
until the current is steady whilst the voltage drops. This
will indicate that the unit has reached normal operating
temperature. Stop the generator, restart it and speed up
gradually to 4500 rev/min. Check that the regulated
current value corresponds to the specified value of
1 6± .5 amps. By continually reducing the resistance the
current should remain constant. The voltage however
should decrease to as l o w as 12 volts.
118
Cut-out relay adjustment:
Ascertain the type of regulator fitted and then wire to
the test unit as shown in FIG 11:10 or FIG 11 :12.
Before the unit is assembled to the test bed the instru-
ments should be set as follows:
P - at minimum so that voltmeter reads zero.
T — open.
R - all inserted giving maximum resistance.
T - open.
1 Contact closing voltage:
This test should be carried out at an ambient tempera-
ture of 25°±10°C. Close the switch T and stabilize the
regulator thermally by feeding current into it for approxi-
mately 15 to 18 minutes at 16.5 volts which is obtained
by adjusting P for initial regulator operating temperatures
of between 15°-20°C or at 15 volts for initial operating
temperatures of 20°-35°C. Once the stabilizing of the
regulator has been completed bring the voltage to 12 6±
.2 volts by adjusting P. Adjust the load on the setting
spring by bending the relevant arm until the pilot light S
is extinguished. Reset P to m inimum and again increase
the voltage by P and check that the pilot lamp is extin-
guished at the specified voltage.
2 Reverse current:
This test must be carried out at a temperature of
25°± 10°C and it is recommended that it is carried out as
soon as possible after the closing voltage test so as to
maintain minimum regulator thermal stability. With the
switch T closed bring the voltage to 14.5 volts by
operating P. The contacts of the cut-out should be closed
and the pilot lamp S off. Close T and increase the reverse
current by means of the rheostat R and check that the
pilot lamp S glows as the contacts part. The opening may
also be unsteady which will be indicated by a slight
buzz from the unit. Check the value of the ammeter of the
reverse current causing the opening of the contacts and
this should not exceed 16 amps. If the reading is unstable
or S lights up at the recommended limit reset the reverse
current to the minimum value and repeat the test once
more. Finally open the switches T and T and again
adjust rheostat R and P to the minimum settings.
Voltage regulator adjustment:
This test should be carried out at a temperature of
5 0 ° ±3 ° C . Connect the unit as shown in FIG 11 :11 and
load the voltage regulator adjusting springs by bending
the relevant arm. With the unit at the required test
temperature close 1 start the generator and stabilize
the regulator thermally by feeding a current for 30
minutes at 15 volts, which is obtained by adjusting the
generator speed. The generator should then be stopped,
I opened and the generator restarted and gradually
speeded up to 4500 rev/min. The voltage regulator
spring load adjustment should be set by suitably bending
the relevant adjusting arm and by rheostat R so as to have
a voltage of 14.2±.3 volts and a half load current of
8 ± 2 amps. Finally check the steadiness and accuracy
of the voltage regulator setting by stopping the generator
and restarting after approximately 2 minutes and gradually
speeding up to 4500 rev/min.
Page 116 of 128
Lamp brilliance varies w i t h the speed of t h e car:
Check the condition of the battery. Examine the battery
connections. Make sure they are tight and renew faulty
cables.
11:10 Panel and warning lights:
All the gauges are clustered in a single instrument
mounted on the dashboard above the steering column.
Incorporated in this cluster is the parking light pilot light,
generator charge indicator, fuel reserve supply indicator,
low oil pressure indicator, and the speedometer w i t h
mileage recorder.
The parking lamp indicator glows green when the
ignition lock switch key is in either position 1 or 2 once
the toggle switch on the instrument panel has been
operated.
The generator charge indicator shows red only when
the ignition is turned on. It should be extinguished when
the generator output is sufficient for battery charge
(12.6 ± 0.2 volts) with the engine running at a speed
of 1100 rev/min and the headlights switched off.
The fuel reserve supply indicator shows red only when
the ignition is turned on and the amount of fuel in the
petrol tank has dropped to approximately .8 to 1.1
Imp. gallons.
The low oil pressure indicator shows red only when the
ignition is turned on and should be extinguished when
the oil pressure reaches 7.1 to 21.3 Ib/sq in, and opens
the sending unit contacts. Once the engine is at normal
operating temperature but at a speed below 1000 rev/
min the indicator might light up even the pressure is under
control and with normal operation.
All the bulbs fitted to the above described units are of
the tubular 2.5W type and to renew a bulb extract the
bulb holder from the rear of t h e instrument cluster and
release the bulb which is attached by a normal bayonet
coupling.
Fuel reserve supply indicator sender u n i t:
The fuel reserve supply indicator should be checked for
correct indication by allowing the fuel tank to empty and
then inserting .8 to 1.1 Imp. gallons at which stage the
light should extinguish. Any failure to do so should be
checked as follows:
1 Ensure that the indicator bulb operates correctly.
2 Check for complete circuit between the sender unit and
the indicator bulb.
3 If the sender unit float bracket is distorted the bulb
will
indicate a reserve supply of fuel greater or smaller than
specified. The bracket should be adjusted to give
correct indication of fuel level.
4 The sender unit could have been inadvertantly
damaged in which case the unit must be renewed.
11 :11 The horn
The horn circuit comprises the horn, push button at the
centre of the steering wheel and normal earth return
electrical circuit through the car body. One terminal is
connected to the battery whilst the other to the push
button on the steering wheel which when the button is
depressed the circuit will be closed so causing the horn
to operate.
F500
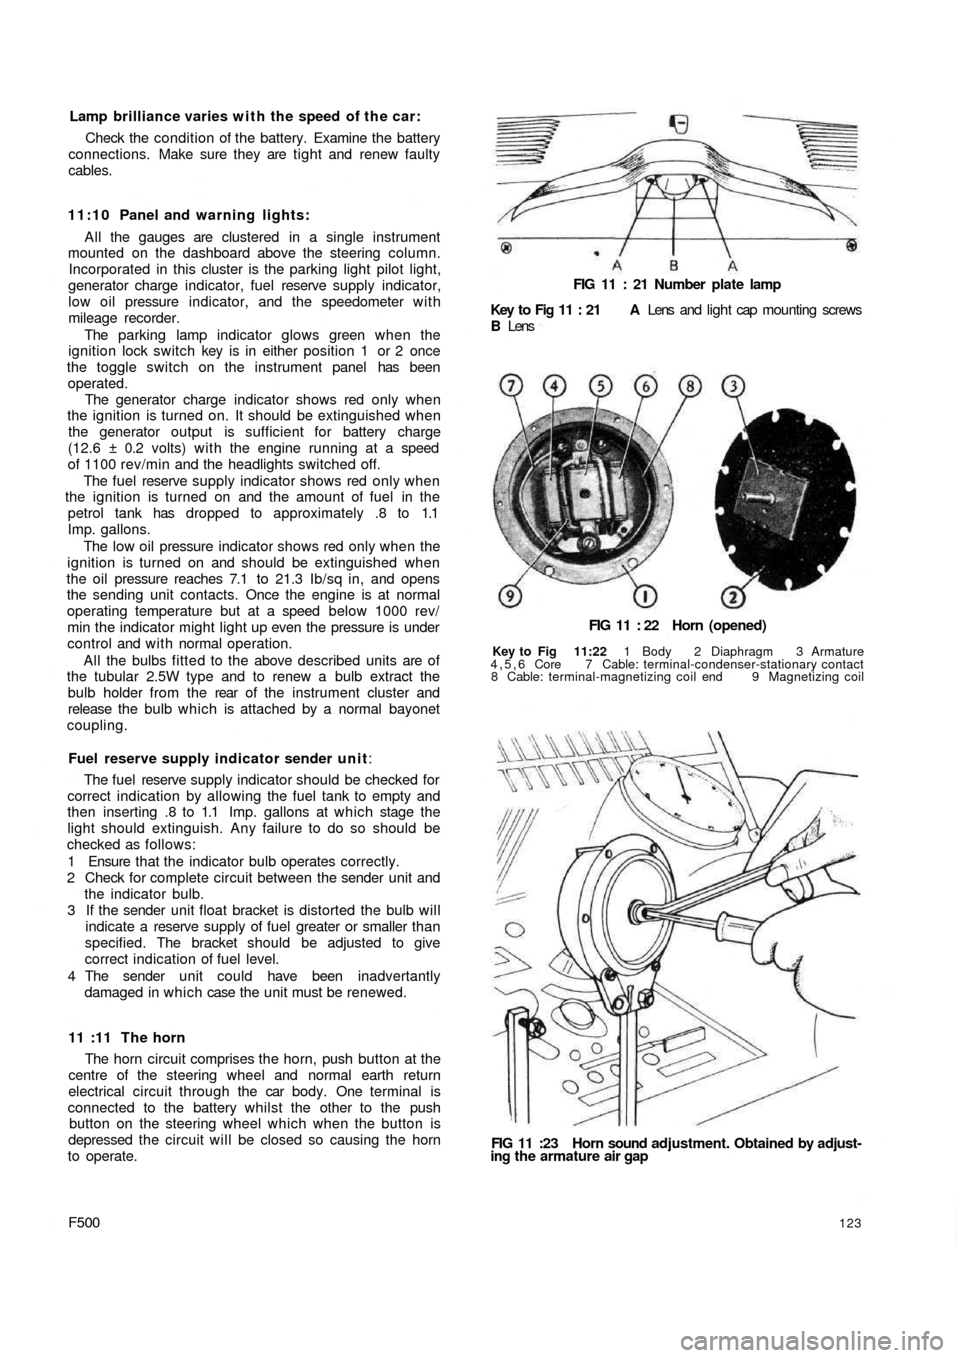
FIG 11 : 21 Number plate lamp
Key to Fig 11 : 21 A Lens and light cap mounting screws
B Lens
FIG 11 : 22 Horn (opened)
Key to Fig 11:22 1 Body 2 Diaphragm 3 Armature
4,5,6 Core 7 Cable: terminal-condenser-stationary contact
8 Cable: terminal-magnetizing coil end 9 Magnetizing coil
FIG 11 :23 Horn sound adjustment. Obtained by adjust-
ing the armature air gap
123
Page 117 of 128
Before removing an apparently faulty horn check the
wiring and connections. Check that the mounting bolts
are tight and that the horn does not foul any adjacent part.
Removal and installation:
This is a straightforward operation and the only
precaution to be taken is to ensure that the rubber gasket
bonded to the horn body does not become detached. If
the horn is renewed, before installing the new horn bond
the rubber gasket to the new unit with adhesive in
the same position as was on the original horn unit fitted.
Should the horn fail to operate the following points
should be noted.
1 Damaged horn.
2 Broken connection between battery and horn.
3 Broken connection between horn and push button on
steering wheel
4 Damaged push button mechanism.
5 Directional signal and outer lighting changeover
switch blade contact failing to make contact with the
steering wheel hub ring contact.
6 Current lead displaced from the horn blade contact on
the directional signal and outer lighting switch.
7 Distorted or broken diaphragm in horn.
8 Connections or inner windings
broken or burnt.
9 Electro-magnet contact points dirty or excessively
worn.The contacts may be adjusted by the adjusting screw
after the points have been cleaned and refaced.
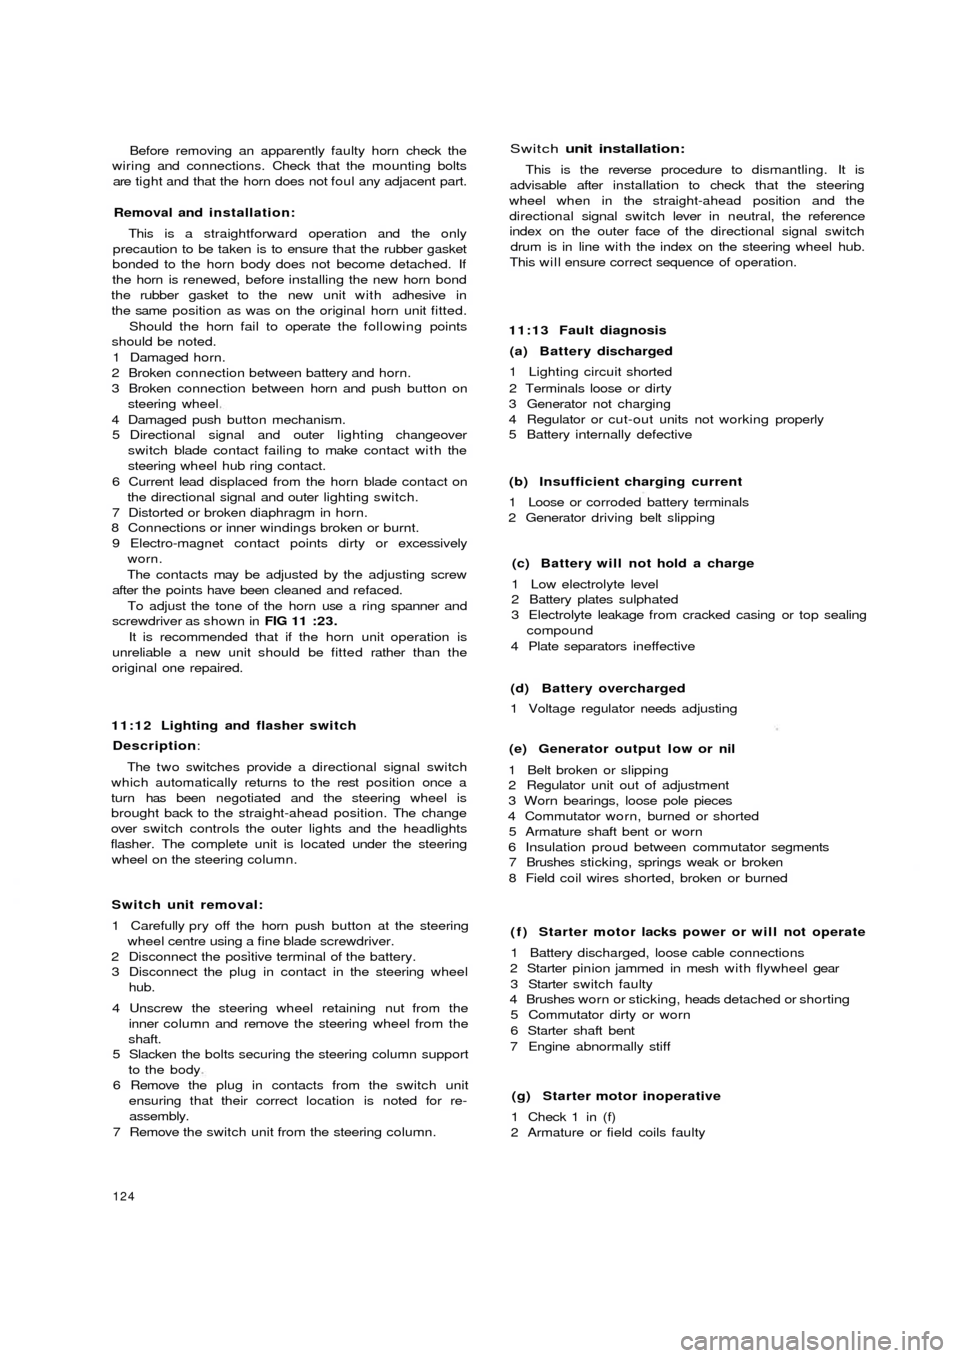
To adjust the tone of the horn use a ring spanner and
screwdriver as shown in FIG 11 :23.
It is recommended that if the horn unit operation is
unreliable a new unit should be fitted rather than the
original one repaired.
11:12 Lighting and flasher switch
Description:
The two switches provide a directional signal switch
which automatically returns to the rest position once a
turn has been negotiated and the steering wheel is
brought back to the straight-ahead position. The change
over switch controls the outer lights and the headlights
flasher. The complete unit is located under the steering
wheel on the steering column.
Switch unit removal:
1 Carefully pry off the horn push button at the steering
wheel centre using a fine blade screwdriver.
2 Disconnect the positive terminal of the battery.
3 Disconnect the plug in contact in the steering wheel
hub.
4 Unscrew the steering wheel retaining nut from the
inner column and remove the steering wheel from the
shaft.
5 Slacken the bolts securing the steering column support
to the body
6 Remove the plug in contacts from the switch unit
ensuring that their correct location is noted for re-
assembly.7 Remove the switch unit from the steering column.
124
Switch unit installation:
This is the reverse procedure to dismantling. It is
advisable after installation to check that the steering
wheel when in the straight-ahead position and the
directional signal switch lever in neutral, the reference
index on the outer face of the directional signal switch
drum is in line with the index on the steering wheel hub.
This will ensure correct sequence of operation.
11:13 Fault diagnosis
(a) Battery discharged
1 Lighting circuit shorted
2 Terminals loose or dirty
3 Generator not charging
4 Regulator or cut-out units not working properly
5 Battery internally defective
(b) Insufficient charging current
1 Loose or corroded battery terminals
2 Generator driving belt slipping
(c) Battery will not hold a charge
1 Low electrolyte level
2 Battery plates sulphated
3 Electrolyte leakage from cracked casing or top sealing
compound
4 Plate separators ineffective
(d) Battery overcharged
1 Voltage regulator needs adjusting
(e) Generator output low or nil
1 Belt broken or slipping
2 Regulator unit out of adjustment
3 Worn bearings, loose pole pieces
4 Commutator worn, burned or shorted
5 Armature shaft bent or worn
6 Insulation proud between commutator segments
7 Brushes sticking, springs weak or broken
8 Field coil wires shorted, broken or burned
( f ) Starter motor lacks power or will not operate
1 Battery discharged, loose cable connections
2 Starter pinion jammed in mesh with flywheel gear
3 Starter switch faulty
4 Brushes worn or sticking, heads detached or shorting
5 Commutator dirty or worn
6 Starter shaft bent
7 Engine abnormally stiff
(g) Starter motor inoperative
1 Check 1 in (f)
2 Armature or field coils faulty