fuel FIAT 500 2019 Owner handbook (in English)
[x] Cancel search | Manufacturer: FIAT, Model Year: 2019, Model line: 500, Model: FIAT 500 2019Pages: 228, PDF Size: 6.01 MB
Page 102 of 228
DUALOGIC
TRANSMISSION
(for versions/markets, where provided)
42) 44)
OPERATING MODE
MANUAL MODE
In this mode, the driver decides when
to shift gear;
Proceed as follows:
press the brake pedal;
start the engine;
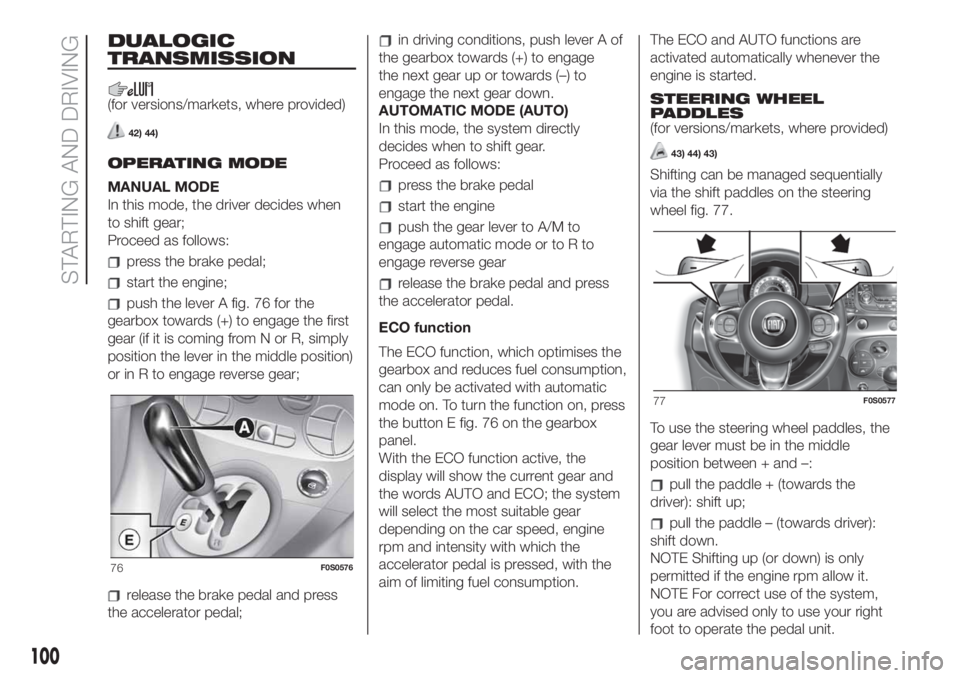
push the lever A fig. 76 for the
gearbox towards (+) to engage the first
gear (if it is coming from N or R, simply
position the lever in the middle position)
or in R to engage reverse gear;
release the brake pedal and press
the accelerator pedal;
in driving conditions, push lever A of
the gearbox towards (+) to engage
the next gear up or towards (–) to
engage the next gear down.
AUTOMATIC MODE (AUTO)
In this mode, the system directly
decides when to shift gear.
Proceed as follows:
press the brake pedal
start the engine
push the gear lever to A/M to
engage automatic mode or to R to
engage reverse gear
release the brake pedal and press
the accelerator pedal.
ECO function
The ECO function, which optimises the
gearbox and reduces fuel consumption,
can only be activated with automatic
mode on. To turn the function on, press
the button E fig. 76 on the gearbox
panel.
With the ECO function active, the
display will show the current gear and
the words AUTO and ECO; the system
will select the most suitable gear
depending on the car speed, engine
rpm and intensity with which the
accelerator pedal is pressed, with the
aim of limiting fuel consumption.The ECO and AUTO functions are
activated automatically whenever the
engine is started.
STEERING WHEEL
PADDLES
(for versions/markets, where provided)
43) 44) 43)
Shifting can be managed sequentially
via the shift paddles on the steering
wheel fig. 77.
To use the steering wheel paddles, the
gear lever must be in the middle
position between + and –:
pull the paddle + (towards the
driver): shift up;
pull the paddle – (towards driver):
shift down.
NOTE Shifting up (or down) is only
permitted if the engine rpm allow it.
NOTE For correct use of the system,
you are advised only to use your right
foot to operate the pedal unit.
76F0S0576
77F0S0577
100
STARTING AND DRIVING
Page 103 of 228
WARNING
42)Avoid keeping your hand placed on this
lever in between gear changes or
Auto/Manual mode.
43)Using the paddles incorrectly (paddles
pushed towards the dashboard) could
break them.
44)If the transmission is faulty, contact a
Fiat Dealership as soon as possible to have
the system checked.
45)Using the paddles incorrectly (paddles
pushed towards the dashboard) could
break them.
DUALDRIVE
ELECTRIC POWER
STEERING
(for versions/markets, where provided)
Turning on/off (CITY function)
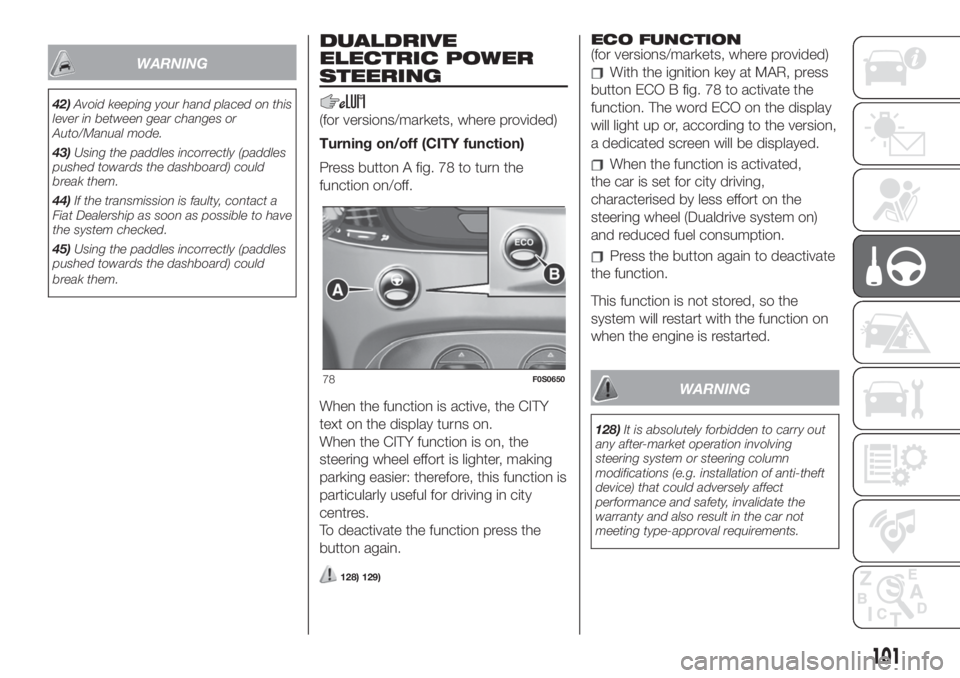
Press button A fig. 78 to turn the
function on/off.
When the function is active, the CITY
text on the display turns on.
When the CITY function is on, the
steering wheel effort is lighter, making
parking easier: therefore, this function is
particularly useful for driving in city
centres.
To deactivate the function press the
button again.
128) 129)
ECO FUNCTION
(for versions/markets, where provided)
With the ignition key at MAR, press
button ECO B fig. 78 to activate the
function. The word ECO on the display
will light up or, according to the version,
a dedicated screen will be displayed.
When the function is activated,
the car is set for city driving,
characterised by less effort on the
steering wheel (Dualdrive system on)
and reduced fuel consumption.
Press the button again to deactivate
the function.
This function is not stored, so the
system will restart with the function on
when the engine is restarted.
WARNING
128)It is absolutely forbidden to carry out
any after-market operation involving
steering system or steering column
modifications (e.g. installation of anti-theft
device) that could adversely affect
performance and safety, invalidate the
warranty and also result in the car not
meeting type-approval requirements.
78F0S0650
101
Page 105 of 228
WARNING
130)If the battery needs to be replaced,
always contact a Fiat Dealership. Replace
the battery with one of the same type
(HEAVY DUTY) and with the same
specifications.
131)Before opening the bonnet, make
sure that the vehicle is switched off and the
key is in the STOP position. Please follow
the instructions on the decal near the front
crossmember. It is advisable to extract
the key when there are other people in the
car. The car should always be left after
the key has been removed or turned to the
STOP position. When refuelling, make
sure that the car is switched off with the
key in the STOP position.132)We recommend that you remove the
key from the ignition if other people remain
in the vehicle. Exit from the vehicle only
after having removed the ignition key
or having rotated it to the STOP position.
During refuelling, make sure that the engine
is off and that the ignition key is in the
STOP position.
133)For cars with Dualogic transmission, if
the engine is automatically stopped on a
slope, the engine should be restarted
by moving the gear lever to + or – without
releasing the brake pedal. For cars with
Dualogic transmission, where the Hill
Holder function is present, in the case of
car stopped on a slope, the engine does
not cut off automatically, so as to make the
Hill Holder function - which is active only
when the engine is running - available.
WARNING
46)If the climate comfort is to be favoured,
the Start&Stop system can be deactivated,
for a continuous operation of the climate
control system.
SPEED LIMITER
(for versions/markets, where provided)
ACTIVATING THE DEVICE
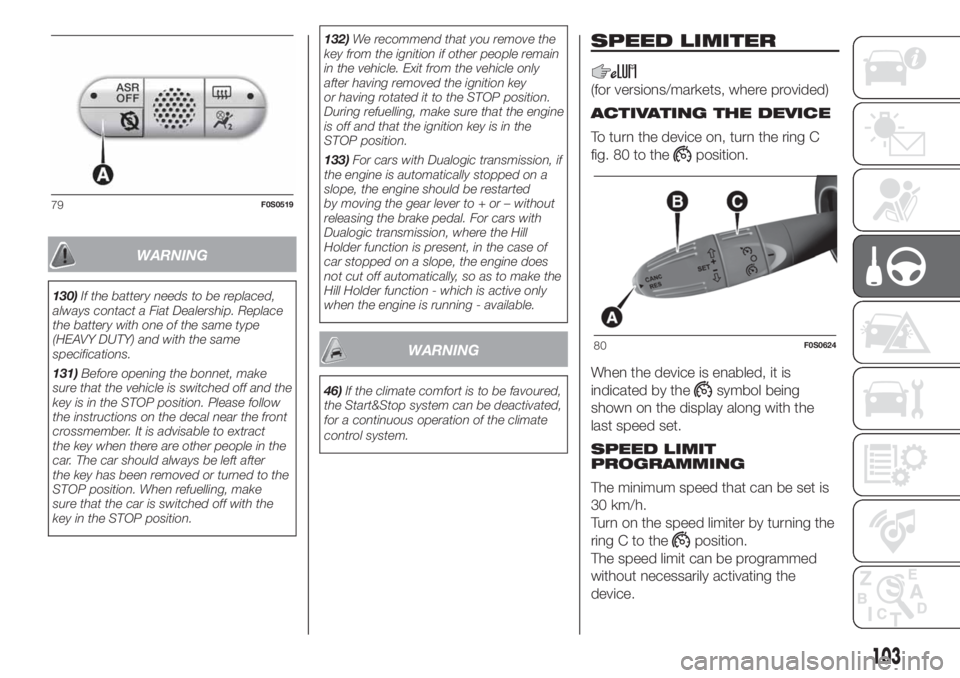
To turn the device on, turn the ring C
fig. 80 to the
position.
When the device is enabled, it is
indicated by the
symbol being
shown on the display along with the
last speed set.
SPEED LIMIT
PROGRAMMING
The minimum speed that can be set is
30 km/h.
Turn on the speed limiter by turning the
ring C to the
position.
The speed limit can be programmed
without necessarily activating the
device.
79F0S0519
80F0S0624
103
Page 110 of 228
SUGGESTIONS FOR
DRIVING
SAVING FUEL
Below are some suggestions which
may help you save fuel and thus lower
the amount of harmful emissions
released into the atmosphere.
Vehicle maintenance
Checks and operations should be
carried out in accordance with
the "Scheduled Servicing Plan" (see the
"Maintenance and care" chapter).
Tyres
Check the tyre pressures at least once
every four weeks: if the pressure is
too low, consumption levels increase as
resistance to rolling is higher.
Unnecessary loads
Do not travel with an overloaded
luggage compartment. The weight of
the vehicle and its arrangement greatly
affect fuel consumption and stability.Roof rack/ski rack
Remove the roof rack or the ski rack
from the roof when they are not used.
These accessories lower aerodynamic
penetration and adversely affect
consumption levels. When transporting
particularly large objects, use a trailer
if possible.
Electric devices
Use electrical devices only for the
amount of time needed. The heated
rear window, windscreen wipers and
heater fan require a considerable
amount of energy; increasing
the current uptake increases fuel
consumption (by up to +25% in an
urban cycle).
Climate control module
Using the climate control system will
increase consumption: use standard
ventilation when the temperature
outside permits.
Devices for aerodynamic control
The use of non-certified devices for
aerodynamic control may adversely
affect air drag and consumption levels.DRIVING STYLE
Start
Do not warm up the engine at low or
high revs when the car is stationary;
this causes the engine to warm up
more slowly, thereby increasing fuel
consumption and emissions. It is
therefore advisable to move off
immediately, slowly, avoiding high
speeds: in this way the engine will
warm up more quickly.
Unnecessary actions
Avoid revving up when starting at traffic
lights or before stopping the engine.
The latter action, as well as double-
declutching, is unnecessary and causes
increased fuel consumption and
pollution.
Gear selection
Use a high gear when traffic and road
conditions allow it. Using a low gear for
faster acceleration will increase fuel
consumption. In the same way,
improper use of a high gear increases
consumption, emissions and engine
wear.
108
STARTING AND DRIVING
Page 111 of 228
Top speed
Fuel consumption considerably
increases as speed increases. Maintain
a constant speed, avoiding
unnecessary braking and acceleration,
which cost in terms of both fuel
consumption and emissions.
Acceleration
Accelerating violently severely affects
consumption and emissions:
acceleration should be gradual and
should not exceed the maximum
torque.
CONDITIONS OF USE
Cold starting
Short journeys and frequent cold starts
do not allow the engine to reach
optimum operating temperature.
Consequently, both consumption (from
+15 to +30% on the urban cycle) and
emissions will increase.
Traffic and road conditions
High fuel consumption is caused by
heavy traffic, for instance when
travelling in a queue with frequent use
of low gears or in cities with many traffic
lights. Winding mountain roads and
rough road surfaces also adversely
affect consumption.Stops in traffic
During prolonged hold-ups (e.g. level
crossings) switch off the engine.REFUELLING THE
VEHICLE
138) 139) 140)
Before refuelling, make sure that the
fuel type is correct. Also stop the
engine before refuelling.
PETROL VERSIONS
Only use unleaded petrol with a number
of octanes (R.O.N.) not lower than 95
(EN228 specification).
IMPORTANT An inefficient catalytic
converter leads to harmful exhaust
emissions, thus contributing to air
pollution.
IMPORTANT Never introduce leaded
petrol to the tank, even in small
amounts in an emergency, as this
would damage the catalytic converter
beyond repair.
REFUELLING CAPACITY
To ensure that you fill the tank
completely, top up twice after the first
click of the fuel supply gun. Further
top-ups could cause faults in the fuel
feeding system.
109
Page 112 of 228
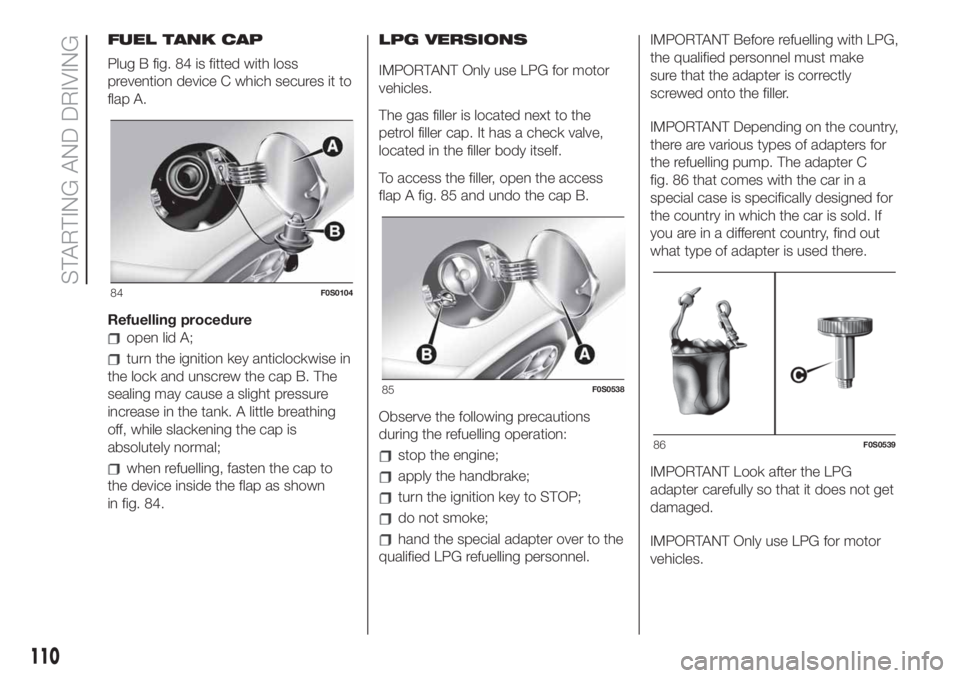
FUEL TANK CAP
Plug B fig. 84 is fitted with loss
prevention device C which secures it to
flap A.
Refuelling procedure
open lid A;
turn the ignition key anticlockwise in
the lock and unscrew the cap B. The
sealing may cause a slight pressure
increase in the tank. A little breathing
off, while slackening the cap is
absolutely normal;
when refuelling, fasten the cap to
the device inside the flap as shown
in fig. 84.LPG VERSIONS
IMPORTANT Only use LPG for motor
vehicles.
The gas filler is located next to the
petrol filler cap. It has a check valve,
located in the filler body itself.
To access the filler, open the access
flap A fig. 85 and undo the cap B.
Observe the following precautions
during the refuelling operation:stop the engine;
apply the handbrake;
turn the ignition key to STOP;
do not smoke;
hand the special adapter over to the
qualified LPG refuelling personnel.IMPORTANT Before refuelling with LPG,
the qualified personnel must make
sure that the adapter is correctly
screwed onto the filler.
IMPORTANT Depending on the country,
there are various types of adapters for
the refuelling pump. The adapter C
fig. 86 that comes with the car in a
special case is specifically designed for
the country in which the car is sold. If
you are in a different country, find out
what type of adapter is used there.
IMPORTANT Look after the LPG
adapter carefully so that it does not get
damaged.
IMPORTANT Only use LPG for motor
vehicles.
84F0S0104
85F0S0538
86F0S0539
110
STARTING AND DRIVING
Page 113 of 228
IMPORTANT Only use the adapter
supplied with the vehicle as it is
equipped with a dedicated fuel
pre-filter.
Fuel - Vehicle
compatibility
identification Graphic
symbol for consumer
information in
accordance with
EN16942
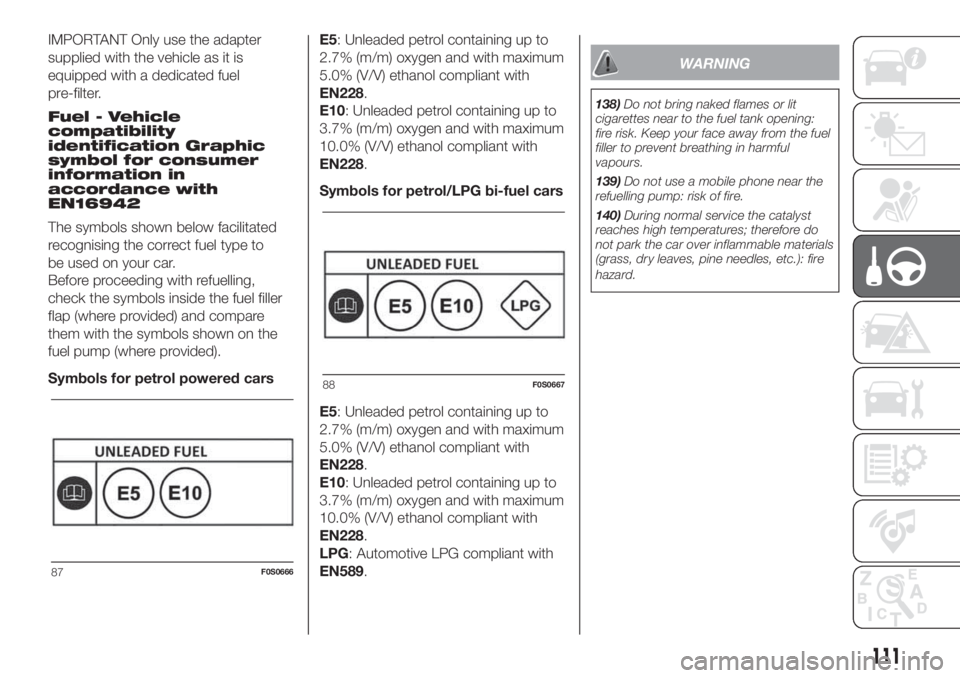
The symbols shown below facilitated
recognising the correct fuel type to
be used on your car.
Before proceeding with refuelling,
check the symbols inside the fuel filler
flap (where provided) and compare
them with the symbols shown on the
fuel pump (where provided).
Symbols for petrol powered carsE5: Unleaded petrol containing up to
2.7% (m/m) oxygen and with maximum
5.0% (V/V) ethanol compliant with
EN228.
E10: Unleaded petrol containing up to
3.7% (m/m) oxygen and with maximum
10.0% (V/V) ethanol compliant with
EN228.
Symbols for petrol/LPG bi-fuel cars
E5: Unleaded petrol containing up to
2.7% (m/m) oxygen and with maximum
5.0% (V/V) ethanol compliant with
EN228.
E10: Unleaded petrol containing up to
3.7% (m/m) oxygen and with maximum
10.0% (V/V) ethanol compliant with
EN228.
LPG: Automotive LPG compliant with
EN589.
WARNING
138)Do not bring naked flames or lit
cigarettes near to the fuel tank opening:
fire risk. Keep your face away from the fuel
filler to prevent breathing in harmful
vapours.
139)Do not use a mobile phone near the
refuelling pump: risk of fire.
140)During normal service the catalyst
reaches high temperatures; therefore do
not park the car over inflammable materials
(grass, dry leaves, pine needles, etc.): fire
hazard.
87F0S0666
88F0S0667
111
Page 115 of 228
IN AN EMERGENCY
A punctured tyre or a burnt-out bulb?
At times, a problem may interfere
with our journey.
The pages on emergencies can help
you to deal with critical situations
independently and with calm.
In an emergency we recommend that
you call the freephone number found in
the Warranty Booklet.
It is also possible to call the national or
international universal freephone
number to search for the nearest
Dealership.HAZARD WARNING LIGHTS...........114
CHANGING A BULB .......................114
REPLACING FUSES........................121
REPLACING A WHEEL ...................127
FIX&GO KIT .....................................131
JUMP STARTING ............................134
FUEL CUT-OFF SYSTEM ................135
TOWING THE VEHICLE ..................136
113
Page 136 of 228
JUMP STARTING
If the battery is flat, a jump starting can
be performed using the battery and
the cables of another car, or using an
auxiliary battery. In all cases, the battery
used must have a capacity equal to or
a little higher than the flat one.
Jump starting may be dangerous if
carried out incorrectly: carefully follow
the procedures described below.
IMPORTANT NOTES
After turning the ignition key to STOP
and having closed the driver's side
door, wait at least one minute before
disconnecting the battery and then
reconnecting the electrical supply to the
battery.
Do not use an auxiliary battery or any
other source of external supply with
a voltage above 12 V: the battery, the
starter, the alternator and the electrical
system of the car could be damaged.
Do not attempt jump starting if the
battery is frozen. The battery could
break and explode!JUMP STARTING166) 167) 168)
56) 57) 58)
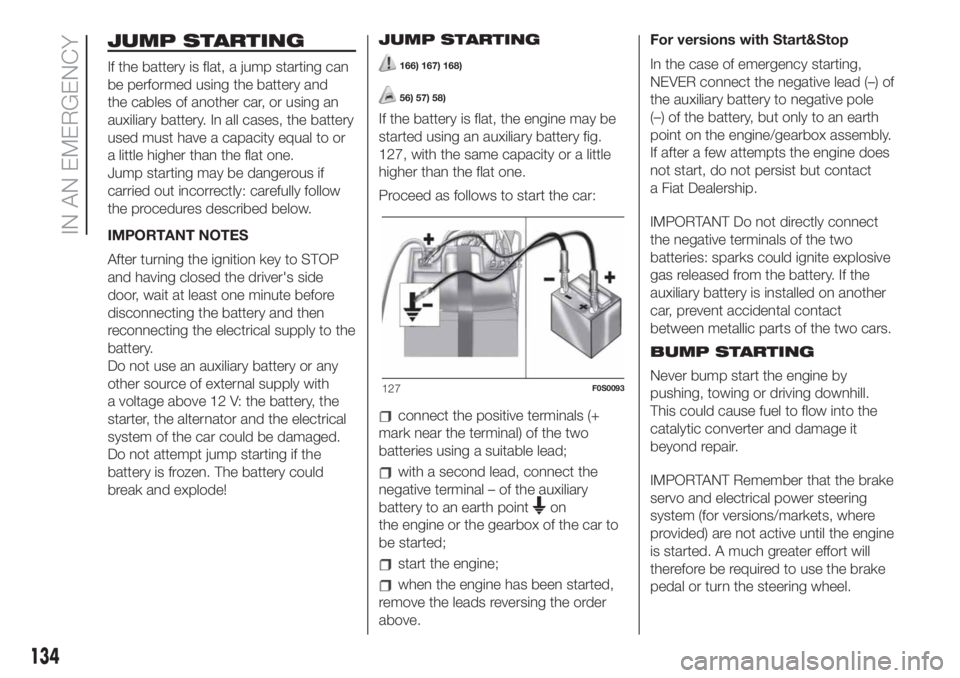
If the battery is flat, the engine may be
started using an auxiliary battery fig.
127, with the same capacity or a little
higher than the flat one.
Proceed as follows to start the car:
connect the positive terminals (+
mark near the terminal) of the two
batteries using a suitable lead;
with a second lead, connect the
negative terminal – of the auxiliary
battery to an earth point
on
the engine or the gearbox of the car to
be started;
start the engine;
when the engine has been started,
remove the leads reversing the order
above.For versions with Start&Stop
In the case of emergency starting,
NEVER connect the negative lead (–) of
the auxiliary battery to negative pole
(–) of the battery, but only to an earth
point on the engine/gearbox assembly.
If after a few attempts the engine does
not start, do not persist but contact
a Fiat Dealership.
IMPORTANT Do not directly connect
the negative terminals of the two
batteries: sparks could ignite explosive
gas released from the battery. If the
auxiliary battery is installed on another
car, prevent accidental contact
between metallic parts of the two cars.
BUMP STARTING
Never bump start the engine by
pushing, towing or driving downhill.
This could cause fuel to flow into the
catalytic converter and damage it
beyond repair.
IMPORTANT Remember that the brake
servo and electrical power steering
system (for versions/markets, where
provided) are not active until the engine
is started. A much greater effort will
therefore be required to use the brake
pedal or turn the steering wheel.
127F0S0093
134
IN AN EMERGENCY
Page 137 of 228
WARNING
166)This starting procedure must be
performed by expert personnel because
incorrect actions could cause electrical
discharge of considerable intensity.
Furthermore, battery fluid is poisonous and
corrosive: avoid contact with skin and
eyes. Keep naked flames and lighted
cigarettes away from the battery and do
not cause sparks.
167)Remove any metal objects (e.g. rings,
watches, bracelets), that might cause an
accidental electrical contact and cause
serious injury.
168)Do not attempt to charge a frozen
battery: it must be thawed first, otherwise it
may explode. If freezing has occurred, the
battery should be checked by skilled
personnel to make sure that the internal
elements are not damaged and that the
body is not cracked, with the risk of leaking
poisonous and corrosive acid.
WARNING
56)Never use a fast battery-charger to
start the engine as this could damage the
electronic systems of your vehicle,
particularly the ignition and engine fuel
supply control units.57)Do not connect the cable to the
negative terminal (–) of the flat battery. The
following spark could lead to battery
explosion and cause serious harm. Only
use the specific earth point; do not use any
other exposed metallic part.
58)Never bump start the engine by
pushing, towing or coasting downhill. This
could cause fuel to flow into the catalytic
converter and damage it beyond repair.
FUEL CUT-OFF
SYSTEM
169)
This intervenes in the case of an impact
causing:
the fuel supply cut-off with the
engine consequently switching off
the automatic unlocking of the doors
turning on of the lights inside the
vehicle;
The intervention of the system is
indicated by a message shown on the
display.
IMPORTANT Carefully check the car for
fuel leaks, for instance in the engine
compartment, under the car or near the
tank area. After a collision, turn the
ignition key to STOP position to prevent
the battery from running down.
To restore the correct operation of the
vehicle, proceed as follows:
turn the ignition key to the MAR-ON
position
activate the right direction indicator
deactivate the right direction
indicator
activate the left direction indicator
deactivate the left direction indicator
135