steering FIAT 500 2019 Owner handbook (in English)
[x] Cancel search | Manufacturer: FIAT, Model Year: 2019, Model line: 500, Model: FIAT 500 2019Pages: 228, PDF Size: 6.01 MB
Page 132 of 228
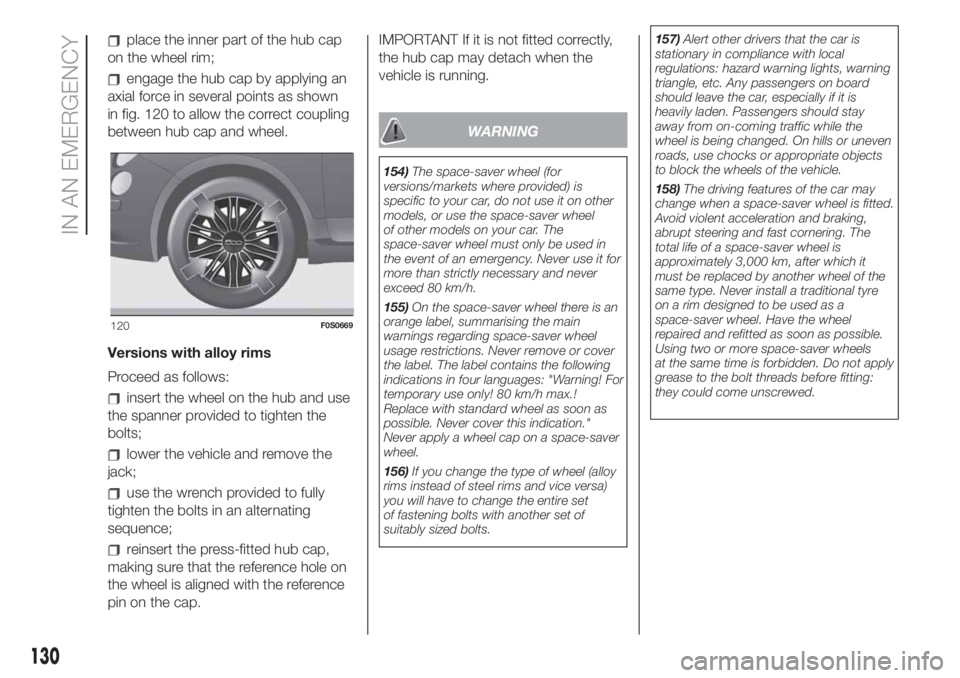
place the inner part of the hub cap
on the wheel rim;
engage the hub cap by applying an
axial force in several points as shown
in fig. 120 to allow the correct coupling
between hub cap and wheel.
Versions with alloy rims
Proceed as follows:
insert the wheel on the hub and use
the spanner provided to tighten the
bolts;
lower the vehicle and remove the
jack;
use the wrench provided to fully
tighten the bolts in an alternating
sequence;
reinsert the press-fitted hub cap,
making sure that the reference hole on
the wheel is aligned with the reference
pin on the cap.IMPORTANT If it is not fitted correctly,
the hub cap may detach when the
vehicle is running.
WARNING
154)The space-saver wheel (for
versions/markets where provided) is
specific to your car, do not use it on other
models, or use the space-saver wheel
of other models on your car. The
space-saver wheel must only be used in
the event of an emergency. Never use it for
more than strictly necessary and never
exceed 80 km/h.
155)On the space-saver wheel there is an
orange label, summarising the main
warnings regarding space-saver wheel
usage restrictions. Never remove or cover
the label. The label contains the following
indications in four languages: "Warning! For
temporary use only! 80 km/h max.!
Replace with standard wheel as soon as
possible. Never cover this indication."
Never apply a wheel cap on a space-saver
wheel.
156)If you change the type of wheel (alloy
rims instead of steel rims and vice versa)
you will have to change the entire set
of fastening bolts with another set of
suitably sized bolts.157)Alert other drivers that the car is
stationary in compliance with local
regulations: hazard warning lights, warning
triangle, etc. Any passengers on board
should leave the car, especially if it is
heavily laden. Passengers should stay
away from on-coming traffic while the
wheel is being changed. On hills or uneven
roads, use chocks or appropriate objects
to block the wheels of the vehicle.
158)The driving features of the car may
change when a space-saver wheel is fitted.
Avoid violent acceleration and braking,
abrupt steering and fast cornering. The
total life of a space-saver wheel is
approximately 3,000 km, after which it
must be replaced by another wheel of the
same type. Never install a traditional tyre
on a rim designed to be used as a
space-saver wheel. Have the wheel
repaired and refitted as soon as possible.
Using two or more space-saver wheels
at the same time is forbidden. Do not apply
grease to the bolt threads before fitting:
they could come unscrewed.
120F0S0669
130
IN AN EMERGENCY
Page 136 of 228
JUMP STARTING
If the battery is flat, a jump starting can
be performed using the battery and
the cables of another car, or using an
auxiliary battery. In all cases, the battery
used must have a capacity equal to or
a little higher than the flat one.
Jump starting may be dangerous if
carried out incorrectly: carefully follow
the procedures described below.
IMPORTANT NOTES
After turning the ignition key to STOP
and having closed the driver's side
door, wait at least one minute before
disconnecting the battery and then
reconnecting the electrical supply to the
battery.
Do not use an auxiliary battery or any
other source of external supply with
a voltage above 12 V: the battery, the
starter, the alternator and the electrical
system of the car could be damaged.
Do not attempt jump starting if the
battery is frozen. The battery could
break and explode!JUMP STARTING166) 167) 168)
56) 57) 58)
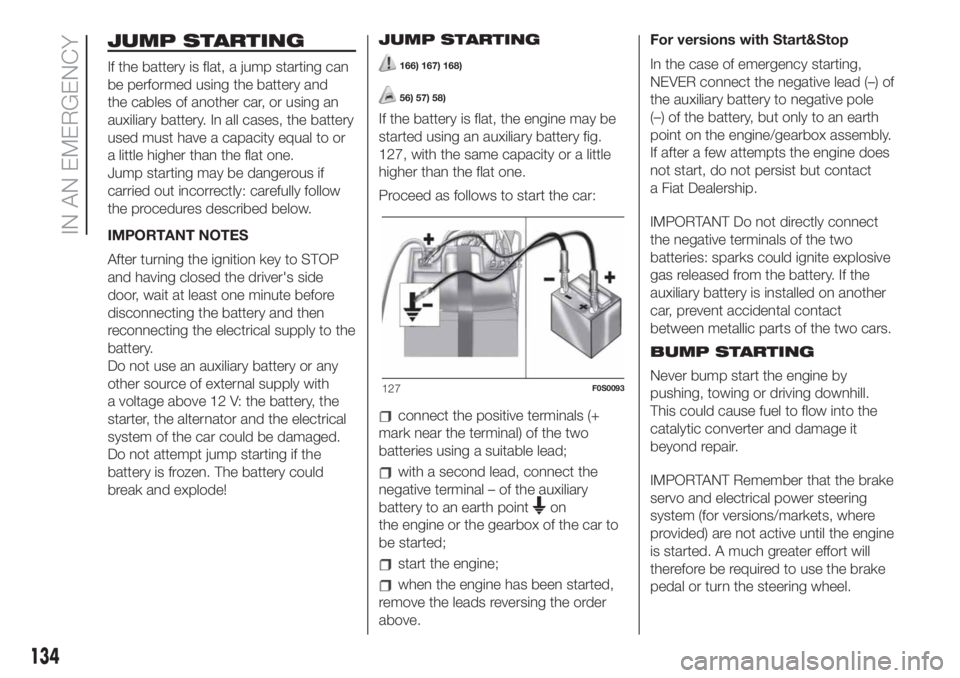
If the battery is flat, the engine may be
started using an auxiliary battery fig.
127, with the same capacity or a little
higher than the flat one.
Proceed as follows to start the car:
connect the positive terminals (+
mark near the terminal) of the two
batteries using a suitable lead;
with a second lead, connect the
negative terminal – of the auxiliary
battery to an earth point
on
the engine or the gearbox of the car to
be started;
start the engine;
when the engine has been started,
remove the leads reversing the order
above.For versions with Start&Stop
In the case of emergency starting,
NEVER connect the negative lead (–) of
the auxiliary battery to negative pole
(–) of the battery, but only to an earth
point on the engine/gearbox assembly.
If after a few attempts the engine does
not start, do not persist but contact
a Fiat Dealership.
IMPORTANT Do not directly connect
the negative terminals of the two
batteries: sparks could ignite explosive
gas released from the battery. If the
auxiliary battery is installed on another
car, prevent accidental contact
between metallic parts of the two cars.
BUMP STARTING
Never bump start the engine by
pushing, towing or driving downhill.
This could cause fuel to flow into the
catalytic converter and damage it
beyond repair.
IMPORTANT Remember that the brake
servo and electrical power steering
system (for versions/markets, where
provided) are not active until the engine
is started. A much greater effort will
therefore be required to use the brake
pedal or turn the steering wheel.
127F0S0093
134
IN AN EMERGENCY
Page 139 of 228
WARNING
170)Before towing, turn the key to MAR
and then to STOP without extracting it.
If the key is removed, the steering lock will
come on automatically and it will be
impossible to steer the wheels.
171)Before tightening the ring clean the
threaded housing thoroughly. Make sure
that the ring is fully fastened in the housing
before towing the car.
172)The (front/rear) tow hook must be
used exclusively for roadside assistance
operations. You are allowed to tow the
vehicle for short distances using an
appropriate device in accordance with the
highway code (a rigid bar), to move the
vehicle on the road in readiness for towing
or transport via a tow truck. The tow hook
MUST NOT be used to tow vehicles off
the road or where there are obstacles
and/or for towing operations using cables
or other non-rigid devices. In compliance
with the above conditions, towing must
take place with the two vehicles (one
towing, the other towed) aligned as much
as possible along the same centre line.173)Whilst towing, remember that as the
assistance of the brake servo and the
electric power assisted steering is
not available, greater force needs to be
exerted on the brake pedal and more effort
is required on the steering wheel. Do not
use flexible cables when towing and avoid
jerky movements. Make sure not to
damage parts in contact with the car while
towing. When towing the vehicle, you
must comply with all specific traffic
regulations and adopt an appropriate
driving behaviour. Do not start the engine
while towing the vehicle.
137
Page 181 of 228
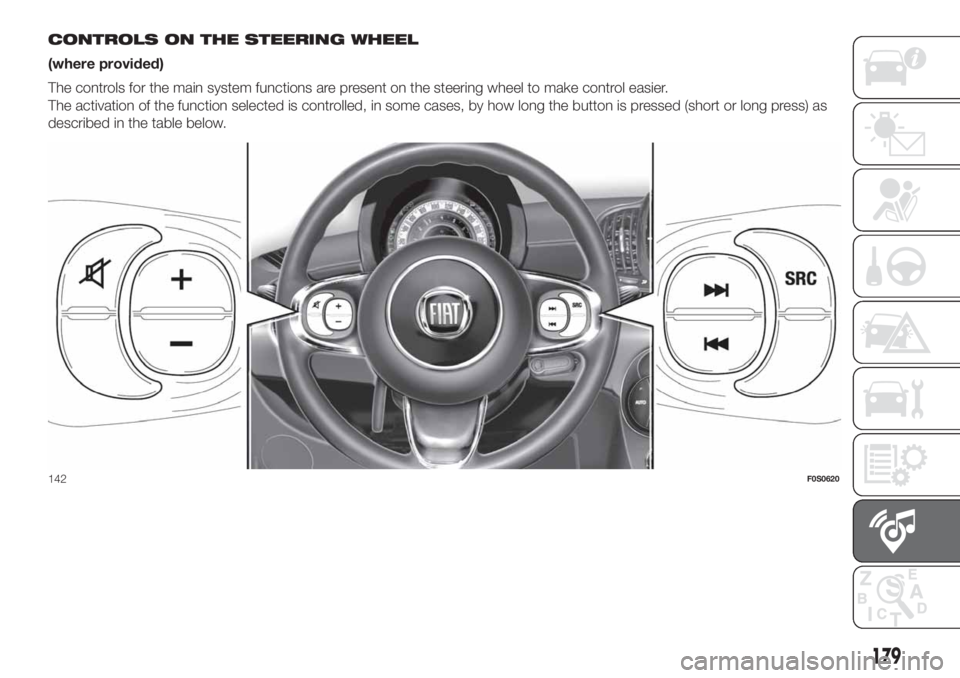
CONTROLS ON THE STEERING WHEEL
(where provided)
The controls for the main system functions are present on the steering wheel to make control easier.
The activation of the function selected is controlled, in some cases, by how long the button is pressed (short or long press) as
described in the table below.
142F0S0620
179
Page 183 of 228
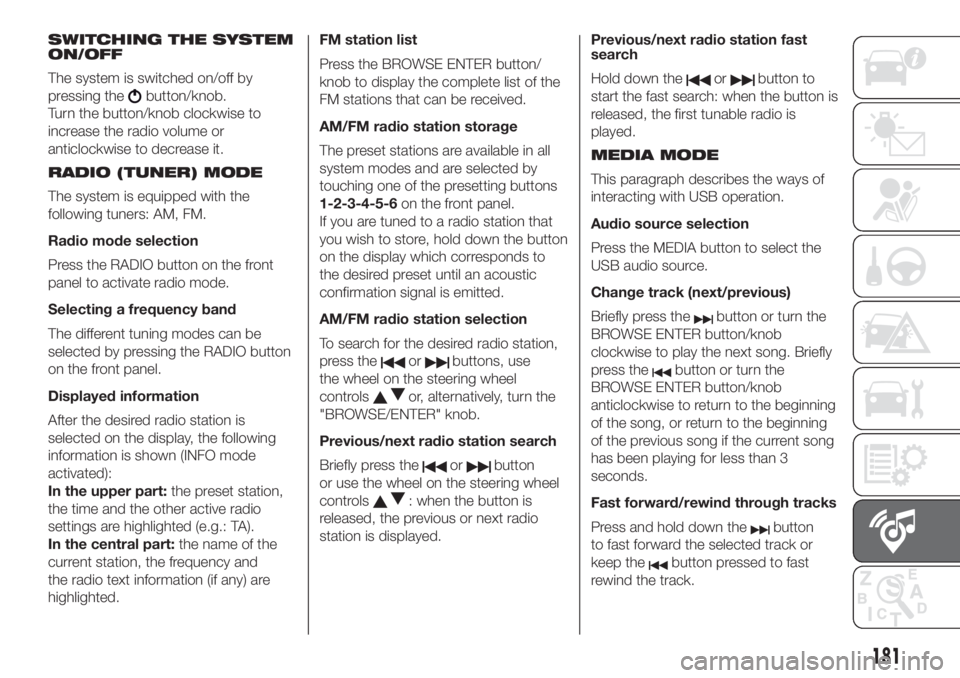
SWITCHING THE SYSTEM
ON/OFF
The system is switched on/off by
pressing the
button/knob.
Turn the button/knob clockwise to
increase the radio volume or
anticlockwise to decrease it.
RADIO (TUNER) MODE
The system is equipped with the
following tuners: AM, FM.
Radio mode selection
Press the RADIO button on the front
panel to activate radio mode.
Selecting a frequency band
The different tuning modes can be
selected by pressing the RADIO button
on the front panel.
Displayed information
After the desired radio station is
selected on the display, the following
information is shown (INFO mode
activated):
In the upper part:the preset station,
the time and the other active radio
settings are highlighted (e.g.: TA).
In the central part:the name of the
current station, the frequency and
the radio text information (if any) are
highlighted.FM station list
Press the BROWSE ENTER button/
knob to display the complete list of the
FM stations that can be received.
AM/FM radio station storage
The preset stations are available in all
system modes and are selected by
touching one of the presetting buttons
1-2-3-4-5-6on the front panel.
If you are tuned to a radio station that
you wish to store, hold down the button
on the display which corresponds to
the desired preset until an acoustic
confirmation signal is emitted.
AM/FM radio station selection
To search for the desired radio station,
press the
orbuttons, use
the wheel on the steering wheel
controls
or, alternatively, turn the
"BROWSE/ENTER" knob.
Previous/next radio station search
Briefly press the
orbutton
or use the wheel on the steering wheel
controls
: when the button is
released, the previous or next radio
station is displayed.Previous/next radio station fast
search
Hold down the
orbutton to
start the fast search: when the button is
released, the first tunable radio is
played.
MEDIA MODE
This paragraph describes the ways of
interacting with USB operation.
Audio source selection
Press the MEDIA button to select the
USB audio source.
Change track (next/previous)
Briefly press the
button or turn the
BROWSE ENTER button/knob
clockwise to play the next song. Briefly
press the
button or turn the
BROWSE ENTER button/knob
anticlockwise to return to the beginning
of the song, or return to the beginning
of the previous song if the current song
has been playing for less than 3
seconds.
Fast forward/rewind through tracks
Press and hold down the
button
to fast forward the selected track or
keep the
button pressed to fast
rewind the track.
181
Page 187 of 228
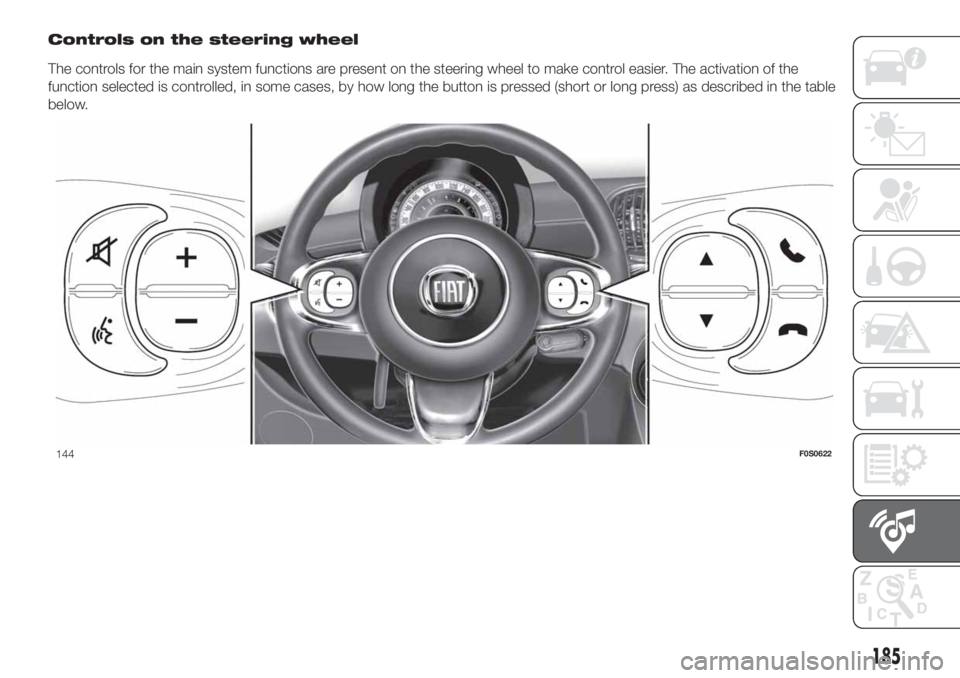
Controls on the steering wheel
The controls for the main system functions are present on the steering wheel to make control easier. The activation of the
function selected is controlled, in some cases, by how long the button is pressed (short or long press) as described in the table
below.
144F0S0622
185
Page 188 of 228
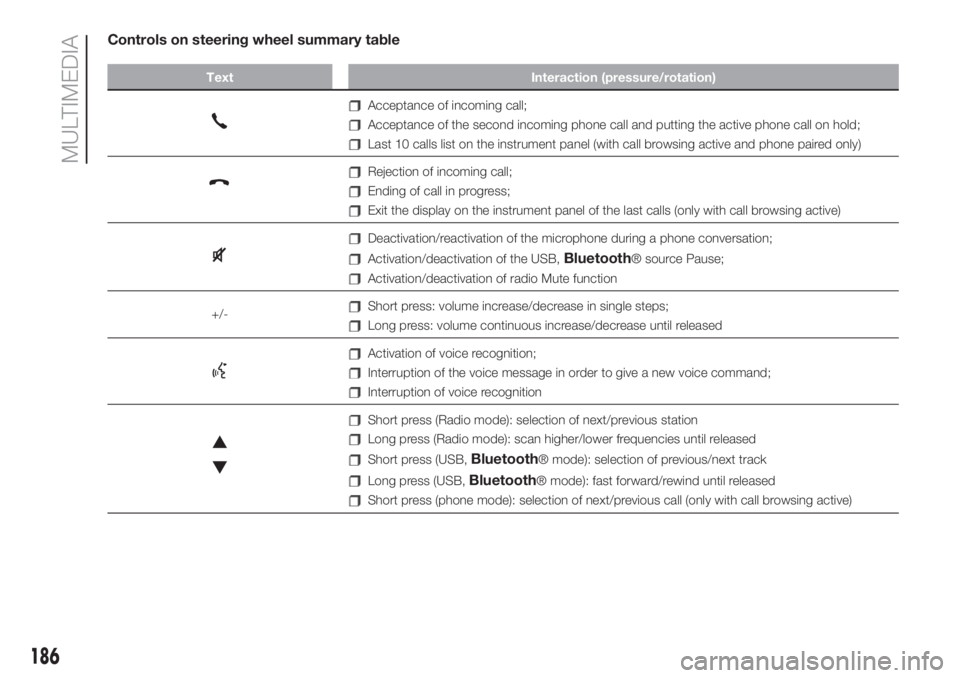
Controls on steering wheel summary table
Text Interaction (pressure/rotation)
Acceptance of incoming call;
Acceptance of the second incoming phone call and putting the active phone call on hold;
Last 10 calls list on the instrument panel (with call browsing active and phone paired only)
Rejection of incoming call;
Ending of call in progress;
Exit the display on the instrument panel of the last calls (only with call browsing active)
Deactivation/reactivation of the microphone during a phone conversation;
Activation/deactivation of the USB,Bluetooth® source Pause;
Activation/deactivation of radio Mute function
+/-
Short press: volume increase/decrease in single steps;
Long press: volume continuous increase/decrease until released
Activation of voice recognition;
Interruption of the voice message in order to give a new voice command;
Interruption of voice recognition
Short press (Radio mode): selection of next/previous station
Long press (Radio mode): scan higher/lower frequencies until released
Short press (USB,Bluetooth® mode): selection of previous/next track
Long press (USB,Bluetooth® mode): fast forward/rewind until released
Short press (phone mode): selection of next/previous call (only with call browsing active)
186
MULTIMEDIA
Page 197 of 228
Voice commands
NOTE For languages not supported by
the system, voice controls are not
available. To use the voice commands,
press the
button on the steering
wheel (”Voice” button) and say out loud
the command you want to activate.
Global
The following voice commands can be
given after pressing the
button on
the steering wheel:
Help
Cancel
Repeat
Voice Prompts
Phone
The following voice commands can be
given after pressing the
button on
the steering wheel and saying "Go
to telephone":
Call
Dial
Re-dial
Call back
Recent calls
Calls made
Missed calls
Calls received
PhoneBook
Search
Show SMS
Radio
The following voice commands can be
given after pressing the
button on
the steering wheel:
Tune to XXX FM
Tune to XXX AM
Tune to Radio XXX
Tune to DAB channel
Media
The following voice commands can be
given after pressing the
button on
the steering wheel:
Play song...
Play album…
Play artist…
Play genre…
Play playlist…
Play podcast…
Play audiobook…
Select the source
View
Navigation (Uconnect™ 5" Nav LIVE
only)
The following voice commands can be
given after pressing the
button on
the steering wheel:
Drive Home
2D view
3D vision
Clear route
Add Favourite
Repeat instruction
195
Page 201 of 228
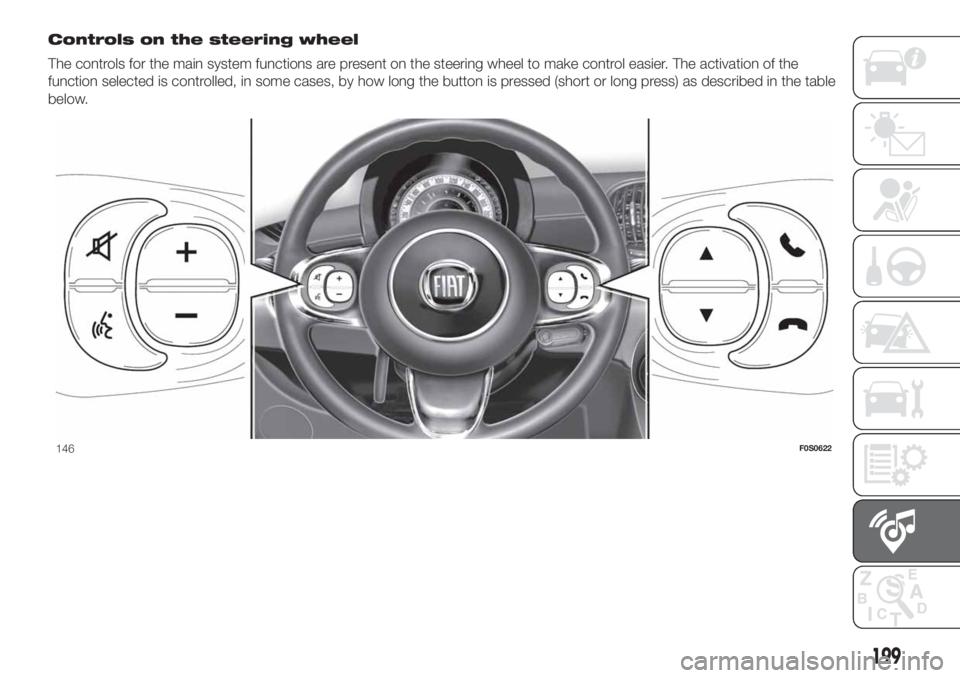
Controls on the steering wheel
The controls for the main system functions are present on the steering wheel to make control easier. The activation of the
function selected is controlled, in some cases, by how long the button is pressed (short or long press) as described in the table
below.
146F0S0622
199
Page 202 of 228
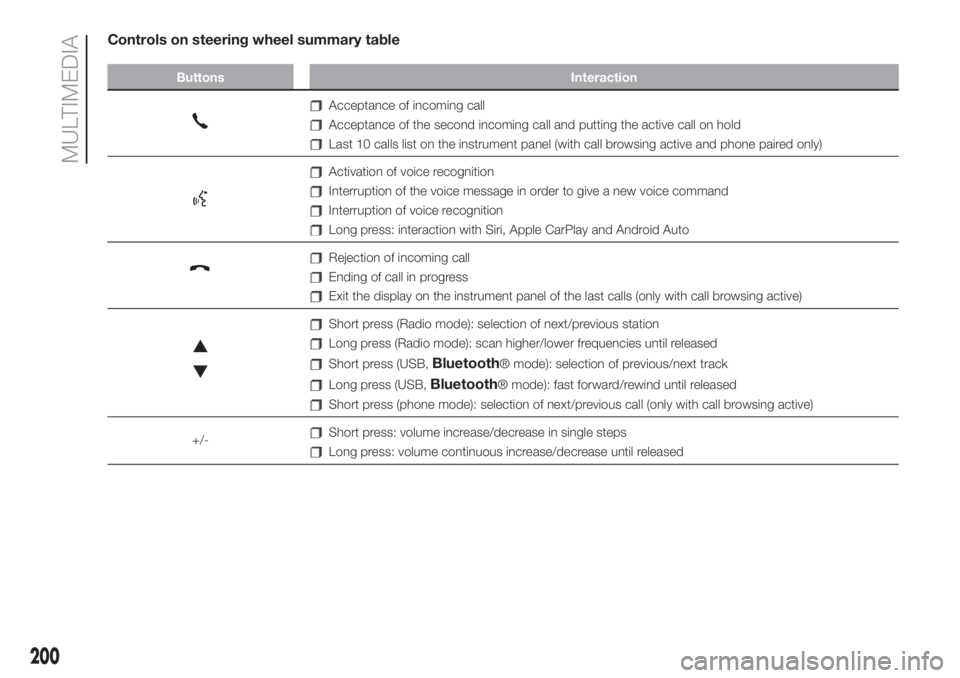
Controls on steering wheel summary table
Buttons Interaction
Acceptance of incoming call
Acceptance of the second incoming call and putting the active call on hold
Last 10 calls list on the instrument panel (with call browsing active and phone paired only)
Activation of voice recognition
Interruption of the voice message in order to give a new voice command
Interruption of voice recognition
Long press: interaction with Siri, Apple CarPlay and Android Auto
Rejection of incoming call
Ending of call in progress
Exit the display on the instrument panel of the last calls (only with call browsing active)
Short press (Radio mode): selection of next/previous station
Long press (Radio mode): scan higher/lower frequencies until released
Short press (USB,Bluetooth® mode): selection of previous/next track
Long press (USB,Bluetooth® mode): fast forward/rewind until released
Short press (phone mode): selection of next/previous call (only with call browsing active)
+/-
Short press: volume increase/decrease in single steps
Long press: volume continuous increase/decrease until released
200
MULTIMEDIA