steering FIAT 500 2020 Owner handbook (in English)
[x] Cancel search | Manufacturer: FIAT, Model Year: 2020, Model line: 500, Model: FIAT 500 2020Pages: 228, PDF Size: 6.01 MB
Page 21 of 228
Deactivation
The function is deactivated by turning
the headlights or the side lights on,
or by pulling the left lever towards the
steering wheel (unstable position)
for more than 2 seconds, or by turning
the ignition device to MAR.
AUTO FUNCTION
(for versions/markets, where provided)
Function activation
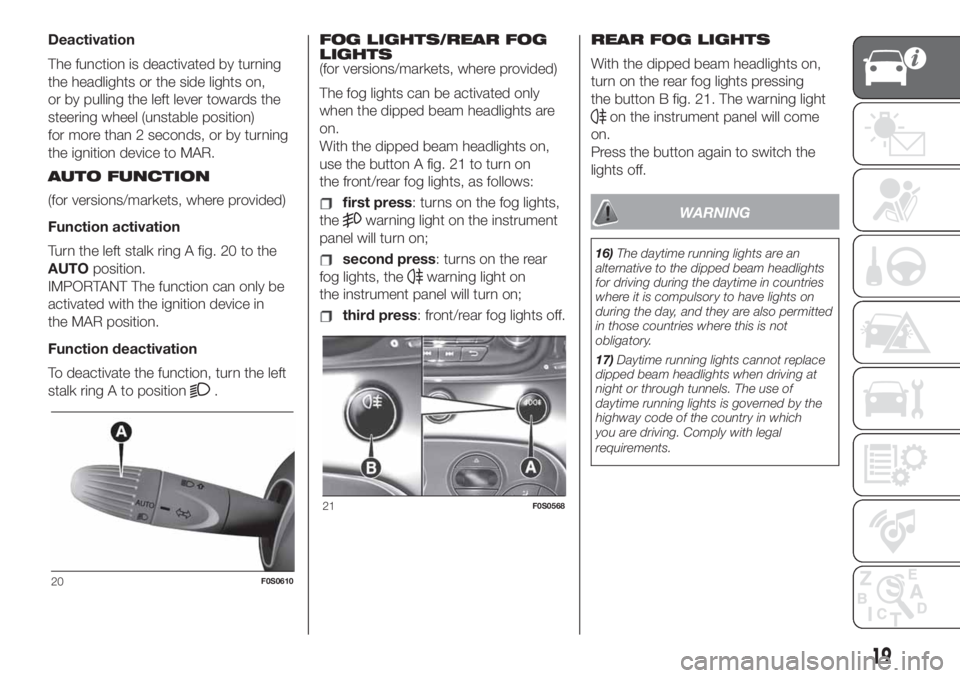
Turn the left stalk ring A fig. 20 to the
AUTOposition.
IMPORTANT The function can only be
activated with the ignition device in
the MAR position.
Function deactivation
To deactivate the function, turn the left
stalk ring A to position
.FOG LIGHTS/REAR FOG
LIGHTS
(for versions/markets, where provided)
The fog lights can be activated only
when the dipped beam headlights are
on.
With the dipped beam headlights on,
use the button A fig. 21 to turn on
the front/rear fog lights, as follows:
first press: turns on the fog lights,
the
warning light on the instrument
panel will turn on;
second press: turns on the rear
fog lights, the
warning light on
the instrument panel will turn on;
third press: front/rear fog lights off.REAR FOG LIGHTS
With the dipped beam headlights on,
turn on the rear fog lights pressing
the button B fig. 21. The warning light
on the instrument panel will come
on.
Press the button again to switch the
lights off.
WARNING
16)The daytime running lights are an
alternative to the dipped beam headlights
for driving during the daytime in countries
where it is compulsory to have lights on
during the day, and they are also permitted
in those countries where this is not
obligatory.
17)Daytime running lights cannot replace
dipped beam headlights when driving at
night or through tunnels. The use of
daytime running lights is governed by the
highway code of the country in which
you are driving. Comply with legal
requirements.
20F0S0610
21F0S0568
19
Page 23 of 228
“Smart washing” function
Pull the stalk towards the steering
wheel (unstable position) to operate the
windscreen washer.
Keep the lever pulled to activate both
the windscreen washer jet and the
windscreen wiper with a single
movement; the latter turns on
automatically if you keep the lever
pulled for more than half a second.
The operation of the windscreen wiper
terminates several strokes after the
stalk is released; a final cleaning stroke
several seconds later completes the
wiping operation.
REAR WINDOW WIPER /
WASHER
8)
This operates only with the ignition key
turned to MAR.
Rear Window Wiper
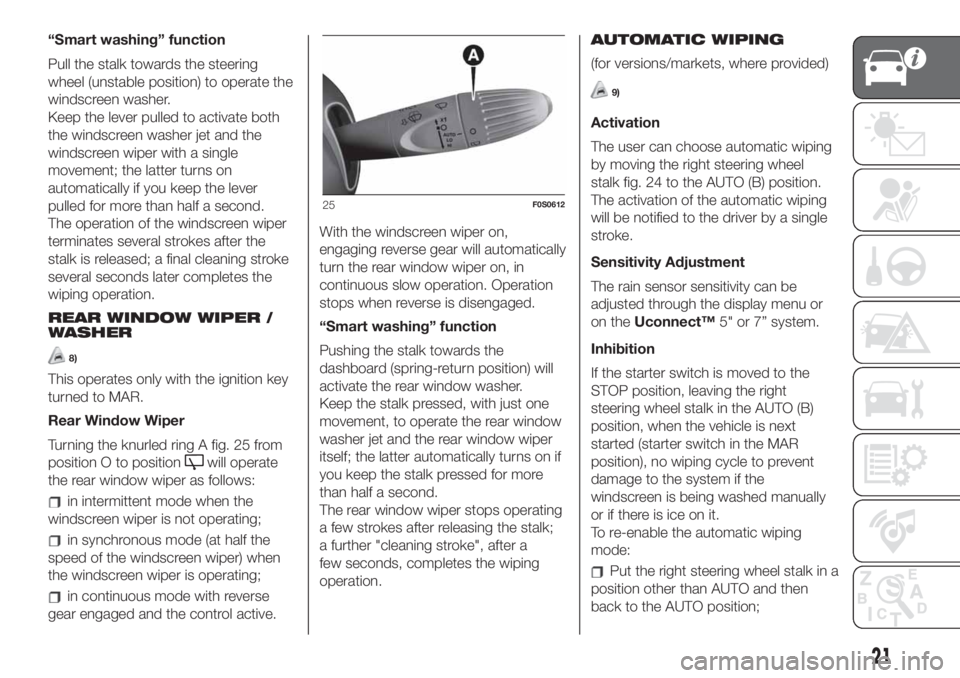
Turning the knurled ring A fig. 25 from
position O to position
will operate
the rear window wiper as follows:
in intermittent mode when the
windscreen wiper is not operating;
in synchronous mode (at half the
speed of the windscreen wiper) when
the windscreen wiper is operating;
in continuous mode with reverse
gear engaged and the control active.With the windscreen wiper on,
engaging reverse gear will automatically
turn the rear window wiper on, in
continuous slow operation. Operation
stops when reverse is disengaged.
“Smart washing” function
Pushing the stalk towards the
dashboard (spring-return position) will
activate the rear window washer.
Keep the stalk pressed, with just one
movement, to operate the rear window
washer jet and the rear window wiper
itself; the latter automatically turns on if
you keep the stalk pressed for more
than half a second.
The rear window wiper stops operating
a few strokes after releasing the stalk;
a further "cleaning stroke", after a
few seconds, completes the wiping
operation.AUTOMATIC WIPING
(for versions/markets, where provided)
9)
Activation
The user can choose automatic wiping
by moving the right steering wheel
stalk fig. 24 to the AUTO (B) position.
The activation of the automatic wiping
will be notified to the driver by a single
stroke.
Sensitivity Adjustment
The rain sensor sensitivity can be
adjusted through the display menu or
on theUconnect™5" or 7” system.
Inhibition
If the starter switch is moved to the
STOP position, leaving the right
steering wheel stalk in the AUTO (B)
position, when the vehicle is next
started (starter switch in the MAR
position), no wiping cycle to prevent
damage to the system if the
windscreen is being washed manually
or if there is ice on it.
To re-enable the automatic wiping
mode:
Put the right steering wheel stalk in a
position other than AUTO and then
back to the AUTO position;
25F0S0612
21
Page 24 of 228
exceed the speed of 5 km/h when
the sensor detects rain.
Deactivation
The user can disable automatic wiping
by moving the right steering wheel
stalk to a position other than AUTO.
WARNING
18)If the window needs to be cleaned,
make sure the device is deactivated or the
key is on STOP.
19)Driving with worn windscreen/rear
window wiper blades is a serious hazard,
because visibility is reduced in bad
weather.
WARNING
5)Never use the windscreen wipers to
remove layers of snow or ice from the
windscreen. In such conditions, the wiper
may be subjected to excessive stress
and the motor cut-out switch, which
prevents operation for a few seconds, may
intervene. If operation is not restored,
contact a Fiat Dealership.
6)Do not operate the windscreen wiper
with the blades lifted from the windscreen.
7)Do not activate the rain sensor or the
rear window wiper when washing the car in
an automatic car wash.8)Do not use the rear window wiper to
remove layers of snow or ice. In these
conditions, the rear window wiper may be
subjected to excessive stress and the
motor protection, which prevents operation
for a few seconds, may intervene. If
operation is not restored, contact a Fiat
Dealership.
9)Make sure the device is switched off if
there is ice on the windscreen.
22
KNOWING YOUR CAR
Page 44 of 228
DISPLAY
MULTIFUNCTION
DISPLAY “STANDARD”
SCREEN
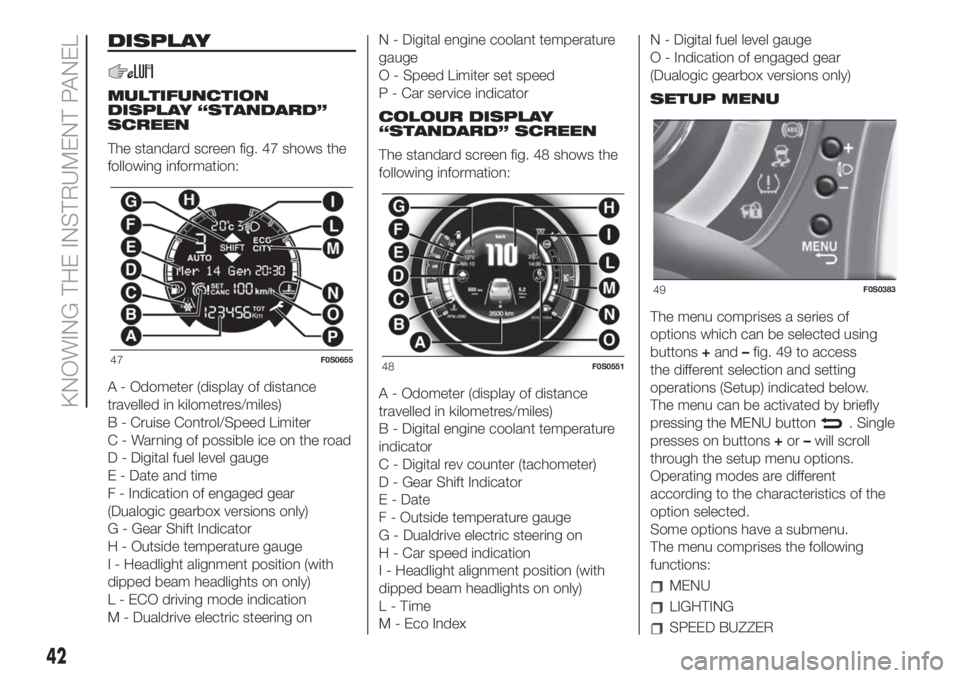
The standard screen fig. 47 shows the
following information:
A - Odometer (display of distance
travelled in kilometres/miles)
B - Cruise Control/Speed Limiter
C - Warning of possible ice on the road
D - Digital fuel level gauge
E - Date and time
F - Indication of engaged gear
(Dualogic gearbox versions only)
G - Gear Shift Indicator
H - Outside temperature gauge
I - Headlight alignment position (with
dipped beam headlights on only)
L - ECO driving mode indication
M - Dualdrive electric steering onN - Digital engine coolant temperature
gauge
O - Speed Limiter set speed
P - Car service indicator
COLOUR DISPLAY
“STANDARD” SCREEN
The standard screen fig. 48 shows the
following information:
A - Odometer (display of distance
travelled in kilometres/miles)
B - Digital engine coolant temperature
indicator
C - Digital rev counter (tachometer)
D - Gear Shift Indicator
E - Date
F - Outside temperature gauge
G - Dualdrive electric steering on
H - Car speed indication
I - Headlight alignment position (with
dipped beam headlights on only)
L-Time
M - Eco IndexN - Digital fuel level gauge
O - Indication of engaged gear
(Dualogic gearbox versions only)
SETUP MENU
The menu comprises a series of
options which can be selected using
buttons+and–fig. 49 to access
the different selection and setting
operations (Setup) indicated below.
The menu can be activated by briefly
pressing the MENU button
. Single
presses on buttons+or–will scroll
through the setup menu options.
Operating modes are different
according to the characteristics of the
option selected.
Some options have a submenu.
The menu comprises the following
functions:
MENU
LIGHTING
SPEED BUZZER
47F0S065548F0S0551
49F0S0383
42
KNOWING THE INSTRUMENT PANEL
Page 53 of 228
WARNING
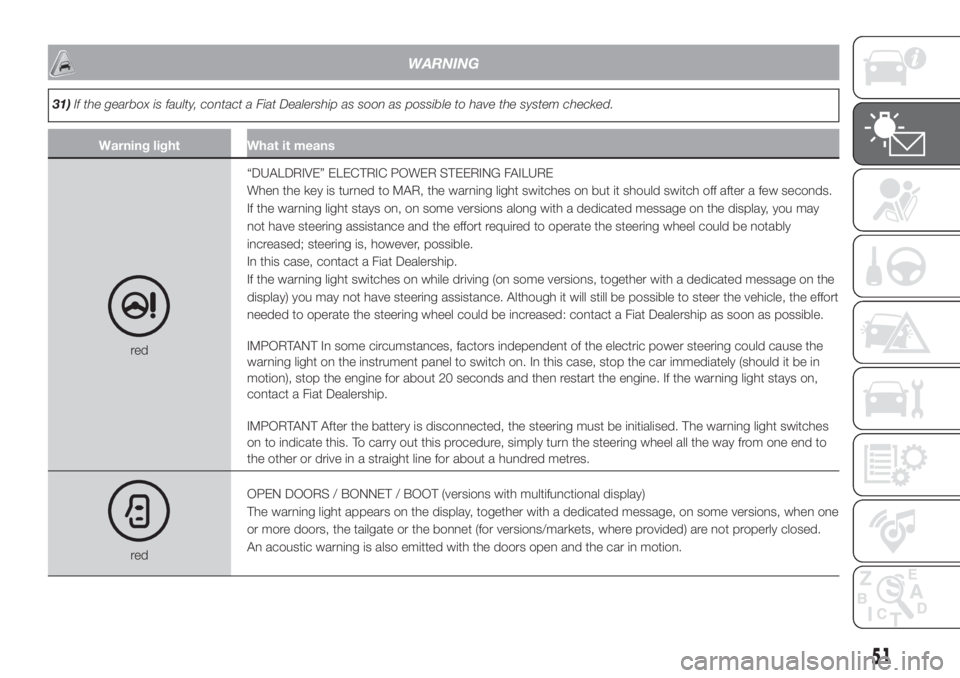
31)If the gearbox is faulty, contact a Fiat Dealership as soon as possible to have the system checked.
Warning light What it means
red“DUALDRIVE” ELECTRIC POWER STEERING FAILURE
When the key is turned to MAR, the warning light switches on but it should switch off after a few seconds.
If the warning light stays on, on some versions along with a dedicated message on the display, you may
not have steering assistance and the effort required to operate the steering wheel could be notably
increased; steering is, however, possible.
In this case, contact a Fiat Dealership.
If the warning light switches on while driving (on some versions, together with a dedicated message on the
display) you may not have steering assistance. Although it will still be possible to steer the vehicle, the effort
needed to operate the steering wheel could be increased: contact a Fiat Dealership as soon as possible.
IMPORTANT In some circumstances, factors independent of the electric power steering could cause the
warning light on the instrument panel to switch on. In this case, stop the car immediately (should it be in
motion), stop the engine for about 20 seconds and then restart the engine. If the warning light stays on,
contact a Fiat Dealership.
IMPORTANT After the battery is disconnected, the steering must be initialised. The warning light switches
on to indicate this. To carry out this procedure, simply turn the steering wheel all the way from one end to
the other or drive in a straight line for about a hundred metres.
redOPEN DOORS / BONNET / BOOT (versions with multifunctional display)
The warning light appears on the display, together with a dedicated message, on some versions, when one
or more doors, the tailgate or the bonnet (for versions/markets, where provided) are not properly closed.
An acoustic warning is also emitted with the doors open and the car in motion.
51
Page 58 of 228
WARNING
44)Warning lightwill blink to indicate possible faults of the warning light. In this case, thewarning light may not indicate a possible
problem with the airbag restraint system. Contact a Fiat Dealership immediately to have the system checked
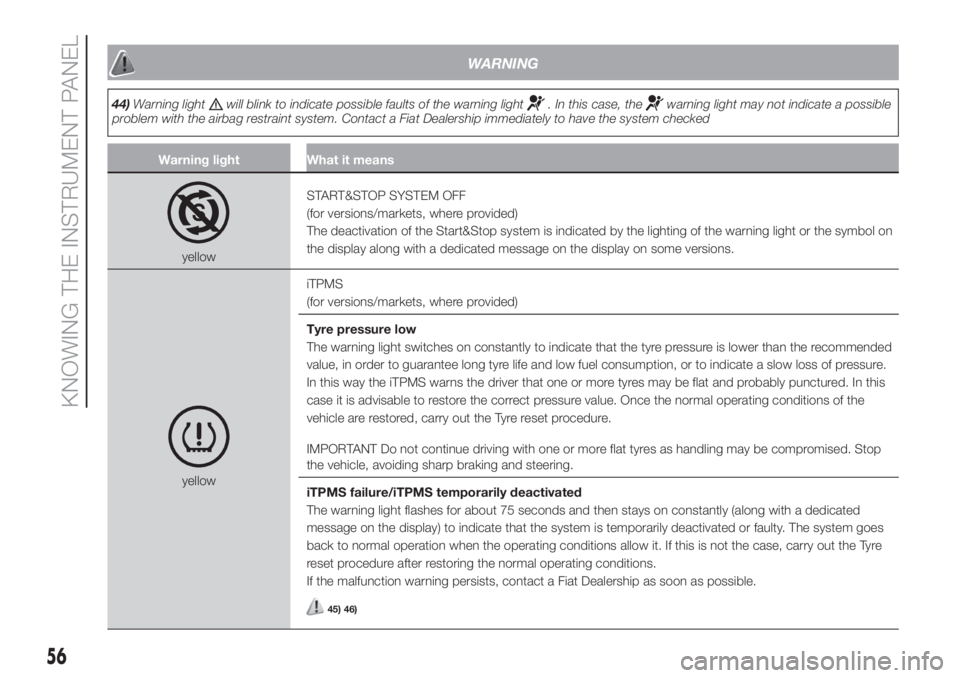
Warning light What it means
yellowSTART&STOP SYSTEM OFF
(for versions/markets, where provided)
The deactivation of the Start&Stop system is indicated by the lighting of the warning light or the symbol on
the display along with a dedicated message on the display on some versions.
yellowiTPMS
(for versions/markets, where provided)
Tyre pressure low
The warning light switches on constantly to indicate that the tyre pressure is lower than the recommended
value, in order to guarantee long tyre life and low fuel consumption, or to indicate a slow loss of pressure.
In this way the iTPMS warns the driver that one or more tyres may be flat and probably punctured. In this
case it is advisable to restore the correct pressure value. Once the normal operating conditions of the
vehicle are restored, carry out the Tyre reset procedure.
IMPORTANT Do not continue driving with one or more flat tyres as handling may be compromised. Stop
the vehicle, avoiding sharp braking and steering.
iTPMS failure/iTPMS temporarily deactivated
The warning light flashes for about 75 seconds and then stays on constantly (along with a dedicated
message on the display) to indicate that the system is temporarily deactivated or faulty. The system goes
back to normal operation when the operating conditions allow it. If this is not the case, carry out the Tyre
reset procedure after restoring the normal operating conditions.
If the malfunction warning persists, contact a Fiat Dealership as soon as possible.
45) 46)
56
KNOWING THE INSTRUMENT PANEL
Page 59 of 228
WARNING
45)If the system signals a pressure decrease on a specific tyre, it is recommended to check the pressure on all four tyres. The iTPMS does
not relieve the driver from the obligation to check the tyre pressure every month; it is not to be considered a system to replace servicing or
a safety system. Tyre pressure must be checked with tyres cold. Should it become necessary for whatever reason to check pressure with
warm tyres, do not reduce pressure even though it is higher than the prescribed value, but repeat the check when tyres are cold.
46)The iTPMS cannot indicate sudden tyre pressure drops (for example when a tyre bursts). In this case, stop the vehicle, braking with
caution and avoiding abrupt steering. The system only warns that the tyre pressure is low: it is not able to inflate them. Insufficient tyre
inflation increases fuel consumption, reduces the tread duration and may affect the capacity to drive safely.
Green warning lights
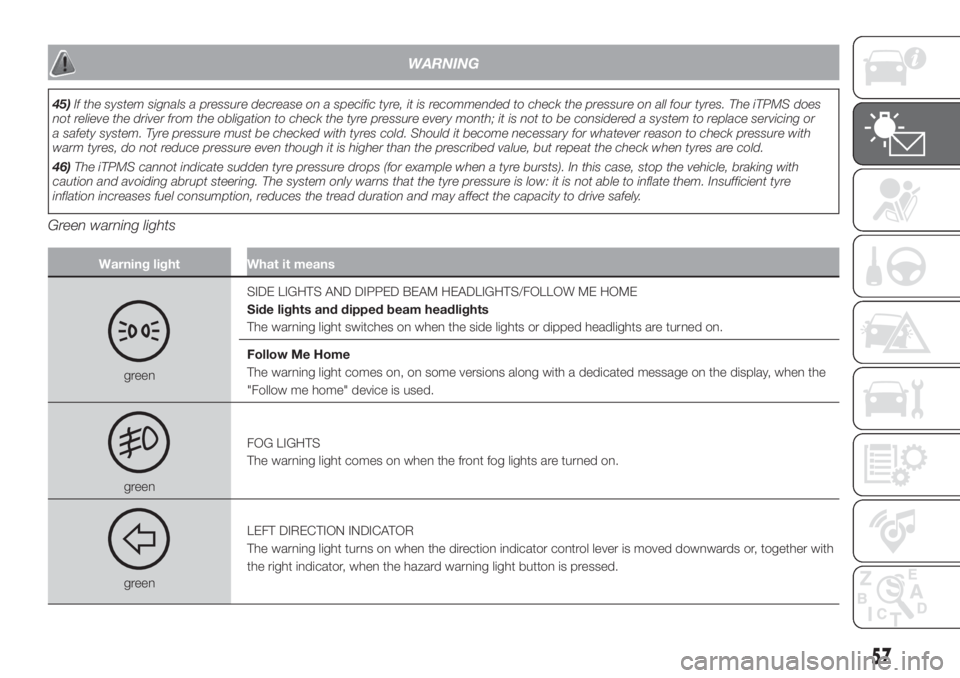
Warning light What it means
greenSIDE LIGHTS AND DIPPED BEAM HEADLIGHTS/FOLLOW ME HOME
Side lights and dipped beam headlights
The warning light switches on when the side lights or dipped headlights are turned on.
Follow Me Home
The warning light comes on, on some versions along with a dedicated message on the display, when the
"Follow me home" device is used.
greenFOG LIGHTS
The warning light comes on when the front fog lights are turned on.
greenLEFT DIRECTION INDICATOR
The warning light turns on when the direction indicator control lever is moved downwards or, together with
the right indicator, when the hazard warning light button is pressed.
57
Page 67 of 228
MESSAGES ON INSTRUMENT PANEL
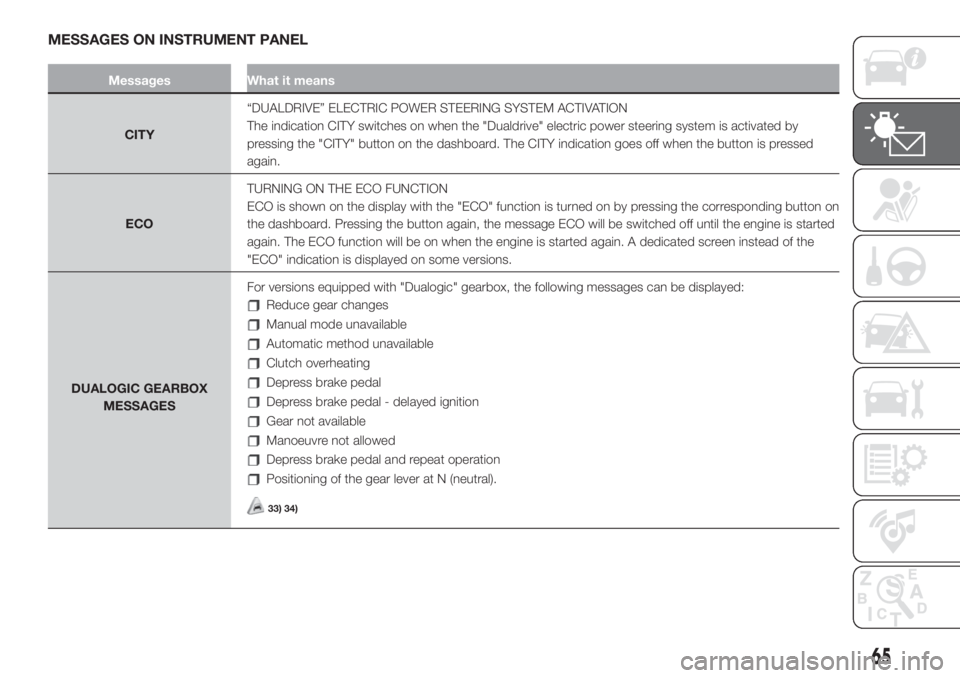
Messages What it means
CITY“DUALDRIVE” ELECTRIC POWER STEERING SYSTEM ACTIVATION
The indication CITY switches on when the "Dualdrive" electric power steering system is activated by
pressing the "CITY" button on the dashboard. The CITY indication goes off when the button is pressed
again.
ECOTURNING ON THE ECO FUNCTION
ECO is shown on the display with the "ECO" function is turned on by pressing the corresponding button on
the dashboard. Pressing the button again, the message ECO will be switched off until the engine is started
again. The ECO function will be on when the engine is started again. A dedicated screen instead of the
"ECO" indication is displayed on some versions.
DUALOGIC GEARBOX
MESSAGESFor versions equipped with "Dualogic" gearbox, the following messages can be displayed:
Reduce gear changes
Manual mode unavailable
Automatic method unavailable
Clutch overheating
Depress brake pedal
Depress brake pedal - delayed ignition
Gear not available
Manoeuvre not allowed
Depress brake pedal and repeat operation
Positioning of the gear lever at N (neutral).
33) 34)
65
Page 75 of 228
Under special conditions (e.g. car
loaded asymmetrically on one side,
damaged or worn tyre, fitting the
space-saver spare wheel, fitting snow
chains, fitting different tyres on the
axles) the system may give false
warnings or be temporarily deactivated.
If the system is temporarily deactivated
the
warning light flashes for about
75 seconds and then is continuously
on; at the same time, the display shows
a warning message.
This warning is displayed also after the
engine has been switched off and
then on again if the correct operating
conditions are not restored.
WARNING
77)If the system signals a pressure
decrease on one or more tyres, it
is recommended to always check the
pressure on all four tyres.
78)The iTPMS does not relieve the driver
from the obligation to check the tyre
pressure every month; it is not to
be considered a system to replace
maintenance or a safety system.
79)Tyre pressure must be checked with
tyres cold. Should it become necessary for
whatever reason to check pressure with
warm tyres, do not reduce pressure even
though it is higher than the prescribed
value, but repeat the check when tyres are
cold.80)The iTPMS cannot indicate sudden tyre
pressure drops (for example when a tyre
bursts). In this case, stop the vehicle,
braking with caution and avoiding abrupt
steering.
81)The system only warns that the tyre
pressure is low: it is not able to inflate
them.
82)Insufficient tyre inflation increases fuel
consumption, reduces the tread duration
and may affect the capacity to drive safely.
OCCUPANT
PROTECTION
SYSTEMS
some of the most important safety
equipment of the vehicle comprise the
following protection systems:
seat belts;
SBR (Seat Belt Reminder) system;
head restraints;
child restraint systems;
Front airbags and side bags.
Read the information given the
following pages with the utmost care. It
is of fundamental importance that the
protection systems are used in the
correct way to guarantee the maximum
possible safety level for the driver and
the passengers.
For the description of the head restraint
adjustment see the "Head restraints"
paragraph in the "Knowing your
vehicle" chapter.
73
Page 77 of 228
SBR SYSTEM (Seat
Belt Reminder)
(for versions/markets, where provided)
The SBR system warns the passengers
of the front and rear (for versions/
markets, where provided) seats if their
seat belt is not fastened.
The system warnings unfastened seat
belts with visual warnings (warning
lights on in the instrument panel and
icons on the display) and an acoustic
warning (see the following paragraphs).
NOTE Contact a Fiat Dealership to
deactivate this acoustic warning
permanently. The acoustic warning can
be reactivated at any time through the
display Setup Menu.
Seat belts warning light operation
The system warns the driver and the
front passenger if their seat belt is
not fastened, as follows:
flashingwarning light and
intermittent acoustic warning for about
100 seconds.
once the cycle has finished, the
warning light remains on constantly until
the seat belts are fastened.
PRE-TENSIONERS
The car is equipped with front seat
belts pretensioners, that reduce slack in
the belts in the event of a severe frontal
collision. This guarantees the perfect
adherence of the seat belts to the
occupants' bodies before the
restraining action begins.
It is evident that the pretensioners have
operated when the belt withdraws
towards the retractor. This car is also
equipped with a second pretensioner
(fitted in the kick plate area). Its
activation is signalled by the shortening
of the metal cable.
A slight discharge of smoke may be
produced during the activation of the
pretensioner which is not harmful and
does not involve any fire hazard.
The pretensioner does not require any
maintenance or lubrication: any
changes to its original conditions will
invalidate its efficiency.
If, due to unusual natural events (floods,
sea storms, etc.), the device has been
affected by water or mud, have it
replaced.
IMPORTANT To obtain the highest
degree of protection from the action of
the pretensioner, wear the seat belt
tight to the chest and pelvis.
85) 86) 87)
35)
LOAD LIMITERS
To increase occupant safety, the
retractors of the safety belts contain a
load limiter to dose the force acting
on the chest and shoulders during the
belt restraining action in the case of
frontal collisions.
GENERAL
INSTRUCTIONS FOR
USING THE SEAT BELTS
88)
Seat belts are also to be worn by
pregnant women: the risk of injury in
the case of impact is greatly reduced
for them and the unborn child if they
are wearing a seat belt.
Pregnant women must position the
lower part of the belt very low down so
that it passes over the pelvis and under
the abdomen (see fig. 55).
While pregnancy increases, the driver
must adjust both seat and steering
wheel to have full control over the
vehicle (pedals and steering wheel
should be easily accessed).
The maximum clearance should be
kept between the abdomen and the
steering wheel.
75