brake FIAT 500 2020 Owner handbook (in English)
[x] Cancel search | Manufacturer: FIAT, Model Year: 2020, Model line: 500, Model: FIAT 500 2020Pages: 228, PDF Size: 6.01 MB
Page 135 of 228
If the pressure gauge 7 fig. 123
indicates a pressure lower than 1.8 bar
/ 26 psi 15 minutes after starting the
compressor, switch off the compressor,
disconnect the sealing fluid tube 4
from the tyre valve and remove
the cartridge 1 from the compressor fig.
121. Move the vehicle by approximately
10 m to promote the distribution of
sealant; stop the vehicle safely, operate
the handbrake and restore pressure
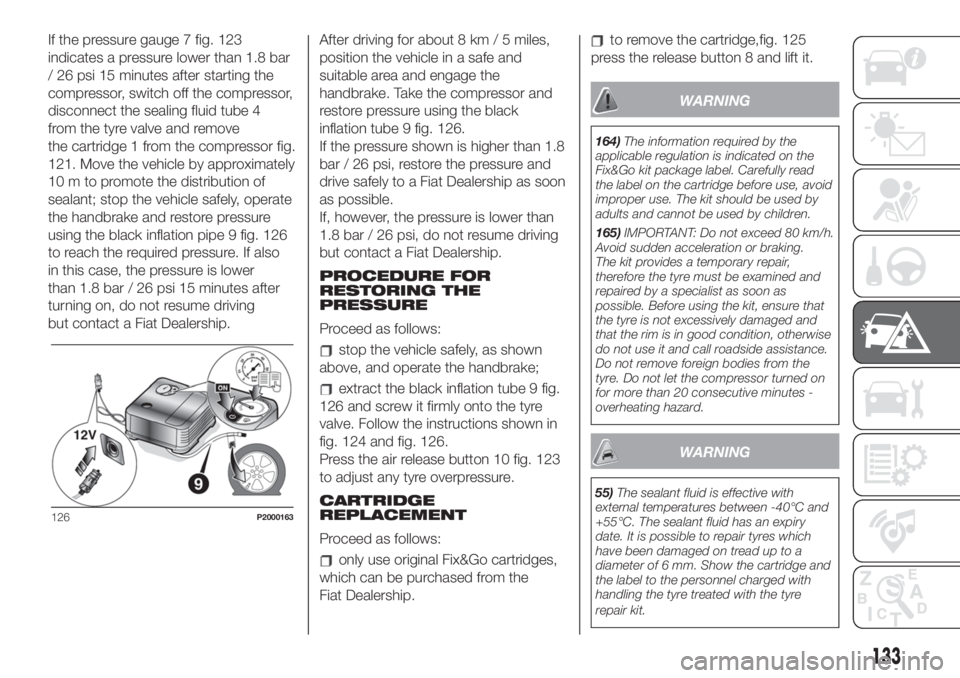
using the black inflation pipe 9 fig. 126
to reach the required pressure. If also
in this case, the pressure is lower
than 1.8 bar / 26 psi 15 minutes after
turning on, do not resume driving
but contact a Fiat Dealership.After driving for about 8 km / 5 miles,
position the vehicle in a safe and
suitable area and engage the
handbrake. Take the compressor and
restore pressure using the black
inflation tube 9 fig. 126.
If the pressure shown is higher than 1.8
bar / 26 psi, restore the pressure and
drive safely to a Fiat Dealership as soon
as possible.
If, however, the pressure is lower than
1.8 bar / 26 psi, do not resume driving
but contact a Fiat Dealership.
PROCEDURE FOR
RESTORING THE
PRESSURE
Proceed as follows:
stop the vehicle safely, as shown
above, and operate the handbrake;
extract the black inflation tube 9 fig.
126 and screw it firmly onto the tyre
valve. Follow the instructions shown in
fig. 124 and fig. 126.
Press the air release button 10 fig. 123
to adjust any tyre overpressure.
CARTRIDGE
REPLACEMENT
Proceed as follows:
only use original Fix&Go cartridges,
which can be purchased from the
Fiat Dealership.
to remove the cartridge,fig. 125
press the release button 8 and lift it.
WARNING
164)The information required by the
applicable regulation is indicated on the
Fix&Go kit package label. Carefully read
the label on the cartridge before use, avoid
improper use. The kit should be used by
adults and cannot be used by children.
165)IMPORTANT: Do not exceed 80 km/h.
Avoid sudden acceleration or braking.
The kit provides a temporary repair,
therefore the tyre must be examined and
repaired by a specialist as soon as
possible. Before using the kit, ensure that
the tyre is not excessively damaged and
that the rim is in good condition, otherwise
do not use it and call roadside assistance.
Do not remove foreign bodies from the
tyre. Do not let the compressor turned on
for more than 20 consecutive minutes -
overheating hazard.
WARNING
55)The sealant fluid is effective with
external temperatures between -40°C and
+55°C. The sealant fluid has an expiry
date. It is possible to repair tyres which
have been damaged on tread up to a
diameter of 6 mm. Show the cartridge and
the label to the personnel charged with
handling the tyre treated with the tyre
repair kit.
126P2000163
133
Page 136 of 228
JUMP STARTING
If the battery is flat, a jump starting can
be performed using the battery and
the cables of another car, or using an
auxiliary battery. In all cases, the battery
used must have a capacity equal to or
a little higher than the flat one.
Jump starting may be dangerous if
carried out incorrectly: carefully follow
the procedures described below.
IMPORTANT NOTES
After turning the ignition key to STOP
and having closed the driver's side
door, wait at least one minute before
disconnecting the battery and then
reconnecting the electrical supply to the
battery.
Do not use an auxiliary battery or any
other source of external supply with
a voltage above 12 V: the battery, the
starter, the alternator and the electrical
system of the car could be damaged.
Do not attempt jump starting if the
battery is frozen. The battery could
break and explode!JUMP STARTING166) 167) 168)
56) 57) 58)
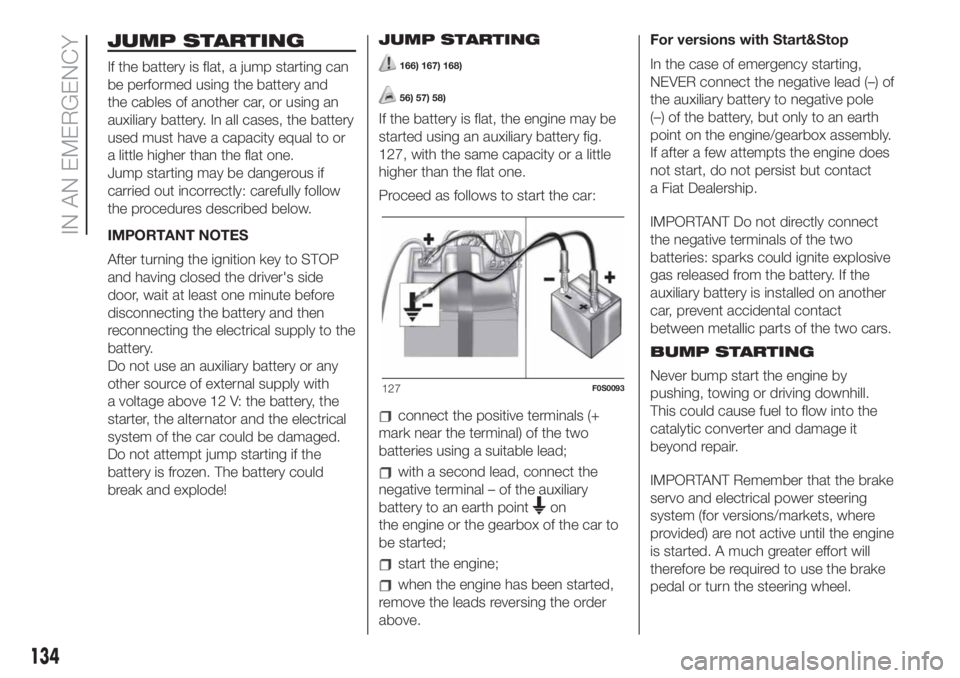
If the battery is flat, the engine may be
started using an auxiliary battery fig.
127, with the same capacity or a little
higher than the flat one.
Proceed as follows to start the car:
connect the positive terminals (+
mark near the terminal) of the two
batteries using a suitable lead;
with a second lead, connect the
negative terminal – of the auxiliary
battery to an earth point
on
the engine or the gearbox of the car to
be started;
start the engine;
when the engine has been started,
remove the leads reversing the order
above.For versions with Start&Stop
In the case of emergency starting,
NEVER connect the negative lead (–) of
the auxiliary battery to negative pole
(–) of the battery, but only to an earth
point on the engine/gearbox assembly.
If after a few attempts the engine does
not start, do not persist but contact
a Fiat Dealership.
IMPORTANT Do not directly connect
the negative terminals of the two
batteries: sparks could ignite explosive
gas released from the battery. If the
auxiliary battery is installed on another
car, prevent accidental contact
between metallic parts of the two cars.
BUMP STARTING
Never bump start the engine by
pushing, towing or driving downhill.
This could cause fuel to flow into the
catalytic converter and damage it
beyond repair.
IMPORTANT Remember that the brake
servo and electrical power steering
system (for versions/markets, where
provided) are not active until the engine
is started. A much greater effort will
therefore be required to use the brake
pedal or turn the steering wheel.
127F0S0093
134
IN AN EMERGENCY
Page 139 of 228
WARNING
170)Before towing, turn the key to MAR
and then to STOP without extracting it.
If the key is removed, the steering lock will
come on automatically and it will be
impossible to steer the wheels.
171)Before tightening the ring clean the
threaded housing thoroughly. Make sure
that the ring is fully fastened in the housing
before towing the car.
172)The (front/rear) tow hook must be
used exclusively for roadside assistance
operations. You are allowed to tow the
vehicle for short distances using an
appropriate device in accordance with the
highway code (a rigid bar), to move the
vehicle on the road in readiness for towing
or transport via a tow truck. The tow hook
MUST NOT be used to tow vehicles off
the road or where there are obstacles
and/or for towing operations using cables
or other non-rigid devices. In compliance
with the above conditions, towing must
take place with the two vehicles (one
towing, the other towed) aligned as much
as possible along the same centre line.173)Whilst towing, remember that as the
assistance of the brake servo and the
electric power assisted steering is
not available, greater force needs to be
exerted on the brake pedal and more effort
is required on the steering wheel. Do not
use flexible cables when towing and avoid
jerky movements. Make sure not to
damage parts in contact with the car while
towing. When towing the vehicle, you
must comply with all specific traffic
regulations and adopt an appropriate
driving behaviour. Do not start the engine
while towing the vehicle.
137
Page 140 of 228
SERVICING AND CARE
Correct maintenance permits the
performance of the vehicle to be
maintained over time, as well as limited
running costs and safeguarding the
efficiency of the safety systems.
This chapter explains how.SCHEDULED SERVICING ...............139
CHECKING LEVELS........................145
BATTERY ........................................149
BRAKES .........................................150
REPLACING THE
WINDSCREEN/REAR WINDOW
WIPER BLADES ..............................150
WHEELS AND TYRES.....................152
BODYWORK ...................................152
INTERIOR .......................................154
138
SERVICING AND CARE
Page 142 of 228
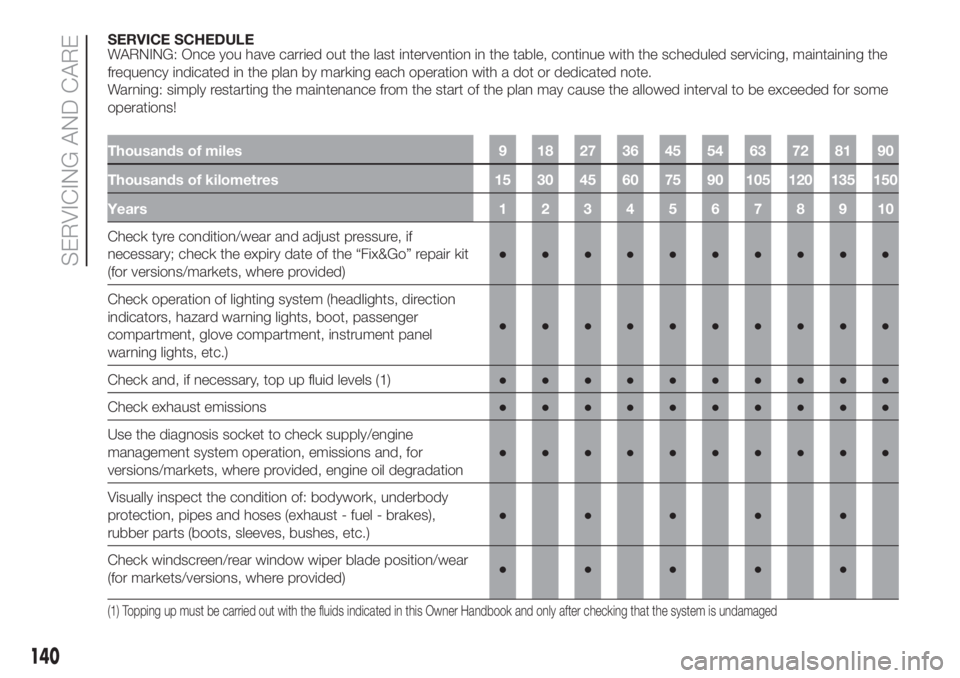
SERVICE SCHEDULE
WARNING: Once you have carried out the last intervention in the table, continue with the scheduled servicing, maintaining the
frequency indicated in the plan by marking each operation with a dot or dedicated note.
Warning: simply restarting the maintenance from the start of the plan may cause the allowed interval to be exceeded for some
operations!
Thousands of miles 9 18 27 36 45 54 63 72 81 90
Thousands of kilometres 15 30 45 60 75 90 105 120 135 150
Years12345678910
Check tyre condition/wear and adjust pressure, if
necessary; check the expiry date of the “Fix&Go” repair kit
(for versions/markets, where provided)●●●●●●●●●●
Check operation of lighting system (headlights, direction
indicators, hazard warning lights, boot, passenger
compartment, glove compartment, instrument panel
warning lights, etc.)●●●●●●●●●●
Check and, if necessary, top up fluid levels (1)●●●●●●●●●●
Check exhaust emissions●●●●●●●●●●
Use the diagnosis socket to check supply/engine
management system operation, emissions and, for
versions/markets, where provided, engine oil degradation●●●●●●●●●●
Visually inspect the condition of: bodywork, underbody
protection, pipes and hoses (exhaust - fuel - brakes),
rubber parts (boots, sleeves, bushes, etc.)●●●●●
Check windscreen/rear window wiper blade position/wear
(for markets/versions, where provided)●●●●●
(1) Topping up must be carried out with the fluids indicated in this Owner Handbook and only after checking that the system is undamaged
140
SERVICING AND CARE
Page 143 of 228
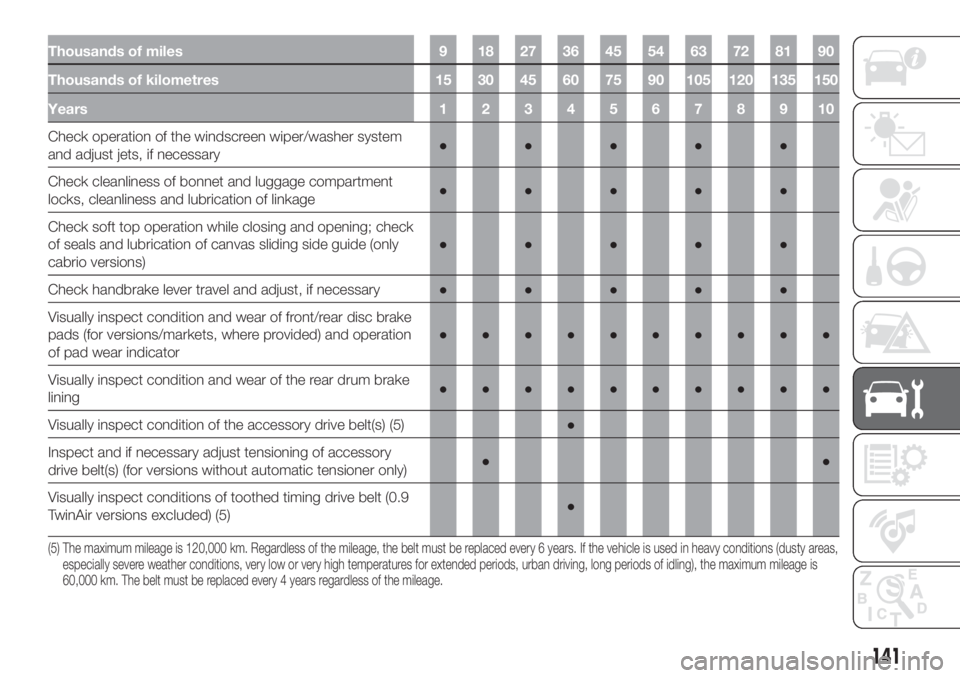
Thousands of miles 9 18 27 36 45 54 63 72 81 90
Thousands of kilometres 15 30 45 60 75 90 105 120 135 150
Years12345678910
Check operation of the windscreen wiper/washer system
and adjust jets, if necessary●●●●●
Check cleanliness of bonnet and luggage compartment
locks, cleanliness and lubrication of linkage●●●●●
Check soft top operation while closing and opening; check
of seals and lubrication of canvas sliding side guide (only
cabrio versions)●●●●●
Check handbrake lever travel and adjust, if necessary●●●●●
Visually inspect condition and wear of front/rear disc brake
pads (for versions/markets, where provided) and operation
of pad wear indicator●●●●●●●●●●
Visually inspect condition and wear of the rear drum brake
lining●●●●●●●●●●
Visually inspect condition of the accessory drive belt(s) (5)●
Inspect and if necessary adjust tensioning of accessory
drive belt(s) (for versions without automatic tensioner only)●●
Visually inspect conditions of toothed timing drive belt (0.9
TwinAir versions excluded) (5)●
(5) The maximum mileage is 120,000 km. Regardless of the mileage, the belt must be replaced every 6 years. If the vehicle is used in heavy conditions (dusty areas,
especially severe weather conditions, very low or very high temperatures for extended periods, urban driving, long periods of idling), the maximum mileage is
60,000 km. The belt must be replaced every 4 years regardless of the mileage.
141
Page 145 of 228
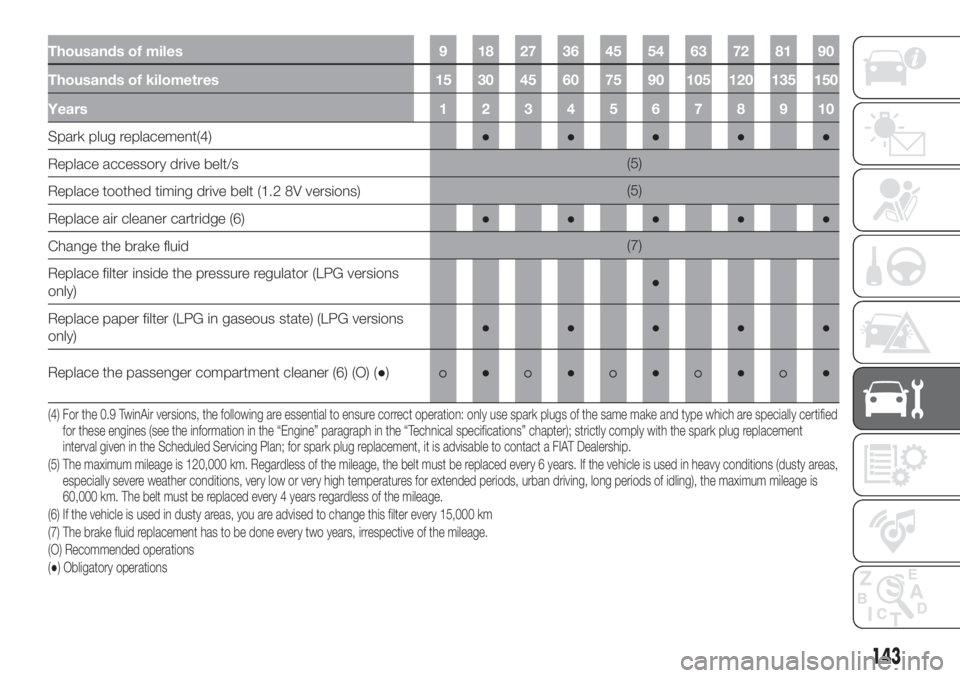
Thousands of miles 9 18 27 36 45 54 63 72 81 90
Thousands of kilometres 15 30 45 60 75 90 105 120 135 150
Years12345678910
Spark plug replacement(4)●●●●●
Replace accessory drive belt/s(5)
Replace toothed timing drive belt (1.2 8V versions)(5)
Replace air cleaner cartridge (6)●●●●●
Change the brake fluid(7)
Replace filter inside the pressure regulator (LPG versions
only)●
Replace paper filter (LPG in gaseous state) (LPG versions
only)●●●●●
Replace the passenger compartment cleaner (6) (O) (●)
●●●●●
(4) For the 0.9 TwinAir versions, the following are essential to ensure correct operation: only use spark plugs of the same make and type which are specially certified
for these engines (see the information in the “Engine” paragraph in the “Technical specifications” chapter); strictly comply with the spark plug replacement
interval given in the Scheduled Servicing Plan; for spark plug replacement, it is advisable to contact a FIAT Dealership.
(5) The maximum mileage is 120,000 km. Regardless of the mileage, the belt must be replaced every 6 years. If the vehicle is used in heavy conditions (dusty areas,
especially severe weather conditions, very low or very high temperatures for extended periods, urban driving, long periods of idling), the maximum mileage is
60,000 km. The belt must be replaced every 4 years regardless of the mileage.
(6) If the vehicle is used in dusty areas, you are advised to change this filter every 15,000 km
(7) The brake fluid replacement has to be done every two years, irrespective of the mileage.
(O) Recommended operations
(●) Obligatory operations
143
Page 146 of 228
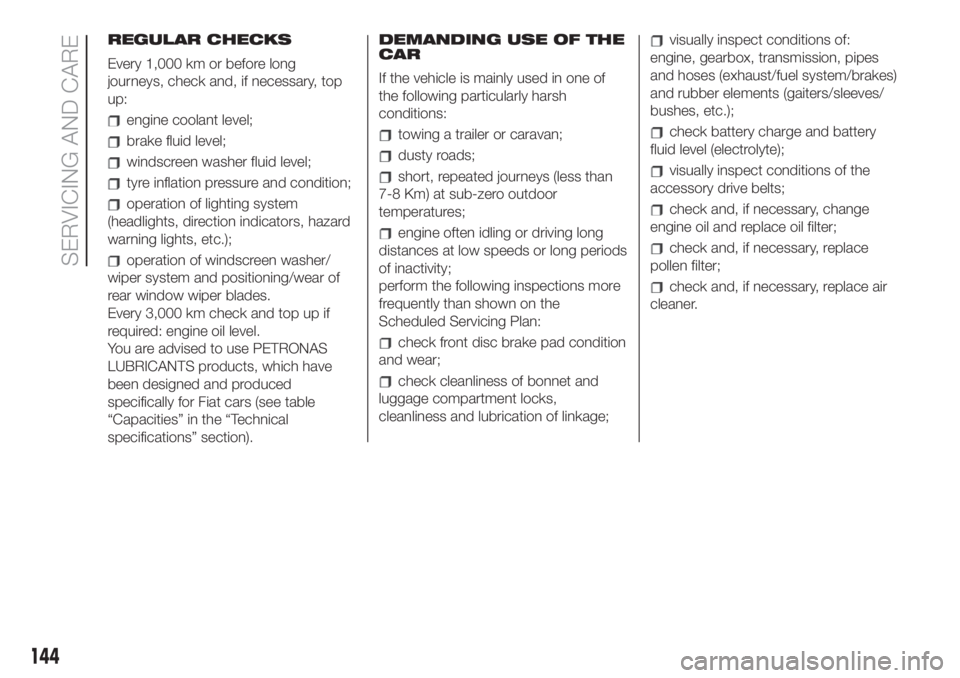
REGULAR CHECKS
Every 1,000 km or before long
journeys, check and, if necessary, top
up:
engine coolant level;
brake fluid level;
windscreen washer fluid level;
tyre inflation pressure and condition;
operation of lighting system
(headlights, direction indicators, hazard
warning lights, etc.);
operation of windscreen washer/
wiper system and positioning/wear of
rear window wiper blades.
Every 3,000 km check and top up if
required: engine oil level.
You are advised to use PETRONAS
LUBRICANTS products, which have
been designed and produced
specifically for Fiat cars (see table
“Capacities” in the “Technical
specifications” section).DEMANDING USE OF THE
CAR
If the vehicle is mainly used in one of
the following particularly harsh
conditions:
towing a trailer or caravan;
dusty roads;
short, repeated journeys (less than
7-8 Km) at sub-zero outdoor
temperatures;
engine often idling or driving long
distances at low speeds or long periods
of inactivity;
perform the following inspections more
frequently than shown on the
Scheduled Servicing Plan:
check front disc brake pad condition
and wear;
check cleanliness of bonnet and
luggage compartment locks,
cleanliness and lubrication of linkage;
visually inspect conditions of:
engine, gearbox, transmission, pipes
and hoses (exhaust/fuel system/brakes)
and rubber elements (gaiters/sleeves/
bushes, etc.);
check battery charge and battery
fluid level (electrolyte);
visually inspect conditions of the
accessory drive belts;
check and, if necessary, change
engine oil and replace oil filter;
check and, if necessary, replace
pollen filter;
check and, if necessary, replace air
cleaner.
144
SERVICING AND CARE
Page 147 of 228
CHECKING LEVELS
174) 175)59) 60)
.
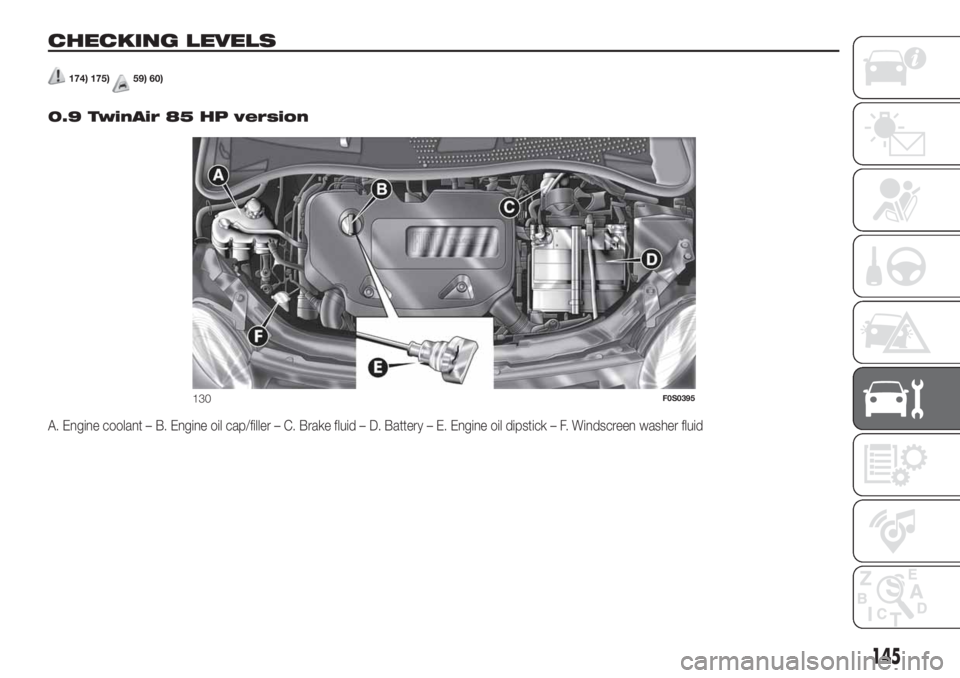
0.9 TwinAir 85 HP version
A. Engine coolant – B. Engine oil cap/filler – C. Brake fluid – D. Battery – E. Engine oil dipstick – F. Windscreen washer fluid
130F0S0395
145
Page 148 of 228
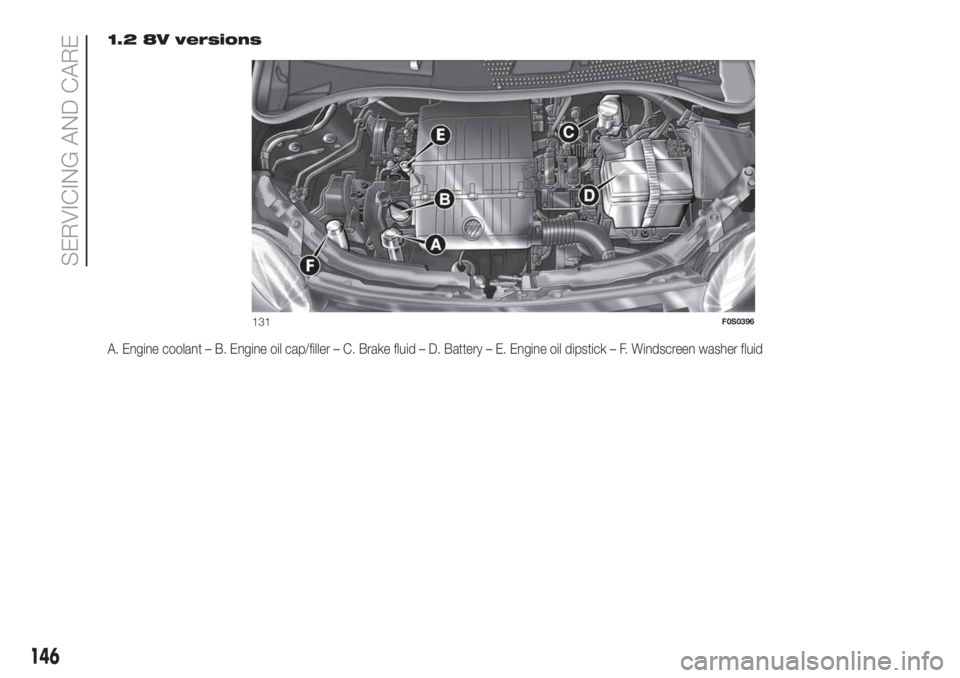
1.2 8V versions
A. Engine coolant – B. Engine oil cap/filler – C. Brake fluid – D. Battery – E. Engine oil dipstick – F. Windscreen washer fluid
131F0S0396
146
SERVICING AND CARE