Eco FIAT 500 2020 Owner handbook (in English)
[x] Cancel search | Manufacturer: FIAT, Model Year: 2020, Model line: 500, Model: FIAT 500 2020Pages: 228, PDF Size: 6.01 MB
Page 3 of 228

Dear Customer,
We would like to congratulate and thank you for choosing a Fiat.
We have written this handbook to help you get familiar with all the features of your car.
Here you will find information, advice and important warnings regarding use of your vehicle and how to achieve the best performance
from the technical features of your Fiat
.
You are advised to read it right through before taking to the road for the first time, to become familiar with the controls and above all
with those concerning brakes, steering and gearbox; at the same time, you can understand the vehicle behaviour on different road
surfaces.
This document also provides a description of special features and tips, as well as essential information for the safe driving, care and
maintenance of your Fiat
over time.
After reading it, you are advised to keep the handbook inside the vehicle, for an easy reference and for making sure it remains on
board the vehicle should it be sold.
In the attached Warranty Booklet you will also find a description of the Services that Fiat offers to its customers, the Warranty
Certificate and the detail of the terms and conditions for maintaining its validity.
We are sure that these will help you to get in touch with and appreciate your new vehicle and the service provided by the people at
Fiat.
Enjoy reading. Happy motoring!
WARNING
This Owner Handbook describes all versions of the Fiat
, it is therefore necessary to please consider only the
information relevant to your car’s trim level, engine and version. All data contained in this publication are purely
indicative. FCA Italy S.p.A. can modify the specifications of the vehicle model described in this publication at any time, for
technical or marketing purposes. For further information, contact a Fiat Dealership.
Page 10 of 228
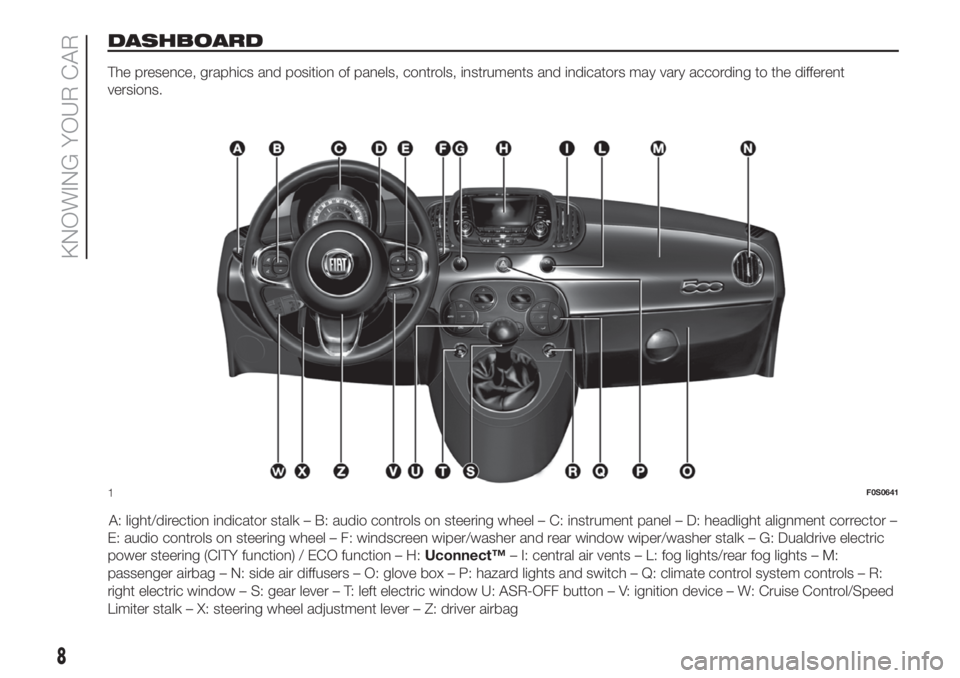
DASHBOARD
The presence, graphics and position of panels, controls, instruments and indicators may vary according to the different
versions.
A: light/direction indicator stalk – B: audio controls on steering wheel – C: instrument panel – D: headlight alignment corrector –
E: audio controls on steering wheel – F: windscreen wiper/washer and rear window wiper/washer stalk – G: Dualdrive electric
power steering (CITY function) / ECO function – H:Uconnect™– I: central air vents – L: fog lights/rear fog lights – M:
passenger airbag – N: side air diffusers – O: glove box – P: hazard lights and switch – Q: climate control system controls – R:
right electric window – S: gear lever – T: left electric window U: ASR-OFF button – V: ignition device – W: Cruise Control/Speed
Limiter stalk – X: steering wheel adjustment lever – Z: driver airbag
1F0S0641
8
KNOWING YOUR CAR
Page 11 of 228
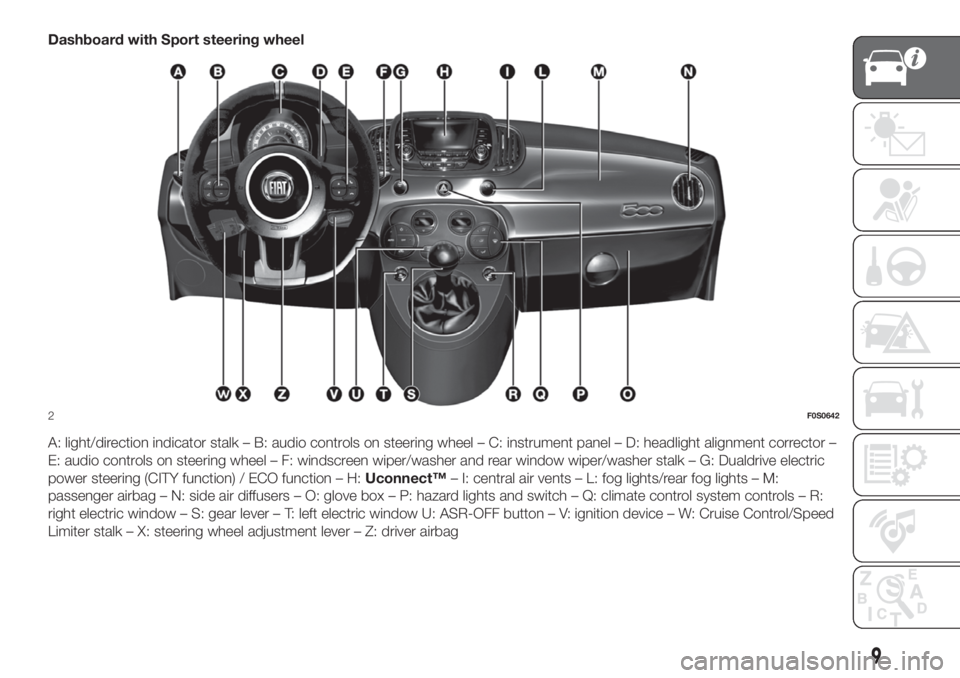
Dashboard with Sport steering wheel
A: light/direction indicator stalk – B: audio controls on steering wheel – C: instrument panel – D: headlight alignment corrector –
E: audio controls on steering wheel – F: windscreen wiper/washer and rear window wiper/washer stalk – G: Dualdrive electric
power steering (CITY function) / ECO function – H:Uconnect™– I: central air vents – L: fog lights/rear fog lights – M:
passenger airbag – N: side air diffusers – O: glove box – P: hazard lights and switch – Q: climate control system controls – R:
right electric window – S: gear lever – T: left electric window U: ASR-OFF button – V: ignition device – W: Cruise Control/Speed
Limiter stalk – X: steering wheel adjustment lever – Z: driver airbag
2F0S0642
9
Page 14 of 228
STEERING LOCK
5)
Engagement:when the key is in
position STOP, remove the key and turn
the steering wheel until it is locked.
Disengagement:move the steering
wheel slightly as you turn the ignition
key to MAR.
WARNING
2)If the ignition device has been tampered
with (e.g. an attempted theft), have it
checked by a Fiat Dealership before driving
again.
3)Always remove the key when you leave
your car to prevent someone from
accidentally operating the controls.
Remember to engage the handbrake.
Engage first gear if the vehicle is parked
uphill or reverse if the vehicle is parked
downhill. Never leave children unattended
in the vehicle.
4)Never remove the key while the car is
moving. The steering wheel would
automatically lock as soon as you try to
turn it. This holds true for cars being towed
as well.
5)It is absolutely forbidden to carry out any
after-market operation involving steering
system or steering column modifications
(e.g. installation of anti-theft device) that
could adversely affect performance and
safety, invalidate the warranty and also
result in the car not meeting type-approval
requirements.
THE FIAT CODE
SYSTEM
This is an electronic engine locking
system which increases protection
against attempted thefts of the car. It is
automatically activated when the
ignition key is removed.
Each time the vehicle is started by
turning the ignition key to MAR, the Fiat
CODE system control unit sends a
recognition code to the Powertrain
Control Module to deactivate the
immobiliser.
If, during starting, the code has not
been correctly recognised, the
warning light switches on in the
instrument panel; on some versions a
symbol is shown on the display instead.
In this case, turn the key to STOP and
then to MAR; if it is still locked, try again
with the other keys that come with the
car. Contact a Fiat Dealership if you
still cannot start the engine.
IMPORTANT Each key has its own
code which must be stored by the
system's control unit. Contact a Fiat
Dealership to have new keys (up to 8)
stored with a code.
DOORS
6)
2)
OPENING/CLOSING WITH
KEY
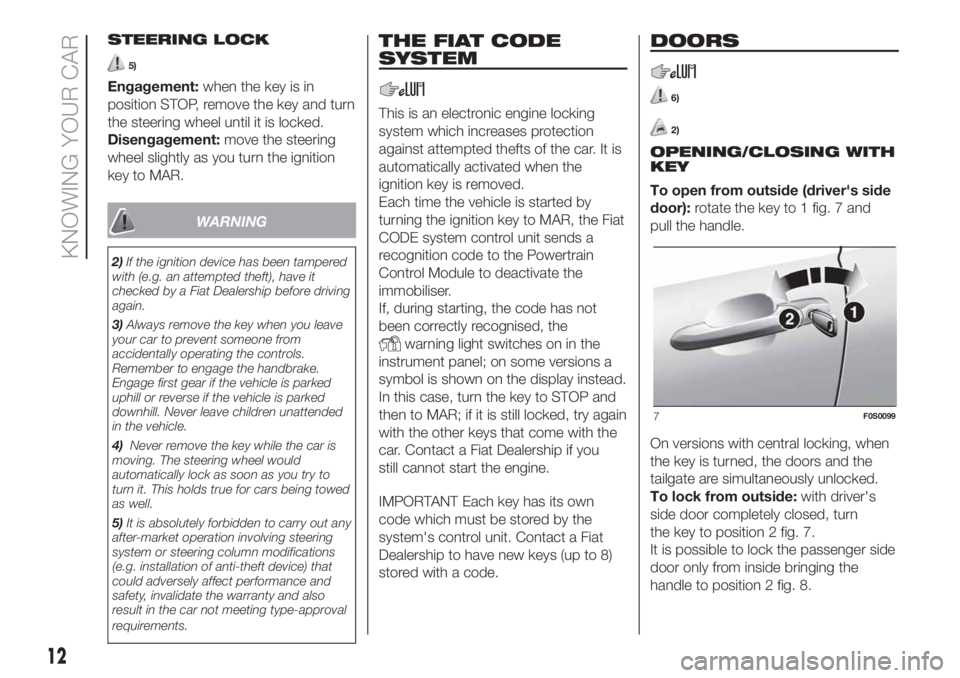
To open from outside (driver's side
door):rotate the key to 1 fig. 7 and
pull the handle.
On versions with central locking, when
the key is turned, the doors and the
tailgate are simultaneously unlocked.
To lock from outside:with driver's
side door completely closed, turn
the key to position 2 fig. 7.
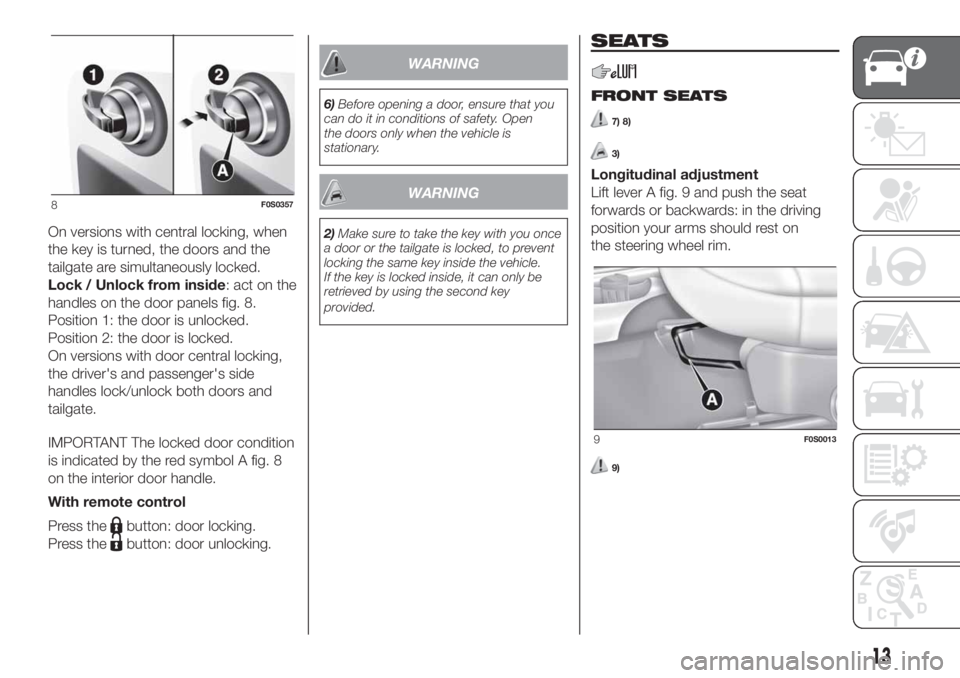
It is possible to lock the passenger side
door only from inside bringing the
handle to position 2 fig. 8.
7F0S0099
12
KNOWING YOUR CAR
Page 15 of 228
On versions with central locking, when
the key is turned, the doors and the
tailgate are simultaneously locked.
Lock / Unlock from inside: act on the
handles on the door panels fig. 8.
Position 1: the door is unlocked.
Position 2: the door is locked.
On versions with door central locking,
the driver's and passenger's side
handles lock/unlock both doors and
tailgate.
IMPORTANT The locked door condition
is indicated by the red symbol A fig. 8
on the interior door handle.
With remote control
Press the
button: door locking.
Press the
button: door unlocking.
WARNING
6)Before opening a door, ensure that you
can do it in conditions of safety. Open
the doors only when the vehicle is
stationary.
WARNING
2)Make sure to take the key with you once
a door or the tailgate is locked, to prevent
locking the same key inside the vehicle.
If the key is locked inside, it can only be
retrieved by using the second key
provided.
SEATS
FRONT SEATS
7) 8)
3)
Longitudinal adjustment
Lift lever A fig. 9 and push the seat
forwards or backwards: in the driving
position your arms should rest on
the steering wheel rim.
9)
8F0S0357
9F0S0013
13
Page 20 of 228
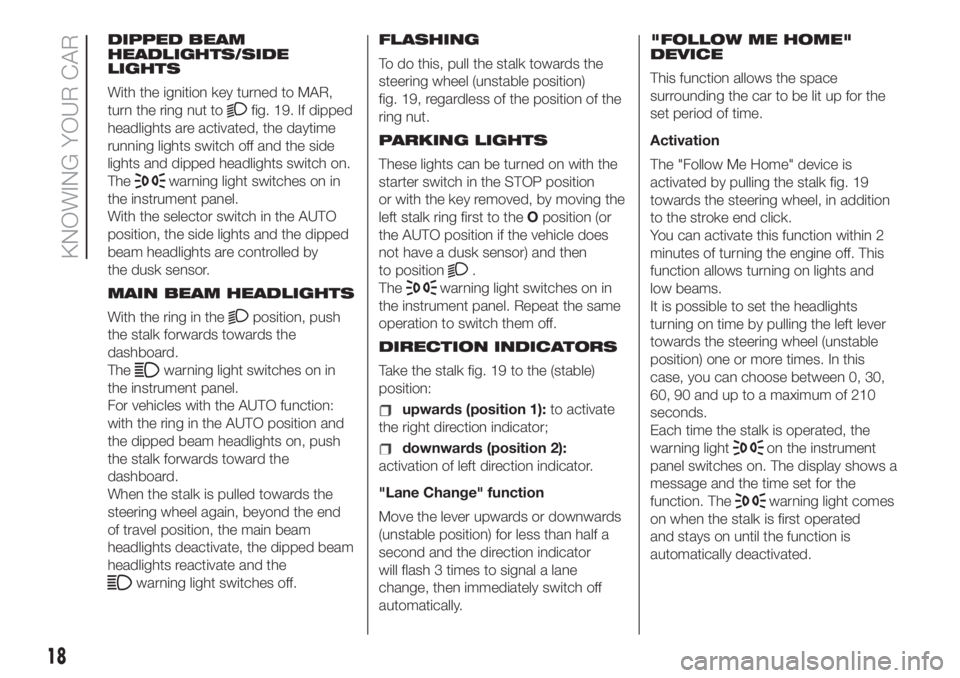
DIPPED BEAM
HEADLIGHTS/SIDE
LIGHTS
With the ignition key turned to MAR,
turn the ring nut to
fig. 19. If dipped
headlights are activated, the daytime
running lights switch off and the side
lights and dipped headlights switch on.
The
warning light switches on in
the instrument panel.
With the selector switch in the AUTO
position, the side lights and the dipped
beam headlights are controlled by
the dusk sensor.
MAIN BEAM HEADLIGHTS
With the ring in the
position, push
the stalk forwards towards the
dashboard.
The
warning light switches on in
the instrument panel.
For vehicles with the AUTO function:
with the ring in the AUTO position and
the dipped beam headlights on, push
the stalk forwards toward the
dashboard.
When the stalk is pulled towards the
steering wheel again, beyond the end
of travel position, the main beam
headlights deactivate, the dipped beam
headlights reactivate and the
warning light switches off.FLASHING
To do this, pull the stalk towards the
steering wheel (unstable position)
fig. 19, regardless of the position of the
ring nut.
PARKING LIGHTS
These lights can be turned on with the
starter switch in the STOP position
or with the key removed, by moving the
left stalk ring first to theOposition (or
the AUTO position if the vehicle does
not have a dusk sensor) and then
to position
.
The
warning light switches on in
the instrument panel. Repeat the same
operation to switch them off.
DIRECTION INDICATORS
Take the stalk fig. 19 to the (stable)
position:
upwards (position 1):to activate
the right direction indicator;
downwards (position 2):
activation of left direction indicator.
"Lane Change" function
Move the lever upwards or downwards
(unstable position) for less than half a
second and the direction indicator
will flash 3 times to signal a lane
change, then immediately switch off
automatically."FOLLOW ME HOME"
DEVICE
This function allows the space
surrounding the car to be lit up for the
set period of time.
Activation
The "Follow Me Home" device is
activated by pulling the stalk fig. 19
towards the steering wheel, in addition
to the stroke end click.
You can activate this function within 2
minutes of turning the engine off. This
function allows turning on lights and
low beams.
It is possible to set the headlights
turning on time by pulling the left lever
towards the steering wheel (unstable
position) one or more times. In this
case, you can choose between 0, 30,
60, 90 and up to a maximum of 210
seconds.
Each time the stalk is operated, the
warning lighton the instrument
panel switches on. The display shows a
message and the time set for the
function. The
warning light comes
on when the stalk is first operated
and stays on until the function is
automatically deactivated.
18
KNOWING YOUR CAR
Page 21 of 228
Deactivation
The function is deactivated by turning
the headlights or the side lights on,
or by pulling the left lever towards the
steering wheel (unstable position)
for more than 2 seconds, or by turning
the ignition device to MAR.
AUTO FUNCTION
(for versions/markets, where provided)
Function activation
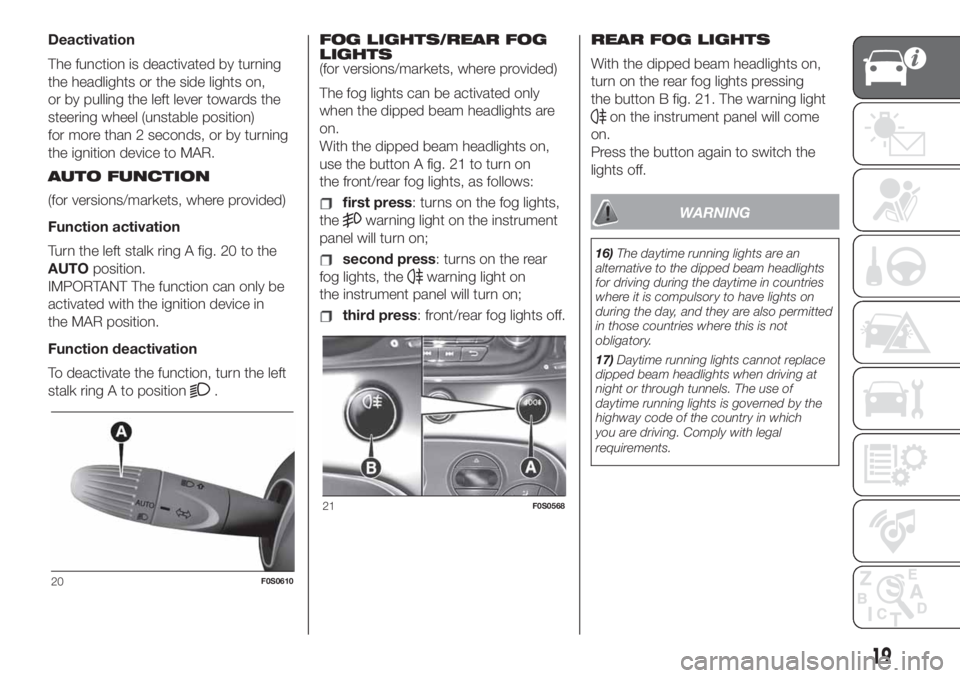
Turn the left stalk ring A fig. 20 to the
AUTOposition.
IMPORTANT The function can only be
activated with the ignition device in
the MAR position.
Function deactivation
To deactivate the function, turn the left
stalk ring A to position
.FOG LIGHTS/REAR FOG
LIGHTS
(for versions/markets, where provided)
The fog lights can be activated only
when the dipped beam headlights are
on.
With the dipped beam headlights on,
use the button A fig. 21 to turn on
the front/rear fog lights, as follows:
first press: turns on the fog lights,
the
warning light on the instrument
panel will turn on;
second press: turns on the rear
fog lights, the
warning light on
the instrument panel will turn on;
third press: front/rear fog lights off.REAR FOG LIGHTS
With the dipped beam headlights on,
turn on the rear fog lights pressing
the button B fig. 21. The warning light
on the instrument panel will come
on.
Press the button again to switch the
lights off.
WARNING
16)The daytime running lights are an
alternative to the dipped beam headlights
for driving during the daytime in countries
where it is compulsory to have lights on
during the day, and they are also permitted
in those countries where this is not
obligatory.
17)Daytime running lights cannot replace
dipped beam headlights when driving at
night or through tunnels. The use of
daytime running lights is governed by the
highway code of the country in which
you are driving. Comply with legal
requirements.
20F0S0610
21F0S0568
19
Page 23 of 228
“Smart washing” function
Pull the stalk towards the steering
wheel (unstable position) to operate the
windscreen washer.
Keep the lever pulled to activate both
the windscreen washer jet and the
windscreen wiper with a single
movement; the latter turns on
automatically if you keep the lever
pulled for more than half a second.
The operation of the windscreen wiper
terminates several strokes after the
stalk is released; a final cleaning stroke
several seconds later completes the
wiping operation.
REAR WINDOW WIPER /
WASHER
8)
This operates only with the ignition key
turned to MAR.
Rear Window Wiper
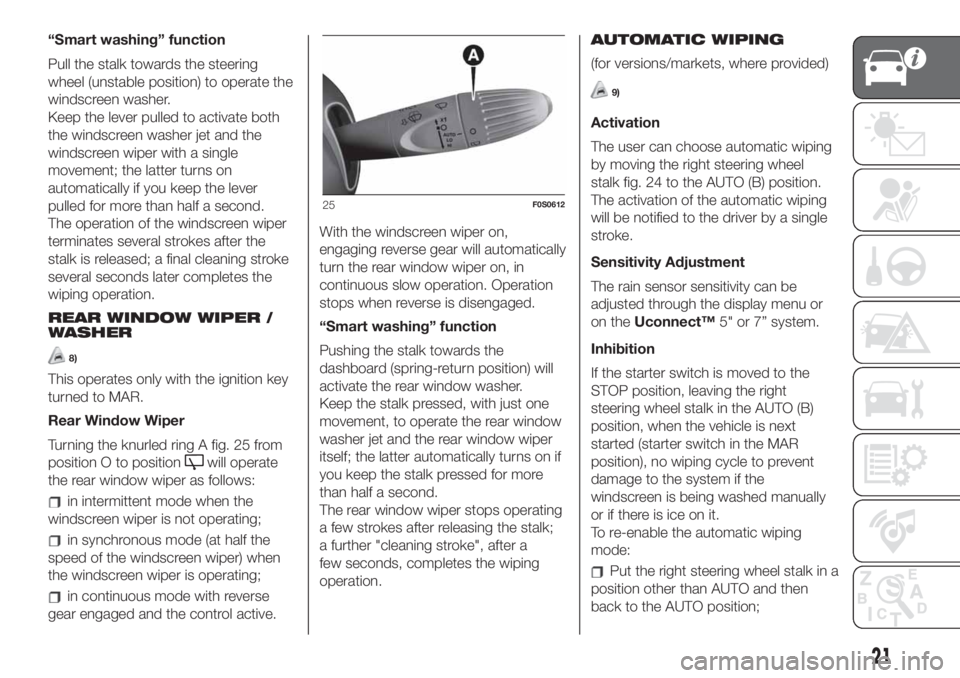
Turning the knurled ring A fig. 25 from
position O to position
will operate
the rear window wiper as follows:
in intermittent mode when the
windscreen wiper is not operating;
in synchronous mode (at half the
speed of the windscreen wiper) when
the windscreen wiper is operating;
in continuous mode with reverse
gear engaged and the control active.With the windscreen wiper on,
engaging reverse gear will automatically
turn the rear window wiper on, in
continuous slow operation. Operation
stops when reverse is disengaged.
“Smart washing” function
Pushing the stalk towards the
dashboard (spring-return position) will
activate the rear window washer.
Keep the stalk pressed, with just one
movement, to operate the rear window
washer jet and the rear window wiper
itself; the latter automatically turns on if
you keep the stalk pressed for more
than half a second.
The rear window wiper stops operating
a few strokes after releasing the stalk;
a further "cleaning stroke", after a
few seconds, completes the wiping
operation.AUTOMATIC WIPING
(for versions/markets, where provided)
9)
Activation
The user can choose automatic wiping
by moving the right steering wheel
stalk fig. 24 to the AUTO (B) position.
The activation of the automatic wiping
will be notified to the driver by a single
stroke.
Sensitivity Adjustment
The rain sensor sensitivity can be
adjusted through the display menu or
on theUconnect™5" or 7” system.
Inhibition
If the starter switch is moved to the
STOP position, leaving the right
steering wheel stalk in the AUTO (B)
position, when the vehicle is next
started (starter switch in the MAR
position), no wiping cycle to prevent
damage to the system if the
windscreen is being washed manually
or if there is ice on it.
To re-enable the automatic wiping
mode:
Put the right steering wheel stalk in a
position other than AUTO and then
back to the AUTO position;
25F0S0612
21
Page 24 of 228
exceed the speed of 5 km/h when
the sensor detects rain.
Deactivation
The user can disable automatic wiping
by moving the right steering wheel
stalk to a position other than AUTO.
WARNING
18)If the window needs to be cleaned,
make sure the device is deactivated or the
key is on STOP.
19)Driving with worn windscreen/rear
window wiper blades is a serious hazard,
because visibility is reduced in bad
weather.
WARNING
5)Never use the windscreen wipers to
remove layers of snow or ice from the
windscreen. In such conditions, the wiper
may be subjected to excessive stress
and the motor cut-out switch, which
prevents operation for a few seconds, may
intervene. If operation is not restored,
contact a Fiat Dealership.
6)Do not operate the windscreen wiper
with the blades lifted from the windscreen.
7)Do not activate the rain sensor or the
rear window wiper when washing the car in
an automatic car wash.8)Do not use the rear window wiper to
remove layers of snow or ice. In these
conditions, the rear window wiper may be
subjected to excessive stress and the
motor protection, which prevents operation
for a few seconds, may intervene. If
operation is not restored, contact a Fiat
Dealership.
9)Make sure the device is switched off if
there is ice on the windscreen.
22
KNOWING YOUR CAR
Page 29 of 228
WARNING
10)Never use R12 or R134a coolant,
which is not compatible with climate
control system components.
ELECTRIC WINDOWS
20) 21)
These operate when the ignition key is
turned to MAR and for about two
minutes after turning the key to STOP
or removing it.
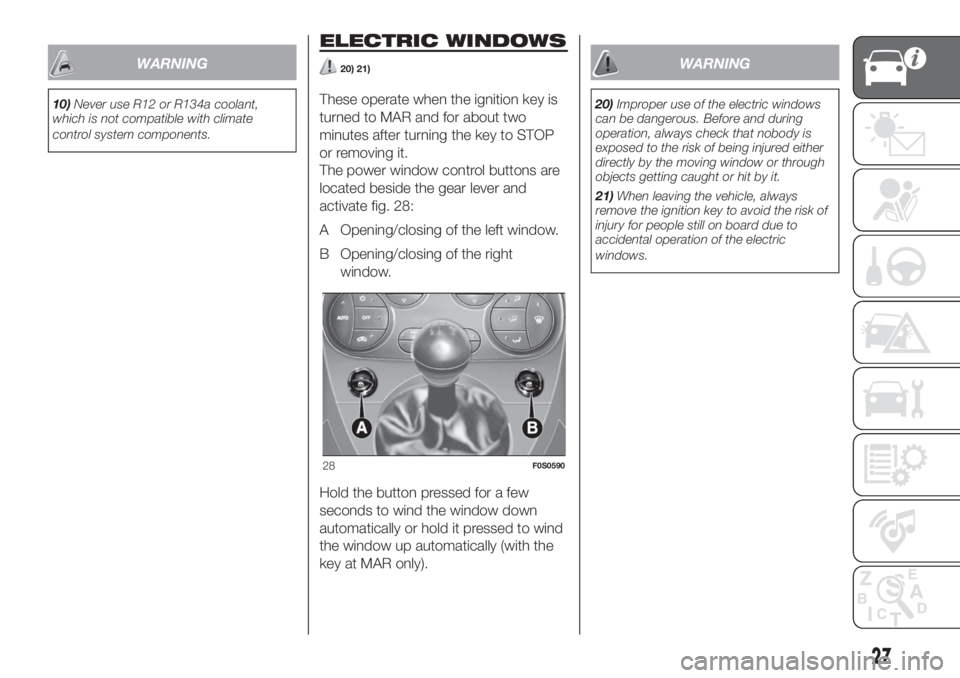
The power window control buttons are
located beside the gear lever and
activate fig. 28:
A Opening/closing of the left window.
B Opening/closing of the right
window.
Hold the button pressed for a few
seconds to wind the window down
automatically or hold it pressed to wind
the window up automatically (with the
key at MAR only).
WARNING
20)Improper use of the electric windows
can be dangerous. Before and during
operation, always check that nobody is
exposed to the risk of being injured either
directly by the moving window or through
objects getting caught or hit by it.
21)When leaving the vehicle, always
remove the ignition key to avoid the risk of
injury for people still on board due to
accidental operation of the electric
windows.
28F0S0590
27