display FIAT 500 2020 Owner handbook (in English)
[x] Cancel search | Manufacturer: FIAT, Model Year: 2020, Model line: 500, Model: FIAT 500 2020Pages: 228, PDF Size: 6.01 MB
Page 14 of 228
STEERING LOCK
5)
Engagement:when the key is in
position STOP, remove the key and turn
the steering wheel until it is locked.
Disengagement:move the steering
wheel slightly as you turn the ignition
key to MAR.
WARNING
2)If the ignition device has been tampered
with (e.g. an attempted theft), have it
checked by a Fiat Dealership before driving
again.
3)Always remove the key when you leave
your car to prevent someone from
accidentally operating the controls.
Remember to engage the handbrake.
Engage first gear if the vehicle is parked
uphill or reverse if the vehicle is parked
downhill. Never leave children unattended
in the vehicle.
4)Never remove the key while the car is
moving. The steering wheel would
automatically lock as soon as you try to
turn it. This holds true for cars being towed
as well.
5)It is absolutely forbidden to carry out any
after-market operation involving steering
system or steering column modifications
(e.g. installation of anti-theft device) that
could adversely affect performance and
safety, invalidate the warranty and also
result in the car not meeting type-approval
requirements.
THE FIAT CODE
SYSTEM
This is an electronic engine locking
system which increases protection
against attempted thefts of the car. It is
automatically activated when the
ignition key is removed.
Each time the vehicle is started by
turning the ignition key to MAR, the Fiat
CODE system control unit sends a
recognition code to the Powertrain
Control Module to deactivate the
immobiliser.
If, during starting, the code has not
been correctly recognised, the
warning light switches on in the
instrument panel; on some versions a
symbol is shown on the display instead.
In this case, turn the key to STOP and
then to MAR; if it is still locked, try again
with the other keys that come with the
car. Contact a Fiat Dealership if you
still cannot start the engine.
IMPORTANT Each key has its own
code which must be stored by the
system's control unit. Contact a Fiat
Dealership to have new keys (up to 8)
stored with a code.
DOORS
6)
2)
OPENING/CLOSING WITH
KEY
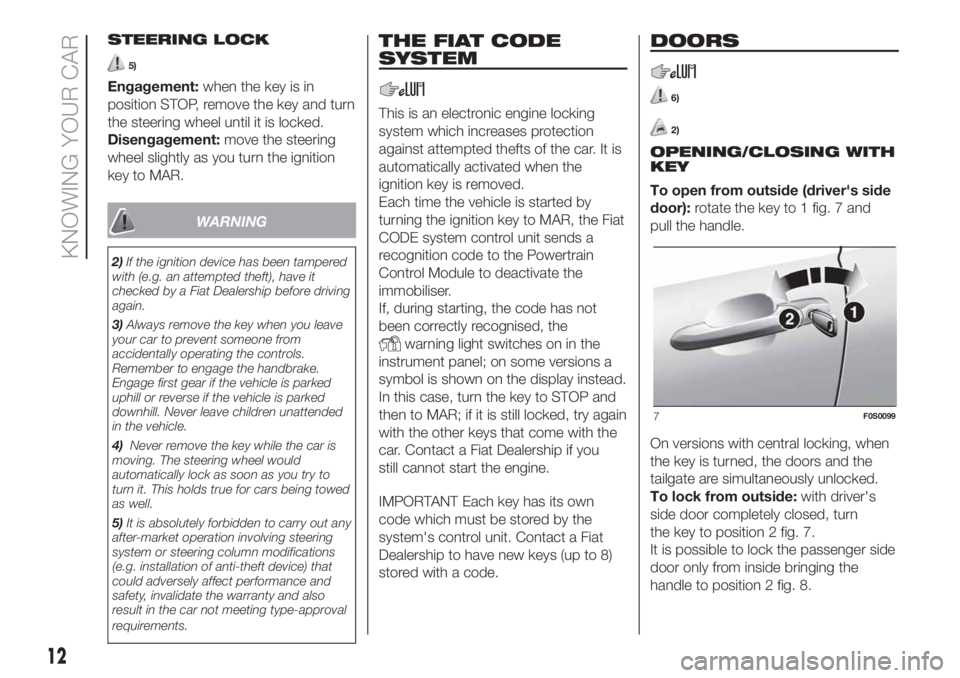
To open from outside (driver's side
door):rotate the key to 1 fig. 7 and
pull the handle.
On versions with central locking, when
the key is turned, the doors and the
tailgate are simultaneously unlocked.
To lock from outside:with driver's
side door completely closed, turn
the key to position 2 fig. 7.
It is possible to lock the passenger side
door only from inside bringing the
handle to position 2 fig. 8.
7F0S0099
12
KNOWING YOUR CAR
Page 20 of 228
DIPPED BEAM
HEADLIGHTS/SIDE
LIGHTS
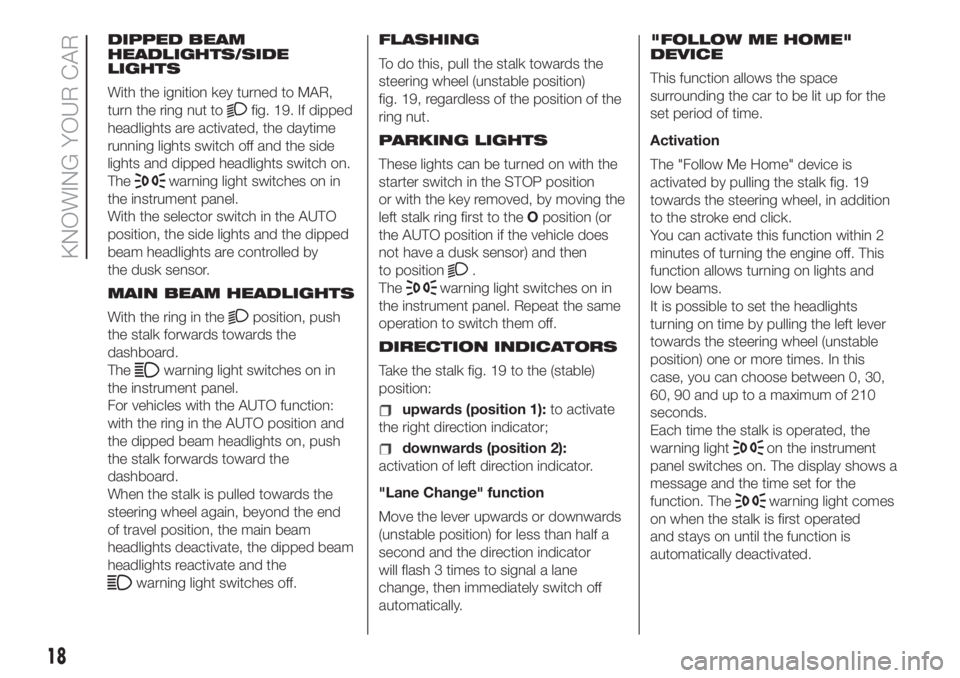
With the ignition key turned to MAR,
turn the ring nut to
fig. 19. If dipped
headlights are activated, the daytime
running lights switch off and the side
lights and dipped headlights switch on.
The
warning light switches on in
the instrument panel.
With the selector switch in the AUTO
position, the side lights and the dipped
beam headlights are controlled by
the dusk sensor.
MAIN BEAM HEADLIGHTS
With the ring in the
position, push
the stalk forwards towards the
dashboard.
The
warning light switches on in
the instrument panel.
For vehicles with the AUTO function:
with the ring in the AUTO position and
the dipped beam headlights on, push
the stalk forwards toward the
dashboard.
When the stalk is pulled towards the
steering wheel again, beyond the end
of travel position, the main beam
headlights deactivate, the dipped beam
headlights reactivate and the
warning light switches off.FLASHING
To do this, pull the stalk towards the
steering wheel (unstable position)
fig. 19, regardless of the position of the
ring nut.
PARKING LIGHTS
These lights can be turned on with the
starter switch in the STOP position
or with the key removed, by moving the
left stalk ring first to theOposition (or
the AUTO position if the vehicle does
not have a dusk sensor) and then
to position
.
The
warning light switches on in
the instrument panel. Repeat the same
operation to switch them off.
DIRECTION INDICATORS
Take the stalk fig. 19 to the (stable)
position:
upwards (position 1):to activate
the right direction indicator;
downwards (position 2):
activation of left direction indicator.
"Lane Change" function
Move the lever upwards or downwards
(unstable position) for less than half a
second and the direction indicator
will flash 3 times to signal a lane
change, then immediately switch off
automatically."FOLLOW ME HOME"
DEVICE
This function allows the space
surrounding the car to be lit up for the
set period of time.
Activation
The "Follow Me Home" device is
activated by pulling the stalk fig. 19
towards the steering wheel, in addition
to the stroke end click.
You can activate this function within 2
minutes of turning the engine off. This
function allows turning on lights and
low beams.
It is possible to set the headlights
turning on time by pulling the left lever
towards the steering wheel (unstable
position) one or more times. In this
case, you can choose between 0, 30,
60, 90 and up to a maximum of 210
seconds.
Each time the stalk is operated, the
warning lighton the instrument
panel switches on. The display shows a
message and the time set for the
function. The
warning light comes
on when the stalk is first operated
and stays on until the function is
automatically deactivated.
18
KNOWING YOUR CAR
Page 23 of 228
“Smart washing” function
Pull the stalk towards the steering
wheel (unstable position) to operate the
windscreen washer.
Keep the lever pulled to activate both
the windscreen washer jet and the
windscreen wiper with a single
movement; the latter turns on
automatically if you keep the lever
pulled for more than half a second.
The operation of the windscreen wiper
terminates several strokes after the
stalk is released; a final cleaning stroke
several seconds later completes the
wiping operation.
REAR WINDOW WIPER /
WASHER
8)
This operates only with the ignition key
turned to MAR.
Rear Window Wiper
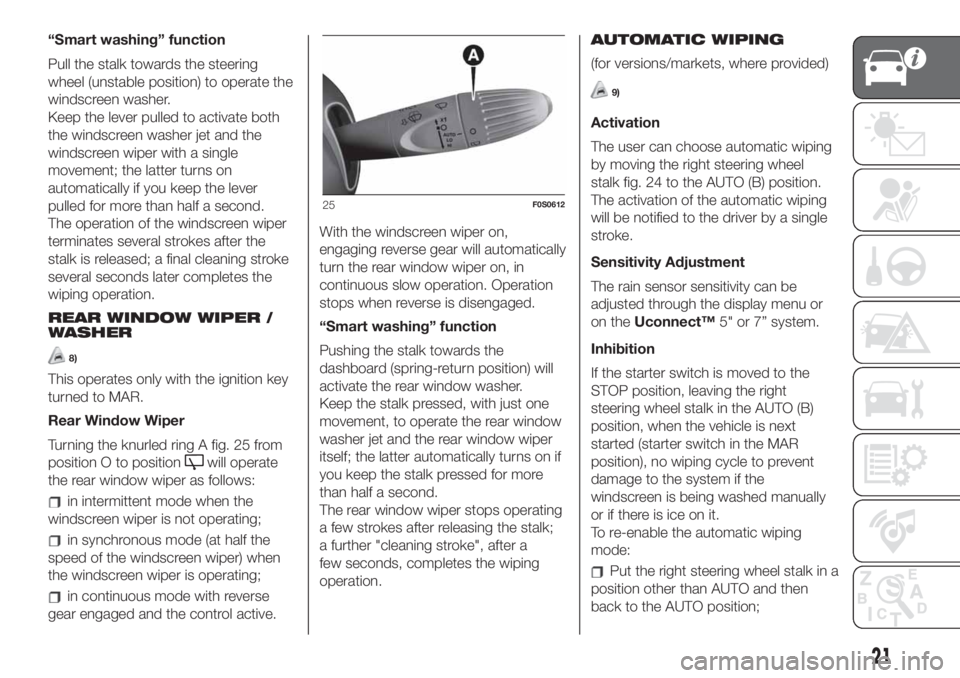
Turning the knurled ring A fig. 25 from
position O to position
will operate
the rear window wiper as follows:
in intermittent mode when the
windscreen wiper is not operating;
in synchronous mode (at half the
speed of the windscreen wiper) when
the windscreen wiper is operating;
in continuous mode with reverse
gear engaged and the control active.With the windscreen wiper on,
engaging reverse gear will automatically
turn the rear window wiper on, in
continuous slow operation. Operation
stops when reverse is disengaged.
“Smart washing” function
Pushing the stalk towards the
dashboard (spring-return position) will
activate the rear window washer.
Keep the stalk pressed, with just one
movement, to operate the rear window
washer jet and the rear window wiper
itself; the latter automatically turns on if
you keep the stalk pressed for more
than half a second.
The rear window wiper stops operating
a few strokes after releasing the stalk;
a further "cleaning stroke", after a
few seconds, completes the wiping
operation.AUTOMATIC WIPING
(for versions/markets, where provided)
9)
Activation
The user can choose automatic wiping
by moving the right steering wheel
stalk fig. 24 to the AUTO (B) position.
The activation of the automatic wiping
will be notified to the driver by a single
stroke.
Sensitivity Adjustment
The rain sensor sensitivity can be
adjusted through the display menu or
on theUconnect™5" or 7” system.
Inhibition
If the starter switch is moved to the
STOP position, leaving the right
steering wheel stalk in the AUTO (B)
position, when the vehicle is next
started (starter switch in the MAR
position), no wiping cycle to prevent
damage to the system if the
windscreen is being washed manually
or if there is ice on it.
To re-enable the automatic wiping
mode:
Put the right steering wheel stalk in a
position other than AUTO and then
back to the AUTO position;
25F0S0612
21
Page 28 of 228
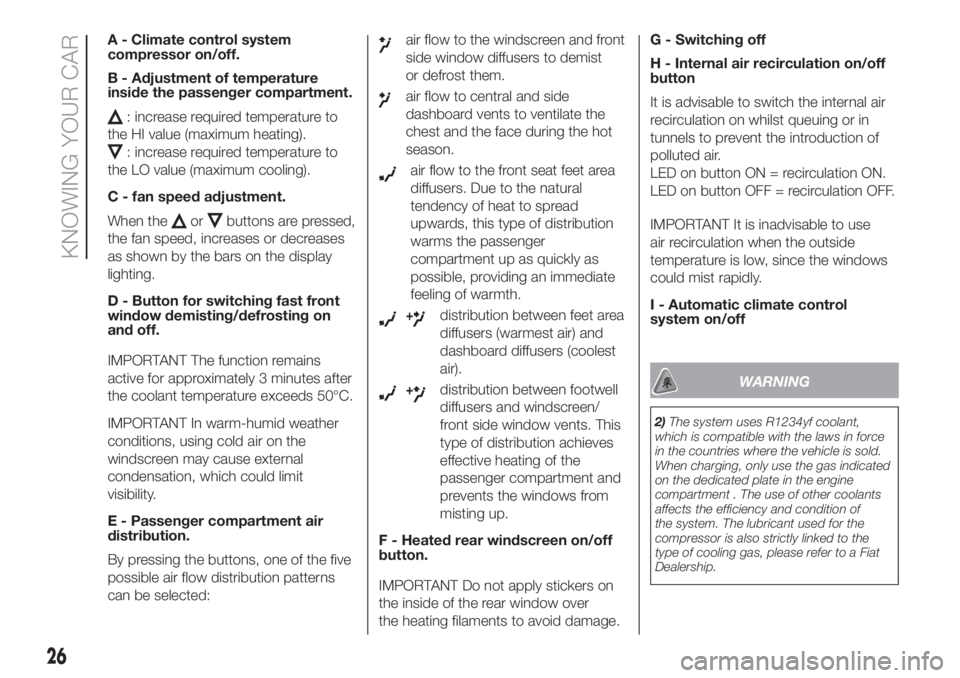
A - Climate control system
compressor on/off.
B - Adjustment of temperature
inside the passenger compartment.
: increase required temperature to
the HI value (maximum heating).
: increase required temperature to
the LO value (maximum cooling).
C - fan speed adjustment.
When the
orbuttons are pressed,
the fan speed, increases or decreases
as shown by the bars on the display
lighting.
D - Button for switching fast front
window demisting/defrosting on
and off.
IMPORTANT The function remains
active for approximately 3 minutes after
the coolant temperature exceeds 50°C.
IMPORTANT In warm-humid weather
conditions, using cold air on the
windscreen may cause external
condensation, which could limit
visibility.
E - Passenger compartment air
distribution.
By pressing the buttons, one of the five
possible air flow distribution patterns
can be selected:
air flow to the windscreen and front
side window diffusers to demist
or defrost them.
air flow to central and side
dashboard vents to ventilate the
chest and the face during the hot
season.
air flow to the front seat feet area
diffusers. Due to the natural
tendency of heat to spread
upwards, this type of distribution
warms the passenger
compartment up as quickly as
possible, providing an immediate
feeling of warmth.
+distribution between feet area
diffusers (warmest air) and
dashboard diffusers (coolest
air).
+distribution between footwell
diffusers and windscreen/
front side window vents. This
type of distribution achieves
effective heating of the
passenger compartment and
prevents the windows from
misting up.
F - Heated rear windscreen on/off
button.
IMPORTANT Do not apply stickers on
the inside of the rear window over
the heating filaments to avoid damage.G - Switching off
H - Internal air recirculation on/off
button
It is advisable to switch the internal air
recirculation on whilst queuing or in
tunnels to prevent the introduction of
polluted air.
LED on button ON = recirculation ON.
LED on button OFF = recirculation OFF.
IMPORTANT It is inadvisable to use
air recirculation when the outside
temperature is low, since the windows
could mist rapidly.
I - Automatic climate control
system on/offWARNING
2)The system uses R1234yf coolant,
which is compatible with the laws in force
in the countries where the vehicle is sold.
When charging, only use the gas indicated
on the dedicated plate in the engine
compartment . The use of other coolants
affects the efficiency and condition of
the system. The lubricant used for the
compressor is also strictly linked to the
type of cooling gas, please refer to a Fiat
Dealership.
26
KNOWING YOUR CAR
Page 35 of 228
22)Rinse immediately to remove soap to
prevent stains and halos. Repeat the
operation if needed.
23)Rinse immediately, and repeat this
operation if necessary. If you choose to
waterproof the soft top, strictly follow the
instructions on the package of the
waterproofing product you have selected in
order to obtain optimal results.
24)The rubber seals on the soft top must
be cleaned exclusively with water. If you
notice that this trim is dry or is sticking,
apply talcum powder or products
specifically for rubber trim (silicone spray).LUGGAGE
COMPARTMENT
26) 27) 28)
ELECTRIC HANDLE
(SOFT TOUCH)
The tailgate can be opened at any time
if the doors are unlocked.
To open it, enable the handle, opening
one of the front doors or unlocking
the doors with the remote control or
using the key without remote control.
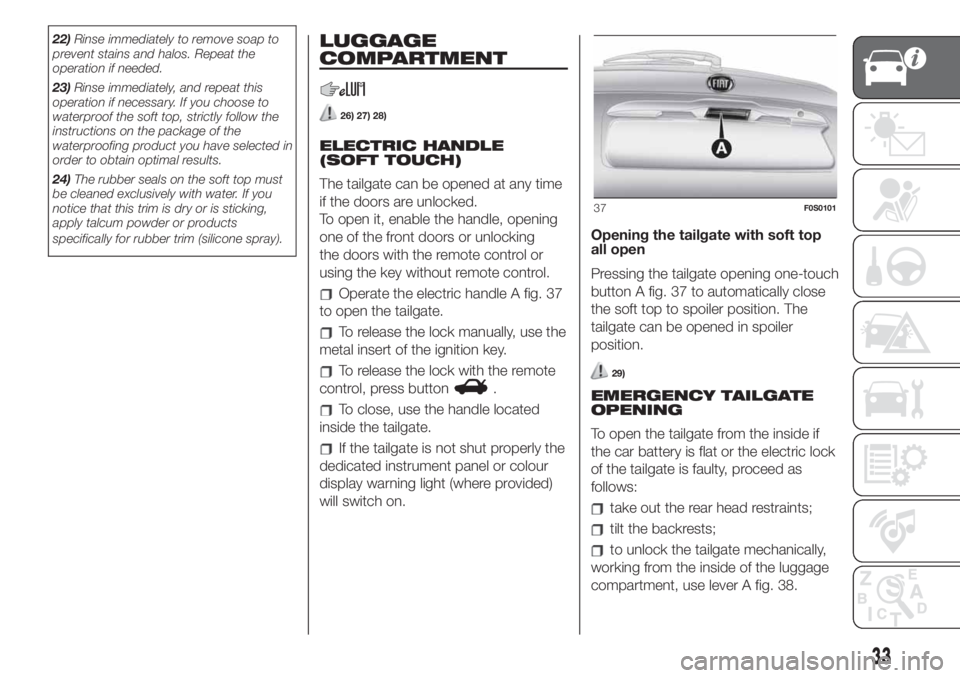
Operate the electric handle A fig. 37
to open the tailgate.
To release the lock manually, use the
metal insert of the ignition key.
To release the lock with the remote
control, press button
.
To close, use the handle located
inside the tailgate.
If the tailgate is not shut properly the
dedicated instrument panel or colour
display warning light (where provided)
will switch on.Opening the tailgate with soft top
all open
Pressing the tailgate opening one-touch
button A fig. 37 to automatically close
the soft top to spoiler position. The
tailgate can be opened in spoiler
position.
29)
EMERGENCY TAILGATE
OPENING
To open the tailgate from the inside if
the car battery is flat or the electric lock
of the tailgate is faulty, proceed as
follows:
take out the rear head restraints;
tilt the backrests;
to unlock the tailgate mechanically,
working from the inside of the luggage
compartment, use lever A fig. 38.
37F0S0101
33
Page 39 of 228
IMPORTANT If the ignition key is turned
to MAR, all the device LEDs will stay
on for approximately 4 seconds (check
function).
Engine starting always occurs on petrol;
then, depending on the position of the
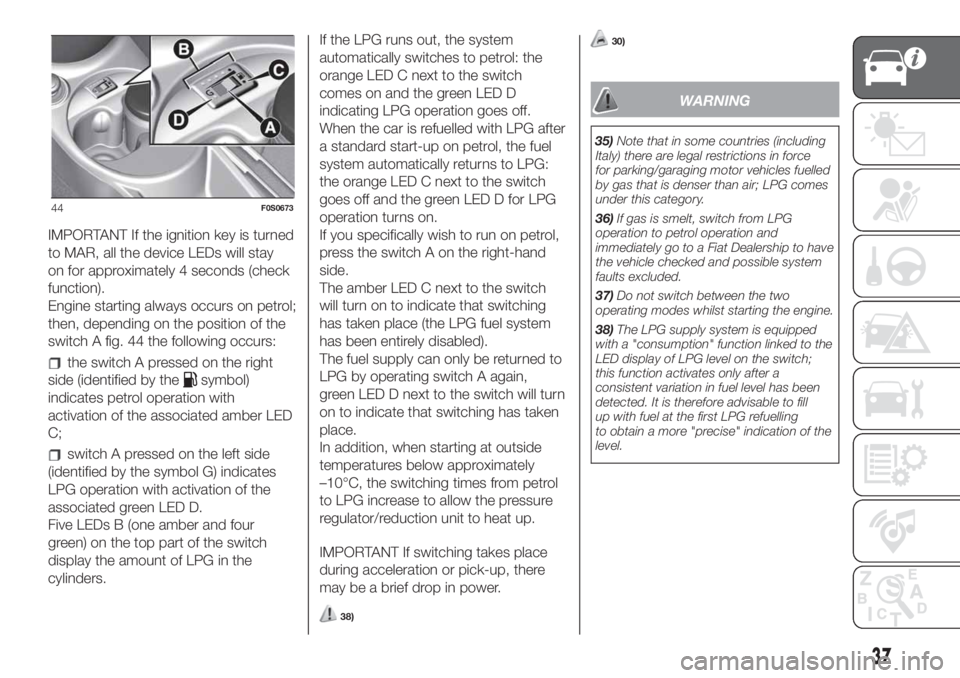
switch A fig. 44 the following occurs:
the switch A pressed on the right
side (identified by the
symbol)
indicates petrol operation with
activation of the associated amber LED
C;
switch A pressed on the left side
(identified by the symbol G) indicates
LPG operation with activation of the
associated green LED D.
Five LEDs B (one amber and four
green) on the top part of the switch
display the amount of LPG in the
cylinders.If the LPG runs out, the system
automatically switches to petrol: the
orange LED C next to the switch
comes on and the green LED D
indicating LPG operation goes off.
When the car is refuelled with LPG after
a standard start-up on petrol, the fuel
system automatically returns to LPG:
the orange LED C next to the switch
goes off and the green LED D for LPG
operation turns on.
If you specifically wish to run on petrol,
press the switch A on the right-hand
side.
The amber LED C next to the switch
will turn on to indicate that switching
has taken place (the LPG fuel system
has been entirely disabled).
The fuel supply can only be returned to
LPG by operating switch A again,
green LED D next to the switch will turn
on to indicate that switching has taken
place.
In addition, when starting at outside
temperatures below approximately
–10°C, the switching times from petrol
to LPG increase to allow the pressure
regulator/reduction unit to heat up.
IMPORTANT If switching takes place
during acceleration or pick-up, there
may be a brief drop in power.
38)
30)
WARNING
35)Note that in some countries (including
Italy) there are legal restrictions in force
for parking/garaging motor vehicles fuelled
by gas that is denser than air; LPG comes
under this category.
36)If gas is smelt, switch from LPG
operation to petrol operation and
immediately go to a Fiat Dealership to have
the vehicle checked and possible system
faults excluded.
37)Do not switch between the two
operating modes whilst starting the engine.
38)The LPG supply system is equipped
with a "consumption" function linked to the
LED display of LPG level on the switch;
this function activates only after a
consistent variation in fuel level has been
detected. It is therefore advisable to fill
up with fuel at the first LPG refuelling
to obtain a more "precise" indication of the
level.
44F0S0673
37
Page 41 of 228
KNOWING THE INSTRUMENT PANEL
This section of the handbook gives you
all the information you need to
understand, interpret and use the
instrument panel correctly.CONTROL PANEL AND
ON-BOARD INSTRUMENTS ........... 40
DISPLAY ......................................... 42
TRIP COMPUTER ........................... 45
WARNING LIGHTS AND
MESSAGES .................................... 46
-Red warning lights............................ 46
-Amber warning lights......................... 52
-Green warning lights......................... 57
-Blue warning lights............................ 58
-Red symbols.................................... 59
-Amber symbols................................ 60
39
Page 42 of 228
CONTROL PANEL AND ON-BOARD INSTRUMENTS
The instrument background colour and type may vary according to the versions..
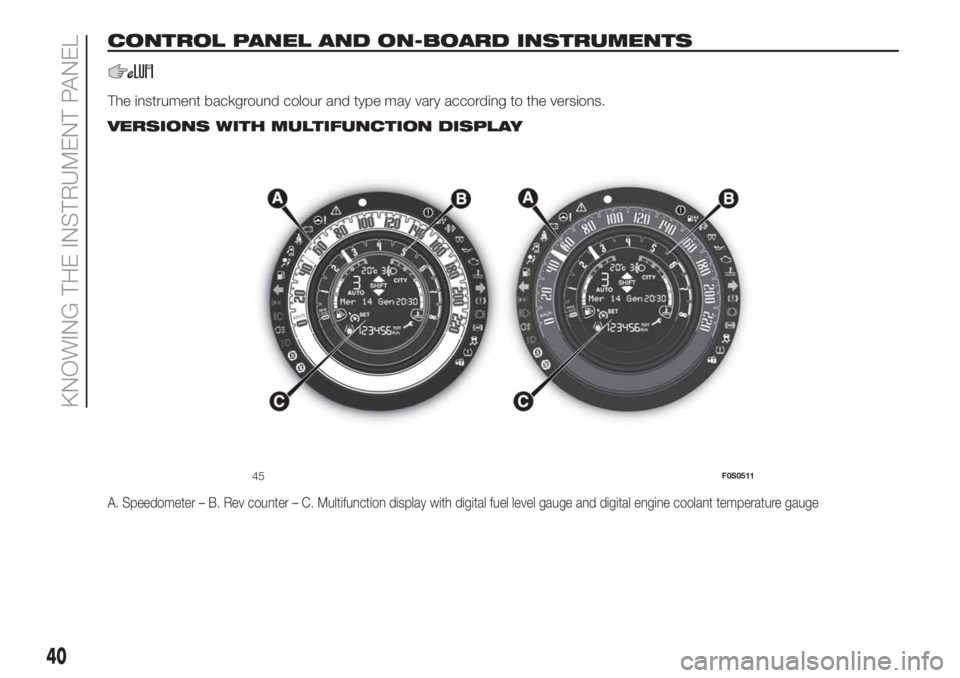
VERSIONS WITH MULTIFUNCTION DISPLAY
A. Speedometer – B. Rev counter – C. Multifunction display with digital fuel level gauge and digital engine coolant temperature gauge
45F0S0511
40
KNOWING THE INSTRUMENT PANEL
Page 43 of 228
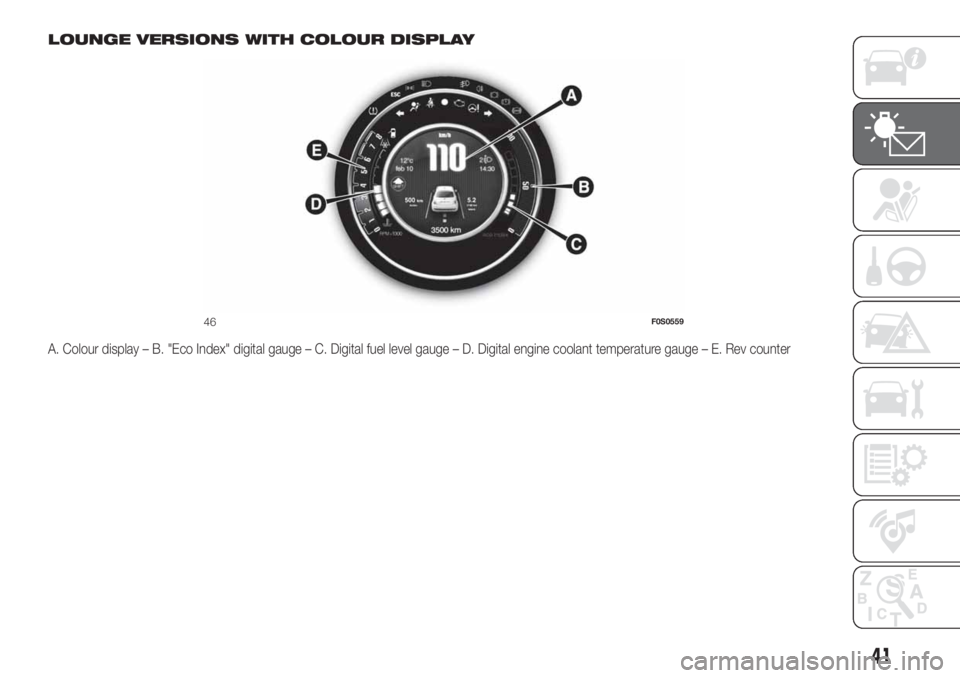
LOUNGE VERSIONS WITH COLOUR DISPLAY
A. Colour display – B. "Eco Index" digital gauge – C. Digital fuel level gauge – D. Digital engine coolant temperature gauge – E. Rev counter
46F0S0559
41
Page 44 of 228
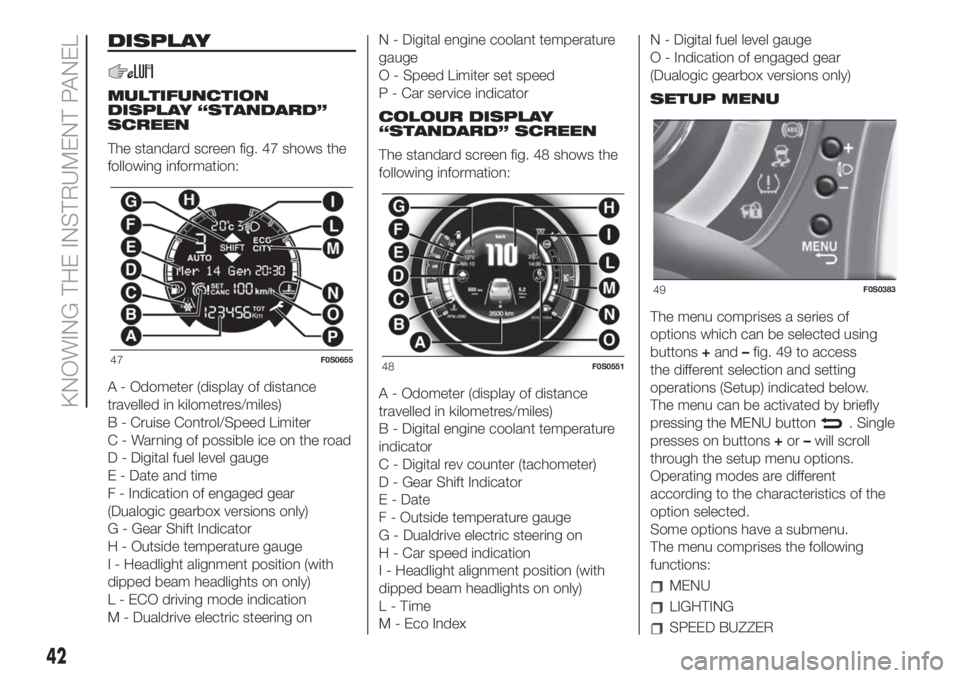
DISPLAY
MULTIFUNCTION
DISPLAY “STANDARD”
SCREEN
The standard screen fig. 47 shows the
following information:
A - Odometer (display of distance
travelled in kilometres/miles)
B - Cruise Control/Speed Limiter
C - Warning of possible ice on the road
D - Digital fuel level gauge
E - Date and time
F - Indication of engaged gear
(Dualogic gearbox versions only)
G - Gear Shift Indicator
H - Outside temperature gauge
I - Headlight alignment position (with
dipped beam headlights on only)
L - ECO driving mode indication
M - Dualdrive electric steering onN - Digital engine coolant temperature
gauge
O - Speed Limiter set speed
P - Car service indicator
COLOUR DISPLAY
“STANDARD” SCREEN
The standard screen fig. 48 shows the
following information:
A - Odometer (display of distance
travelled in kilometres/miles)
B - Digital engine coolant temperature
indicator
C - Digital rev counter (tachometer)
D - Gear Shift Indicator
E - Date
F - Outside temperature gauge
G - Dualdrive electric steering on
H - Car speed indication
I - Headlight alignment position (with
dipped beam headlights on only)
L-Time
M - Eco IndexN - Digital fuel level gauge
O - Indication of engaged gear
(Dualogic gearbox versions only)
SETUP MENU
The menu comprises a series of
options which can be selected using
buttons+and–fig. 49 to access
the different selection and setting
operations (Setup) indicated below.
The menu can be activated by briefly
pressing the MENU button
. Single
presses on buttons+or–will scroll
through the setup menu options.
Operating modes are different
according to the characteristics of the
option selected.
Some options have a submenu.
The menu comprises the following
functions:
MENU
LIGHTING
SPEED BUZZER
47F0S065548F0S0551
49F0S0383
42
KNOWING THE INSTRUMENT PANEL