stop start FIAT 500 ABARTH 2015 2.G Owners Manual
[x] Cancel search | Manufacturer: FIAT, Model Year: 2015, Model line: 500 ABARTH, Model: FIAT 500 ABARTH 2015 2.GPages: 426, PDF Size: 9.89 MB
Page 13 of 426
A WORD ABOUT YOUR KEYS
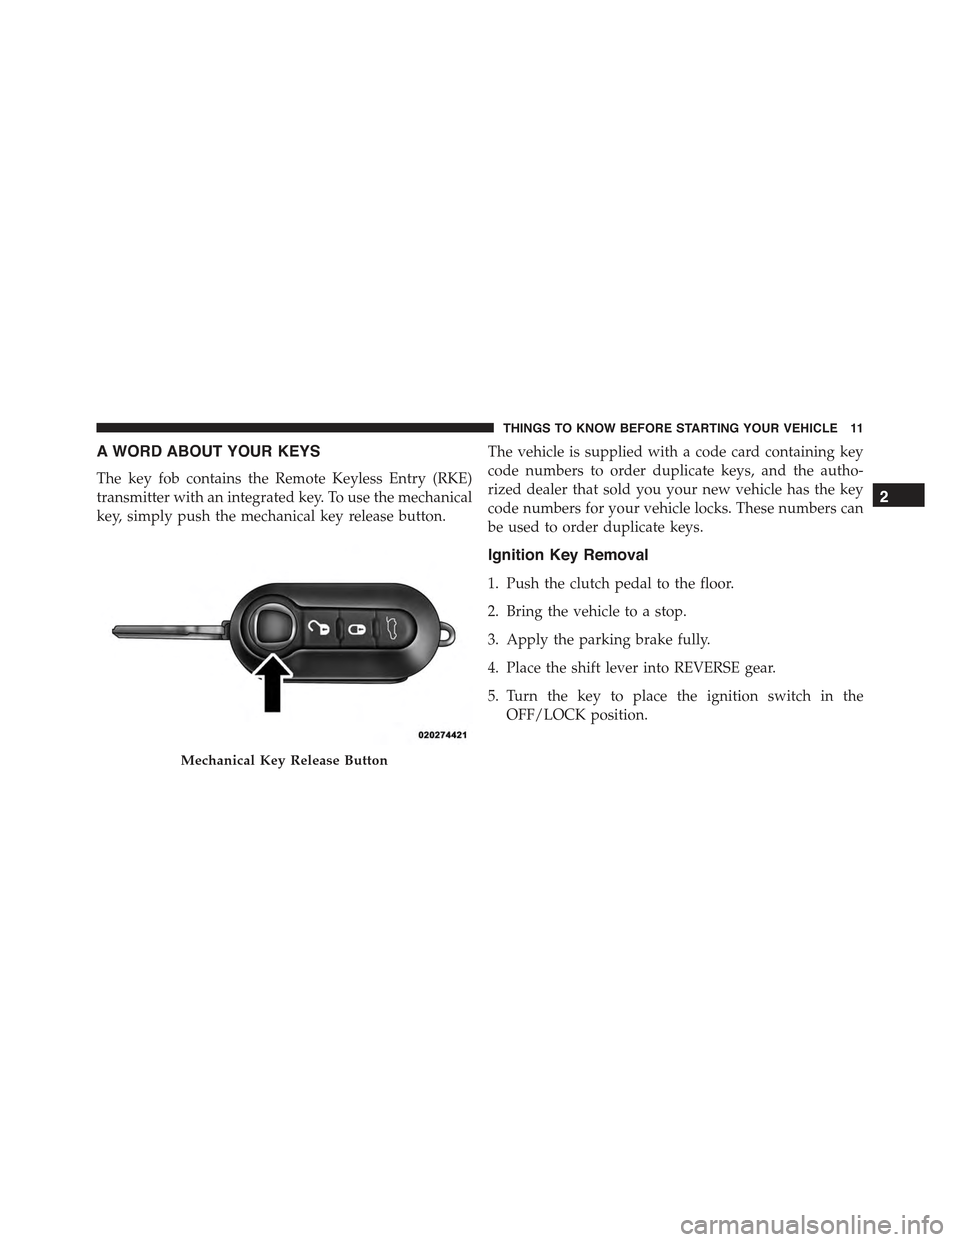
The key fob contains the Remote Keyless Entry (RKE)
transmitter with an integrated key. To use the mechanical
key, simply push the mechanical key release button.
The vehicle is supplied with a code card containing key
code numbers to order duplicate keys, and the autho-
rized dealer that sold you your new vehicle has the key
code numbers for your vehicle locks. These numbers can
be used to order duplicate keys.
Ignition Key Removal
1. Push the clutch pedal to the floor.
2. Bring the vehicle to a stop.
3. Apply the parking brake fully.
4. Place the shift lever into REVERSE gear.
5. Turn the key to place the ignition switch in the
OFF/LOCK position.
Mechanical Key Release Button
2
THINGS TO KNOW BEFORE STARTING YOUR VEHICLE 11
Page 14 of 426
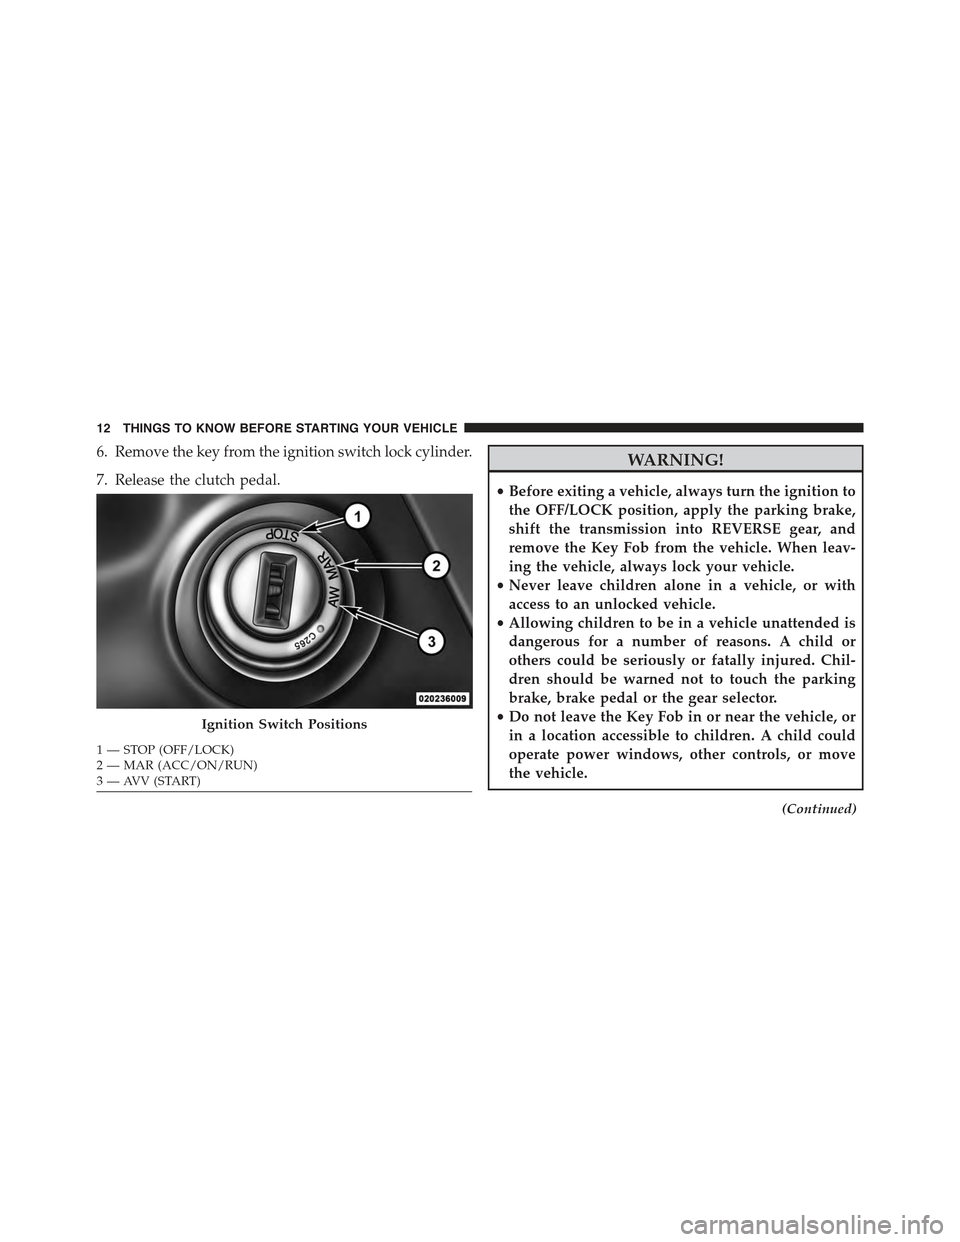
6. Remove the key from the ignition switch lock cylinder.
7. Release the clutch pedal.
WARNING!
•Before exiting a vehicle, always turn the ignition to
the OFF/LOCK position, apply the parking brake,
shift the transmission into REVERSE gear, and
remove the Key Fob from the vehicle. When leav-
ing the vehicle, always lock your vehicle.
•Never leave children alone in a vehicle, or with
access to an unlocked vehicle.
•Allowing children to be in a vehicle unattended is
dangerous for a number of reasons. A child or
others could be seriously or fatally injured. Chil-
dren should be warned not to touch the parking
brake, brake pedal or the gear selector.
•Do not leave the Key Fob in or near the vehicle, or
in a location accessible to children. A child could
operate power windows, other controls, or move
the vehicle.
(Continued)
Ignition Switch Positions
1—STOP(OFF/LOCK)2—MAR(ACC/ON/RUN)3—AVV(START)
12 THINGS TO KNOW BEFORE STARTING YOUR VEHICLE
Page 19 of 426
Opening Power Top Remote Function:
1.OPEN— Push and hold the unlock button down on
the key fob for a minimum of three seconds to initiate
Power Top Open. The roof will stop opening when-
ever the unlock button on the key fob is released, or
when it reaches the spoiler position
NOTE:If your power convertible top does not open with
the remote, please refer to the#Power Convertible Top
Relearn Procedure” in “Understanding The Features Of
Your Vehicle” for additional information.
WARNING!
Failure to follow these warnings can result in injuries
that are serious or fatal to you, your passengers, and
others around you:
(Continued)
WARNING!(Continued)
•Before operating the power top, make sure that no
moving parts of the convertible top can injure a
person or animal.
•Never place any extremities (hands, feet, etc.) near
the convertible top components, the upper wind-
shield area, the shelf area behind the rear seats, or
the convertible top stowage area while raising or
lowering the convertible top.
•When using the power top button on RKE trans-
mitter, if potential danger exists while lowering the
top, release the button immediately to interrupt the
operation.
•Only drive the vehicle with the convertible top
completely closed and latched or fully lowered into
its stowage compartment.
•Do not operate the power top when the vehicle is in
motion.
2
THINGS TO KNOW BEFORE STARTING YOUR VEHICLE 17
Page 31 of 426
After the sequence completes, the Seat Belt Reminder
Light remains illuminated until the respective seat belts
are buckled. The driver should instruct all other occu-
pants to buckle their seat belts. If an outboard front seat
belt is unbuckled while traveling at speeds greater than
5 mph (8 km/h), BeltAlert will provide both audio and
visual notification.
The outboard front passenger seat BeltAlert is not active
when the outboard front passenger seat is unoccupied.
BeltAlert may be triggered when an animal or heavy
object is on the outboard front passenger seat or when the
seat is folded flat (if equipped). It is recommended that
pets be restrained in the rear seat (if equipped) in pet
harnesses or pet carriers that are secured by seat belts,
and cargo is properly stowed.
BeltAlert can be activated or deactivated by your autho-
rized dealer. Chrysler Group LLC does not recommend
deactivating BeltAlert.
NOTE:If BeltAlert has been deactivated, the Seat Belt
Reminder Light will continue to illuminate while the
driver ’s or outboard front passenger ’s (if equipped with
BeltAlert) seat belt remains unbuckled.
Lap/Shoulder Belts
All seating positions in your vehicle are equipped with
lap/shoulder belts.
The seat belt webbing retractor will lock only during very
sudden stops or collisions. This feature allows the shoul-
der part of the seat belt to move freely with you under
normal conditions. However, in a collision the seat belt
will lock and reduce your risk of striking the inside of the
vehicle or being thrown out of the vehicle.
2
THINGS TO KNOW BEFORE STARTING YOUR VEHICLE 29
Page 33 of 426
WARNING!(Continued)
•A lap belt worn too high can increase the risk of
injury in a collision. The seat belt forces won’t be at
the strong hip and pelvic bones, but across your
abdomen. Always wear the lap part of your seat
belt as low as possible and keep it snug.
•A twisted seat belt may not protect you properly. In
a collision, it could even cut into you. Be sure the
seat belt is flat against your body, without twists. If
you can’t straighten a seat belt in your vehicle, take
it to your authorized dealer immediately and have
it fixed.
•A seat belt that is buckled into the wrong buckle
will not protect you properly. The lap portion could
ride too high on your body, possibly causing inter-
nal injuries. Always buckle your seat belt into the
buckle nearest you.
(Continued)
WARNING!(Continued)
•A seat belt that is too loose will not protect you
properly. In a sudden stop, you could move too far
forward, increasing the possibility of injury. Wear
your seat belt snugly.
•A seat belt that is worn under your arm is danger-
ous. Your body could strike the inside surfaces of
the vehicle in a collision, increasing head and neck
injury. A seat belt worn under the arm can cause
internal injuries. Ribs aren’t as strong as shoulder
bones. Wear the seat belt over your shoulder so that
your strongest bones will take the force in a colli-
sion.
(Continued)
2
THINGS TO KNOW BEFORE STARTING YOUR VEHICLE 31
Page 62 of 426
WARNING!
•Improper installation can lead to failure of an
infant or child restraint. It could come loose in a
collision. The child could be badly injured or
killed. Follow the child restraint manufacturer ’s
directions exactly when installing an infant or
child restraint.
•After a child restraint is installed in the vehicle, do
not move the vehicle seat forward or rearward
because it can loosen the child restraint attach-
ments. Remove the child restraint before adjusting
the vehicle seat position. When the vehicle seat has
been adjusted, reinstall the child restraint.
(Continued)
WARNING!(Continued)
•When your child restraint is not in use, secure it in
the vehicle with the seat belt or LATCH anchor-
ages, or remove it from the vehicle. Do not leave it
loose in the vehicle. In a sudden stop or accident, it
could strike the occupants or seatbacks and cause
serious personal injury.
Children Too Large For Booster Seats
Children who are large enough to wear the shoulder belt
comfortably, and whose legs are long enough to bend
over the front of the seat when their back is against the
seatback, should use the seat belt in a rear seat. Use this
simple 5-step test to decide whether the child can use the
vehicle’s seat belt alone:
1. Can the child sit all the way back against the back of
the vehicle seat?
60 THINGS TO KNOW BEFORE STARTING YOUR VEHICLE
Page 150 of 426
INSTRUMENT CLUSTER DESCRIPTIONS
1. Tire Pressure Monitoring Telltale Light — If Equipped
Each tire, including the spare (if provided),
should be checked monthly when cold and
inflated to the inflation pressure recommended
by the vehicle manufacturer on the vehicle
placard or tire inflation pressure label. (If your vehicle
has tires of a different size than the size indicated on the
vehicle placard or tire inflation pressure label, you should
determine the proper tire inflation pressure for those
tires.)
As an added safety feature, your vehicle has been
equipped with a Tire Pressure Monitoring System
(TPMS) that illuminates a low tire pressure telltale when
one or more of your tires is significantly under-inflated.
Accordingly, when the low tire pressure telltale illumi-
nates, you should stop and check your tires as soon as
possible, and inflate them to the proper pressure. Driving
on a significantly under-inflated tire causes the tire to
overheat and can lead to tire failure. Under-inflation also
reduces fuel efficiency and tire tread life, and may affect
the vehicle’s handling and stopping ability.
Please note that the TPMS is not a substitute for proper
tire maintenance, and it is the driver ’s responsibility to
maintain correct tire pressure, even if under-inflation has
not reached the level to trigger illumination of the TPMS
low tire pressure telltale.
Your vehicle has also been equipped with a TPMS
malfunction indicator to indicate when the system is not
operating properly. The TPMS malfunction indicator is
combined with the low tire pressure telltale. When the
system detects a malfunction, the telltale will flash for
approximately one minute and then remain continuously
illuminated. This sequence will continue upon subse-
quent vehicle start-ups as long as the malfunction exists.
When the malfunction indicator is illuminated, the sys-
tem may not be able to detect or signal low tire pressure
148 UNDERSTANDING YOUR INSTRUMENT PANEL
Page 161 of 426
23. Generic Warning Light
The Generic Warning Light will illuminate if
any of the following conditions occur: Oil
Change Request, Engine Oil Pressure Sensor
Failure, External Light Failure, Fuel Cut-Off
Intervention, Fuel Cut-Off Not Available, Parking Sensor
Failure.
24. Cruise On Indicator — If Equipped
This light will turn on when the electronic
speed control is ON. For further information,
refer to “Electronic Speed Control” in “Under-
standing Your Instrument Panel.”
25. Charging System Light
This light shows the status of the electrical charg-
ing system. The light should come on when the
ignition switch is first turned to ON/RUN and remain on
briefly as a bulb check. If the light stays on or comes on
while driving, turn off some of the vehicle’s non-essential
electrical devices or increase engine speed (if at idle). If
the charging system light remains on, it means that the
vehicle is experiencing a problem with the charging
system. Obtain SERVICE IMMEDIATELY. See an autho-
rized dealer.
If jump starting is required, refer to “Jump Starting
Procedures” in “What To Do In Emergencies.”
26. Electronic Throttle Control (ETC) Light
This light informs you of a problem with the
Electronic Throttle Control (ETC) system. If a
problem is detected, the light will come on
while the engine is running. Cycle the ignition
key when the vehicle has completely stopped and the
shift lever is placed in the NEUTRAL position. The light
should turn off. If the light remains lit with the engine
running, your vehicle will usually be drivable. However,
see an authorized dealer for service as soon as possible. If
4
UNDERSTANDING YOUR INSTRUMENT PANEL 159
Page 162 of 426
the light is flashing when the engine is running, imme-
diate service is required and you may experience reduced
performance, an elevated/rough idle or engine stall and
your vehicle may require towing. The light will come on
when the ignition is first turned to ON/RUN and remain
on briefly as a bulb check. If the light does not come on
during starting, have the system checked by an autho-
rized dealer.
27. Oil Pressure Warning Light
This light indicates low engine oil pressure. The
light should turn on momentarily when the engine is
started. If the light turns on while driving, stop the
vehicle and shut off the engine as soon as possible. A
chime will sound for four minutes when this light turns
on.
Do not operate the vehicle until the cause is corrected.
This light does not indicate how much oil is in the engine.
The engine oil level must be checked under the hood.
28. Engine Temperature Warning Light
This light warns of an overheated engine condi-
tion. The engine coolant temperature indicator
will illuminate and a single chime will sound after
reaching a set threshold.
If the light turns on while driving, safely pull over and
stop the vehicle. If the A/C system is on, turn it off. Also,
shift the transmission into NEUTRAL and idle the ve-
hicle. If the temperature reading does not return to
normal, turn the engine off immediately and call for
service. Refer to “If Your Engine Overheats” in “What To
Do In Emergencies” for further information.
160 UNDERSTANDING YOUR INSTRUMENT PANEL
Page 182 of 426
Hill Start Assist
This function is used when starting a vehicle from a stop
on a hill. Hill Start Assist maintains the same level of
brake pressure the driver applied for a short period of
time after the foot has been removed from the brake
pedal.
Proceed as follows to switch this function on or off:
1. Briefly push and release theMENUbutton. Push and
release the UPor DOWNbutton to highlight
the Hill Start Assist. Push and release theMENU
button to enter the Hill Start AssistMENU.
2. Push and release the UPor DOWNbutton for
setting.
3. Briefly push and release theMENUbutton to go back
to the menu screen, or push and hold the button
(approximately one second) to go back to the main
screen without storing the settings.
Tire Pressure
This function will be used to display the tire pressures
individually for all four tires by location.
Proceed as follows:
1. Briefly push and release theMENUbutton. Push and
release the UPor DOWNbutton to highlight
the Tire Pressure. Push and release theMENU
button to enter the Tire PressureMENU.
2. Push and release the UP or DOWN button to scroll
through all four tire pressure value locations.
3. Briefly push and release theMENUbutton to go back
to the menu screen, or push and hold the button
(approximately one second) to go back to the main
screen.
180 UNDERSTANDING YOUR INSTRUMENT PANEL