engine FIAT 500 ABARTH 2015 2.G Owner's Manual
[x] Cancel search | Manufacturer: FIAT, Model Year: 2015, Model line: 500 ABARTH, Model: FIAT 500 ABARTH 2015 2.GPages: 108, PDF Size: 2.63 MB
Page 64 of 108
IF YOUR ENGINE OVERHEATS
In any of the following situations, you can reduce the potential for overheating by
taking the appropriate action:
• On the highways — slow down.
• In city traffic — while stopped, shift transmission into NEUTRAL, but do not in-
crease engine idle speed.
NOTE:There are steps that you can take to slow down an overheat condition:
• If your air conditioner (A/C) is on, turn it off. The A/C system adds heat to the en-
gine cooling system and turning the A/C off can help remove this heat.
• You can also turn the Temperature control to maximum heat, the Mode control to
floor and the Fan control to high. This allows the heater core to act as a supple-
ment to the radiator and aids in removing heat from the engine cooling system.
• If the temperature reading does not return to normal, turn the engine off immedi-
ately.
• We recommend that you do not operate the vehicle or engine damage will occur.
Have the vehicle serviced immediately.
CAUTION!
Driving with a hot cooling system could damage your vehicle. If the temperature
gauge reads hot, pull over and stop the vehicle. Idle the vehicle with the air condi-
tioner turned off until the pointer drops back into the normal range. If the pointer
remains on hot, turn the engine off immediately and call for service.
WARNING!
You or others can be badly burned by hot engine coolant (antifreeze) or steam
from your radiator. If you see or hear steam coming from under the hood, do not
open the hood until the radiator has had time to cool. Never try to open a cooling
system pressure cap when the radiator or coolant bottle is hot.
WHAT TO DO IN EMERGENCIES
62
Page 67 of 108
(B) Setting Up To Use Tire Service Kit:
1. Turn the Mode Select Knob (5) to the Sealant Mode position.
2. Uncoil the Sealant Hose (6) and then remove the cap from the fitting at the end
of the hose.
3. Place the Tire Service Kit flat on the ground next to the deflated tire.
4. Remove the cap from the valve stem and then screw the fitting at the end of the
Sealant Hose (6) onto the valve stem.
5. Uncoil the Power Plug (8) and insert the plug into the vehicle’s 12 Volt power
outlet.
6. Do not remove foreign objects (e.g., screws or nails) from the tire.
(C) Injecting Tire Service Kit Sealant Into The Deflated Tire:
Always start the engine before turning ON the Tire Service Kit.
NOTE:
Manual transmission vehicles must have the parking brake engaged and the shift lever in
NEUTRAL.
After pressing the Power Button (4), the sealant (white fluid) will flow from the Seal-
ant Bottle (1) through the Sealant Hose (6) and into the tire.
NOTE:
Sealant may leak out through the puncture in the tire.
If the sealant (white fluid) does not flow within 0 – 10seconds through
the Sealant Hose (6):
1. Press the Power Button (4) to turn Off the Tire Service Kit. Disconnect the Seal-
ant Hose (6) from the valve stem. Make sure the valve stem is free of debris. Re-
connect the Sealant Hose (6) to the valve stem. Check that the Mode Select
Knob (5) is in the Sealant Mode position and not Air Mode. Press the Power But-
ton (4) to turn On the Tire Service Kit.
2. Connect the Power Plug (8) to a different 12 Volt power outlet in your vehicle or
another vehicle, if available. Make sure the engine is running before turning ON
the Tire Service Kit.
3. The Sealant Bottle (1) may be empty due to previous use. Call for assistance.
WHAT TO DO IN EMERGENCIES
65
Page 71 of 108
JUMP-STARTING PROCEDURE
• If your vehicle has a discharged battery, it can be jump-started using a set of
jumper cables and a battery in another vehicle or by using a portable battery
booster pack. Jump-starting can be dangerous if done improperly so please fol-
low the procedures in this section carefully.
NOTE:When using a portable battery booster pack, follow the manufacturer’s operating instruc-tions and precautions.
Preparations For Jump-Start
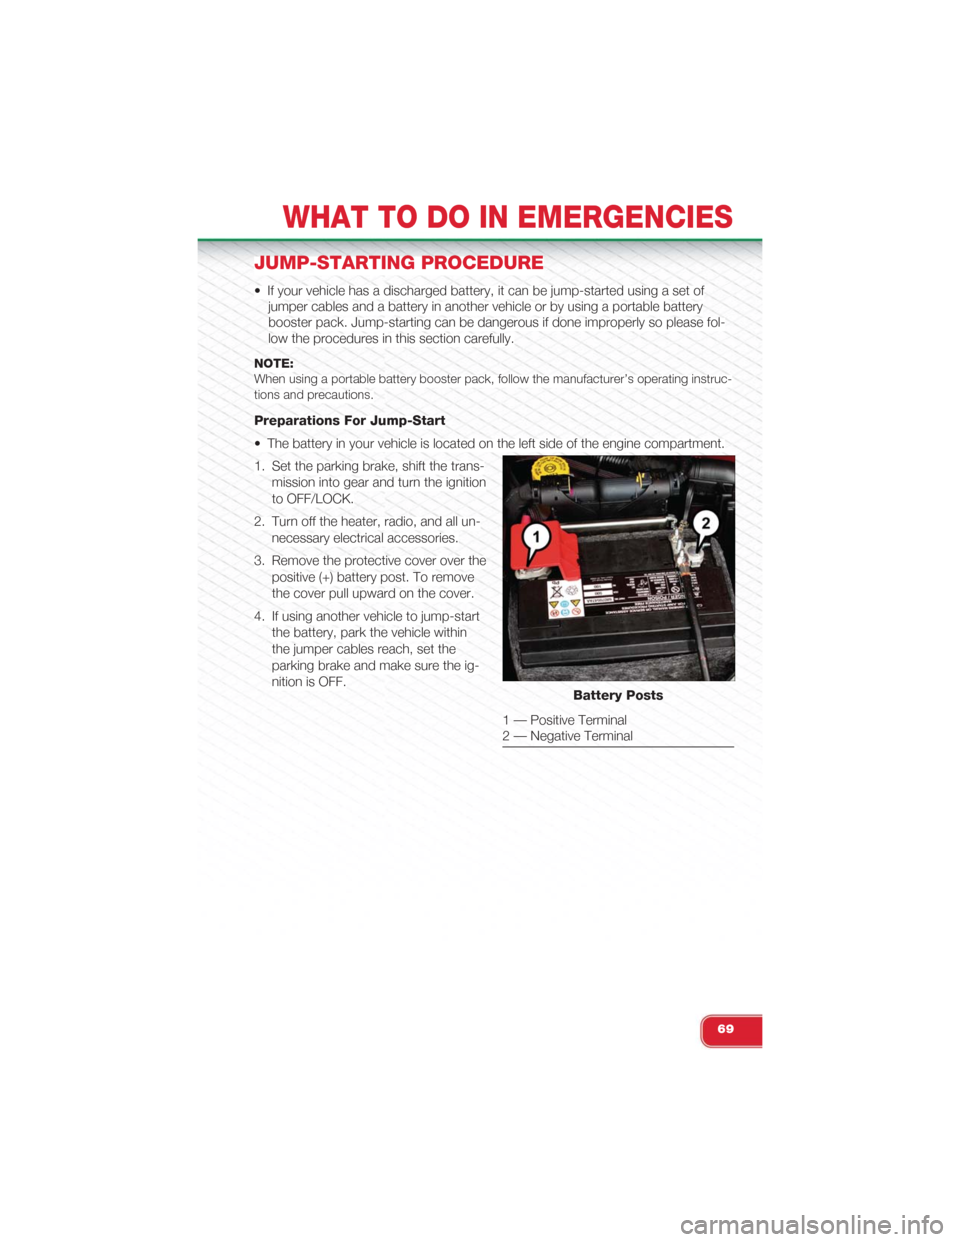
• The battery in your vehicle is located on the left side of the engine compartment.
1. Set the parking brake, shift the trans-
mission into gear and turn the ignition
to OFF/LOCK.
2. Turn off the heater, radio, and all un-
necessary electrical accessories.
3. Remove the protective cover over the
positive (+) battery post. To remove
the cover pull upward on the cover.
4. If using another vehicle to jump-start
the battery, park the vehicle within
the jumper cables reach, set the
parking brake and make sure the ig-
nition is OFF.Battery Posts
1 — Positive Terminal2 — Negative Terminal
WHAT TO DO IN EMERGENCIES
69
Page 72 of 108
Jump-Starting Procedure
1. Connect the positive(+)end of the jumper cable to the positive(+)post of the
vehicle with the discharged battery.
2. Connect the opposite end of the positive(+)jumper cable to the positive(+)post
of the booster battery.
3. Connect the negative end(-)of the jumper cable to the negative(-)post of the
booster battery.
4. Connect the opposite end of the negative(-)jumper cable to a good engine
ground (exposed metal part of the discharged vehicles engine) away from the
battery and the fuel injection system.
5. Start the engine in the vehicle that has the booster battery, let the engine idle a
few minutes, and then start the engine in the vehicle with the discharged battery.
Once the engine is started, remove the jumper cables in the reverse sequence:
1. Disconnect the negative(-)jumper cable from the engine ground(-)of the ve-
hicle with the discharged battery.
2. Disconnect the negative end(-)of the jumper cable from the negative(-)post of
the booster battery.
3. Disconnect the opposite end of the positive(+)jumper cable from the positive
(+)post of the booster battery.
4. Disconnect the positive(+)end of the jumper cable from the positive(+)post of
the vehicle with the discharged battery.
• If frequent jump-starting is required to start your vehicle, you should have the bat-
tery and charging system inspected at your authorized dealer.
CAUTION!
• Accessories that can be plugged into the vehicle power outlets draw power
from the vehicle’s battery, even when not in use (i.e., cellular phones, etc.).
Eventually, if plugged in long enough, the vehicle’s battery will discharge suf-
ficiently to degrade battery life and/or prevent the engine from starting.
• Do not use a portable battery booster pack or any other booster source with
a system voltage greater than 12 Volts or damage to the battery, starter mo-
tor, alternator or electrical system may occur.
• Failure to follow these procedures could result in damage to the charging
system of the booster vehicle or the discharged vehicle.
WHAT TO DO IN EMERGENCIES
70
Page 75 of 108
ENHANCED ACCIDENT RESPONSE SYSTEM
In the event of an impact causing air bag deployment, if the communication network
remains intact, and the power remains intact, depending on the nature of the event
the Occupant Restraint Controller (ORC) will determine whether to have the En-
hanced Accident Response System perform the following functions:
• Cut off fuel to the engine.
• Flash hazard lights as long as the battery has power or until the ignition key is
turned off.
• Turn on the interior lights, which remain on as long as the battery has power or
until the ignition key is removed.
• Unlock the doors automatically.
After the event occurs, when the system is active, the message "Fuel Cutoff See
Handbook" is displayed.
Carefully check the vehicle for fuel leaks in the engine compartment and on the
ground near the engine compartment and fuel tank before resetting the system and
starting the engine.
NOTE:In order to start the engine and move the vehicle to a safe location after an impact, theSystem Reset Procedure must be completed.
System Reset Procedure
After an impact causing air bag deployment, the left and right turn signal lights, located in
the instrument panel cluster, will both be blinking until the ignition is turned off.
WHAT TO DO IN EMERGENCIES
73
Page 76 of 108
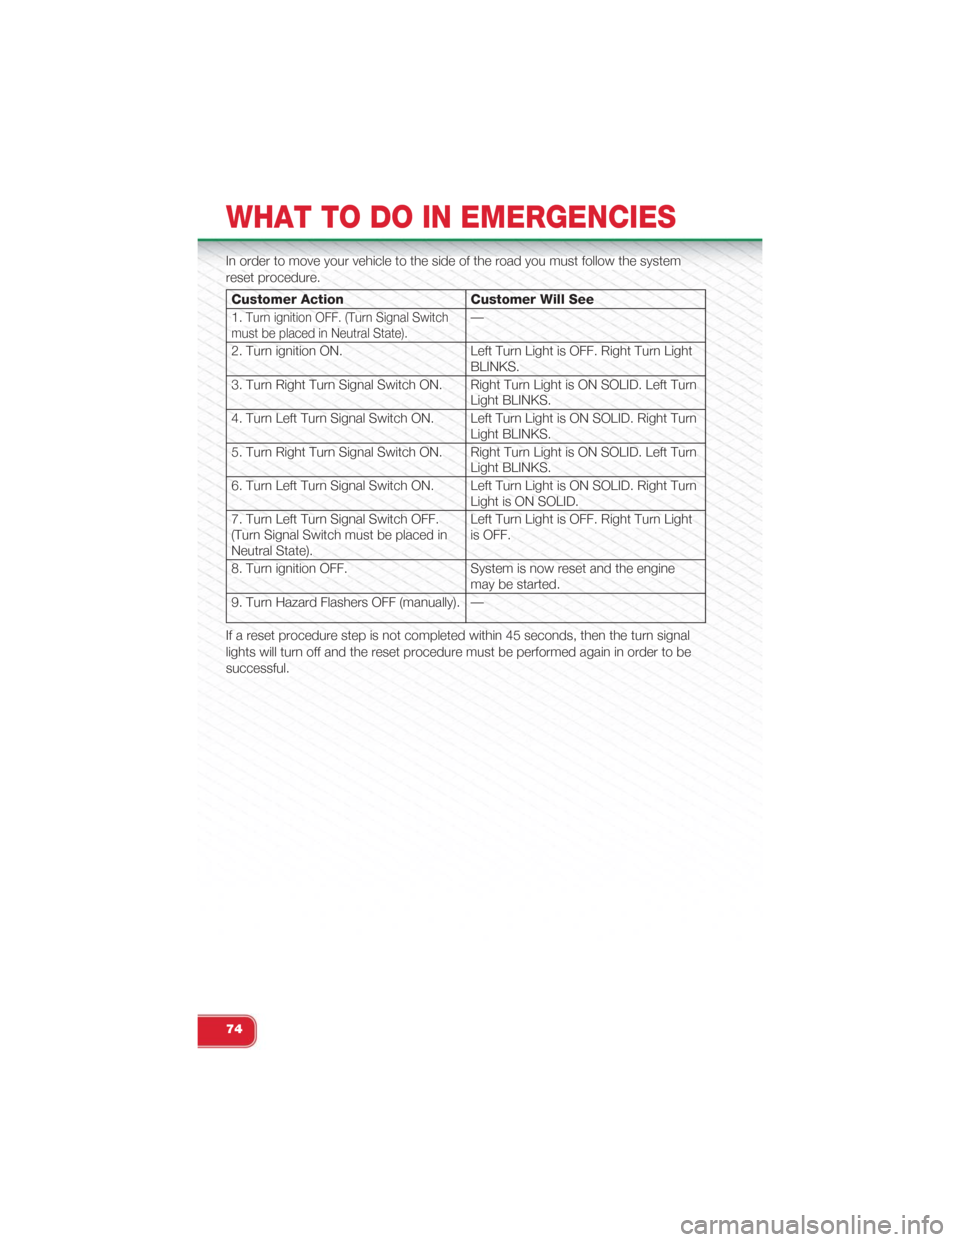
In order to move your vehicle to the side of the road you must follow the system
reset procedure.
Customer Action Customer Will See
1.Turn ignition OFF. (Turn Signal Switchmust be placed in Neutral State).—
2. Turn ignition ON. Left Turn Light is OFF. Right Turn LightBLINKS.
3. Turn Right Turn Signal Switch ON. Right Turn Light is ON SOLID. Left TurnLight BLINKS.
4. Turn Left Turn Signal Switch ON. Left Turn Light is ON SOLID. Right TurnLight BLINKS.
5. Turn Right Turn Signal Switch ON. Right Turn Light is ON SOLID. Left TurnLight BLINKS.
6. Turn Left Turn Signal Switch ON. Left Turn Light is ON SOLID. Right TurnLight is ON SOLID.
7. Turn Left Turn Signal Switch OFF.(Turn Signal Switch must be placed inNeutral State).
Left Turn Light is OFF. Right Turn Lightis OFF.
8. Turn ignition OFF. System is now reset and the enginemay be started.
9. Turn Hazard Flashers OFF (manually). —
If a reset procedure step is not completed within 45 seconds, then the turn signal
lights will turn off and the reset procedure must be performed again in order to be
successful.
WHAT TO DO IN EMERGENCIES
74
Page 77 of 108
FREEING A STUCK VEHICLE
• If your vehicle becomes stuck in mud, sand or snow, it can often be moved by a
rocking motion. Turn your steering wheel right and left to clear the area around
the front wheels. Then shift back and forth between 2nd gear and REVERSE.
Using minimal accelerator pedal pressure to maintain the rocking motion, without
spinning the wheels, is most effective.
NOTE:If your vehicle is equipped with Traction Control or Electronic Stability Control (ESC), turnthe system OFF before attempting to “rock” the vehicle.
CAUTION!
• Racing the engine or spinning the wheels may lead to transmission overheat-
ing and failure. Allow the engine to idle with the shift lever in NEUTRAL for at
least one minute after every five rocking-motion cycles. This will minimize
overheating and reduce the risk of transmission failure during prolonged ef-
forts to free a stuck vehicle.
•When “rocking” a stuck vehicle by moving between 1st and REVERSE, do not
spin the wheels faster than 15 mph (24 km/h), or drivetrain damage may result.
• Revving the engine or spinning the wheels too fast may lead to transmission
overheating and failure. It can also damage the tires. Do not spin the wheels
above 30 mph (48 km/h) while in gear (no transmission shifting occurring).
WARNING!
Fast spinning tires can be dangerous. Forces generated by excessive wheel
speeds may cause tire damage or failure. A tire could explode and injure some-
one. Do not spin your vehicle's wheels faster than 30 mph (48 km/h) when you
are stuck. Do not let anyone near a spinning wheel, no matter what the speed.
WHAT TO DO IN EMERGENCIES
75
Page 80 of 108
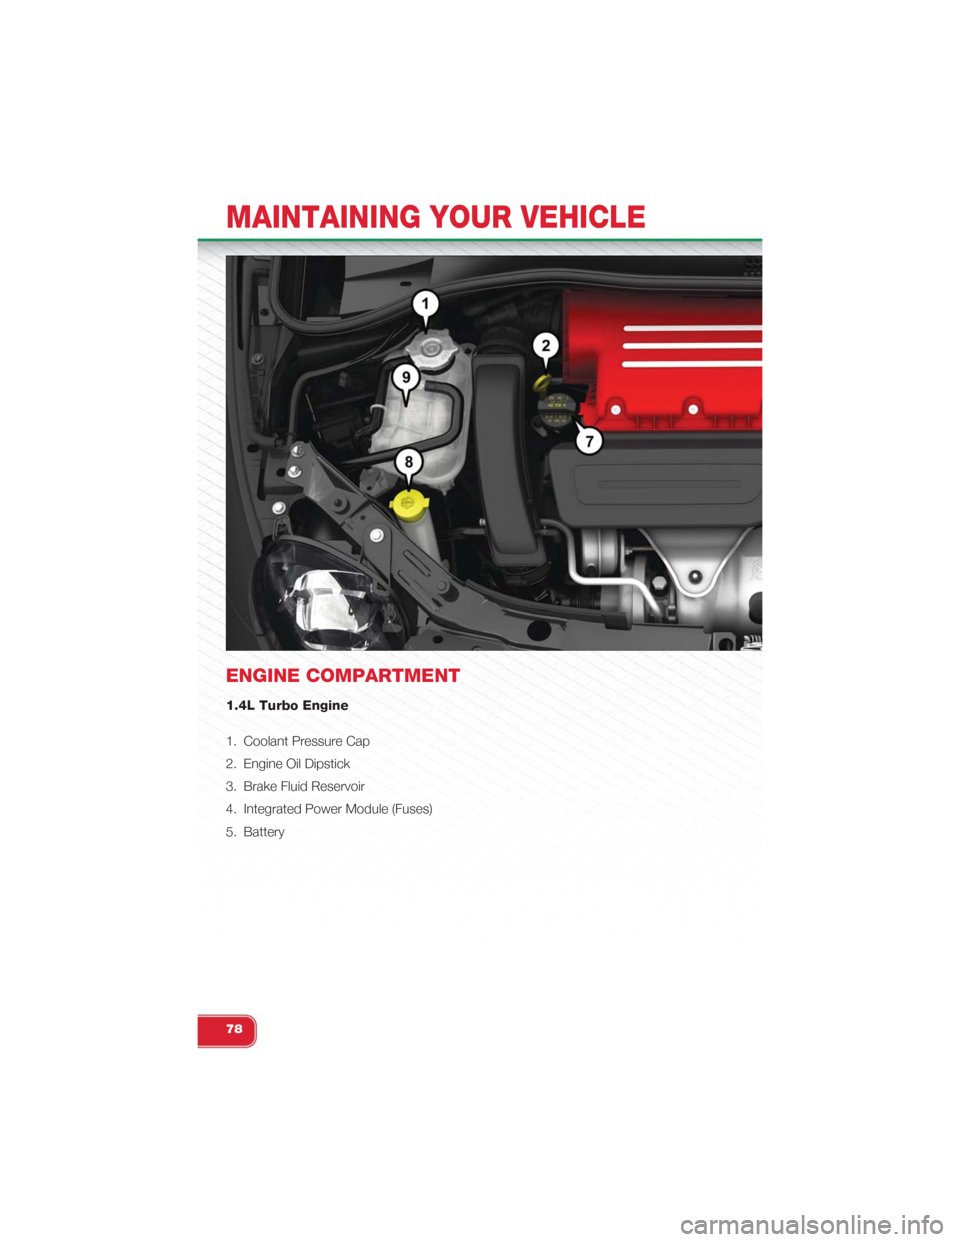
ENGINE COMPARTMENT
1.4L Turbo Engine
1. Coolant Pressure Cap
2. Engine Oil Dipstick
3. Brake Fluid Reservoir
4. Integrated Power Module (Fuses)
5. Battery
MAINTAINING YOUR VEHICLE
78
Page 81 of 108
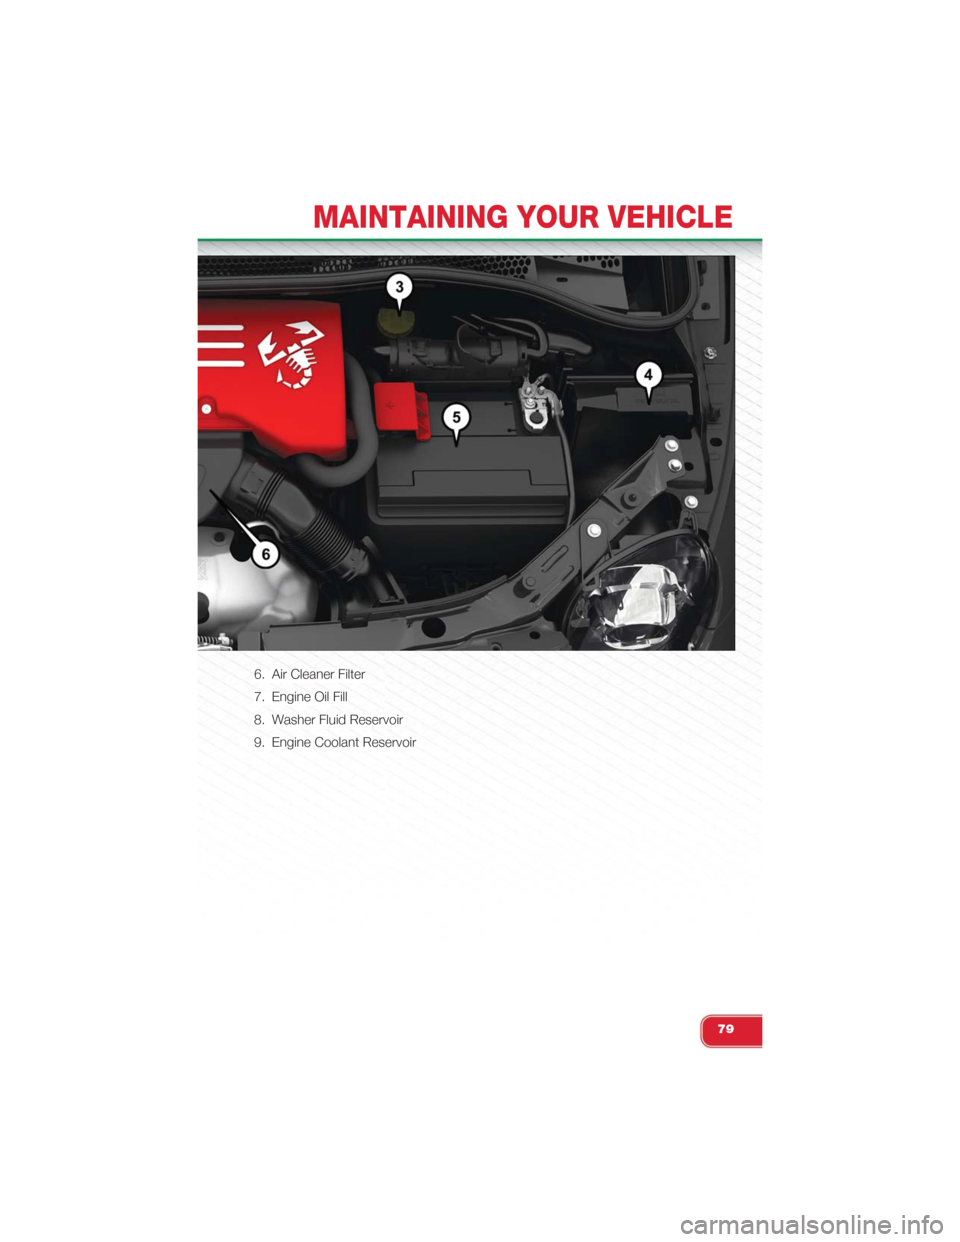
6. Air Cleaner Filter
7. Engine Oil Fill
8. Washer Fluid Reservoir
9. Engine Coolant Reservoir
MAINTAINING YOUR VEHICLE
79
Page 82 of 108
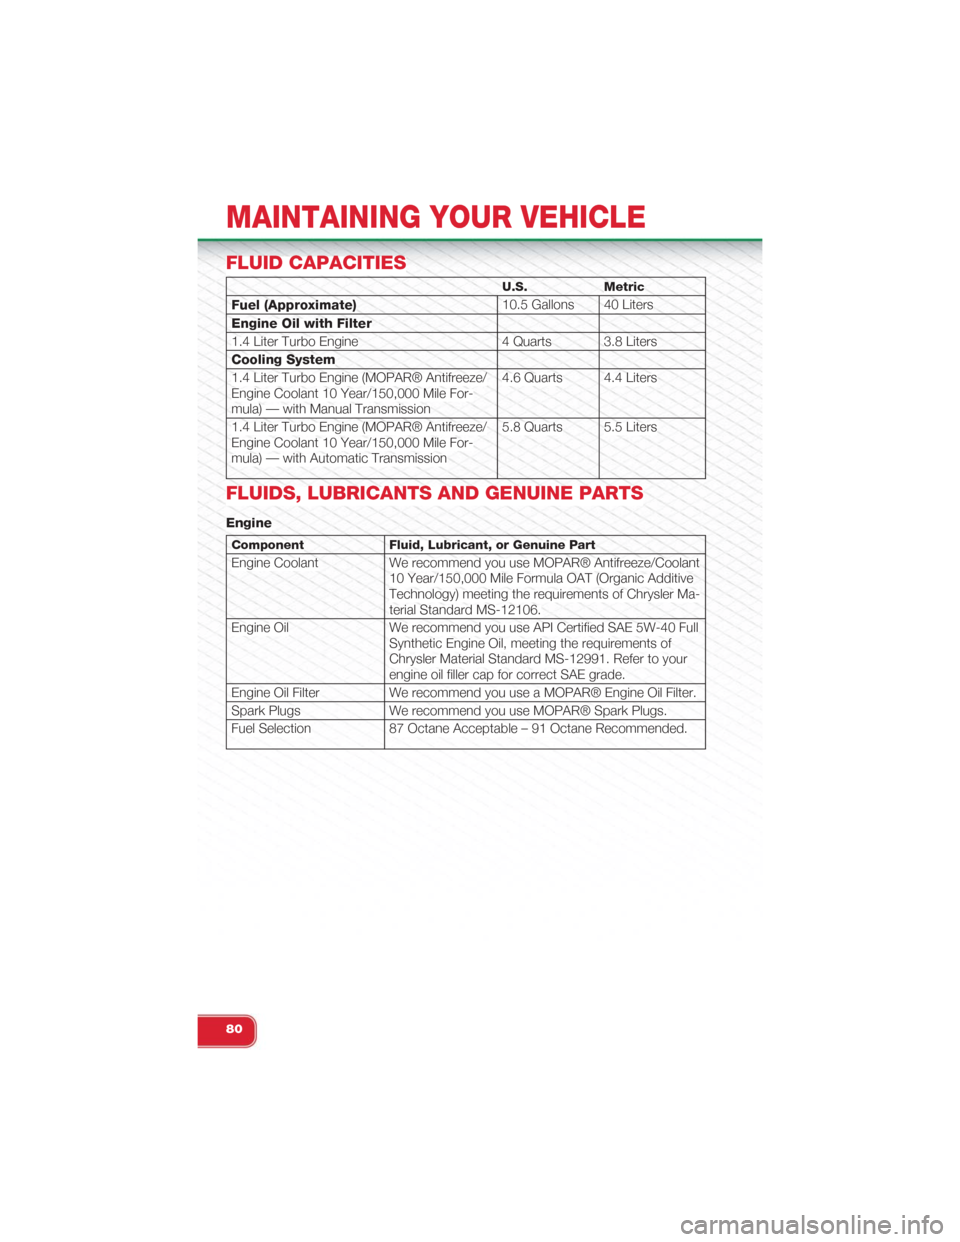
FLUID CAPACITIES
U.S. Metric
Fuel (Approximate)10.5 Gallons 40 Liters
Engine Oil with Filter
1.4 Liter Turbo Engine 4 Quarts 3.8 Liters
Cooling System
1.4 Liter Turbo Engine (MOPAR® Antifreeze/Engine Coolant 10 Year/150,000 Mile For-mula) — with Manual Transmission
4.6 Quarts 4.4 Liters
1.4 Liter Turbo Engine (MOPAR® Antifreeze/Engine Coolant 10 Year/150,000 Mile For-mula) — with Automatic Transmission
5.8 Quarts 5.5 Liters
FLUIDS, LUBRICANTS AND GENUINE PARTS
Engine
Component Fluid, Lubricant, or Genuine Part
Engine Coolant We recommend you use MOPAR® Antifreeze/Coolant10 Year/150,000 Mile Formula OAT (Organic AdditiveTechnology) meeting the requirements of Chrysler Ma-terial Standard MS-12106.
Engine Oil We recommend you use API Certified SAE 5W-40 FullSynthetic Engine Oil, meeting the requirements ofChrysler Material Standard MS-12991. Refer to yourengine oil filler cap for correct SAE grade.
Engine Oil Filter We recommend you use a MOPAR® Engine Oil Filter.
Spark Plugs We recommend you use MOPAR® Spark Plugs.
Fuel Selection 87 Octane Acceptable – 91 Octane Recommended.
MAINTAINING YOUR VEHICLE
80