wheel FIAT 500 ABARTH 2015 2.G Owner's Manual
[x] Cancel search | Manufacturer: FIAT, Model Year: 2015, Model line: 500 ABARTH, Model: FIAT 500 ABARTH 2015 2.GPages: 108, PDF Size: 2.63 MB
Page 46 of 108
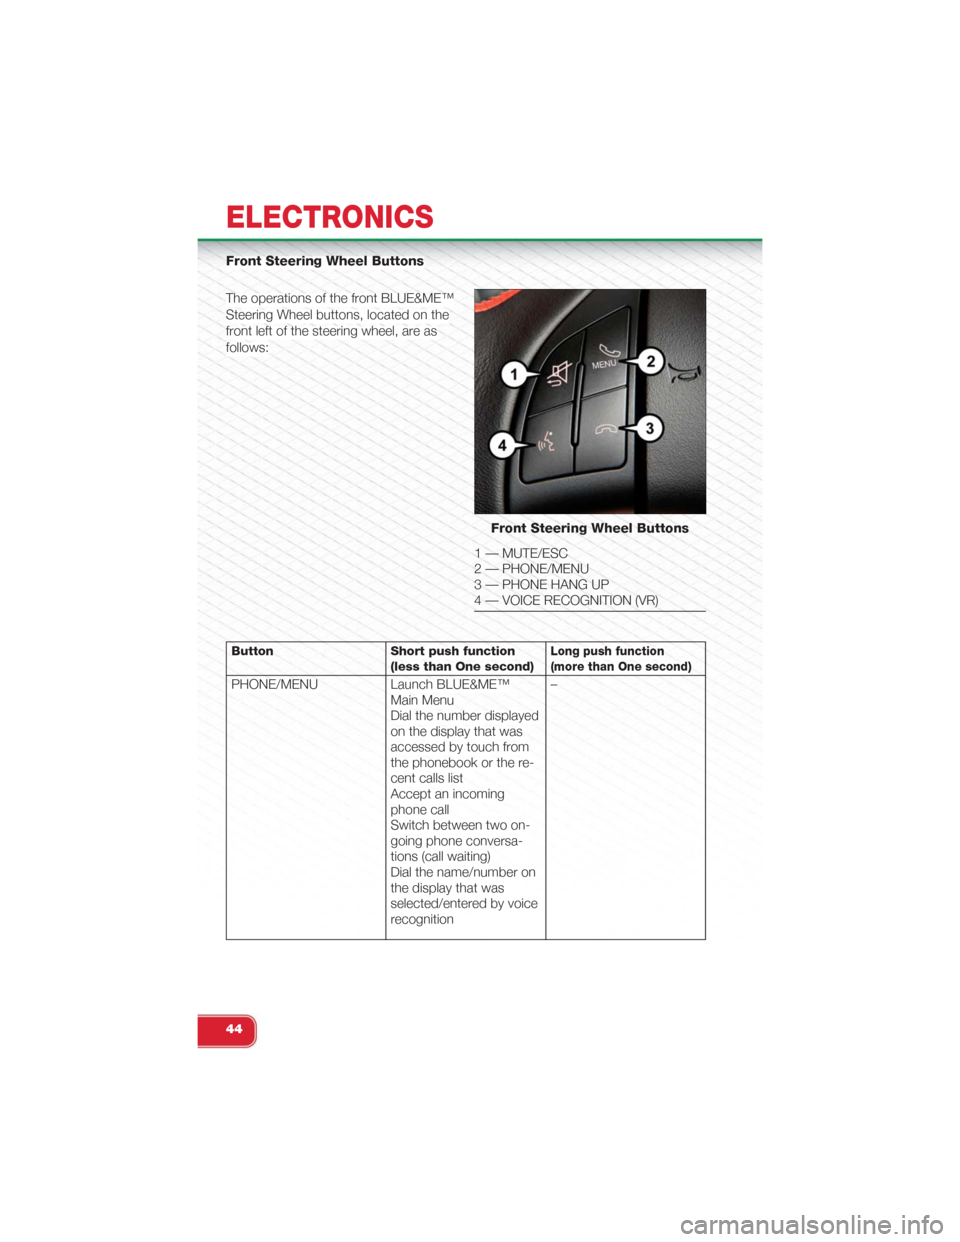
Front Steering Wheel Buttons
The operations of the front BLUE&ME™
Steering Wheel buttons, located on the
front left of the steering wheel, are as
follows:
Button Short push function(less than One second)Long push function(more than One second)
PHONE/MENU Launch BLUE&ME™Main MenuDial the number displayedon the display that wasaccessed by touch fromthe phonebook or the re-cent calls listAccept an incomingphone callSwitch between two on-going phone conversa-tions (call waiting)Dial the name/number onthe display that wasselected/entered by voicerecognition
–
Front Steering Wheel Buttons
1 — MUTE/ESC2 — PHONE/MENU3 — PHONE HANG UP4 — VOICE RECOGNITION (VR)
ELECTRONICS
44
Page 47 of 108
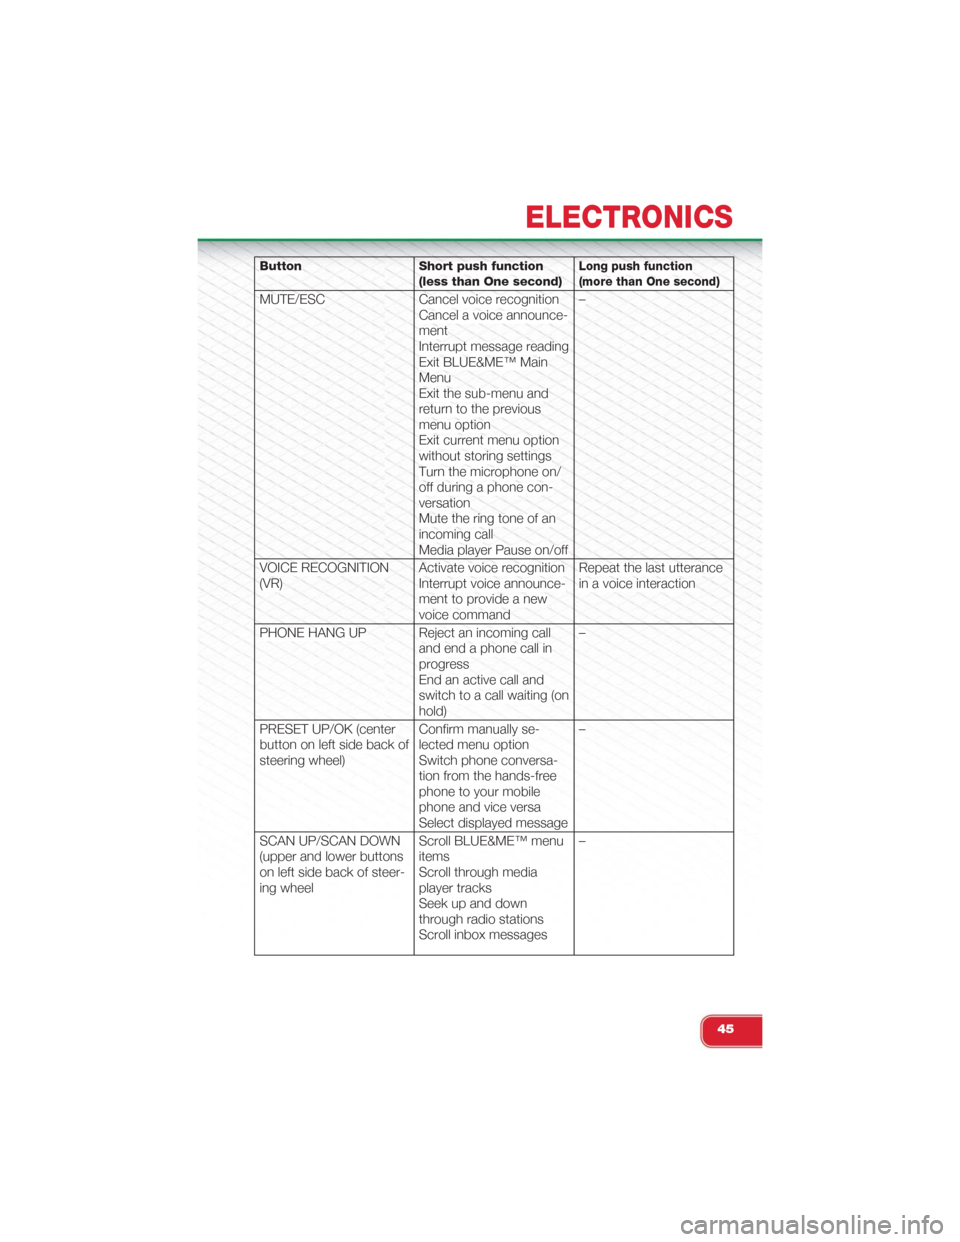
Button Short push function(less than One second)Long push function(more than One second)
MUTE/ESC Cancel voice recognitionCancel a voice announce-mentInterrupt message readingExit BLUE&ME™ MainMenuExit the sub-menu andreturn to the previousmenu optionExit current menu optionwithout storing settingsTurn the microphone on/off during a phone con-versationMute the ring tone of anincoming callMedia player Pause on/off
–
VOICE RECOGNITION(VR)Activate voice recognitionInterrupt voice announce-ment to provide a newvoice command
Repeat the last utterancein a voice interaction
PHONE HANG UP Reject an incoming calland end a phone call inprogressEnd an active call andswitch to a call waiting (onhold)
–
PRESET UP/OK (centerbutton on left side back ofsteering wheel)
Confirm manually se-lected menu optionSwitch phone conversa-tion from the hands-freephone to your mobilephone and vice versaSelect displayed message
–
SCAN UP/SCAN DOWN(upper and lower buttonson left side back of steer-ing wheel
Scroll BLUE&ME™ menuitemsScroll through mediaplayer tracksSeek up and downthrough radio stationsScroll inbox messages
–
ELECTRONICS
45
Page 48 of 108
BLUE&ME™ Hands-Free Communication
•To use the hands-free feature, you need a Bluetooth® wireless technology enabled
mobile phone. This hands-free feature gives you the possibility of interacting vocally
with your mobile phone while driving, even if your mobile device does not feature this
capability. You can also interact with your mobile phone manually and visually using
the steering wheel controls and the instrument panel Electronic Vehicle Information
Center (EVIC) display.
• To get started with BLUE&ME™ hands-free feature with voice recognition, you
have to simply pair your Bluetooth® wireless technology enabled mobile phone
with the system.
• Refer to the BLUE&ME™ User's Manual on the DVD for more details.
Pair Your Mobile Phone
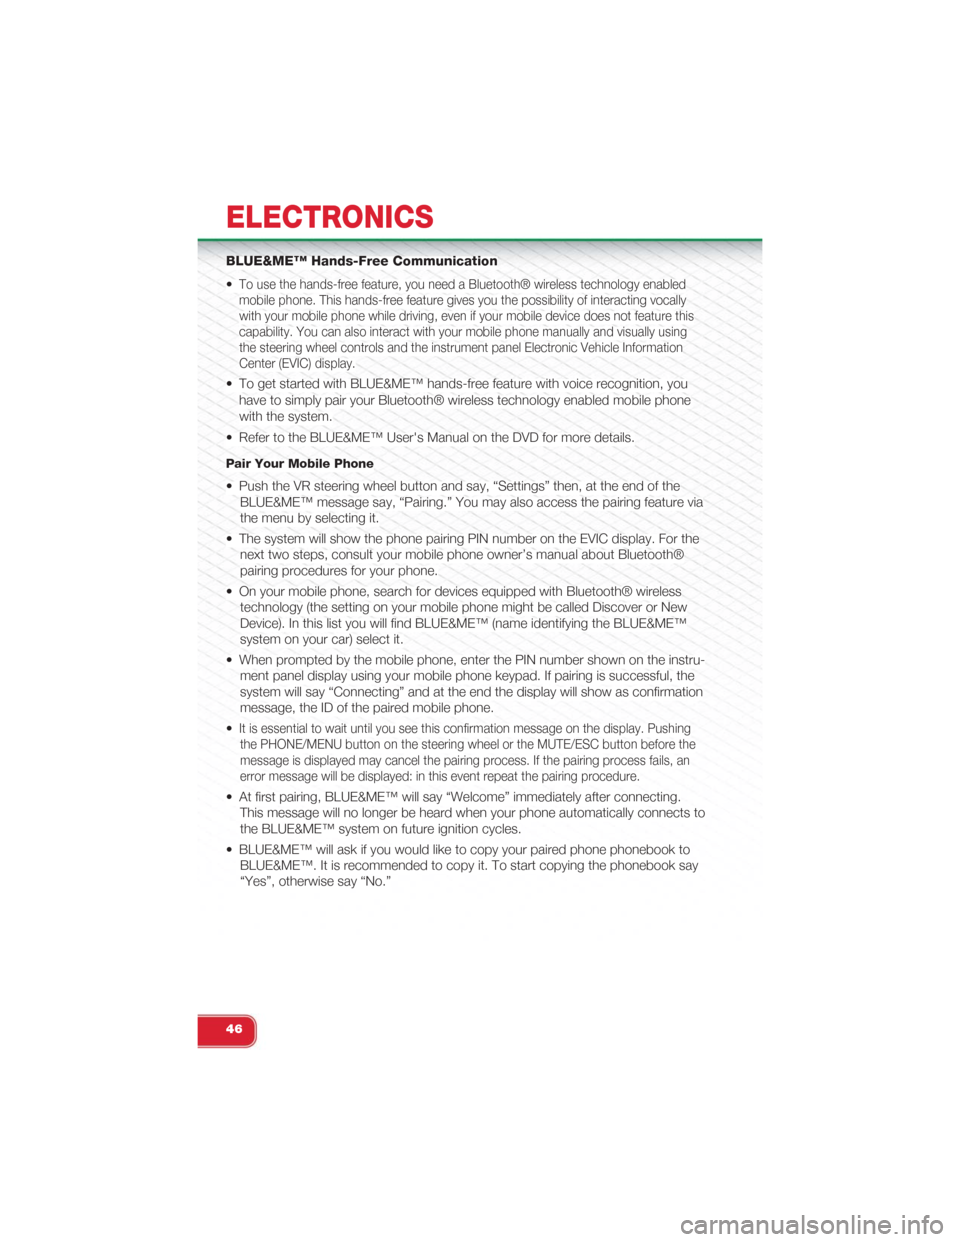
• Push the VR steering wheel button and say, “Settings” then, at the end of the
BLUE&ME™ message say, “Pairing.” You may also access the pairing feature via
the menu by selecting it.
• The system will show the phone pairing PIN number on the EVIC display. For the
next two steps, consult your mobile phone owner’s manual about Bluetooth®
pairing procedures for your phone.
• On your mobile phone, search for devices equipped with Bluetooth® wireless
technology (the setting on your mobile phone might be called Discover or New
Device). In this list you will find BLUE&ME™ (name identifying the BLUE&ME™
system on your car) select it.
• When prompted by the mobile phone, enter the PIN number shown on the instru-
ment panel display using your mobile phone keypad. If pairing is successful, the
system will say “Connecting” and at the end the display will show as confirmation
message, the ID of the paired mobile phone.
•It is essential to wait until you see this confirmation message on the display. Pushing
the PHONE/MENU button on the steering wheel or the MUTE/ESC button before the
message is displayed may cancel the pairing process. If the pairing process fails, an
error message will be displayed: in this event repeat the pairing procedure.
• At first pairing, BLUE&ME™ will say “Welcome” immediately after connecting.
This message will no longer be heard when your phone automatically connects to
the BLUE&ME™ system on future ignition cycles.
• BLUE&ME™ will ask if you would like to copy your paired phone phonebook to
BLUE&ME™. It is recommended to copy it. To start copying the phonebook say
“Yes”, otherwise say “No.”
ELECTRONICS
46
Page 49 of 108
• For certain mobile phones the phonebook is not copied automatically, in this case
you must transfer the phonebook contacts using your mobile phone keypad. If
BLUE&ME™ asks you to do this, then perform this procedure following the in-
structions specific to your mobile phone and push the PHONE/MENU button on
the steering wheel when you have finished. Certain mobile phones may require
you to indicate that you do not want to be asked every time to copy the phone-
book. If this is the case, this could be indicated by checking a box during on the
phone the pairing process. If applicable, this option will only be presented on the
phone during the pairing process.
Making A Phone Call
• Assume that “John Smith” is one of the contacts stored in your phonebook.
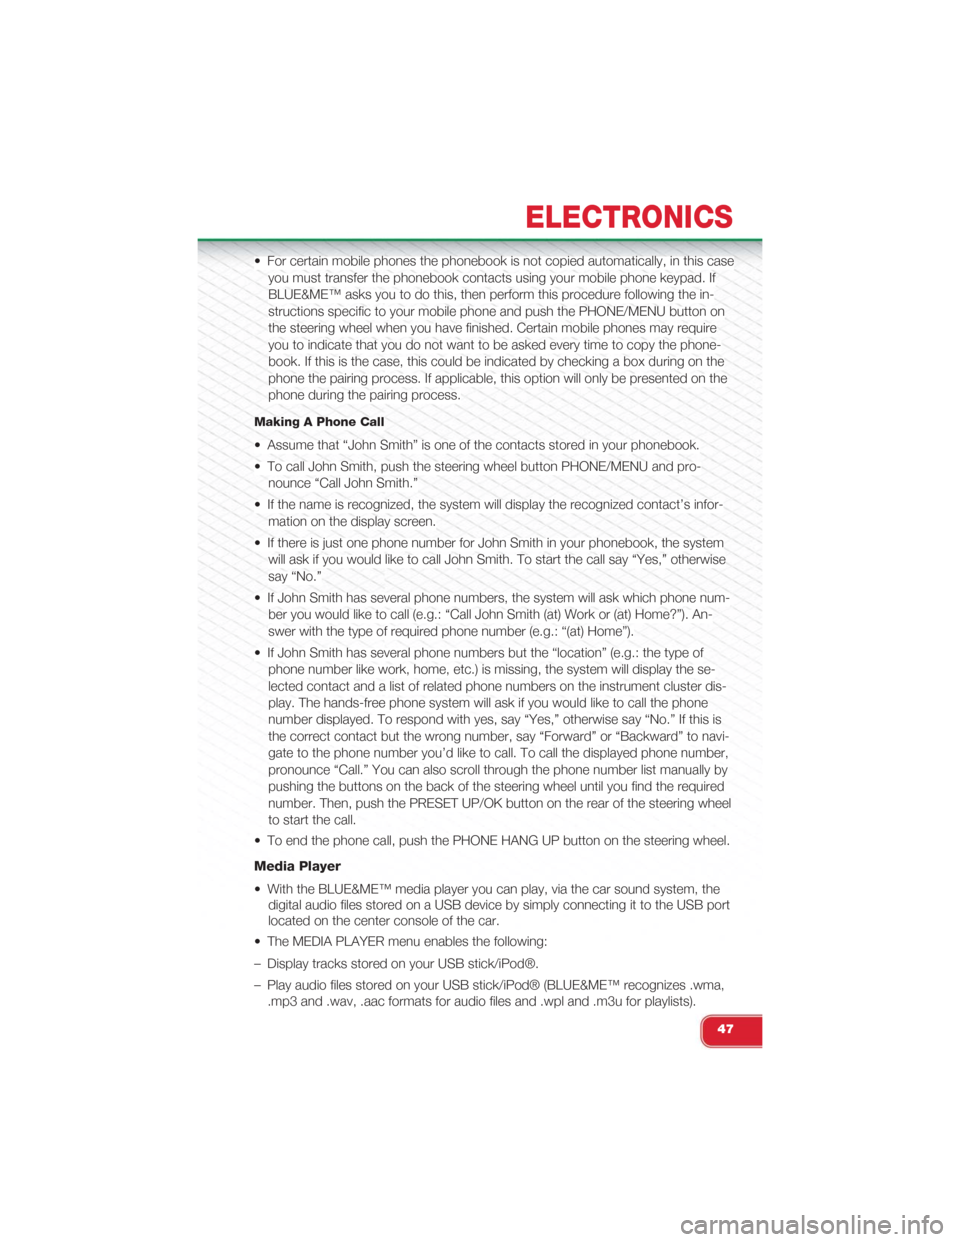
• To call John Smith, push the steering wheel button PHONE/MENU and pro-
nounce “Call John Smith.”
• If the name is recognized, the system will display the recognized contact’s infor-
mation on the display screen.
• If there is just one phone number for John Smith in your phonebook, the system
will ask if you would like to call John Smith. To start the call say “Yes,” otherwise
say “No.”
• If John Smith has several phone numbers, the system will ask which phone num-
ber you would like to call (e.g.: “Call John Smith (at) Work or (at) Home?”). An-
swer with the type of required phone number (e.g.: “(at) Home”).
• If John Smith has several phone numbers but the “location” (e.g.: the type of
phone number like work, home, etc.) is missing, the system will display the se-
lected contact and a list of related phone numbers on the instrument cluster dis-
play. The hands-free phone system will ask if you would like to call the phone
number displayed. To respond with yes, say “Yes,” otherwise say “No.” If this is
the correct contact but the wrong number, say “Forward” or “Backward” to navi-
gate to the phone number you’d like to call. To call the displayed phone number,
pronounce “Call.” You can also scroll through the phone number list manually by
pushing the buttons on the back of the steering wheel until you find the required
number. Then, push the PRESET UP/OK button on the rear of the steering wheel
to start the call.
• To end the phone call, push the PHONE HANG UP button on the steering wheel.
Media Player
• With the BLUE&ME™ media player you can play, via the car sound system, the
digital audio files stored on a USB device by simply connecting it to the USB port
located on the center console of the car.
• The MEDIA PLAYER menu enables the following:
– Display tracks stored on your USB stick/iPod®.
– Play audio files stored on your USB stick/iPod® (BLUE&ME™ recognizes .wma,
.mp3 and .wav, .aac formats for audio files and .wpl and .m3u for playlists).
ELECTRONICS
47
Page 50 of 108
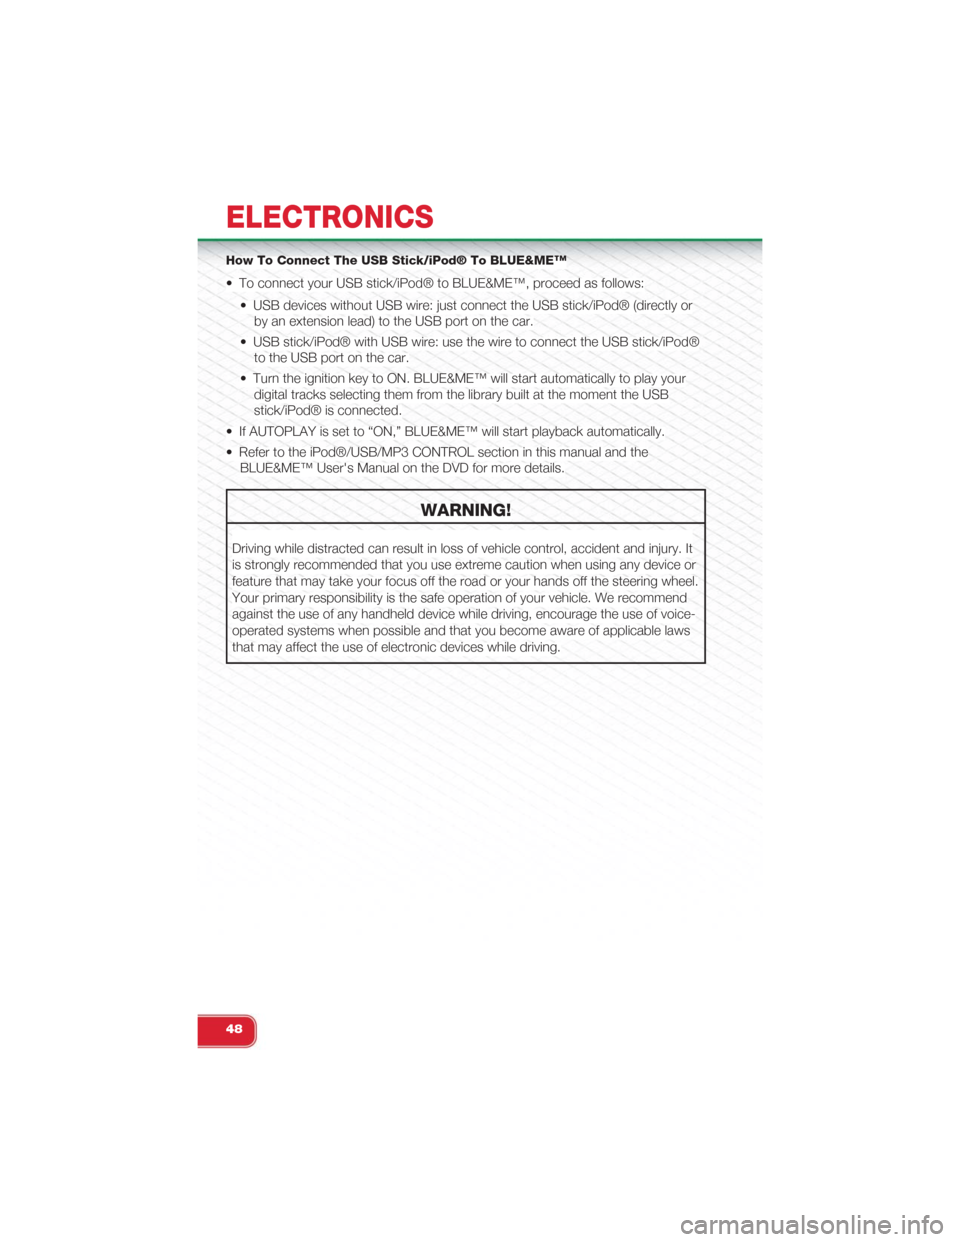
How To Connect The USB Stick/iPod® To BLUE&ME™
• To connect your USB stick/iPod® to BLUE&ME™, proceed as follows:
• USB devices without USB wire: just connect the USB stick/iPod® (directly or
by an extension lead) to the USB port on the car.
• USB stick/iPod® with USB wire: use the wire to connect the USB stick/iPod®
to the USB port on the car.
• Turn the ignition key to ON. BLUE&ME™ will start automatically to play your
digital tracks selecting them from the library built at the moment the USB
stick/iPod® is connected.
• If AUTOPLAY is set to “ON,” BLUE&ME™ will start playback automatically.
• Refer to the iPod®/USB/MP3 CONTROL section in this manual and the
BLUE&ME™ User's Manual on the DVD for more details.
WARNING!
Driving while distracted can result in loss of vehicle control, accident and injury. It
is strongly recommended that you use extreme caution when using any device or
feature that may take your focus off the road or your hands off the steering wheel.
Your primary responsibility is the safe operation of your vehicle. We recommend
against the use of any handheld device while driving, encourage the use of voice-
operated systems when possible and that you become aware of applicable laws
that may affect the use of electronic devices while driving.
ELECTRONICS
48
Page 56 of 108
TRAILER TOWING WEIGHTS (MAXIMUM TRAILER
WEIGHT RATINGS)
• Trailer towing with this vehicle is not recommended.
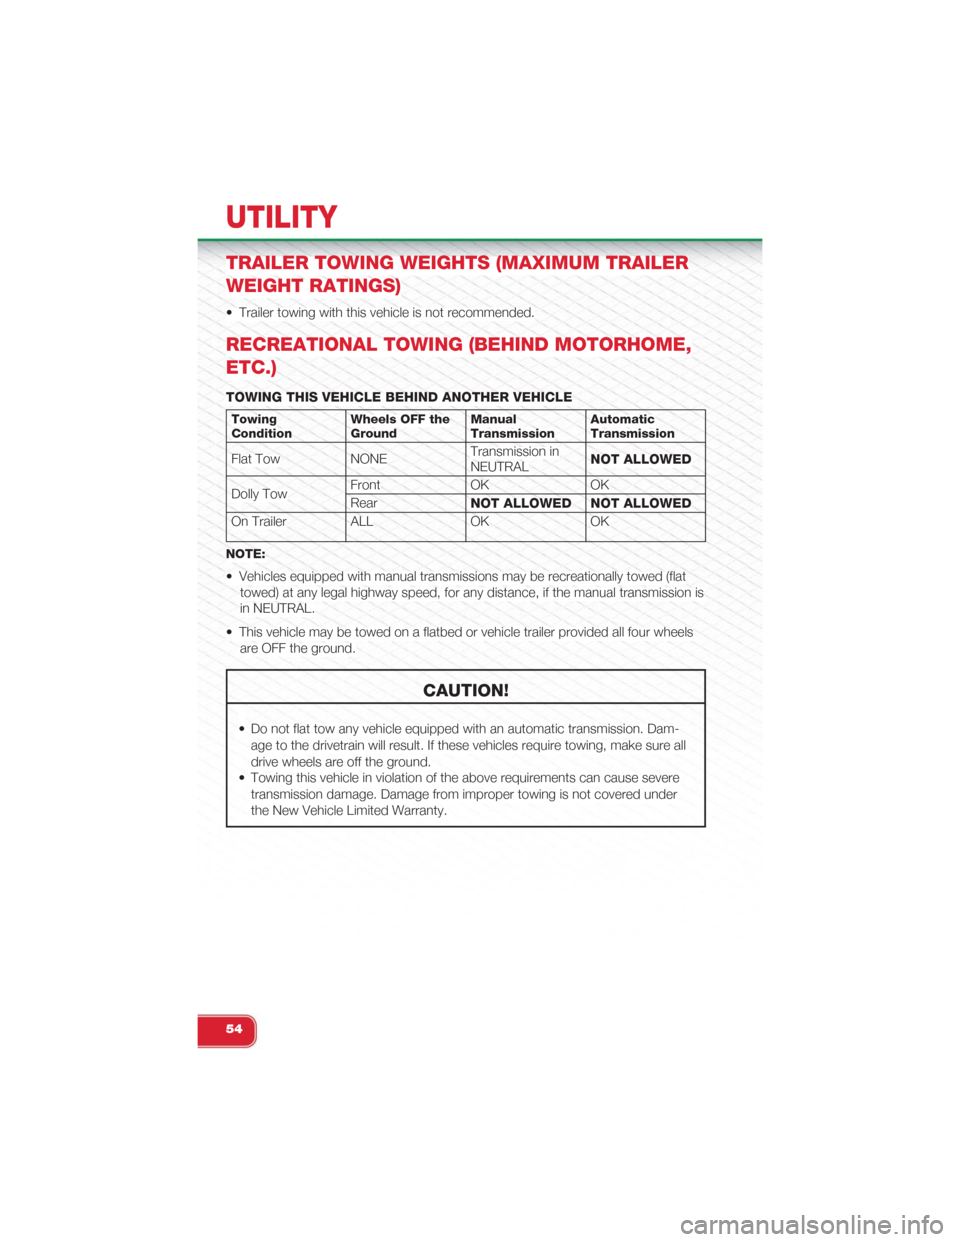
RECREATIONAL TOWING (BEHIND MOTORHOME,
ETC.)
TOWING THIS VEHICLE BEHIND ANOTHER VEHICLE
TowingConditionWheels OFF theGroundManualTransmissionAutomaticTransmission
Flat Tow NONETransmission inNEUTRALNOT ALLOWED
Dolly TowFront OK OK
RearNOT ALLOWED NOT ALLOWED
On Trailer ALL OK OK
NOTE:
• Vehicles equipped with manual transmissions may be recreationally towed (flat
towed) at any legal highway speed, for any distance, if the manual transmission is
in NEUTRAL.
• This vehicle may be towed on a flatbed or vehicle trailer provided all four wheels
are OFF the ground.
CAUTION!
• Do not flat tow any vehicle equipped with an automatic transmission. Dam-
age to the drivetrain will result. If these vehicles require towing, make sure all
drive wheels are off the ground.
• Towing this vehicle in violation of the above requirements can cause severe
transmission damage. Damage from improper towing is not covered under
the New Vehicle Limited Warranty.
UTILITY
54
Page 58 of 108
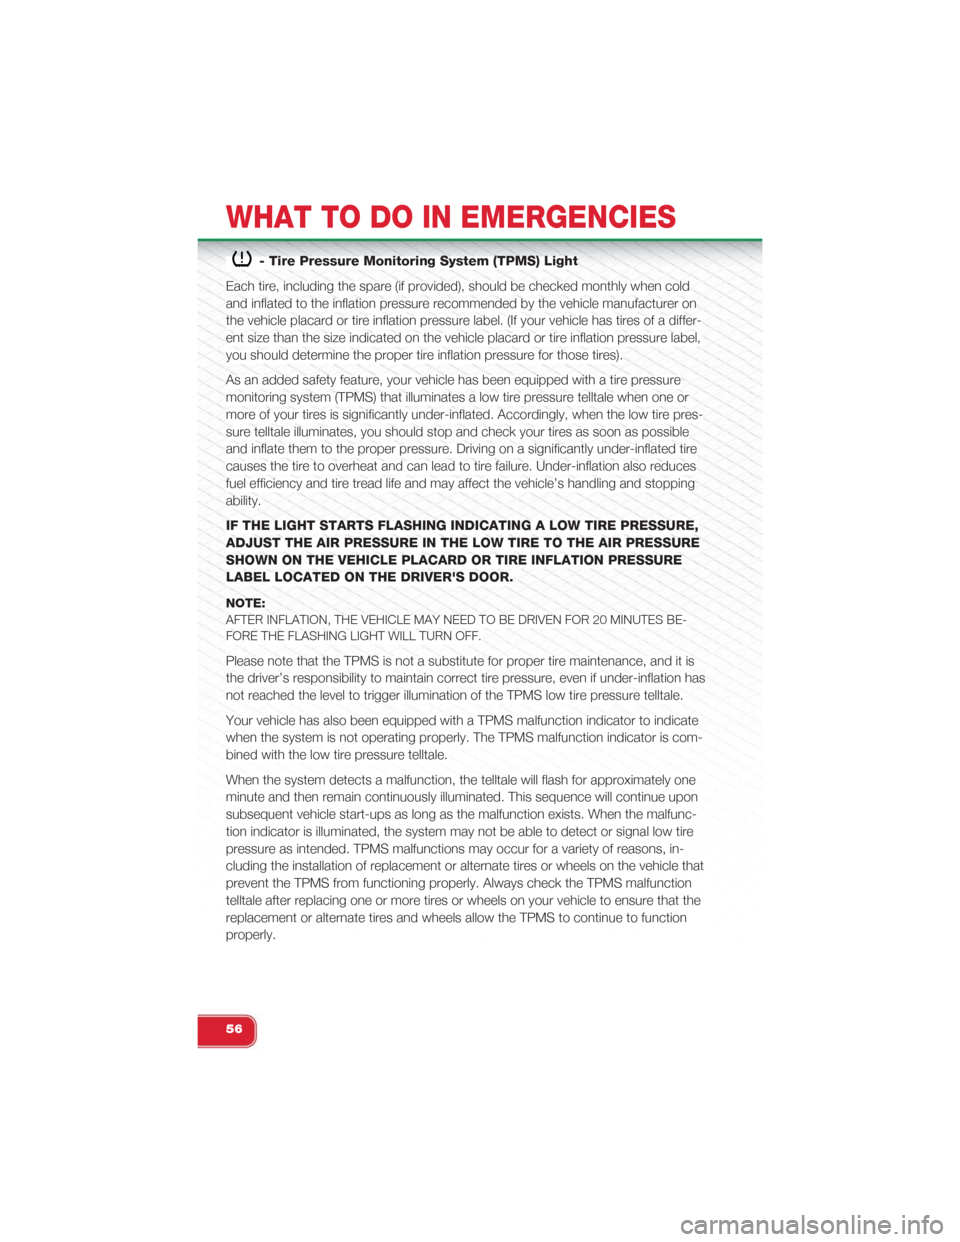
- Tire Pressure Monitoring System (TPMS) Light
Each tire, including the spare (if provided), should be checked monthly when cold
and inflated to the inflation pressure recommended by the vehicle manufacturer on
the vehicle placard or tire inflation pressure label. (If your vehicle has tires of a differ-
ent size than the size indicated on the vehicle placard or tire inflation pressure label,
you should determine the proper tire inflation pressure for those tires).
As an added safety feature, your vehicle has been equipped with a tire pressure
monitoring system (TPMS) that illuminates a low tire pressure telltale when one or
more of your tires is significantly under-inflated. Accordingly, when the low tire pres-
sure telltale illuminates, you should stop and check your tires as soon as possible
and inflate them to the proper pressure. Driving on a significantly under-inflated tire
causes the tire to overheat and can lead to tire failure. Under-inflation also reduces
fuel efficiency and tire tread life and may affect the vehicle’s handling and stopping
ability.
IF THE LIGHT STARTS FLASHING INDICATING A LOW TIRE PRESSURE,
ADJUST THE AIR PRESSURE IN THE LOW TIRE TO THE AIR PRESSURE
SHOWN ON THE VEHICLE PLACARD OR TIRE INFLATION PRESSURE
LABEL LOCATED ON THE DRIVER'S DOOR.
NOTE:
AFTER INFLATION, THE VEHICLE MAY NEED TO BE DRIVEN FOR 20 MINUTES BE-
FORE THE FLASHING LIGHT WILL TURN OFF.
Please note that the TPMS is not a substitute for proper tire maintenance, and it is
the driver’s responsibility to maintain correct tire pressure, even if under-inflation has
not reached the level to trigger illumination of the TPMS low tire pressure telltale.
Your vehicle has also been equipped with a TPMS malfunction indicator to indicate
when the system is not operating properly. The TPMS malfunction indicator is com-
bined with the low tire pressure telltale.
When the system detects a malfunction, the telltale will flash for approximately one
minute and then remain continuously illuminated. This sequence will continue upon
subsequent vehicle start-ups as long as the malfunction exists. When the malfunc-
tion indicator is illuminated, the system may not be able to detect or signal low tire
pressure as intended. TPMS malfunctions may occur for a variety of reasons, in-
cluding the installation of replacement or alternate tires or wheels on the vehicle that
prevent the TPMS from functioning properly. Always check the TPMS malfunction
telltale after replacing one or more tires or wheels on your vehicle to ensure that the
replacement or alternate tires and wheels allow the TPMS to continue to function
properly.
WHAT TO DO IN EMERGENCIES
56
Page 59 of 108
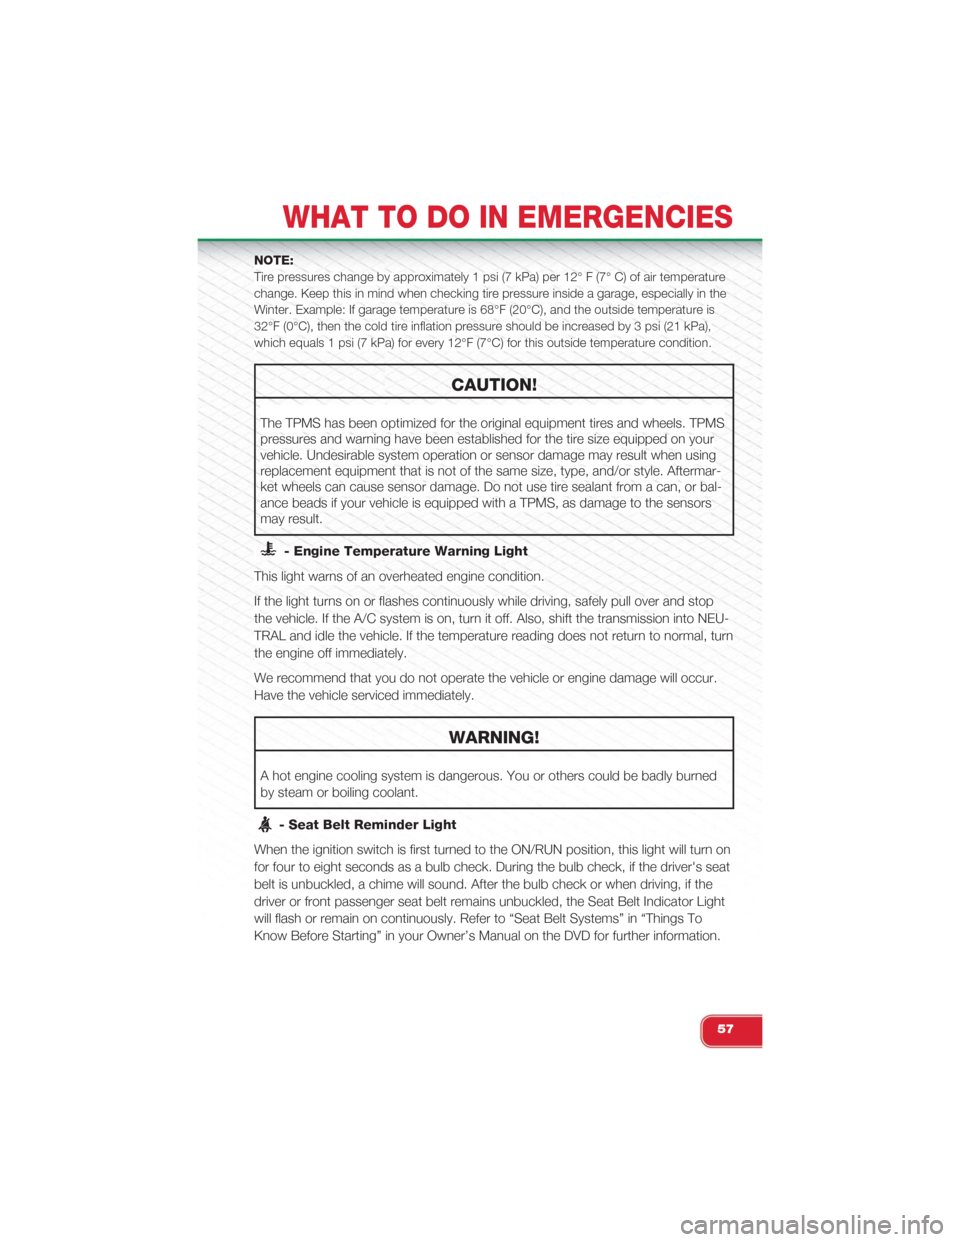
NOTE:
Tire pressures change by approximately 1 psi (7 kPa) per 12° F (7° C) of air temperature
change. Keep this in mind when checking tire pressure inside a garage, especially in the
Winter. Example: If garage temperature is 68°F (20°C), and the outside temperature is
32°F (0°C), then the cold tire inflation pressure should be increased by 3 psi (21 kPa),
which equals 1 psi (7 kPa) for every 12°F (7°C) for this outside temperature condition.
CAUTION!
The TPMS has been optimized for the original equipment tires and wheels. TPMS
pressures and warning have been established for the tire size equipped on your
vehicle. Undesirable system operation or sensor damage may result when using
replacement equipment that is not of the same size, type, and/or style. Aftermar-
ket wheels can cause sensor damage. Do not use tire sealant from a can, or bal-
ance beads if your vehicle is equipped with a TPMS, as damage to the sensors
may result.
- Engine Temperature Warning Light
This light warns of an overheated engine condition.
If the light turns on or flashes continuously while driving, safely pull over and stop
the vehicle. If the A/C system is on, turn it off. Also, shift the transmission into NEU-
TRAL and idle the vehicle. If the temperature reading does not return to normal, turn
the engine off immediately.
We recommend that you do not operate the vehicle or engine damage will occur.
Have the vehicle serviced immediately.
WARNING!
A hot engine cooling system is dangerous. You or others could be badly burned
by steam or boiling coolant.
- Seat Belt Reminder Light
When the ignition switch is first turned to the ON/RUN position, this light will turn on
for four to eight seconds as a bulb check. During the bulb check, if the driver's seat
belt is unbuckled, a chime will sound. After the bulb check or when driving, if the
driver or front passenger seat belt remains unbuckled, the Seat Belt Indicator Light
will flash or remain on continuously. Refer to “Seat Belt Systems” in “Things To
Know Before Starting” in your Owner’s Manual on the DVD for further information.
WHAT TO DO IN EMERGENCIES
57
Page 62 of 108
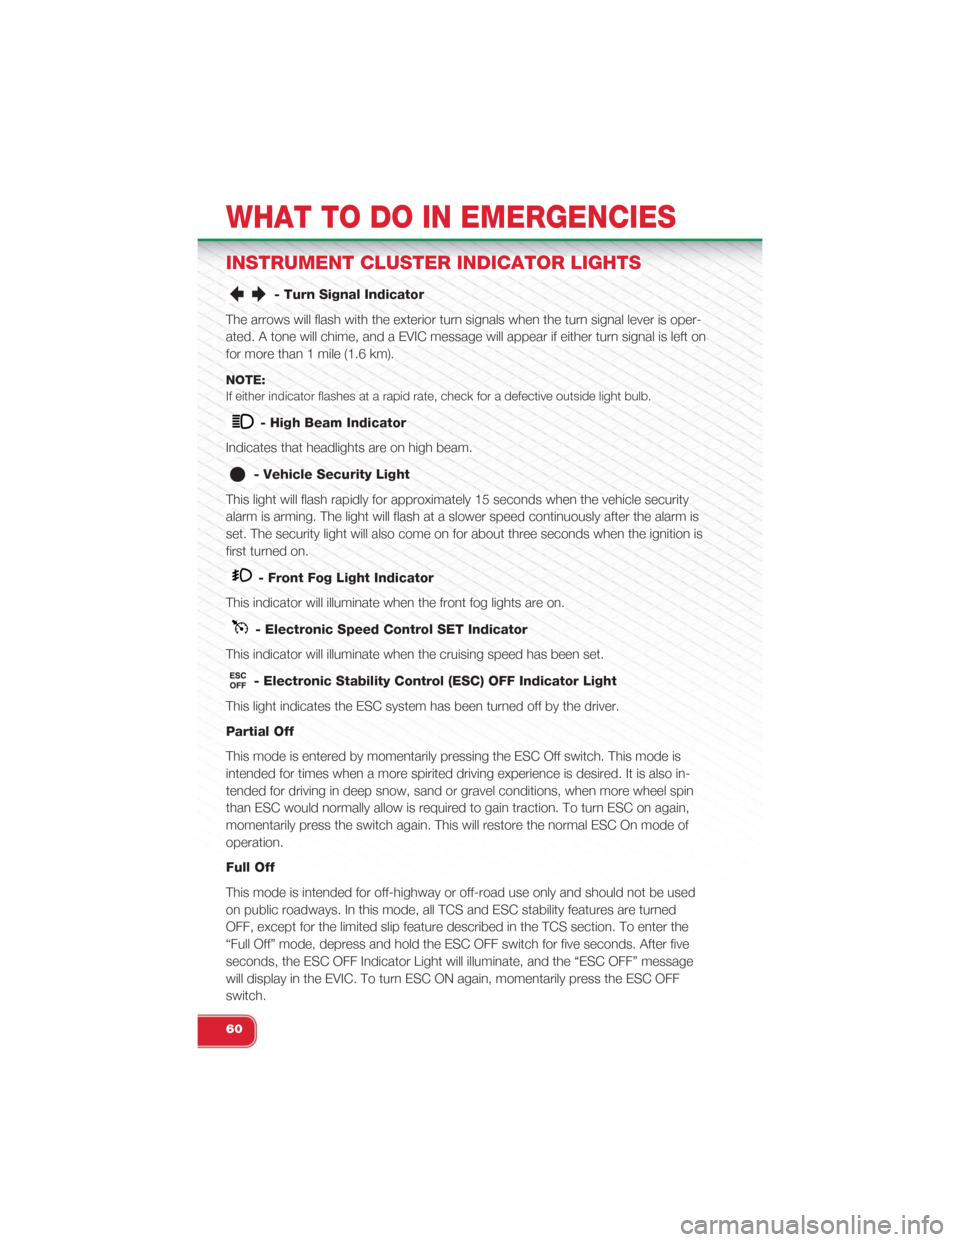
INSTRUMENT CLUSTER INDICATOR LIGHTS
- Turn Signal Indicator
The arrows will flash with the exterior turn signals when the turn signal lever is oper-
ated. A tone will chime, and a EVIC message will appear if either turn signal is left on
for more than 1 mile (1.6 km).
NOTE:
If either indicator flashes at a rapid rate, check for a defective outside light bulb.
- High Beam Indicator
Indicates that headlights are on high beam.
- Vehicle Security Light
This light will flash rapidly for approximately 15 seconds when the vehicle security
alarm is arming. The light will flash at a slower speed continuously after the alarm is
set. The security light will also come on for about three seconds when the ignition is
first turned on.
- Front Fog Light Indicator
This indicator will illuminate when the front fog lights are on.
- Electronic Speed Control SET Indicator
This indicator will illuminate when the cruising speed has been set.
- Electronic Stability Control (ESC) OFF Indicator Light
This light indicates the ESC system has been turned off by the driver.
Partial Off
This mode is entered by momentarily pressing the ESC Off switch. This mode is
intended for times when a more spirited driving experience is desired. It is also in-
tended for driving in deep snow, sand or gravel conditions, when more wheel spin
than ESC would normally allow is required to gain traction. To turn ESC on again,
momentarily press the switch again. This will restore the normal ESC On mode of
operation.
Full Off
This mode is intended for off-highway or off-road use only and should not be used
on public roadways. In this mode, all TCS and ESC stability features are turned
OFF, except for the limited slip feature described in the TCS section. To enter the
“Full Off” mode, depress and hold the ESC OFF switch for five seconds. After five
seconds, the ESC OFF Indicator Light will illuminate, and the “ESC OFF” message
will display in the EVIC. To turn ESC ON again, momentarily press the ESC OFF
switch.
WHAT TO DO IN EMERGENCIES
60
Page 63 of 108
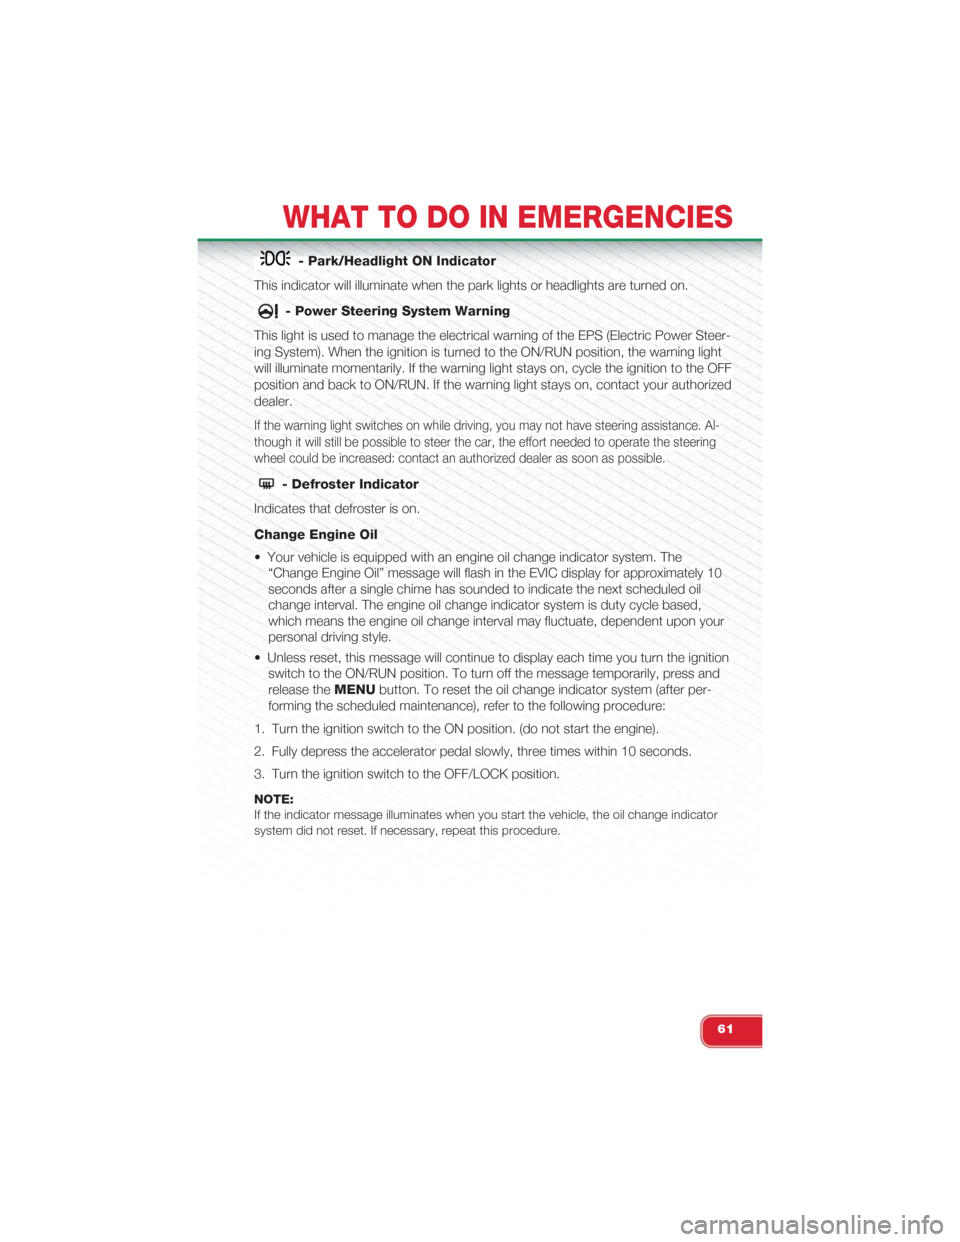
- Park/Headlight ON Indicator
This indicator will illuminate when the park lights or headlights are turned on.
- Power Steering System Warning
This light is used to manage the electrical warning of the EPS (Electric Power Steer-
ing System). When the ignition is turned to the ON/RUN position, the warning light
will illuminate momentarily. If the warning light stays on, cycle the ignition to the OFF
position and back to ON/RUN. If the warning light stays on, contact your authorized
dealer.
If the warning light switches on while driving, you may not have steering assistance. Al-
though it will still be possible to steer the car, the effort needed to operate the steering
wheel could be increased: contact an authorized dealer as soon as possible.
- Defroster Indicator
Indicates that defroster is on.
Change Engine Oil
• Your vehicle is equipped with an engine oil change indicator system. The
“Change Engine Oil” message will flash in the EVIC display for approximately 10
seconds after a single chime has sounded to indicate the next scheduled oil
change interval. The engine oil change indicator system is duty cycle based,
which means the engine oil change interval may fluctuate, dependent upon your
personal driving style.
• Unless reset, this message will continue to display each time you turn the ignition
switch to the ON/RUN position. To turn off the message temporarily, press and
release theMENUbutton. To reset the oil change indicator system (after per-
forming the scheduled maintenance), refer to the following procedure:
1. Turn the ignition switch to the ON position. (do not start the engine).
2. Fully depress the accelerator pedal slowly, three times within 10 seconds.
3. Turn the ignition switch to the OFF/LOCK position.
NOTE:If the indicator message illuminates when you start the vehicle, the oil change indicatorsystem did not reset. If necessary, repeat this procedure.
WHAT TO DO IN EMERGENCIES
61