display FIAT 500 GUCCI 2012 2.G User Guide
[x] Cancel search | Manufacturer: FIAT, Model Year: 2012, Model line: 500 GUCCI, Model: FIAT 500 GUCCI 2012 2.GPages: 80, PDF Size: 1.87 MB
Page 7 of 80

A. Turn Signal/Lights Lever pg. 16
B. Instrument Cluster pg. 6
C. Electronic Vehicle Information Center (EVIC)
Display pg. 35
D. Electronic Vehicle Information Center (EVIC)
Controls pg. 35
E. Wiper/Washer Lever pg. 17
F. Audio System pg. 28G. SWITCH PANEL
− Sport Function pg. 22
− Hazard Switch
− Rear Defrost
H. Climate Controls pg. 20
I. Passenger Power Window Switch
J. Transmission Gear Selector K. Driver Power Window Switch
L. Speed Control pg. 18
M. Hood Release
N. BLUE&ME™ Hands-Free Communication
pg. 29
O. Door Handle/Power Door Locks
P. Power Mirror Switches
CONTROLS AT A GLANCE
5
Page 24 of 80
SPORT MODE
•The Sport mode increases steering feedback to the driver with slight increases in effort and
throttle pedal-to-engine response. Changes to the transmission shift schedules for more
aggressive shifting will occur on automatic transmission versions.
• Sport driving mode is useful while driving on winding roads where more steering precision is
desired.
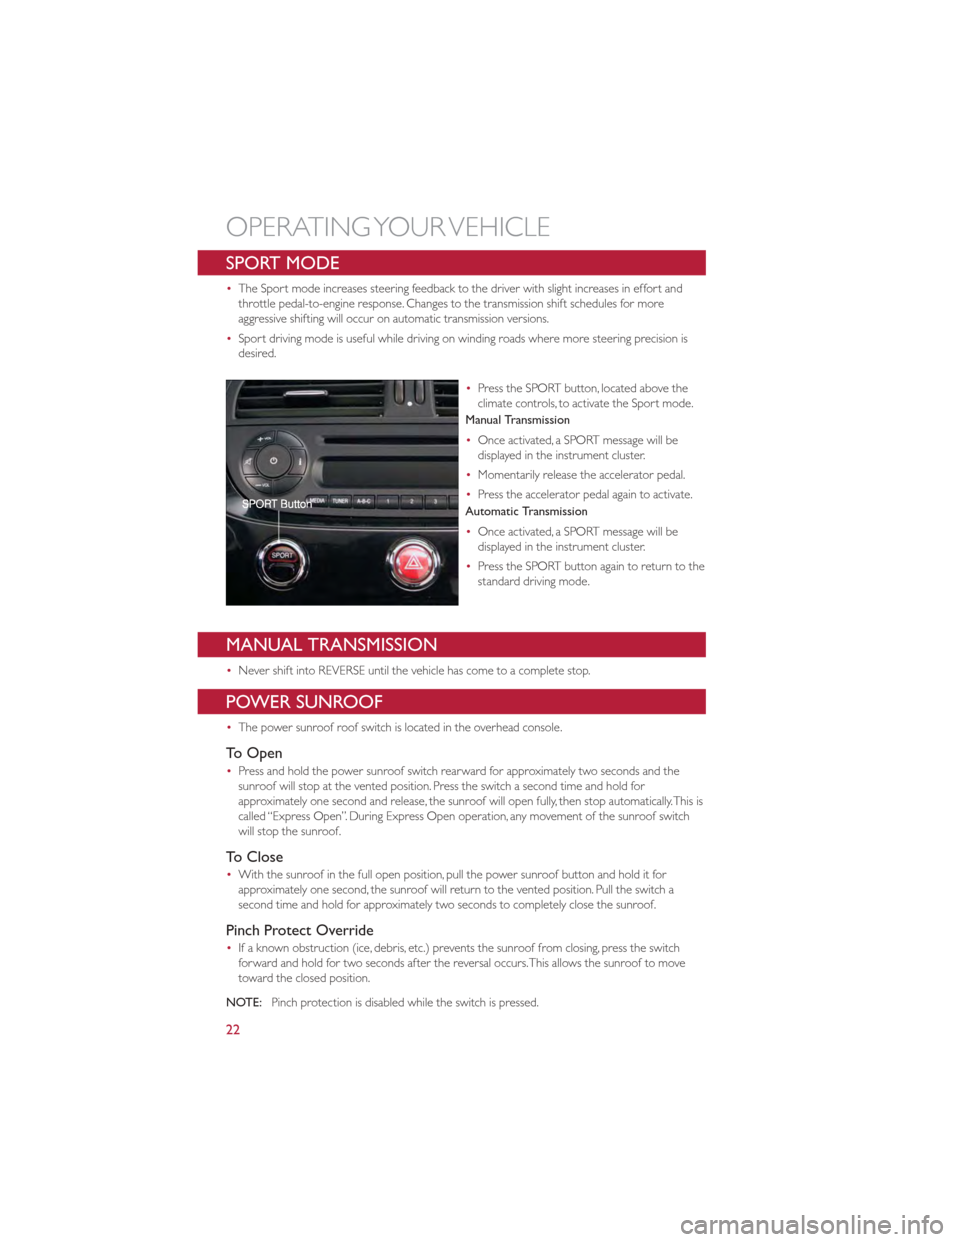
•Press the SPORT button, located above the
climate controls, to activate the Sport mode.
Manual Transmission
• Once activated, a SPORT message will be
displayed in the instrument cluster.
• Momentarily release the accelerator pedal.
• Press the accelerator pedal again to activate.
Automatic Transmission
• Once activated, a SPORT message will be
displayed in the instrument cluster.
• Press the SPORT button again to return to the
standard driving mode.
MANUAL TRANSMISSION
•Never shift into REVERSE until the vehicle has come to a complete stop.
POWER SUNROOF
•The power sunroof roof switch is located in the overhead console.
To Open
•Press and hold the power sunroof switch rearward for approximately two seconds and the
sunroof will stop at the vented position. Press the switch a second time and hold for
approximately one second and release, the sunroof will open fully, then stop automatically.This is
called “Express Open”. During Express Open operation, any movement of the sunroof switch
will stop the sunroof.
To Close
•With the sunroof in the full open position, pull the power sunroof button and hold it for
approximately one second, the sunroof will return to the vented position. Pull the switch a
second time and hold for approximately two seconds to completely close the sunroof.
Pinch Protect Override
•If a known obstruction (ice, debris, etc.) prevents the sunroof from closing, press the switch
forward and hold for two seconds after the reversal occurs.This allows the sunroof to move
toward the closed position.
NOTE: Pinch protection is disabled while the switch is pressed.
OPERATING YOUR VEHICLE
22
Page 27 of 80
COLD WEATHER OPERATION (Engine Block Heater)
Engine Block Heater
•To prevent possible engine damage while starting at low temperatures, this vehicle will inhibit
engine cranking when the ambient temperature is less than –22° F (–30° C) and the oil
temperature sensor reading indicates an engine block heater has not been used.An
externally-powered electric engine block heater is available as optional equipment or from your
authorized dealer.
• The message "plug in engine heater" will be displayed in the instrument cluster when the
ambient temperature is below 5° F (–15° C) at the time the engine is shut off as a reminder to
avoid possible crank delays at the next cold start.
If Engine Fails To Start
CAUTION!
•Use of the recommended SAE 5W-30 oil and adhering to the prescribed oil change
intervals is important to prevent engine damage and ensure satisfactory starting in
cold conditions.
• Do not attempt to push or tow your vehicle to get it started.Vehicles equipped with
an automatic transmission cannot be started this way. Unburned fuel could enter the
catalytic converter and once the engine has started, ignite and damage the converter
and vehicle.
• To prevent damage to the starter, do not continuously crank the engine for more
than 15 seconds at a time.Wait 10 to 15 seconds before trying again.
WARNING!
Never pour fuel or other flammable liquids into the throttle body air inlet opening in
an attempt to start the vehicle.This could result in a flash fire causing serious personal
injury.
OPERATING YOUR VEHICLE
25
Page 31 of 80
MENU
•Press the MENU button and one of the following options will appear on the Radio display. Use
the up and down arrows to scroll through the options; use the left and right arrows to change a
selection setting.
• Speech Volume •Sirius Telephone Number
• Aux Audio Offset •System Reset
• Radio Off •Speed Volume
• Sat ID •On Volume Limit
Clock Setting
• The time is set using the Electronic Vehicle Information Center (EVIC) Display.
• With the Date and Time shown in the EVIC display, press the MENU ESC button to enter the
menu mode.
• Press the plus or minus buttons until "Set Time" is displayed and press the MENU ESC button
again.
• Press the MENU ESC button;“hours” will flash on the display.
• Press the plus or minus buttons to adjust the hours.
• When setting the hour is complete, briefly press the MENU ESC button and “minutes” will flash
in the display. Press the plus or minus buttons to adjust the minutes.
• When setting the time is complete, press and hold the MENU ESC button.
Station Presets
•To store a tuned station, find the station to store by either pressing the right and left arrow
(Seek) buttons or by pressing up or down arrow (Manual Tune) buttons.
• Once the station is found, press and hold one of the PRESET buttons, until you hear a
confirmation beep (Preset Saved will be shown in the radio display).A total of 15 FM, 10 AM
and 15 Sirius XM™ Satellite Radio stations can be preset by pressing the A-B-C button.
A-B-C Button
•Press the A-B-C button to choose between the presets stored in the AM, FM or SAT modes.
The mode (AM, FM, SAT), station preset (A, B, C) and preset button number (P 1-5) will be
displayed in the middle of the radio display.
BLUE&ME™ Hands-Free Communication
•FIAT’s Windows Mobile™ based BLUE&ME™ Hands-Free Communication is a personal
telematics system that incorporates communication and entertainment applications that are
expressly designed for use in your car.
• The BLUE&ME™ Hands-Free Communication package installed in your car is equipped with
integral hands-free kit, message reader, and media player. BLUE&ME™ is designed to support the
future installation of additional services.
ELECTRONICS
29
Page 32 of 80
•The BLUE&ME™ Hands-Free Communication package features integrated voice recognition,
steering wheel controls and a multifunction electronic display that allows you to use your
Bluetooth
®wireless technology enabled mobile phone without having to take your eyes off the
road.You can even keep your phone in a pocket or a bag.You are not required to train the voice
recognition system to recognize your voice.The system is “speaker independent” and performs
equally well for different users.
Steering Wheel Buttons
Front Steering Wheel Buttons
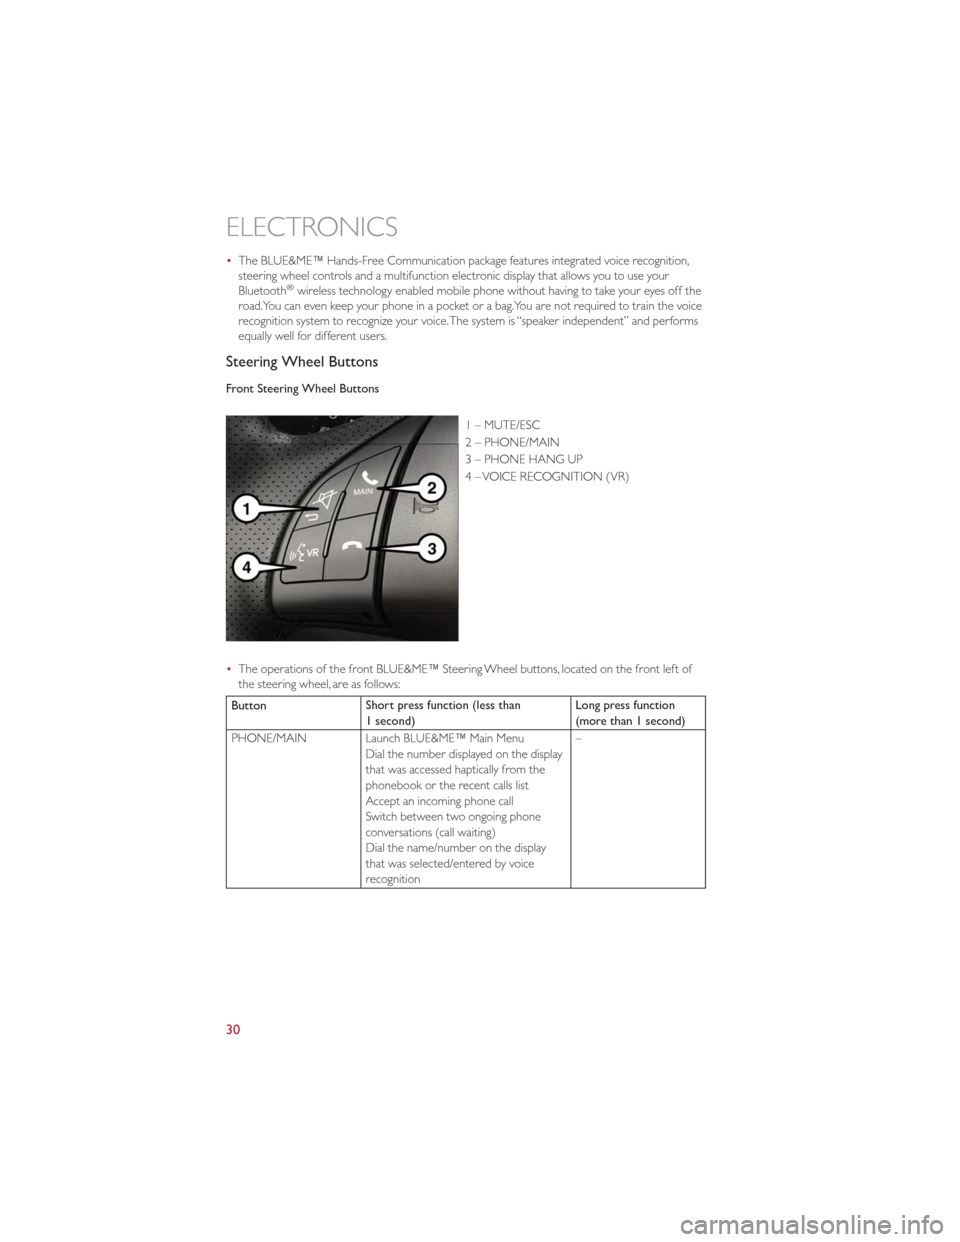
1 – MUTE/ESC
2 – PHONE/MAIN
3 – PHONE HANG UP
4 – VOICE RECOGNITION (VR)
• The operations of the front BLUE&ME™ Steering Wheel buttons, located on the front left of
the steering wheel, are as follows:
Button Short press function (less than
1 second) Long press function
(more than 1 second)
PHONE/MAIN Launch BLUE&ME™ Main Menu Dial the number displayed on the display
that was accessed haptically from the
phonebook or the recent calls list
Accept an incoming phone call
Switch between two ongoing phone
conversations (call waiting)
Dial the name/number on the display
that was selected/entered by voice
recognition –
ELECTRONICS
30
Page 33 of 80
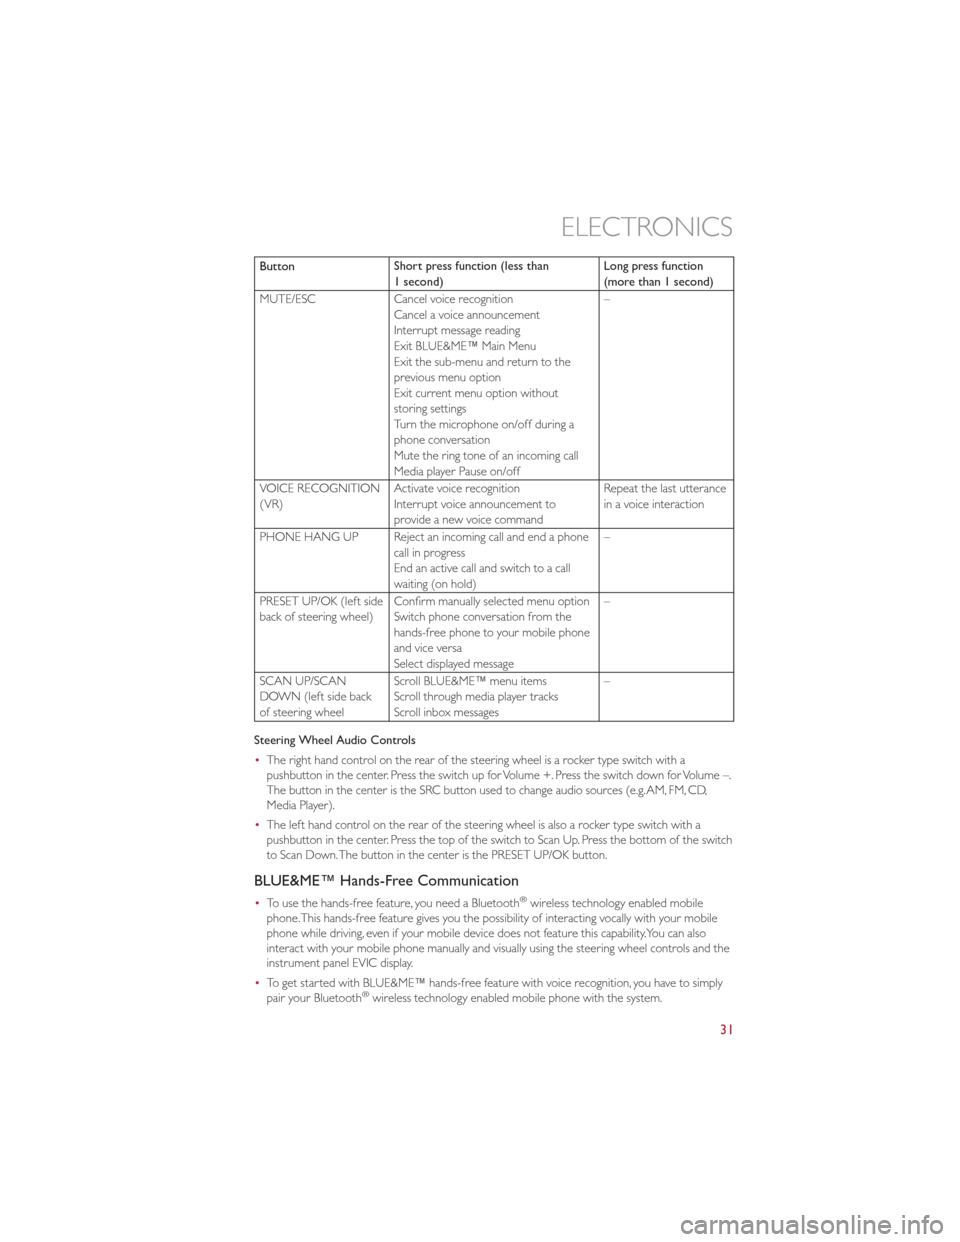
ButtonShort press function (less than
1 second) Long press function
(more than 1 second)
MUTE/ESC Cancel voice recognition
Cancel a voice announcement
Interrupt message reading
Exit BLUE&ME™ Main Menu
Exit the sub-menu and return to the
previous menu option
Exit current menu option without
storing settings
Turn the microphone on/off during a
phone conversation
Mute the ring tone of an incoming call
Media player Pause on/off –
VOICE RECOGNITION
(VR) Activate voice recognition
Interrupt voice announcement to
provide a new voice command Repeat the last utterance
in a voice interaction
PHONE HANG UP Reject an incoming call and end a phone call in progress
End an active call and switch to a call
waiting (on hold) –
PRESET UP/OK (left side
back of steering wheel) Confirm manually selected menu option
Switch phone conversation from the
hands-free phone to your mobile phone
and vice versa
Select displayed message –
SCAN UP/SCAN
DOWN (left side back
of steering wheel Scroll BLUE&ME™ menu items
Scroll through media player tracks
Scroll inbox messages –
Steering Wheel Audio Controls
• The right hand control on the rear of the steering wheel is a rocker type switch with a
pushbutton in the center. Press the switch up for Volume +. Press the switch down for Volume –.
The button in the center is the SRC button used to change audio sources (e.g.AM, FM, CD,
Media Player).
• The left hand control on the rear of the steering wheel is also a rocker type switch with a
pushbutton in the center. Press the top of the switch to Scan Up. Press the bottom of the switch
to Scan Down.The button in the center is the PRESET UP/OK button.
BLUE&ME™ Hands-Free Communication
•To use the hands-free feature, you need a Bluetooth®wireless technology enabled mobile
phone.This hands-free feature gives you the possibility of interacting vocally with your mobile
phone while driving, even if your mobile device does not feature this capability.You can also
interact with your mobile phone manually and visually using the steering wheel controls and the
instrument panel EVIC display.
• To get started with BLUE&ME™ hands-free feature with voice recognition, you have to simply
pair your Bluetooth
®wireless technology enabled mobile phone with the system.
ELECTRONICS
31
Page 34 of 80
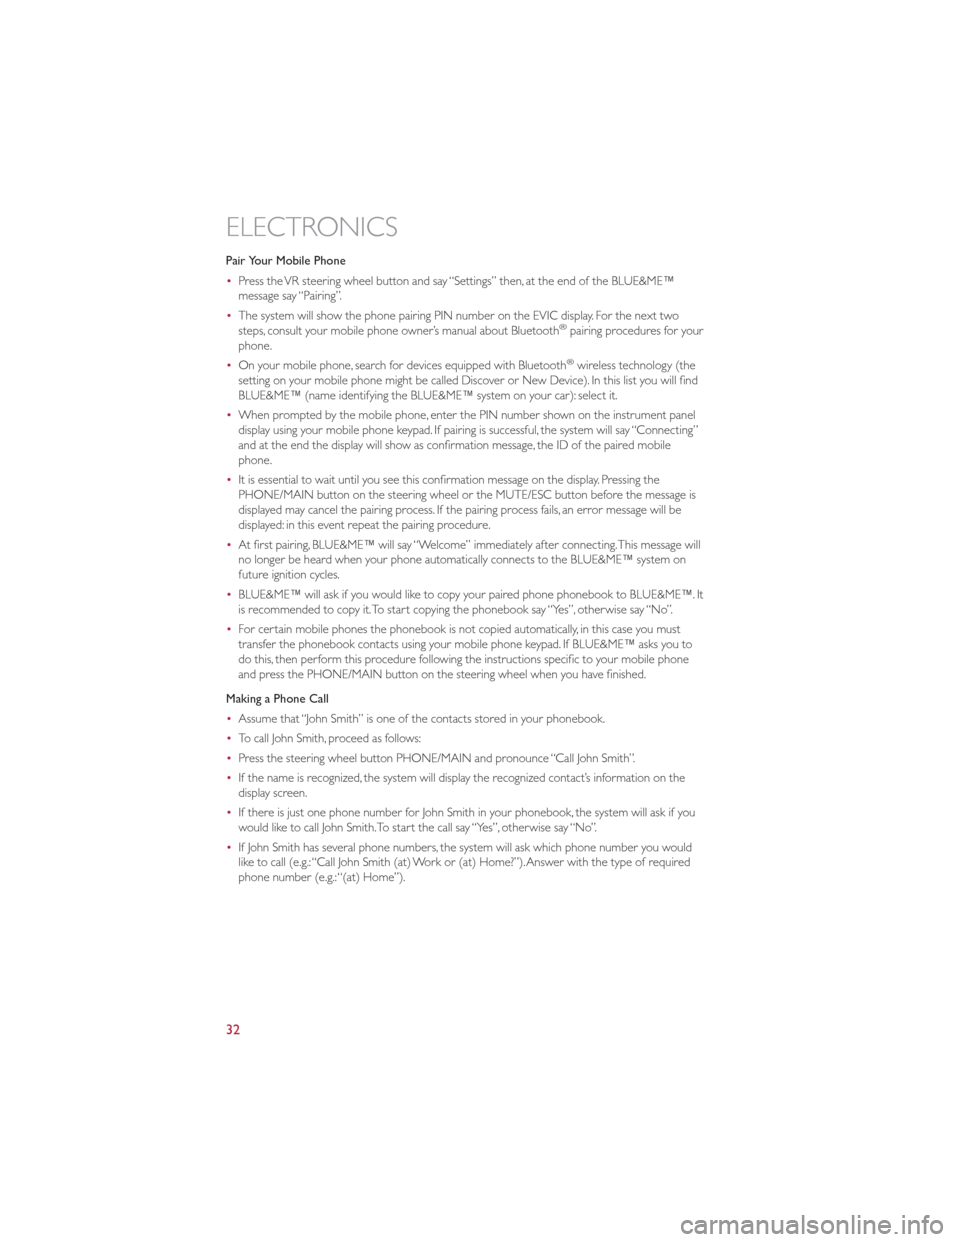
Pair Your Mobile Phone
•Press the VR steering wheel button and say “Settings” then, at the end of the BLUE&ME™
message say “Pairing”.
• The system will show the phone pairing PIN number on the EVIC display. For the next two
steps, consult your mobile phone owner’s manual about Bluetooth
®pairing procedures for your
phone.
• On your mobile phone, search for devices equipped with Bluetooth
®wireless technology (the
setting on your mobile phone might be called Discover or New Device). In this list you will find
BLUE&ME™ (name identifying the BLUE&ME™ system on your car): select it.
• When prompted by the mobile phone, enter the PIN number shown on the instrument panel
display using your mobile phone keypad. If pairing is successful, the system will say “Connecting”
and at the end the display will show as confirmation message, the ID of the paired mobile
phone.
• It is essential to wait until you see this confirmation message on the display. Pressing the
PHONE/MAIN button on the steering wheel or the MUTE/ESC button before the message is
displayed may cancel the pairing process. If the pairing process fails, an error message will be
displayed: in this event repeat the pairing procedure.
• At first pairing, BLUE&ME™ will say “Welcome” immediately after connecting.This message will
no longer be heard when your phone automatically connects to the BLUE&ME™ system on
future ignition cycles.
• BLUE&ME™ will ask if you would like to copy your paired phone phonebook to BLUE&ME™. It
is recommended to copy it.To start copying the phonebook say “Yes”, otherwise say “No”.
• For certain mobile phones the phonebook is not copied automatically, in this case you must
transfer the phonebook contacts using your mobile phone keypad. If BLUE&ME™ asks you to
do this, then perform this procedure following the instructions specific to your mobile phone
and press the PHONE/MAIN button on the steering wheel when you have finished.
Making a Phone Call
• Assume that “John Smith” is one of the contacts stored in your phonebook.
• To call John Smith, proceed as follows:
• Press the steering wheel button PHONE/MAIN and pronounce “Call John Smith”.
• If the name is recognized, the system will display the recognized contact’s information on the
display screen.
• If there is just one phone number for John Smith in your phonebook, the system will ask if you
would like to call John Smith.To start the call say “Yes”, otherwise say “No”.
• If John Smith has several phone numbers, the system will ask which phone number you would
like to call (e.g.:“Call John Smith (at) Work or (at) Home?”).Answer with the type of required
phone number (e.g.:“(at) Home”).
ELECTRONICS
32
Page 35 of 80
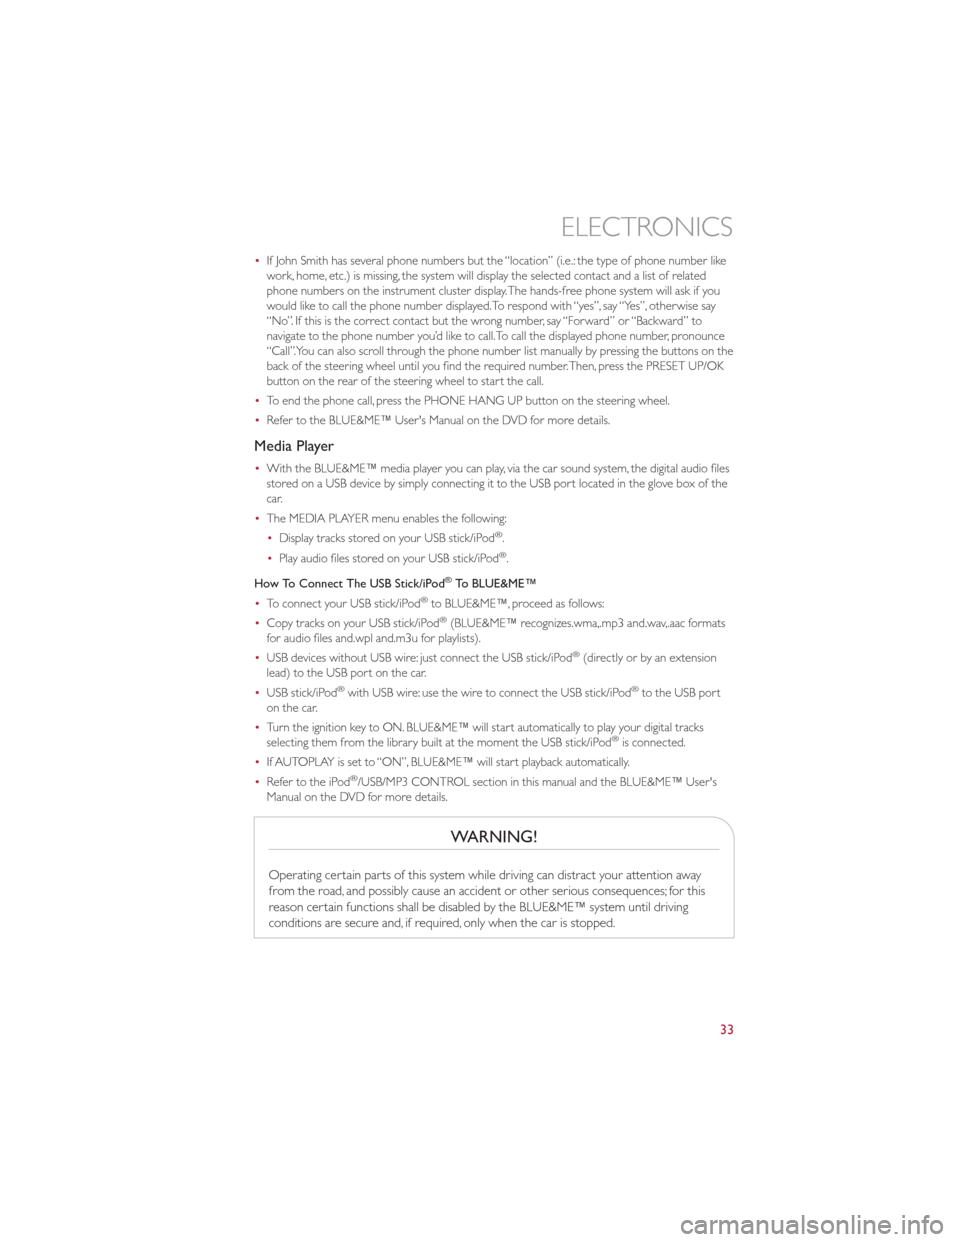
•If John Smith has several phone numbers but the “location” (i.e.: the type of phone number like
work, home, etc.) is missing, the system will display the selected contact and a list of related
phone numbers on the instrument cluster display.The hands-free phone system will ask if you
would like to call the phone number displayed.To respond with “yes”, say “Yes”, otherwise say
“No”. If this is the correct contact but the wrong number, say “Forward” or “Backward” to
navigate to the phone number you’d like to call.To call the displayed phone number, pronounce
“Call”.You can also scroll through the phone number list manually by pressing the buttons on the
back of the steering wheel until you find the required number.Then, press the PRESET UP/OK
button on the rear of the steering wheel to start the call.
• To end the phone call, press the PHONE HANG UP button on the steering wheel.
• Refer to the BLUE&ME™ User's Manual on the DVD for more details.
Media Player
•With the BLUE&ME™ media player you can play, via the car sound system, the digital audio files
stored on a USB device by simply connecting it to the USB port located in the glove box of the
car.
• The MEDIA PLAYER menu enables the following:
•Display tracks stored on your USB stick/iPod
®.
• Play audio files stored on your USB stick/iPod®.
How To Connect The USB Stick/iPod
®To BLUE&ME™
• To connect your USB stick/iPod®to BLUE&ME™, proceed as follows:
• Copy tracks on your USB stick/iPod®(BLUE&ME™ recognizes.wma,.mp3 and.wav,.aac formats
for audio files and.wpl and.m3u for playlists).
• USB devices without USB wire: just connect the USB stick/iPod
®(directly or by an extension
lead) to the USB port on the car.
• USB stick/iPod
®with USB wire: use the wire to connect the USB stick/iPod®to the USB port
on the car.
• Turn the ignition key to ON. BLUE&ME™ will start automatically to play your digital tracks
selecting them from the library built at the moment the USB stick/iPod
®is connected.
• If AUTOPLAY is set to “ON”, BLUE&ME™ will start playback automatically.
• Refer to the iPod
®/USB/MP3 CONTROL section in this manual and the BLUE&ME™ User's
Manual on the DVD for more details.
WARNING!
Operating certain parts of this system while driving can distract your attention away
from the road, and possibly cause an accident or other serious consequences; for this
reason certain functions shall be disabled by the BLUE&ME™ system until driving
conditions are secure and, if required, only when the car is stopped.
ELECTRONICS
33
Page 37 of 80
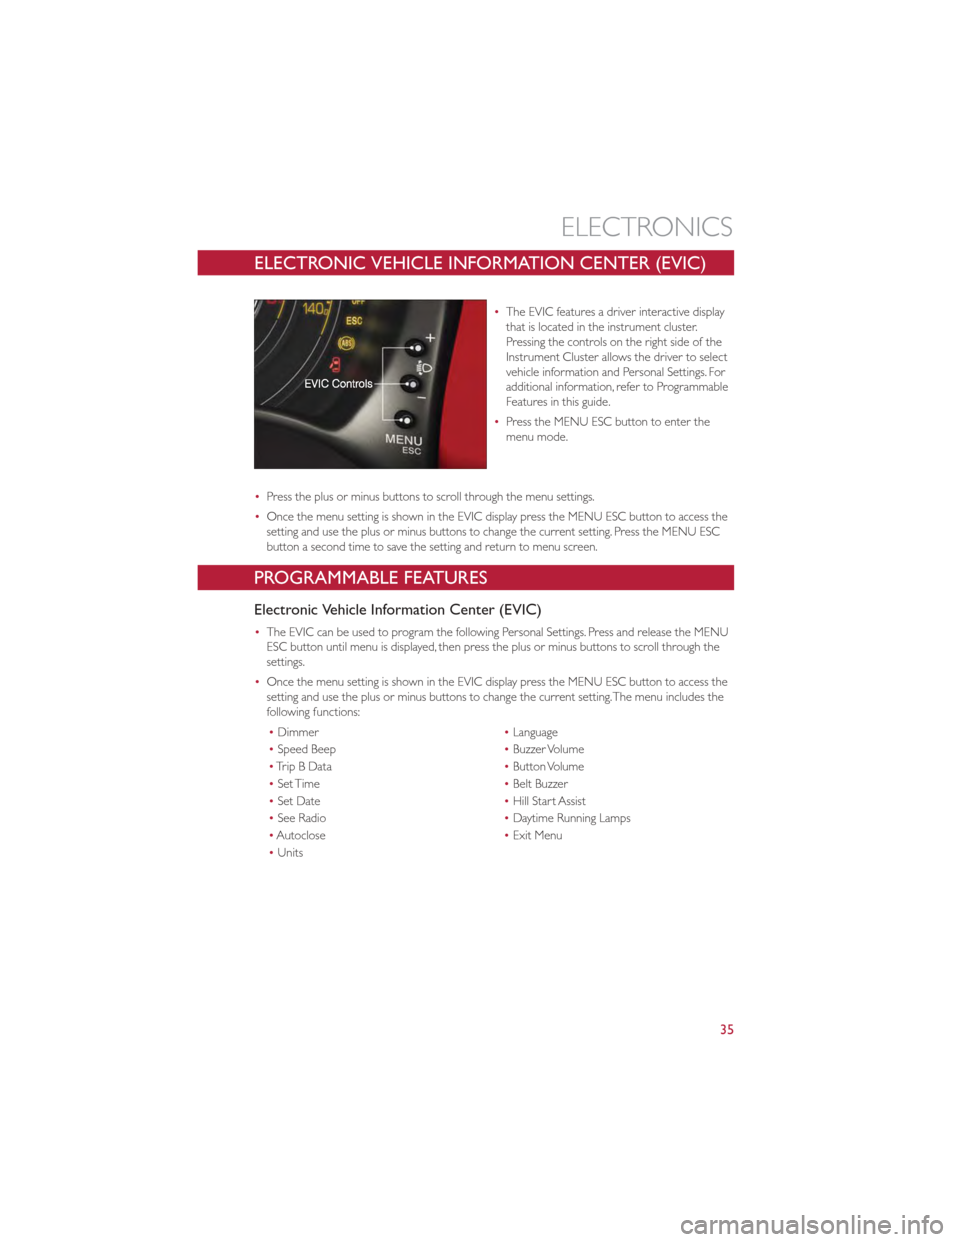
ELECTRONIC VEHICLE INFORMATION CENTER (EVIC)
•The EVIC features a driver interactive display
that is located in the instrument cluster.
Pressing the controls on the right side of the
Instrument Cluster allows the driver to select
vehicle information and Personal Settings. For
additional information, refer to Programmable
Features in this guide.
• Press the MENU ESC button to enter the
menu mode.
• Press the plus or minus buttons to scroll through the menu settings.
• Once the menu setting is shown in the EVIC display press the MENU ESC button to access the
setting and use the plus or minus buttons to change the current setting. Press the MENU ESC
button a second time to save the setting and return to menu screen.
PROGRAMMABLE FEATURES
Electronic Vehicle Information Center (EVIC)
•The EVIC can be used to program the following Personal Settings. Press and release the MENU
ESC button until menu is displayed, then press the plus or minus buttons to scroll through the
settings.
• Once the menu setting is shown in the EVIC display press the MENU ESC button to access the
setting and use the plus or minus buttons to change the current setting.The menu includes the
following functions:
• Dimmer •Language
• Speed Beep •Buzzer Volume
• TripBData •Button Volume
• Set Time •Belt Buzzer
• Set Date •Hill Start Assist
• See Radio •Daytime Running Lamps
• Autoclose •Exit Menu
• Units
ELECTRONICS
35
Page 38 of 80
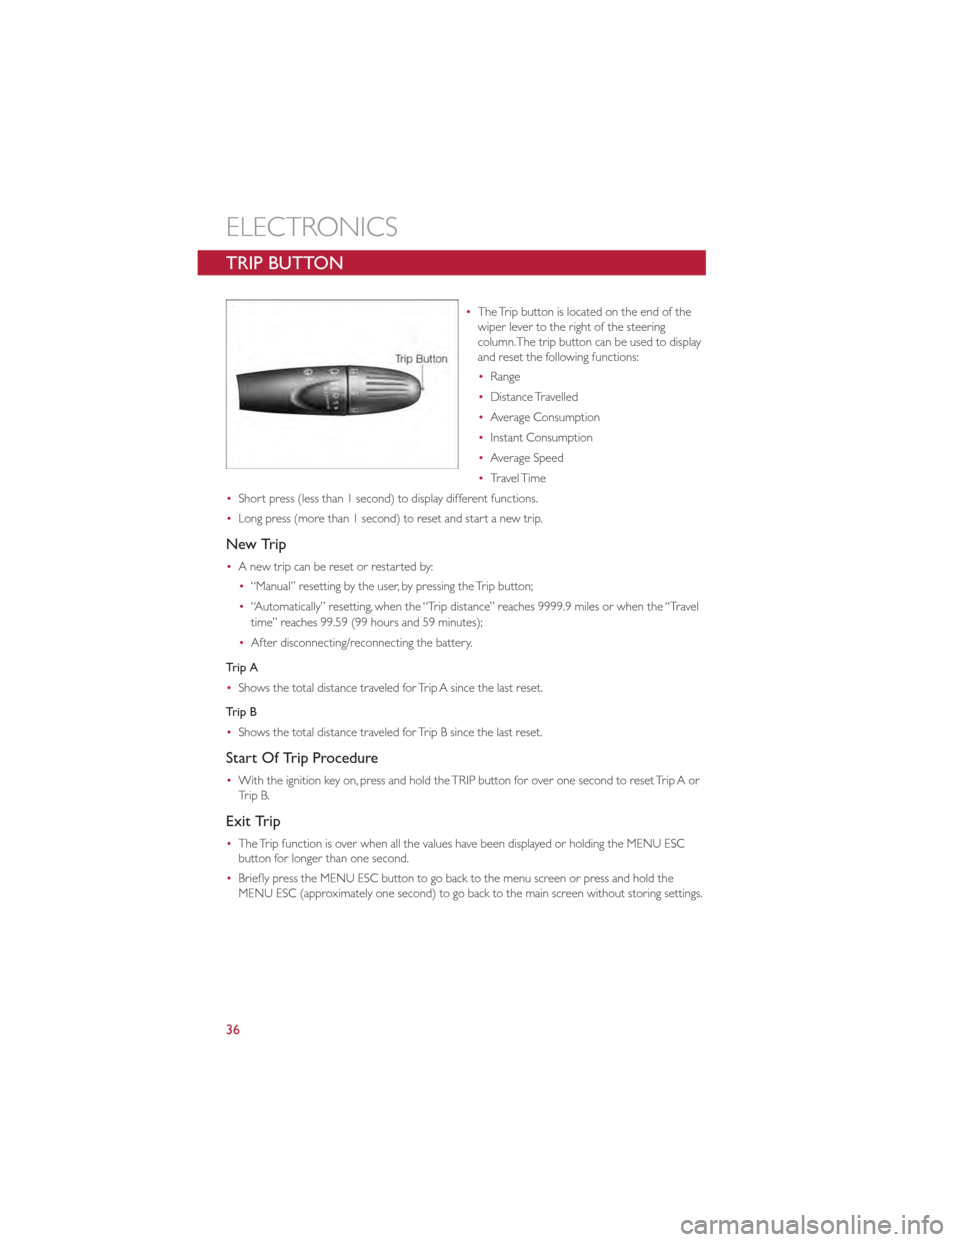
TRIP BUTTON
•The Trip button is located on the end of the
wiper lever to the right of the steering
column.The trip button can be used to display
and reset the following functions:
•Range
• Distance Travelled
• Average Consumption
• Instant Consumption
• Average Speed
• Travel Time
• Short press (less than 1 second) to display different functions.
• Long press (more than 1 second) to reset and start a new trip.
New Trip
•A new trip can be reset or restarted by:
•“Manual” resetting by the user, by pressing the Trip button;
• “Automatically” resetting, when the “Trip distance” reaches 9999.9 miles or when the “Travel
time” reaches 99.59 (99 hours and 59 minutes);
• After disconnecting/reconnecting the battery.
Trip A
• Shows the total distance traveled for Trip A since the last reset.
Trip B
• Shows the total distance traveled for Trip B since the last reset.
Start Of Trip Procedure
•With the ignition key on, press and hold the TRIP button for over one second to reset Trip A or
Trip B.
Exit Trip
•The Trip function is over when all the values have been displayed or holding the MENU ESC
button for longer than one second.
• Briefly press the MENU ESC button to go back to the menu screen or press and hold the
MENU ESC (approximately one second) to go back to the main screen without storing settings.
ELECTRONICS
36