FIAT 500E 2013 2.G Owner's Manual
Manufacturer: FIAT, Model Year: 2013, Model line: 500E, Model: FIAT 500E 2013 2.GPages: 84, PDF Size: 1.56 MB
Page 11 of 84

Indicators
- Turn Signal Indicators
- High Beam Indicator
- Front Fog Light Indicator
- Park/Headlight ON Indicator
- Electronic Speed Control SETIndicator
- Door Ajar Indicator
- Electronic Stability Control(ESC) OFF Indicator
- Electronic Stability Control(ESC) Activation/Malfunction
Indicator
CONTROLS AT A GLANCE
9
Page 12 of 84

ELECTRIC VEHICLE FEATURES
Auto Park
•The Auto Park features automatically places the transmission into PARK if there is any
indication that the driver may leave the vehicle while the transmission is in D (DRIVE),
N (NEUTRAL) or R (REVERSE).
• Auto Park is enabled under the following conditions:
• Key On (12 Volt ON and High Voltage OFF) or READY mode (12 Volt ON and High
Voltage ON).
• Vehicle speed is below 2 mph (3 km/h).
NOTE:
Auto Park is disabled above 2 mph (3 km/h) and transmission range will be maintained.
• The instrument cluster will display an Auto shift to park message and chime once when
Auto Park action occurs.
Mode of operation with key ON
• Auto Park will be engaged when the transmission is in DRIVE, NEUTRAL or REVERSE
and the following conditions are detected:
• Seat Belt is unlatched
• Brake pedal is released
• Driver's door is ajar
Mode of operation with key OFF
• Auto Park will be engaged when the transmission is in D (DRIVE), N (NEUTRAL) or
R (REVERSE) and the vehicle speed is less than 2 mph (3 km/h).
Audible Pedestrian Warning System
• Your vehicle is equipped with an Audible Pedestrian Warning System. The Audible
Pedestrian Warning System uses distinct sounds to alert pedestrians that your vehicle is
approaching.
• The audible warning system uses an in-car sound synthesizer with a speaker located in
the underhood compartment. The warning system is automatically activated when
selecting D (DRIVE) or R (REVERSE).
• In D (DRIVE) range, the system will remain active until the vehicle reaches a speed of
approximately 22 mph (35.5 km/h). At approximately 22 mph (35.5 km/h) the warning
system is deactivated and will automatically be active when the vehicle returns to
approximately 20 mph (32 km/h).
GETTING STARTED
10
Page 13 of 84

Smartphone Features
•With the “FIAT Access” smartphone app, you can monitor the state of charge of the high
voltage battery or initiate charging from your phone .You can also turn on your car’s
climate control system remotely .The smartphone app provides the following features:
• Monitor battery charge level
• Display available driving distance
• Check charging status
• Remotely activate vehicle climate control system
• Unlock and lock doors
• Assist with locating your vehicle
• Locate charging stations
• Send a point-of-interest to your vehicle
• Schedule a charge
• View energy consumed
• Notifications for charging and preconditioning events
How do I get the “FIAT Access” smartphone App?
• Visit the 500e registration website:
https://www .uconnectaccess.fiatusa.com/bevsubscribe/basicSubscription.jsp
•
Once in the registration website, you will need to enter your vehicle’s VIN and Con-
nectivity ID .The connectivity ID is found in
the vehicle's instrument cluster .To locate
the connectivity ID follow the steps below:
1. Press the menu button on the instrument
cluster .
GETTING STARTED
11
Page 14 of 84

2.Choose “Settings” and scroll down to the “Connectivity ID” .
3. Select “Connectivity ID” .
•
After obtaining the connectivity ID and VIN number return to the vehicle registration
website and perform the following:
1. After entering the VIN (Vehicle Identifica-
tion Number), Connectivity ID and your
email address, click “submit” .
2. You will now be asked to fill in your
contact information and a user name and
password.
3. Once finished with registration you will
be directed to your 500e owner’s site .
4. From the owner’s site you will be able to
download the 500e mobile application
and learn how to use your connected
features.
5. Use your owner’s site username and
password for logging into the mobile
application.
NOTE:
Your smartphone must have a valid data
connection to use the 500e mobile applica-
tion.
Need help with registration?
• Please call the 500e Call Center Toll Free
number below:
(855) 261-5364
GETTING STARTED
12
Page 15 of 84

ELECTRIC SYSTEM OPERATION
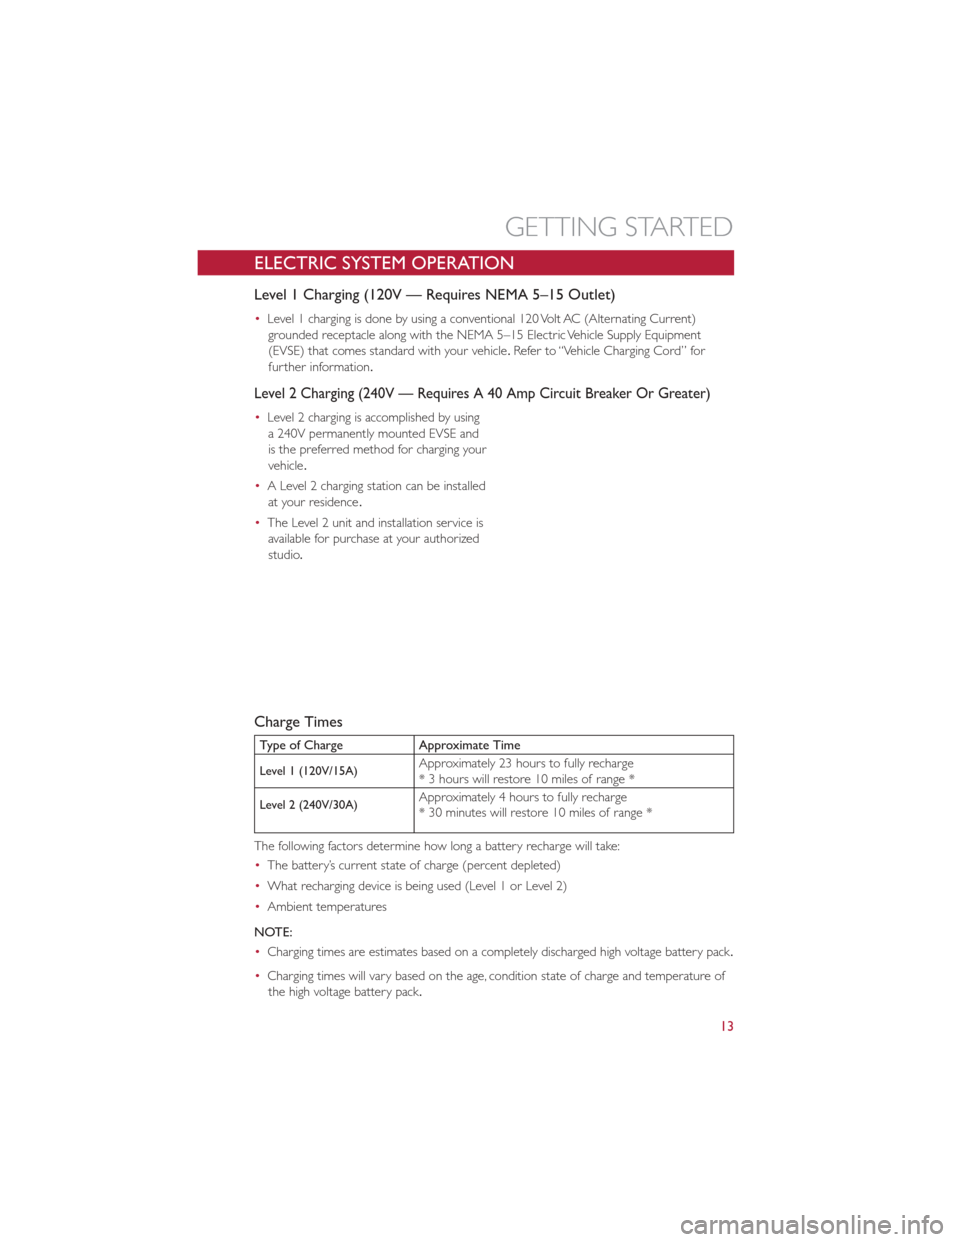
Level 1 Charging (120V — Requires NEMA 5–15 Outlet)
•Level 1 charging is done by using a conventional 120 Volt AC (Alternating Current)
grounded receptacle along with the NEMA 5–15 Electric Vehicle Supply Equipment
(EVSE) that comes standard with your vehicle .Refer to “Vehicle Charging Cord” for
further information.
Level 2 Charging (240V — Requires A 40 Amp Circuit Breaker Or Greater)
• Level 2 charging is accomplished by using
a 240V permanently mounted EVSE and
is the preferred method for charging your
vehicle .
• A Level 2 charging station can be installed
at your residence .
• The Level 2 unit and installation service is
available for purchase at your authorized
studio .
Charge Times
Type of Charge Approximate Time
Level 1 (120V/15A)Approximately 23 hours to fully recharge
* 3 hours will restore 10 miles of range *
Level 2 (240V/30A)Approximately 4 hours to fully recharge
* 30 minutes will restore 10 miles of range *
The following factors determine how long a battery recharge will take:
• The battery’s current state of charge (percent depleted)
• What recharging device is being used (Level 1 or Level 2)
• Ambient temperatures
NOTE:
• Charging times are estimates based on a completely discharged high voltage battery pack .
• Charging times will vary based on the age, condition state of charge and temperature of
the high voltage battery pack .
GETTING STARTED
13
Page 16 of 84

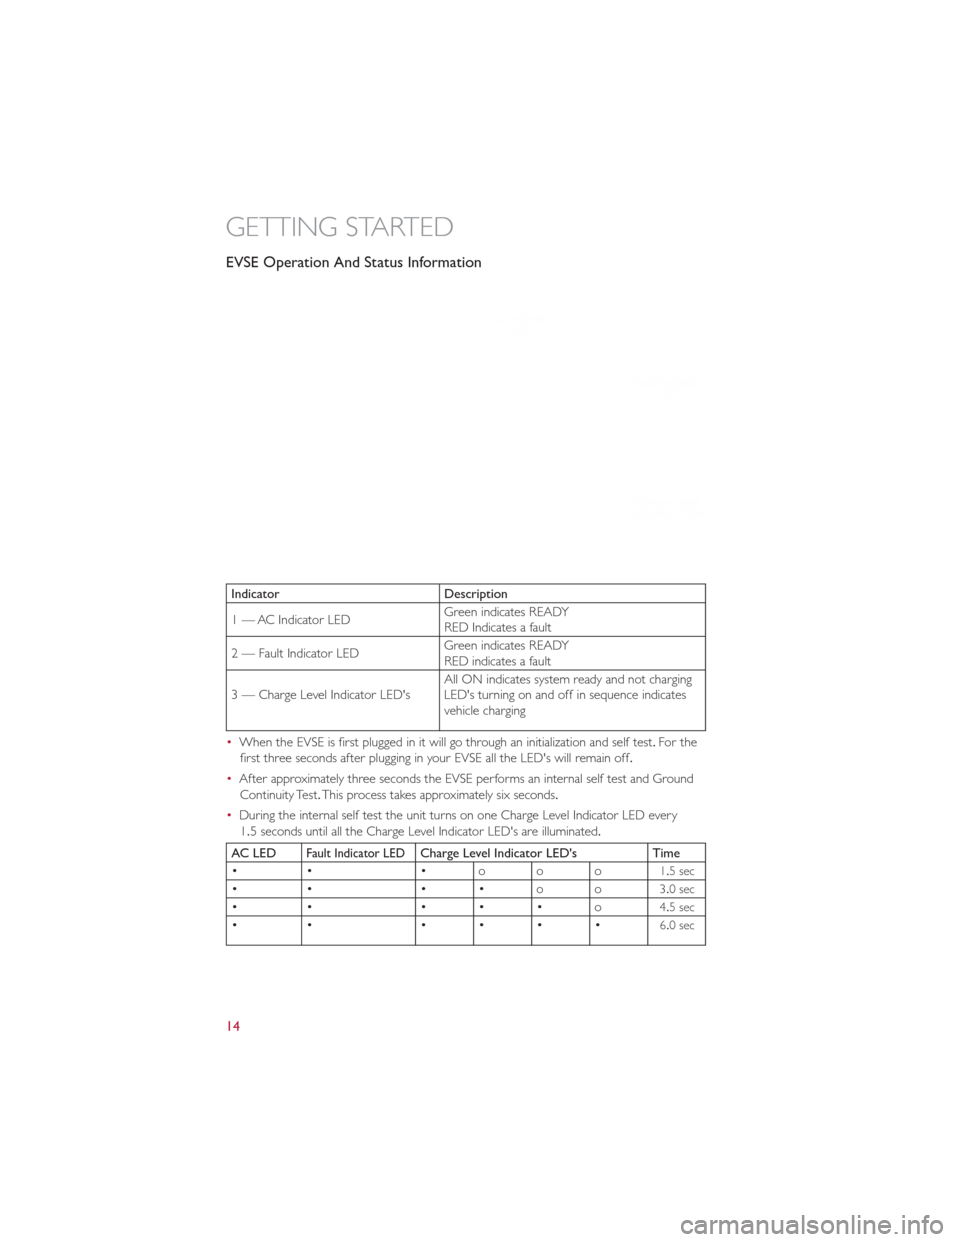
EVSE Operation And Status Information
IndicatorDescription
1 — AC Indicator LED Green indicates READY
RED Indicates a fault
2 — Fault Indicator LED Green indicates READY
RED indicates a fault
3 — Charge Level Indicator LED's All ON indicates system ready and not charging
LED's turning on and off in sequence indicates
vehicle charging
• When the EVSE is first plugged in it will go through an initialization and self test. For the
first three seconds after plugging in your EVSE all the LED's will remain off.
• After approximately three seconds the EVSE performs an internal self test and Ground
Continuity Test. This process takes approximately six seconds.
• During the internal self test the unit turns on one Charge Level Indicator LED every
1.5 seconds until all the Charge Level Indicator LED's are illuminated.
AC LEDFault Indicator LEDCharge Level Indicator LED's Time
• • •ooo
1.5 sec
• • ••oo3.0 sec
• • •••o4.5 sec
• • ••••6.0 sec
GETTING STARTED
14
Page 17 of 84

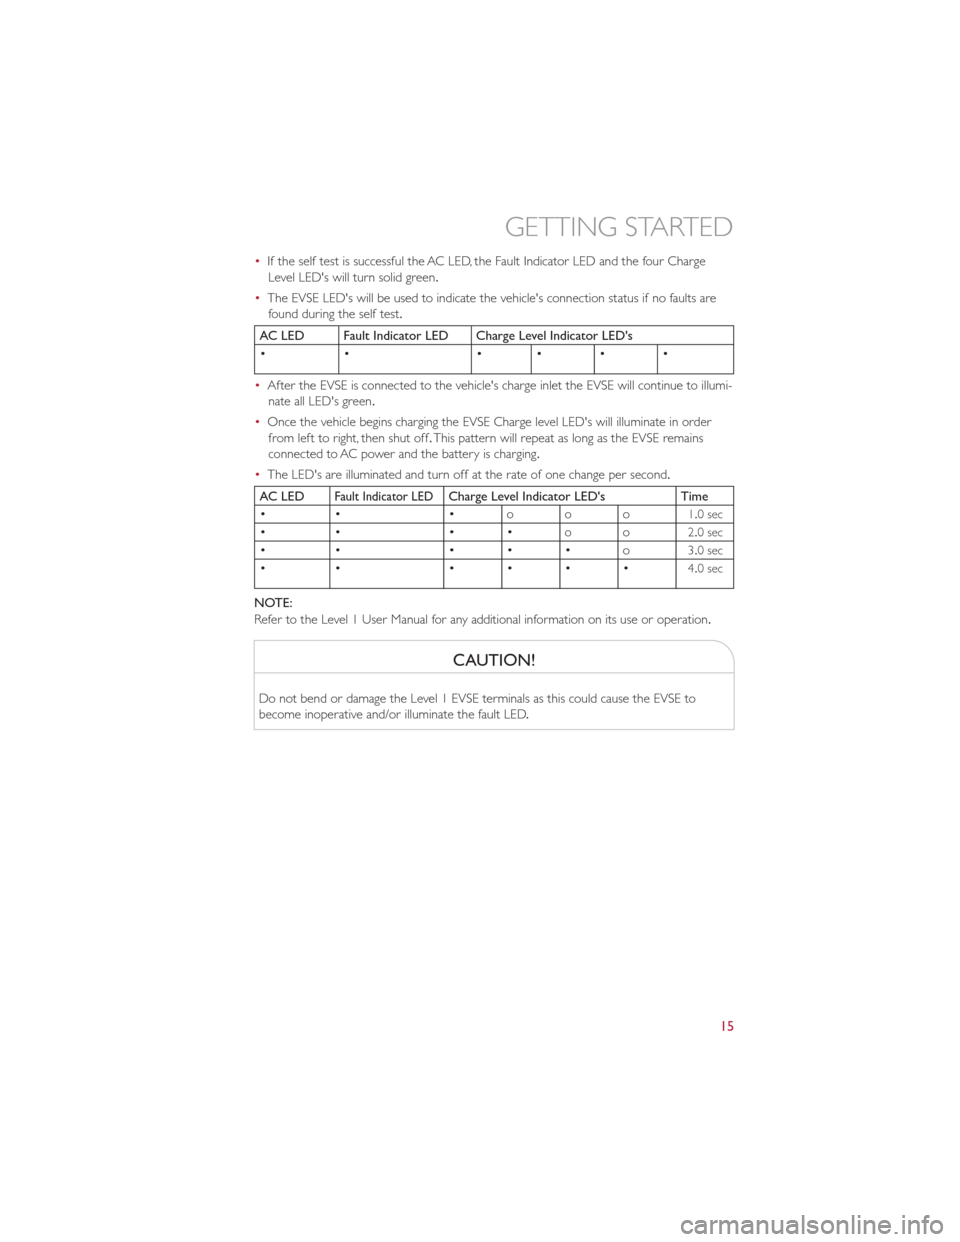
•If the self test is successful the AC LED, the Fault Indicator LED and the four Charge
Level LED's will turn solid green.
• The EVSE LED's will be used to indicate the vehicle's connection status if no faults are
found during the self test.
AC LED Fault Indicator LED Charge Level Indicator LED's
• • ••••
• After the EVSE is connected to the vehicle's charge inlet the EVSE will continue to illumi-
nate all LED's green.
• Once the vehicle begins charging the EVSE Charge level LED's will illuminate in order
from left to right, then shut off. This pattern will repeat as long as the EVSE remains
connected to AC power and the battery is charging.
• The LED's are illuminated and turn off at the rate of one change per second.
AC LEDFault Indicator LEDCharge Level Indicator LED's Time
• • •ooo
1.0 sec
• • ••oo2.0 sec
• • •••o3.0 sec
• • ••••4.0 sec
NOTE:
Refer to the Level 1 User Manual for any additional information on its use or operation.
CAUTION!
Do not bend or damage the Level 1 EVSE terminals as this could cause the EVSE to
become inoperative and/or illuminate the fault LED .
GETTING STARTED
15
Page 18 of 84

CHARGING THE HIGH VOLTAGE BATTERY
1.Put the vehicle in PARK.
2. Turn the ignition to the OFF position.
3. Remove the Level 1 EVSE from its storage bin by lifting the rear cargo cover .
4. Uncoil the entire length of the EVSE
(charge cord).
5. Plug the EVSE into a standard 120V AC
outlet that is properly grounded. It is rec-
ommended that the EVSE is connected
to an AC outlet on a circuit which is not
electrically loaded by other devices.
Extension cords may not be used.
NOTE:
All of the EVSE LED’s illuminate green.
6. Open the charge receptacle door .
NOTE:
The charge receptacle door is locked when-
ever the vehicle is locked. Unlock the doors
to unlock the charge receptacle door for
charging.
7.
Plug the EVSE into the charge receptacle .
Push the EVSE in firmly until it is com-
pletely engaged (if not completely engaged
the vehicle may not charge) .
GETTING STARTED
16
Page 19 of 84

NOTE:•The vehicle will initiate the charging cycle automatically when all the
conditions are satisfied.
• The vehicle battery gauge will show the pattern for charging.
• When charging is complete, or the
vehicle needs to be unplugged, remove
the EVSE by pushing the button on the
connector and pull firmly to remove it
from the vehicle’s charge receptacle .
8. Close the charge receptacle door .
NOTE:
• In the event of an error in the charging
process the AC power to the vehicle will
stop and a red indicator will illuminate on
the EVSE.
• Keep the door for the charge receptacle
closed when not in use .
Instrument Panel State Of Charge Indicator
• In addition to the instrument cluster the vehicle is also equipped with a State Of Charge
indicator .The indicator is made up of five lights that are mounted to the center of the
instrument panel.
• The State Of Charge indicator represents
the current state of charge for the high
voltage battery .The indicator lights quickly
identify the battery state of charge while
the vehicle is being charged. Each light
represents an incremental 20% level of
charge .Solid and blinking lights indicate
charge status similar to a mobile device .
NOTE:
In the event of an error in the charging
process the outer two lights will blink .
Number Of Indicator Lights Illuminated Percent Of Battery Charge
1 Light 0 – 20%
2 Lights 21 – 40%
3 Lights 41 – 60%
4 Lights 61 – 80%
5 Lights 81 – 100%
GETTING STARTED
17
Page 20 of 84

STARTING YOUR 500e
•Before starting your vehicle, adjust your seat, adjust both inside and outside mirrors, and
fasten your seat belts .
WARNING!
•Never leave children alone in a vehicle, or with access to an unlocked vehicle .
• Allowing children to be in a vehicle unattended is dangerous for a number of
reasons. A child or others could be seriously or fatally injured. Children should be
warned not to touch the parking brake, brake pedal or the shift lever .
• Do not leave the key fob in or near the vehicle (or in a location accessible to
children), and do not leave the ignition in the ACC or ON/RUN position. A child
could operate power windows, other controls, or move the vehicle .
• Turn the key to the START position while your vehicle is in PARK. When the ignition key
is turned to the START and then the RUN position, the “READY” indicator in the Elec-
tronic Vehicle Information Center (EVIC) will illuminate to indicate the 500e's Electric
Drive System has started.
• When the “READY” indicator is illuminated your 500e is ready to be driven.
• If the “READY” indicator fails to illuminate
after you have followed the normal start-
ing procedure contact your authorized
studio .
NOTE:
You must press the brake pedal before
shifting out of PARK.
GETTING STARTED
18