warning FIAT 500E 2013 2.G Owner's Manual
[x] Cancel search | Manufacturer: FIAT, Model Year: 2013, Model line: 500E, Model: FIAT 500E 2013 2.GPages: 84, PDF Size: 1.56 MB
Page 56 of 84
- Anti-Lock Brake (ABS) Light
•This light monitors the Anti-Lock Brake System (ABS).
• If the light is not on during starting, stays on, or turns on while driving, we recommend
you drive to the nearest authorized studio immediately and have the vehicle serviced
immediately .
- Air Bag Warning Light
•If the light is not on during starting, stays on, or turns on while driving, have the vehicle
serviced by an authorized studio immediately .
TIREFIT KIT
•Your vehicle may be equipped with a TIREFIT kit. The TIREFIT kit is located under the
front driver’s seat.
• Small punctures up to 1/4 in (6 mm) in the tire tread can be sealed with TIREFIT .Foreign
objects (e .g., screws or nails) should not be removed from the tire .TIREFIT can be used
in outside temperatures down to approximately -4°F (-20°C) .
• This kit will provide a temporary tire seal, allowing you to drive your vehicle up to
100 miles (160 km) with a maximum speed of 55 mph (88 km/h).
TIREFIT Storage
• The TIREFIT kit is located in the rear cargo area.
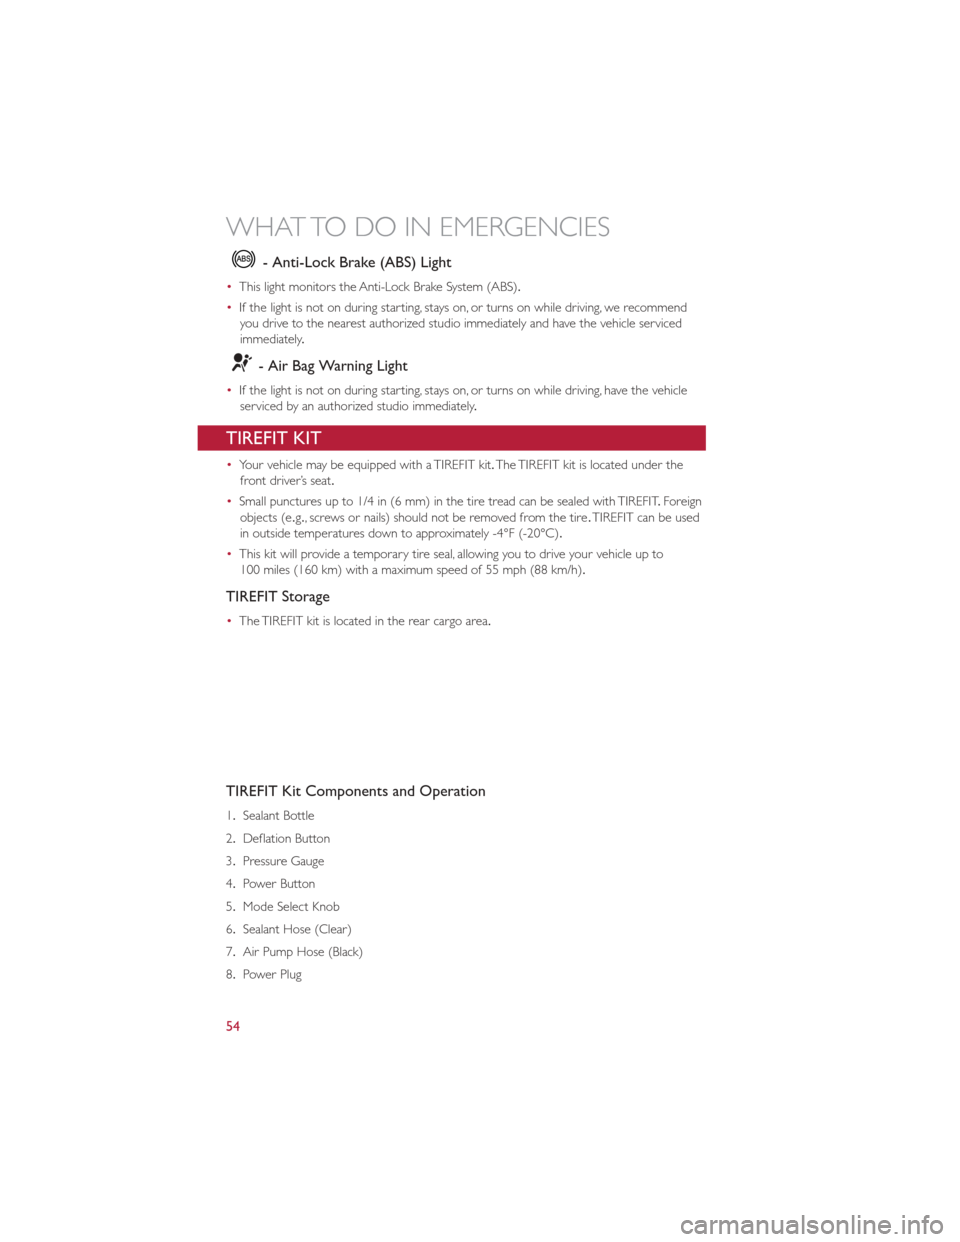
TIREFIT Kit Components and Operation
1. Sealant Bottle
2. Deflation Button
3. Pressure Gauge
4. Power Button
5. Mode Select Knob
6. Sealant Hose (Clear)
7. Air Pump Hose (Black)
8. Power Plug
WHAT TO DO IN EMERGENCIES
54
Page 58 of 84
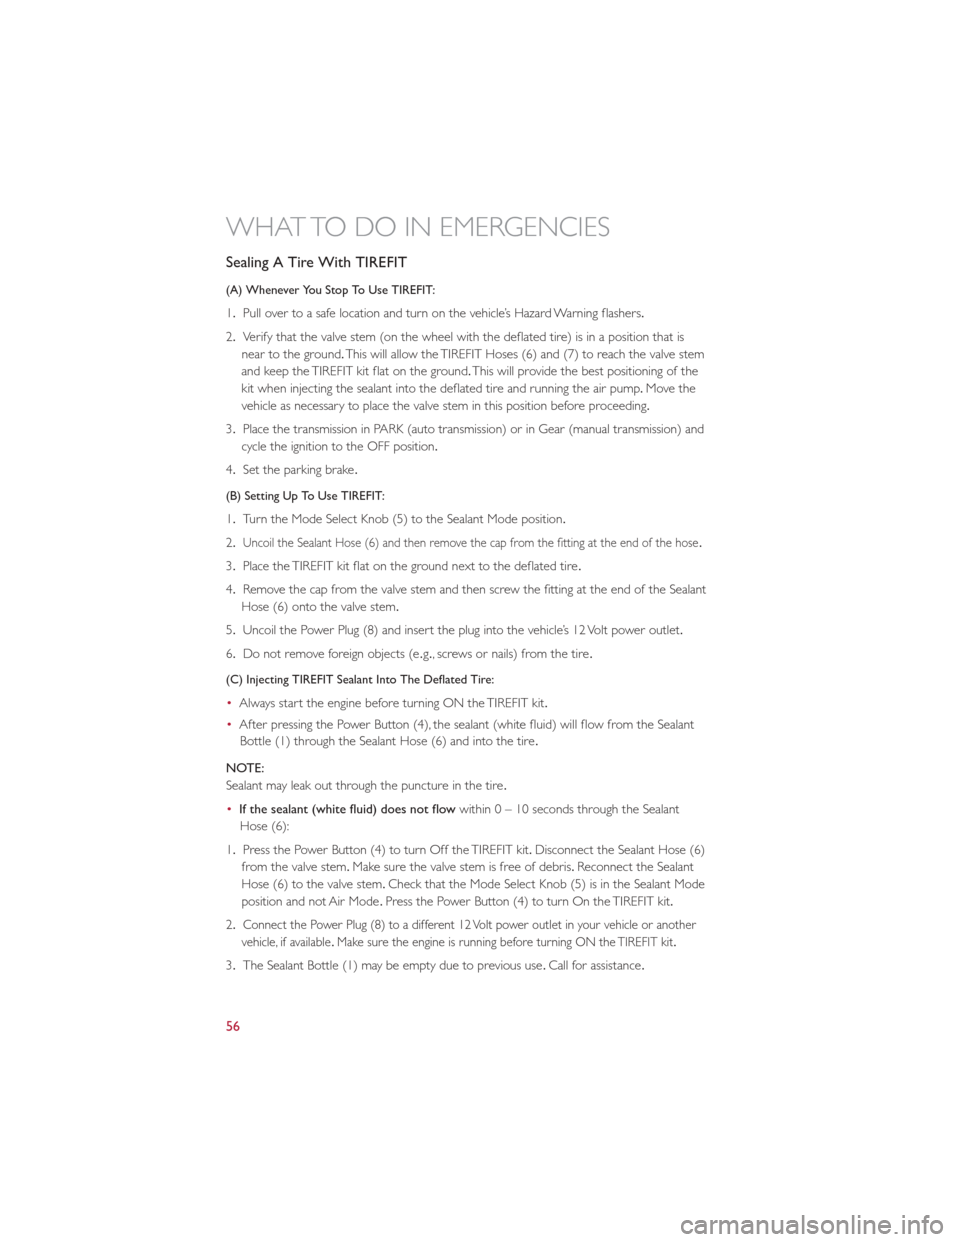
Sealing A Tire With TIREFIT
(A) Whenever You Stop To Use TIREFIT:
1.Pull over to a safe location and turn on the vehicle’s Hazard Warning flashers.
2. Verify that the valve stem (on the wheel with the deflated tire) is in a position that is
near to the ground. This will allow the TIREFIT Hoses (6) and (7) to reach the valve stem
and keep the TIREFIT kit flat on the ground. This will provide the best positioning of the
kit when injecting the sealant into the deflated tire and running the air pump .Move the
vehicle as necessary to place the valve stem in this position before proceeding.
3. Place the transmission in PARK (auto transmission) or in Gear (manual transmission) and
cycle the ignition to the OFF position.
4. Set the parking brake .
(B) Setting Up To Use TIREFIT:
1.Turn the Mode Select Knob (5) to the Sealant Mode position.
2.
Uncoil the Sealant Hose (6) and then remove the cap from the fitting at the end of the hose .
3.Place the TIREFIT kit flat on the ground next to the deflated tire .
4. Remove the cap from the valve stem and then screw the fitting at the end of the Sealant
Hose (6) onto the valve stem.
5. Uncoil the Power Plug (8) and insert the plug into the vehicle’s 12 Volt power outlet.
6. Do not remove foreign objects (e .g., screws or nails) from the tire.
(C) Injecting TIREFIT Sealant Into The Deflated Tire:
•Always start the engine before turning ON the TIREFIT kit.
• After pressing the Power Button (4), the sealant (white fluid) will flow from the Sealant
Bottle (1) through the Sealant Hose (6) and into the tire .
NOTE:
Sealant may leak out through the puncture in the tire .
• If the sealant (white fluid) does not flow within0–10seconds through the Sealant
Hose (6):
1. Press the Power Button (4) to turn Off the TIREFIT kit. Disconnect the Sealant Hose (6)
from the valve stem. Make sure the valve stem is free of debris. Reconnect the Sealant
Hose (6) to the valve stem. Check that the Mode Select Knob (5) is in the Sealant Mode
position and not Air Mode .Press the Power Button (4) to turn On the TIREFIT kit.
2.
Connect the Power Plug (8) to a different 12 Volt power outlet in your vehicle or another
vehicle, if available .Make sure the engine is running before turning ON the TIREFIT kit .
3.The Sealant Bottle (1) may be empty due to previous use .Call for assistance .
WHAT TO DO IN EMERGENCIES
56
Page 61 of 84
CAUTION!
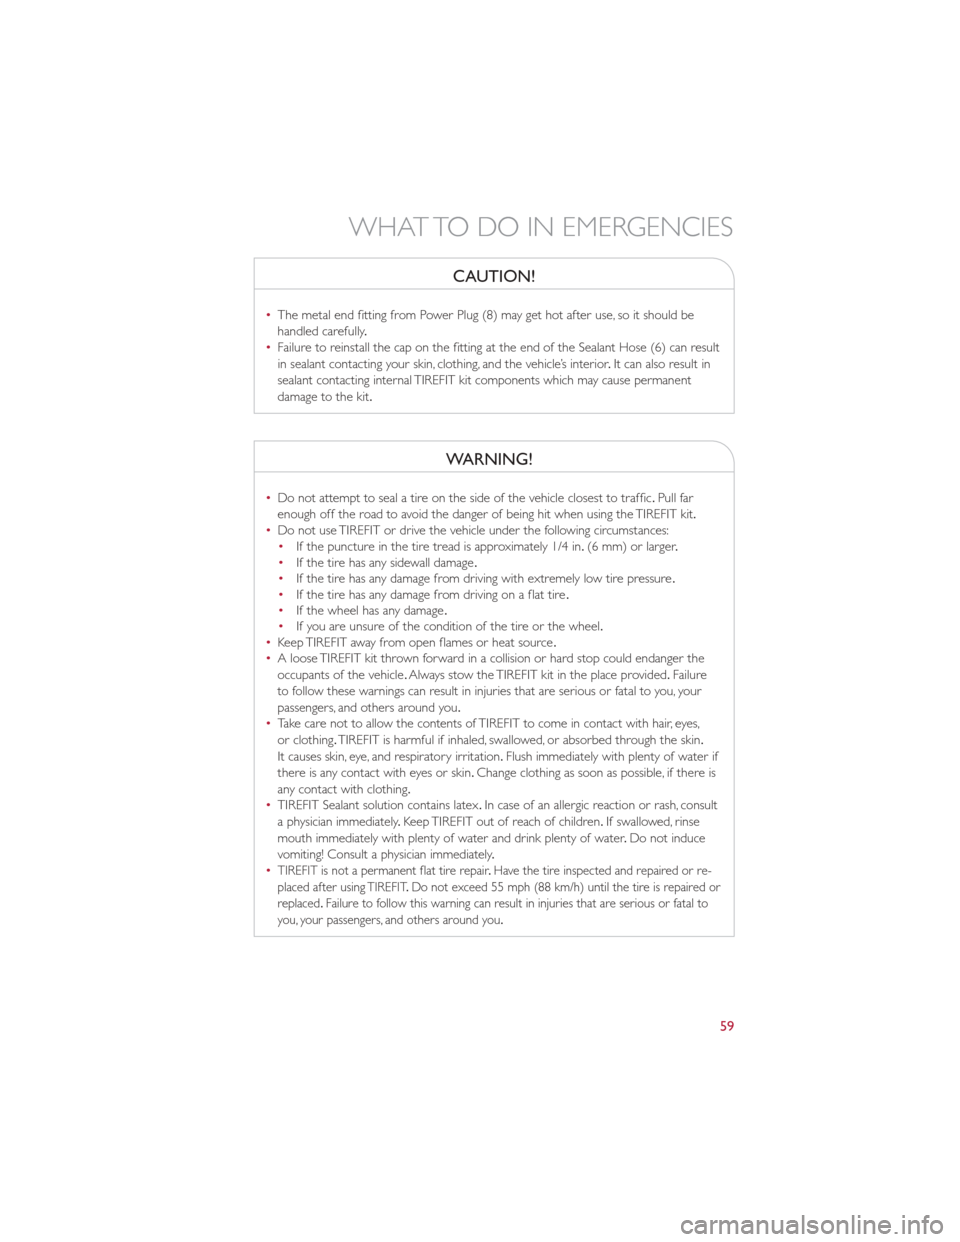
•The metal end fitting from Power Plug (8) may get hot after use, so it should be
handled carefully .
• Failure to reinstall the cap on the fitting at the end of the Sealant Hose (6) can result
in sealant contacting your skin, clothing, and the vehicle’s interior .It can also result in
sealant contacting internal TIREFIT kit components which may cause permanent
damage to the kit.
WARNING!
• Do not attempt to seal a tire on the side of the vehicle closest to traffic .Pull far
enough off the road to avoid the danger of being hit when using the TIREFIT kit.
• Do not use TIREFIT or drive the vehicle under the following circumstances:
• If the puncture in the tire tread is approximately 1/4 in. (6 mm) or larger.
• If the tire has any sidewall damage .
• If the tire has any damage from driving with extremely low tire pressure .
• If the tire has any damage from driving on a flat tire .
• If the wheel has any damage .
• If you are unsure of the condition of the tire or the wheel.
• Keep TIREFIT away from open flames or heat source .
• A loose TIREFIT kit thrown forward in a collision or hard stop could endanger the
occupants of the vehicle .Always stow the TIREFIT kit in the place provided. Failure
to follow these warnings can result in injuries that are serious or fatal to you, your
passengers, and others around you.
• Take care not to allow the contents of TIREFIT to come in contact with hair, eyes,
or clothing. TIREFIT is harmful if inhaled, swallowed, or absorbed through the skin.
It causes skin, eye, and respiratory irritation. Flush immediately with plenty of water if
there is any contact with eyes or skin. Change clothing as soon as possible, if there is
any contact with clothing.
• TIREFIT Sealant solution contains latex .In case of an allergic reaction or rash, consult
a physician immediately .Keep TIREFIT out of reach of children. If swallowed, rinse
mouth immediately with plenty of water and drink plenty of water .Do not induce
vomiting! Consult a physician immediately .
•
TIREFIT is not a permanent flat tire repair .Have the tire inspected and repaired or re-
placed after using TIREFIT .Do not exceed 55 mph (88 km/h) until the tire is repaired or
replaced. Failure to follow this warning can result in injuries that are serious or fatal to
you, your passengers, and others around you .
WHAT TO DO IN EMERGENCIES
59
Page 63 of 84
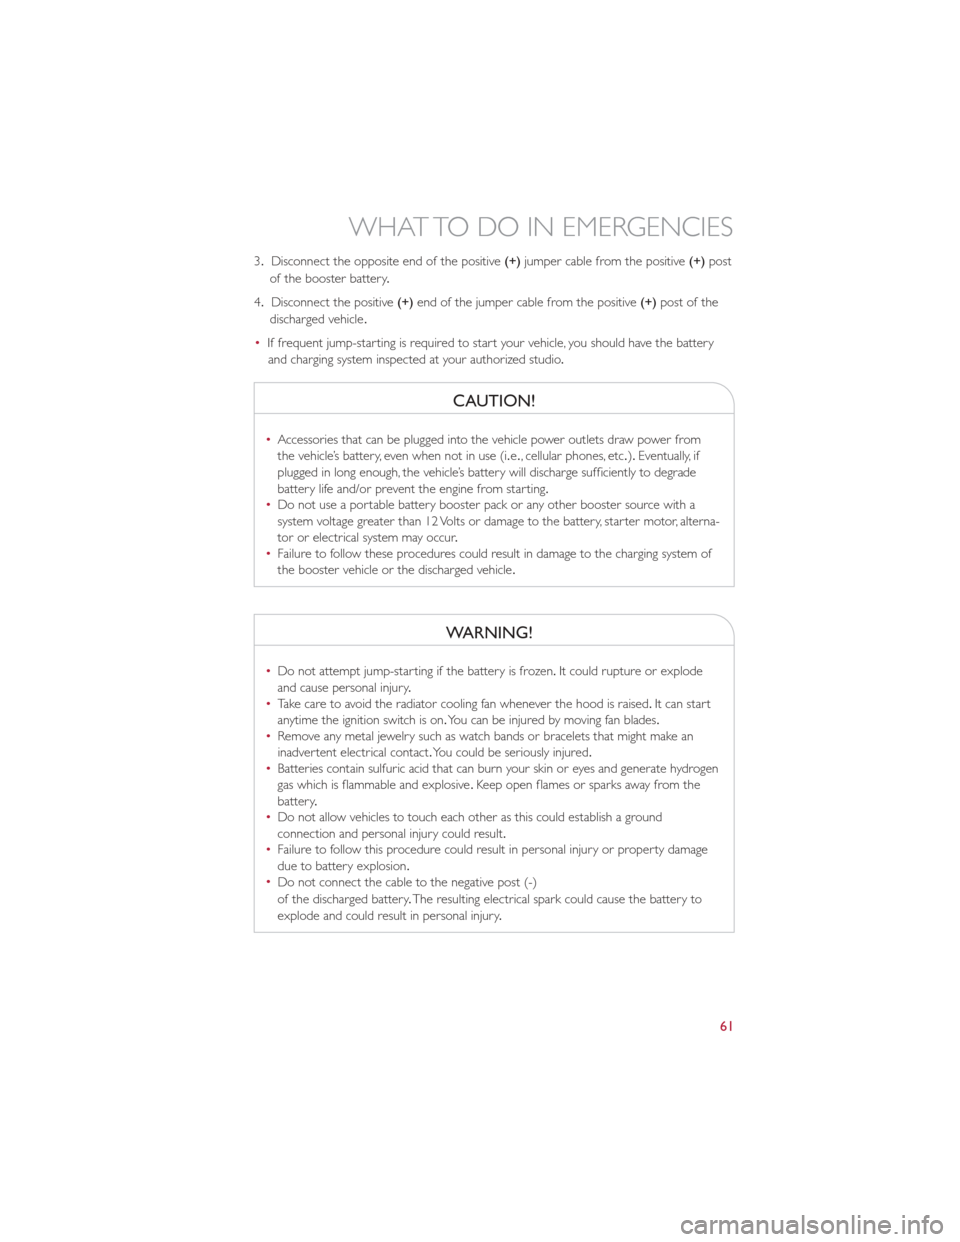
3.Disconnect the opposite end of the positive (+)jumper cable from the positive (+)post
of the booster battery .
4. Disconnect the positive (+)end of the jumper cable from the positive (+)post of the
discharged vehicle .
• If frequent jump-starting is required to start your vehicle, you should have the battery
and charging system inspected at your authorized studio .
CAUTION!
•Accessories that can be plugged into the vehicle power outlets draw power from
the vehicle’s battery, even when not in use (i.e ., cellular phones, etc.).Eventually, if
plugged in long enough, the vehicle’s battery will discharge sufficiently to degrade
battery life and/or prevent the engine from starting.
• Do not use a portable battery booster pack or any other booster source with a
system voltage greater than 12 Volts or damage to the battery, starter motor, alterna-
tor or electrical system may occur .
• Failure to follow these procedures could result in damage to the charging system of
the booster vehicle or the discharged vehicle .
WARNING!
•Do not attempt jump-starting if the battery is frozen. It could rupture or explode
and cause personal injury .
• Take care to avoid the radiator cooling fan whenever the hood is raised. It can start
anytime the ignition switch is on. You can be injured by moving fan blades.
• Remove any metal jewelry such as watch bands or bracelets that might make an
inadvertent electrical contact. You could be seriously injured.
• Batteries contain sulfuric acid that can burn your skin or eyes and generate hydrogen
gas which is flammable and explosive .Keep open flames or sparks away from the
battery .
• Do not allow vehicles to touch each other as this could establish a ground
connection and personal injury could result.
• Failure to follow this procedure could result in personal injury or property damage
due to battery explosion.
• Do not connect the cable to the negative post (-)
of the discharged battery .The resulting electrical spark could cause the battery to
explode and could result in personal injury .
WHAT TO DO IN EMERGENCIES
61
Page 64 of 84
MANUAL PARK RELEASE
WARNING!
Always secure your vehicle by fully applying the parking brake, before activating the
Manual Park Release.Activating the Manual Park Release will allow your vehicle to roll
away if it is not secured by the parking brake or other means. Activating the Manual Park
Release on an unsecured vehicle could lead to serious injury or death for those in or
around the vehicle .
• In order to move the vehicle in cases where the transmission will not shift out of PARK
(such as a dead battery), a Manual Park Release is available .Ifadead12voltbatteryis
the cause of the condition refer to “Jump Start Procedure — 12 Volt Battery” before
performing the Manual Park Release .
• To perform the Manual Park Release follow these steps:
1. To prevent the vehicle from rolling unintentionally, firmly apply the parking brake .
2.
If possible, raise the front driver's side of the vehicle to provide access to the transmission .
3.Working from underneath the vehicle, remove the black rubber plug from the front of
the Park module (a black canister mounted on the front of the transmission).
4. Using a T25 driver bit, rotate the Manual Park Release shaft (located just behind the
rubber plug) clockwise, at least 20 turns, to release the Park mechanism. The vehicle is
now out of PARK and can be moved.
5. Reinstall the rubber plug.
6. Release the parking brake only when a
driver is in the vehicle, or the vehicle is
secured by other means. The Manual Park
Release will be reset automatically once
the vehicle is restarted.
WHAT TO DO IN EMERGENCIES
62
Page 67 of 84
WARNING!
Fast spinning tires can be dangerous.Forces generated by excessive wheel speeds may
cause damage, or even failure, of the axle and tires .A tire could explode and injure some-
one .Do not spin your vehicle's wheels faster than 30 mph (48 km/h) or for longer than
30 seconds continuously without stopping when you are stuck and do not let anyone near
a spinning wheel, no matter what the speed .
EVENT DATA RECORDER (EDR)
•This vehicle is equipped with an Event Data Recorder (EDR) .The main purpose of an EDR
is to record, in certain crash or near crash-like situations, such as an air bag deployment or
hitting a road obstacle, data that assists in understanding how a vehicle’s systems performed .
The EDR is designed to record data related to vehicle dynamics and safety systems for a
short period of time, typically 30 seconds or less .The EDR in this vehicle is designed to
record such data as:
• How various systems in your vehicle were operating.
• Whether or not the driver and passenger safety belts were buckled/fastened .
• How far (if at all) the driver was depressing the accelerator and/or brake pedal.
• How fast the vehicle was traveling.
• These data can help provide a better understanding of the circumstances in which
crashes and injuries occur .
NOTE:
EDR data are recorded by your vehicle only if a non-trivial crash situation occurs; no data
are recorded by the EDR under normal driving conditions and no personal data (e .g.name,
gender, age, and crash location) are recorded. However, other parties, such as law enforce-
ment, could combine the EDR data with the type of personally identifying data routinely
acquired during a crash investigation.
• To read data recorded by an EDR, special equipment is required, and access to the vehicle
or the EDR is needed. In addition to the vehicle manufacturer, other parties such as law
enforcement, that have the special equipment, can read the information if they have
access to the vehicle or the EDR.
WHAT TO DO IN EMERGENCIES
65
Page 68 of 84
OPENING THE HOOD
•Pull the release lever located below the
instrument panel and in front of the
driver’s door .
• Raise the hood and locate the safety latch
in the middle of the hood opening.
• Move the safety latch while lifting the
hood at the same time .
• Insert the support rod into the slot on
the hood.
• To close the hood, remove the support
rod and place it in the retaining clip, then
lower the hood slowly .
WARNING!
Be sure the hood is fully latched before driving your vehicle .If the hood is not fully
latched, it could open when the vehicle is in motion and block your vision. Failure to follow
this warning could result in serious injury or death.
MAINTAINING YOUR VEHICLE
66
Page 72 of 84
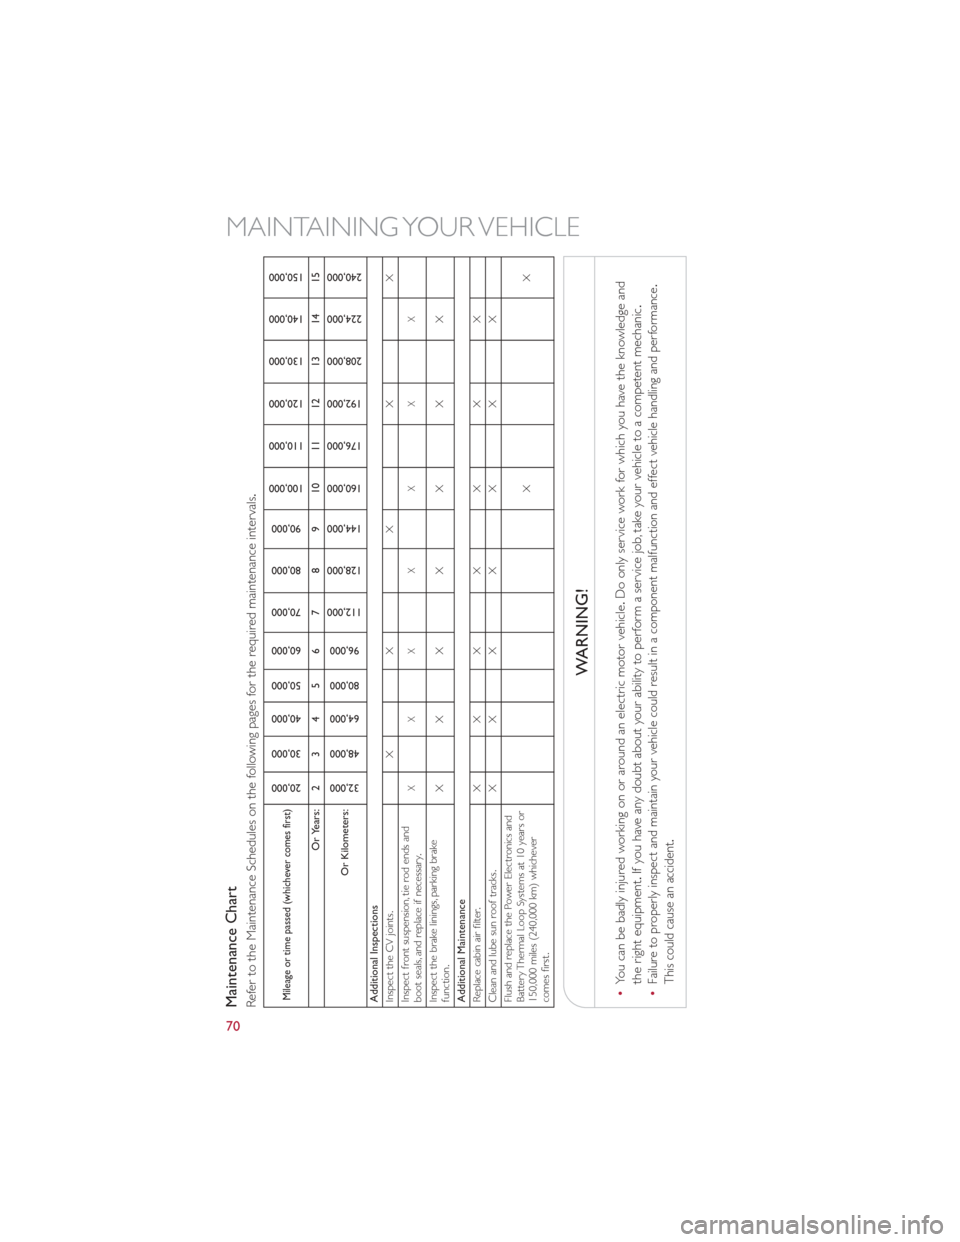
Maintenance ChartRefer to the Maintenance Schedules on the following pages for the required maintenance intervals.Mileage or time passed (whichever comes first)
20,000
30,000
40,000
50,000
60,000
70,000
80,000
90,000
100,000
110,000
120,000
130,000
140,000
150,000
Or Years: 2 3 4 5 6 7 8 9 10 11 12 13 14 15
Or Kilometers:
32,000
48,000
64,000
80,000
96,000
112,000
128,000
144,000
160,000
176,000
192,000
208,000
224,000
240,000
Additional Inspections
Inspect the CV joints. XX X X X
Inspect front suspension, tie rod ends and
boot seals, and replace if necessary .
XXXXXXX
Inspect the brake linings, parking brake
function. XXXXXXX
Additional Maintenance
Replace cabin air filter . XXXXXXX
Clean and lube sun roof tracks .XXXXXXX
Flush and replace the Power Electronics and
Battery Thermal Loop Systems at 10 years or
150,000 miles (240,000 km) whichever
comes first. XX
WARNING!
•
You can be badly injured working on or around an electric motor vehicle .Do only service work for which you have the knowledge and
the right equipment. If you have any doubt about your ability to perform a service job, take your vehicle to a competent mechanic .
•Failure to properly inspect and maintain your vehicle could result in a component malfunction and effect vehicle handling and performance .
This could cause an accident .
MAINTAINING YOUR VEHICLE
70
Page 75 of 84
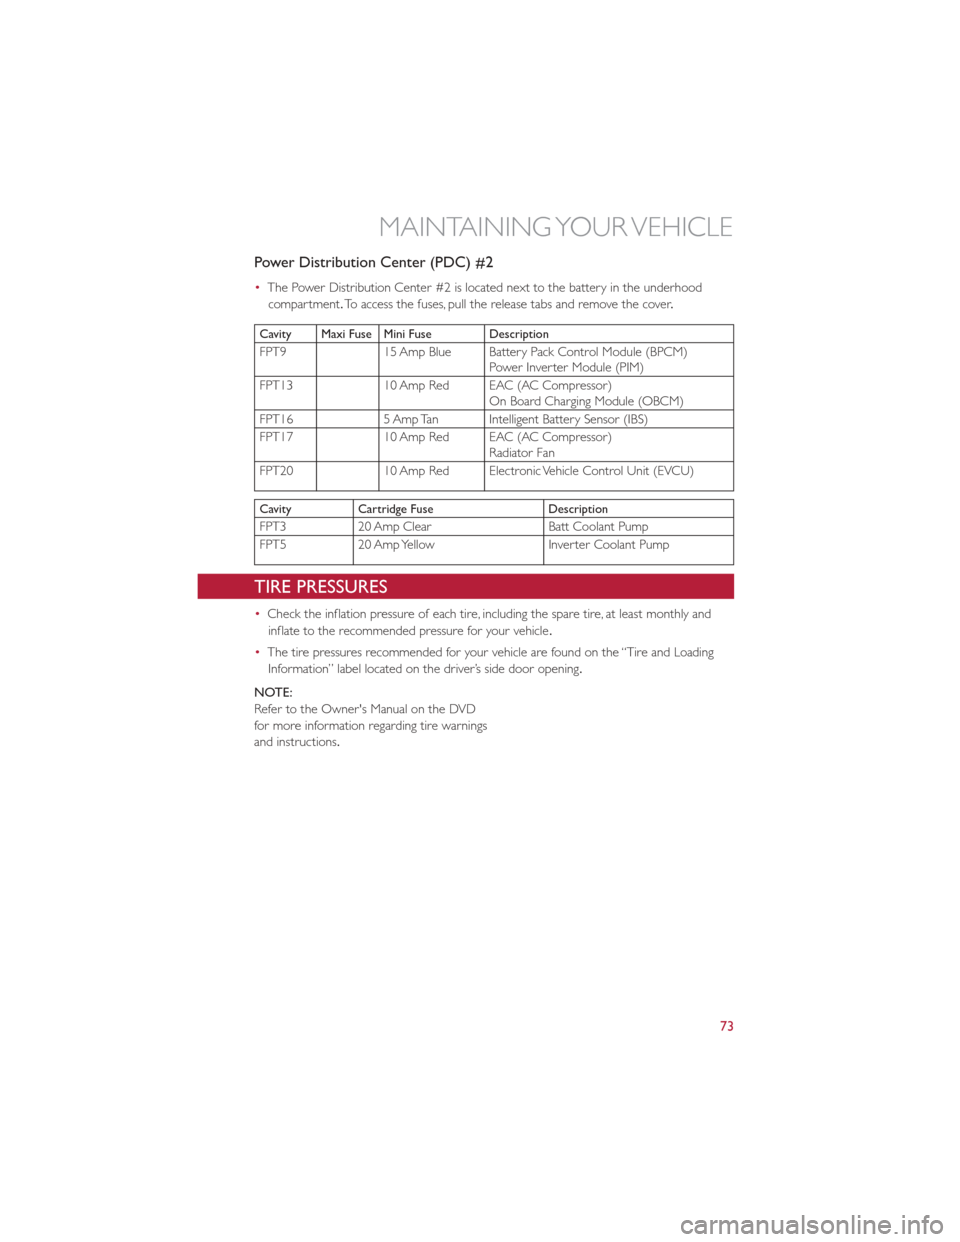
Power Distribution Center (PDC) #2
•The Power Distribution Center #2 is located next to the battery in the underhood
compartment. To access the fuses, pull the release tabs and remove the cover .
Cavity Maxi Fuse Mini Fuse Description
FPT915 Amp Blue Battery Pack Control Module (BPCM)
Power Inverter Module (PIM)
FPT13 10 Amp Red EAC (AC Compressor)
On Board Charging Module (OBCM)
FPT16 5 Amp Tan Intelligent Battery Sensor (IBS)
FPT17 10 Amp Red EAC (AC Compressor)
Radiator Fan
FPT20 10 Amp Red Electronic Vehicle Control Unit (EVCU)
CavityCartridge Fuse Description
FPT320 Amp Clear Batt Coolant Pump
FPT5 20 Amp Yellow Inverter Coolant Pump
TIRE PRESSURES
•Check the inflation pressure of each tire, including the spare tire, at least monthly and
inflate to the recommended pressure for your vehicle .
• The tire pressures recommended for your vehicle are found on the “Tire and Loading
Information” label located on the driver’s side door opening.
NOTE:
Refer to the Owner's Manual on the DVD
for more information regarding tire warnings
and instructions.
MAINTAINING YOUR VEHICLE
73
Page 76 of 84
WARNING!
•Overloading of your tires is dangerous. Overloading can cause tire failure, affect ve-
hicle handling, and increase your stopping distance .Use tires of the recommended
load capacity for your vehicle .Never overload them.
• Improperly inflated tires are dangerous and can cause collisions. Under-inflation is the
leading cause of tire failure and may result in severe cracking, component separation,
or “blow out” .Over-inflation reduces a tire’s ability to cushion shock .Objects on the
road and chuck holes can cause damage that results in tire failure .Unequal tire
pressures can cause steering problems. You could lose control of your vehicle.
Over-inflated or under-inflated tires can affect vehicle handling and can fail suddenly,
resulting in loss of vehicle control.
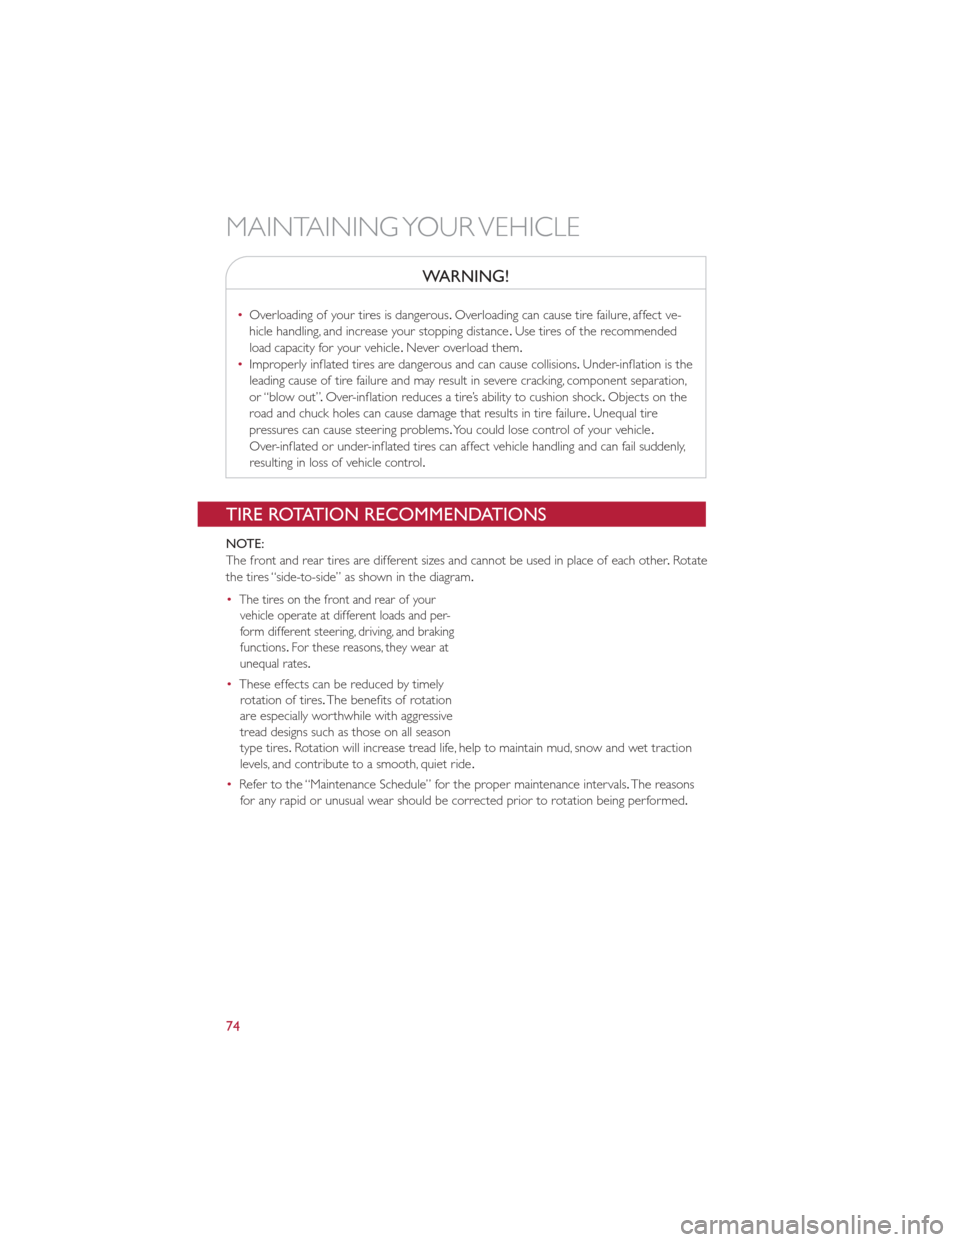
TIRE ROTATION RECOMMENDATIONS
NOTE:
The front and rear tires are different sizes and cannot be used in place of each other .Rot ate
the tires “side-to-side” as shown in the diagram.
•
The tires on the front and rear of your vehicle operate at different loads and per-
form different steering, driving, and braking
functions. For these reasons, they wear at
unequal rates.
• These effects can be reduced by timely
rotation of tires. The benefits of rotation
are especially worthwhile with aggressive
tread designs such as those on all season
type tires. Rotation will increase tread life, help to maintain mud, snow and wet traction
levels, and contribute to a smooth, quiet ride .
• Refer to the “Maintenance Schedule” for the proper maintenance intervals. The reasons
for any rapid or unusual wear should be corrected prior to rotation being performed.
MAINTAINING YOUR VEHICLE
74