buttons FIAT 500E 2013 2.G User Guide
[x] Cancel search | Manufacturer: FIAT, Model Year: 2013, Model line: 500E, Model: FIAT 500E 2013 2.GPages: 84, PDF Size: 1.56 MB
Page 9 of 84
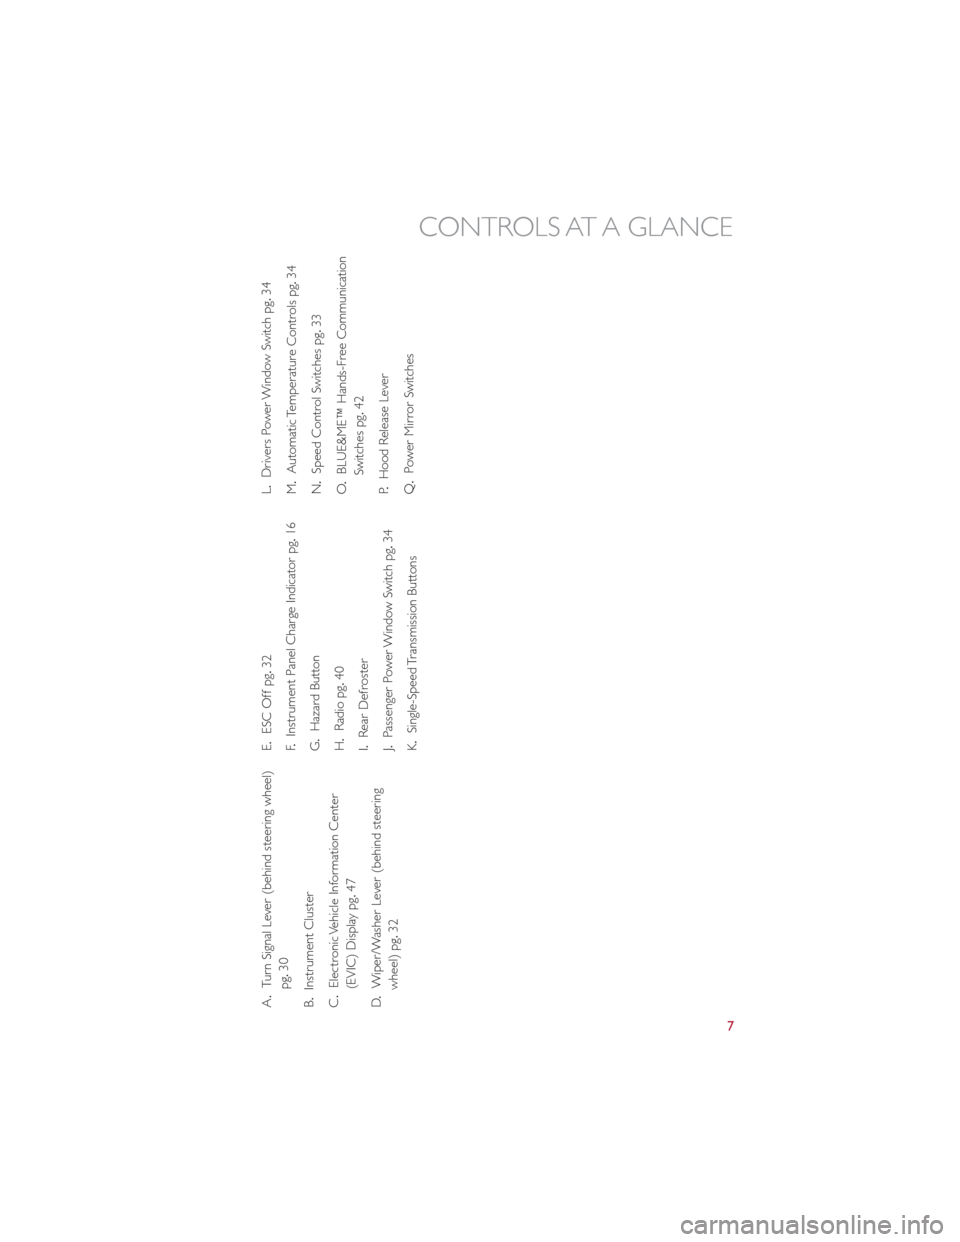
A. Turn Signal Lever (behind steering wheel)
pg. 30
B. Instrument Cluster
C . Electronic Vehicle Information Center
(EVIC) Display pg. 47
D . Wiper/Washer Lever (behind steering
wheel) pg. 32 E.
ESC Off pg. 32
F . Instrument Panel Charge Indicator pg. 16
G. Hazard Button
H. Radio pg. 40
I. Rear Defroster
J. Passenger Power Window Switch pg. 34
K. Single-Speed Transmission Buttons L.
Drivers Power Window Switch pg. 34
M. Automatic Temperature Controls pg. 34
N. Speed Control Switches pg. 33
O . BLUE&ME™ Hands-Free Communication
Switches pg. 42
P . Hood Release Lever
Q. Power Mirror Switches
CONTROLS AT A GLANCE
7
Page 36 of 84
Cancel
•Push the CANCEL button, or apply the brakes to cancel the set speed and maintain the
set speed memory .
• Push the ON/OFF button to turn the system off and erase the set speed memory .
WARNING!
•Leaving the Electronic Speed Control system on when not in use is dangerous.
You could accidentally set the system or cause it to go faster than you want.
You could lose control and have a collision. Always leave the Electronic Speed
Control system off when you are not using it.
• Electronic Speed Control can be dangerous where the system cannot maintain a
constant speed. Your vehicle could go too fast for the conditions, and you could lose
control. A collision could be the result. Do not use Electronic Speed Control in heavy
traffic or on roads that are winding, icy, snow-covered or slippery .
POWER WINDOWS
•The controls for the power windows are located on either side of the transmission push
buttons.
• Power windows can be operated with the
ignition in the ON/RUN position.
•
Both windows have an Auto Down feature .
Push the switch down past the detent and
release to fully lower the window .
•Pull the switch upward to close the
window .
OPERATING YOUR VEHICLE
34
Page 37 of 84
AUTOMATIC TEMPERATURE CONTROLS (ATC)
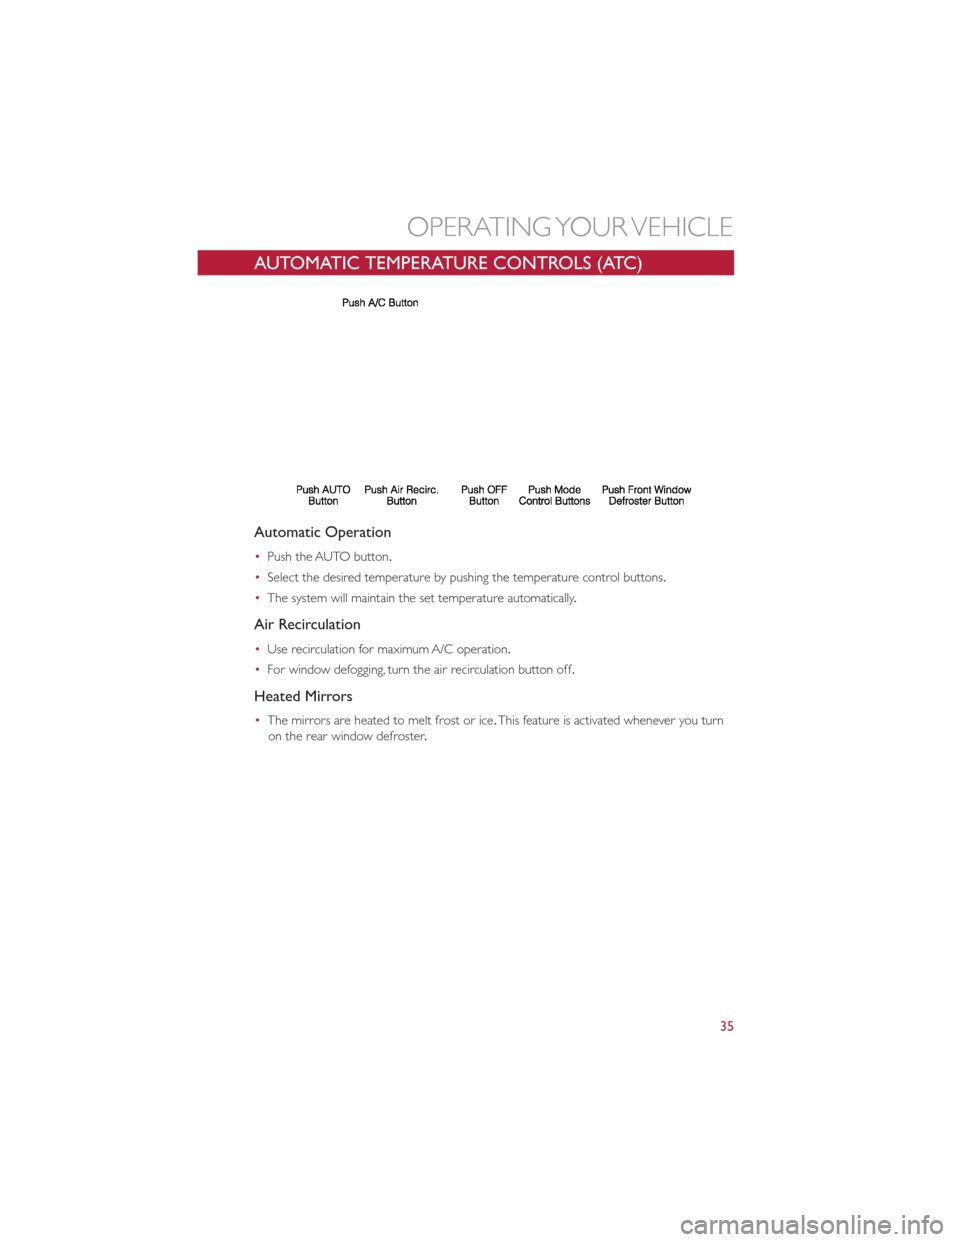
Automatic Operation
•Push the AUTO button.
• Select the desired temperature by pushing the temperature control buttons.
• The system will maintain the set temperature automatically .
Air Recirculation
•Use recirculation for maximum A/C operation.
• For window defogging, turn the air recirculation button off.
Heated Mirrors
•The mirrors are heated to melt frost or ice .This feature is activated whenever you turn
on the rear window defroster .
OPERATING YOUR VEHICLE
35
Page 42 of 84
AM/FM RADIO WITH CD PLAYER AND SiriusXM
SATELLITE RADIO
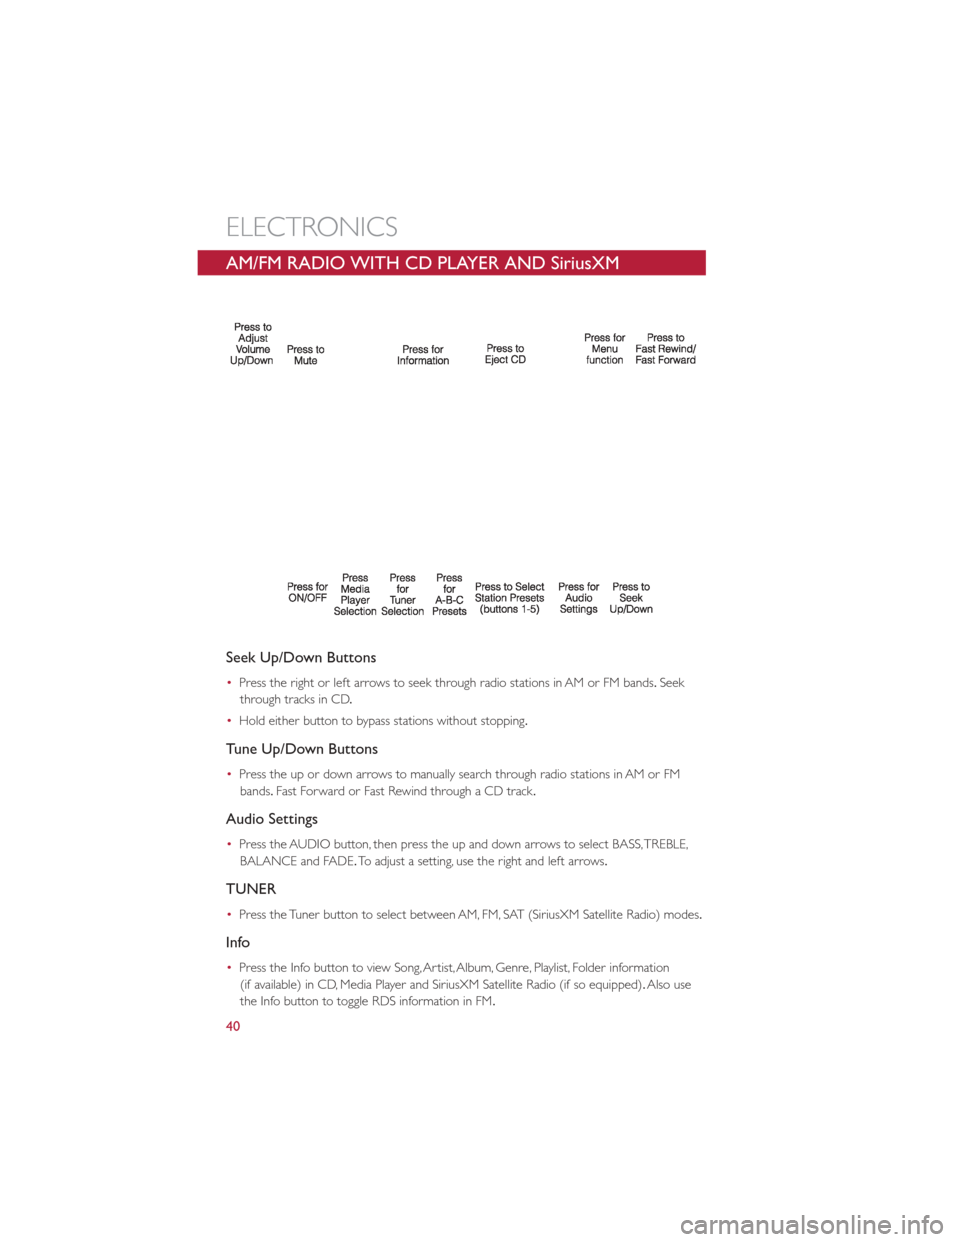
Seek Up/Down Buttons
•Press the right or left arrows to seek through radio stations in AM or FM bands. Seek
through tracks in CD .
• Hold either button to bypass stations without stopping.
Tune Up/Down Buttons
•Press the up or down arrows to manually search through radio stations in AM or FM
bands. Fast Forward or Fast Rewind through a CD track .
Audio Settings
•Press the AUDIO button, then press the up and down arrows to select BASS, TREBLE,
BALANCE and FADE. To adjust a setting, use the right and left arrows.
TUNER
•Press the Tuner button to select between AM, FM, SAT (SiriusXM Satellite Radio) modes.
Info
•Press the Info button to view Song, Artist, Album, Genre, Playlist, Folder information
(if available) in CD, Media Player and SiriusXM Satellite Radio (if so equipped). Also use
the Info button to toggle RDS information in FM.
ELECTRONICS
40
Page 43 of 84
MENU
•Press the MENU button and one of the following options will appear on the Radio
display .Use the up and down arrows to scroll through the options; use the left and right
arrows to change a selection setting.
• Speech Volume •SiriusXM Telephone Number
• Aux Audio Offset •System Reset
• Radio Off •Speed Volume
• Sat ID •On Volume Limit
Clock Setting
• The time is set using the Electronic Vehicle Information Center (EVIC) Display .
• With the Date and Time shown in the EVIC display, press the SET ESC button to enter
the menu mode .
• Press the plus or minus buttons until "Set Time" is displayed and press the SET ESC but-
ton again.
• Press the SET ESC button; “hours” will flash on the display .
• Press the plus or minus buttons to adjust the hours.
• When setting the hour is complete, briefly press the SET ESC button and “minutes” will
flash in the display .Press the plus or minus buttons to adjust the minutes.
• When setting the time is complete, press and hold the SET ESC button.
NOTE:
The charging schedule is based on this date and time .
Station Presets
•To store a tuned station, find the station to store by either pressing the right and left
arrow (Seek) buttons or by pressing up or down arrow (Manual Tune) buttons.
• Once the station is found, press and hold one of the PRESET buttons, until you hear a
confirmation beep (Preset Saved will be shown in the radio display). A total of 15 FM, 10
AM and 15 SiriusXM Satellite Radio stations can be preset by pressing the A-B-C button.
A-B-C Button
• Press the A-B button to choose between the presets stored in the AM mode, A-B-C to
choose between the presets stored in the FM and SAT modes. The mode (AM, FM, SAT),
station preset (A, B, C) and preset button number (P 1-5) will be displayed in the middle
of the radio display .
ELECTRONICS
41
Page 44 of 84
BLUE&ME™ HANDS-FREE OPERATION
•FIAT’s Windows Mobile™ based BLUE&ME™ Hands-Free Communication is a personal
telematics system that incorporates communication and entertainment applications that
are specifically designed for use in your car .
• The BLUE&ME™ Hands-Free Communication package installed in your car is equipped
with integral hands-free functionality, message reader, and media player .BLUE&ME™ is
designed to support the future installation of additional services.
• The BLUE&ME™ Hands-Free Communication package features integrated voice recogni-
tion, steering wheel controls and a multifunction electronic display that allows you to use
your Bluetooth® enabled wireless technology enabled mobile phone without having to
take your eyes off the road. You can even keep your phone in a pocket or a bag. Yo u a r e
not required to train the voice recognition system to recognize your voice .The system is
“speaker independent” and performs equally well for different users.
WARNING!
Driving while distracted can result in loss of vehicle control, accident and injury .It is
strongly recommended that you use extreme caution when using any device or feature
that may take your focus off the road or your hands off the steering wheel. Your primary
responsibility is the safe operation of your vehicle .
Front Steering Wheel Buttons
•The operations of the front BLUE&ME™
Steering Wheel buttons, located on the
front left of the steering wheel, are as
follows:
ELECTRONICS
42
Page 45 of 84
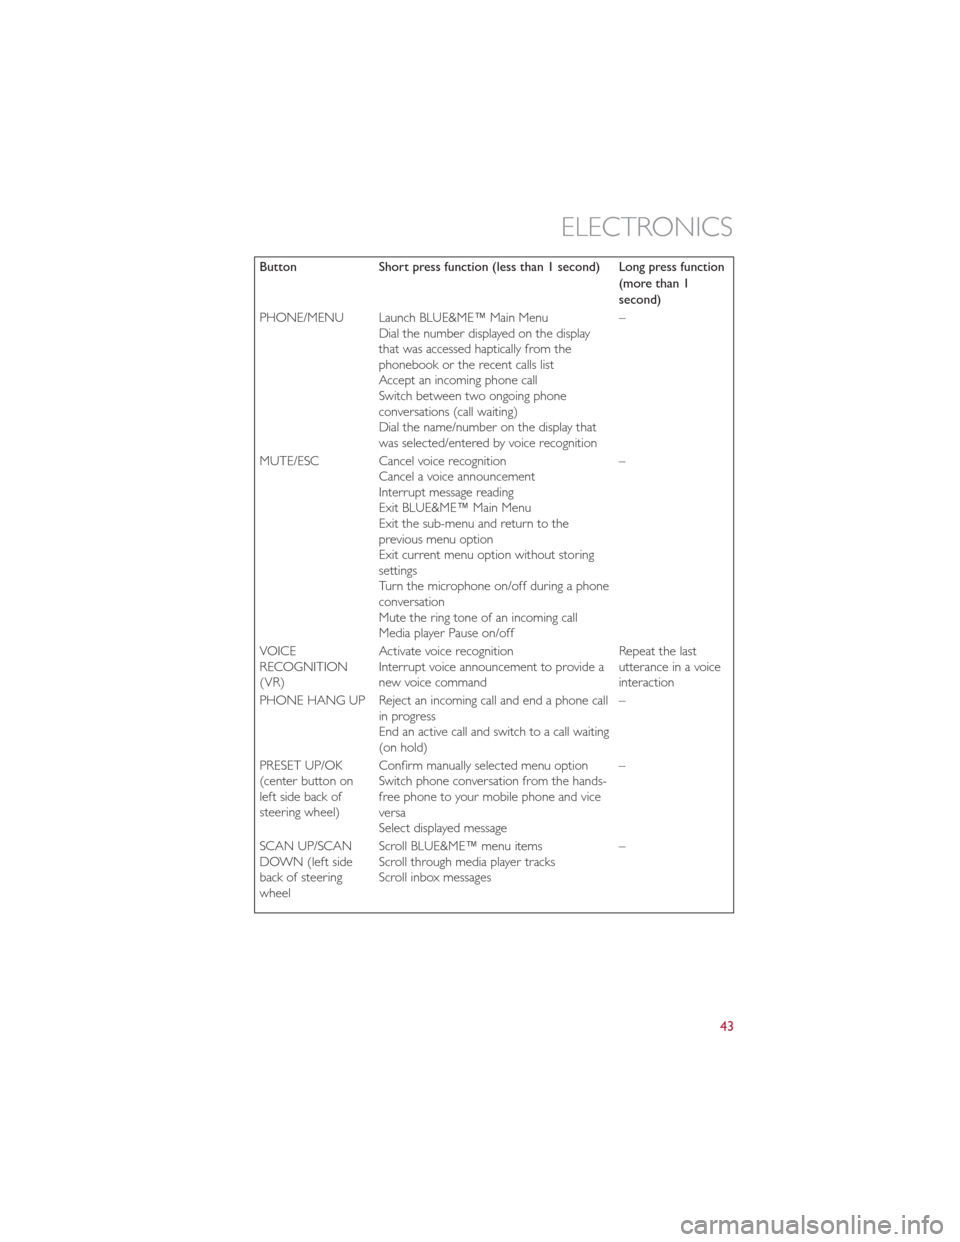
ButtonShort press function (less than 1 second) Long press function
(more than 1
second)
PHONE/MENU Launch BLUE&ME™ Main Menu Dial the number displayed on the display
that was accessed haptically from the
phonebook or the recent calls list
Accept an incoming phone call
Switch between two ongoing phone
conversations (call waiting)
Dial the name/number on the display that
was selected/entered by voice recognition –
MUTE/ESC Cancel voice recognition Cancel a voice announcement
Interrupt message reading
Exit BLUE&ME™ Main Menu
Exit the sub-menu and return to the
previous menu option
Exit current menu option without storing
settings
Turn the microphone on/off during a phone
conversation
Mute the ring tone of an incoming call
Media player Pause on/off –
VOICE
RECOGNITION
(VR) Activate voice recognition
Interrupt voice announcement to provide a
new voice command Repeat the last
utterance in a voice
interaction
PHONE HANG UP Reject an incoming call and end a phone call in progress
End an active call and switch to a call waiting
(on hold) –
PRESET UP/OK
(center button on
left side back of
steering wheel) Confirm manually selected menu option
Switch phone conversation from the hands-
free phone to your mobile phone and vice
versa
Select displayed message –
SCAN UP/SCAN
DOWN (left side
back of steering
wheel Scroll BLUE&ME™ menu items
Scroll through media player tracks
Scroll inbox messages
–
ELECTRONICS
43
Page 47 of 84
•For certain mobile phones the phonebook is not copied automatically, in this case you
must transfer the phonebook contacts using your mobile phone keypad .If BLUE&ME™
asks you to do this, then perform this procedure following the instructions specific to
your mobile phone and press PHONE/MENU button on the steering wheel when you
have finished.
Making a Phone Call
• Assume that “John Smith” is one of the contacts stored in your phonebook .
• To call John Smith, proceed as follows:
• Press the VR steering wheel button and pronounce “Call John Smith” .
• If the name is recognized, the system will display the recognized contact’s information on
the display screen.
• If there is just one phone number for John Smith in your phonebook, the system will ask
if you would like to call John Smith. To start the call say “Yes”, otherwise say “No” .
• If John Smith has several phone numbers, the system will ask which phone number you
would like to call (e .g.: “Call John Smith (at) Work or (at) Home?”). Answer with the type
of required phone number (e .g.: “(at) Home”).
•
If John Smith has several phone numbers but the “location” (i .e.: the type of phone number
like work, home, etc .) is missing, the system will display the selected contact and a list of re-
lated phone numbers on the instrument cluster display .The hands-free phone system will
ask if you would like to call the phone number displayed .To respond with “Yes”, pronounce
“Yes”, otherwise say “No” .If this is the correct contact but the wrong number, say “Forward”
or “Backward” to navigate to the phone number you’d like to call .To call the displayed phone
number, pronounce “Call” .You can also scroll through the phone number list manually by
pressing the buttons on the back of the steering wheel until you find the required number .
Then, press PRESET UP/OK button on the rear of the steering wheel to start the call .
•To end the phone call, press the PHONE HANG UP button on the steering wheel.
Media Player
•With the BLUE&ME™ media player you can play, via the car sound system, the digital
audio files stored on a USB device by simply connecting it to the USB port located in the
glove box of the car .
• The MEDIA PLAYER menu enables the following:
– Display tracks stored on your USB stick/iPod®.
– Play audio files stored on your USB stick/iPod®.
How To Connect The USB Stick/iPod® To BLUE&ME™
• To connect your USB stick/iPod® to BLUE&ME™, proceed as follows:
• Copy tracks on your USB stick/iPod® (BLUE&ME™ recognizes .wma,.mp3 and .wav,.aac
formats for audio files and .wpl and.m3u for playlists) .
• USB devices without USB wire: just connect the USB stick/iPod® (directly or by an
extension lead) to the USB port on the car .
ELECTRONICS
45
Page 48 of 84
•USB stick/iPod® with USB wire: use the wire to connect the USB stick/iPod® to the USB
port on the car .
• Turn the ignition key to ON. BLUE&ME™ will start automatically to play your digital
tracks selecting them from the library built at the moment the USB stick/iPod® is
connected.
• If AUTOPLAY is set to “ON”, BLUE&ME™ will start playback automatically .
• Refer to the iPod®/USB/MP3 CONTROL section in this manual and the BLUE&ME™
User's Manual on the DVD for more details.
WARNING!
Driving while distracted can result in loss of vehicle control, accident and injury .It is
strongly recommended that you use extreme caution when using any device or feature
that may take your focus off the road or your hands off the steering wheel. Your primary
responsibility is the safe operation of your vehicle .
iPod®/USB/MP3 CONTROL
•The USB port located within the glove
box, allows you to plug an iPod® or USB
device into the vehicle's sound system.
• To hear audio from devices connected to
this port press the MEDIA button on the
radio faceplate .
• When connected to this feature:
• The iPod® or USB device audio can be
played on the vehicle’s sound system.
• The iPod® can be controlled using the
radio buttons to Play, Browse, and List
the iPod® or external devices contents .Refer to the BLUE&ME™ Manual on the DVD
for details.
• The iPod® battery charges when plugged into the USB port (if supported by the
specific audio device).
• Compatible iPod® devices may also be controllable using voice commands. Refertothe
BLUE&ME™ Manual on the DVD for details.
NOTE:
The USB port supports certain Mini, Classic, Nano, Touch, and iPhone® devices .The USB port
also supports playing music from compatible external USB Mass Storage Class memory devices .
For supported audio file formats, refer to the USB Port section on the Owner's Manual on the
DVD .Some iPod® software versions may not fully support the USB port features .Please visit
Apple’s website for iPod® software updates .
ELECTRONICS
46
Page 49 of 84
WARNING!
Do not plug in or remove the iPod® or external device while driving.Failure to follow this
warning could result in a collision.
ELECTRONIC VEHICLE INFORMATION CENTER (EVIC)
• The EVIC features a driver interactive display that is located in the instrument cluster .
Pressing the controls on the right side of the Instrument Cluster allows the driver to
select vehicle information and Personal Settings. For additional information, refer to
Programmable Features in this guide .
• Press the MENU ESC button to enter the menu mode .
• Press the + or – buttons to scroll through the menu settings.
• Once the menu setting is shown in the EVIC display press the MENU ESC button to
access the setting and use the plus or minus buttons to change the current setting. Press
the MENU ESC button a second time to save the setting and return to menu screen.
PROGRAMMABLE FEATURES
Electronic Vehicle Information Center (EVIC)
• The EVIC can be used to program the following Personal Settings. Press and release
the MENU ESC button until menu is displayed, then press the + or – buttons to scroll
through the settings.
• Once the menu setting is shown in the EVIC display press the MENU ESC button to
access the setting and use the + or – buttons to change the current setting. The menu
includes the following functions:
• Charging Schedule •Daytime Running Lights
• Set Date •Button Volume
• Set Time •Hill Start Assist
• Standard Units •Stored Warning
• Languages •Tutorial
• Audio Display •Connectivity ID
• Battery % Display •Restore Factory Settings
• Auto Door Lock •Exit Menu
• Remote Unlock
Selecting An Option Of The Main Menu Without Submenu:
• Briefly press the MENU ESC button to select the main menu option to set.
• Press the + or – button (by single presses) to select the new setting.
• Briefly press the MENU ESC button to store the new setting and go back to the main
menu option previously selected.
ELECTRONICS
47