reset FIAT 500E 2014 2.G User Guide
[x] Cancel search | Manufacturer: FIAT, Model Year: 2014, Model line: 500E, Model: FIAT 500E 2014 2.GPages: 92, PDF Size: 3.24 MB
Page 47 of 92
Menu
•Press the MENU button and one of the following options will appear on the Radio
display.Use the Up and Down arrows to scroll through the options; use the Left and
Right arrows to change a selection setting.
•Speech Volume•SiriusXM Telephone Number
•Aux Audio Offset•System Reset
•Radio Off•Speed Volume
•Sat ID•On Volume Limit
Station Presets
•To store a tuned station, find the station to store by either pressing the Right and Left
arrow (Seek) buttons or by pressing Up or Down arrow (Manual Tune) buttons.
•Once the station is found, press and hold one of the PRESET buttons, until you hear a
confirmation beep (Preset Saved will be shown in the radio display).A total of 15 FM,
10 AM and 15 SiriusXM Satellite Radio stations can be preset by pressing the A-B-C
button.
A-B-C Button
•Press the A-B-C button to choose between the presets stored in the AM, FM or SAT
modes.The mode (AM, FM, SAT), station preset (A, B, C) and preset button number
(P 1-5) will be displayed in the middle of the radio display.
BLUE&ME™ HANDS-FREE OPERATION
•FIAT’s Windows Mobile™ based BLUE&ME™ Hands-Free Communication is a personal
telematics system that incorporates communication and entertainment applications that
are specifically designed for use in your car.
•The BLUE&ME™ Hands-Free Communication package installed in your car is equipped
with integral hands-free functionality, message reader, and media player.BLUE&ME™ is
designed to support the future installation of additional services.
•The BLUE&ME™ Hands-Free Communication package features integrated voice recog-
nition, steering wheel controls and a multifunction electronic display that allows you to
use your Bluetooth® enabled wireless technology enabled mobile phone without
having to take your eyes off the road.You can even keep your phone in a pocket or a
bag.You are not required to train the voice recognition system to recognize your
voice.The system is “speaker independent” and performs equally well for different
users.
ELECTRONICS
45
Page 50 of 92
Button Short press function
(less than One second)Long press function
(more than One second)
PRESET UP/OK (center
button on left side back of
steering wheel)Confirm manually selected
menu option
Switch phone conversation
from the hands-free phone
to your mobile phone and
vice versa
Select displayed message–
SCAN UP/SCAN DOWN
(upper and lower buttons
on left side back of steering
wheelScroll BLUE&ME™ menu
items
Scroll through media player
tracks
Seek up or down through
radio stations
Scroll inbox messages–
Steering Wheel Audio Controls
•The right hand control on the rear of the steering wheel is a rocker type switch with
a pushbutton in the center.Press the switch up for Volume +.Press the switch down
for Volume –.The button in the center is the SRC button used to change audio
sources (e.g.AM, FM, CD, Media Player).
•The left hand control on the rear of the steering wheel is also a rocker type switch
with a pushbutton in the center.Press the top of the switch to Scan Up.Press the
bottom of the switch to Scan Down.The button in the center is the PRESET UP/OK
button.
BLUE&ME™ Hands-Free Communication
•To use the hands-free feature, you need a Bluetooth® wireless technology enabled
mobile phone.This hands-free feature gives you the possibility of interacting vocally
with your mobile phone while driving, even if your mobile device does not feature this
capability.You can also interact with your mobile phone manually and visually using the
steering wheel controls and the instrument panel Electronic Vehicle Information Center
(EVIC) display.
•To get started with BLUE&ME™ hands-free feature with voice recognition, you have to
simply pair your Bluetooth® wireless technology enabled mobile phone with the
system.
Pair Your Mobile Phone
•Press the VR button on the steering wheel then “Settings.” At the end of the
BLUE&ME™ message say “Pairing.” You may also access the pairing feature via the
menu by selecting it.
•The system will show the phone pairing PIN number on the EVIC display.For the next
two steps, consult your mobile phone owner’s manual about Bluetooth® pairing proce-
dures for your phone.
ELECTRONICS
48
Page 52 of 92
3.If John Smith has several phone numbers but the “location” (e.g.: the type of phone
number like work, home, etc.) is missing, the system will display the selected contact
and a list of related phone numbers on the instrument cluster display.The hands-free
phone system will ask if you would like to call the phone number displayed.To r e -
spond with “Yes,” pronounce “Yes,” otherwise say “No.” If this is the correct contact
but the wrong number, say “Forward” or “Backward” to navigate to the phone num-
ber you’d like to call.To call the displayed phone number, pronounce “Call.” You can
also scroll through the phone number list manually by pressing the buttons on the
back of the steering wheel until you find the required number.Then, press PRESET
UP/OK button on the rear of the steering wheel to start the call.
4.To end the phone call, press the PHONE HANG UP button on the steering wheel.
Media Player
•With the BLUE&ME™ media player you can play, via the car sound system, the digital
audio files stored on a USB device by simply connecting it to the USB port located in
the glove compartment of the car.
•The MEDIA PLAYER menu enables the following:
– Display tracks stored on your USB stick/iPod®.
– Play audio files stored on your USB stick/iPod® (BLUE&ME™ recognizes.wma,.mp3
and.wav,.aac formats for audio files and.wpl and.m3u for playlists).
How To Connect The USB Stick/iPod® To BLUE&ME™
•To connect your USB stick/iPod® to BLUE&ME™, proceed as follows:
•USB devices without USB wire: just connect the USB stick/iPod® (directly or by an
extension lead) to the USB port on the car.
•USB stick/iPod® with USB wire: use the wire to connect the USB stick/iPod® to
the USB port on the car.
•Turn the ignition key to ON.BLUE&ME™ will start automatically to play your digital
tracks selecting them from the library built at the moment the USB stick/iPod® is
connected.
•If AUTOPLAY is set to “ON,” BLUE&ME™ will start playback automatically.
•Refer to the iPod®/USB/MP3 CONTROL section in this manual and the BLUE&ME™
User's Manual on the DVD for more details.
WARNING!
Driving while distracted can result in loss of vehicle control, accident and injury.It is
strongly recommended that you use extreme caution when using any device or feature
that may take your focus off the road or your hands off the steering wheel.Your pri-
mary responsibility is the safe operation of your vehicle.
ELECTRONICS
50
Page 55 of 92
TRIP BUTTON
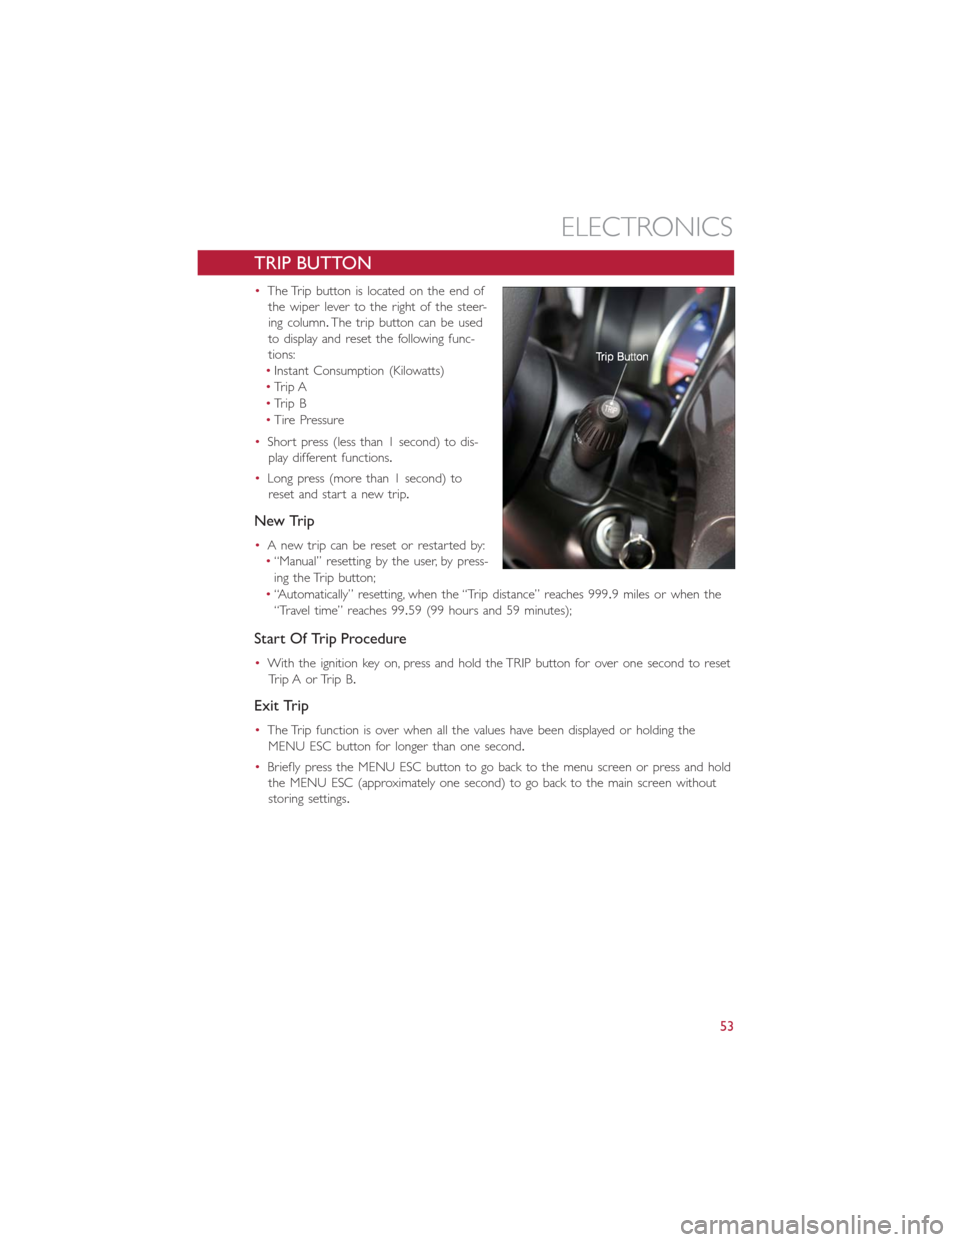
•The Trip button is located on the end of
the wiper lever to the right of the steer-
ing column.The trip button can be used
to display and reset the following func-
tions:
•Instant Consumption (Kilowatts)
•Trip A
•Trip B
•Tire Pressure
•Short press (less than 1 second) to dis-
play different functions.
•Long press (more than 1 second) to
reset and start a new trip.
New Trip
•A new trip can be reset or restarted by:
•“Manual” resetting by the user, by press-
ing the Trip button;
•“Automatically” resetting, when the “Trip distance” reaches 999.9 miles or when the
“Travel time” reaches 99.59 (99 hours and 59 minutes);
Start Of Trip Procedure
•With the ignition key on, press and hold the TRIP button for over one second to reset
Trip A or Trip B.
Exit Trip
•The Trip function is over when all the values have been displayed or holding the
MENU ESC button for longer than one second.
•Briefly press the MENU ESC button to go back to the menu screen or press and hold
the MENU ESC (approximately one second) to go back to the main screen without
storing settings.
ELECTRONICS
53
Page 70 of 92
MANUAL PARK RELEASE
WARNING!
Always secure your vehicle by fully applying the parking brake, before activating the
Manual Park Release.Activating the Manual Park Release will allow your vehicle to roll
away if it is not secured by the parking brake or other means.Activating the Manual
Park Release on an unsecured vehicle could lead to serious injury or death for those in
or around the vehicle.
In order to move the vehicle in cases where the transmission will not shift out of PARK
(such as a dead battery), a Manual Park Release is available.Ifadead12voltbatteryis
the cause of the condition refer to “Jump Start Procedure — 12 Volt Battery” before
performing the Manual Park Release.
To perform the Manual Park Release follow these steps:
1.To prevent the vehicle from rolling unintentionally, firmly apply the parking brake.
2.If possible, raise the front driver's side of the vehicle to provide access to the trans-
mission.
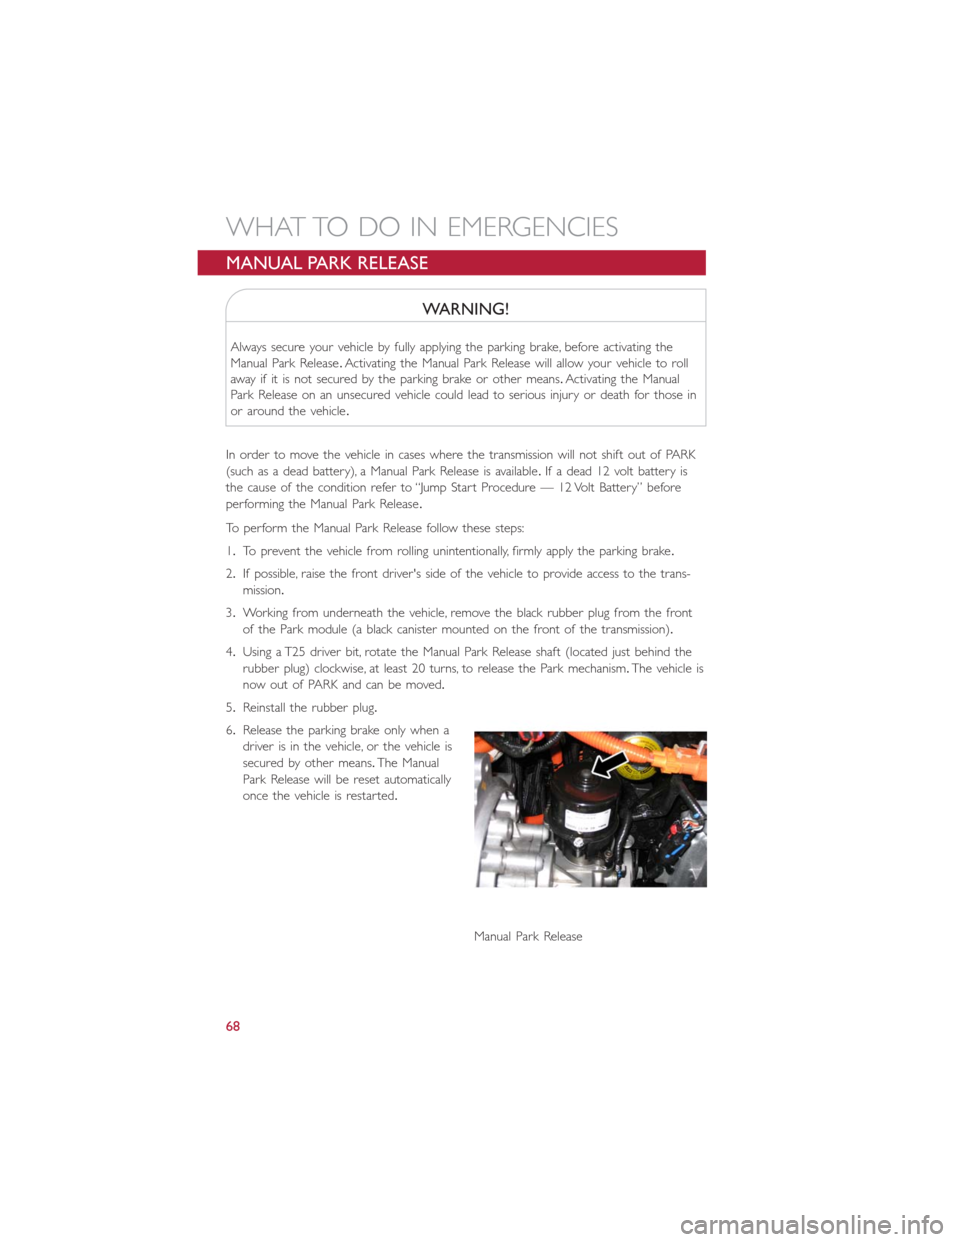
3.Working from underneath the vehicle, remove the black rubber plug from the front
of the Park module (a black canister mounted on the front of the transmission).
4.Using a T25 driver bit, rotate the Manual Park Release shaft (located just behind the
rubber plug) clockwise, at least 20 turns, to release the Park mechanism.The vehicle is
now out of PARK and can be moved.
5.Reinstall the rubber plug.
6.Release the parking brake only when a
driver is in the vehicle, or the vehicle is
secured by other means.The Manual
Park Release will be reset automatically
once the vehicle is restarted.
Manual Park Release
WHAT TO DO IN EMERGENCIES
68
Page 72 of 92
ENHANCED ACCIDENT RESPONSE SYSTEM
•In the event of an impact causing air bag deployment, if the communication network
and power remains intact, depending on the nature of the event, the ORC will deter-
mine whether to have the Enhanced Accident Response System perform the following
functions:
•Disable the high voltage battery.
•Place the transmission into PARK.
•Flash hazard lights as long as the 12 Volt battery has power or until the ignition key is
turned off.
•Turn on the interior lights, which remain on as long as the 12 Volt battery has power
or until the ignition key is removed.
•Unlock the doors automatically.
•In order to move your vehicle to the side of the road the transmission must be in
NEUTRAL and the 12 Volt system must be functional.To place the transmission into
NEUTRAL you must turn the ignition OFF and then back to the RUN position (cycle
the ignition) then press the NEUTRAL button.
NOTE:
The high voltage battery will remain disabled after an Enhanced Accident Response Event
and must be reset by your authorized dealership.
FREEING A STUCK VEHICLE
•If your vehicle becomes stuck in mud, sand or snow, it can often be moved using a
rocking motion.Turn the steering wheel right and left to clear the area around the
front wheels.Then shift back and forth between DRIVE and REVERSE while gently
pressing the accelerator.Use the least amount of accelerator pedal pressure that will
maintain the rocking motion, without spinning the wheels.
NOTE:
Press the “ESC Off ” switch, to place the Electronic Stability Control (ESC) system in “Par-
tial Off ” mode, before rocking the vehicle.Refer to “Electronic Brake Control” in “Start-
ing And Operating” for further information.Once the vehicle has been freed, press the
“ESC Off ” switch again to restore “ESC On” mode.
CAUTION!
•When “rocking” a stuck vehicle by shifting between DRIVE and REVERSE, do not
spin the wheels faster than 15 mph (24 km/h), or drivetrain damage may result.
•Spinning the wheels too fast may lead to transmission overheating and failure.It
can also damage the tires.Do not spin the wheels above 30 mph (48 km/h) while
in gear.
WHAT TO DO IN EMERGENCIES
70
Page 87 of 92
FAQ’s
GETTING STARTED
•How do I charge my vehicle? pg.16
•How do I install my LATCH Equipped Child Seat? pg.24
•How do I fold down my rear seat? pg.30
ELECTRONICS
•What Sound System do I have? pg.42
•How do I set the general settings? pg.51
•How do I set the presets on my radio? pg.45
•How do I connect my portable media player/iPod/MP3? pg.51
•How do I pair my cell phone via Bluetooth® with the BLUE&ME™ Hands-Free
Communication System? pg.48
WHAT TO DO IN EMERGENCIES
•What do I do if my TPMS warning light is blinking? pg.57
•How do I Jump-Start my vehicle? pg.65
MAINTAINING YOUR VEHICLE
•Where is my underhood fuse block located? pg.77
•Where is my interior fuse block located? pg.77
•What should my tire pressure be set at? pg.79
FREQUENTLY ASKED QUESTIONS
85
Page 89 of 92
Lights
Turn Signal...............34
Locks
Key s...................20
Liftgate, Tailgate.............20
Lower Anchors and Tether for CHildren
(LATCH).................24
Maintenance Schedule............75
Mirrors
Heated.................40
MOPAR® Accessories............84
Phone (Pairing)...............48
Placard, Tire and Loading Information....79
Power
Door Locks...............21
Steering.................56
Programmable Electronic Features.....52
Radio (Sound Systems)...........44
Reclining Front Seats............28
Recreational Towing.............55
Remote Keyless Entry (RKE)
Disarm The Alarm............21
Replacement Bulbs.............81
Reporting Safety Defects..........83
Rotation, Tires................80
Schedule, Maintenance............75
Seat Belt
Automatic Locking Retractor (ALR)...21
Child Restraints.............21
Energy Management Feature......21
Engage The Automatic Locking Mode..25
Lap/Shoulder Belts............21
Seat Belt Pretensioner.........21
Seat Belt Reminder...........21
Seats
Adjustment...............28
Heated.................31Security Alarm
Disarm The System...........21
Security Alarm..............21
Signals, Turn.................34
Speed Control
Accel/Decel...............37
Cancel..................38
Speed Control (Cruise Control)......37
Store Radio Presets.............45
Stuck, Freeing................70
TIREFIT.................59, 60
Tires
Air Pressure...............79
Pressure Warning Light.........57
Rotation.................80
Towing....................55
Disabled Vehicle.............69
Recreational...............55
Towing Vehicle Behind a Motorhome....55
Trailer Towing
Trailer and Tongue Weight.......55
Trailer Weight................55
Transmission
Capacities................74
Turn Signals.................34
Uconnect® (Hands-Free Phone)
Making A Phone Call..........49
Underhood Compartment.........73
Vehicle Security Alarm Disarming......21
Washer
Rear...................36
Wheel and Wheel Trim Care........81
Wind Buffeting
...............41
Wiper, Rear.................36
INDEX
87