steering FIAT 500E 2014 2.G User Guide
[x] Cancel search | Manufacturer: FIAT, Model Year: 2014, Model line: 500E, Model: FIAT 500E 2014 2.GPages: 92, PDF Size: 3.24 MB
Page 3 of 92
INTRODUCTION/WELCOMEWELCOME FROM FIAT...............2
IMPORTANT VEHICLE INFORMATION......4
CONTROLS AT A GLANCEDRIVER COCKPIT..................6
INSTRUMENT CLUSTER..............8
GETTING STARTEDELECTRIC VEHICLE FEATURES..........10
ELECTRIC SYSTEM OPERATION.........13
CHARGING THE HIGH VOLTAGE BATTERY...16
STARTING YOUR 500e...............19
KEY FOB......................20
VEHICLE SECURITY ALARM...........21
POWER DOOR LOCKS..............21
SEAT BELT......................21
SUPPLEMENTAL RESTRAINT SYSTEM (SRS) —
AIR BAGS......................22
CHILD RESTRAINTS................23
FRONT SEATS....................28
REAR SEATS.....................30
HEATED SEATS...................31
TILT STEERING...................32
OPERATING YOUR VEHICLEEXTENDING YOUR DRIVING RANGE
PER CHARGE....................33
TURN SIGNAL/LIGHTS/HIGH BEAM LEVER...34
WIPER/WASHER LEVER..............36
SPEED CONTROL..................37
POWER WINDOWS................39
AUTOMATIC TEMPERATURE
CONTROLS (ATC).................39
REAR PARK ASSIST.................40
POWER SUNROOF.................40
WIND BUFFETING.................41
ELECTRONICSYOUR VEHICLE'S SOUND SYSTEM........42
AM/FM RADIO WITH CD PLAYER AND
SiriusXM SATELLITE RADIO............44
BLUE&ME™ HANDS-FREE OPERATION.....45
iPod®/USB/MP3 CONTROL............51
ELECTRONIC VEHICLE INFORMATION
CENTER (EVIC)...................51
PROGRAMMABLE FEATURES...........52
TRIP BUTTON....................53
POWER OUTLET..................54
UTILITY
TRAILER TOWING WEIGHTS
(MAXIMUM TRAILER WEIGHT RATINGS)....55
RECREATIONAL TOWING
(BEHIND MOTORHOME, ETC.).........55
WHAT TO DO IN EMERGENCIES
24-HOUR ROADSIDE ASSISTANCE........56INSTRUMENT CLUSTER WARNING LIGHTS...56
TIREFIT KIT......................59
JUMP-STARTING PROCEDURE —
12 VOLT BATTERY.................65
MANUAL PARK RELEASE.............68
TOWING A DISABLED VEHICLE.........69
ENHANCED ACCIDENT RESPONSE
SYSTEM.......................70
FREEING A STUCK VEHICLE............70
EVENT DATA RECORDER (EDR).........71
MAINTAINING YOUR VEHICLE
OPENING THE HOOD..............72
UNDERHOOD COMPARTMENT........73
FLUIDS AND CAPACITIES.............74
MAINTENANCE SCHEDULE...........75
FUSES.........................77
TIRE PRESSURES..................79
TIRE ROTATION RECOMMENDATIONS....80
WHEEL AND WHEEL TRIM CARE........81
EXTERIOR BULBS.................81
CUSTOMER ASSISTANCE
FIAT CUSTOMER CENTER.............82
ASSISTANCE FOR THE HEARING IMPAIRED..82
PUBLICATIONS ORDERING...........82
REPORTING SAFETY DEFECTS IN THE
UNITED STATES...................83
MOPAR® ACCESSORIES
AUTHENTIC ACCESSORIES BY MOPAR®...84
FREQUENTLY ASKED QUESTIONS
FAQ ’s.........................85
INDEX.......................86
TABLE OF CONTENTS
1
Page 8 of 92
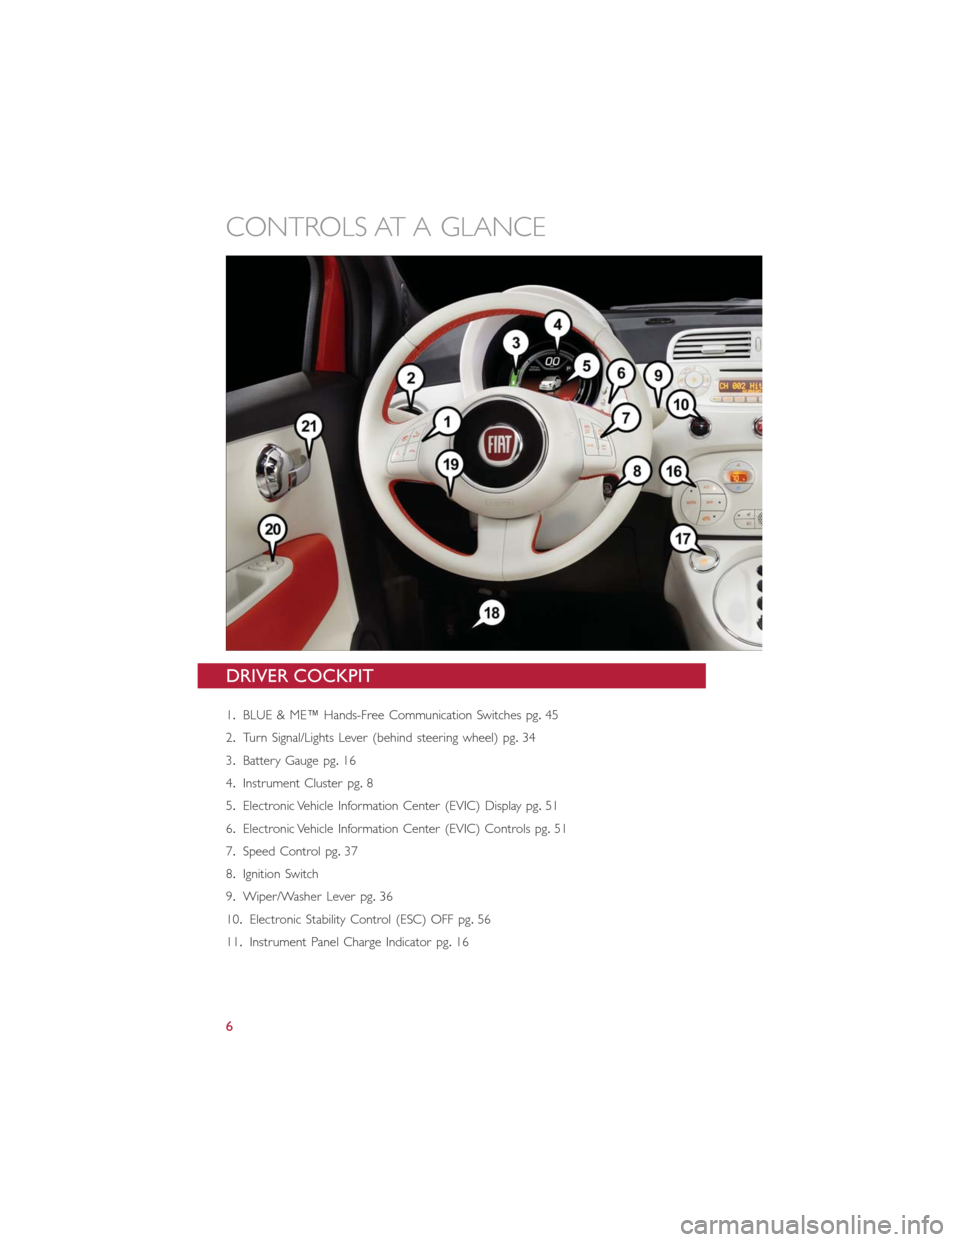
DRIVER COCKPIT
1.BLUE & ME™ Hands-Free Communication Switches pg.45
2.Turn Signal/Lights Lever (behind steering wheel) pg.34
3.Battery Gauge pg.16
4.Instrument Cluster pg.8
5.Electronic Vehicle Information Center (EVIC) Display pg.51
6.Electronic Vehicle Information Center (EVIC) Controls pg.51
7.Speed Control pg.37
8.Ignition Switch
9.Wiper/Washer Lever pg.36
10.Electronic Stability Control (ESC) OFF pg.56
11.Instrument Panel Charge Indicator pg.16
CONTROLS AT A GLANCE
6
Page 9 of 92
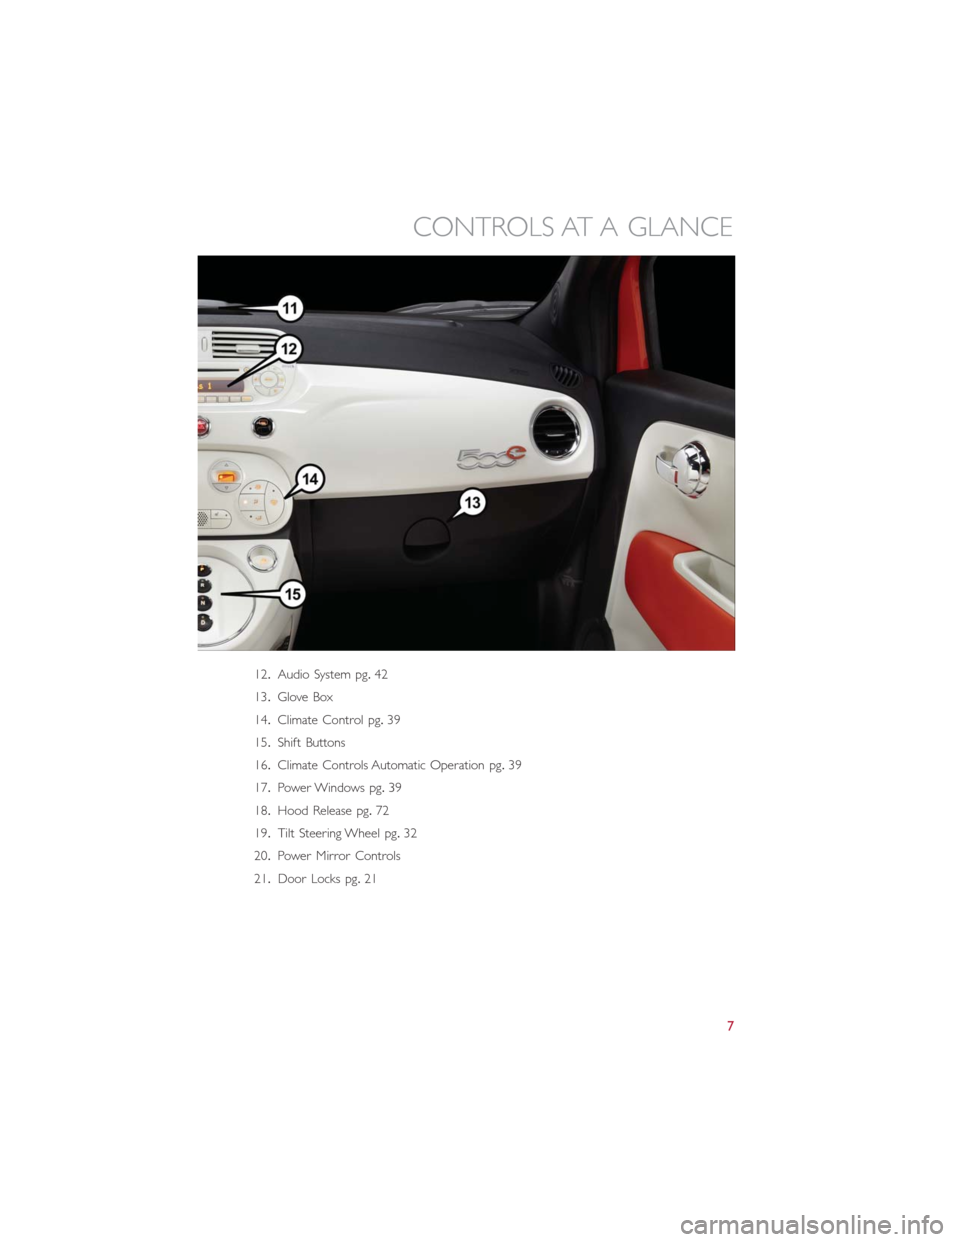
12.Audio System pg.42
13.Glove Box
14.Climate Control pg.39
15.Shift Buttons
16.Climate Controls Automatic Operation pg.39
17.Power Windows pg.39
18.Hood Release pg.72
19.Tilt Steering Wheel pg.32
20.Power Mirror Controls
21.Door Locks pg.21
CONTROLS AT A GLANCE
7
Page 10 of 92
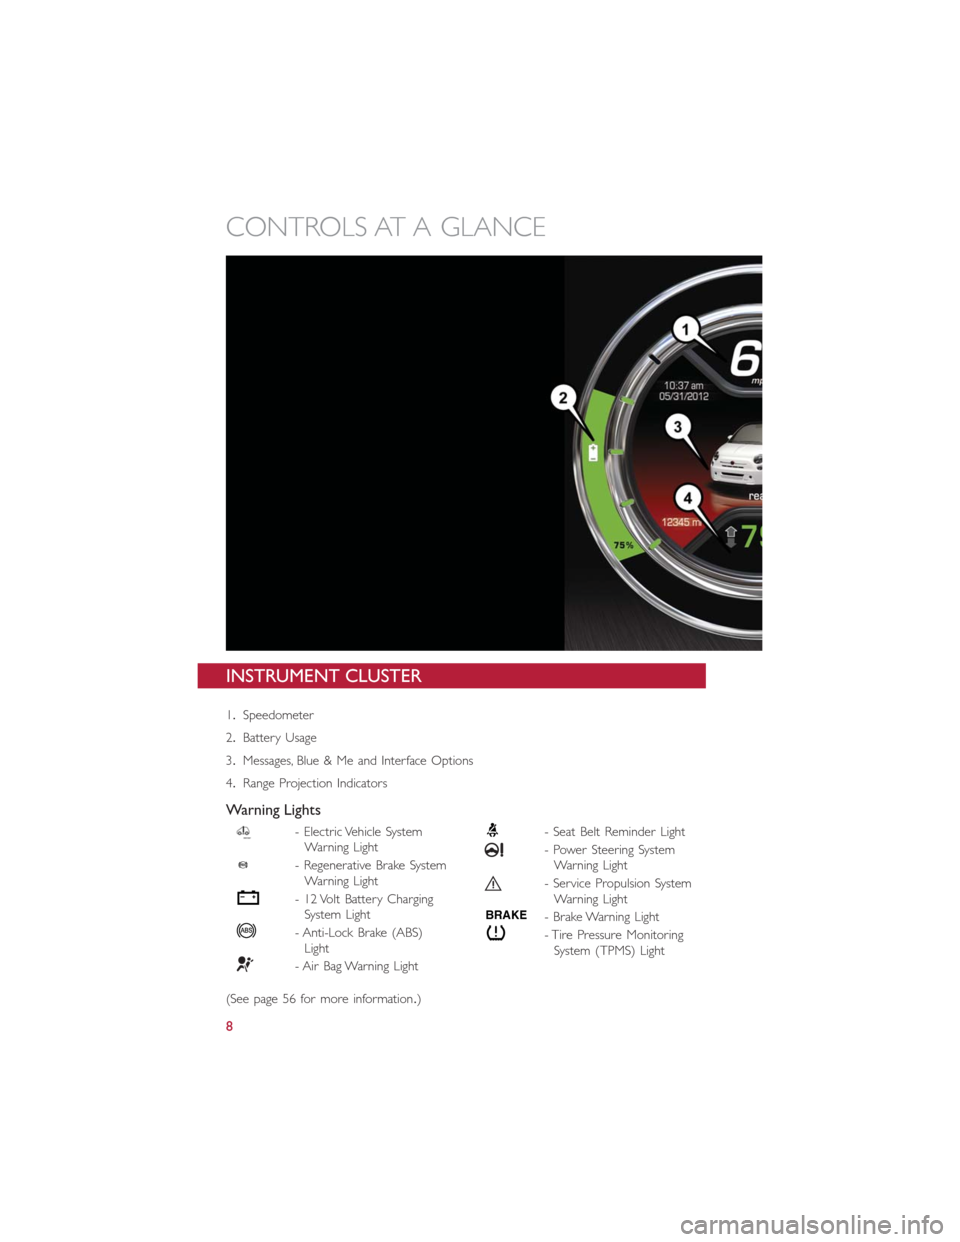
INSTRUMENT CLUSTER
1.Speedometer
2.Battery Usage
3.Messages, Blue & Me and Interface Options
4.Range Projection Indicators
Warning Lights
- Electric Vehicle System
Warning Light
- Regenerative Brake System
Warning Light
- 12 Volt Battery Charging
System Light
- Anti-Lock Brake (ABS)
Light
- Air Bag Warning Light
- Seat Belt Reminder Light
- Power Steering System
Warning Light
- Service Propulsion System
Warning Light
BRAKE- Brake Warning Light
- Tire Pressure Monitoring
System (TPMS) Light
(See page 56 for more information.)
CONTROLS AT A GLANCE
8
Page 25 of 92
WARNING!
•Relying on the air bags alone could lead to more severe injuries in a collision.The
air bags work with your seat belt to restrain you properly.In some collisions, the
air bags won't deploy at all.Always wear your seat belts even though you have air
bags.
•Being too close to the steering wheel or instrument panel during Advanced Front
Air Bag deployment could cause serious injury, including death.Air bags need
room to inflate.Sit back, comfortably extending your arms to reach the steering
wheel or instrument panel.
•Supplemental Side Air Bag Inflatable Curtains and Supplemental Seat-Mounted
Side Air Bags need room to inflate.Do not lean against the door or window.Sit
upright in the center of the seat.
•Being too close to the Supplemental Side Air Bag Inflatable Curtain and/or Seat-
Mounted Side Air Bag during deployment could cause you to be severely injured
or killed.
•Do not drive your vehicle after the air bags have deployed.If you are involved in
another collision, the air bags will not be in place to protect you.
•
After any collision, the vehicle should be taken to an authorized dealer immediately.
CHILD RESTRAINTS
•Children 12 years or younger should ride properly buckled up in a rear seat, if avail-
able.According to crash statistics, children are safer when properly restrained in the
rear seats rather than in the front.
•Every state in the United States require that small children ride in proper restraint
systems.This is the law, and you can be prosecuted for ignoring it.
NOTE:
•For additional information, refer to www.seatcheck.org or call 1–866–SEAT-CHECK
(1–866–732–8243).
GETTING STARTED
23
Page 34 of 92
TILT STEERING
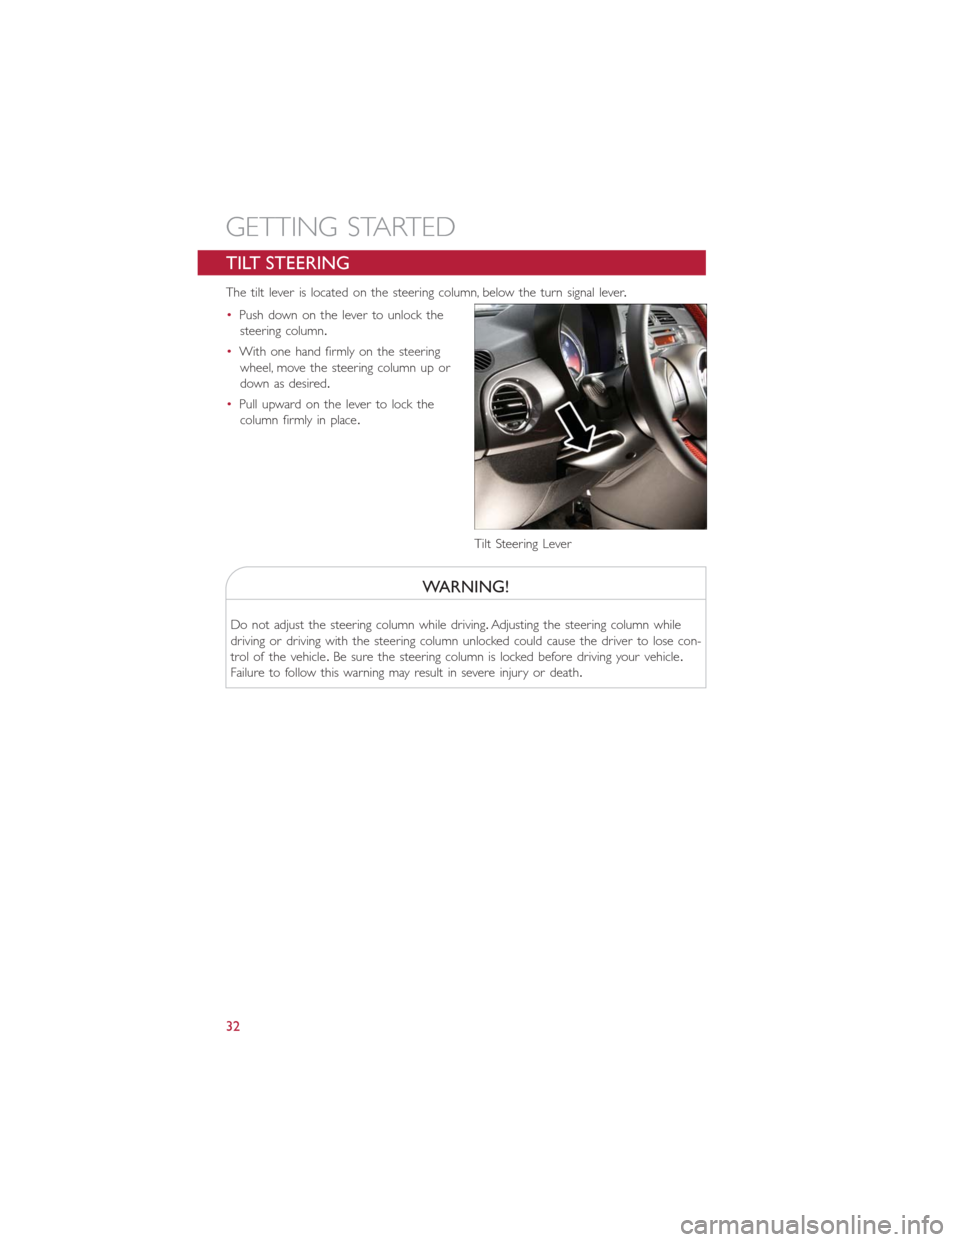
The tilt lever is located on the steering column, below the turn signal lever.
•Push down on the lever to unlock the
steering column.
•With one hand firmly on the steering
wheel, move the steering column up or
down as desired.
•Pull upward on the lever to lock the
column firmly in place.
WARNING!
Do not adjust the steering column while driving.Adjusting the steering column while
driving or driving with the steering column unlocked could cause the driver to lose con-
trol of the vehicle.Be sure the steering column is locked before driving your vehicle.
Failure to follow this warning may result in severe injury or death.
Tilt Steering Lever
GETTING STARTED
32
Page 37 of 92
Headlight Delay (Follow Me Home)
•Within two minutes of the ignition switch being turned to the OFF/LOCK position or
the ignition key being removed from the ignition, pull the turn signal lever toward the
steering wheel.
•Each movement of the lever toward the steering wheel will increase the illumination
period by 30 seconds, up to a maximum of 210 seconds.
•To deactivate, pull the multifunction lever toward the steering wheel and hold it for
more than two seconds.
NOTE:
Activation of Follow Me Home is only enabled once per key cycle and the steps outlined
above must be repeated each time you want to activate it.
Fog Lights
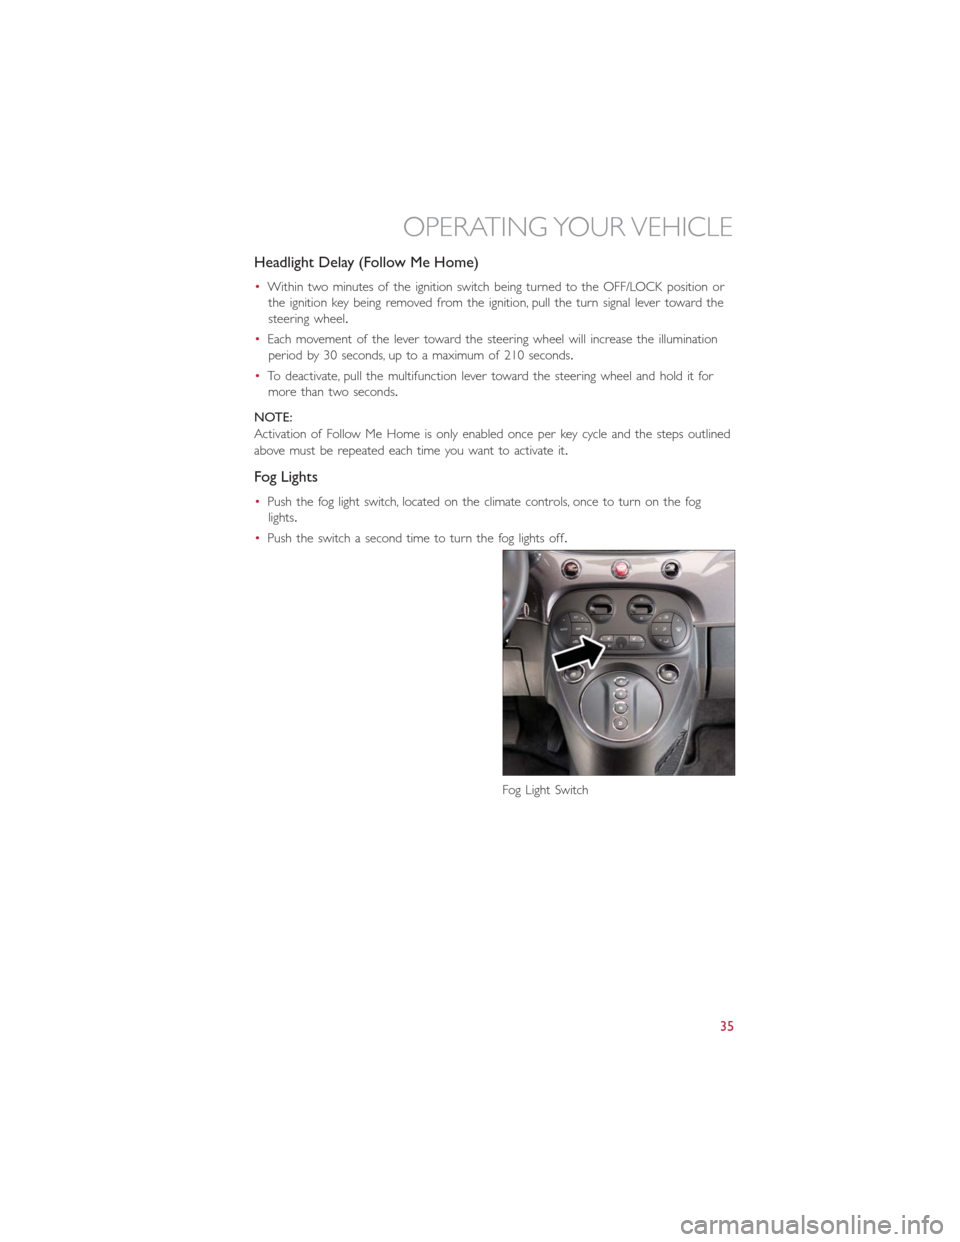
•Push the fog light switch, located on the climate controls, once to turn on the fog
lights.
•Push the switch a second time to turn the fog lights off.
Fog Light Switch
OPERATING YOUR VEHICLE
35
Page 39 of 92
SPEED CONTROL
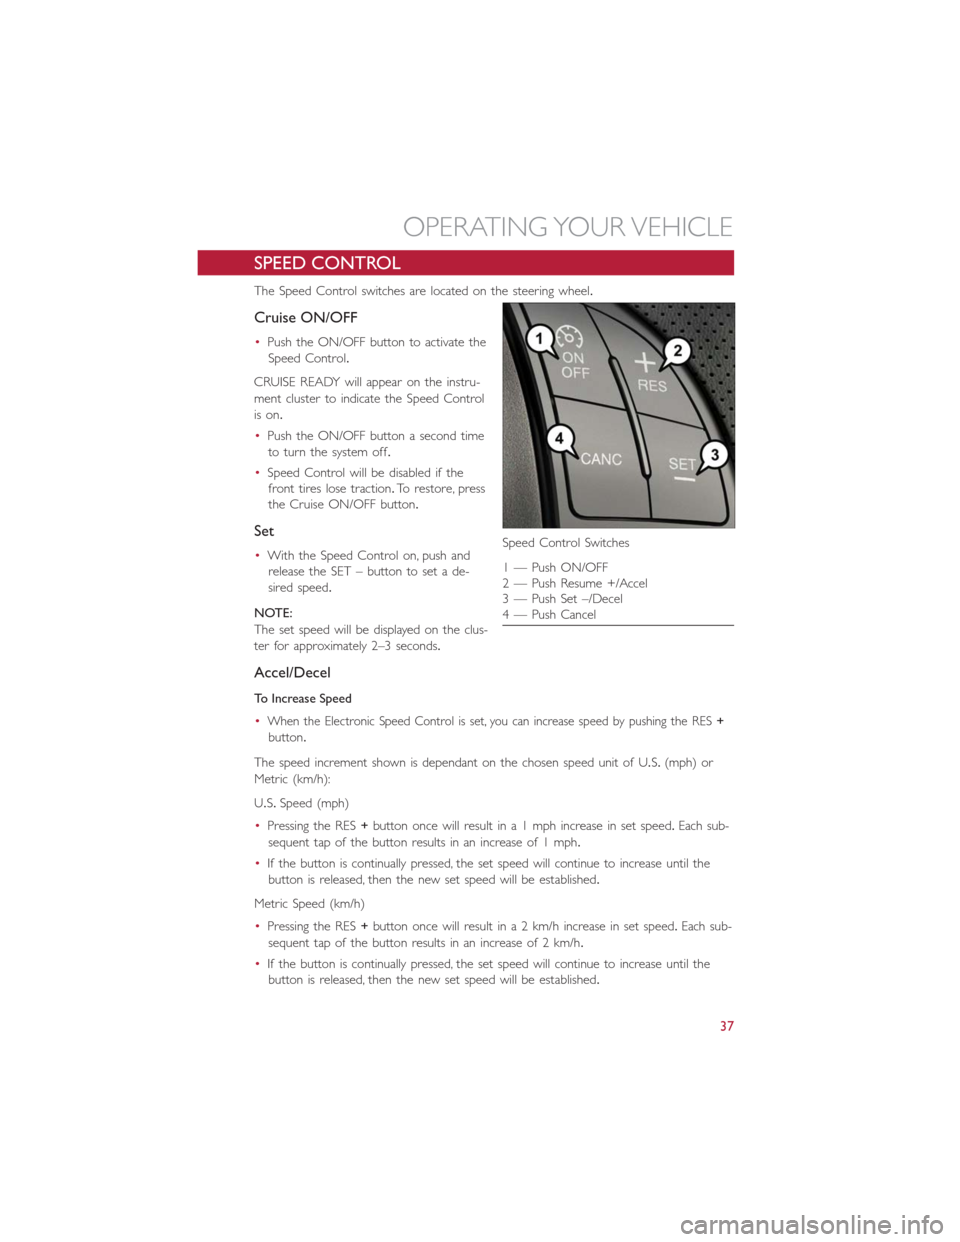
The Speed Control switches are located on the steering wheel.
Cruise ON/OFF
•Push the ON/OFF button to activate the
Speed Control.
CRUISE READY will appear on the instru-
ment cluster to indicate the Speed Control
is on.
•Push the ON/OFF button a second time
to turn the system off.
•Speed Control will be disabled if the
front tires lose traction.To restore, press
the Cruise ON/OFF button.
Set
•With the Speed Control on, push and
release the SET – button to set a de-
sired speed.
NOTE:
The set speed will be displayed on the clus-
ter for approximately 2–3 seconds.
Accel/Decel
To Increase Speed
•
When the Electronic Speed Control is set, you can increase speed by pushing the RES+
button.
The speed increment shown is dependant on the chosen speed unit of U.S.(mph) or
Metric (km/h):
U.S.Speed (mph)
•Pressing the RES+button once will result in a 1 mph increase in set speed.Each sub-
sequent tap of the button results in an increase of 1 mph.
•If the button is continually pressed, the set speed will continue to increase until the
button is released, then the new set speed will be established.
Metric Speed (km/h)
•Pressing the RES+button once will result in a 2 km/h increase in set speed.Each sub-
sequent tap of the button results in an increase of 2 km/h.
•If the button is continually pressed, the set speed will continue to increase until the
button is released, then the new set speed will be established.
Speed Control Switches
1 — Push ON/OFF
2 — Push Resume +/Accel
3 — Push Set –/Decel
4 — Push Cancel
OPERATING YOUR VEHICLE
37
Page 44 of 92
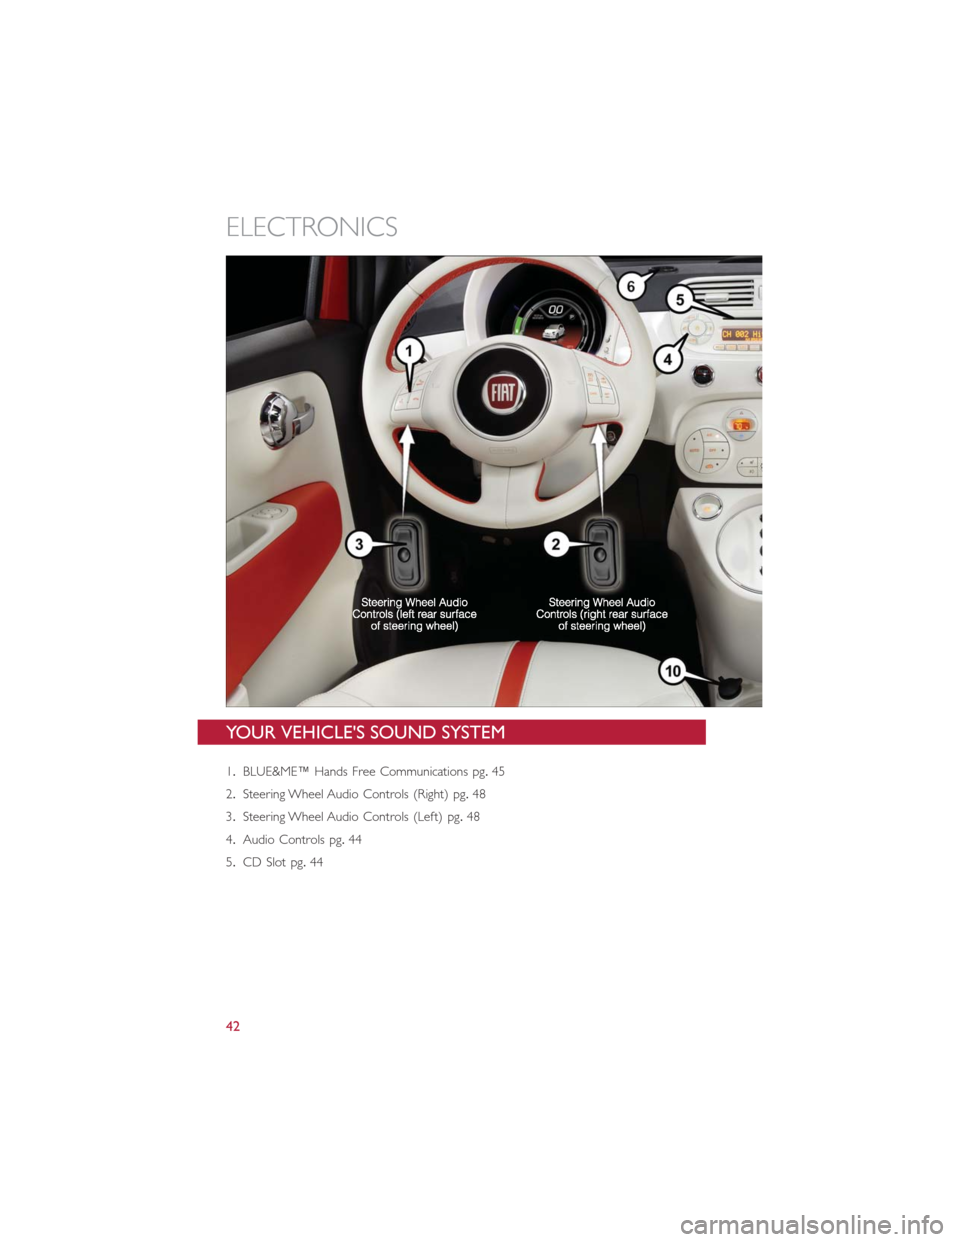
YOUR VEHICLE'S SOUND SYSTEM
1.BLUE&ME™ Hands Free Communications pg.45
2.Steering Wheel Audio Controls (Right) pg.48
3.Steering Wheel Audio Controls (Left) pg.48
4.Audio Controls pg.44
5.CD Slot pg.44
ELECTRONICS
42
Page 47 of 92
Menu
•Press the MENU button and one of the following options will appear on the Radio
display.Use the Up and Down arrows to scroll through the options; use the Left and
Right arrows to change a selection setting.
•Speech Volume•SiriusXM Telephone Number
•Aux Audio Offset•System Reset
•Radio Off•Speed Volume
•Sat ID•On Volume Limit
Station Presets
•To store a tuned station, find the station to store by either pressing the Right and Left
arrow (Seek) buttons or by pressing Up or Down arrow (Manual Tune) buttons.
•Once the station is found, press and hold one of the PRESET buttons, until you hear a
confirmation beep (Preset Saved will be shown in the radio display).A total of 15 FM,
10 AM and 15 SiriusXM Satellite Radio stations can be preset by pressing the A-B-C
button.
A-B-C Button
•Press the A-B-C button to choose between the presets stored in the AM, FM or SAT
modes.The mode (AM, FM, SAT), station preset (A, B, C) and preset button number
(P 1-5) will be displayed in the middle of the radio display.
BLUE&ME™ HANDS-FREE OPERATION
•FIAT’s Windows Mobile™ based BLUE&ME™ Hands-Free Communication is a personal
telematics system that incorporates communication and entertainment applications that
are specifically designed for use in your car.
•The BLUE&ME™ Hands-Free Communication package installed in your car is equipped
with integral hands-free functionality, message reader, and media player.BLUE&ME™ is
designed to support the future installation of additional services.
•The BLUE&ME™ Hands-Free Communication package features integrated voice recog-
nition, steering wheel controls and a multifunction electronic display that allows you to
use your Bluetooth® enabled wireless technology enabled mobile phone without
having to take your eyes off the road.You can even keep your phone in a pocket or a
bag.You are not required to train the voice recognition system to recognize your
voice.The system is “speaker independent” and performs equally well for different
users.
ELECTRONICS
45