charging FIAT 500E 2015 2.G User Guide
[x] Cancel search | Manufacturer: FIAT, Model Year: 2015, Model line: 500E, Model: FIAT 500E 2015 2.GPages: 100, PDF Size: 2.97 MB
Page 3 of 100
INTRODUCTION/WELCOMEWELCOME FROM FIAT...............2IMPORTANT VEHICLE INFORMATION......4
CONTROLS AT A GLANCEDRIVER COCKPIT..................6INSTRUMENT CLUSTER..............8
GETTING STARTEDELECTRIC VEHICLE FEATURES..........10ELECTRIC SYSTEM OPERATION.........13CHARGING THE HIGH VOLTAGE BATTERY...16STARTING YOUR 500e...............18KEY FOB......................19VEHICLE SECURITY ALARM...........20POWER DOOR LOCKS..............20SEAT BELT SYSTEMS................20SUPPLEMENTAL RESTRAINT SYSTEM (SRS) —AIR BAGS......................21CHILD RESTRAINTS................24HEAD RESTRAINTS.................28FRONT SEATS....................30REAR SEATS.....................32HEATED SEATS...................33TILT STEERING...................34
OPERATING YOUR VEHICLEEXTENDING YOUR DRIVING RANGE PERCHARGE.......................35TURN SIGNAL/LIGHTS/HIGH BEAM LEVER...36WIPER/WASHER LEVER..............37ELECTRONIC SPEED CONTROL.........38POWER WINDOWS................40AUTOMATIC TEMPERATURECONTROLS (ATC).................41REAR PARK ASSIST.................42POWER SUNROOF.................42WIND BUFFETING.................43
ELECTRONICSYO U R V E H I C L E ' S S O U N D S YS T E M........44AM/FM RADIO WITH CD PLAYER ANDSiriusXM SATELLITE RADIO............46BLUE&ME™ HANDS-FREE OPERATION.....48iPod®/USB/MP3 CONTROL — IF EQUIPPED..53ELECTRONIC VEHICLE INFORMATIONCENTER (EVIC)...................54PROGRAMMABLE FEATURES...........55TRIP BUTTON....................56POWER OUTLET..................57
UTILITY
TRAILER TOWING WEIGHTS (MAXIMUMTRAILER WEIGHT RATINGS)...........58RECREATIONAL TOWING (BEHINDMOTORHOME, ETC.)...............58
WHAT TO DO IN EMERGENCIES
ROADSIDE ASSISTANCE..............59INSTRUMENT CLUSTER WARNING LIGHTS..59INSTRUMENT CLUSTER INDICATORLIGHTS.......................63TIRE SERVICE KIT..................63JUMP-STARTING PROCEDURE — 12 VOLTBATTERY.......................70MANUAL PARK RELEASE.............72TOW I N G A D I S A B L E D V E H I C L E.........73ENHANCED ACCIDENT RESPONSESYSTEM.......................73FREEING A STUCK VEHICLE............73EVENT DATA RECORDER (EDR).........74
MAINTAINING YOUR VEHICLEOPENING THE HOOD..............75UNDERHOOD COMPARTMENT.........76FLUID CAPACITIES.................78FLUIDS, LUBES, AND GENUINE PARTS......78MAINTENANCE PROCEDURES..........79MAINTENANCE SCHEDULE...........79FUSES.........................83TIRE PRESSURES..................85TIRE ROTATION RECOMMENDATIONS....86SPARE TIRES — IF EQUIPPED...........87WHEEL AND WHEEL TRIM CARE........88REPLACEMENT BULBS..............89
CUSTOMER ASSISTANCEFIAT CUSTOMER CENTER.............90ASSISTANCE FOR THE HEARING IMPAIRED..90PUBLICATIONS ORDERING...........90REPORTING SAFETY DEFECTS IN THEUNITED STATES...................91
MOPAR® ACCESSORIESAUTHENTIC ACCESSORIES BY MOPAR®...92
FAQ ’sFREQUENTLY ASKED QUESTIONS........93
INDEX.......................94
TABLE OF CONTENTS
1
Page 6 of 100
IMPORTANT VEHICLE INFORMATION
Your 500e operates entirely on electricity stored in the high voltage battery.Unlike a
conventional vehicle or Hybrid there is no internal combustion engine.Battery Electric
Vehicles have unique operating characteristics that you should become familiar with to
ensure you are getting the optimal performance from your vehicle.
High Voltage Battery
Your vehicle is equipped with a Lithium-ion high voltage battery that is used to power
the electric powertrain systems and the 12 Volt vehicle electrical system.
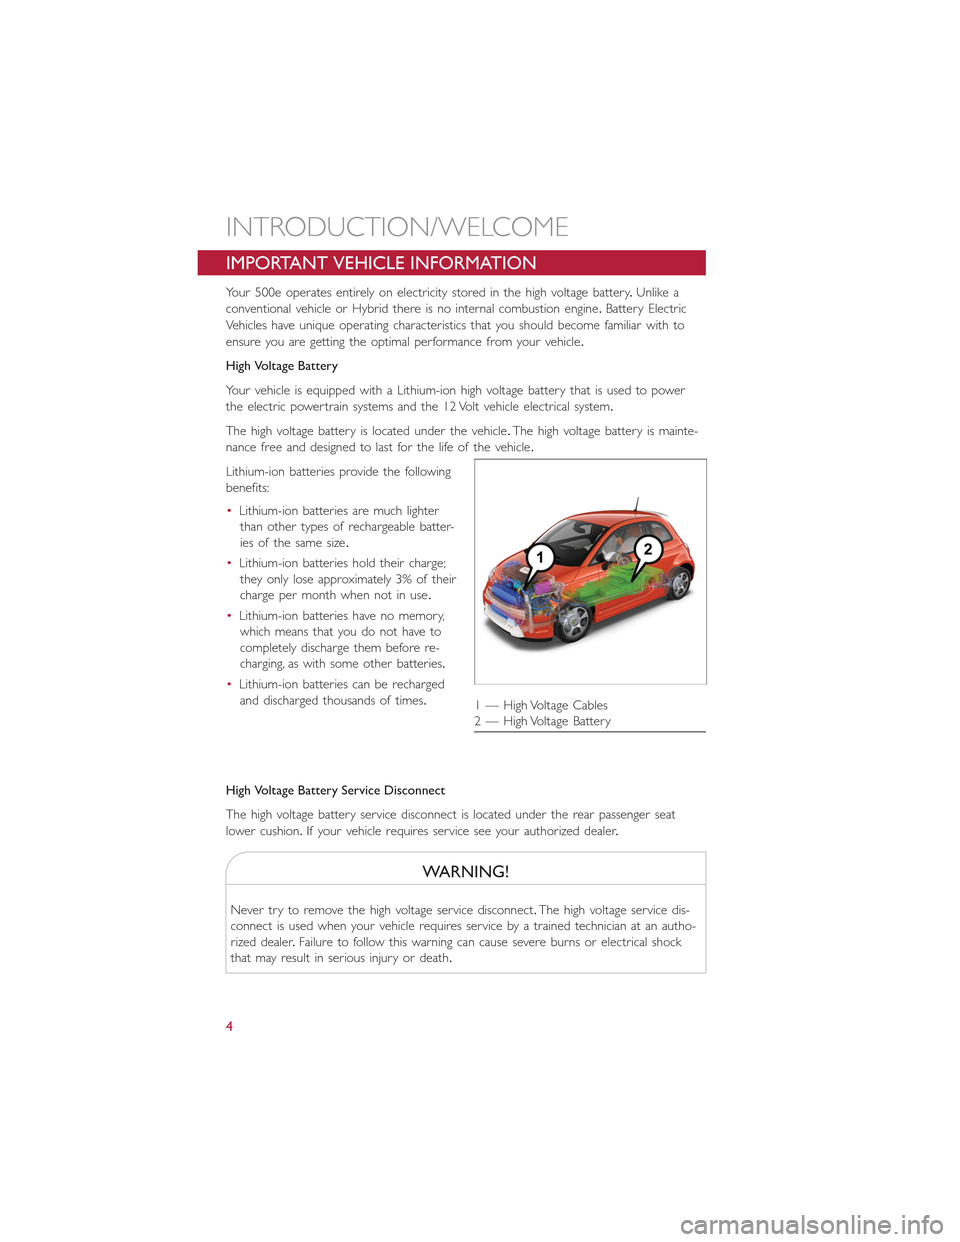
The high voltage battery is located under the vehicle.The high voltage battery is mainte-
nance free and designed to last for the life of the vehicle.
Lithium-ion batteries provide the following
benefits:
•Lithium-ion batteries are much lighter
than other types of rechargeable batter-
ies of the same size.
•Lithium-ion batteries hold their charge;
they only lose approximately 3% of their
charge per month when not in use.
•Lithium-ion batteries have no memory,
which means that you do not have to
completely discharge them before re-
charging, as with some other batteries.
•Lithium-ion batteries can be recharged
and discharged thousands of times.
High Voltage Battery Service Disconnect
The high voltage battery service disconnect is located under the rear passenger seat
lower cushion.If your vehicle requires service see your authorized dealer.
WARNING!
Never try to remove the high voltage service disconnect.The high voltage service dis-
connect is used when your vehicle requires service by a trained technician at an autho-
rized dealer.Failure to follow this warning can cause severe burns or electrical shock
that may result in serious injury or death.
1 — High Voltage Cables2 — High Voltage Battery
INTRODUCTION/WELCOME
4
Page 7 of 100

Disposal Of The High Voltage Battery
Your vehicle’s high voltage battery is designed to last the life of your vehicle.See your
authorized dealer for information on the disposal of the battery if it should require re-
placement.
General Information
The vehicle is also equipped with a Battery Management System that is designed to:
•Ensure safe operation
•Maximize driving range
•Maximize the life expectancy of the high voltage battery
NOTE:
The high voltage battery contains contactors that will open and close during vehicle shut
down, start up or when plugging the vehicle in for charging.The contactors will produce a
clicking noise that can be heard from within the vehicle.The clicking noise observed is the
sound of these contactors as they open and close and is normal operation for your 500e.
INTRODUCTION/WELCOME
5
Page 13 of 100
Smartphone Features
With the “FIAT Access” smartphone app, you can monitor the state of charge of the high
voltage battery or initiate charging from your phone.You can also turn on your car’s cli-
mate control system remotely.The smartphone app provides the following features:
•Monitor battery charge level
•Display available driving distance
•Check charging status
•Remotely activate vehicle climate control system
•Unlock and lock doors
•Assist with locating your vehicle
•Locate charging stations
•Send a point-of-interest to your vehicle
•Schedule a charge
•View energy consumed
•Notifications for charging and preconditioning events
How Do I Get The “FIAT Access” Smartphone App?
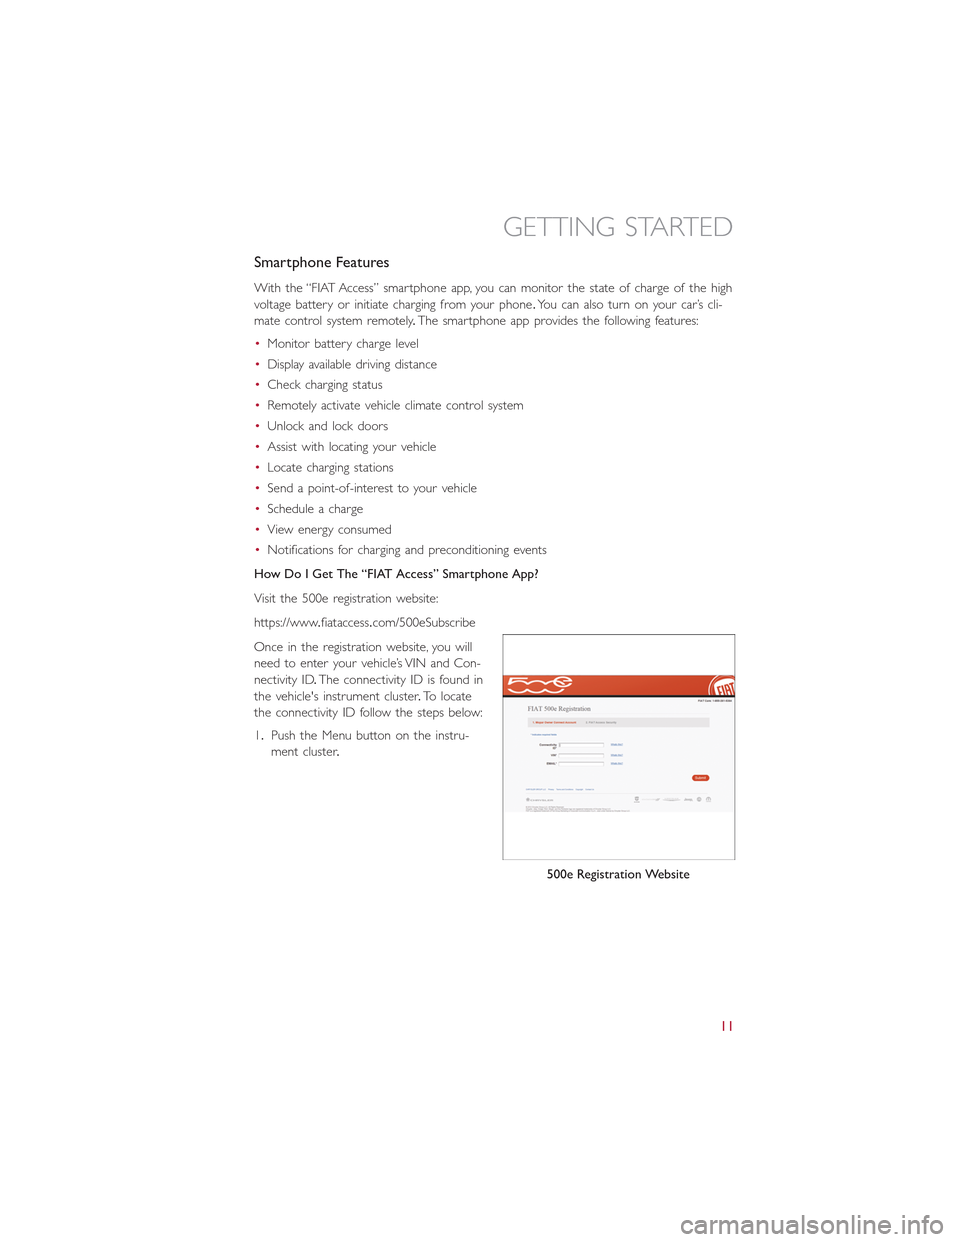
Visit the 500e registration website:
https://www.fiataccess.com/500eSubscribe
Once in the registration website, you will
need to enter your vehicle’s VIN and Con-
nectivity ID.The connectivity ID is found in
the vehicle's instrument cluster.To locate
the connectivity ID follow the steps below:
1.Push the Menu button on the instru-
ment cluster.
500e Registration Website
GETTING STARTED
11
Page 15 of 100
ELECTRIC SYSTEM OPERATION
Level 1 Charging (120V — Requires NEMA 5–15 Outlet)
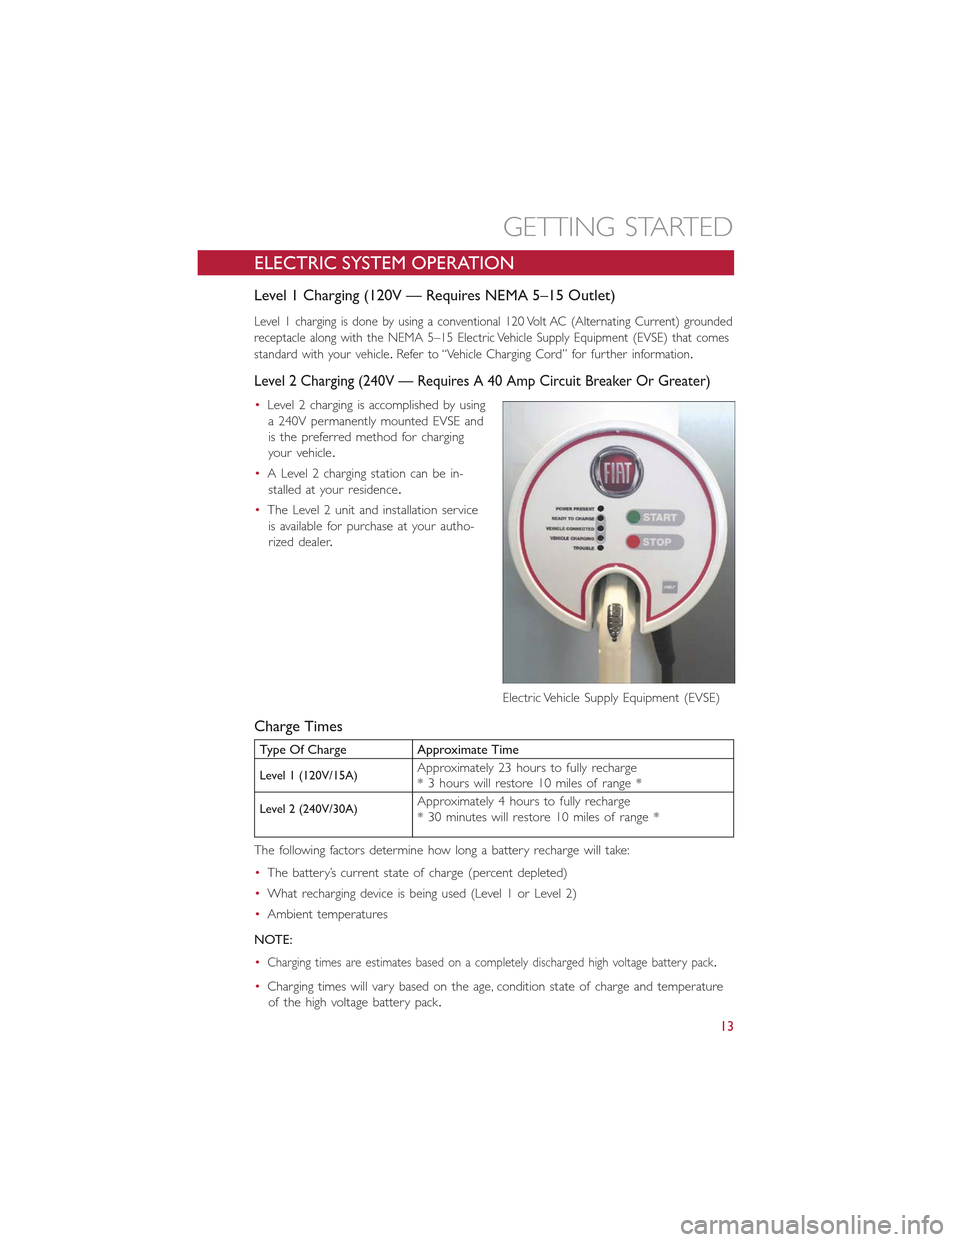
Level 1 charging is done by using a conventional 120 Volt AC (Alternating Current) grounded
receptacle along with the NEMA 5–15 Electric Vehicle Supply Equipment (EVSE) that comes
standard with your vehicle.Refer to “Vehicle Charging Cord” for further information.
Level 2 Charging (240V — Requires A 40 Amp Circuit Breaker Or Greater)
•Level 2 charging is accomplished by using
a 240V permanently mounted EVSE and
is the preferred method for charging
your vehicle.
•A Level 2 charging station can be in-
stalled at your residence.
•The Level 2 unit and installation service
is available for purchase at your autho-
rized dealer.
Charge Times
Type Of Charge Approximate Time
Level 1 (120V/15A)Approximately 23 hours to fully recharge* 3 hours will restore 10 miles of range *
Level 2 (240V/30A)Approximately 4 hours to fully recharge* 30 minutes will restore 10 miles of range *
The following factors determine how long a battery recharge will take:
•The battery’s current state of charge (percent depleted)
•What recharging device is being used (Level 1 or Level 2)
•Ambient temperatures
NOTE:
•Charging times are estimates based on a completely discharged high voltage battery pack.
•Charging times will vary based on the age, condition state of charge and temperature
of the high voltage battery pack.
Electric Vehicle Supply Equipment (EVSE)
GETTING STARTED
13
Page 16 of 100
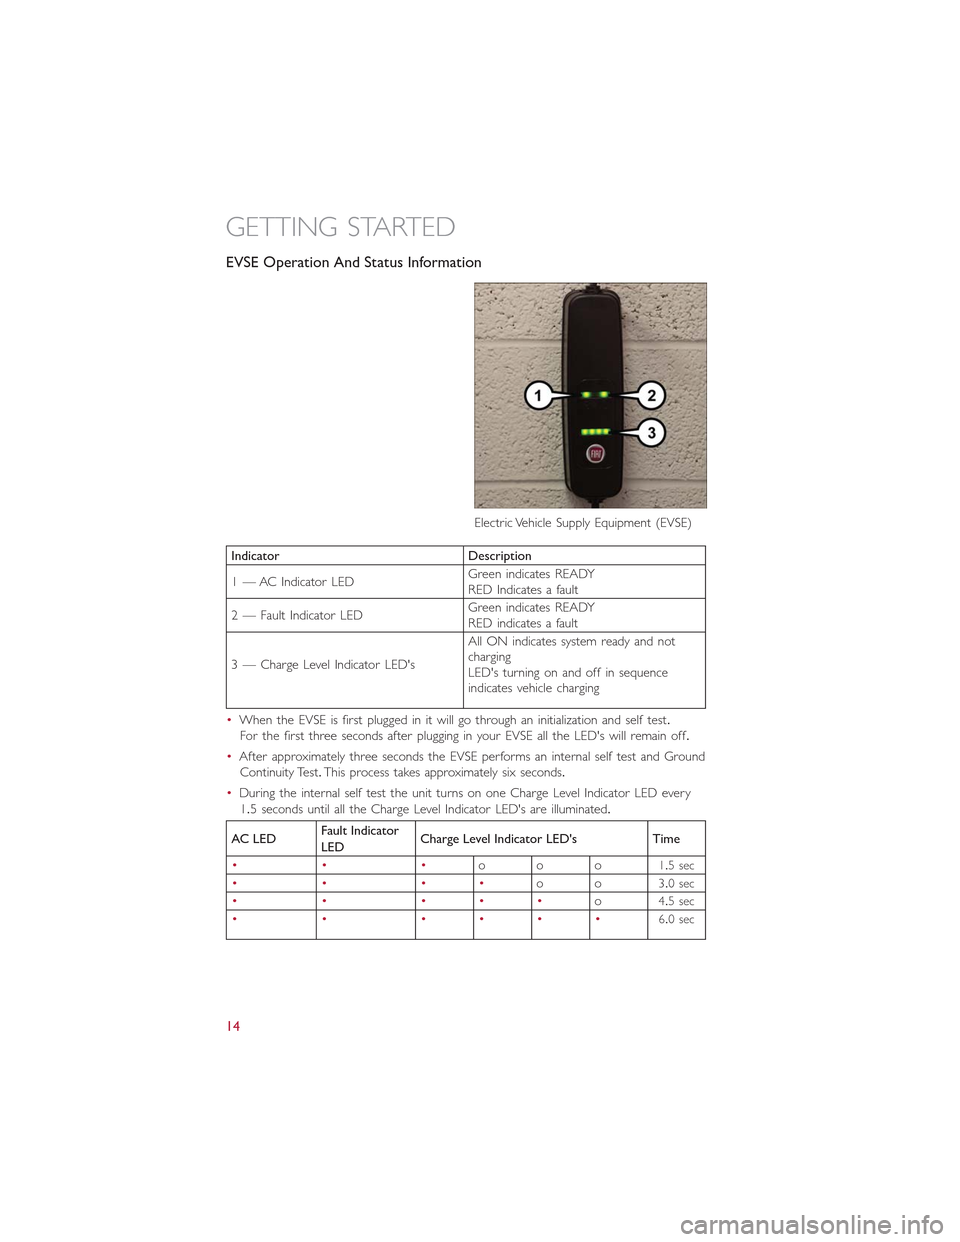
EVSE Operation And Status Information
Indicator Description
1 — AC Indicator LEDGreen indicates READYRED Indicates a fault
2 — Fault Indicator LEDGreen indicates READYRED indicates a fault
3 — Charge Level Indicator LED's
All ON indicates system ready and notchargingLED's turning on and off in sequenceindicates vehicle charging
•When the EVSE is first plugged in it will go through an initialization and self test.
For the first three seconds after plugging in your EVSE all the LED's will remain off.
•After approximately three seconds the EVSE performs an internal self test and Ground
Continuity Test.This process takes approximately six seconds.
•During the internal self test the unit turns on one Charge Level Indicator LED every
1.5 seconds until all the Charge Level Indicator LED's are illuminated.
AC LEDFault Indicator
LEDCharge Level Indicator LED's Time
•• •ooo1.5 sec
•• ••oo3.0 sec
•• •••o4.5 sec
•• ••••6.0 sec
Electric Vehicle Supply Equipment (EVSE)
GETTING STARTED
14
Page 17 of 100

•If the self test is successful the AC LED, the Fault Indicator LED and the four Charge
Level LED's will turn solid green.
•The EVSE LED's will be used to indicate the vehicle's connection status if no faults are
found during the self test.
AC LEDFault Indicator
LEDCharge Level Indicator LED's
•• ••••
•After the EVSE is connected to the vehicle's charge inlet the EVSE will continue to
illuminate all LED's green.
•Once the vehicle begins charging the EVSE Charge level LED's will illuminate in order
from left to right, then shut off.This pattern will repeat as long as the EVSE remains
connected to AC power and the battery is charging.
•The LED's are illuminated and turn off at the rate of one change per second.
AC LEDFault Indicator
LEDCharge Level Indicator LED's Time
•• •ooo1.0 sec
•• ••oo2.0 sec
•• •••o3.0 sec
•• ••••4.0 sec
NOTE:
Refer to the Level 1 User Manual for any additional information on its use or operation.
CAUTION!
Do not bend or damage the Level 1 EVSE terminals as this could cause the EVSE to
become inoperative and/or illuminate the fault LED.
GETTING STARTED
15
Page 18 of 100
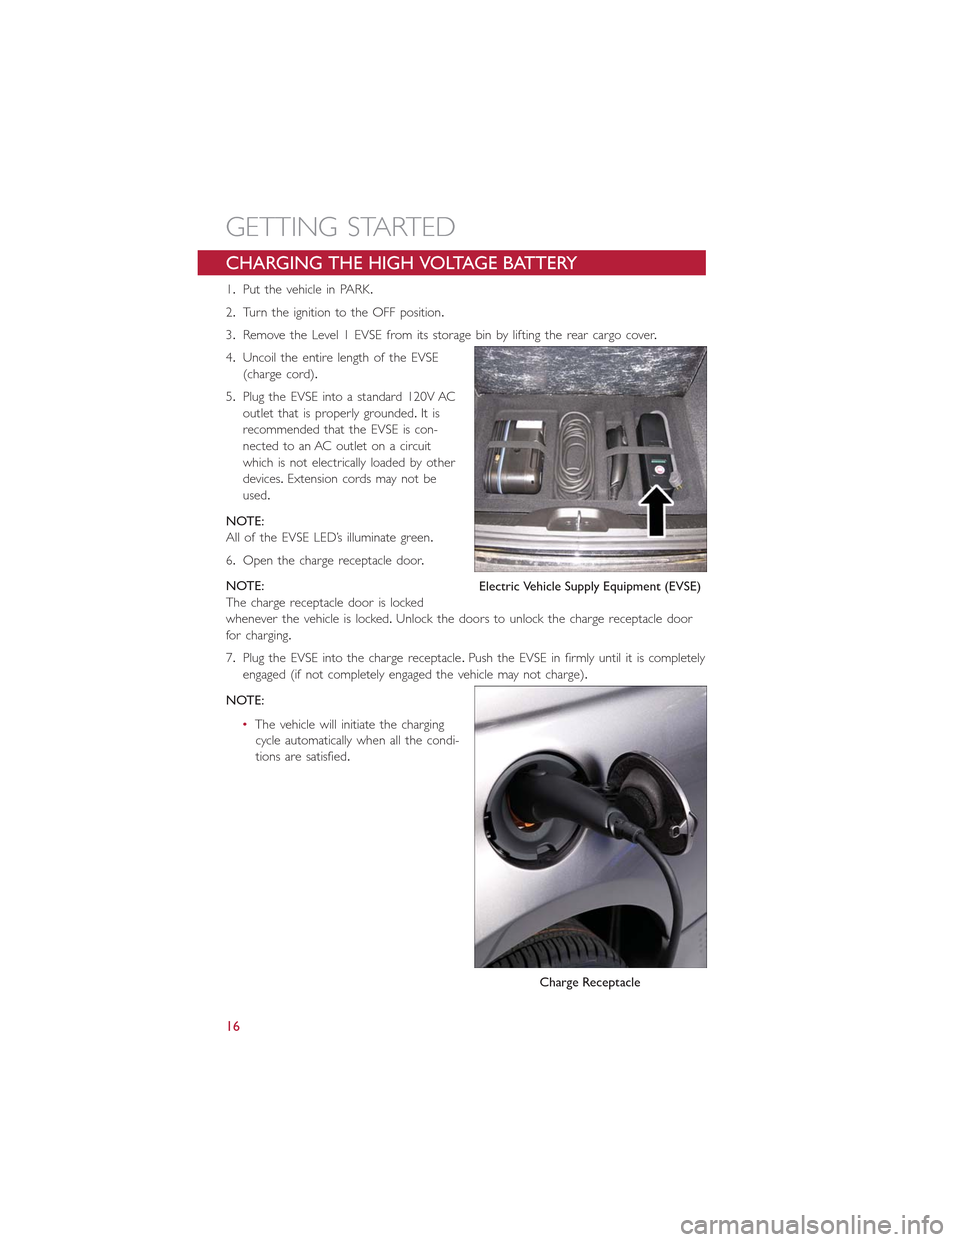
CHARGING THE HIGH VOLTAGE BATTERY
1.Put the vehicle in PARK.
2.Turn the ignition to the OFF position.
3.Remove the Level 1 EVSE from its storage bin by lifting the rear cargo cover.
4.Uncoil the entire length of the EVSE
(charge cord).
5.Plug the EVSE into a standard 120V AC
outlet that is properly grounded.It is
recommended that the EVSE is con-
nected to an AC outlet on a circuit
which is not electrically loaded by other
devices.Extension cords may not be
used.
NOTE:
All of the EVSE LED’s illuminate green.
6.Open the charge receptacle door.
NOTE:
The charge receptacle door is locked
whenever the vehicle is locked.Unlock the doors to unlock the charge receptacle door
for charging.
7.Plug the EVSE into the charge receptacle.Push the EVSE in firmly until it is completely
engaged (if not completely engaged the vehicle may not charge).
NOTE:
•The vehicle will initiate the charging
cycle automatically when all the condi-
tions are satisfied.
Electric Vehicle Supply Equipment (EVSE)
Charge Receptacle
GETTING STARTED
16
Page 19 of 100
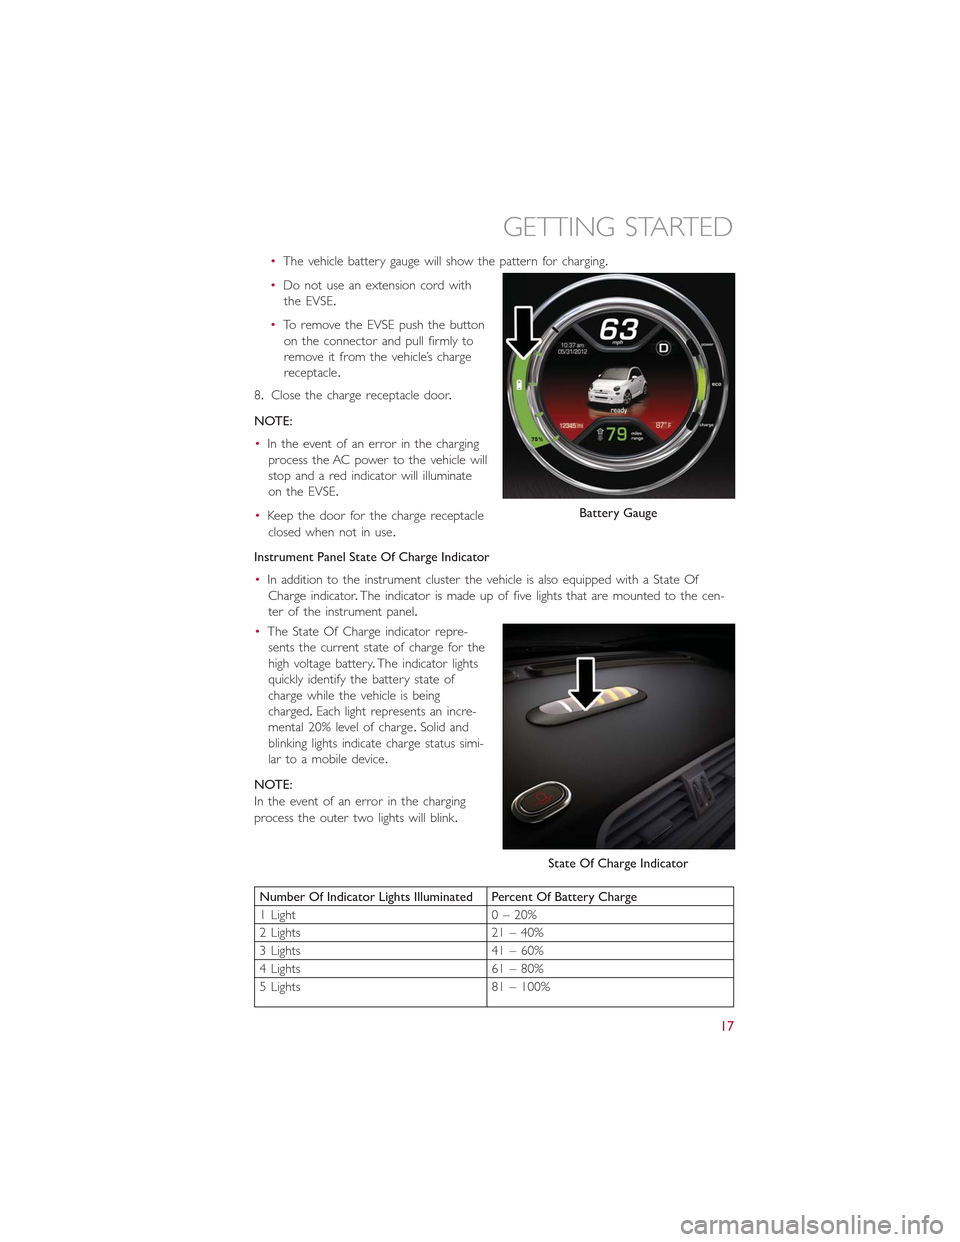
•The vehicle battery gauge will show the pattern for charging.
•Do not use an extension cord with
the EVSE.
•To remove the EVSE push the button
on the connector and pull firmly to
remove it from the vehicle’s charge
receptacle.
8.Close the charge receptacle door.
NOTE:
•In the event of an error in the charging
process the AC power to the vehicle will
stop and a red indicator will illuminate
on the EVSE.
•Keep the door for the charge receptacle
closed when not in use.
Instrument Panel State Of Charge Indicator
•In addition to the instrument cluster the vehicle is also equipped with a State Of
Charge indicator.The indicator is made up of five lights that are mounted to the cen-
ter of the instrument panel.
•The State Of Charge indicator repre-
sents the current state of charge for the
high voltage battery.The indicator lights
quickly identify the battery state of
charge while the vehicle is being
charged.Each light represents an incre-
mental 20% level of charge.Solid and
blinking lights indicate charge status simi-
lar to a mobile device.
NOTE:
In the event of an error in the charging
process the outer two lights will blink.
Number Of Indicator Lights Illuminated Percent Of Battery Charge
1 Light 0 – 20%
2 Lights 21 – 40%
3 Lights 41 – 60%
4 Lights 61 – 80%
5 Lights 81 – 100%
Battery Gauge
State Of Charge Indicator
GETTING STARTED
17
Page 37 of 100
EXTENDING YOUR DRIVING RANGE PER CHARGE
•A little knowledge will go a long way to extend your driving range on the 500e.First
and foremost understand that the drive system and cabin temperature management
features use the most energy from the high voltage battery.Reducing energy draw
from these features are the easiest and most effective way to extend driving range.
•Just like a conventional vehicle, 500e likes to keep things smooth and steady for most
efficient operation.When driving, avoid aggressive driving styles and high speeds for
extended times.When practical, choose surface streets over the highway, work to
maintain a steady speed to extend range.
•The 500e uses high voltage components to heat and cool the cabin, so a little aware-
ness can go a long way to extend range.When using automatic climate control, con-
sider setting temperatures a few degrees higher or lower during hot and cold days.
If your 500e has been soaking in hot or cold temperatures for an extended period, it
is recommended that the car be preconditioned via the FIAT Access smartphone app
while still plugged into a charging source.This will allow 500e to use external power to
establish a comfortable cabin temperature before the drive, and allow the battery to
maintain the temperature using significantly less energy during the drive.
Additional Tips:
•Keep tires properly inflated
•Avoid carrying nonessential cargo
•Be mindful of adding external accessories that may increase aerodynamic drag
•Perform all scheduled maintenance at recommended intervals
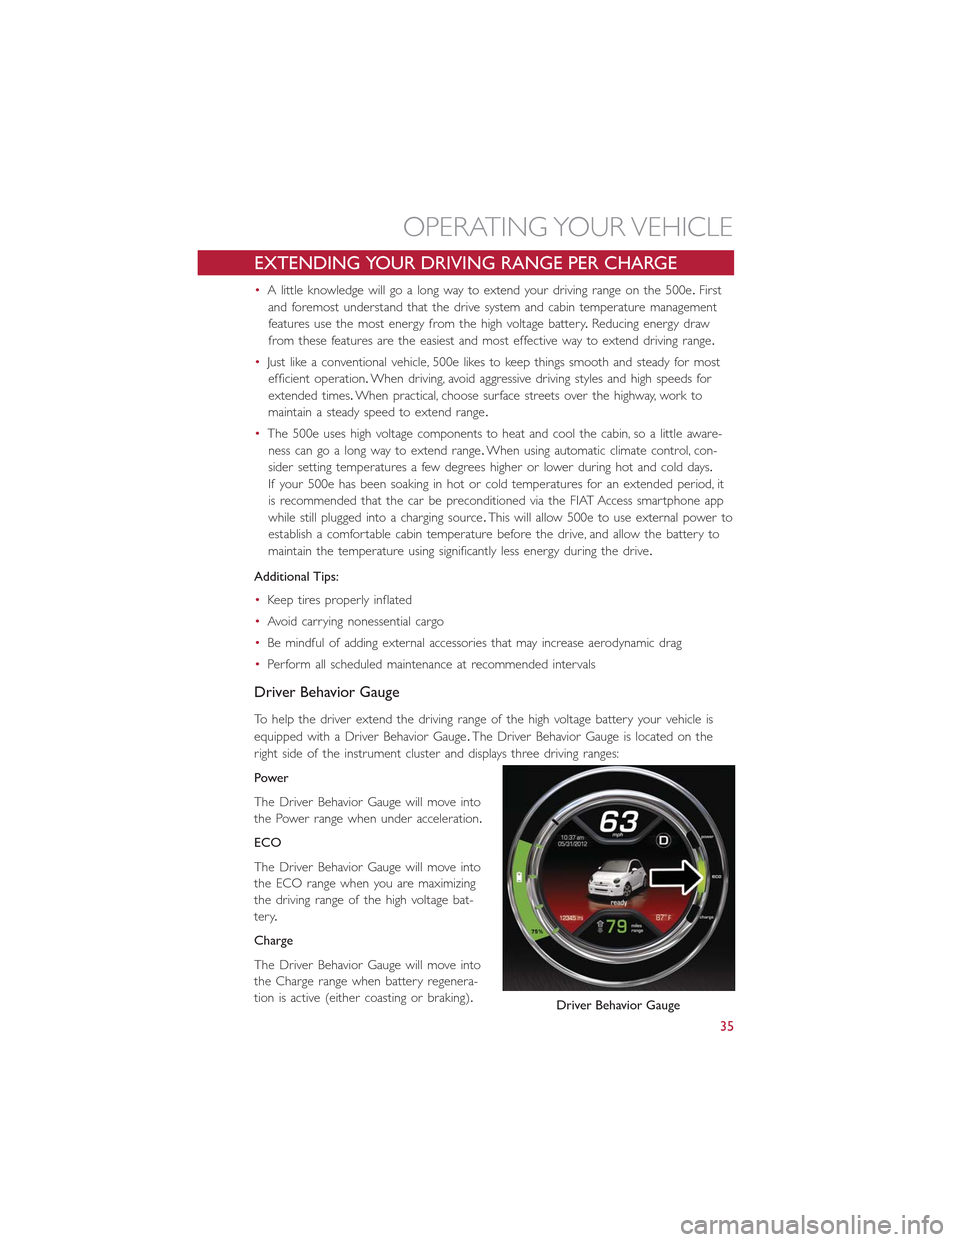
Driver Behavior Gauge
To help the driver extend the driving range of the high voltage battery your vehicle is
equipped with a Driver Behavior Gauge.The Driver Behavior Gauge is located on the
right side of the instrument cluster and displays three driving ranges:
Power
The Driver Behavior Gauge will move into
the Power range when under acceleration.
ECO
The Driver Behavior Gauge will move into
the ECO range when you are maximizing
the driving range of the high voltage bat-
tery.
Charge
The Driver Behavior Gauge will move into
the Charge range when battery regenera-
tion is active (either coasting or braking).Driver Behavior Gauge
OPERATING YOUR VEHICLE
35