steering FIAT 500E 2015 2.G User Guide
[x] Cancel search | Manufacturer: FIAT, Model Year: 2015, Model line: 500E, Model: FIAT 500E 2015 2.GPages: 100, PDF Size: 2.97 MB
Page 3 of 100
INTRODUCTION/WELCOMEWELCOME FROM FIAT...............2IMPORTANT VEHICLE INFORMATION......4
CONTROLS AT A GLANCEDRIVER COCKPIT..................6INSTRUMENT CLUSTER..............8
GETTING STARTEDELECTRIC VEHICLE FEATURES..........10ELECTRIC SYSTEM OPERATION.........13CHARGING THE HIGH VOLTAGE BATTERY...16STARTING YOUR 500e...............18KEY FOB......................19VEHICLE SECURITY ALARM...........20POWER DOOR LOCKS..............20SEAT BELT SYSTEMS................20SUPPLEMENTAL RESTRAINT SYSTEM (SRS) —AIR BAGS......................21CHILD RESTRAINTS................24HEAD RESTRAINTS.................28FRONT SEATS....................30REAR SEATS.....................32HEATED SEATS...................33TILT STEERING...................34
OPERATING YOUR VEHICLEEXTENDING YOUR DRIVING RANGE PERCHARGE.......................35TURN SIGNAL/LIGHTS/HIGH BEAM LEVER...36WIPER/WASHER LEVER..............37ELECTRONIC SPEED CONTROL.........38POWER WINDOWS................40AUTOMATIC TEMPERATURECONTROLS (ATC).................41REAR PARK ASSIST.................42POWER SUNROOF.................42WIND BUFFETING.................43
ELECTRONICSYO U R V E H I C L E ' S S O U N D S YS T E M........44AM/FM RADIO WITH CD PLAYER ANDSiriusXM SATELLITE RADIO............46BLUE&ME™ HANDS-FREE OPERATION.....48iPod®/USB/MP3 CONTROL — IF EQUIPPED..53ELECTRONIC VEHICLE INFORMATIONCENTER (EVIC)...................54PROGRAMMABLE FEATURES...........55TRIP BUTTON....................56POWER OUTLET..................57
UTILITY
TRAILER TOWING WEIGHTS (MAXIMUMTRAILER WEIGHT RATINGS)...........58RECREATIONAL TOWING (BEHINDMOTORHOME, ETC.)...............58
WHAT TO DO IN EMERGENCIES
ROADSIDE ASSISTANCE..............59INSTRUMENT CLUSTER WARNING LIGHTS..59INSTRUMENT CLUSTER INDICATORLIGHTS.......................63TIRE SERVICE KIT..................63JUMP-STARTING PROCEDURE — 12 VOLTBATTERY.......................70MANUAL PARK RELEASE.............72TOW I N G A D I S A B L E D V E H I C L E.........73ENHANCED ACCIDENT RESPONSESYSTEM.......................73FREEING A STUCK VEHICLE............73EVENT DATA RECORDER (EDR).........74
MAINTAINING YOUR VEHICLEOPENING THE HOOD..............75UNDERHOOD COMPARTMENT.........76FLUID CAPACITIES.................78FLUIDS, LUBES, AND GENUINE PARTS......78MAINTENANCE PROCEDURES..........79MAINTENANCE SCHEDULE...........79FUSES.........................83TIRE PRESSURES..................85TIRE ROTATION RECOMMENDATIONS....86SPARE TIRES — IF EQUIPPED...........87WHEEL AND WHEEL TRIM CARE........88REPLACEMENT BULBS..............89
CUSTOMER ASSISTANCEFIAT CUSTOMER CENTER.............90ASSISTANCE FOR THE HEARING IMPAIRED..90PUBLICATIONS ORDERING...........90REPORTING SAFETY DEFECTS IN THEUNITED STATES...................91
MOPAR® ACCESSORIESAUTHENTIC ACCESSORIES BY MOPAR®...92
FAQ ’sFREQUENTLY ASKED QUESTIONS........93
INDEX.......................94
TABLE OF CONTENTS
1
Page 8 of 100
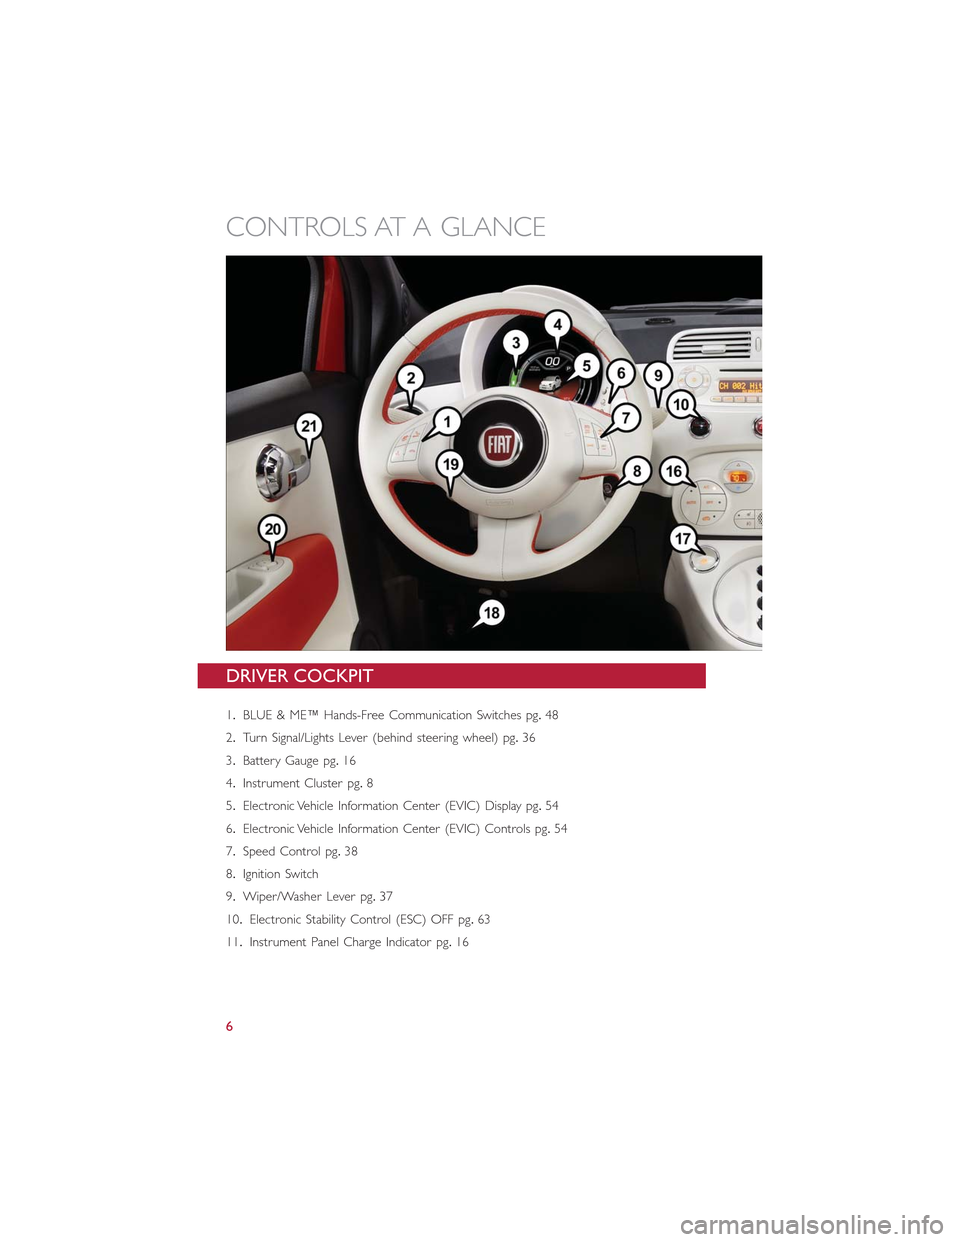
DRIVER COCKPIT
1.BLUE & ME™ Hands-Free Communication Switches pg.48
2.Turn Signal/Lights Lever (behind steering wheel) pg.36
3.Battery Gauge pg.16
4.Instrument Cluster pg.8
5.Electronic Vehicle Information Center (EVIC) Display pg.54
6.Electronic Vehicle Information Center (EVIC) Controls pg.54
7.Speed Control pg.38
8.Ignition Switch
9.Wiper/Washer Lever pg.37
10.Electronic Stability Control (ESC) OFF pg.63
11.Instrument Panel Charge Indicator pg.16
CONTROLS AT A GLANCE
6
Page 9 of 100
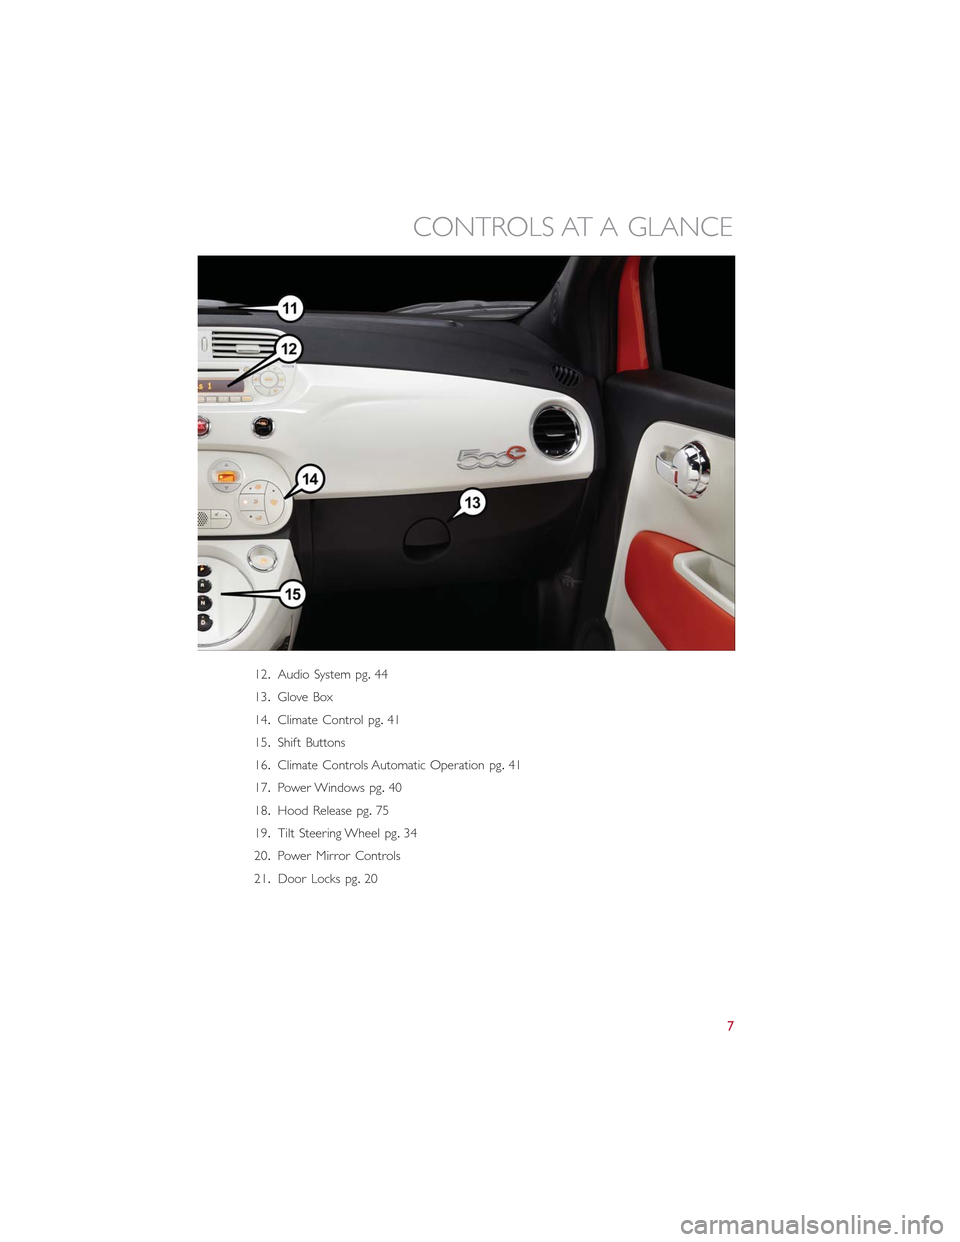
12.Audio System pg.44
13.Glove Box
14.Climate Control pg.41
15.Shift Buttons
16.Climate Controls Automatic Operation pg.41
17.Power Windows pg.40
18.Hood Release pg.75
19.Tilt Steering Wheel pg.34
20.Power Mirror Controls
21.Door Locks pg.20
CONTROLS AT A GLANCE
7
Page 23 of 100
Seat Belt Pretensioner
•The front seat belt system is equipped with pretensioning devices that are designed to
remove slack from the seat belt in the event of a collision.
•A deployed pretensioner or a deployed air bag must be replaced immediately.
WARNING!
•In a collision, you and your passengers can suffer much greater injuries if you are
not properly buckled up.You can strike the interior of your vehicle or other pas-
sengers, or you can be thrown out of the vehicle.Always be sure you and others
in your vehicle are buckled up properly.
•A shoulder belt placed behind you will not protect you from injury during a colli-
sion.You are more likely to hit your head in a collision if you do not wear your
shoulder belt.The lap and shoulder belt are meant to be used together.
•A seat belt that is too loose will not protect you properly.In a sudden stop, you
could move too far forward, increasing the possibility of injury.Wear your seat belt
snugly.
•A frayed or torn seat belt could rip apart in a collision and leave you with no pro-
tection.Inspect the seat belt system periodically, checking for cuts, frays, or loose
parts.Damaged parts must be replaced immediately.Do not disassemble or
modify the system.Seat belt assemblies must be replaced after a collision.
SUPPLEMENTAL RESTRAINT SYSTEM (SRS) — AIR BAGS
Air Bag System Components
Your vehicle may be equipped with the following air bag system components:
•Occupant Restraint Controller (ORC)
•Air Bag Warning Light
•Steering Wheel and Column
•Instrument Panel
•Knee Impact Bolsters
•Advanced Front Air Bags
•Supplemental Side Air Bags
•Supplemental Knee Air Bags
•Front and Side Impact Sensors
•Seat Belt Pretenioners
•Seat Belt Buckle Switch
•Seat Track Position Sensors
GETTING STARTED
21
Page 25 of 100
•After any collision, the vehicle should be taken to an authorized dealer immediately.
•Do not drive your vehicle after the air bags have deployed.If you are involved in an-
other collision, the air bags will not be in place to protect you.
•If it is necessary to modify the air bag system for persons with disabilities, contact your
authorized dealer.
•Refer to the Owner's Manual on the DVD regarding the Supplemental Restraint Sys-
tem (SRS) for further details.
Supplemental Knee Air Bags
This vehicle is equipped with a Supplemental Driver Knee Air Bag mounted in the instru-
ment panel below the steering column.The Supplemental Driver Knee Air Bag provides
enhanced protection during a frontal impact by working together with the seat belts, pre-
tensioners, and Advanced Front Air Bags.
WARNING!
•Relying on the air bags alone could lead to more severe injuries in a collision.The
air bags work with your seat belt to restrain you properly.In some collisions, the
air bags won't deploy at all.Always wear your seat belts even though you have air
bags.
•Being too close to the steering wheel or instrument panel during Advanced Front
Air Bag deployment could cause serious injury, including death.Air bags need
room to inflate.Sit back, comfortably extending your arms to reach the steering
wheel or instrument panel.
•No objects should be placed over or near the air bag on the instrument panel or
steering wheel because any such objects could cause harm if the vehicle is in a
collision severe enough to cause the air bag to inflate.
Supplemental Side Air Bags
•This vehicle is equipped with Supplemental Seat-Mounted Side Air Bags (SABs) located
in the outboard side of the front seats.The SABs are marked with a SRS AIRBAG or
AIRBAG label sewn into the outboard side of the seats.
•This vehicle is equipped with Supplemental Side Air Bag Inflatable Curtains (SABICs)
located above the side windows.The trim covering the SABICs is labeled SRS AIRBAG
or AIRBAG.The SABICs may help reduce the risk of partial or complete ejection of
vehicle occupants through side windows in cer tain side impact events.
•The SABICs and SABs (“Side Air Bags”) are designed to activate in certain side im-
pacts.The Occupant Restraint Controller (“ORC”) determines whether the deploy-
ment of the Side Air Bags in a particular impact event is appropriate, based on the
severity and type of collision.Vehicle damage by itself is not a good indicator of
whether or not Side Air Bags should have deployed.
GETTING STARTED
23
Page 36 of 100
TILT STEERING
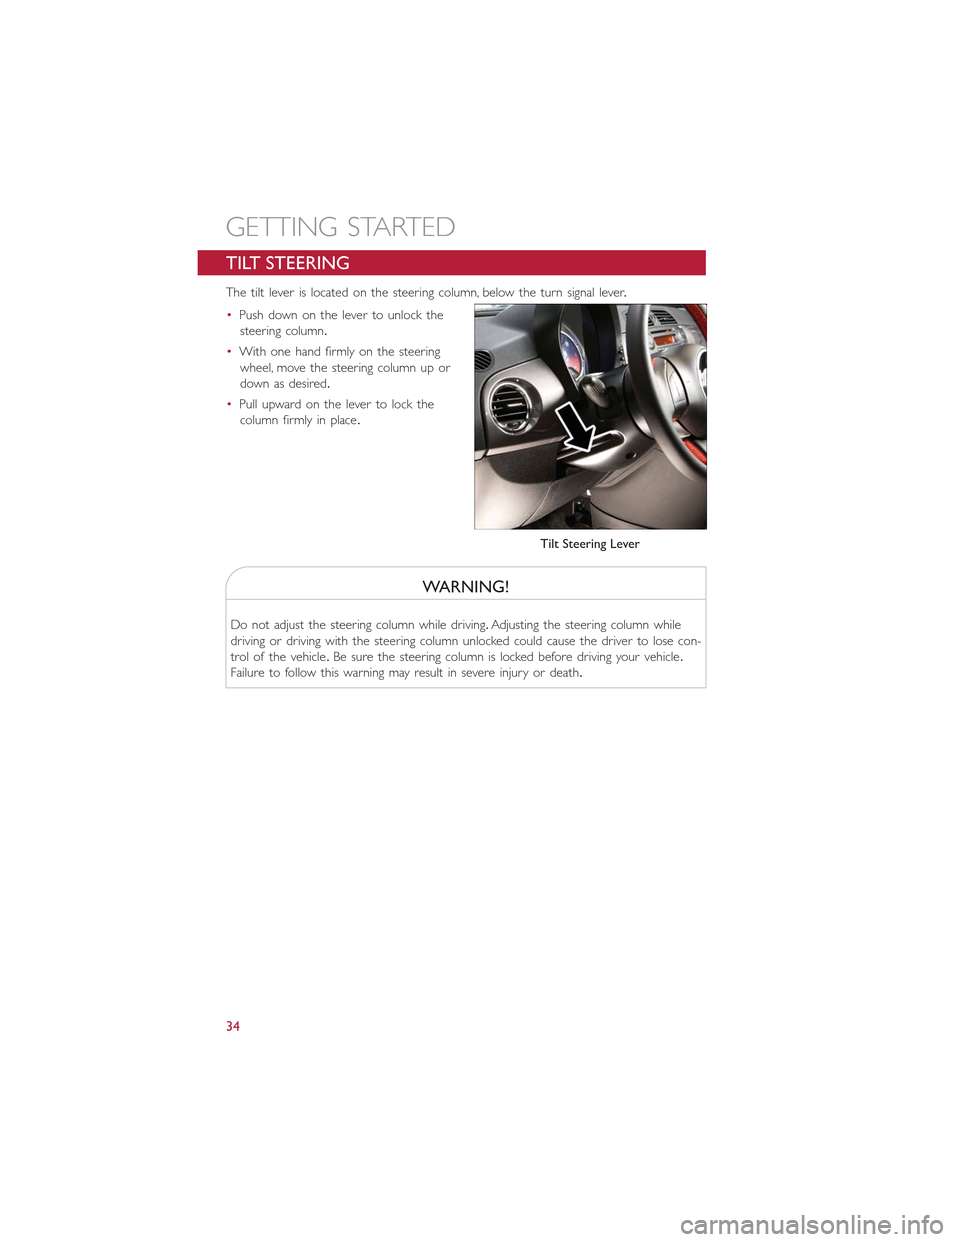
The tilt lever is located on the steering column, below the turn signal lever.
•Push down on the lever to unlock the
steering column.
•With one hand firmly on the steering
wheel, move the steering column up or
down as desired.
•Pull upward on the lever to lock the
column firmly in place.
WARNING!
Do not adjust the steering column while driving.Adjusting the steering column while
driving or driving with the steering column unlocked could cause the driver to lose con-
trol of the vehicle.Be sure the steering column is locked before driving your vehicle.
Failure to follow this warning may result in severe injury or death.
Tilt Steering Lever
GETTING STARTED
34
Page 38 of 100
TURN SIGNAL/LIGHTS/HIGH BEAM LEVER
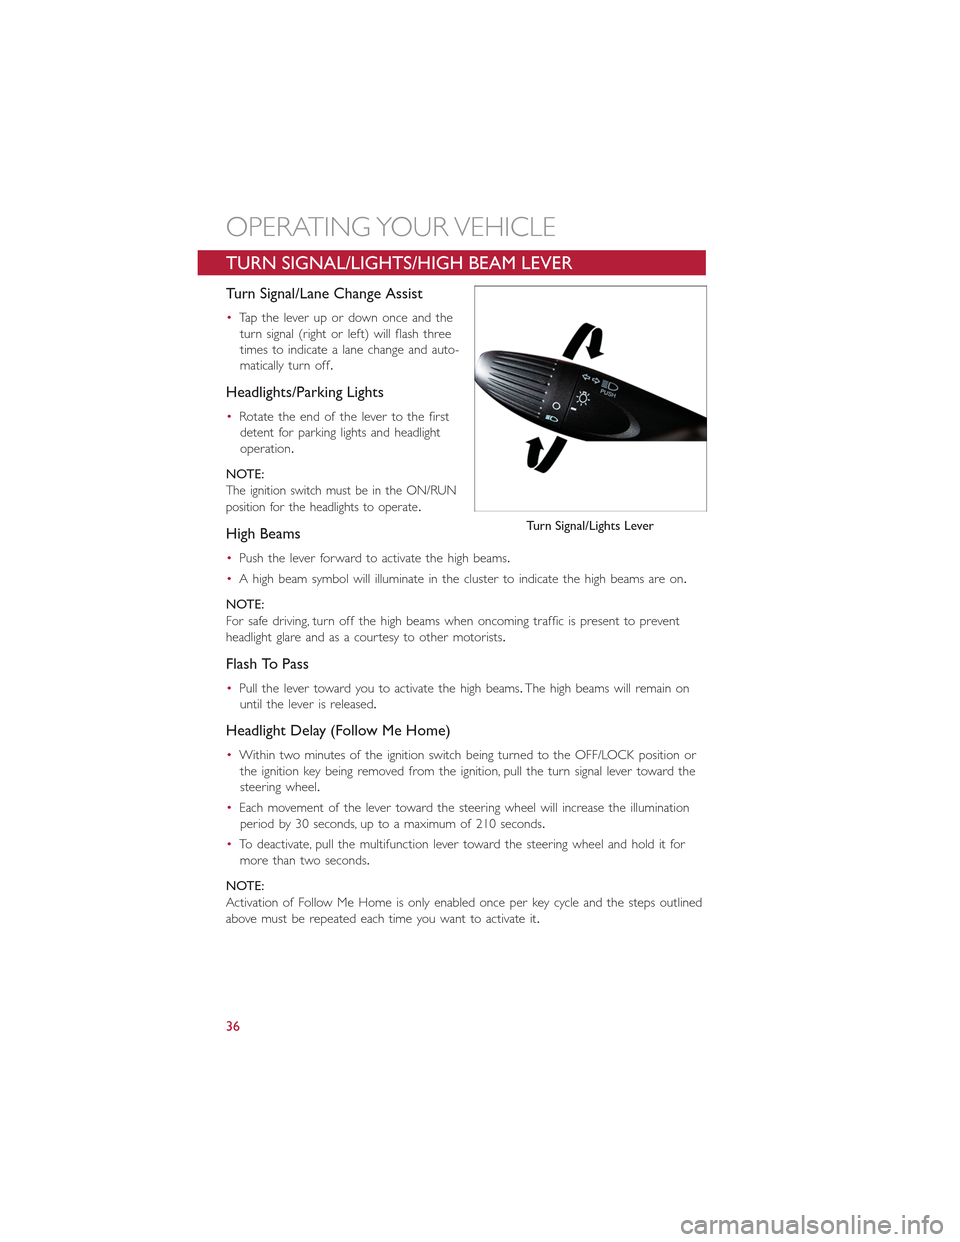
Turn Signal/Lane Change Assist
•Tap the lever up or down once and the
turn signal (right or left) will flash three
times to indicate a lane change and auto-
matically turn off.
Headlights/Parking Lights
•Rotate the end of the lever to the first
detent for parking lights and headlight
operation.
NOTE:
The ignition switch must be in the ON/RUN
position for the headlights to operate.
High Beams
•Push the lever forward to activate the high beams.
•A high beam symbol will illuminate in the cluster to indicate the high beams are on.
NOTE:
For safe driving, turn off the high beams when oncoming traffic is present to prevent
headlight glare and as a courtesy to other motorists.
Flash To Pass
•Pull the lever toward you to activate the high beams.The high beams will remain on
until the lever is released.
Headlight Delay (Follow Me Home)
•Within two minutes of the ignition switch being turned to the OFF/LOCK position or
the ignition key being removed from the ignition, pull the turn signal lever toward the
steering wheel.
•Each movement of the lever toward the steering wheel will increase the illumination
period by 30 seconds, up to a maximum of 210 seconds.
•To deactivate, pull the multifunction lever toward the steering wheel and hold it for
more than two seconds.
NOTE:
Activation of Follow Me Home is only enabled once per key cycle and the steps outlined
above must be repeated each time you want to activate it.
Turn Signal/Lights Lever
OPERATING YOUR VEHICLE
36
Page 40 of 100
Rear Wiper
Rear Wiper Operation
•Rotate the end of the lever to activate the rear wiper.
Rear Washer Operation
•Push the lever forward and hold for as long as spray is desired.
NOTE:
The rear wiper will automatically operate if the front wipers are on and the vehicle is
placed in reverse.
ELECTRONIC SPEED CONTROL
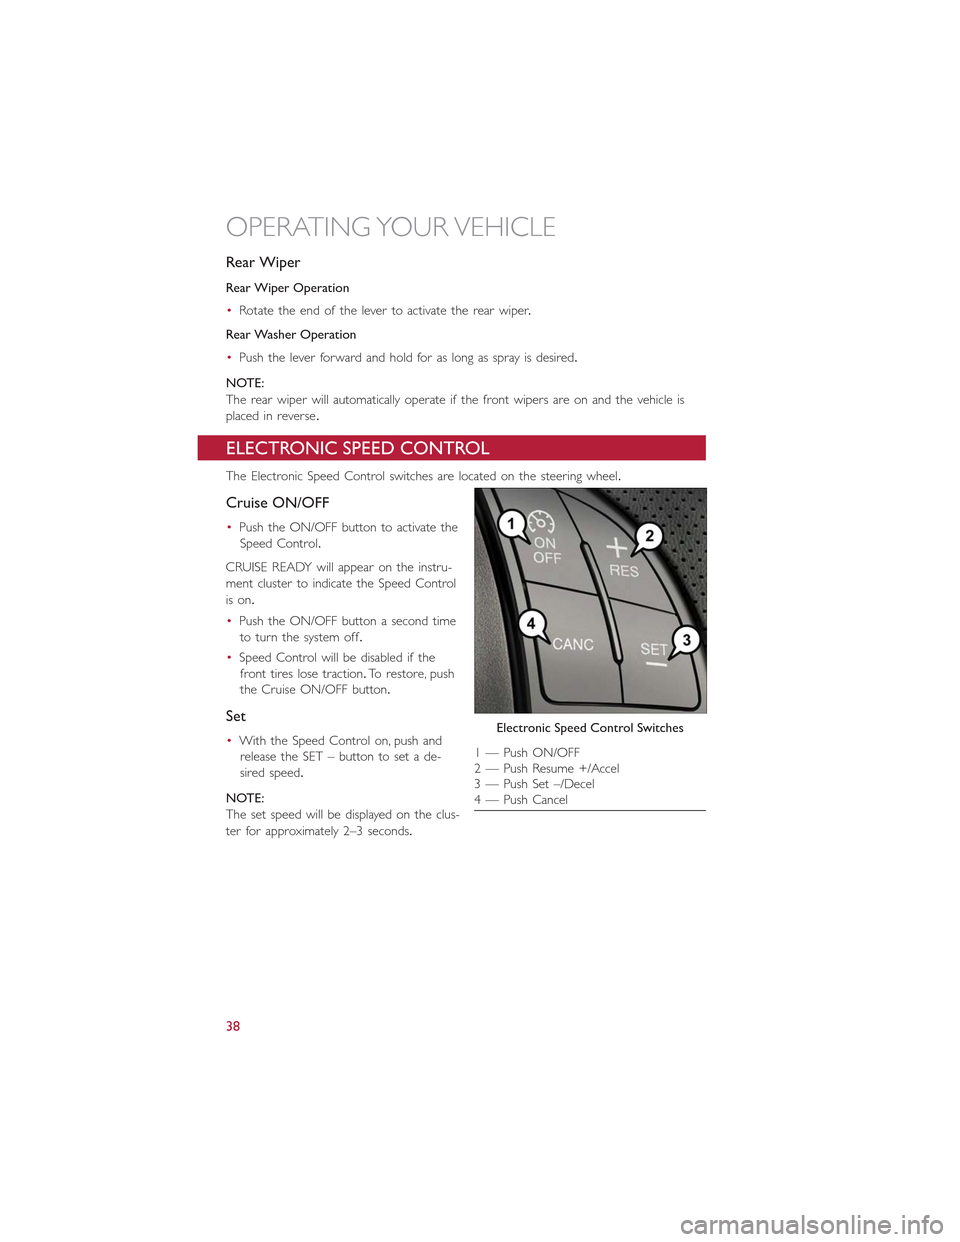
The Electronic Speed Control switches are located on the steering wheel.
Cruise ON/OFF
•Push the ON/OFF button to activate the
Speed Control.
CRUISE READY will appear on the instru-
ment cluster to indicate the Speed Control
is on.
•Push the ON/OFF button a second time
to turn the system off.
•Speed Control will be disabled if the
front tires lose traction.To restore, push
the Cruise ON/OFF button.
Set
•With the Speed Control on, push and
release the SET – button to set a de-
sired speed.
NOTE:
The set speed will be displayed on the clus-
ter for approximately 2–3 seconds.
Electronic Speed Control Switches
1 — Push ON/OFF2 — Push Resume +/Accel3 — Push Set –/Decel4 — Push Cancel
OPERATING YOUR VEHICLE
38
Page 46 of 100
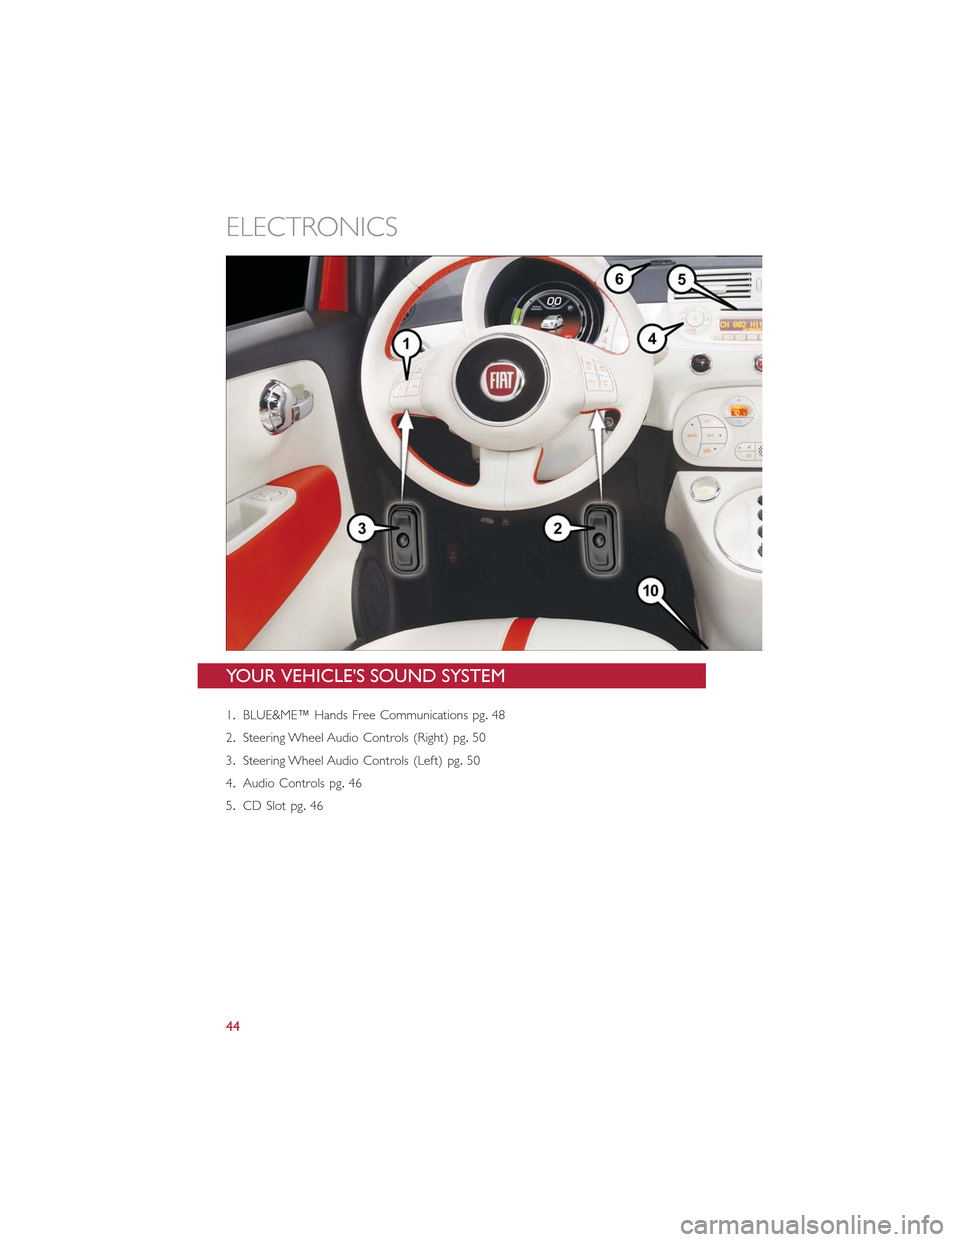
YOUR VEHICLE'S SOUND SYSTEM
1.BLUE&ME™ Hands Free Communications pg.48
2.Steering Wheel Audio Controls (Right) pg.50
3.Steering Wheel Audio Controls (Left) pg.50
4.Audio Controls pg.46
5.CD Slot pg.46
ELECTRONICS
44
Page 50 of 100
BLUE&ME™ HANDS-FREE OPERATION
•FIAT’s Windows Mobile™ based BLUE&ME™ Hands-Free Communication is a personal
telematics system that incorporates communication and entertainment applications that
are specifically designed for use in your car.
•The BLUE&ME™ Hands-Free Communication package installed in your car is equipped
with integral hands-free functionality, message reader, and media player.BLUE&ME™ is
designed to support the future installation of additional services.
•The BLUE&ME™ Hands-Free Communication package features integrated voice recogni-
tion, steering wheel controls and a multifunction electronic display that allows you to use
your Bluetooth® enabled wireless technology enabled mobile phone without having to
take your eyes off the road.You can even keep your phone in a pocket or a bag.You are
not required to train the voice recognition system to recognize your voice.The system is
“speaker independent” and performs equally well for different users.
•Bluetooth® wireless technology enables wireless connection between your mobile
phone and the hands-free kit installed on your car.
•To use the hands-free kit, you need a Bluetooth® wireless technology enabled mobile
phone.This hands-free kit gives you the possibility of interacting vocally with your mobile
phone while driving, even if your mobile device does not feature Voice Recognition.You
can also interact with your mobile phone manually and visually using the steering wheel
controls and the instrument panel multifunction display.Please refer to the Fiat Blue & Me
Radio Supplement for further information.
WARNING!
Driving while distracted can result in loss of vehicle control, accident and injury.It is
strongly recommended that you use extreme caution when using any device or feature
that may take your focus off the road or your hands off the steering wheel.Your pri-
mary responsibility is the safe operation of your vehicle.We recommend against the
use of any handheld device while driving, encourage the use of voice-operated systems
when possible and that you become aware of applicable laws that may affect the use of
electronic devices while driving.
ELECTRONICS
48