change wheel FIAT 500E 2016 2.G Owners Manual
[x] Cancel search | Manufacturer: FIAT, Model Year: 2016, Model line: 500E, Model: FIAT 500E 2016 2.GPages: 362, PDF Size: 2.58 MB
Page 115 of 362
NOTE:The indicators will automatically turn off when
the turn has been completed and the steering wheel is
returned to a straight position.
Lane Change Assist
Tap the lever up or down once, without moving beyond
the detent, and the turn signal (right or left) will flash
three times then automatically turn off.
Follow Me Home/Headlight Delay
When this feature is selected the driver can choose to
have the headlights remain on for a preset period of time.
Activation
Remove the key or turn the ignition to the OFF/LOCK
position, and pull the multifunction lever toward the
steering wheel, within two minutes. Each time the lever
is pulled, the activation of the lights will be extended by
30 seconds. The activation of the lights can be extended to
a maximum of 210 seconds.
Turn Signal Operation
3
UNDERSTANDING THE FEATURES OF YOUR VEHICLE 113
Page 119 of 362
NOTE:The Intermittent function only has one detent but
wiper delay will vary with changes in vehicle speed. As
vehicle speed increases the delay time will decrease.
Low Speed
Push the lever downward to the second detent. The
wipers will operate at low speed.
High Speed
Push the lever downward to the third detent. The wipers
will operate at high speed.
Manual High Speed/Mist
Push the lever upward from the off position. The wipers
will operate at high speed to clear off road mist or spray
from a passing vehicle. This operation will continue until
the lever is released. When the lever is released, the
wipers will return to the off position and automatically
shut off.
Front Windshield Washer Operation
Pull the windshield wiper/washer lever toward the
steering wheel to activate the washers. The wipers will
activate automatically for three cycles after the lever is
released.
CAUTION!
• Turn the windshield wipers off when driving
through an automatic car wash. Damage to the
windshield wipers may result if the wiper control
is left in any position other than off.
• In cold weather, always turn off the wiper switch
and allow the wipers to return to the “Park” posi-
tion before turning off the vehicle. If the wiper
switch is left on and the wipers freeze to the
windshield, damage to the wiper motor may occur
when the vehicle is restarted.
(Continued)
3
UNDERSTANDING THE FEATURES OF YOUR VEHICLE 117
Page 194 of 362
Radio Operation And Mobile Phones
Under certain conditions, the mobile phone being on in
your vehicle can cause erratic or noisy performance from
your radio. This condition may be lessened or eliminated
by relocating the mobile phone antenna. This condition is
not harmful to the radio. If your radio performance does
not satisfactorily “clear” by the repositioning of the
antenna, it is recommended that the radio volume be
turned down or off during mobile phone operation.
Harmful Interference Statement
This device complies with Part 15 of the FCC rules and
RSS 210 of Industry Canada. Operation is subject to the
following conditions:
•This device may not cause harmful interference.
• This device must accept any interference received,
including interference that may cause undesired op-
eration. NOTE:
Changes or modifications not expressly approved
by the party responsible for compliance could void the
user ’s authority to operate the equipment.
Additional Information
© 2015 FCA US LLC. All rights reserved. Mopar and
Uconnect are registered trademarks and Mopar Owner
Connect is a trademark of FCA US LLC. Android is a
trademark of Google Inc. SiriusXM and all related marks
and logos are trademarks of SiriusXM Radio Inc.
For Uconnect system support, call 1-877-855-8400 (24
hours a day 7 days a week) or visit DriveUconnect.com.
STEERING WHEEL AUDIO CONTROLS
The remote sound system controls are located on the rear
surface of the steering wheel. Reach behind the wheel to
access the switches.
192 UNDERSTANDING YOUR INSTRUMENT PANEL
Page 226 of 362
WARNING!(Continued)
prevailing road conditions. ESC cannot prevent all
accidents, including those resulting from excessive
speed in turns, driving on very slippery surfaces, or
hydroplaning. ESC also cannot prevent collisions
resulting from loss of vehicle control due to inap-
propriate driver input for the conditions. Only a
safe, attentive, and skillful driver can prevent acci-
dents. The capabilities of an ESC equipped vehicle
must never be exploited in a reckless or dangerous
manner which could jeopardize the user ’s safety or
the safety of others.
• Vehicle modifications, or failure to properly main-
tain your vehicle, may change the handling charac-
teristics of your vehicle, and may negatively affect
the performance of the ESC system. Changes to the
steering system, suspension, braking system, tire
(Continued)
WARNING! (Continued)
type and size or wheel size may adversely affect
ESC performance. Improperly inflated and un-
evenly worn tires may also degrade ESC perfor-
mance. Any vehicle modification or poor vehicle
maintenance that reduces the effectiveness of the
ESC system can increase the risk of loss of vehicle
control, vehicle rollover, personal injury and death.
ESC Operating Modes
The ESC system has two available operating modes.
Full On
This is the normal operating mode for ESC. Whenever
the vehicle is started, the ESC system will be in On mode.
This mode should be used for most driving situations.
ESC should only be turned to Partial Off for specific
reasons as noted below.
224 STARTING AND OPERATING
Page 253 of 362
WARNING!
•Do not use a tire, wheel size or rating other than
that specified for your vehicle. Some combinations
of unapproved tires and wheels may change sus-
pension dimensions and performance characteris-
tics, resulting in changes to steering, handling, and
braking of your vehicle. This can cause unpredict-
able handling and stress to steering and suspen-
sion components. You could lose control and have
a collision resulting in serious injury or death. Use
only the tire and wheel sizes with load ratings
approved for your vehicle.
• Never use a tire with a smaller load index or
capacity, other than what was originally equipped
on your vehicle. Using a tire with a smaller load
index could result in tire overloading and failure.
You could lose control and have a collision.
(Continued)
WARNING! (Continued)
•Failure to equip your vehicle with tires having
adequate speed capability can result in sudden tire
failure and loss of vehicle control.
CAUTION!
Replacing original tires with tires of a different size
may result in false speedometer and odometer read-
ings.
(Continued)
5
STARTING AND OPERATING 251
Page 259 of 362
•It is particularly important for you to check the tire
pressure in all of the tires on your vehicle monthly and
to maintain the proper pressure.
• The TPMS is not a substitute for proper tire mainte-
nance, and it is the driver ’s responsibility to maintain
correct tire pressure using an accurate tire pressure
gauge, even if under-inflation has not reached the level
to trigger illumination of the “Tire Pressure Monitor-
ing Telltale Light”.
• Seasonal temperature changes will affect tire pressure,
and the TPMS will monitor the actual tire pressure in
the tire.
Premium TPM System
The Tire Pressure Monitor System (TPMS) uses wireless
technology with wheel rim mounted electronic sensors to monitor tire pressure levels. Sensors, mounted to each
wheel as part of the valve stem, transmit tire pressure
readings to the receiver module.
The TPMS consists of the following components:
•
Receiver module
• Four Tire Pressure Monitoring Sensors
• Various Tire Pressure Monitoring System messages,
which display in the Electronic Vehicle Information
Center (EVIC)
• Tire Pressure Monitoring Telltale Light
Tire Pressure Monitoring Low Pressure Warnings
The “Tire Pressure Monitoring Telltale Light” will
illuminate in the instrument cluster and a chime will
sound when tire pressure is low in one or more of the
four active road tires. In addition, the Electronic
Vehicle Information Center (EVIC) will display a 5
STARTING AND OPERATING 257
Page 263 of 362
NOTE:Changes or modifications not expressly approved
by the party responsible for compliance could void the
user ’s authority to operate the equipment.TRAILER TOWING
Trailer towing with this vehicle is not recommended.
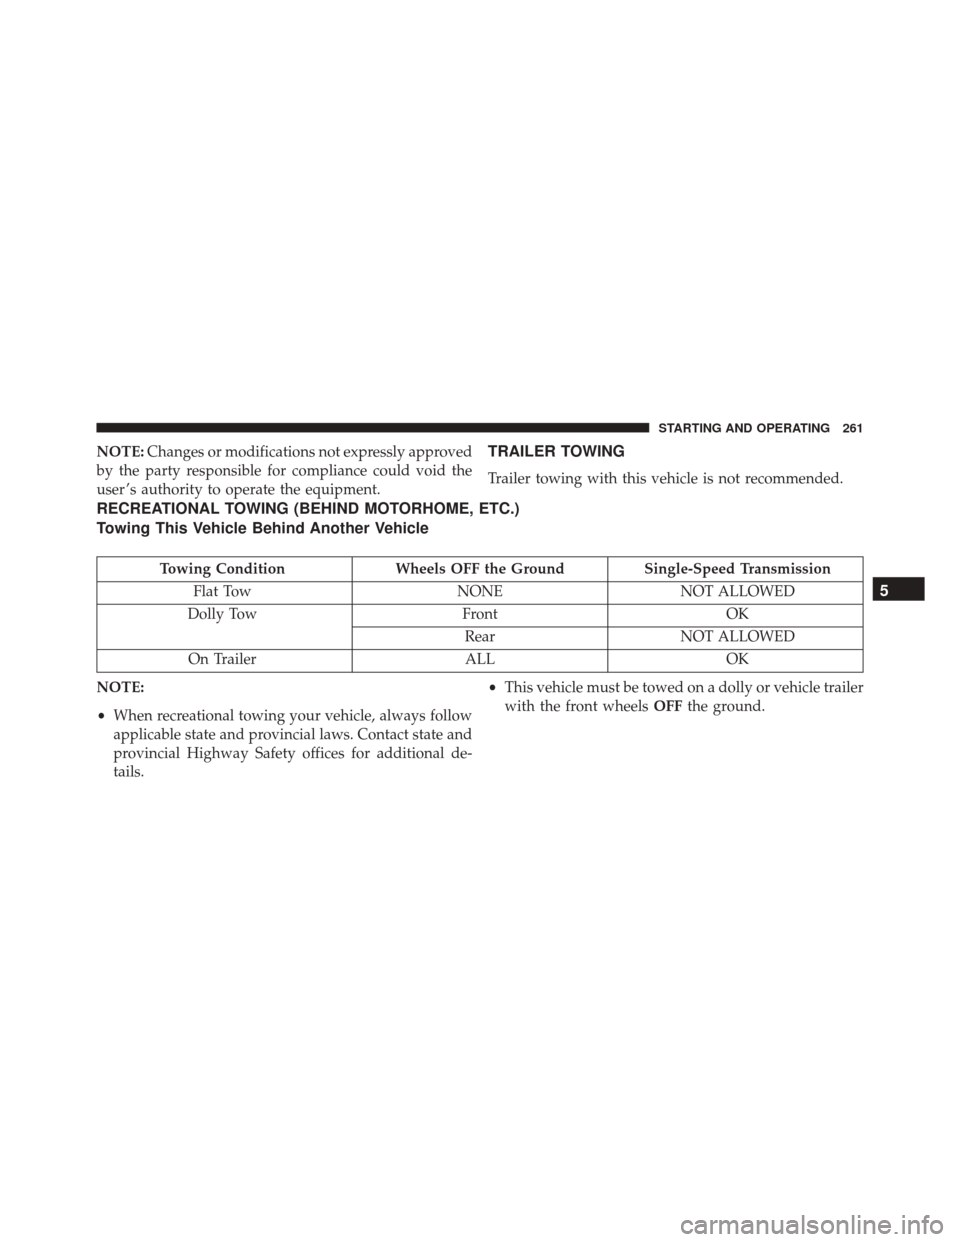
RECREATIONAL TOWING (BEHIND MOTORHOME, ETC.)
Towing This Vehicle Behind Another Vehicle
Towing Condition Wheels OFF the Ground Single-Speed Transmission
Flat Tow NONENOT ALLOWED
Dolly Tow FrontOK
Rear NOT ALLOWED
On Trailer ALLOK
NOTE:
• When recreational towing your vehicle, always follow
applicable state and provincial laws. Contact state and
provincial Highway Safety offices for additional de-
tails. •
This vehicle must be towed on a dolly or vehicle trailer
with the front wheels OFFthe ground.
5
STARTING AND OPERATING 261
Page 274 of 362
WARNING!(Continued)
•Keep Tire Service Kit away from open flames or
heat source.
• A loose Tire Service Kit thrown forward in a
collision or hard stop could endanger the occupants
of the vehicle. Always stow the Tire Service Kit in
the place provided. Failure to follow these warn-
ings can result in injuries that are serious or fatal to
you, your passengers, and others around you.
• Take care not to allow the contents of Tire Service
Kit to come in contact with hair, eyes, or clothing.
Tire Service Kit sealant is harmful if inhaled,
swallowed, or absorbed through the skin. It causes
skin, eye, and respiratory irritation. Flush immedi-
ately with plenty of water if there is any contact
with eyes or skin. Change clothing as soon as
possible, if there is any contact with clothing.
(Continued)
WARNING! (Continued)
•Tire Service Kit Sealant solution contains latex. In
case of an allergic reaction or rash, consult a phy-
sician immediately. Keep Tire Service Kit out of
reach of children. If swallowed, rinse mouth imme-
diately with plenty of water and drink plenty of
water. Do not induce vomiting! Consult a physician
immediately.
Sealing A Tire With Tire Service Kit
(A) Whenever You Stop To Use Tire Service Kit:
1. Pull over to a safe location and turn on the vehicle’s Hazard Warning flashers.
2. Verify that the valve stem (on the wheel with the deflated tire) is in a position that is near to the ground.
This will allow the Tire Service Kit Hoses (6) and (7) to
reach the valve stem and keep the Tire Service Kit flat
272 WHAT TO DO IN EMERGENCIES
Page 327 of 362
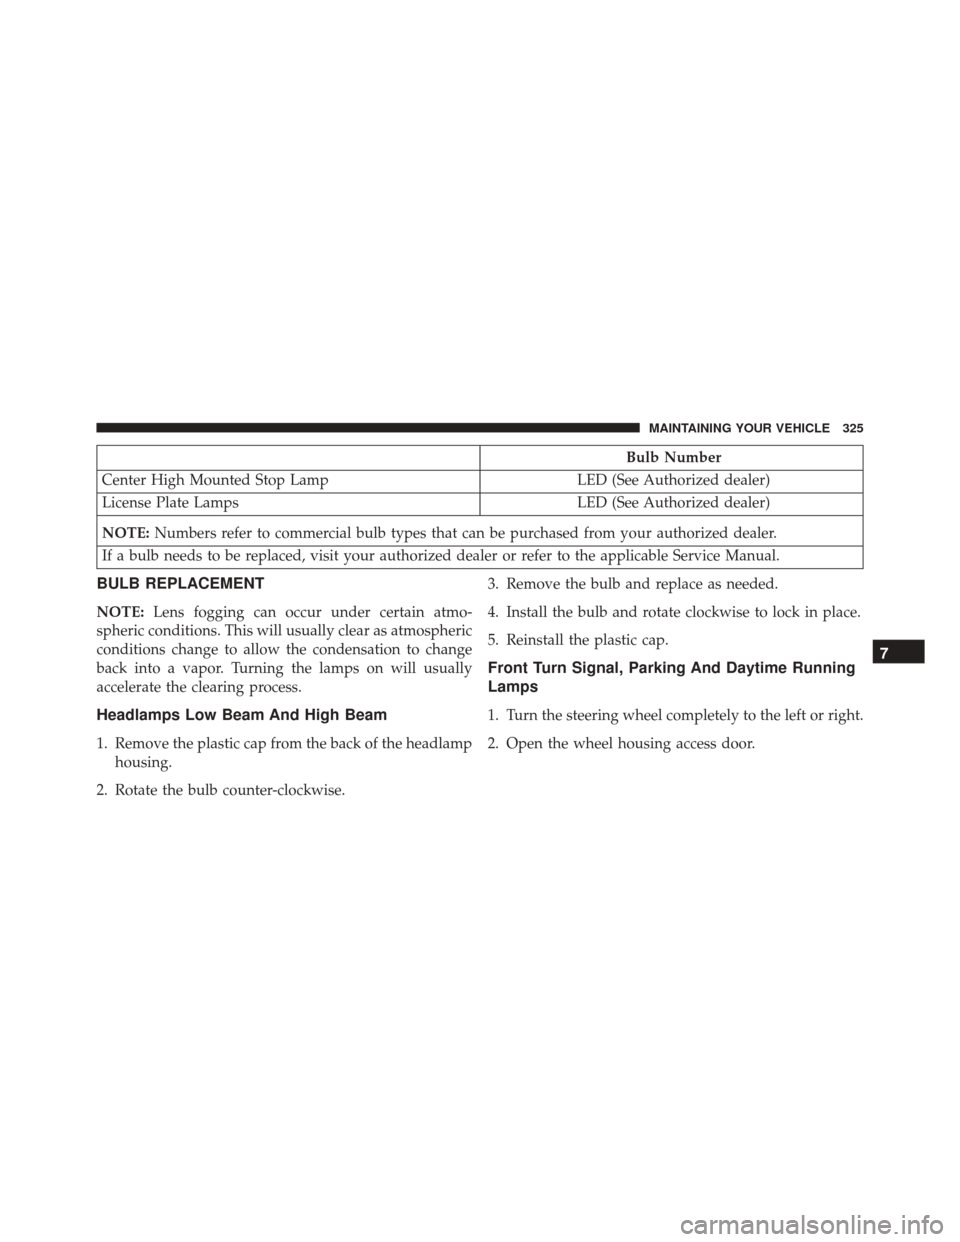
Bulb Number
Center High Mounted Stop Lamp LED (See Authorized dealer)
License Plate Lamps LED (See Authorized dealer)
NOTE: Numbers refer to commercial bulb types that can be purchased from your authorized dealer.
If a bulb needs to be replaced, visit your authorized dealer or refer to the applicable Service Manual.
BULB REPLACEMENT
NOTE: Lens fogging can occur under certain atmo-
spheric conditions. This will usually clear as atmospheric
conditions change to allow the condensation to change
back into a vapor. Turning the lamps on will usually
accelerate the clearing process.
Headlamps Low Beam And High Beam
1. Remove the plastic cap from the back of the headlamp housing.
2. Rotate the bulb counter-clockwise. 3. Remove the bulb and replace as needed.
4. Install the bulb and rotate clockwise to lock in place.
5. Reinstall the plastic cap.
Front Turn Signal, Parking And Daytime Running
Lamps
1. Turn the steering wheel completely to the left or right.
2. Open the wheel housing access door.
7
MAINTAINING YOUR VEHICLE 325