audio FIAT 500L 2014 2.G User Guide
[x] Cancel search | Manufacturer: FIAT, Model Year: 2014, Model line: 500L, Model: FIAT 500L 2014 2.GPages: 116, PDF Size: 4.53 MB
Page 3 of 116
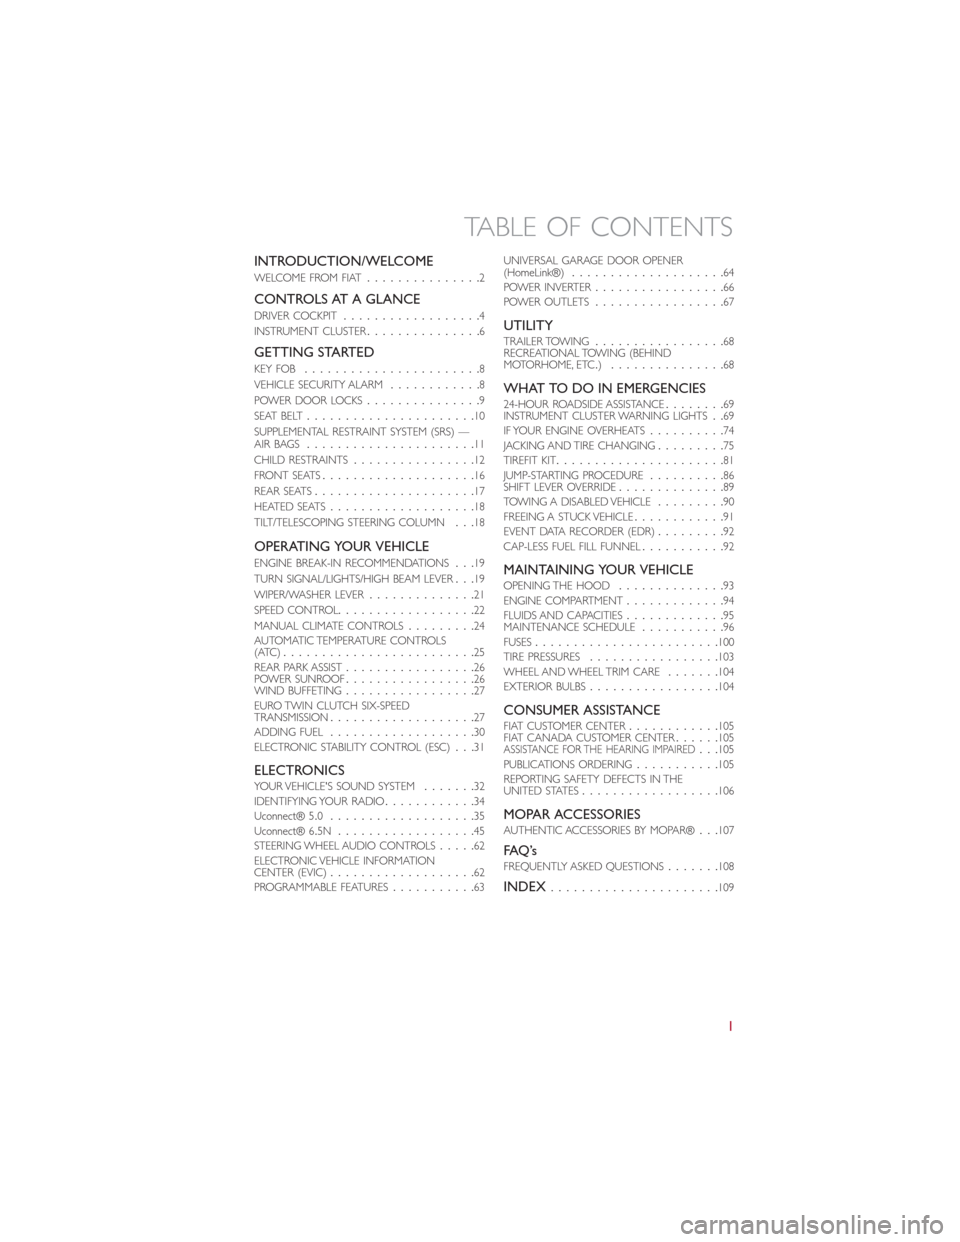
INTRODUCTION/WELCOME
WELCOME FROM FIAT...............2
CONTROLS AT A GLANCE
DRIVER COCKPIT..................4
INSTRUMENT CLUSTER...............6
GETTING STARTED
KEY FOB.......................8
VEHICLE SECURITY ALARM............8
POWER DOOR LOCKS...............9
SEAT BELT......................10
SUPPLEMENTAL RESTRAINT SYSTEM (SRS) —
AIR BAGS......................11
CHILD RESTRAINTS................12
FRONT SEATS....................16
REAR SEATS.....................17
HEATED SEATS...................18
TILT/TELESCOPING STEERING COLUMN...18
OPERATING YOUR VEHICLE
ENGINE BREAK-IN RECOMMENDATIONS...19
TURN SIGNAL/LIGHTS/HIGH BEAM LEVER...19
WIPER/WASHER LEVER..............21
SPEED CONTROL..................22
MANUAL CLIMATE CONTROLS.........24
AUTOMATIC TEMPERATURE CONTROLS
(ATC).........................25
REAR PARK ASSIST.................26
POWER SUNROOF.................26
WIND BUFFETING.................27
EURO TWIN CLUTCH SIX-SPEED
TRANSMISSION...................27
ADDING FUEL...................30
ELECTRONIC STABILITY CONTROL (ESC)...31
ELECTRONICSYOUR VEHICLE'S SOUND SYSTEM.......32
IDENTIFYING YOUR RADIO............34
Uconnect® 5.0...................35
Uconnect® 6.5N..................45
STEERING WHEEL AUDIO CONTROLS.....62
ELECTRONIC VEHICLE INFORMATION
CENTER (EVIC)...................62
PROGRAMMABLE FEATURES...........63UNIVERSAL GARAGE DOOR OPENER
(HomeLink®)....................64
POWER INVERTER.................66
POWER OUTLETS.................67
UTILITYTRAILER TOWING.................68
RECREATIONAL TOWING (BEHIND
MOTORHOME, ETC.)...............68
WHAT TO DO IN EMERGENCIES24-HOUR ROADSIDE ASSISTANCE........69
INSTRUMENT CLUSTER WARNING LIGHTS..69
IF YOUR ENGINE OVERHEATS..........74
JACKING AND TIRE CHANGING.........75
TIREFIT KIT......................81
JUMP-STARTING PROCEDURE..........86
SHIFT LEVER OVERRIDE..............89
TOWING A DISABLED VEHICLE.........90
FREEING A STUCK VEHICLE............91
EVENT DATA RECORDER (EDR).........92
CAP-LESS FUEL FILL FUNNEL...........92
MAINTAINING YOUR VEHICLEOPENING THE HOOD..............93
ENGINE COMPARTMENT.............94
FLUIDS AND CAPACITIES.............95
MAINTENANCE SCHEDULE...........96
FUSES........................100
TIRE PRESSURES.................103
WHEEL AND WHEEL TRIM CARE.......104
EXTERIOR BULBS.................104
CONSUMER ASSISTANCEFIAT CUSTOMER CENTER............105
FIAT CANADA CUSTOMER CENTER......105
ASSISTANCE FOR THE HEARING IMPAIRED...105
PUBLICATIONS ORDERING...........105
REPORTING SAFETY DEFECTS IN THE
UNITED STATES..................106
MOPAR ACCESSORIESAUTHENTIC ACCESSORIES BY MOPAR®...107
FAQ ’sFREQUENTLY ASKED QUESTIONS.......108
INDEX......................109
TABLE OF CONTENTS
1
Page 6 of 116
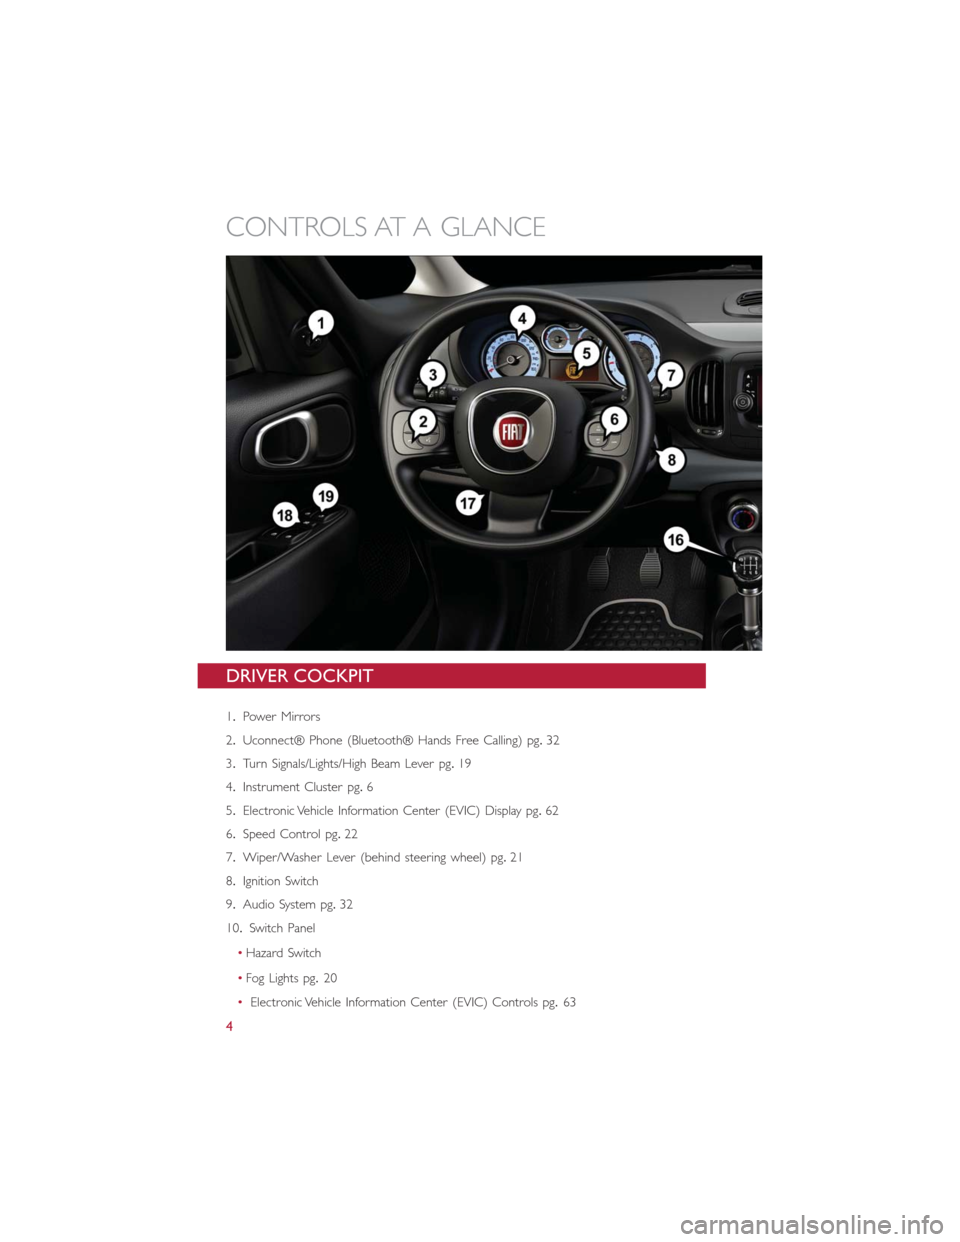
DRIVER COCKPIT
1.Power Mirrors
2.Uconnect® Phone (Bluetooth® Hands Free Calling) pg.32
3.Turn Signals/Lights/High Beam Lever pg.19
4.Instrument Cluster pg.6
5.Electronic Vehicle Information Center (EVIC) Display pg.62
6.Speed Control pg.22
7.Wiper/Washer Lever (behind steering wheel) pg.21
8.Ignition Switch
9.Audio System pg.32
10.Switch Panel
•Hazard Switch
•Fog Lights pg.20
•Electronic Vehicle Information Center (EVIC) Controls pg.63
CONTROLS AT A GLANCE
4
Page 10 of 116
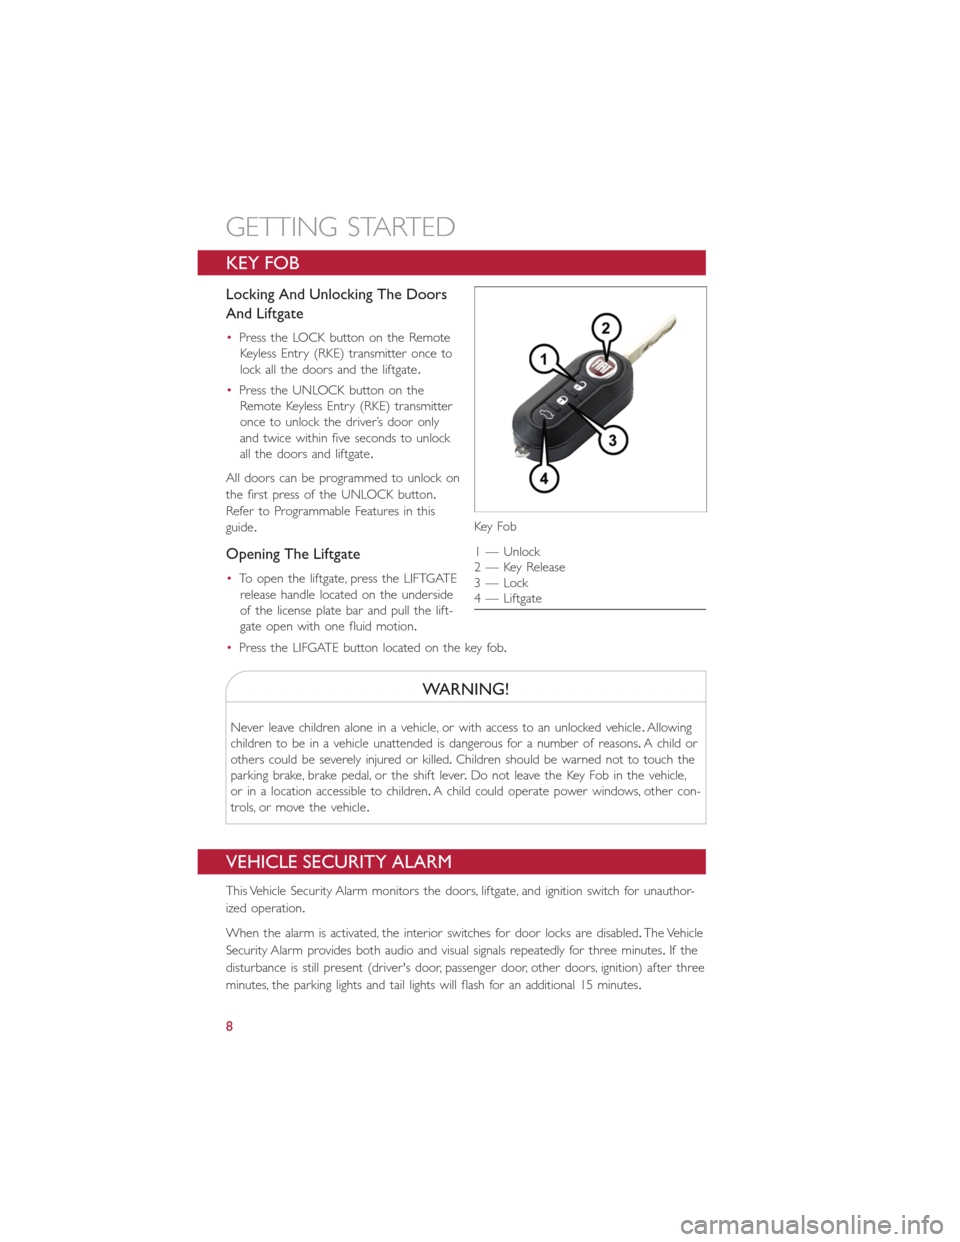
KEY FOB
Locking And Unlocking The Doors
And Liftgate
•Press the LOCK button on the Remote
Keyless Entry (RKE) transmitter once to
lock all the doors and the liftgate.
•Press the UNLOCK button on the
Remote Keyless Entry (RKE) transmitter
once to unlock the driver’s door only
and twice within five seconds to unlock
all the doors and liftgate.
All doors can be programmed to unlock on
the first press of the UNLOCK button.
Refer to Programmable Features in this
guide.
Opening The Liftgate
•To open the liftgate, press the LIFTGATE
release handle located on the underside
of the license plate bar and pull the lift-
gate open with one fluid motion.
•Press the LIFGATE button located on the key fob.
WARNING!
Never leave children alone in a vehicle, or with access to an unlocked vehicle.Allowing
children to be in a vehicle unattended is dangerous for a number of reasons.A child or
others could be severely injured or killed.Children should be warned not to touch the
parking brake, brake pedal, or the shift lever.Do not leave the Key Fob in the vehicle,
or in a location accessible to children.A child could operate power windows, other con-
trols, or move the vehicle.
VEHICLE SECURITY ALARM
This Vehicle Security Alarm monitors the doors, liftgate, and ignition switch for unauthor-
ized operation.
When the alarm is activated, the interior switches for door locks are disabled.The Vehicle
Security Alarm provides both audio and visual signals repeatedly for three minutes.If the
disturbance is still present (driver's door, passenger door, other doors, ignition) after three
minutes, the parking lights and tail lights will flash for an additional 15 minutes.
Key Fo b
1 — Unlock
2 — Key Release
3 — Lock
4 — Liftgate
GETTING STARTED
8
Page 34 of 116
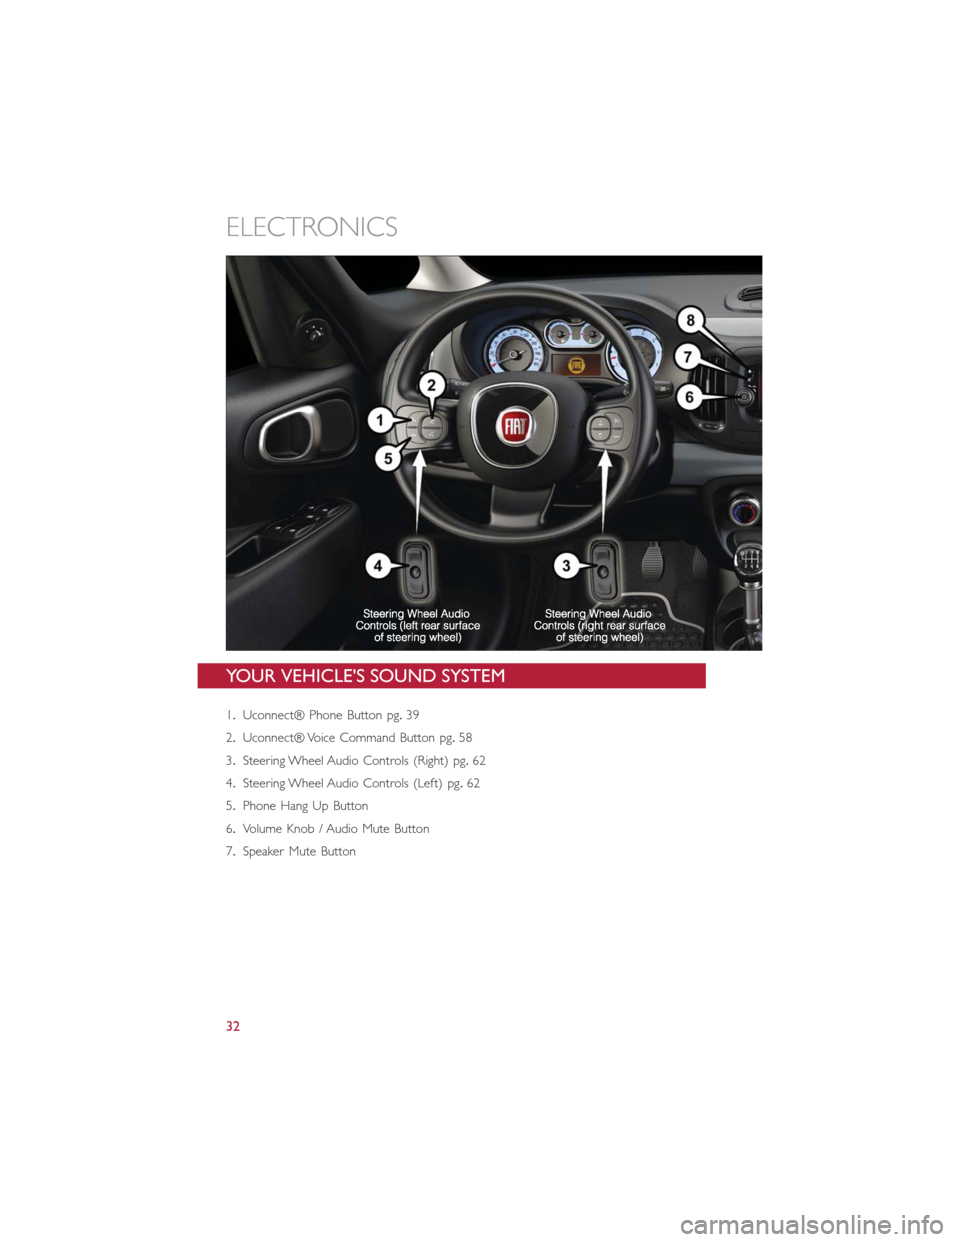
YOUR VEHICLE'S SOUND SYSTEM
1.Uconnect® Phone Button pg.39
2.Uconnect® Voice Command Button pg.58
3.Steering Wheel Audio Controls (Right) pg.62
4.Steering Wheel Audio Controls (Left) pg.62
5.Phone Hang Up Button
6.Volume Knob / Audio Mute Button
7.Speaker Mute Button
ELECTRONICS
32
Page 38 of 116
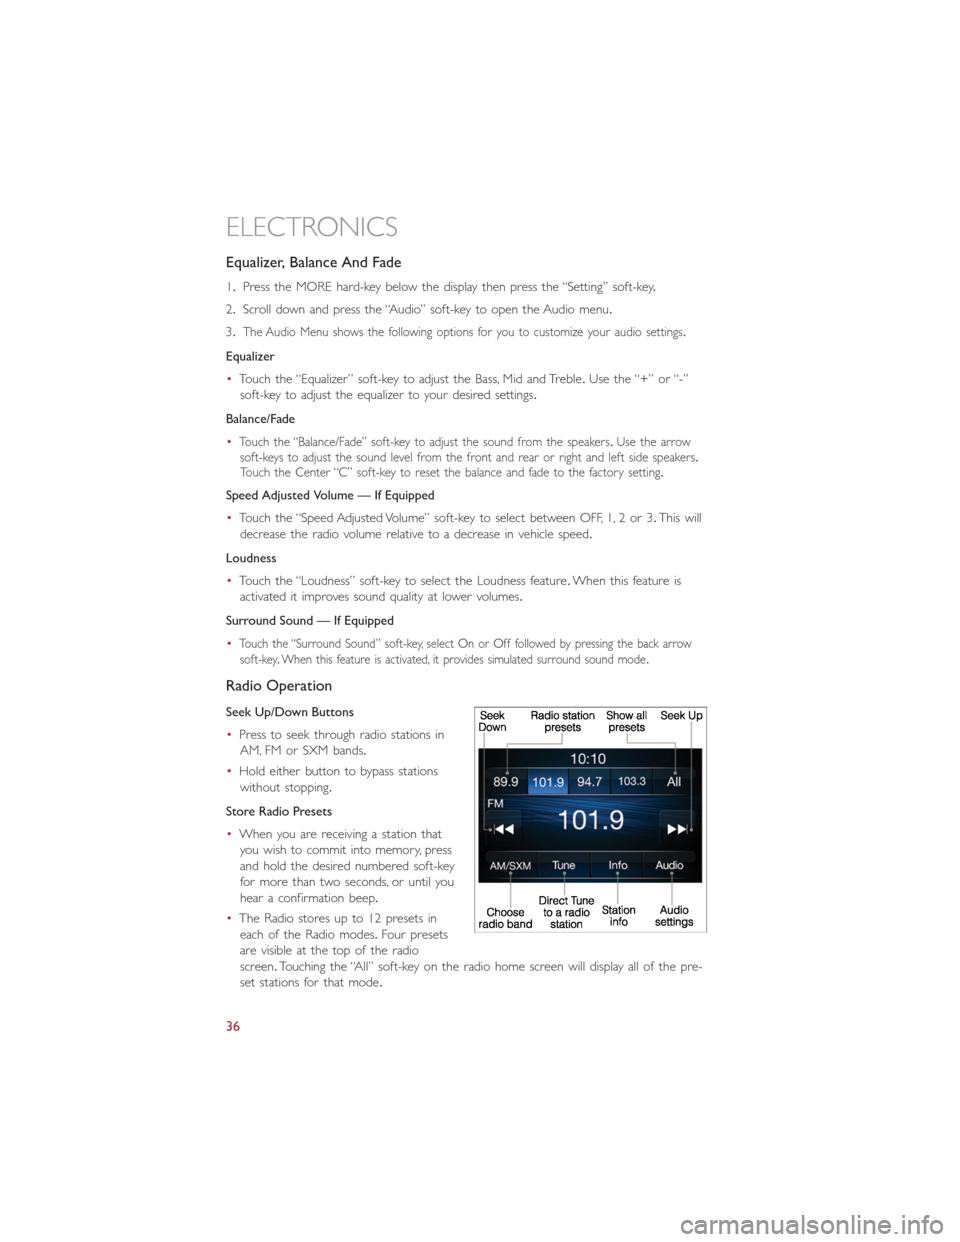
Equalizer, Balance And Fade
1.Press the MORE hard-key below the display then press the “Setting” soft-key.
2.Scroll down and press the “Audio” soft-key to open the Audio menu.
3.
The Audio Menu shows the following options for you to customize your audio settings.
Equalizer
•Touch the “Equalizer” soft-key to adjust the Bass, Mid and Treble.Use the “+” or “-”
soft-key to adjust the equalizer to your desired settings.
Balance/Fade
•
Touch the “Balance/Fade” soft-key to adjust the sound from the speakers.Use the arrow
soft-keys to adjust the sound level from the front and rear or right and left side speakers.
Touch the Center “C” soft-key to reset the balance and fade to the factory setting.
Speed Adjusted Volume — If Equipped
•Touch the “Speed Adjusted Volume” soft-key to select between OFF, 1, 2 or 3.This will
decrease the radio volume relative to a decrease in vehicle speed.
Loudness
•Touch the “Loudness” soft-key to select the Loudness feature.When this feature is
activated it improves sound quality at lower volumes.
Surround Sound — If Equipped
•
Touch the “Surround Sound” soft-key, select On or Off followed by pressing the back arrow
soft-key.When this feature is activated, it provides simulated surround sound mode.
Radio Operation
Seek Up/Down Buttons
•Press to seek through radio stations in
AM, FM or SXM bands.
•Hold either button to bypass stations
without stopping.
Store Radio Presets
•When you are receiving a station that
you wish to commit into memory, press
and hold the desired numbered soft-key
for more than two seconds, or until you
hear a confirmation beep.
•The Radio stores up to 12 presets in
each of the Radio modes.Four presets
are visible at the top of the radio
screen.Touching the “All” soft-key on the radio home screen will display all of the pre-
set stations for that mode.
ELECTRONICS
36
Page 40 of 116
USB/Audio Jack (AUX)/Bluetooth® Operation
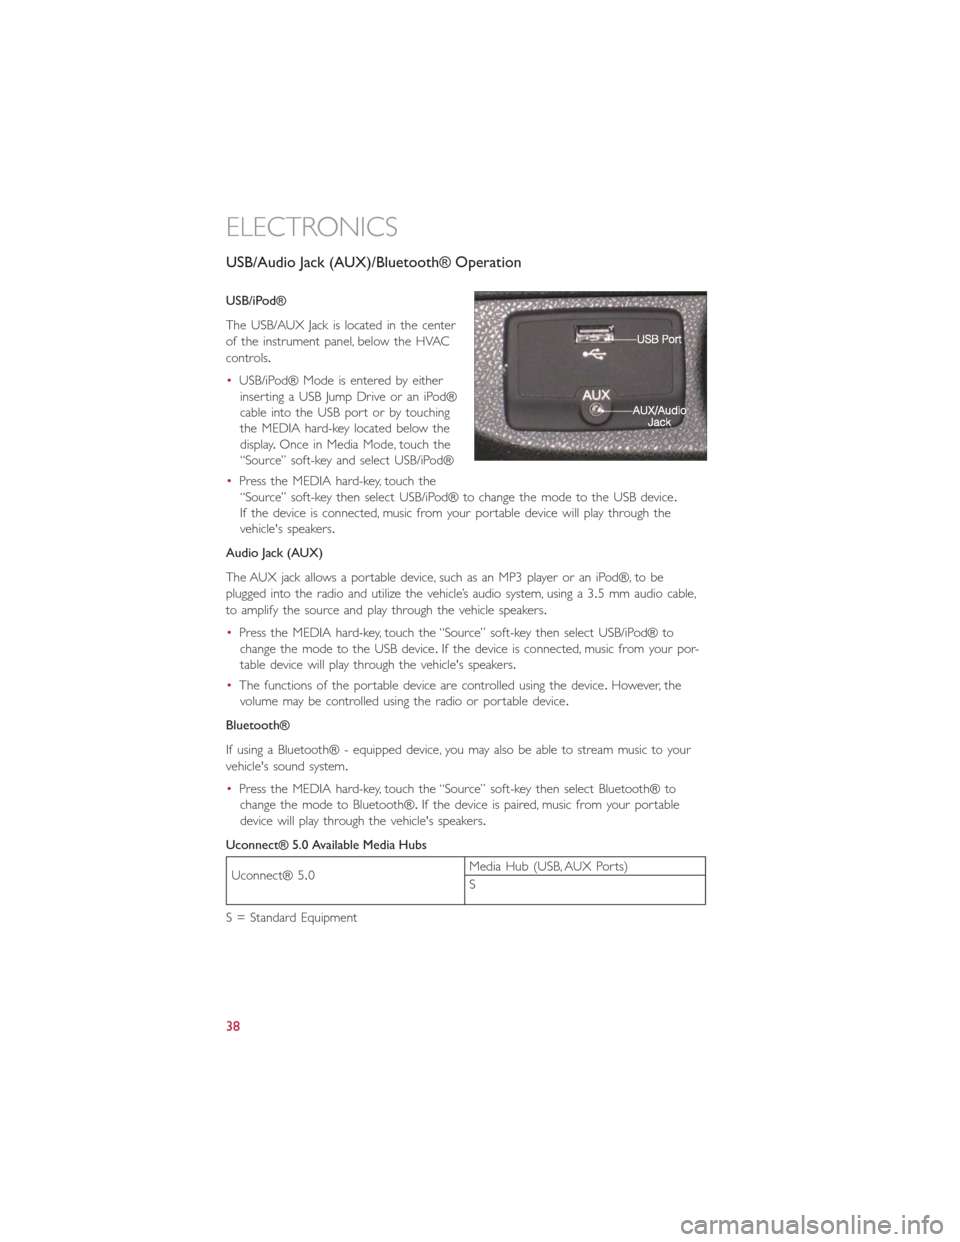
USB/iPod®
The USB/AUX Jack is located in the center
of the instrument panel, below the HVAC
controls.
•USB/iPod® Mode is entered by either
inserting a USB Jump Drive or an iPod®
cable into the USB port or by touching
the MEDIA hard-key located below the
display.Once in Media Mode, touch the
“Source” soft-key and select USB/iPod®
•Press the MEDIA hard-key, touch the
“Source” soft-key then select USB/iPod® to change the mode to the USB device.
If the device is connected, music from your portable device will play through the
vehicle's speakers.
Audio Jack (AUX)
The AUX jack allows a portable device, such as an MP3 player or an iPod®, to be
plugged into the radio and utilize the vehicle’s audio system, using a 3.5 mm audio cable,
to amplify the source and play through the vehicle speakers.
•Press the MEDIA hard-key, touch the “Source” soft-key then select USB/iPod® to
change the mode to the USB device.If the device is connected, music from your por-
table device will play through the vehicle's speakers.
•The functions of the portable device are controlled using the device.However, the
volume may be controlled using the radio or portable device.
Bluetooth®
If using a Bluetooth® - equipped device, you may also be able to stream music to your
vehicle's sound system.
•Press the MEDIA hard-key, touch the “Source” soft-key then select Bluetooth® to
change the mode to Bluetooth®.If the device is paired, music from your portable
device will play through the vehicle's speakers.
Uconnect® 5.0 Available Media Hubs
Uconnect® 5.0Media Hub (USB, AUX Ports)
S
S = Standard Equipment
ELECTRONICS
38
Page 43 of 116
Voice Command Tips
•Using the complete name of a contact, as stored in your phonebook, (e.g.Call John
Doe vs.Call John) results in greater system accuracy.
•You can ‘chain’ commands together for faster results.Say “Call John Doe, mobile,” for
example.
•If you are listening to available voice command options, you do not have to listen to
the entire list.When you hear the command that you need, press the
button
on the steering wheel, wait for the beep and say your command.
Changing The Volume
•Start a dialogue by pressing the Phone button, then say a command for example
- "Help".
•Use the radio ON/OFF VOLUME rotary knob to adjust the volume to a comfortable
level while the Uconnect® system is speaking.Please note the volume setting for
Uconnect® is different than the audio system.
NOTE:
To access help, press the Uconnect® Phone
button on the steering wheel and say
"help." Touch the display or push either
orbutton and say "cancel" to
cancel the help session.
Voice Text Reply
•Uconnect® Phone can read or send new text messages on your mobile phone.
•Your mobile phone must be MAP (Message Access Profile) compatible to support SMS
via Bluetooth® to use this feature.If the Uconnect® Phone determines your phone is
not compatible with SMS messaging over Bluetooth® the “Messaging” button is greyed
out and the feature is not available for use.
NOTE:
For mobile phone compatibility and pairing instructions, please visit www.UconnectPhone.com
WARNING!
•Any voice commanded system should be used only in safe driving conditions fol-
lowing applicable laws regarding phone use.Your attention should be focused on
safely operating the vehicle.Failure to do so may result in a collision causing you
and others to be severely injured or killed.
•In an emergency, to use Uconnect® Phone, your mobile phone must be:
•turned on,
•paired to Uconnect® Phone,
•and have network coverage.
ELECTRONICS
41
Page 48 of 116
Audio Settings
•Touch the “Audio” soft-key to activate the Audio settings screen to adjust Balance\Fade,
Equalizer, and Speed Adjusted Volume.
•You can return to the Radio screen by touching the “X” located at the top right.
Balance/Fade
•Touch the “Balance/Fade” soft-key to Balance audio between the front speakers or fade
the audio between the rear and front speakers.
•Touching the “Front,” “Rear,” “Left,” or “Right” soft-keys or touch and drag the Speaker
Icon to adjust the Balance/Fade.
Equalizer
•Touch the “Equalizer” soft-key to activate the Equalizer screen.
•Touch the “+” or “-” soft-keys, or touch and drag over the level bar for each of the
equalizer bands.The level value, which spans between plus or minus 9, is displayed at
the bottom of each of the Bands.
Speed Adjusted Volume — If Equipped
•Touch the “Speed Adjusted Volume” soft-key to activate the Speed Adjusted Volume
screen.The Speed Adjusted Volume is adjusted by touching the “+” and “-” buttons or
by touching and dragging over the level bar.This alters the automatic adjustment of the
audio volume with variation to vehicle speed.
Surround Sound — If Equipped
•Touch the “Surround Sound” soft-key, select On or Off followed by pressing the back
arrow soft-key.When this feature is activated, it provides simulated surround sound
mode.
ELECTRONICS
46
Page 52 of 116
MEDIA HUB – PLAYING iPod®/USB/MP3 DEVICES
•There are many ways to play music from iPod®/MP3 players or USB devices through
your vehicle's sound system.
Audio Jack (AUX)
•The AUX allows a portable device, such as an MP3 player or an iPod®, to be plugged
into the radio and utilize the vehicle’s sound system, using a 3.5 mm audio cable, to
amplify the source and play through the vehicle speakers.
•Press the MEDIA button, touch “Select Source” and then choose “AUX” source will
change the mode to auxiliary device if the audio jack is connected, allowing the music
from your portable device to be heard through the vehicle's speakers.In order to
activate the AUX, plug in the audio jack.
•The functions of the portable device are controlled using the device buttons.The vol-
ume may be controlled using the radio or portable device.
•To route the audio cable out of the center console, use the access cut out in the front
of the console.
USB Port
•Connect your iPod® or compatible device using a USB cable into the USB Port.USB
Memory sticks with audio files can also be used.Then, audio from the device can be
played on the vehicles sound system while providing metadata (artist, track title, album,
etc.) information on the radio display.
•When connected, the iPod®/compatible USB device can be controlled using the radio
or Steering Wheel Audio Controls to play, skip to the next or previous track, browse,
and list the contents.
•The iPod® battery charges when plugged into the USB port (if supported by the
specific device).
•To route the USB/iPod® cable out of the center console, use the access cut out.
NOTE:
•When connecting your iPod® device for the first time, the system may take several
minutes to read your music, depending on the number of files.For example, the sys-
tem will take approximately five minutes for every 1000 songs loaded on the device.
Also during the reading process, the Shuffle and Browse functions will be disabled.This
process is needed to ensure the full use of your iPod® features and only happens the
first time it is connected.After the first time, the reading process of your iPod® will
take considerably less time unless changes are made or new songs are added to the
play list.
•The USB port supports certain Mini, Classic, Nano, Touch, and iPhone® devices.The
USB port also supports playing music from compatible external USB Mass Storage
Class memory devices.Some iPod® software versions may not fully support the
USB port features.Please visit Apple’s website for iPod® software updates.
ELECTRONICS
50
Page 53 of 116
SD Card
•Play songs stored on an SD card inserted into the SD card slot.
•Song playback can be controlled using the radio or Steering Wheel Audio Controls to
play, skip to the next or previous track, browse, and list the contents.
Bluetooth® Streaming Audio
•
If equipped with Uconnect® Voice Command, your Bluetooth®-equipped iPod® devices,
cell phones or other media players, may also be able to stream music to your vehicle's
sound system.Your connected device must be Bluetooth®-compatible, and paired with
your system (see Uconnect® Phone for pairing instructions).You can access the music
from your connected Bluetooth® device by touching the “Bluetooth®” soft-key while in
Media mode.
Uconnect® 6.5N Media Hub (USB,
AUX Ports)Media Hub (SD,
USB, AUX Ports)Remote USB Port
(Fully Functional)
-SS
S = Standard Equipment
O = Optional Equipment
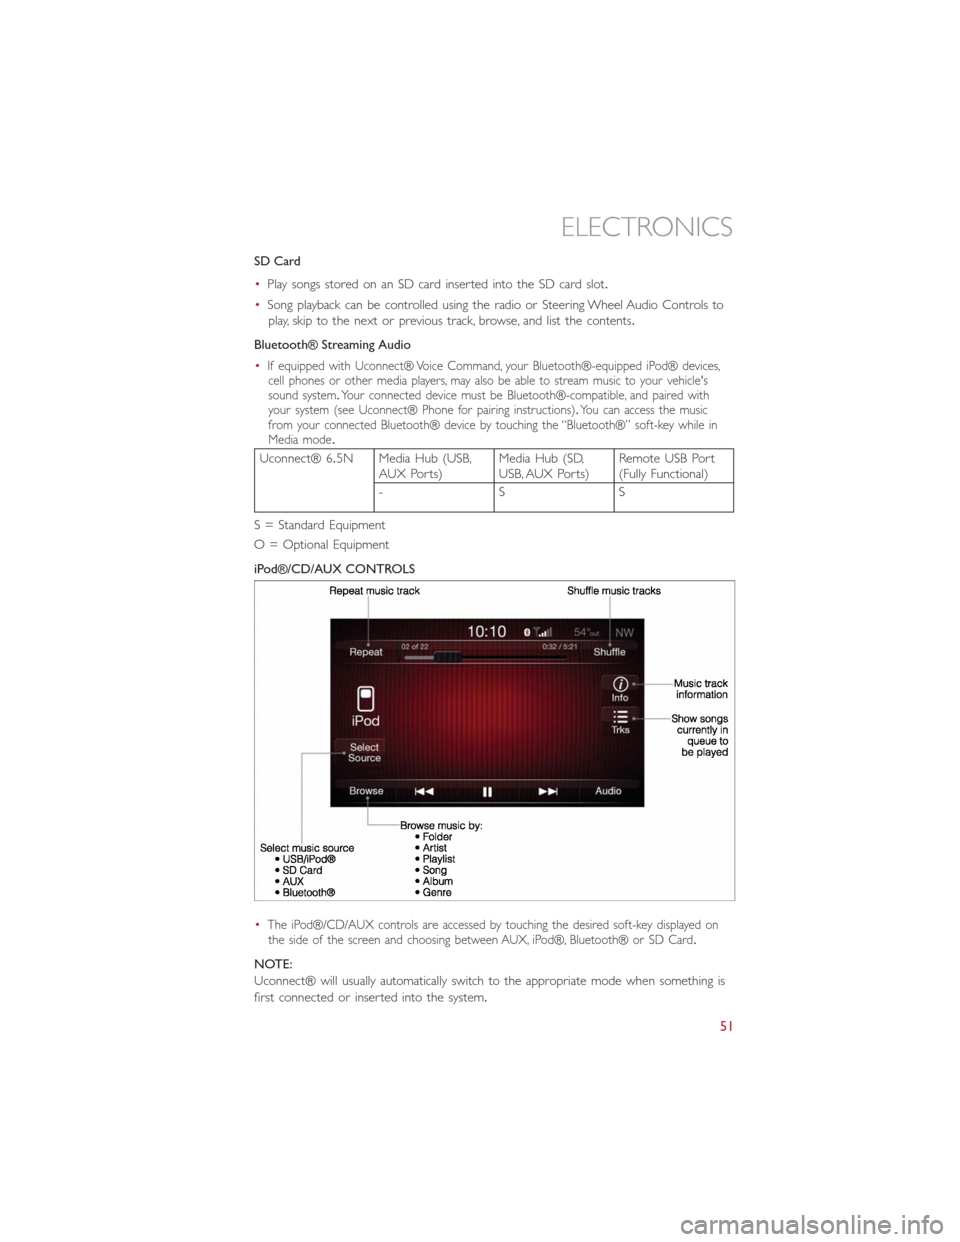
iPod®/CD/AUX CONTROLS
•
The iPod®/CD/AUX controls are accessed by touching the desired soft-key displayed on
the side of the screen and choosing between AUX, iPod®, Bluetooth® or SD Card.
NOTE:
Uconnect® will usually automatically switch to the appropriate mode when something is
first connected or inserted into the system.
ELECTRONICS
51