display FIAT 500L 2014 2.G User Guide
[x] Cancel search | Manufacturer: FIAT, Model Year: 2014, Model line: 500L, Model: FIAT 500L 2014 2.GPages: 116, PDF Size: 4.53 MB
Page 6 of 116
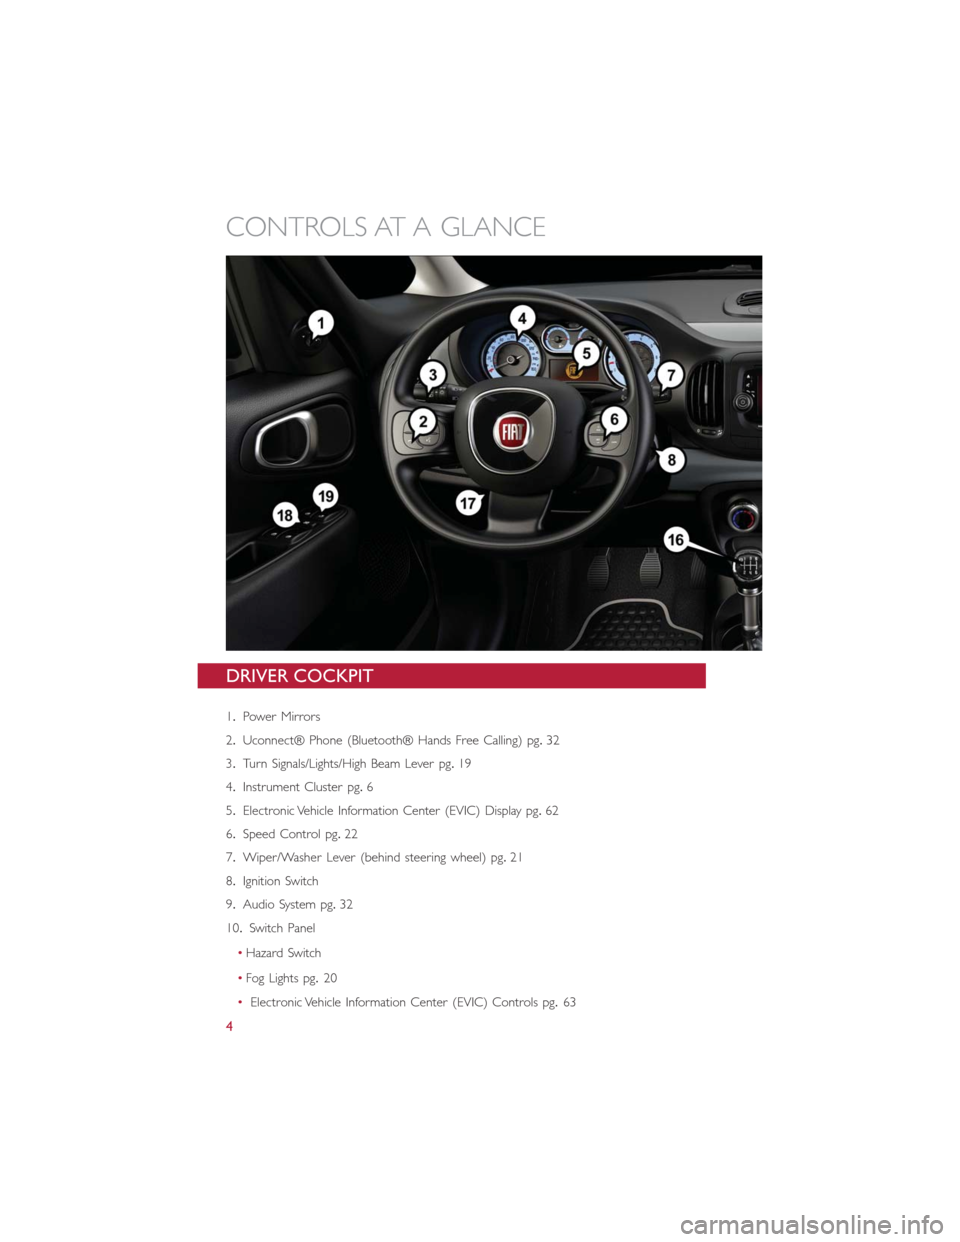
DRIVER COCKPIT
1.Power Mirrors
2.Uconnect® Phone (Bluetooth® Hands Free Calling) pg.32
3.Turn Signals/Lights/High Beam Lever pg.19
4.Instrument Cluster pg.6
5.Electronic Vehicle Information Center (EVIC) Display pg.62
6.Speed Control pg.22
7.Wiper/Washer Lever (behind steering wheel) pg.21
8.Ignition Switch
9.Audio System pg.32
10.Switch Panel
•Hazard Switch
•Fog Lights pg.20
•Electronic Vehicle Information Center (EVIC) Controls pg.63
CONTROLS AT A GLANCE
4
Page 29 of 116
WARNING!
•Do not let children play with the sunroof, or leave children unattended in the ve-
hicle, and do not leave the key in or near the vehicle (or in a location accessible
to children).Occupants, particularly unattended children, can become entrapped by
the power sunroof while operating the power sunroof switch.Such entrapment
may result in serious injury or death.
•In a collision, there is a greater risk of being thrown from a vehicle with an open
sunroof.You could also be seriously injured or killed.Always fasten your seat belt
properly and make sure all passengers are properly secured.
•Do not allow small children to operate the sunroof.Never allow your fingers,
other body parts, or any object to project through the sunroof opening.Injury
may result.
WIND BUFFETING
Wind buffeting can be described as a helicopter-type percussion sound.If buffeting
occurs with the rear windows open, adjust the front and rear windows together.
If buffeting occurs with the sunroof open, adjust the sunroof opening, or adjust any
window.This will minimize buffeting.
EURO TWIN CLUTCH SIX-SPEED TRANSMISSION
•This vehicle may be equipped with a fuel efficient Euro Twin Clutch Six Speed Trans-
mission.This transmission offers a sportier driving experience with faster AutoStick®
shifting.
•During low-speed driving conditions in first gear, vehicle momentum changes may feel
exaggerated in response to changes in accelerator pedal position.This behavior is nor-
mal and is similar to vehicles equipped with a manual transmission.
NOTE:
•Very aggressive driving may result in some clutch odor similar to a manual transmission.
An active warning message will display in the Instrument Cluster if cool down actions
are needed.
•The first few shifts on a new vehicle may be somewhat abrupt.This is a normal condi-
tion, and precision shifts will develop within a few hundred miles (kilometers).
•
At low speeds you may hear mechanical noises similar to a manual transmission as the
transmission changes gears.These noises are normal and will not damage the transmission.
•Before and after the engine is started, you may hear a hydraulic pump for a short
period of time.This noise is normal and will not damage the transmission.
OPERATING YOUR VEHICLE
27
Page 30 of 116
Shifting The Transmission
•The transmission shift lever position (PRND) is displayed both on the shift lever and in
the Electronic Vehicle Information Center (EVIC).
•To drive, depress the brake pedal, press the button on the front of the shift lever and
move the shift lever from PARK or NEUTRAL to the DRIVE position.
•Manual shifts can also be made using the AutoStick® shift control.
•This transmission is programmed to prevent shifting from REVERSE to DRIVE or
DRIVE to REVERSE, if vehicle speed is above 6 mph (10 km/h).This safety feature
helps protect your transmission from damage.
NOTE:
•When stopped on an incline, it is recommended that you always hold the vehicle in
place using the brakes.On steep inclines, Hill Start Assist (HSA) will temporarily hold
the car in position when the brake pedal is released.If the accelerator pedal is not
applied after a short time, the car will roll back.Either reapply the brake (to hold the
vehicle) or press the accelerator to climb the hill.
•During acceleration, gear changes will feel smooth compared to a vehicle with a tradi-
tional manual transmission.This is a benefit of the Euro Twin Clutch Transmission de-
sign that avoids power loss during up-shifts.
Instrument Cluster Messages
•Messages will be displayed in the instrument cluster (if equipped with an EVIC) to alert
the driver when certain conditions occur.These messages are described below.
MESSAGE DESCRIPTION
GEAR NOT AVAILABLE In AutoStick® mode, the gear selected by the driver is
not available due to a fault condition.See your autho-
rized dealer for diagnosis and service.
SHIFT NOT ALLOWED
The gear position requested by the driver is currently
blocked.This occurs if NEUTRAL is requested while mov-
ing, if REVERSE is requested while moving (at 6 mph
[10 km/h] or faster), if DRIVE is requested while moving
backwards (at 6 mph [10 km/h] or faster), or if 3rd gear
or higher is requested at a stop.Make sure the vehicle is
stopped before engaging DRIVE or REVERSE.
SHIFT TO NEUTRAL THEN
DorRThe transmission has shifted itself into NEUTRAL (due
to a fault condition, or overheat due to excessive idling
when stopped in DRIVE with the brakes released), but
the shift lever remains in gear.Shift into NEUTRAL and
then back into gear for continued driving.If the trans-
mission will not reengage, see your authorized dealer.
OPERATING YOUR VEHICLE
28
Page 31 of 116
AUTOSTICK NOT
AVAILABLEAutoStick® mode is unavailable due to a shift lever fault.
See your authorized dealer for diagnosis and service.
AUTOMATIC MODE NOT
AVAILABLEThe transmission is unable to shift itself automatically,
due to a fault condition.Use the AutoStick® mode to
shift the transmission manually.See your authorized
dealer for diagnosis and service.
REDUCE GEAR CHANGES The transmission pump is overheating.In AutoStick®
mode, try to drive in one specific gear as much as pos-
sible, avoiding frequent gear changes.In DRIVE, the
transmission will automatically modify its shift schedule
to reduce the number of shifts.
TRANS.GETTING HOT
PRESS BRAKEThe transmission driving clutch is overheating, usually
due to repeated launches in stop-and-go traffic.Pull
over and allow the transmission to cool in NEUTRAL
until “TRANS.COOL READY TO DRIVE” is displayed.
TRANS.HOT STOP SAFELY
SHIFT TO PThe transmission driving clutch has overheated.Pull
over, shift the transmission into PARK, and allow the
vehicle to cool until “TRANS.COOL READY TO
DRIVE” is displayed.
TRANS.COOL READY TO
DRIVEThe transmission driving clutch has cooled down after
being overheated and the vehicle is ready to continue
driving.
SERVICE TRANSMISSION A transmission fault has been detected.See your autho-
rized dealer for diagnosis and service.
SERVICE SHIFTER A shift lever fault has been detected.See your autho-
rized dealer for diagnosis and service.
ENGAGE PARK BRAKE The sensor that monitors PARK engagement is not
functioning properly.Engage the parking brake to en-
sure that the vehicle will not roll when in PARK.
•Refer to your Owner's Manual on the DVD for further details.
OPERATING YOUR VEHICLE
29
Page 35 of 116
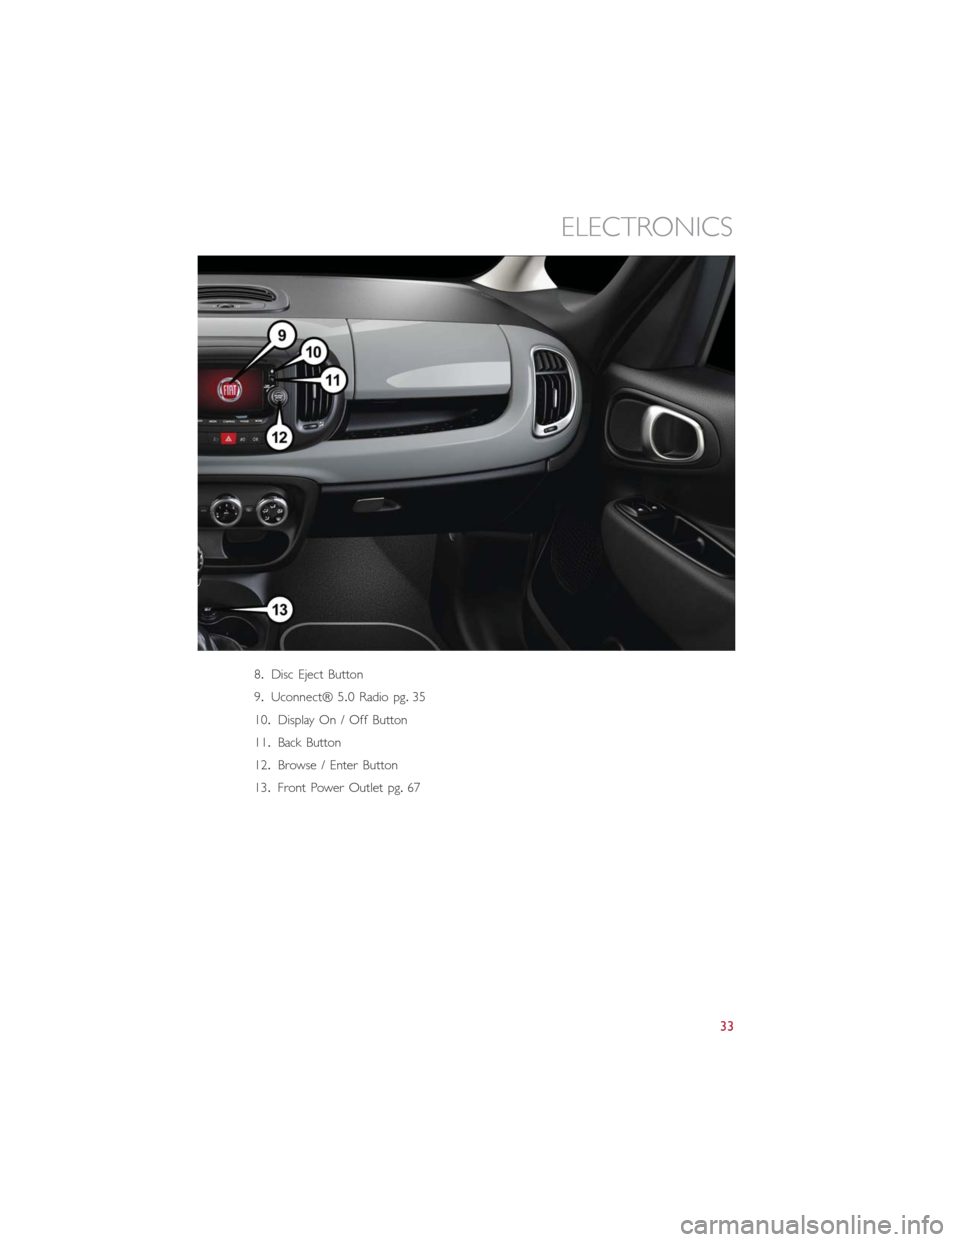
8.Disc Eject Button
9.Uconnect® 5.0 Radio pg.35
10.Display On / Off Button
11.Back Button
12.Browse / Enter Button
13.Front Power Outlet pg.67
ELECTRONICS
33
Page 36 of 116
IDENTIFYING YOUR RADIO
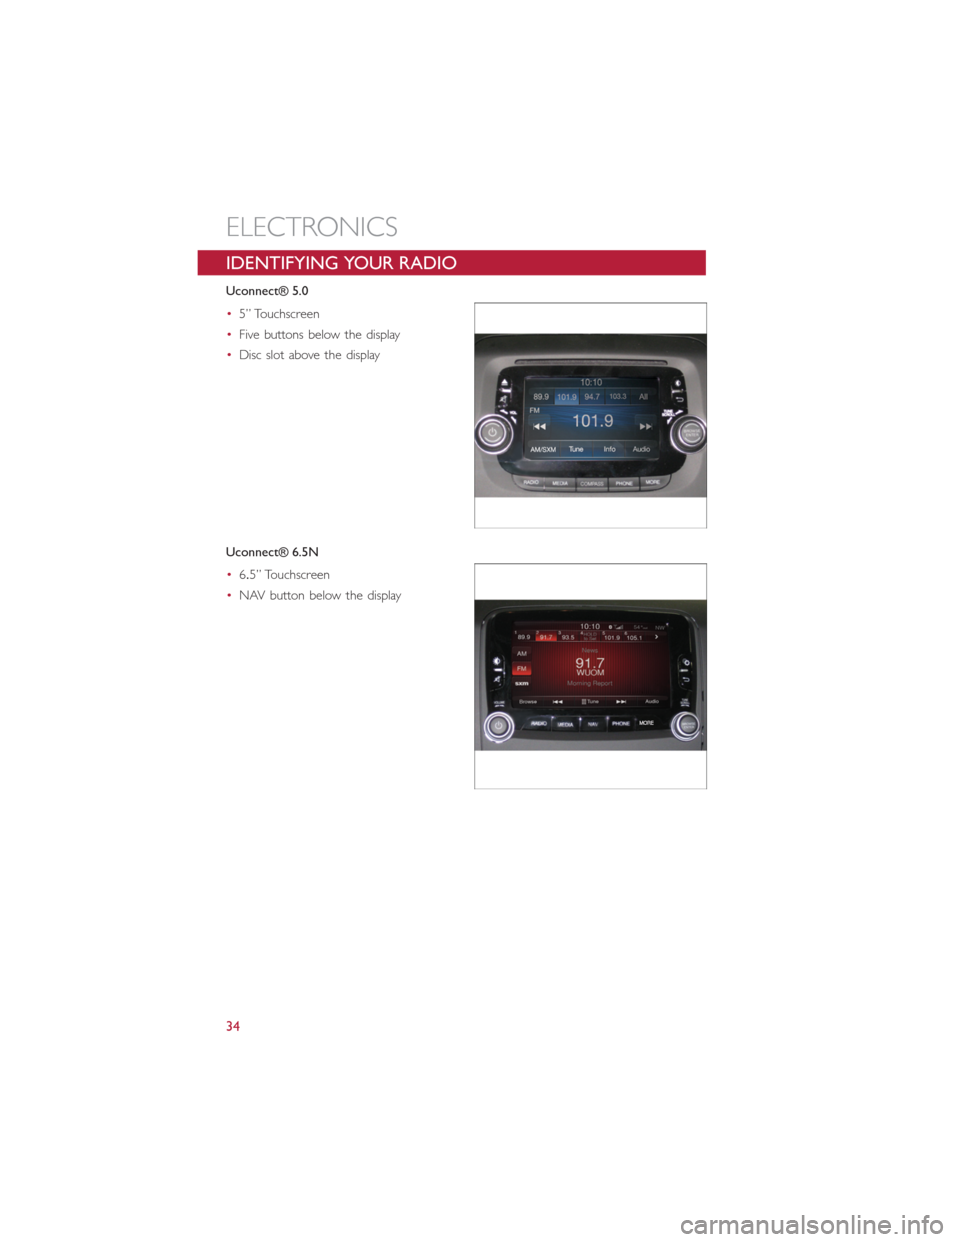
Uconnect® 5.0
•5” Touchscreen
•Five buttons below the display
•Disc slot above the display
Uconnect® 6.5N
•6.5” Touchscreen
•NAV button below the display
ELECTRONICS
34
Page 37 of 116
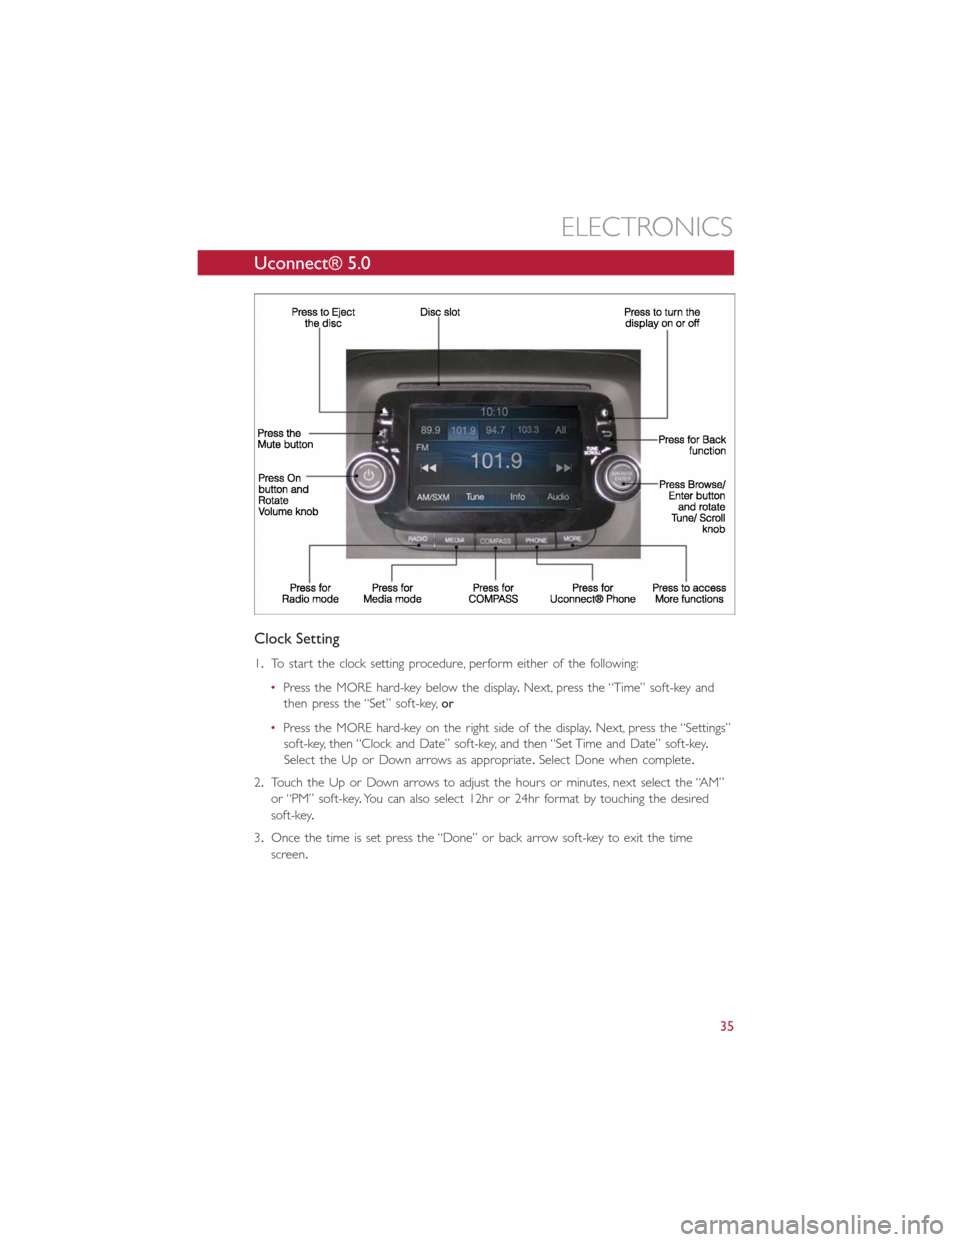
Uconnect® 5.0
Clock Setting
1.To start the clock setting procedure, perform either of the following:
•Press the MORE hard-key below the display.Next, press the “Time” soft-key and
then press the “Set” soft-key,or
•Press the MORE hard-key on the right side of the display.Next, press the “Settings”
soft-key, then “Clock and Date” soft-key, and then “Set Time and Date” soft-key.
Select the Up or Down arrows as appropriate.Select Done when complete.
2.Touch the Up or Down arrows to adjust the hours or minutes, next select the “AM”
or “PM” soft-key.You can also select 12hr or 24hr format by touching the desired
soft-key.
3.Once the time is set press the “Done” or back arrow soft-key to exit the time
screen.
ELECTRONICS
35
Page 38 of 116
Equalizer, Balance And Fade
1.Press the MORE hard-key below the display then press the “Setting” soft-key.
2.Scroll down and press the “Audio” soft-key to open the Audio menu.
3.
The Audio Menu shows the following options for you to customize your audio settings.
Equalizer
•Touch the “Equalizer” soft-key to adjust the Bass, Mid and Treble.Use the “+” or “-”
soft-key to adjust the equalizer to your desired settings.
Balance/Fade
•
Touch the “Balance/Fade” soft-key to adjust the sound from the speakers.Use the arrow
soft-keys to adjust the sound level from the front and rear or right and left side speakers.
Touch the Center “C” soft-key to reset the balance and fade to the factory setting.
Speed Adjusted Volume — If Equipped
•Touch the “Speed Adjusted Volume” soft-key to select between OFF, 1, 2 or 3.This will
decrease the radio volume relative to a decrease in vehicle speed.
Loudness
•Touch the “Loudness” soft-key to select the Loudness feature.When this feature is
activated it improves sound quality at lower volumes.
Surround Sound — If Equipped
•
Touch the “Surround Sound” soft-key, select On or Off followed by pressing the back arrow
soft-key.When this feature is activated, it provides simulated surround sound mode.
Radio Operation
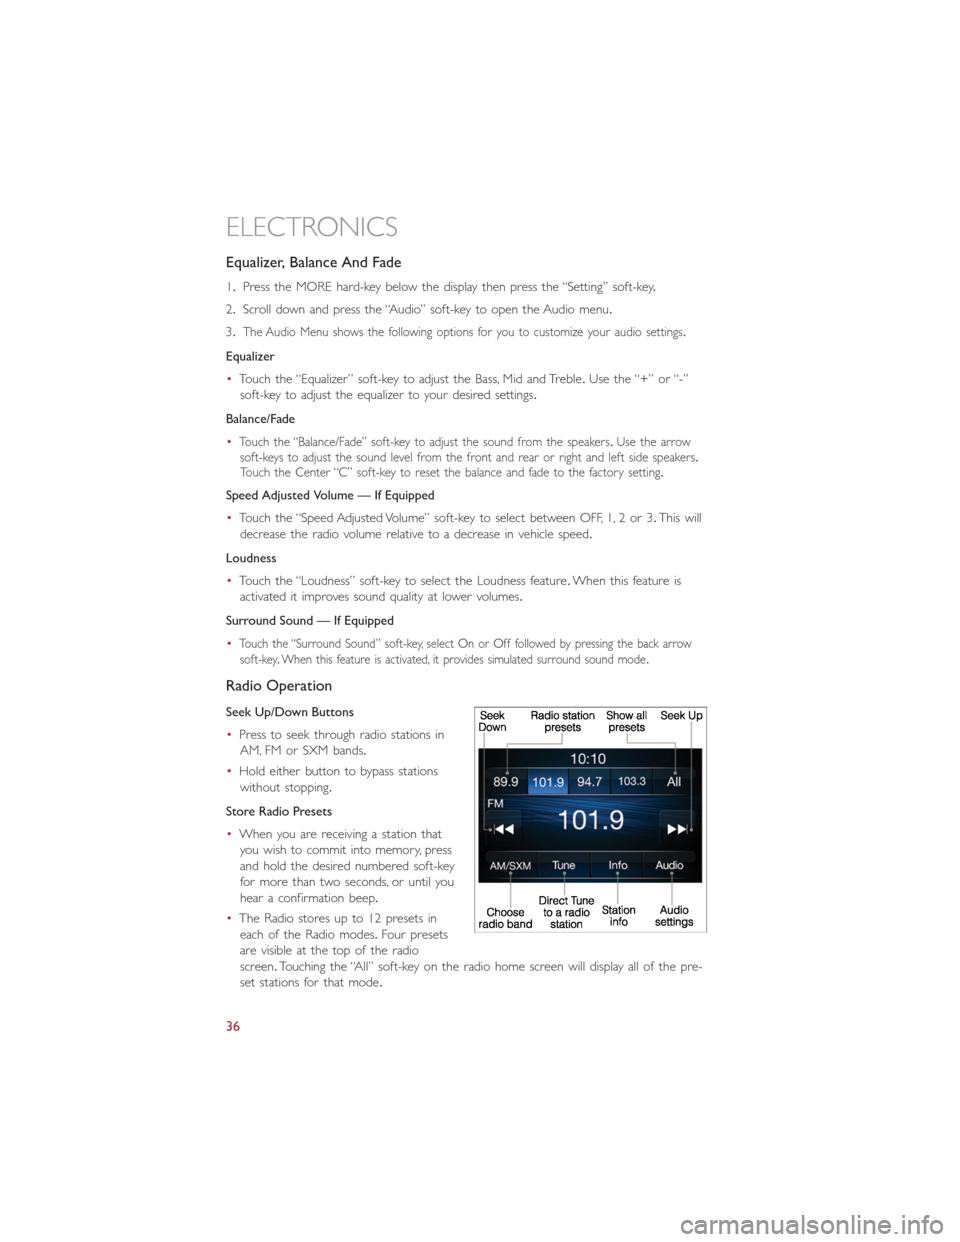
Seek Up/Down Buttons
•Press to seek through radio stations in
AM, FM or SXM bands.
•Hold either button to bypass stations
without stopping.
Store Radio Presets
•When you are receiving a station that
you wish to commit into memory, press
and hold the desired numbered soft-key
for more than two seconds, or until you
hear a confirmation beep.
•The Radio stores up to 12 presets in
each of the Radio modes.Four presets
are visible at the top of the radio
screen.Touching the “All” soft-key on the radio home screen will display all of the pre-
set stations for that mode.
ELECTRONICS
36
Page 39 of 116
SiriusXM Premier Over 160 Channels
Get every channel available on your satellite radio, and enjoy all you want, all in one place.
Hear commercial-free music plus sports, news, talk and entertainment.Get all the pre-
mium programming, including Howard Stern, every NFL game, Oprah Radio®, every
MLB® and NHL® game, every NASCAR® race and more.And get 20+ Xtra channels,
including SiriusXM Latino, a selection of channels dedicated to Spanish language program-
ming.
•To access SiriusXM Satellite Radio, press the RADIO hard-key and then the “SXM”
soft-key.
SiriusXM services require subscriptions, sold separately after the 12-month trial included
with the new vehicle purchase.If you decide to continue your service at the end of your
trial subscription, the plan you choose will automatically renew and bill at then-current
rates until you call SiriusXM at 1-866-635-2349 for U.S. residents and 1-888-539-7474
for Canadian residents to cancel. See SiriusXM Customer Agreement for complete
terms at www.siriusxm.com.All fees and programming subject to change.Our satellite
service is available only to those at least 18 and older in the 48 contiguous USA and
D.C.Our Sirius satellite service is also available in PR (with coverage limitations).Our
Internet radio service is available throughout our satellite service area and in AK and HI.
© 2014 Sirius XM Radio Inc.Sirius, XM and all related marks and logos are trademarks
of Sirius XM Radio Inc.
Disc Operation — If Equipped
Your vehicle may have a remote CD player located in the lower center console storage
bin.
•CD/Disc Mode is entered by either inserting a CD/Disc or by touching the MEDIA
button located below the display.Once in Media Mode, select Disc.
•Gently insert one CD into the CD player with the CD label facing as indicated on the
illustration located on the Disc player.
Seek Up/Down Buttons
•Press to seek through Disc tracks.
•Hold either button to bypass tracks without stopping.
Browse
•Touch the “Browse” soft-key to scroll through and select a desired track on the Disc.
Touch the “Exit” soft-key if you wish to cancel the browse function.
ELECTRONICS
37
Page 40 of 116
USB/Audio Jack (AUX)/Bluetooth® Operation
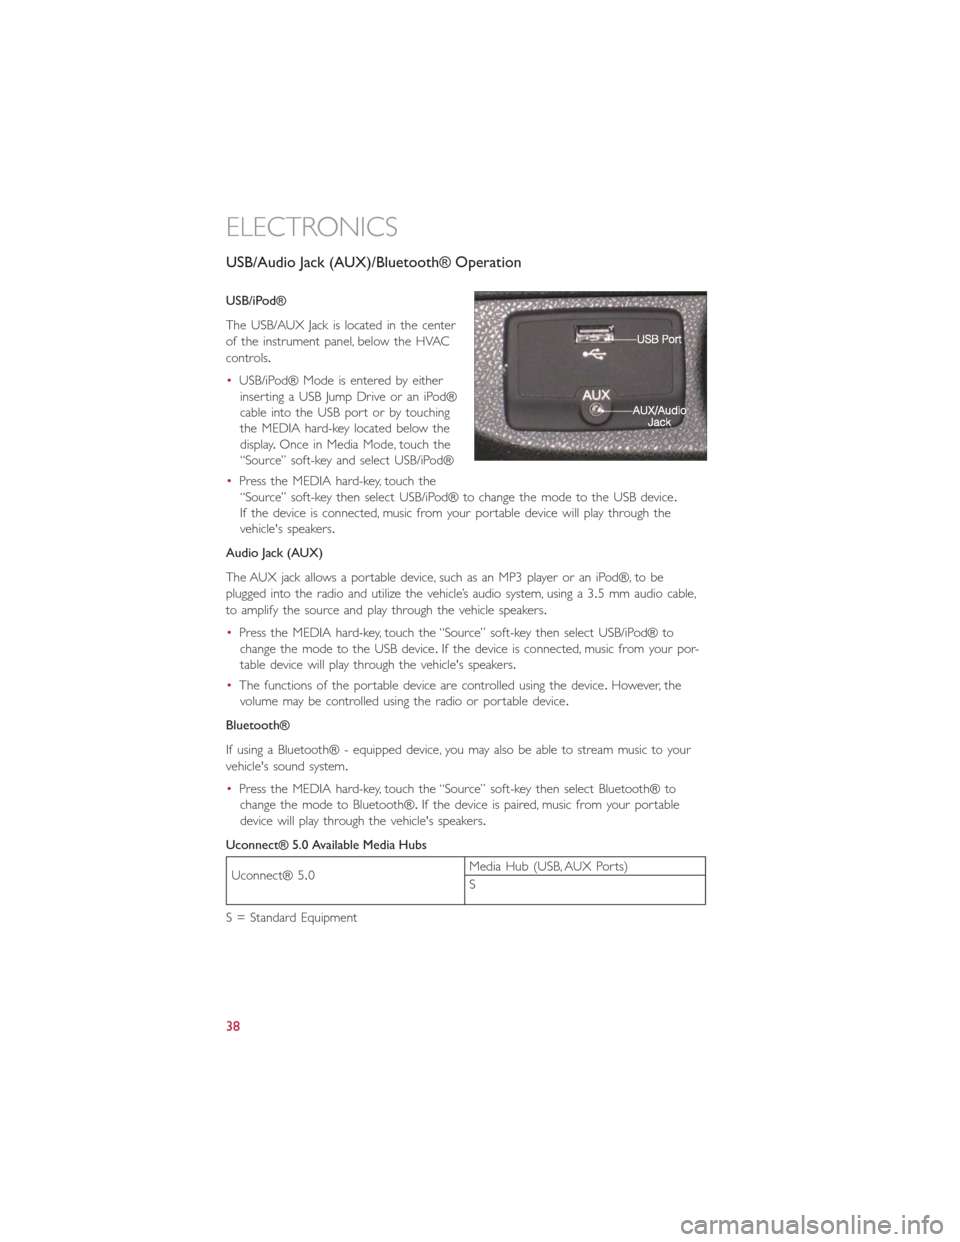
USB/iPod®
The USB/AUX Jack is located in the center
of the instrument panel, below the HVAC
controls.
•USB/iPod® Mode is entered by either
inserting a USB Jump Drive or an iPod®
cable into the USB port or by touching
the MEDIA hard-key located below the
display.Once in Media Mode, touch the
“Source” soft-key and select USB/iPod®
•Press the MEDIA hard-key, touch the
“Source” soft-key then select USB/iPod® to change the mode to the USB device.
If the device is connected, music from your portable device will play through the
vehicle's speakers.
Audio Jack (AUX)
The AUX jack allows a portable device, such as an MP3 player or an iPod®, to be
plugged into the radio and utilize the vehicle’s audio system, using a 3.5 mm audio cable,
to amplify the source and play through the vehicle speakers.
•Press the MEDIA hard-key, touch the “Source” soft-key then select USB/iPod® to
change the mode to the USB device.If the device is connected, music from your por-
table device will play through the vehicle's speakers.
•The functions of the portable device are controlled using the device.However, the
volume may be controlled using the radio or portable device.
Bluetooth®
If using a Bluetooth® - equipped device, you may also be able to stream music to your
vehicle's sound system.
•Press the MEDIA hard-key, touch the “Source” soft-key then select Bluetooth® to
change the mode to Bluetooth®.If the device is paired, music from your portable
device will play through the vehicle's speakers.
Uconnect® 5.0 Available Media Hubs
Uconnect® 5.0Media Hub (USB, AUX Ports)
S
S = Standard Equipment
ELECTRONICS
38