tow FIAT 500L 2014 2.G Owner's Manual
[x] Cancel search | Manufacturer: FIAT, Model Year: 2014, Model line: 500L, Model: FIAT 500L 2014 2.GPages: 116, PDF Size: 4.53 MB
Page 74 of 116
NOTE:
Tire pressures change by approximately 1 psi (7 kPa) per 12° F (7° C) of air tempera-
ture change.Keep this in mind when checking tire pressure inside a garage, especially in
the Winter.Example: If garage temperature is 68°F (20°C) and the outside temperature
is 32°F (0°C), then the cold tire inflation pressure should be increased by 3 psi (21 kPa),
which equals 1 psi (7 kPa) for every 12°F (7°C) for this outside temperature condition.
CAUTION!
The TPMS has been optimized for the original equipment tires and wheels.TPMS pres-
sures and warning have been established for the tire size equipped on your vehicle.
Undesirable system operation or sensor damage may result when using replacement
equipment that is not of the same size, type, and/or style.Aftermarket wheels can cause
sensor damage.Do not use tire sealant from a can, or balance beads if your vehicle is
equipped with a TPMS, as damage to the sensors may result.
BRAKE- Brake Warning Light
The Brake Warning light illuminates when there is either a system malfunction or the
parking brake is applied.If the light is on and the parking brake is not applied, it indicates
a possible brake hydraulic malfunction, brake booster problem or an Anti-Lock Brake Sys-
tem problem.
Please have your vehicle serviced immediately.
WARNING!
Driving a vehicle with the red brake light on is dangerous.Part of the brake system
may have failed.It will take longer to stop the vehicle.You could have a collision.Have
the vehicle checked immediately.
- Malfunction Indicator Light (MIL)
Certain conditions, such as a loose or missing gas cap, poor fuel quality, etc., may illumi-
nate the MIL after engine start.The vehicle should be serviced if the light stays on
through several typical driving cycles.In most situations, the vehicle will drive normally and
not require towing.
If the MIL flashes when the engine is running, serious conditions may exist that could lead
to immediate loss of power or severe catalytic converter damage.We recommend you
do not operate the vehicle.Have the vehicle serviced immediately.
WHAT TO DO IN EMERGENCIES
72
Page 77 of 116
JACKING AND TIRE CHANGING
Jack Location
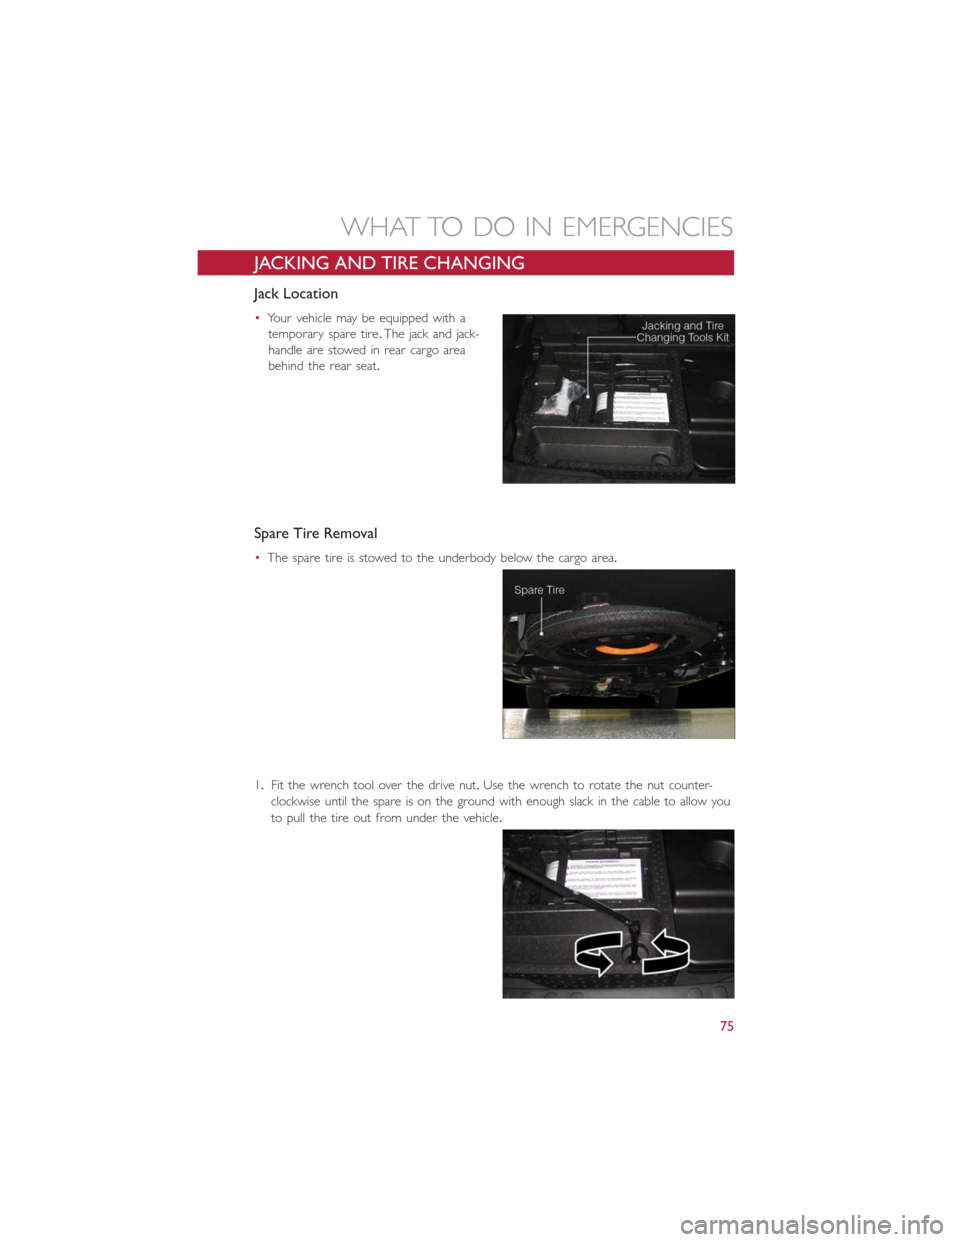
•Your vehicle may be equipped with a
temporary spare tire.The jack and jack-
handle are stowed in rear cargo area
behind the rear seat.
Spare Tire Removal
•The spare tire is stowed to the underbody below the cargo area.
1.Fit the wrench tool over the drive nut.Use the wrench to rotate the nut counter-
clockwise until the spare is on the ground with enough slack in the cable to allow you
to pull the tire out from under the vehicle.
WHAT TO DO IN EMERGENCIES
75
Page 80 of 116
NOTE:
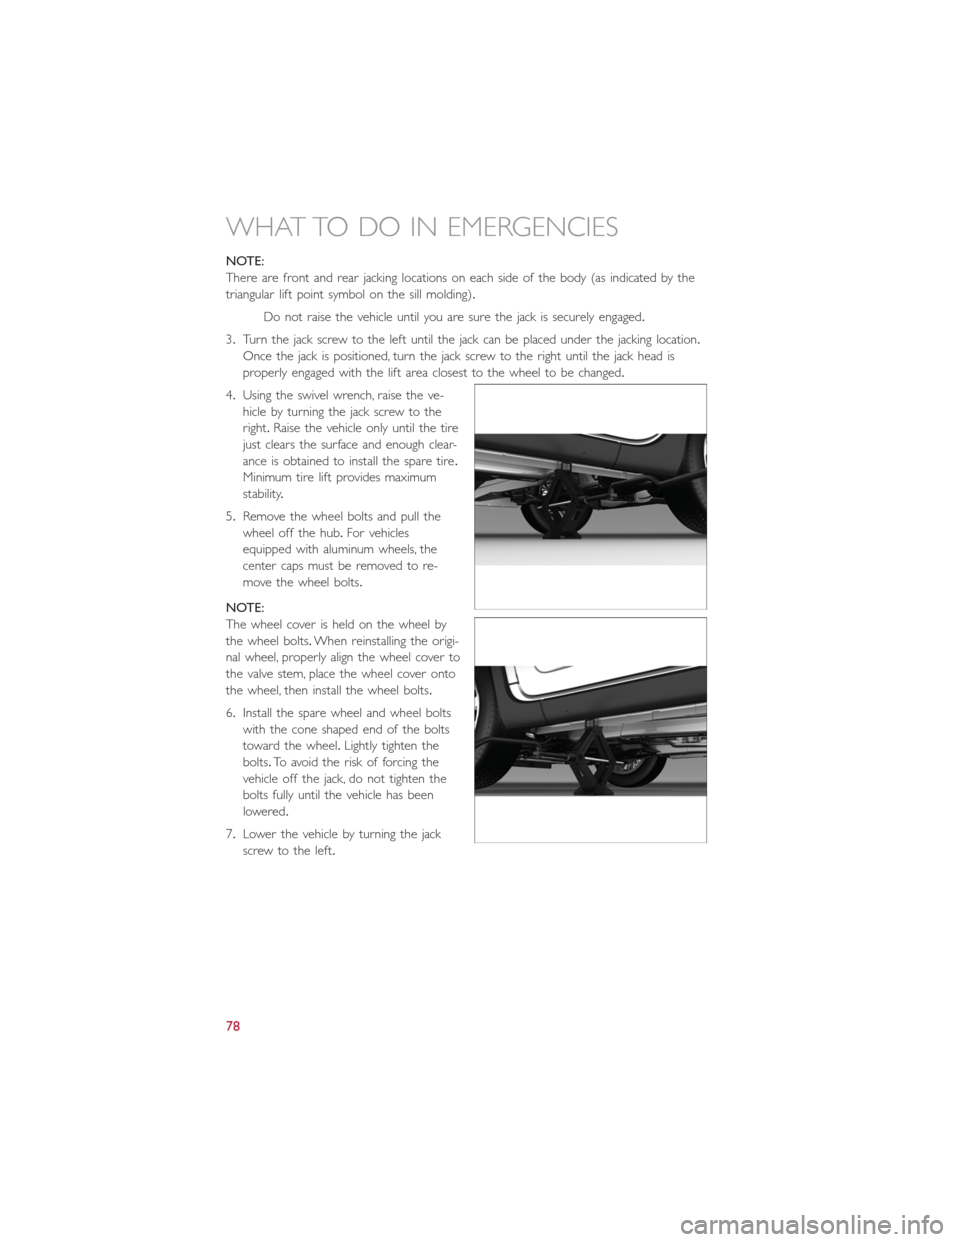
There are front and rear jacking locations on each side of the body (as indicated by the
triangular lift point symbol on the sill molding).
Do not raise the vehicle until you are sure the jack is securely engaged.
3.Turn the jack screw to the left until the jack can be placed under the jacking location.
Once the jack is positioned, turn the jack screw to the right until the jack head is
properly engaged with the lift area closest to the wheel to be changed.
4.Using the swivel wrench, raise the ve-
hicle by turning the jack screw to the
right.Raise the vehicle only until the tire
just clears the surface and enough clear-
ance is obtained to install the spare tire.
Minimum tire lift provides maximum
stability.
5.Remove the wheel bolts and pull the
wheel off the hub.For vehicles
equipped with aluminum wheels, the
center caps must be removed to re-
move the wheel bolts.
NOTE:
The wheel cover is held on the wheel by
the wheel bolts.When reinstalling the origi-
nal wheel, properly align the wheel cover to
the valve stem, place the wheel cover onto
the wheel, then install the wheel bolts.
6.Install the spare wheel and wheel bolts
with the cone shaped end of the bolts
toward the wheel.Lightly tighten the
bolts.To avoid the risk of forcing the
vehicle off the jack, do not tighten the
bolts fully until the vehicle has been
lowered.
7.Lower the vehicle by turning the jack
screw to the left.
WHAT TO DO IN EMERGENCIES
78
Page 81 of 116
8.Finish tightening the bolts.Push down on the wrench while tightening the wheel bolts.
Alternate bolts until each bolt has been tightened twice.The correct wheel bolt
torque is 63 ft lbs (86 N·m) for steel wheels and 89 ft lbs (120 N·m) for aluminum
wheels.If you doubt that you have tightened the bolts correctly, have them checked
with a torque wrench by your authorized dealer or service station.
9.Disassemble the jack and tools and place them in the in the rear cargo area.
10.Place the deflated (flat) tire in the cargo area.Have the tire repaired or replaced as
soon as possible.
11.Check the spare tire pressure as soon as possible.Correct the tire pressure as re-
quired.
Spare Tire Stowage
•Reverse instructions of the spare removal section.
•Rotate the jack wrench tool on the winch drive nut clockwise until effort becomes
heavy and an audible click is heard indicating the spare is properly stowed.
CAUTION!
•The winch mechanism is designed for use with the jack extension tube only.Use
of an air wrench or other power tools is not recommended and they can damage
the winch.
•Do not attempt to raise the vehicle by jacking on locations other than those indi-
cated in the Jacking Instructions for this vehicle.
•Be sure to mount the spare tire with the valve stem facing outward.The vehicle
could be damaged if the spare tire is mounted incorrectly.
WHAT TO DO IN EMERGENCIES
79
Page 82 of 116
WARNING!
•Do not attempt to change a tire on the side of the vehicle close to moving traffic.
Pull far enough off the road to avoid the danger of being hit when operating the
jack or changing the wheel.
•Being under a jacked-up vehicle is dangerous.The vehicle could slip off the jack
and fall on you.You could be crushed.Never put any part of your body under a
vehicle that is on a jack.
•Never start or run the engine while the vehicle is on a jack.if you need to get
under a raised vehicle, take it to a authorized dealer where it can be raised on a
lift.
•The jack is designed to use as a tool for changing tires only.The jack should not be
used to lift the vehicle for service purposes.The vehicle should be jacked on a
firm, level surface only.Avoid ice or slippery areas.
•After using the jack and tools, always reinstall them in the original carrier and loca-
tion.While driving you may experience abrupt stopping, rapid acceleration, or
sharp turns.A loose jack, tools, bracket or other objects in the vehicle may move
around with force, resulting in serious injury.
•Carefully follow these tire changing warnings to help prevent personal injury or
damage to your vehicle:
•Always park on a firm, level surface as far from the edge of the roadway as pos-
sible before raising the vehicle.
•Turn on the Hazard Warning flasher.
•Block the wheel diagonally opposite the wheel to be raised.
•Set the parking brake firmly and set the Euro Twin Clutch Transmission in PARK; a
manual transmission in REVERSE.
•Do not let anyone sit in the vehicle when it is on a jack.
•Do not get under the vehicle when it is on a jack.
•Only use the jack in the positions indicated and for lifting this vehicle during a tire
change.
•If working on or near a roadway, be extremely careful of motor traffic.
•To assure that spare tires, flat or inflated, are securely stowed, spares must be
stowed with the valve stem facing the ground.
•Raising the vehicle higher than necessary can make the vehicle unstable and cause
a collision.It could slip off the jack and hurt someone near it.Raise the vehicle
only enough to remove the tire.
•A loose tire or jack thrown forward in a collision or hard stop could injure some-
one in the vehicle.Always stow the jack parts and the extra tire and wheel in the
places provided.
WHAT TO DO IN EMERGENCIES
80
Page 88 of 116
WARNING!
•Do not attempt to seal a tire on the side of the vehicle closest to traffic.Pull far
enough off the road to avoid the danger of being hit when using the TIREFIT kit.
•Do not use TIREFIT or drive the vehicle under the following circumstances:
•If the puncture in the tire tread is approximately 1/4”.(6 mm) or larger.
•If the tire has any sidewall damage.
•If the tire has any damage from driving with extremely low tire pressure.
•If the tire has any damage from driving on a flat tire.
•If the wheel has any damage.
•If you are unsure of the condition of the tire or the wheel.
•Keep TIREFIT away from open flames or heat source.
•A loose TIREFIT kit thrown forward in a collision or hard stop could endanger the
occupants of the vehicle.Always stow the TIREFIT kit in the place provided.Failure
to follow these warnings can result in injuries that are serious or fatal to you, your
passengers, and others around you.
•Take care not to allow the contents of TIREFIT to come in contact with hair, eyes,
or clothing.TIREFIT is harmful if inhaled, swallowed, or absorbed through the skin.
It causes skin, eye, and respiratory irritation.Flush immediately with plenty of water
if there is any contact with eyes or skin.Change clothing as soon as possible, if
there is any contact with clothing.
•TIREFIT Sealant solution contains latex.In case of an allergic reaction or rash, con-
sult a physician immediately.Keep TIREFIT out of reach of children.If swallowed,
rinse mouth immediately with plenty of water and drink plenty of water.Do not
induce vomiting! Consult a physician immediately.
•TIREFIT is not a permanent flat tire repair.Have the tire inspected and repaired
or replaced after using TIREFIT.Do not exceed 55 mph (88 km/h) until the tire is
repaired or replaced.Failure to follow this warning can result in injuries that are
serious or fatal to you, your passengers, and others around you.
JUMP-STARTING PROCEDURE
•If your vehicle has a discharged battery, it can be jump-started using a set of jumper
cables and a battery in another vehicle or by using a portable battery booster pack.
Jump-starting can be dangerous if done improperly so please follow the procedures in
this section carefully.
NOTE:
When using a portable battery booster pack, follow the manufacturer’s operating instruc-
tions and precautions.
WHAT TO DO IN EMERGENCIES
86
Page 92 of 116
TOWING A DISABLED VEHICLE
With Ignition Key
Euro Twin Clutch Transmission
•Vehicle can be towed with the front wheels elevated.
•Vehicle can be towed on a flatbed truck (all wheels off the ground).
Manual Transmission
•Vehicle can be flat towed (all four wheels on the ground) with the transmission in
NEUTRAL.
•Vehicle can be towed with the front wheels elevated.
•Vehicle can be towed on a flatbed truck (all wheels off the ground).
NOTE:
If it is necessary to use the accessories while being towed (wipers, defrosters, etc.),
the key must be in the ON/RUN position.Make certain the transmission remains in
NEUTRAL.
All Transmissions
•If it is necessary to use the accessories while being towed (wipers, defrosters, etc.),
the key must be in the ON/RUN position.Make certain the transmission remains in
NEUTRAL.
Without The Ignition Key
•Special care must be taken when the vehicle is towed with the ignition in the OFF/
LOCK position.A dolly should be used under the front wheels if the rear wheels are
raised.Proper towing equipment is necessary to prevent damage to the vehicle.
•Battery power is required to release the brake/transmission interlock system (Euro
Twin Clutch Transmission only).There is a removable plug in the right side of the shift
lever housing that allows you to override the system.Refer to Shift Lever Override in
this guide.
CAUTION!
•Failure to follow these towing methods can cause severe transmission damage.
Such damage is not covered by the New Vehicle Limited Warranty.
•DO NOT flat tow any vehicle equipped with a Euro Twin Clutch Transmission.
Damage to the drivetrain will result.
•If the vehicle being towed requires steering, the ignition switch must be in the
ON/RUN position.
•Do not attempt to use sling-type equipment when towing.When securing the
vehicle to a flatbed truck, do not attach to front or rear suspension components.
Damage to your vehicle may result from improper towing.
WHAT TO DO IN EMERGENCIES
90
Page 98 of 116
MAINTENANCE SCHEDULE
Your vehicle is equipped with an automatic oil change indicator system.The oil change
indicator system will remind you that it is time to take your vehicle in for scheduled
maintenance.
Based on engine operation conditions, the oil change indicator message will illuminate in
the instrument cluster.This means that service is required for your vehicle.Operating
conditions such as frequent short-trips, trailer tow and extremely hot or cold ambient
temperatures will influence when the “Change Oil” or “Oil Change Required” message is
displayed.Severe Operating Conditions can cause the change oil message to illuminate as
early as 3,500 miles (5,600 km) since last reset.Have your vehicle serviced as soon as
possible, within the next 500 miles (805 km).
Your authorized dealer will reset the oil change indicator message after completing the
scheduled oil change.If a scheduled oil change is performed by someone other than your
authorized dealer, the message can be reset by referring to the steps described under
“Electronic Vehicle Information Center (EVIC)” in “Understanding Your Instrument Panel”
in your Owners Manual on the DVD for further information.
NOTE:
Under no circumstances should oil change intervals exceed 10,000 miles (16,000 km) or
twelve months, whichever comes first.
Severe Duty All Models
Change Engine Oil at 4000 miles (6,500 km) if the vehicle is operated in a dusty and off
road environment.This type of vehicle use is considered Severe Duty
Once A Month Or Before A Long Trip:
•Check engine oil level
•Check windshield washer fluid level
•Check the tire inflation pressures and look for unusual wear or damage
•Check the fluid levels of the coolant reservoir, brake master cylinder reservoir, and
transmission as needed
•Check function of all interior and exterior lights
MAINTAINING YOUR VEHICLE
96
Page 110 of 116
FREQUENTLY ASKED QUESTIONS
GETTING STARTED
•How do I install my LATCH Equipped Child Seat? pg.13
•How do I adjust my rear seat? pg.17
ELECTRONICS
•What Sound System do I have? pg.32
•How do I set the clock on my radio? pg.35
•How do I set the presets on my radio? pg.36
•How do I use my USB/Audio Jack (AUX)? pg.38
•How do I pair my cell phone via Uconnect® Phone (Bluetooth® Hands Free Calling)?
pg.39
UTILITY
•How much can I tow with my FIAT 500L? pg.68
•How do I tow my FIAT 500L behind another vehicle? pg.68
WHAT TO DO IN EMERGENCIES
•What do I do if my TPMS warning light is blinking? pg.71
•How do I Jump-Start my vehicle? pg.86
•What should I do if my engine overheats? pg.74
•How do I change a flat tire? pg.75
MAINTAINING YOUR VEHICLE
•Where is my underhood fuse block located? pg.100
•Where is my interior fuse block located? pg.101
•What type of oil do I use? pg.95
•How often should I change my engines oil? pg.96
•What should my tire pressure be set at? pg.103
FAQ’s
108
Page 111 of 116
Adding Fuel.................30
Airbag....................11
Air Bag
Advance Front Air Bag.........11
Driver Knee Air Bag...........11
Front Air Bag..............11
Front Passenger Knee Air bag......11
Knee Impact Bolsters..........11
Side Air Bags...............11
Airbag Light...............11, 73
Alarm
Disarm The System............9
Vehicle Security Alarm..........8
Alarm (Security Alarm)............8
Anti-Lock Warning Light...........73
Audio Systems (Radio)...........33
Break-In Recommendations, New Vehicle..19
Bulb Replacement.............104
Caps, Filler..................30
Fuel...................92
Changing A Flat Tire.............75
Charging System Light............73
Child Restraint................12
Child Restraints
Child Seat Installation..........14
Installing Child Restraints Using The
Vehicle Seat Belt.............14
Lower Anchors And Tethers For
Children.................14
Using The Top Tether Anchorage....14
Child Seat..................14
Climate Control
Automatic................25
Manual..................24
Cluster Warning/Indicator Lights
Anti-Lock Brake (ABS) Light......73
Charging System Light.........73
Electronic Throttle Control (ETC)
Indicator Light..............70
Engine Temperature Warning Light...69
Malfunction Indicator Light (MIL)....72
Oil Pressure Warning Light.......73
Seat Belt Reminder Light........73
Tire Pressure Monitoring System
(TPMS) Light..............71Cruise Control (Speed Control)......22
Customer Assistance............105
Customer Programmable Features.....63
Defects, Reporting.............106
Disarming, Security System..........9
Door Locks.................8, 9
Driver Cockpit................4
Electronics
Your Vehicle's Sound System......32
Electronic Speed Control
(Cruise
Control).................22
Electronic Stability Control (ESC)......31
Electronic Throttle Control Warning Light...70
Electronic Vehicle Information Center
(EVIC)..................62
Emergency, In Case of
Brake Warning Light.........72, 73
Freeing Vehicle When Stuck......89
Jacking..................75
Towing.................90
Engine
Break-In Recommendations.......19
Compartment..............94
Overheating...............74
Temperature Warning Light.......69
Euro Twin Clutch Transmission.......27
Event Data Recorder............92
Exterior Lights...............104
Flash-To-Pass.................20
Folding Rear Seat..............17
Freeing A Stuck Vehicle...........91
Front Heated Seats.............18
Fuse....................100
Fuses....................100
Heated Mirrors.............24, 25
Heated Seats................18
HomeLink® (Garage Door Opener)....64
Hood Release................93
Identifying Your Radio............34
Information Center, Vehicle.........62
Instrument Cluster Warning Lights.....69
INDEX
109