key FIAT 500L 2014 2.G Owner's Manual
[x] Cancel search | Manufacturer: FIAT, Model Year: 2014, Model line: 500L, Model: FIAT 500L 2014 2.GPages: 116, PDF Size: 4.53 MB
Page 56 of 116
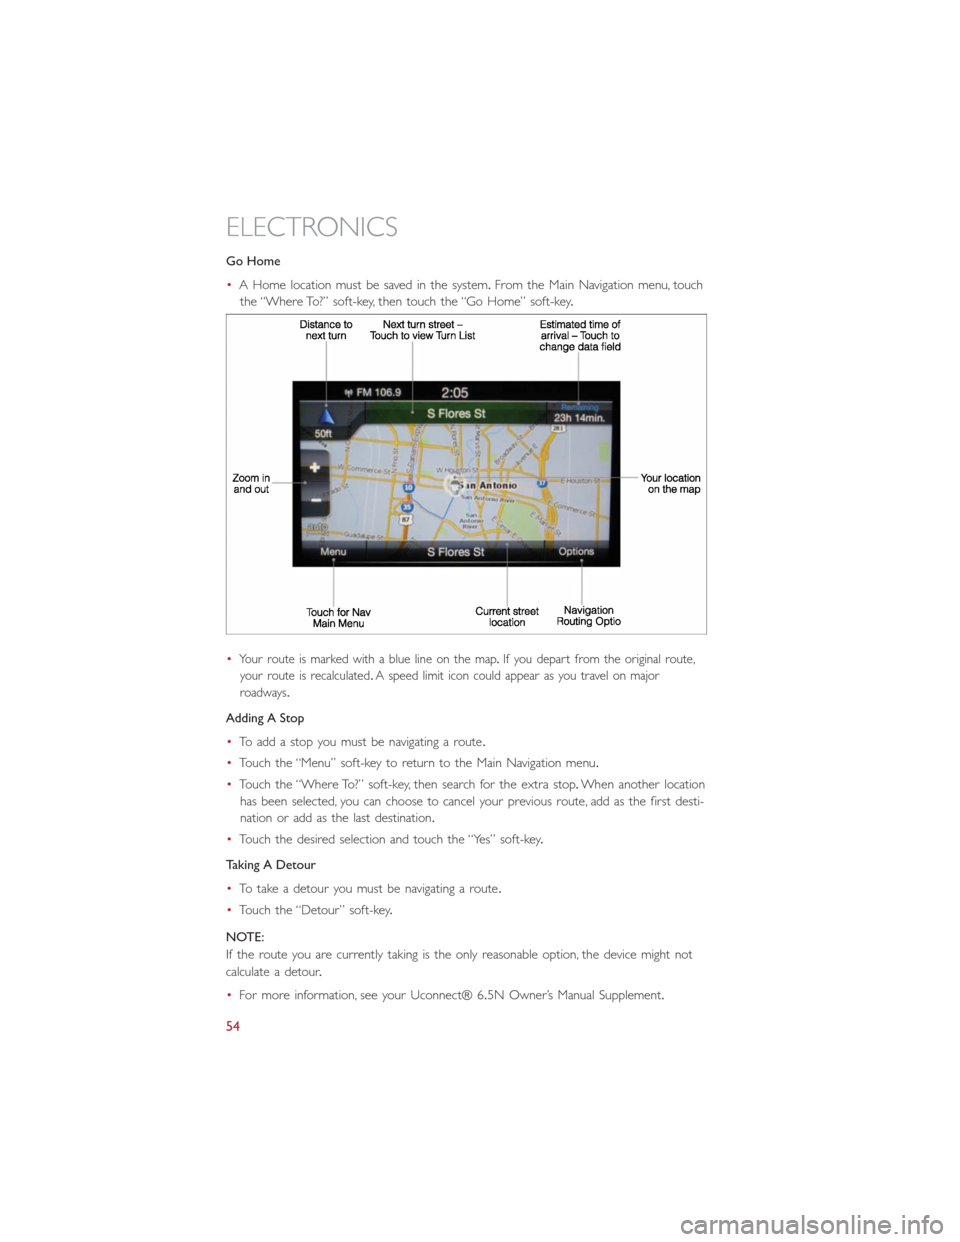
Go Home
•A Home location must be saved in the system.From the Main Navigation menu, touch
the “Where To?” soft-key, then touch the “Go Home” soft-key.
•
Your route is marked with a blue line on the map.If you depart from the original route,
your route is recalculated.A speed limit icon could appear as you travel on major
roadways.
Adding A Stop
•To add a stop you must be navigating a route.
•Touch the “Menu” soft-key to return to the Main Navigation menu.
•Touch the “Where To?” soft-key, then search for the extra stop.When another location
has been selected, you can choose to cancel your previous route, add as the first desti-
nation or add as the last destination.
•Touch the desired selection and touch the “Yes” soft-key.
Taking A Detour
•To take a detour you must be navigating a route.
•Touch the “Detour” soft-key.
NOTE:
If the route you are currently taking is the only reasonable option, the device might not
calculate a detour.
•For more information, see your Uconnect® 6.5N Owner’s Manual Supplement.
ELECTRONICS
54
Page 57 of 116
Uconnect® 6.5 Phone
Bluetooth® Hands Free Calling
•If the Uconnect® Phone Buttonexists on your steering wheel, then you have
the Uconnect® Phone features.
•The Uconnect® Phone is a voice-activated, hands-free, in-vehicle communications sys-
tem with Voice Command Capability (see Voice Command section).
•The Uconnect® Phone allows you to dial a phone number with your mobile phone
using simple voice commands or using screen soft-keys.
•Refer to the Understand The Features Of Your Vehicle section of your vehicle's
Owner's Manual on the DVD for further details.
NOTE:
The Uconnect® Phone requires a mobile phone equipped with the Bluetooth®
Hands-Free Profile, Version 1.0 or higher.For Uconnect® Customer Support: U.S.resi-
dents visit www.UconnectPhone.com or call 1-888-242-6342.Canadian Residents visit
www.UconnectPhone.com or call 1-800-465–2001 (English) or 1-800-387-9983
(French).
Pairing A Phone
•To use the Uconnect® Phone feature, you must first pair your Bluetooth® phone with
the Uconnect® system.
Start Pairing Procedure On The Radio
•Press the Phone button and then the “Settings” soft-key.Next, touch Add Device.
•Uconnect® Phone will display an “In progress” screen while the system is connecting.
Start Pairing Procedure On Mobile Phone
•Search for available devices on your Bluetooth® enabled mobile phone.This is usually
within Settings or Options under “Bluetooth.” See your mobile phone’s manual for
details.
•When your phone finds the system, select “Uconnect” as the paired device.Yo u m a y
be prompted by your phone to download the phonebook.This is so you can make
calls by saying the name of your contact (PBAP-Phone Book Access Profile).
Complete The Pairing Procedure
•When prompted on the phone, verify with radio password shown on the Uconnect®
Screen.
•If your phone asks you to accept a connection request from Uconnect, select “Yes.”
If available, check the box telling it not to ask again – that way your phone will auto-
matically connect each time you start the vehicle.
ELECTRONICS
55
Page 58 of 116
Select The Mobile Phone's Priority Level
•When the pairing process has successfully completed, the system will prompt you to
choose whether or not this is your favorite phone.Selecting Yes will make this phone
the highest priority.This phone will take precedence over other paired phones within
range.Only one phone can be paired at a time.
•You are now ready to make hands-free calls.Press the Uconnect® Phone button on
your steering wheel to begin.
Making A Phone Call
•Press the Uconnect® Phone button.
•After the BEEP, say “dial” then the number (or “call” then the name as listed in your
phone; see Phonebook).
NOTE:
You can also initiate a call by using the touchscreen on the Phone main screen.
Receiving A Call — Accept (And End)
•When an incoming call rings/is announced on Uconnect®, press the Phone button
.
•To end a call, press the Hang Up or Phone button.
Mute (Or Unmute) Microphone During Call
•During a call, touch the “Mute” soft-key on the Phone main screen to mute and
unmute the microphone.
Transfer Ongoing Call Between Handset And Vehicle
•During an on-going call, touch the “Transfer” soft-key on the Phone main screen to
transfer an on-going call between handset and vehicle.
Common Phone Commands (Examples)
•“Call John Smith”
•“Call John Smith mobile”
•“Dial 1 248 555 1212”
•“Call Emergency”
•“Call Towing Assistance”
•“Redial”
ELECTRONICS
56
Page 59 of 116
Phonebook
•Uconnect® radios automatically downloads your phonebook from your paired phone,
if this feature is supported by your phone.Entries are updated each time that the
phone is connected.If your phone book entries do not appear, check the settings on
your phone.Some phones require you to enable this feature manually.
•Your phonebook can be browsed on your radio screen, but editing can only be done
on your phone.To browse, touch the “Phone” soft-key, then the “Phonebook” soft-key.
•Favorite phonebook entries can be saved as Favorites for quicker access.Favorites are
shown at the top of your main phone screen.
Voice Command Tips
•Using complete names (i.e; Call John Doe vs.Call John) will result in greater system
accuracy.
•You can “chain” commands together for faster results.Say “Call John Doe, mobile”, for
example.
•If you are listening to available voice command options, you do not have to listen to
the entire list.When you hear the command that you need, press the
button
on the steering wheel, wait for the beep and say your command.
Changing The Volume
•Start a dialogue by pressing the Phone button, then say a command for example
- "Help".
•Use the radio ON/OFF VOLUME rotary knob to adjust the volume to a comfortable
level while the Uconnect® system is speaking.Please note the volume setting for
Uconnect® is different than the audio system.
NOTE:
To access help, press the Uconnect® Phone
button on the steering wheel and say
"help." Touch the display or push either
orbutton and say "cancel" to
cancel the help session.
Voice Text Reply
•Uconnect® Phone can read or send new text messages on your mobile phone.
•Your mobile phone must be MAP (Message Access Profile) compatible to support SMS
via Bluetooth® to use this feature.If the Uconnect® Phone determines your phone is
not compatible with SMS messaging over Bluetooth® the “Messaging” button is greyed
out and the feature is not available for use.
NOTE:
For mobile phone compatibility and pairing instructions, please visit
www.UconnectPhone.com
ELECTRONICS
57
Page 61 of 116
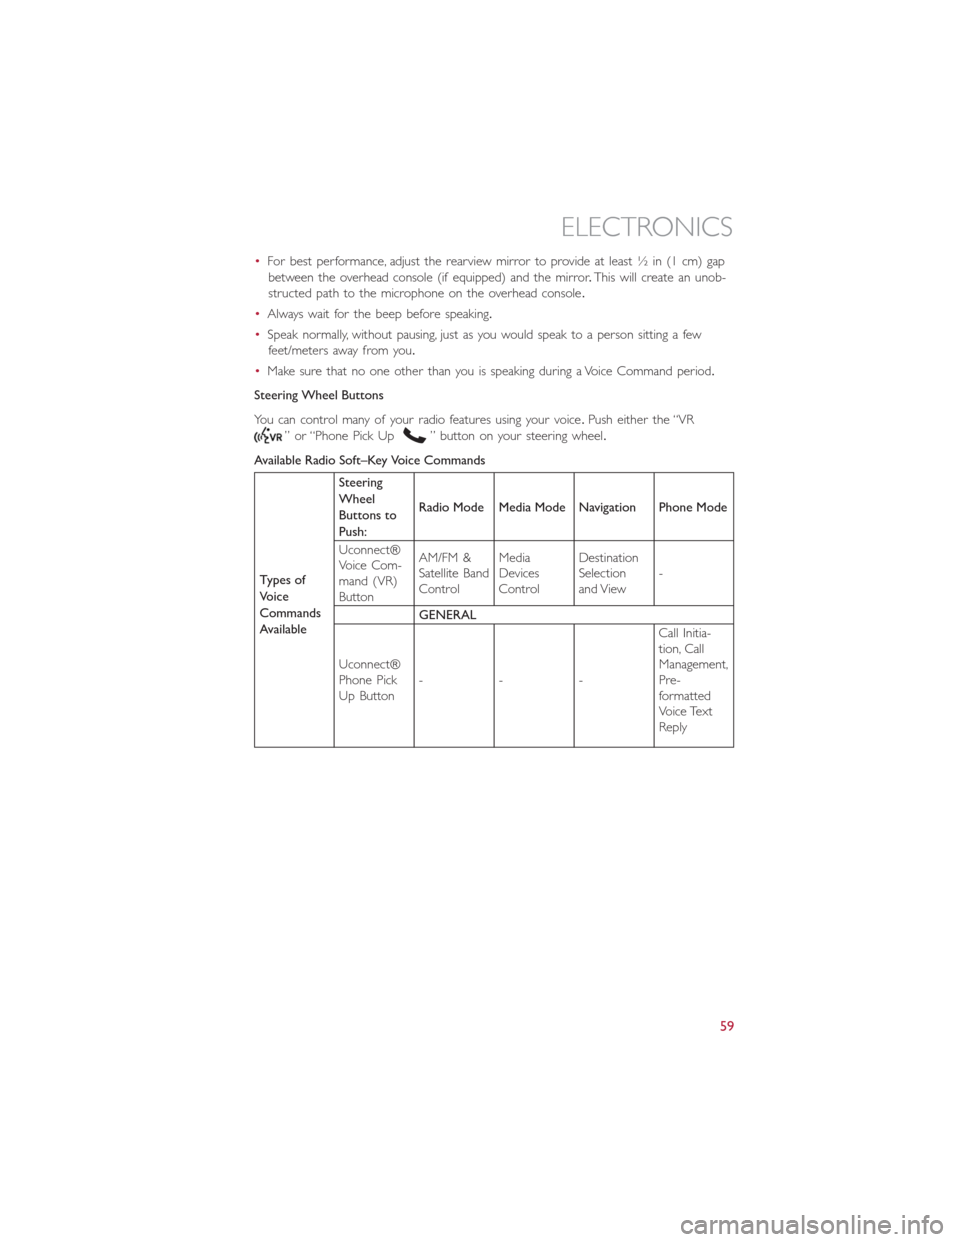
•For best performance, adjust the rearview mirror to provide at least ½ in (1 cm) gap
between the overhead console (if equipped) and the mirror.This will create an unob-
structed path to the microphone on the overhead console.
•Always wait for the beep before speaking.
•Speak normally, without pausing, just as you would speak to a person sitting a few
feet/meters away from you.
•Make sure that no one other than you is speaking during a Voice Command period.
Steering Wheel Buttons
You can control many of your radio features using your voice.Push either the “VR
” or “Phone Pick Up” button on your steering wheel.
Available Radio Soft–Key Voice Commands
Types of
Voice
Commands
AvailableSteering
Wheel
Buttons to
Push:Radio Mode Media Mode Navigation Phone Mode
Uconnect®
Voice Com-
mand (VR)
ButtonAM/FM &
Satellite Band
ControlMedia
Devices
ControlDestination
Selection
and View-
GENERAL
Uconnect®
Phone Pick
Up Button---Call Initia-
tion, Call
Management,
Pre-
formatted
Voice Text
Reply
ELECTRONICS
59
Page 65 of 116
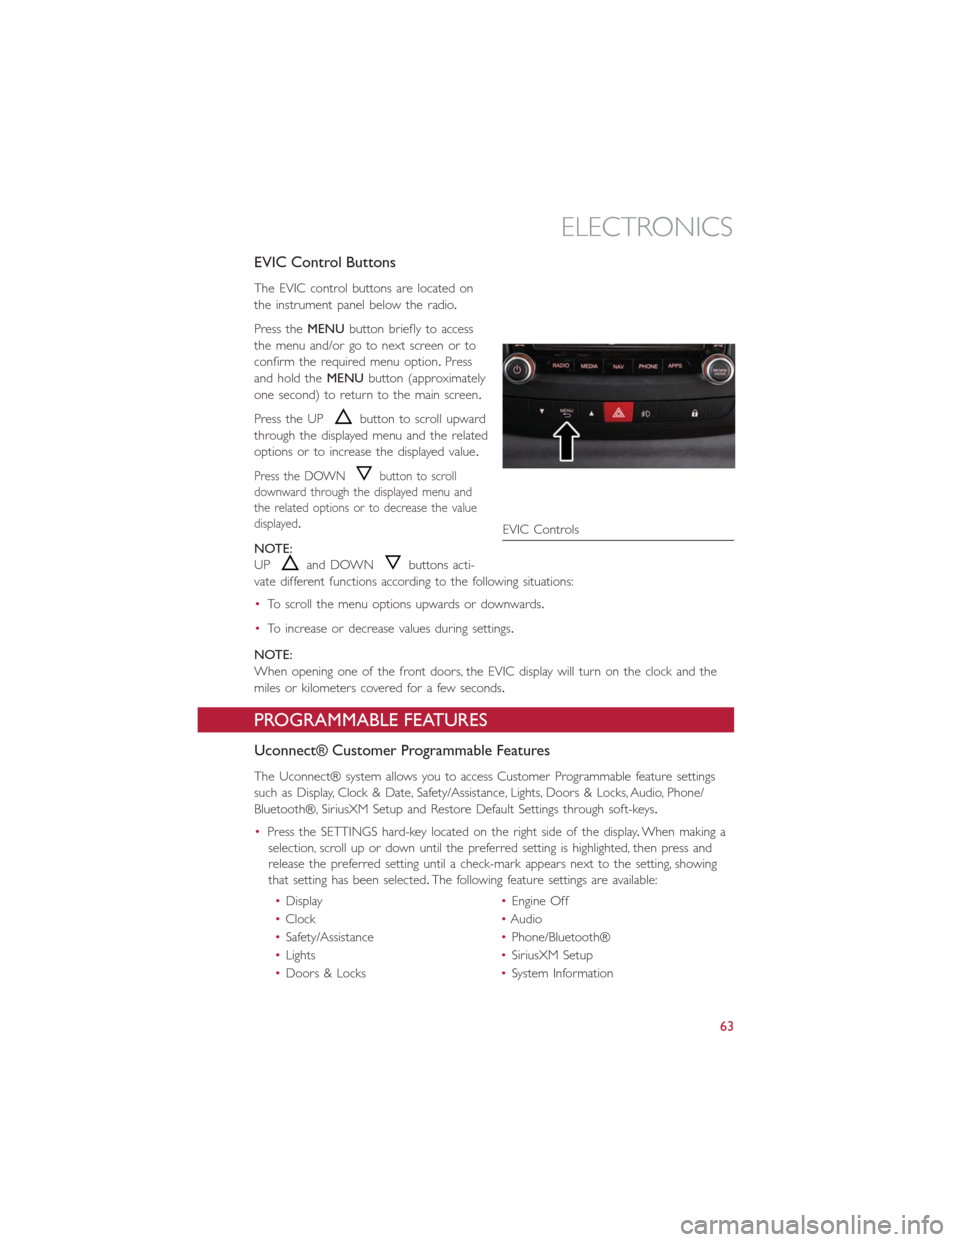
EVIC Control Buttons
The EVIC control buttons are located on
the instrument panel below the radio.
Press theMENUbutton briefly to access
the menu and/or go to next screen or to
confirm the required menu option.Press
and hold theMENUbutton (approximately
one second) to return to the main screen.
Press the UP
button to scroll upward
through the displayed menu and the related
options or to increase the displayed value.
Press the DOWNbutton to scroll
downward through the displayed menu and
the related options or to decrease the value
displayed.
NOTE:
UP
and DOWNbuttons acti-
vate different functions according to the following situations:
•To scroll the menu options upwards or downwards.
•To increase or decrease values during settings.
NOTE:
When opening one of the front doors, the EVIC display will turn on the clock and the
miles or kilometers covered for a few seconds.
PROGRAMMABLE FEATURES
Uconnect® Customer Programmable Features
The Uconnect® system allows you to access Customer Programmable feature settings
such as Display, Clock & Date, Safety/Assistance, Lights, Doors & Locks, Audio, Phone/
Bluetooth®, SiriusXM Setup and Restore Default Settings through soft-keys.
•Press the SETTINGS hard-key located on the right side of the display.When making a
selection, scroll up or down until the preferred setting is highlighted, then press and
release the preferred setting until a check-mark appears next to the setting, showing
that setting has been selected.The following feature settings are available:
•Display•Engine Off
•Clock•Audio
•Safety/Assistance•Phone/Bluetooth®
•Lights•SiriusXM Setup
•Doors & Locks•System Information
EVIC Controls
ELECTRONICS
63
Page 92 of 116
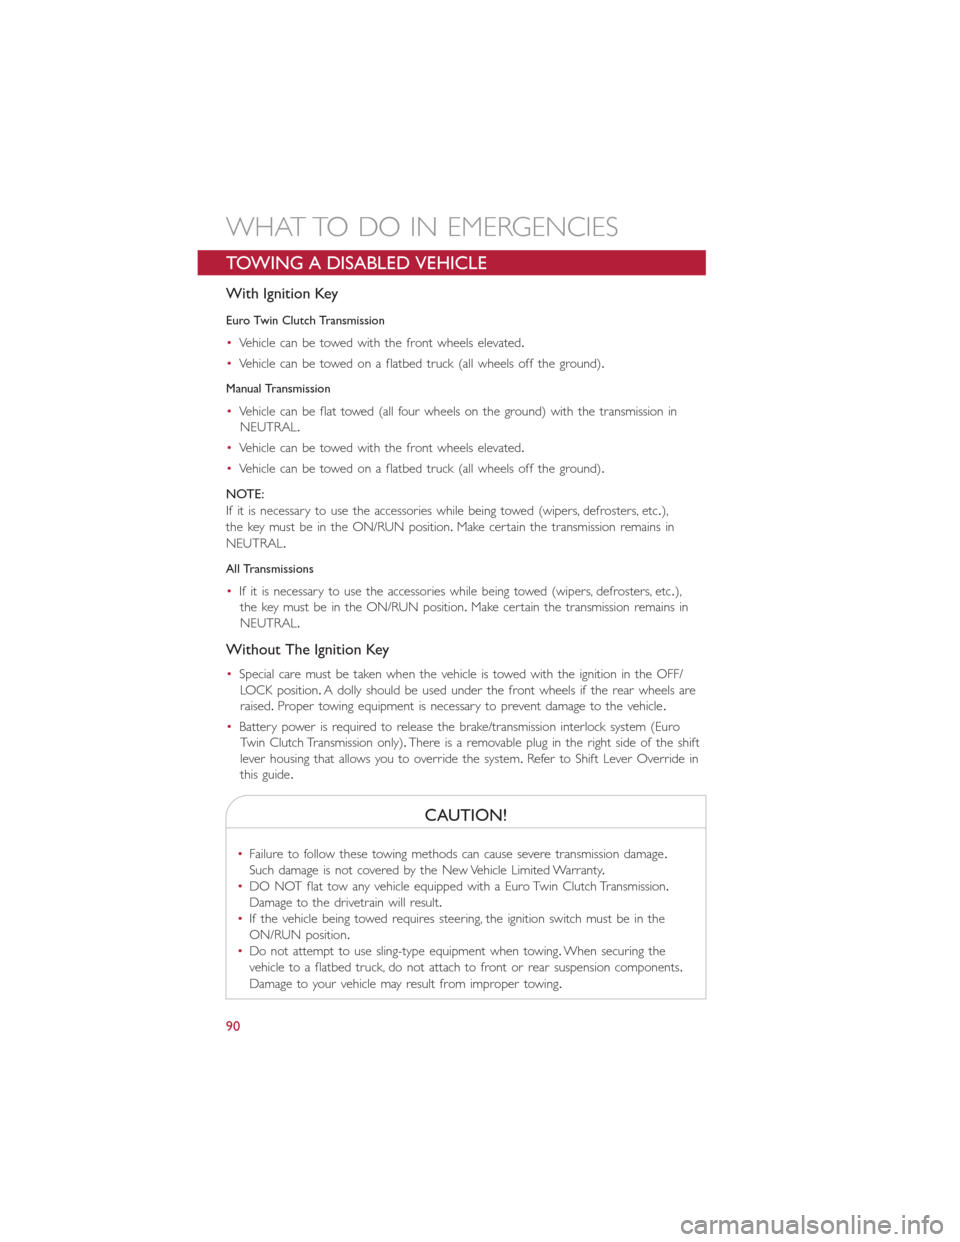
TOWING A DISABLED VEHICLE
With Ignition Key
Euro Twin Clutch Transmission
•Vehicle can be towed with the front wheels elevated.
•Vehicle can be towed on a flatbed truck (all wheels off the ground).
Manual Transmission
•Vehicle can be flat towed (all four wheels on the ground) with the transmission in
NEUTRAL.
•Vehicle can be towed with the front wheels elevated.
•Vehicle can be towed on a flatbed truck (all wheels off the ground).
NOTE:
If it is necessary to use the accessories while being towed (wipers, defrosters, etc.),
the key must be in the ON/RUN position.Make certain the transmission remains in
NEUTRAL.
All Transmissions
•If it is necessary to use the accessories while being towed (wipers, defrosters, etc.),
the key must be in the ON/RUN position.Make certain the transmission remains in
NEUTRAL.
Without The Ignition Key
•Special care must be taken when the vehicle is towed with the ignition in the OFF/
LOCK position.A dolly should be used under the front wheels if the rear wheels are
raised.Proper towing equipment is necessary to prevent damage to the vehicle.
•Battery power is required to release the brake/transmission interlock system (Euro
Twin Clutch Transmission only).There is a removable plug in the right side of the shift
lever housing that allows you to override the system.Refer to Shift Lever Override in
this guide.
CAUTION!
•Failure to follow these towing methods can cause severe transmission damage.
Such damage is not covered by the New Vehicle Limited Warranty.
•DO NOT flat tow any vehicle equipped with a Euro Twin Clutch Transmission.
Damage to the drivetrain will result.
•If the vehicle being towed requires steering, the ignition switch must be in the
ON/RUN position.
•Do not attempt to use sling-type equipment when towing.When securing the
vehicle to a flatbed truck, do not attach to front or rear suspension components.
Damage to your vehicle may result from improper towing.
WHAT TO DO IN EMERGENCIES
90
Page 109 of 116
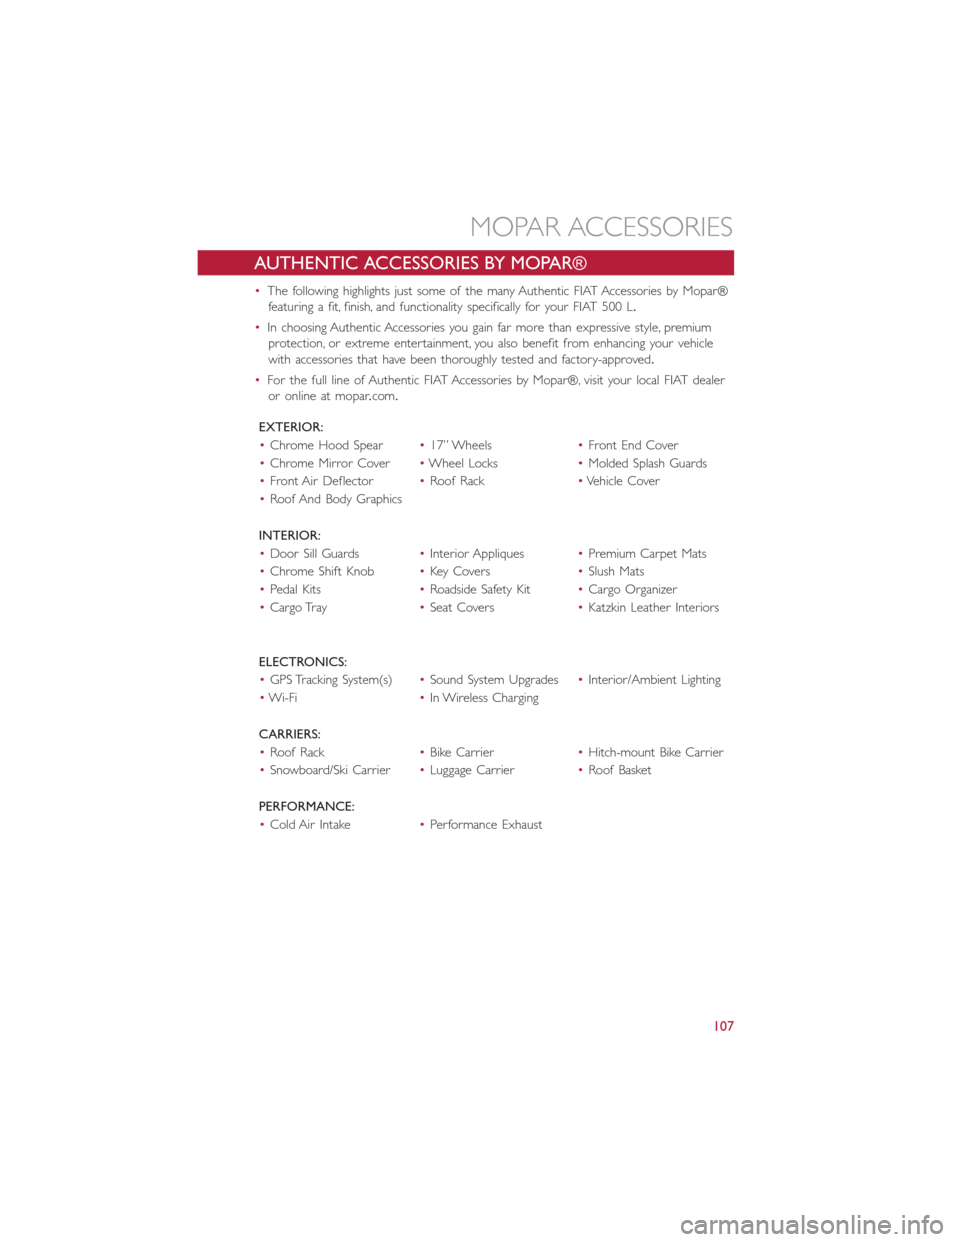
AUTHENTIC ACCESSORIES BY MOPAR®
•The following highlights just some of the many Authentic FIAT Accessories by Mopar®
featuring a fit, finish, and functionality specifically for your FIAT 500 L.
•In choosing Authentic Accessories you gain far more than expressive style, premium
protection, or extreme entertainment, you also benefit from enhancing your vehicle
with accessories that have been thoroughly tested and factory-approved.
•For the full line of Authentic FIAT Accessories by Mopar®, visit your local FIAT dealer
or online at mopar.com.
EXTERIOR:
•Chrome Hood Spear•17” Wheels•Front End Cover
•Chrome Mirror Cover•Wheel Locks•Molded Splash Guards
•Front Air Deflector•Roof Rack•Vehicle Cover
•Roof And Body Graphics
INTERIOR:
•Door Sill Guards•Interior Appliques•Premium Carpet Mats
•Chrome Shift Knob•Key Covers•Slush Mats
•Pedal Kits•Roadside Safety Kit•Cargo Organizer
•Cargo Tray•Seat Covers•Katzkin Leather Interiors
ELECTRONICS:
•GPS Tracking System(s)•Sound System Upgrades•Interior/Ambient Lighting
•Wi-Fi•In Wireless Charging
CARRIERS:
•Roof Rack•Bike Carrier•Hitch-mount Bike Carrier
•Snowboard/Ski Carrier•Luggage Carrier•Roof Basket
PERFORMANCE:
•Cold Air Intake•Performance Exhaust
MOPAR ACCESSORIES
107
Page 112 of 116
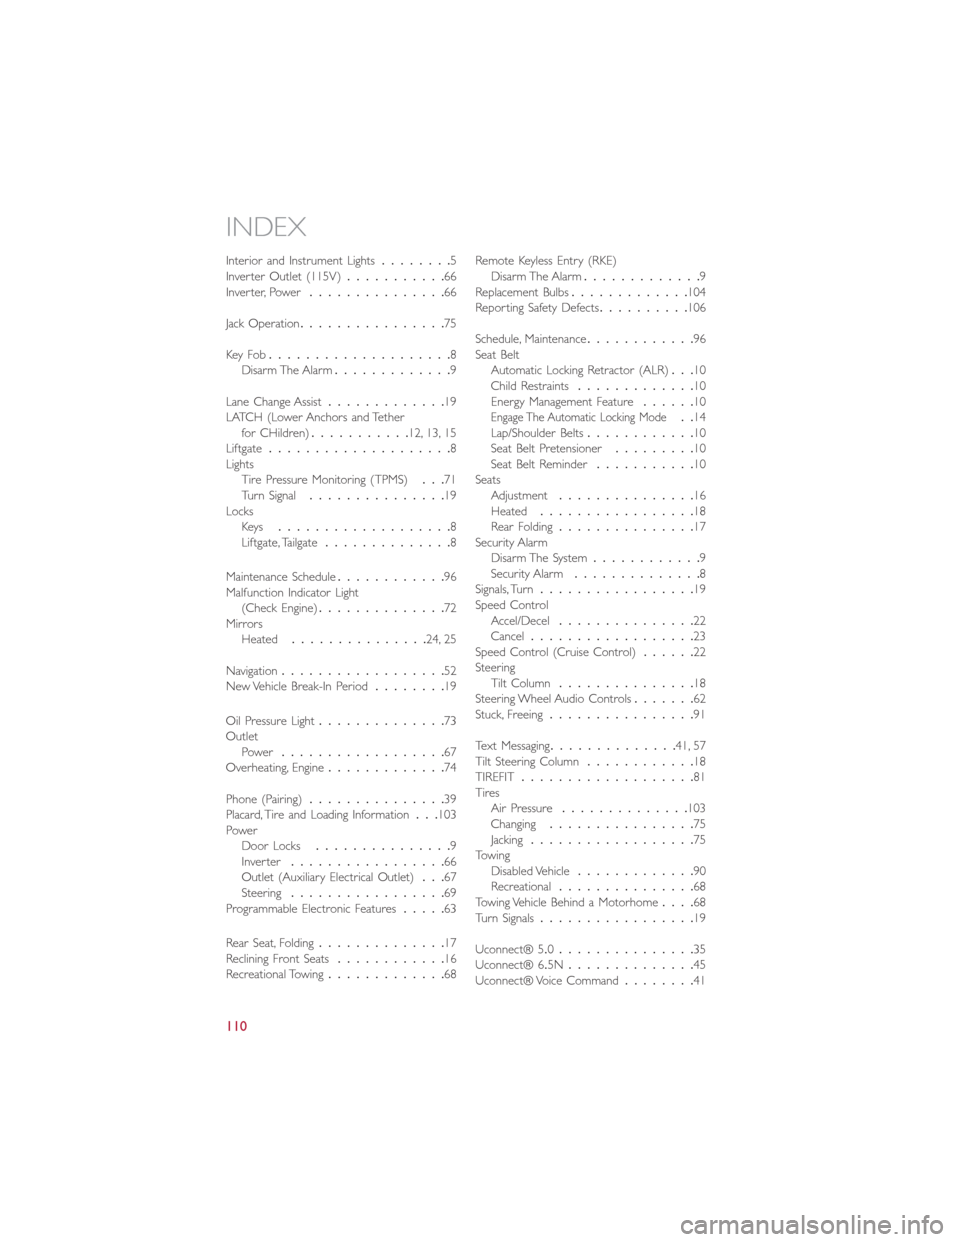
Interior and Instrument Lights........5
Inverter Outlet (115V)...........66
Inverter, Power...............66
Jack Operation................75
Key Fo b....................8
Disarm The Alarm.............9
Lane Change Assist.............19
LATCH (Lower Anchors and Tether
for CHildren)...........12, 13, 15
Liftgate....................8
Lights
Tire Pressure Monitoring (TPMS)...71
Turn Signal...............19
Locks
Key s...................8
Liftgate, Tailgate..............8
Maintenance Schedule............96
Malfunction Indicator Light
(Check Engine)..............72
Mirrors
Heated...............24, 25
Navigation..................52
New Vehicle Break-In Period........19
Oil Pressure Light..............73
Outlet
Power..................67
Overheating, Engine.............74
Phone (Pairing)...............39
Placard, Tire and Loading Information...103
Power
Door Locks...............9
Inver ter.................66
Outlet (Auxiliary Electrical Outlet)...67
Steering.................69
Programmable Electronic Features.....63
Rear Seat, Folding..............17
Reclining Front Seats............16
Recreational Towing.............68Remote Keyless Entry (RKE)Disarm The Alarm.............9
Replacement Bulbs.............104
Reporting Safety Defects..........106
Schedule, Maintenance............96
Seat Belt
Automatic Locking Retractor (ALR)...10
Child Restraints.............10
Energy Management Feature......10
Engage The Automatic Locking Mode..14
Lap/Shoulder Belts............10
Seat Belt Pretensioner.........10
Seat Belt Reminder...........10
Seats
Adjustment...............16
Heated.................18
Rear Folding...............17
Security Alarm
Disarm The System............9
Security Alarm..............8
Signals, Turn.................19
Speed Control
Accel/Decel...............22
Cancel..................23
Speed Control (Cruise Control)......22
Steering
Tilt Column...............18
Steering Wheel Audio Controls.......62
Stuck, Freeing................91
Text Messaging..............41, 57
Tilt Steering Column............18
TIREFIT...................81
Tires
Air Pressure..............103
Changing................75
Jacking..................75
Towing
Disabled Vehicle.............90
Recreational...............68
Towing Vehicle Behind a Motorhome....68
Turn Signals.................19
Uconnect® 5.0...............35
Uconnect® 6.5N..............45
Uconnect® Voice Command........41
INDEX
110
Page 116 of 116
Download a free
Vehicle Information App
by visiting your application store, Keyword (My FIAT), or
scanning the Microsoft Tag. To put Microsoft Tags to work
for you, use your mobile phone’s browser or App store
to download a Microsoft Tag reader, like the free one at
www.gettag.mobi. Then follow the directions to scan the code.
Download a FREE electronic copy
of the Owner’s Manual or Warranty Booklet by visiting
the Owners tab at:
www.fiatusa.com (U.S.)
14BF-926-AA
Fourth Edition REV 2 User Guide
2 014 USER GUIDE
1752732_14d_500L_UG_REV2_041514.indd 14/15/14 8:51 AM