key FIAT 500L 2014 2.G Owner's Manual
[x] Cancel search | Manufacturer: FIAT, Model Year: 2014, Model line: 500L, Model: FIAT 500L 2014 2.GPages: 116, PDF Size: 4.53 MB
Page 40 of 116
USB/Audio Jack (AUX)/Bluetooth® Operation
USB/iPod®
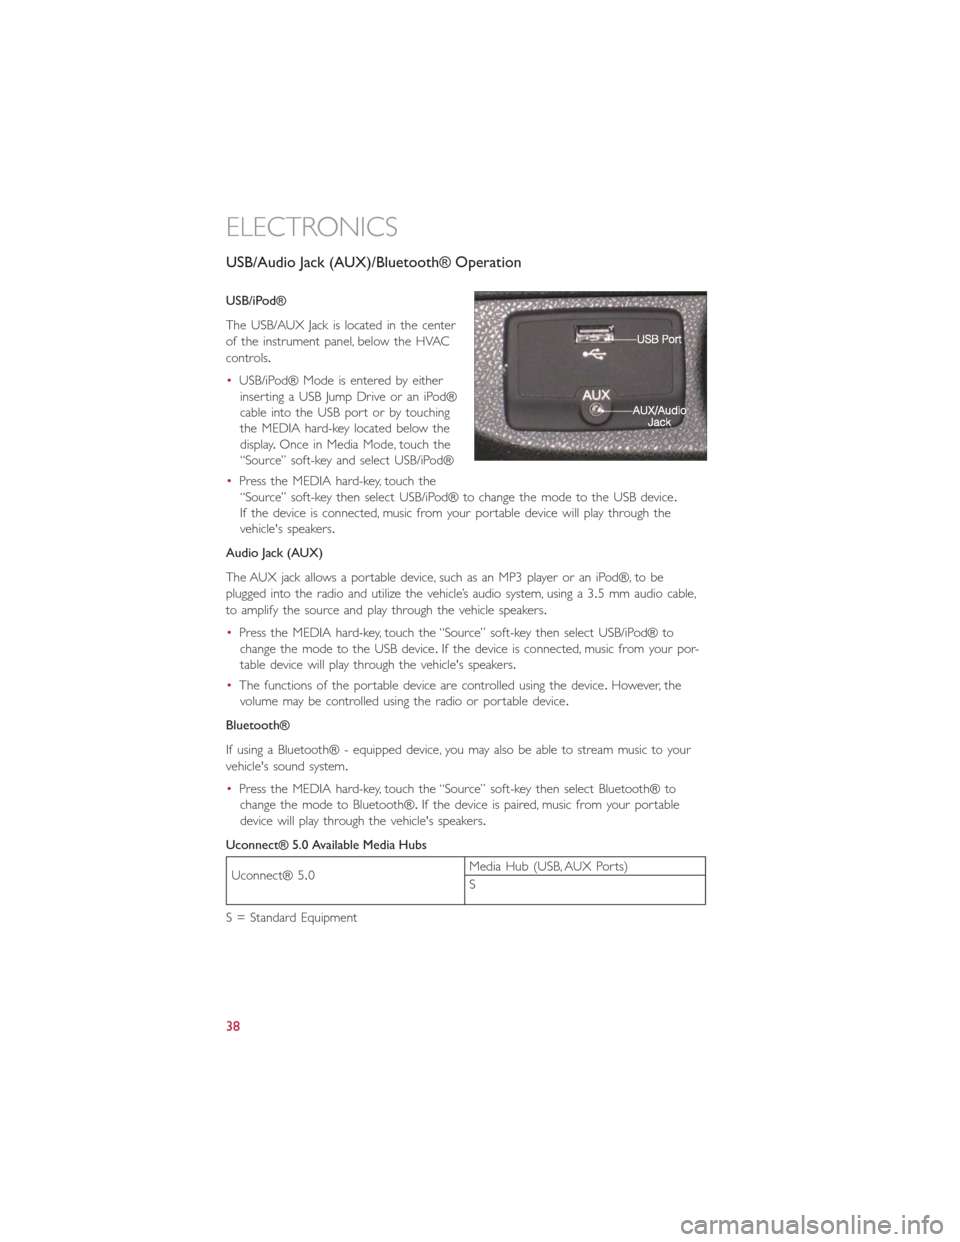
The USB/AUX Jack is located in the center
of the instrument panel, below the HVAC
controls.
•USB/iPod® Mode is entered by either
inserting a USB Jump Drive or an iPod®
cable into the USB port or by touching
the MEDIA hard-key located below the
display.Once in Media Mode, touch the
“Source” soft-key and select USB/iPod®
•Press the MEDIA hard-key, touch the
“Source” soft-key then select USB/iPod® to change the mode to the USB device.
If the device is connected, music from your portable device will play through the
vehicle's speakers.
Audio Jack (AUX)
The AUX jack allows a portable device, such as an MP3 player or an iPod®, to be
plugged into the radio and utilize the vehicle’s audio system, using a 3.5 mm audio cable,
to amplify the source and play through the vehicle speakers.
•Press the MEDIA hard-key, touch the “Source” soft-key then select USB/iPod® to
change the mode to the USB device.If the device is connected, music from your por-
table device will play through the vehicle's speakers.
•The functions of the portable device are controlled using the device.However, the
volume may be controlled using the radio or portable device.
Bluetooth®
If using a Bluetooth® - equipped device, you may also be able to stream music to your
vehicle's sound system.
•Press the MEDIA hard-key, touch the “Source” soft-key then select Bluetooth® to
change the mode to Bluetooth®.If the device is paired, music from your portable
device will play through the vehicle's speakers.
Uconnect® 5.0 Available Media Hubs
Uconnect® 5.0Media Hub (USB, AUX Ports)
S
S = Standard Equipment
ELECTRONICS
38
Page 41 of 116
Uconnect® 5.0 Phone
Bluetooth® Hands Free Calling
•If the Uconnect® Phone Buttonexists on your steering wheel, then you have
the Uconnect® Phone features.
•The Uconnect® Phone is a voice-activated, hands-free, in-vehicle communications sys-
tem with Voice Command Capability (see Voice Command section).
•The Uconnect® Phone allows you to dial a phone number with your mobile phone
using simple voice commands or using screen soft-keys.
•Refer to the Understand The Features Of Your Vehicle section of your vehicle's
Owner's Manual on the DVD for further details.
NOTE:
The Uconnect® Phone requires a mobile phone equipped with the Bluetooth® Hands-Free
Profile, Version 1.0 or higher.For Uconnect® Customer Support: U.S.residents visit
www.UconnectPhone.com or call 1-888-242-6342.Canadian Residents visit
www.UconnectPhone.com or call 1-800-465–2001 (English) or 1-800-387-9983 (French).
Pairing A Phone
•To use the Uconnect® Phone feature, you must first pair your Bluetooth® phone with
the Uconnect® system.
Start Pairing Procedure On Mobile Phone
•
Search for available devices on your Bluetooth® enabled mobile phone.This is usually
within Settings or Options under “Bluetooth.” See your mobile phone’s manual for details.
•When your phone finds the system, select “Uconnect” as the paired device.Yo u m a y
be prompted by your phone to download the phonebook.This is so you can make
calls by saying the name of your contact (PBAP-Phone Book Access Profile).
Start Pairing Procedure On The Radio
•Press the PHONE hard-key then press “Yes” to start searching for the mobile phone.
•Uconnect® Phone will display an “In progress” screen while the system is connecting.
Complete The Pairing Procedure
•When prompted on the phone, verify with radio password shown on the Uconnect®
Screen.
•If your phone asks you to accept a connection request from Uconnect®, select “Yes.”
If available, check the box telling it not to ask again – that way your phone automati-
cally connects each time you start the vehicle.
Select The Mobile Phone's Priority Level
•When the pairing process has successfully completed, the system prompts you to
choose whether or not this is your favorite phone.Selecting “Yes” makes this phone
the highest priority.This phone takes precedence over other paired phones within
range.Only one phone can be paired at a time.
•You are now ready to make hands-free calls.Press the Uconnect® Phone button on
your steering wheel to begin.
ELECTRONICS
39
Page 42 of 116
Making A Phone Call
•Press the Uconnect® Phone button.
•After the BEEP, say “dial” then the number (or “call” then the name as listed in your
phone; see Phonebook).
NOTE:
You can also initiate a call by using the touchscreen on the Phone main screen.
Receiving A Call — Accept (And End)
•When an incoming call rings/is announced on Uconnect®, press the Phone button
.
•To end a call, press the Hang Up or Phone button.
Mute (Or Unmute) Microphone During Call
•During a call, press the “Mute” button on the touchscreen on the Phone main screen
to mute and unmute the call.
Transfer Ongoing Call Between Handset And Vehicle
•During an on-going call, touch the “Transfer” soft-key on the Phone main screen to
transfer an on-going call between handset and vehicle.
Common Phone Commands (Examples)
•“Call John Smith”
•“Call John Smith mobile”
•“Dial 1 248 555 1212”
•“Call Emergency”
•“Call Towing Assistance”
•“Redial”
Phonebook
•Uconnect® radios automatically downloads your phonebook from your paired phone,
if this feature is supported by your phone.Entries are updated each time that the
phone is connected.If your phone book entries do not appear, check the settings on
your phone.Some phones require you to enable this feature manually.
•Your phonebook can be browsed on your radio screen, but editing can only be done
on your phone.To browse, touch the “Phone” soft-key, then the “Phonebook” soft-key.
•Favorite phonebook entries can be saved as Favorites for quicker access.Favorites are
shown at the top of your main phone screen.
ELECTRONICS
40
Page 47 of 116
Uconnect® 6.5N
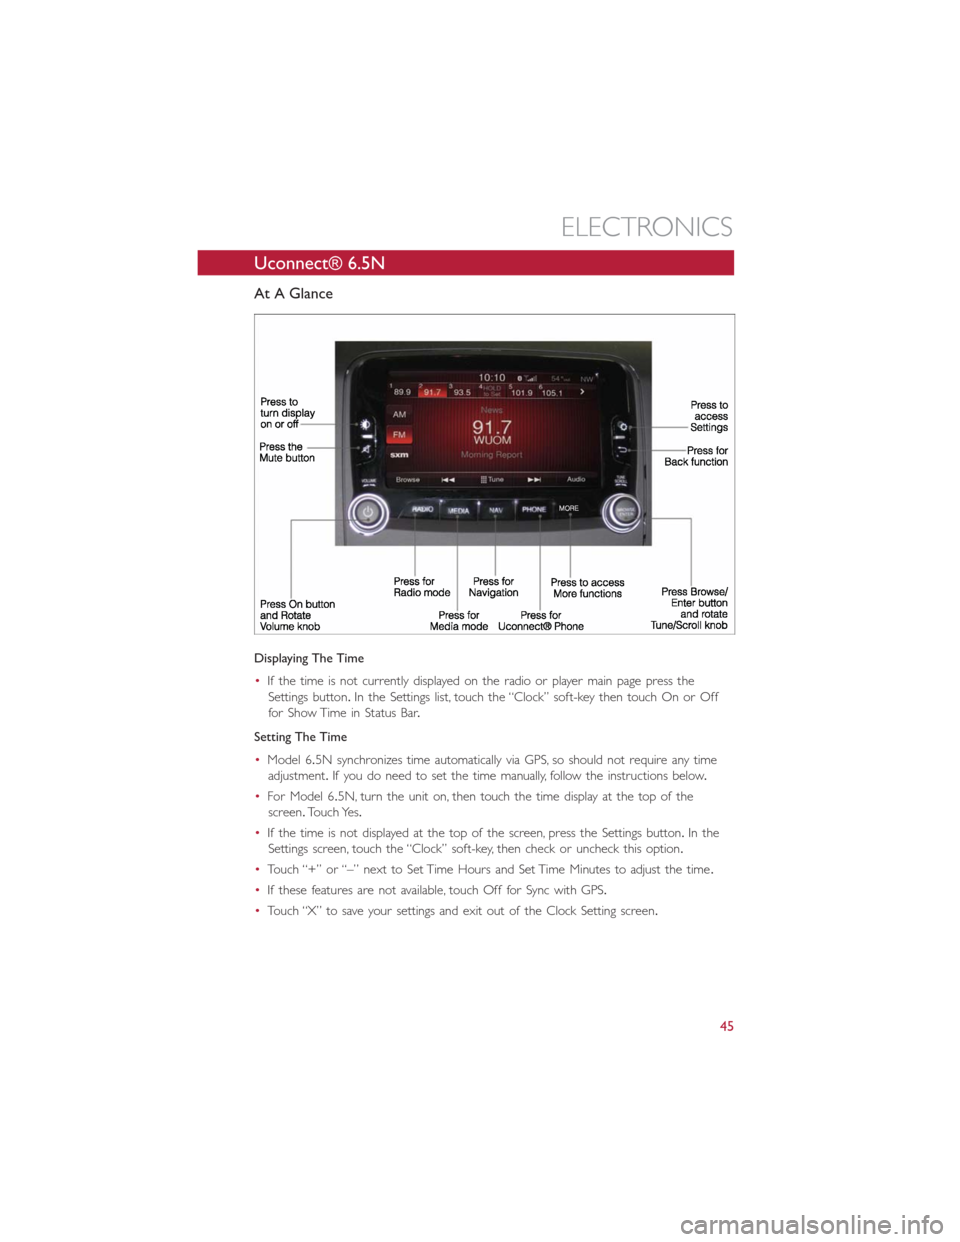
At A Glance
Displaying The Time
•If the time is not currently displayed on the radio or player main page press the
Settings button.In the Settings list, touch the “Clock” soft-key then touch On or Off
for Show Time in Status Bar.
Setting The Time
•Model 6.5N synchronizes time automatically via GPS, so should not require any time
adjustment.If you do need to set the time manually, follow the instructions below.
•For Model 6.5N, turn the unit on, then touch the time display at the top of the
screen.Touch Yes.
•If the time is not displayed at the top of the screen, press the Settings button.In the
Settings screen, touch the “Clock” soft-key, then check or uncheck this option.
•Touch “+” or “–” next to Set Time Hours and Set Time Minutes to adjust the time.
•If these features are not available, touch Off for Sync with GPS.
•Touch “X” to save your settings and exit out of the Clock Setting screen.
ELECTRONICS
45
Page 48 of 116
Audio Settings
•Touch the “Audio” soft-key to activate the Audio settings screen to adjust Balance\Fade,
Equalizer, and Speed Adjusted Volume.
•You can return to the Radio screen by touching the “X” located at the top right.
Balance/Fade
•Touch the “Balance/Fade” soft-key to Balance audio between the front speakers or fade
the audio between the rear and front speakers.
•Touching the “Front,” “Rear,” “Left,” or “Right” soft-keys or touch and drag the Speaker
Icon to adjust the Balance/Fade.
Equalizer
•Touch the “Equalizer” soft-key to activate the Equalizer screen.
•Touch the “+” or “-” soft-keys, or touch and drag over the level bar for each of the
equalizer bands.The level value, which spans between plus or minus 9, is displayed at
the bottom of each of the Bands.
Speed Adjusted Volume — If Equipped
•Touch the “Speed Adjusted Volume” soft-key to activate the Speed Adjusted Volume
screen.The Speed Adjusted Volume is adjusted by touching the “+” and “-” buttons or
by touching and dragging over the level bar.This alters the automatic adjustment of the
audio volume with variation to vehicle speed.
Surround Sound — If Equipped
•Touch the “Surround Sound” soft-key, select On or Off followed by pressing the back
arrow soft-key.When this feature is activated, it provides simulated surround sound
mode.
ELECTRONICS
46
Page 49 of 116
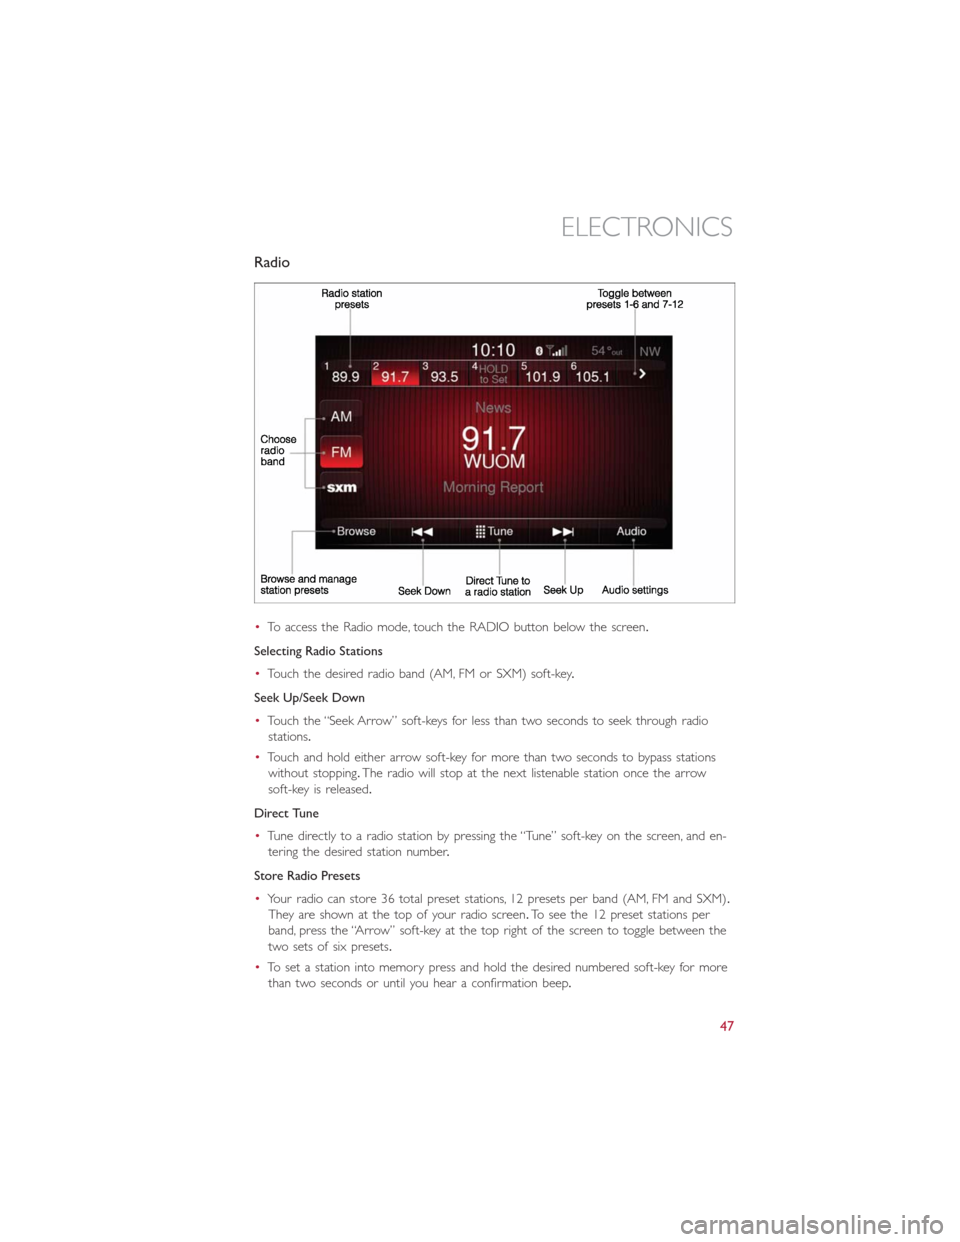
Radio
•To access the Radio mode, touch the RADIO button below the screen.
Selecting Radio Stations
•Touch the desired radio band (AM, FM or SXM) soft-key.
Seek Up/Seek Down
•Touch the “Seek Arrow” soft-keys for less than two seconds to seek through radio
stations.
•Touch and hold either arrow soft-key for more than two seconds to bypass stations
without stopping.The radio will stop at the next listenable station once the arrow
soft-key is released.
Direct Tune
•Tune directly to a radio station by pressing the “Tune” soft-key on the screen, and en-
tering the desired station number.
Store Radio Presets
•Your radio can store 36 total preset stations, 12 presets per band (AM, FM and SXM).
They are shown at the top of your radio screen.To see the 12 preset stations per
band, press the “Arrow” soft-key at the top right of the screen to toggle between the
two sets of six presets.
•To set a station into memory press and hold the desired numbered soft-key for more
than two seconds or until you hear a confirmation beep.
ELECTRONICS
47
Page 50 of 116
SiriusXM Premier Over 160 Channels
Get every channel available on your satellite radio, and enjoy all you want, all in one place.
Hear commercial-free music plus sports, news, talk and entertainment.Get all the pre-
mium programming, including Howard Stern, every NFL game, Oprah Radio®, every
MLB® and NHL® game, every NASCAR® race and more.And get 20+ Xtra channels,
including SiriusXM Latino, a selection of channels dedicated to Spanish language program-
ming.
•To access SiriusXM Satellite Radio, touch the “SXM” soft-key on the main Radio screen.
The following describes features that are available when in SiriusXM Satellite Radio mode.
Seek Up/Seek Down
•Touch the “Seek Arrow” soft-keys for less than two seconds to seek through channels
in SXM mode.
•Touch and hold either arrow soft-key for more than two seconds to bypass channels
without stopping.The radio will stop at the next listenable channel once the arrow
soft-key is released.
Direct Tune
•Tune directly to a SXM channel by pressing the “Tune” soft-key on the screen, and
entering the desired station number.
Traffic & Weather
Automatically tells you when Traffic & Weather for a favorite city is available, and gives
you the option to switch to that channel.
Fav
Activates the favorites menu.You can add up to 50 favorite artists or songs.Just touch
Add Fav Artist or Add Fav Song while the song is playing.You will then be alerted any
time one of these songs, or works by these artists, is playing on other SiriusXM channels.
SiriusXM Parental Controls
•You can skip or hide certain channels from view if you do not want access to them.
Touch the SETTINGS hard-key, touch the “SiriusXM Setup” soft-key, then select Chan-
nel Skip.Touch the box, check-mark, next to the channel you want skipped.They will
not show up in normal usage.
•SiriusXM also offers the option to permanently block selected channels.Call
(1-888-601-6297 for U.S.customers, 1-877-438-9677 for Canadian customers) and
request the Family-Friendly Package.
ELECTRONICS
48
Page 53 of 116
SD Card
•Play songs stored on an SD card inserted into the SD card slot.
•Song playback can be controlled using the radio or Steering Wheel Audio Controls to
play, skip to the next or previous track, browse, and list the contents.
Bluetooth® Streaming Audio
•
If equipped with Uconnect® Voice Command, your Bluetooth®-equipped iPod® devices,
cell phones or other media players, may also be able to stream music to your vehicle's
sound system.Your connected device must be Bluetooth®-compatible, and paired with
your system (see Uconnect® Phone for pairing instructions).You can access the music
from your connected Bluetooth® device by touching the “Bluetooth®” soft-key while in
Media mode.
Uconnect® 6.5N Media Hub (USB,
AUX Ports)Media Hub (SD,
USB, AUX Ports)Remote USB Port
(Fully Functional)
-SS
S = Standard Equipment
O = Optional Equipment
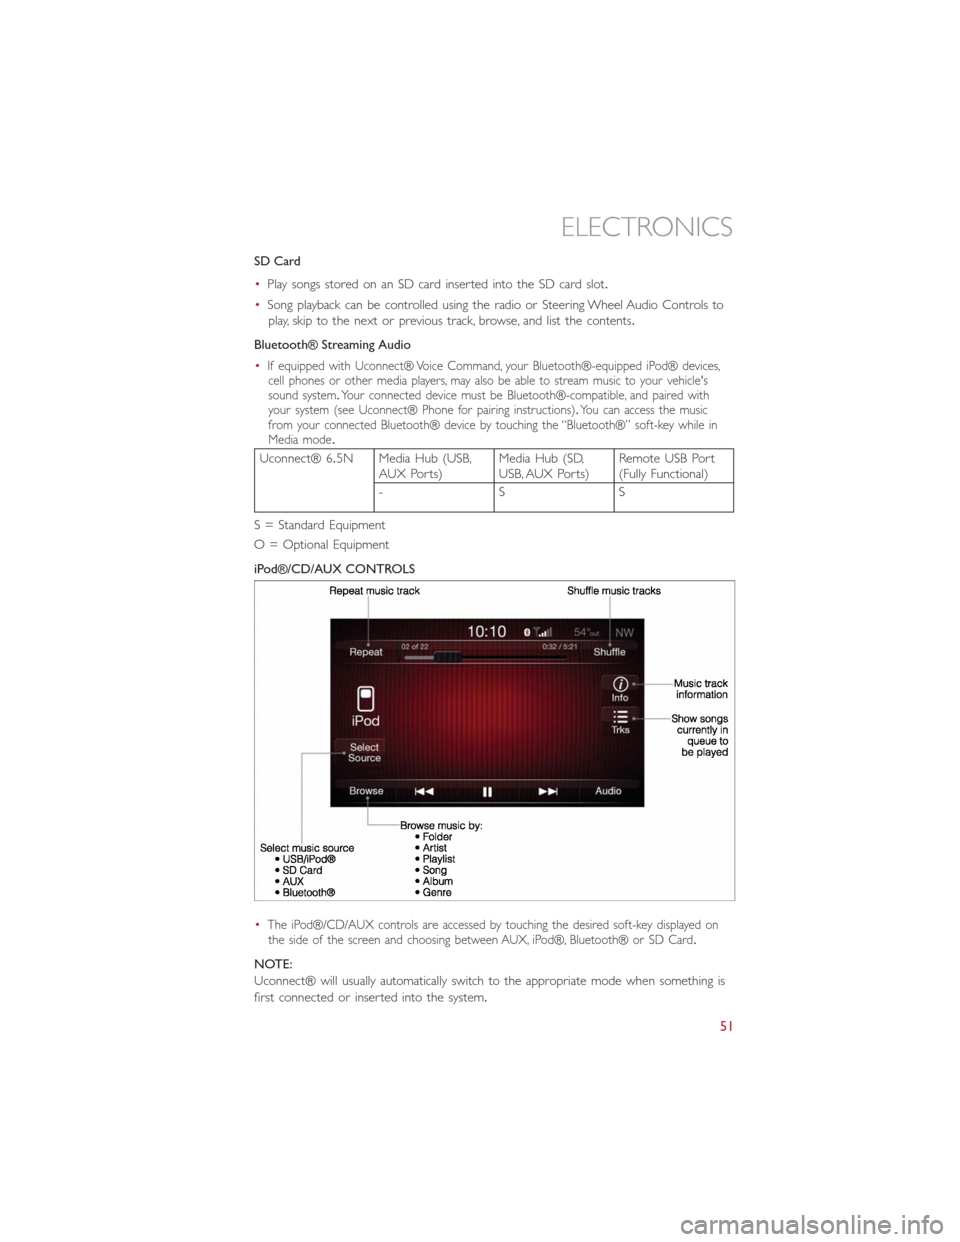
iPod®/CD/AUX CONTROLS
•
The iPod®/CD/AUX controls are accessed by touching the desired soft-key displayed on
the side of the screen and choosing between AUX, iPod®, Bluetooth® or SD Card.
NOTE:
Uconnect® will usually automatically switch to the appropriate mode when something is
first connected or inserted into the system.
ELECTRONICS
51
Page 54 of 116
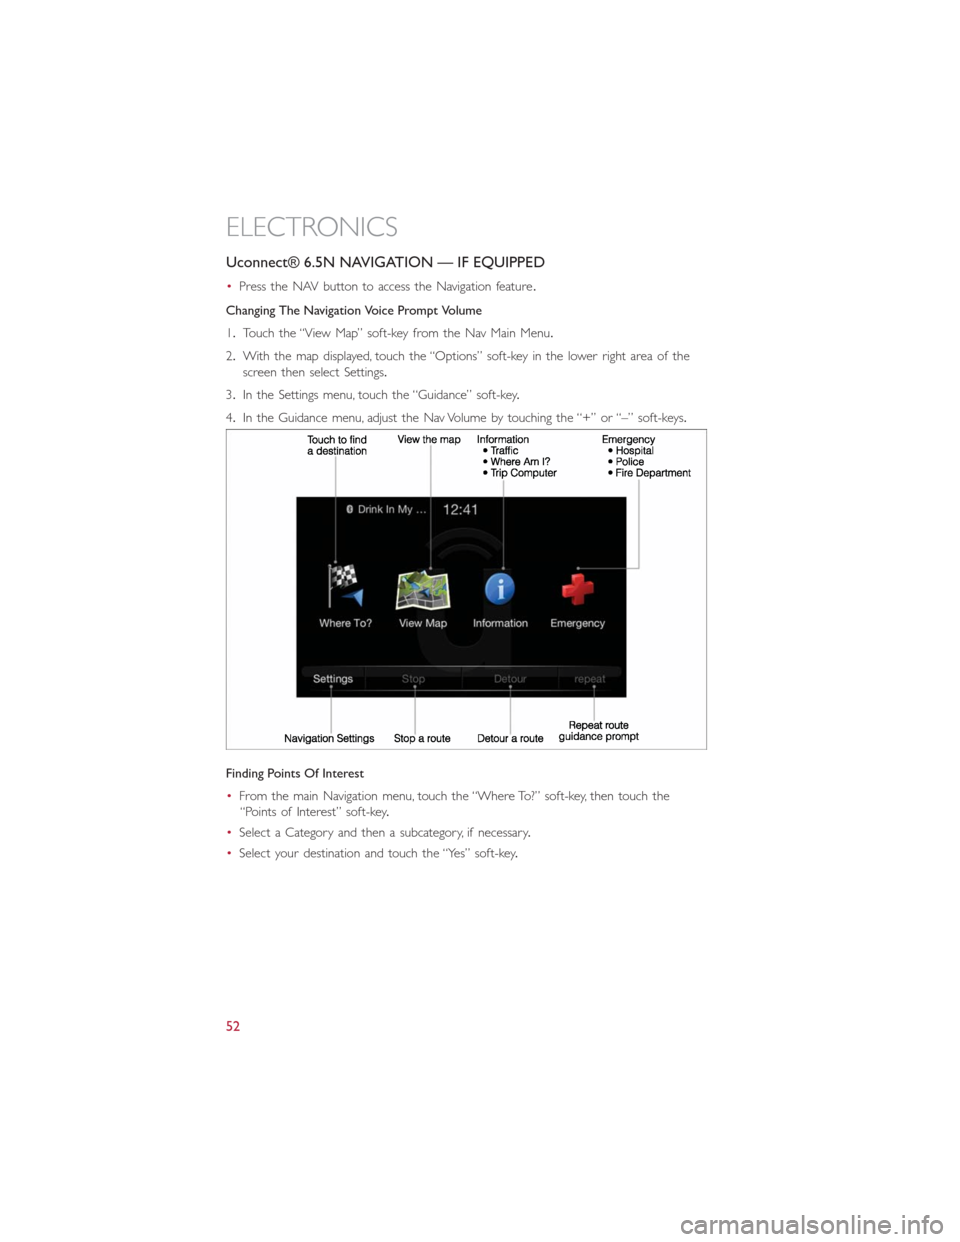
Uconnect® 6.5N NAVIGATION — IF EQUIPPED
•Press the NAV button to access the Navigation feature.
Changing The Navigation Voice Prompt Volume
1.Touch the “View Map” soft-key from the Nav Main Menu.
2.With the map displayed, touch the “Options” soft-key in the lower right area of the
screen then select Settings.
3.In the Settings menu, touch the “Guidance” soft-key.
4.In the Guidance menu, adjust the Nav Volume by touching the “+” or “–” soft-keys.
Finding Points Of Interest
•From the main Navigation menu, touch the “Where To?” soft-key, then touch the
“Points of Interest” soft-key.
•Select a Category and then a subcategory, if necessary.
•Select your destination and touch the “Yes” soft-key.
ELECTRONICS
52
Page 55 of 116
Finding A Place By Spelling The Name
•From the Main Navigation Menu touch the “Where to?” soft-key, touch the “Points of
Interest” soft-key and then touch the “Spell Name” soft-key.
•Enter the name of your destination.
•Touch the “List” soft-key.
•Select your destination and touch the “Yes” soft-key.
Entering A Destination Address
•From the main Navigation menu touch the “Where To?” soft-key, then touch the “Ad-
dress” soft-key.
•Follow the on-screen prompts (country, state/province, city, street) to enter the address
and touch the “Yes” soft-key.
•Destination entry is not available while your vehicle is in motion.However, you can also
use Voice Command to enter an address while moving.See Voice Command Tips for
more information.
Setting Your Home Location
•Press the NAV button to access the Navigation system and the Main Navigation menu.
•Touch the “Where To?” soft-key, then touch the “Go Home” soft-key.
•You may enter your address directly, use your current location as your home address,
or choose from recently found locations.
•To delete your Home location (or other saved locations) so you can save a new Home
location, touch the “Where To?” soft-key from the Main Navigation menu, then touch
the “Go Home” soft-key, and in the Yes screen touch the “Options” soft-key.In the
Options menu touch Clear Home.Set a new Home location by following the previous
instructions.
ELECTRONICS
53