instrument panel FIAT 500L 2015 2.G User Guide
[x] Cancel search | Manufacturer: FIAT, Model Year: 2015, Model line: 500L, Model: FIAT 500L 2015 2.GPages: 148, PDF Size: 3.77 MB
Page 6 of 148
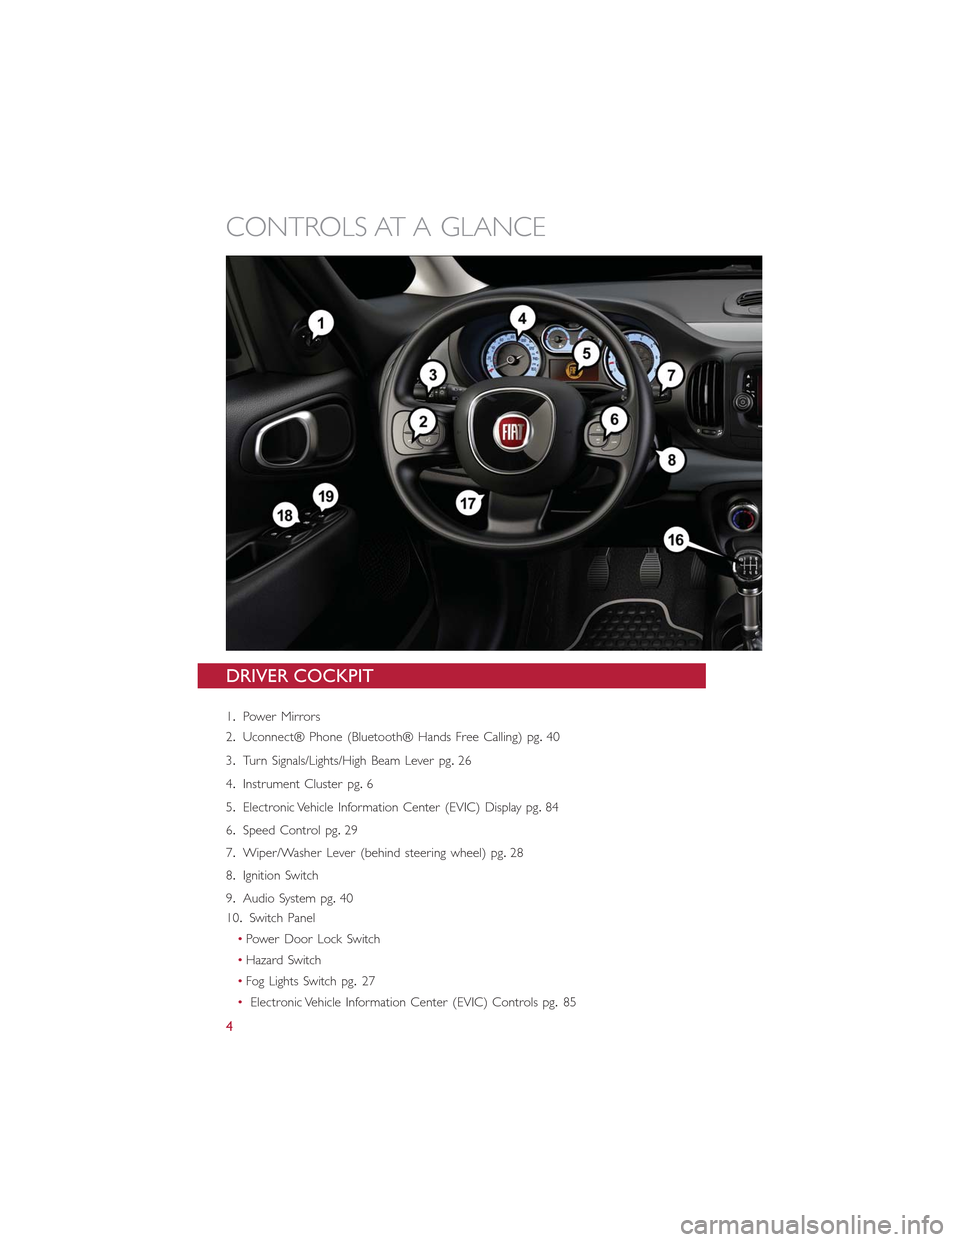
DRIVER COCKPIT
1.Power Mirrors
2.Uconnect® Phone (Bluetooth® Hands Free Calling) pg.40
3.Turn Signals/Lights/High Beam Lever pg.26
4.Instrument Cluster pg.6
5.Electronic Vehicle Information Center (EVIC) Display pg.84
6.Speed Control pg.29
7.Wiper/Washer Lever (behind steering wheel) pg.28
8.Ignition Switch
9.Audio System pg.40
10.Switch Panel
•Power Door Lock Switch
•Hazard Switch
•Fog Lights Switch pg.27
•Electronic Vehicle Information Center (EVIC) Controls pg.85
CONTROLS AT A GLANCE
4
Page 11 of 148
VEHICLE SECURITY ALARM
The Vehicle Security Alarm monitors the vehicle doors for unauthorized entry and the
Keyless Enter-N-Go™ START/STOP button for unauthorized operation.While the Vehicle
Security Alarm is armed, interior switches for door locks and decklid release are disabled.
If something triggers the alarm, the Vehicle Security Alarm will provide the following au-
dible and visible signals: the horn will pulse, the park lamps and/or turn signals will flash,
and the Vehicle Security Light in the instrument cluster will flash.
To Arm The System:
Push the Key Fob LOCK button.
To Disarm The System:
Push the Key Fob UNLOCK button or cycle the ignition to the ON/RUN position.
The Vehicle Security Alarm is designed to protect your vehicle.However, you can create
conditions where the Vehicle Security Alarm will give you a false alarm.If one of the pre-
viously described arming sequences has occurred, the Vehicle Security Alarm will arm re-
gardless of whether you are in the vehicle or not.If you remain in the vehicle and open
a door, the alarm will sound.If this occurs, disarm the Vehicle Security Alarm.
If the Vehicle Security Alarm is armed and the battery becomes disconnected, the Vehicle
Security Alarm will remain armed when the battery is reconnected.The exterior lights
will flash, and the horn will sound.If this occurs, disarm the Vehicle Security Alarm.
POWER DOOR LOCKS
•Push the central LOCK/UNLOCK button located on the instrument panel, in the
switch bank below the radio.The button has an LED that indicates whether the doors
are locked or unlocked.
•LED ON:doors locked.Pushing the central LOCK/UNLOCK button once will unlock
all doors.The LED will switch off once the doors are unlocked.
•LED OFF:doors unlocked.Pushing the central LOCK/UNLOCK button once will lock
all doors.The LED will switch on once the doors are locked.
•Once the doors have been locked with the RKE transmitter, it will no longer be pos-
sible to unlock them by pushing central LOCK/UNLOCK button.
NOTE:
With central locking active (LED ON), opening one of the front doors, it is possible to
perform a central unlocking (LED OFF).With central locking active (LED ON), in order
to open one of the rear passenger doors, it is necessary pulling the internal door handle
twice.With one of the rear door open (LED OFF), the unlocking is performed only for
that door, not for all the vehicle.
•To unlock the front doors, pull the inside door handle to the first detent.If the rear
doors are locked, you must pull the door handle once to unlock the door and pull the
door handle a second time to open the door.
GETTING STARTED
9
Page 14 of 148
SUPPLEMENTAL RESTRAINT SYSTEM (SRS) — AIR BAGS
Air Bag System Components
Your vehicle may be equipped with the following air bag system components:
•Occupant Restraint Controller (ORC)
•Air Bag Warning Light
•Steering Wheel and Column
•Instrument Panel
•Knee Impact Bolsters
•Advanced Front Air Bags
•Supplemental Side Air Bags
•Supplemental Knee Air Bags
•Front and Side Impact Sensors
•Seat Belt Pretentioners
•Seat Belt Buckle Switch
•Seat Track Position Sensors
Advanced Front Air Bags
•This vehicle has Advanced Front Air Bags for both the driver and front passenger as a
supplement to the seat belt restraint systems.The Advanced Front Air Bags will not
deploy in every type of collision.
•Advanced Front Air Bags are designed to provide additional protection by supplement-
ing the seat belts.Advanced Front Air Bags are not expected to reduce the risk of
injury in rear, side, or rollover collisions.
•The Advanced Front Air Bags will not deploy in all frontal collisions, including some that
may produce substantial vehicle damage — for example, some pole collisions, truck
underrides, and angle offset collisions.
•On the other hand, depending on the type and location of impact, Advanced Front Air
Bags may deploy in crashes with little vehicle front-end damage but that produce a
severe initial deceleration.
•Because air bag sensors measure vehicle deceleration over time, vehicle speed and
damage by themselves are not good indicators of whether or not an air bag should
have deployed.
•Seat belts are necessary for your protection in all collisions, and also are needed to
help keep you in position, away from an inflating air bag.
•The air bags must be ready to inflate for your protection in a collision.The Occupant
Restraint Controller (ORC) monitors the internal circuits and interconnecting wiring
associated with air bag system electrical components.
GETTING STARTED
12
Page 15 of 148
•The ORC turns on the Air Bag Warning Light in the instrument panel for approxi-
mately four to eight seconds for a self-check when the ignition switch is first turned to
the ON/RUN position.After the self-check, the Air Bag Warning Light will turn off.If
the ORC detects a malfunction in any part of the system, it turns on the Air Bag
Warning Light, either momentarily or continuously.A single chime will sound to alert
you if the light comes on again after initial startup.
•The ORC monitors the readiness of the electronic parts of the air bag system when-
ever the ignition switch is in the START or ON/RUN position.If the ignition switch is
in the OFF position or in the ACC position, the air bag system is not on and the air
bags will not inflate.
•If the Air Bag Warning Light in the instrument panel is not on during the four to eight
seconds when the ignition switch is first turned to the ON/RUN position, stays on, or
turns on while driving, have the vehicle serviced by an authorized service center imme-
diately.
NOTE:
If the speedometer, tachometer, or any engine related gauges are not working, the Occu-
pant Restraint Controller (ORC) may also be disabled.In this condition the air bags may
not be ready to inflate for your protection.Have an authorized dealer service the air bag
system immediately.
•After any collision, the vehicle should be taken to an authorized dealer immediately.
•Do not drive your vehicle after the air bags have deployed.If you are involved in an-
other collision, the air bags will not be in place to protect you.
•If it is necessary to modify the air bag system for persons with disabilities, contact your
authorized dealer.
•Refer to “Supplemental Restraint System (SRS)” in “Things To Know Before Starting
Your Vehicle” in the Owner's Manual on the DVD for further information.
Supplemental Knee Air Bags
This vehicle is equipped with a Supplemental Driver Knee Air Bag mounted in the instru-
ment panel below the steering column.The Supplemental Driver Knee Air Bag provides
enhanced protection during a frontal impact by working together with the seat belts, pre-
tensioners, and Advanced Front Air Bags.
GETTING STARTED
13
Page 16 of 148
WARNING!
•Relying on the air bags alone could lead to more severe injuries in a collision.The
air bags work with your seat belt to restrain you properly.In some collisions, the
air bags won't deploy at all.Always wear your seat belts even though you have air
bags.
•Being too close to the steering wheel or instrument panel during Advanced Front
Air Bag deployment could cause serious injury, including death.Air bags need
room to inflate.Sit back, comfortably extending your arms to reach the steering
wheel or instrument panel.
•No objects should be placed over or near the air bag on the instrument panel or
steering wheel because any such objects could cause harm if the vehicle is in a
collision severe enough to cause the air bag to inflate.
Supplemental Side Air Bags
•This vehicle is equipped with Supplemental Seat-Mounted Side Air Bags (SABs) located
in the outboard side of the front seats.The SABs are marked with a SRS AIRBAG or
AIRBAG label sewn into the outboard side of the seats.
•This vehicle is equipped with Supplemental Side Air Bag Inflatable Curtains (SABICs)
located above the side windows.The trim covering the SABICs is labeled SRS AIRBAG
or AIRBAG.The SABICs may help reduce the risk of partial or complete ejection of
vehicle occupants through side windows in cer tain side impact events.
•The SABICs and SABs (“Side Air Bags”) are designed to activate in certain side impacts
and certain rollover events (if equipped with rollover sensing).The Occupant Restraint
Controller (“ORC”) determines whether the deployment of the Side Air Bags in a
particular side impact or rollover event (if equipped with rollover sensing) is appropri-
ate, based on the severity and type of collision.Ve h i c l e d a m a g e b y i t s e l f i s n o t a g o o d
indicator of whether or not Side Air Bags should have deployed.
GETTING STARTED
14
Page 29 of 148
High Beams
•Pull the lever rearward to activate the high beams.
•A high beam symbol will illuminate in the cluster to indicate the high beams are on.
NOTE:
For safe driving, turn off the high beams when oncoming traffic is present to prevent
headlight glare and as a courtesy to other motorists.
Flash To Pass
•Pull the lever toward you to activate the high beams.The high beams will remain on
until the lever is released.
Headlight Delay (Follow Me Home)
•Within two minutes of the ignition switch being turned to the OFF/LOCK position or
the ignition key being removed from the ignition, pull the turn signal lever toward the
steering wheel.
•Each movement of the lever toward the steering wheel will increase the illumination
period by 30 seconds, up to a maximum of 210 seconds.
•To deactivate, pull the multifunction lever toward the steering wheel and hold it for
more than two seconds.
NOTE:
Activation of Follow Me Home is only enabled once per key cycle and the steps outlined
above must be repeated each time you want to activate it.
Fog Lights
•Push the fog light button, located on the center stack of the instrument panel just be-
low the radio, once to turn on the fog lights.
•Push the button a second time to turn the fog lights off.
OPERATING YOUR VEHICLE
27
Page 31 of 148
ELECTRONIC SPEED CONTROL
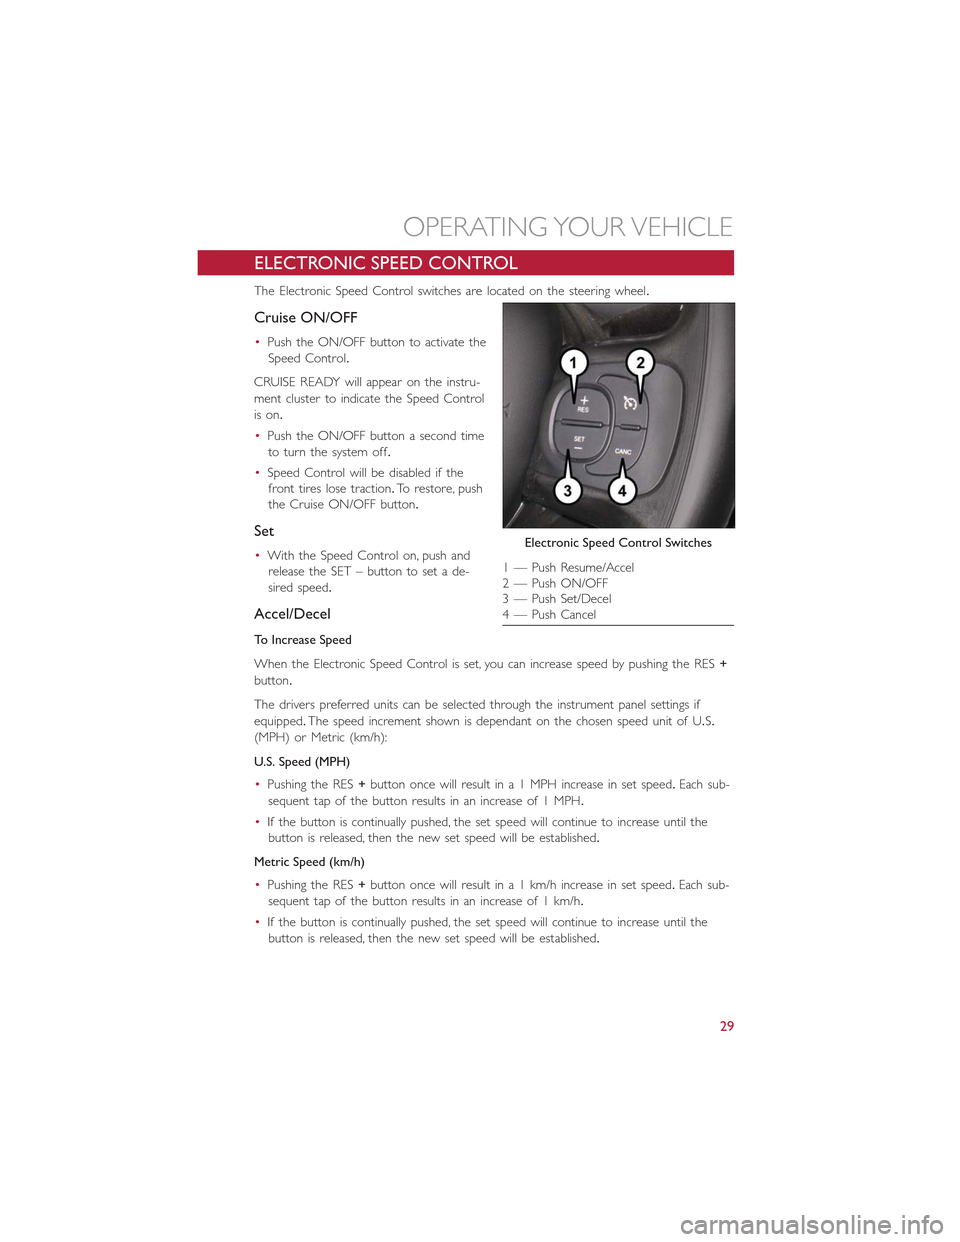
The Electronic Speed Control switches are located on the steering wheel.
Cruise ON/OFF
•Push the ON/OFF button to activate the
Speed Control.
CRUISE READY will appear on the instru-
ment cluster to indicate the Speed Control
is on.
•Push the ON/OFF button a second time
to turn the system off.
•Speed Control will be disabled if the
front tires lose traction.To restore, push
the Cruise ON/OFF button.
Set
•With the Speed Control on, push and
release the SET – button to set a de-
sired speed.
Accel/Decel
To Increase Speed
When the Electronic Speed Control is set, you can increase speed by pushing the RES+
button.
The drivers preferred units can be selected through the instrument panel settings if
equipped.The speed increment shown is dependant on the chosen speed unit of U.S.
(MPH) or Metric (km/h):
U.S. Speed (MPH)
•Pushing the RES+button once will result in a 1 MPH increase in set speed.Each sub-
sequent tap of the button results in an increase of 1 MPH.
•If the button is continually pushed, the set speed will continue to increase until the
button is released, then the new set speed will be established.
Metric Speed (km/h)
•Pushing the RES+button once will result in a 1 km/h increase in set speed.Each sub-
sequent tap of the button results in an increase of 1 km/h.
•If the button is continually pushed, the set speed will continue to increase until the
button is released, then the new set speed will be established.
Electronic Speed Control Switches
1 — Push Resume/Accel2 — Push ON/OFF3 — Push Set/Decel4 — Push Cancel
OPERATING YOUR VEHICLE
29
Page 32 of 148
To Decrease Speed
When the Electronic Speed Control is set, you can decrease speed by pushing the SET-
button.
The drivers preferred units can be selected through the instrument panel settings if
equipped.The speed decrement shown is dependant on the chosen speed unit of U.S.
(MPH) or Metric (km/h):
U.S. Speed (MPH)
•Pushing the SET-button once will result in a 1 MPH decrease in set speed.Each sub-
sequent tap of the button results in a decrease of 1 MPH.
•If the button is continually pushed, the set speed will continue to decrease until the
button is released, then the new set speed will be established.
Metric Speed (km/h)
•Pushing the SET-button once will result in a 1 km/h decrease in set speed.Each sub-
sequent tap of the button results in a decrease of 1 km/h.
•If the button is continually pushed, the set speed will continue to decrease until the
button is released, then the new set speed will be established.
Resume
•To resume a previously selected set speed in memory, push the RES + button and
release.
Cancel
Push the CANCEL button, or apply the brakes to cancel the set speed and maintain the
set speed memory.
Push the ON/OFF button to turn the system off and erase the set speed memory.
WARNING!
•Leaving the Electronic Speed Control system on when not in use is dangerous.You
could accidentally set the system or cause it to go faster than you want.You could
lose control and have a collision.Always leave the Electronic Speed Control system
off when you are not using it.
•Electronic Speed Control can be dangerous where the system cannot maintain a
constant speed.Your vehicle could go too fast for the conditions, and you could
lose control.A collision could be the result.Do not use Electronic Speed Control
in heavy traffic or on roads that are winding, icy, snow-covered or slippery.
OPERATING YOUR VEHICLE
30
Page 35 of 148
Heated Mirrors
•The mirrors are heated to melt frost or ice.This feature is activated whenever you
turn on the rear window defroster.
REAR PARK ASSIST
If an object is detected behind the rear bumper while the vehicle is in REVERSE, a visual
warning will display in the instrument cluster and an audible tone will sound.The audible
tone rate will change depending on the distance of the object, getting faster as the object
gets closer to the bumper.The audible tone will become continuous when the distance
between the vehicle and the obstacle is less than 12 inches (30 cm).
POWER SUNROOF
The sunroof has two glass panels (the front one is operational and the rear one fixed)
and is equipped with an electrically operated sun blind.
The power sunroof and the power sun blind can be operated only with the ignition key
turned to the ON/RUN position.
The power sunroof and power sun blind switches are located in the overhead console.
WARNING!
•Never leave children alone in a vehicle, or with access to an unlocked vehicle.
Never leave the Key Fob in or near the vehicle or in a location accessible to chil-
dren.Occupants, particularly unattended children, can become entrapped by the
power sunroof while operating the power sunroof switch.Such entrapment may
result in serious injury or death.
•In a collision, there is greater risk of being thrown from a vehicle with an open
sunroof.You could also be seriously injured or killed.Always fasten your seat belt
properly and make sure all passengers are properly secured too.
•Do not allow small children to operate the sunroof.Never allow your fingers,
other body parts, or any object to project through the sunroof opening.Injury
may result.
To Open
•Pull the power sunroof switch for approximately one second and the sunroof will stop
at the vented position.Pull the power sunroof switch a second time for approximately
one second and release, the sunroof will open fully, then stop automatically.This is
called “Express Open”.
NOTE:
During Express Open operation, any movement of the sunroof switch will stop the sun-
roof.
OPERATING YOUR VEHICLE
33
Page 49 of 148
USB/Audio Jack (AUX)/Bluetooth® Operation
USB/iPod®
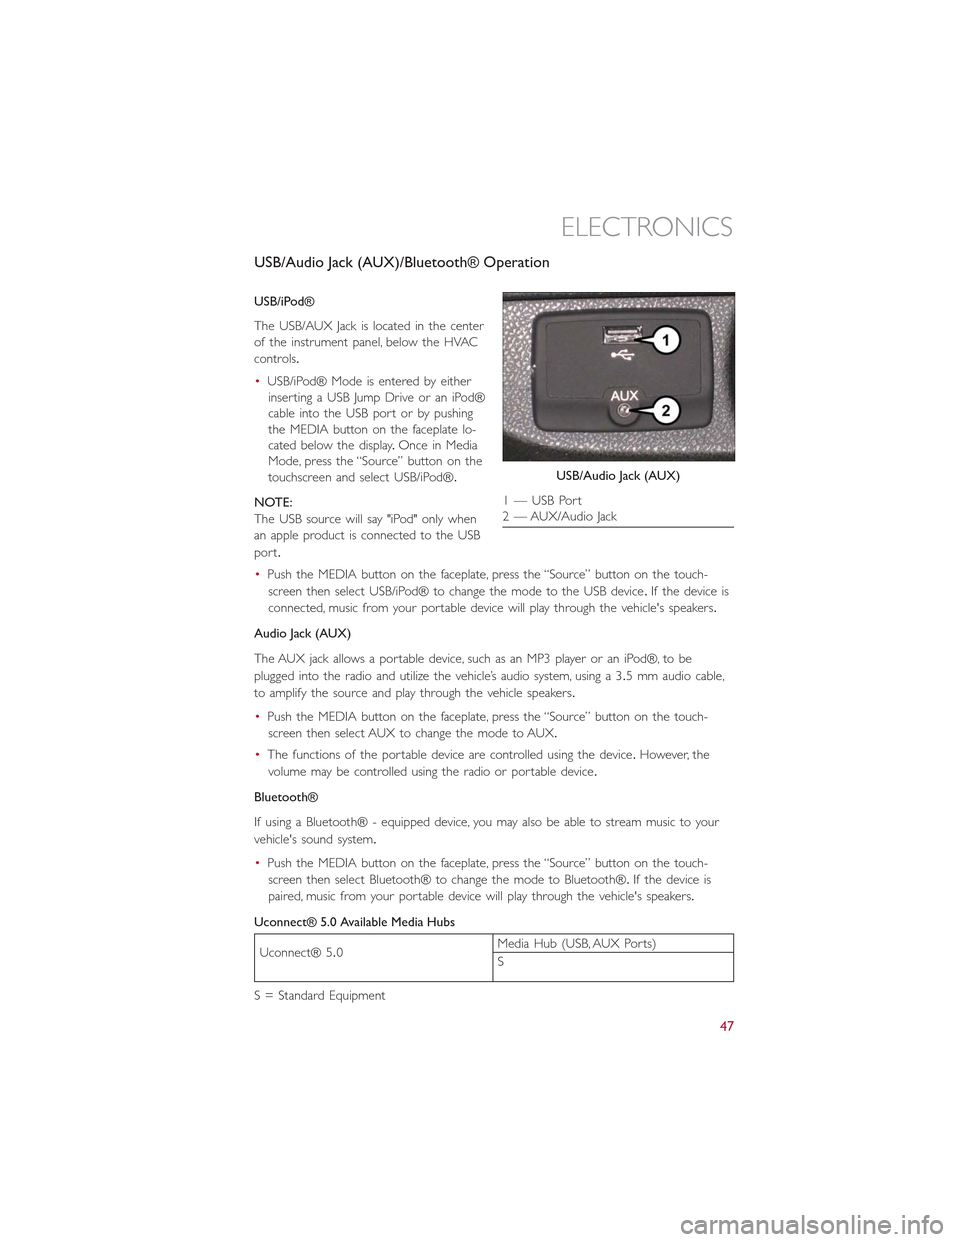
The USB/AUX Jack is located in the center
of the instrument panel, below the HVAC
controls.
•USB/iPod® Mode is entered by either
inserting a USB Jump Drive or an iPod®
cable into the USB port or by pushing
the MEDIA button on the faceplate lo-
cated below the display.Once in Media
Mode, press the “Source” button on the
touchscreen and select USB/iPod®.
NOTE:
The USB source will say "iPod" only when
an apple product is connected to the USB
port.
•Push the MEDIA button on the faceplate, press the “Source” button on the touch-
screen then select USB/iPod® to change the mode to the USB device.If the device is
connected, music from your portable device will play through the vehicle's speakers.
Audio Jack (AUX)
The AUX jack allows a portable device, such as an MP3 player or an iPod®, to be
plugged into the radio and utilize the vehicle’s audio system, using a 3.5 mm audio cable,
to amplify the source and play through the vehicle speakers.
•Push the MEDIA button on the faceplate, press the “Source” button on the touch-
screen then select AUX to change the mode to AUX.
•The functions of the portable device are controlled using the device.However, the
volume may be controlled using the radio or portable device.
Bluetooth®
If using a Bluetooth® - equipped device, you may also be able to stream music to your
vehicle's sound system.
•Push the MEDIA button on the faceplate, press the “Source” button on the touch-
screen then select Bluetooth® to change the mode to Bluetooth®.If the device is
paired, music from your portable device will play through the vehicle's speakers.
Uconnect® 5.0 Available Media Hubs
Uconnect® 5.0Media Hub (USB, AUX Ports)
S
S = Standard Equipment
USB/Audio Jack (AUX)
1 — USB Port2 — AUX/Audio Jack
ELECTRONICS
47