service FIAT 500L 2015 2.G Owner's Manual
[x] Cancel search | Manufacturer: FIAT, Model Year: 2015, Model line: 500L, Model: FIAT 500L 2015 2.GPages: 148, PDF Size: 3.77 MB
Page 111 of 148
5.Uncoil the Power Plug (8) and insert the plug into the vehicle’s 12 Volt power outlet.
6.Do not remove foreign objects (e.g., screws or nails) from the tire.
(C) Injecting Tire Service Kit Sealant Into The Deflated Tire:
Always start the engine before turning ON the Tire Service Kit.
NOTE:
Manual transmission vehicles must have the parking brake engaged and the shift lever in
NEUTRAL.
After pushing the Power Button (4), the sealant (white fluid) will flow from the Sealant
Bottle (1) through the Sealant Hose (6) and into the tire.
NOTE:
Sealant may leak out through the puncture in the tire.
If the sealant (white fluid) does not flow within 0 – 10seconds through the Sealant Hose
(6):
1.Push the Power Button (4) to turn Off the Tire Service Kit.Disconnect the Sealant
Hose (6) from the valve stem.Make sure the valve stem is free of debris.Reconnect
the Sealant Hose (6) to the valve stem.Check that the Mode Select Knob (5) is in
the Sealant Mode position and not Air Mode.Push the Power Button (4) to turn On
the Tire Service Kit.
2.Connect the Power Plug (8) to a different 12 Volt power outlet in your vehicle or
another vehicle, if available.Make sure the engine is running before turning ON the
Tire Service Kit.
3.The Sealant Bottle (1) may be empty due to previous use.Call for assistance.
NOTE:
If the Mode Select Knob (5) is on Air Mode and the pump is operating, air will dispense
from the Air Pump Hose (7) only, not the Sealant Hose (6).
If the sealant (white fluid) does flow through the Sealant Hose (6):
1.Continue to operate the pump until sealant is no longer flowing through the hose
(typically takes 30 - 70 seconds).As the sealant flows through the Sealant Hose (6),
the Pressure Gauge (3) can read as high as 70 psi (4.8 Bar).The Pressure Gauge (3)
will decrease quickly from approximately 70 psi (4.8 Bar) to the actual tire pressure
when the Sealant Bottle (1) is empty.
2.The pump will start to inject air into the tire immediately after the Sealant Bottle (1)
is empty.Continue to operate the pump and inflate the tire to the pressure indicated
on the tire pressure label on the driver-side latch pillar (recommended pressure).
Check the tire pressure by looking at the Pressure Gauge (3).
WHAT TO DO IN EMERGENCIES
109
Page 112 of 148
If the tire does not inflate to at least 26 psi (1.8 Bar) pressure within 15 minutes:
The tire is too badly damaged.Do not attempt to drive the vehicle further.Call for assis-
tance.
NOTE:
If the tire becomes over-inflated, push the Deflation Button to reduce the tire pressure
to the recommended inflation pressure before continuing.
If the tire inflates to the recommended pressure or is at least 26 psi (1.8 Bar) pressure
within 15 minutes:
1.Push the Power Button (4) to turn off the Tire Service Kit.
2.Remove the Speed Limit sticker from the top of the Sealant Bottle (1) and place the
sticker on the instrument panel.
3.Immediately disconnect the Sealant Hose (6) from the valve stem, reinstall the cap on
the fitting at the end of the hose, and place the Tire Service Kit in the vehicle storage
location.Quickly proceed to (D) “Drive Vehicle.”
(D) Drive Vehicle:
Immediately after injecting sealant and inflating the tire, drive the vehicle 5 miles (8 km)
or 10 minutes to ensure distribution of the Tire Service Kit Sealant within the tire.Do
not exceed 55 mph (88 km/h).
(E) After Driving:
Pull over to a safe location.Refer to “Whenever You Stop to Use Tire Service Kit” before
continuing.
1.Turn the Mode Select Knob (5) to the Air Mode position.
2.Uncoil the Air Pump Hose (7) (black in color) and screw the fitting at the end of
hose (7) onto the valve stem.
3.Uncoil the power plug and insert the plug into the vehicles 12 Volt power outlet.
4.Check the pressure in the tire by reading the Pressure Gauge (3).
If tire pressure is less than 19 psi (1.3 Bar), the tire is too badly damaged. Do not at-
tempt to drive the vehicle further. Call for assistance.
If the tire pressure is 19 psi (1.3 Bar) or higher:
1.Push the Power Button (4) to turn on Tire Service Kit and inflate the tire to the pres-
sure indicated on the tire and loading information label on the driver-side door open-
ing.
2.Disconnect the Tire Service Kit from the valve stem, reinstall the cap on the valve
stem and unplug from 12 Volt outlet.
3.Place the Tire Service Kit in its proper storage area in the vehicle.
4.Have the tire inspected and repaired or replaced at the earliest opportunity at an
authorized dealer or tire service center.
WHAT TO DO IN EMERGENCIES
110
Page 113 of 148
5.Remove the Speed Limit sticker from the instrument panel after the tire has been
repaired.
6.Replace the Sealant Bottle (1) and Sealant Hose (6) assembly at your authorized
dealer as soon as possible.Refer to “(F) Sealant Bottle and Hose Replacement.”
NOTE:
•If the tire becomes over-inflated, push the Deflation Button to reduce the tire pressure
to the recommended inflation pressure before continuing.
•When having the tire serviced, advise the authorized dealer or service center that the
tire has been sealed using the Tire Service Kit.
(F) Sealant Bottle And Hose Replacement:
1.Uncoil the Sealant Hose (6) (clear in color).
2.Locate the round Sealant Bottle release button in the recessed area under the sealant
bottle.
3.Push the Sealant Bottle release button.The Sealant Bottle (1) will pop up.Remove the
bottle and dispose of it accordingly.
4.Clean any remaining sealant from the Tire Service Kit housing.
5.Position the new Sealant Bottle (1) in the housing so that the Sealant Hose (6) aligns
with the hose slot in the front of the housing.Push the bottle into the housing.An
audible click will be heard indicating the bottle is locked into place.
6.Verify that the cap is installed on the fitting at the end of the Sealant Hose (6) and
return the hose to its storage area (located on the bottom of the air pump).
7.Return the Tire Service Kit to its storage location in the vehicle.
NOTE:
•The metal end fitting from Power Plug (8) may get hot after use, so it should be
handled carefully.
•Failure to reinstall the cap on the fitting at the end of the Sealant Hose (6) can result
in sealant contacting your skin, clothing, and the vehicle’s interior.It can also result in
sealant contacting internal Tire Service Kit components which may cause permanent
damage to the kit.
WHAT TO DO IN EMERGENCIES
111
Page 114 of 148
WARNING!
•Do not attempt to seal a tire on the side of the vehicle closest to traffic.Pull far
enough off the road to avoid the danger of being hit when using the Tire Service
Kit.
•Do not use the Tire Service Kit or drive the vehicle under the following circum-
stances:
•If the puncture in the tire tread is approximately 1/4”.(6 mm) or larger.
•If the tire has any sidewall damage.
•If the tire has any damage from driving with extremely low tire pressure.
•If the tire has any damage from driving on a flat tire.
•If the wheel has any damage.
•If you are unsure of the condition of the tire or the wheel.
•Keep the Tire Service Kit away from open flames or heat source.
•A loose Tire Service Kit thrown forward in a collision or hard stop could endanger
the occupants of the vehicle.Always stow the Tire Service Kit in the place pro-
vided.Failure to follow these warnings can result in injuries that are serious or
fatal to you, your passengers, and others around you.
•Take care not to allow the contents of the Tire Service Kit to come in contact
with hair, eyes, or clothing.The Tire Service Kit is harmful if inhaled, swallowed, or
absorbed through the skin.It causes skin, eye, and respiratory irritation.Flush im-
mediately with plenty of water if there is any contact with eyes or skin.Change
clothing as soon as possible, if there is any contact with clothing.
•The Tire Service Kit Sealant solution contains latex.In case of an allergic reaction
or rash, consult a physician immediately.Keep the Tire Service Kit out of reach of
children.If swallowed, rinse mouth immediately with plenty of water and drink
plenty of water.Do not induce vomiting! Consult a physician immediately.
•The Tire Service Kit is not a permanent flat tire repair.Have the tire inspected
and repaired or replaced after using the Tire Service Kit.Do not exceed 55 mph
(88 km/h) until the tire is repaired or replaced.Failure to follow this warning can
result in injuries that are serious or fatal to you, your passengers, and others
around you.
WHAT TO DO IN EMERGENCIES
112
Page 118 of 148
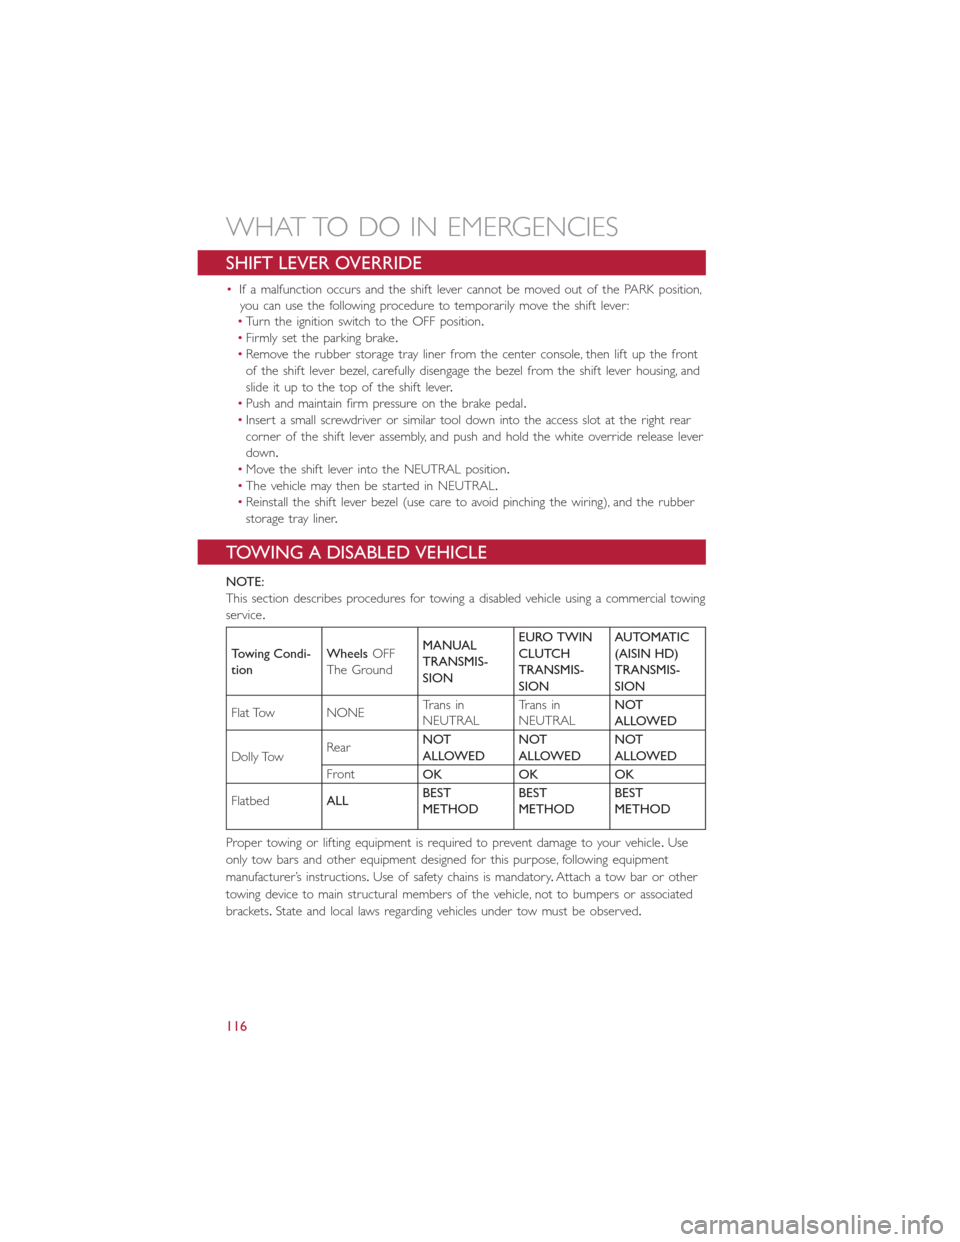
SHIFT LEVER OVERRIDE
•If a malfunction occurs and the shift lever cannot be moved out of the PARK position,
you can use the following procedure to temporarily move the shift lever:
•Turn the ignition switch to the OFF position.
•Firmly set the parking brake.
•Remove the rubber storage tray liner from the center console, then lift up the front
of the shift lever bezel, carefully disengage the bezel from the shift lever housing, and
slide it up to the top of the shift lever.
•Push and maintain firm pressure on the brake pedal.
•Insert a small screwdriver or similar tool down into the access slot at the right rear
corner of the shift lever assembly, and push and hold the white override release lever
down.
•Move the shift lever into the NEUTRAL position.
•The vehicle may then be started in NEUTRAL.
•Reinstall the shift lever bezel (use care to avoid pinching the wiring), and the rubber
storage tray liner.
TOWING A DISABLED VEHICLE
NOTE:
This section describes procedures for towing a disabled vehicle using a commercial towing
service.
Towing Condi-
tion
WheelsOFF
The Ground
MANUAL
TRANSMIS-
SION
EURO TWIN
CLUTCH
TRANSMIS-
SION
AUTOMATIC
(AISIN HD)
TRANSMIS-
SION
Flat Tow NONETrans inNEUTRALTrans inNEUTRAL
NOT
ALLOWED
Dolly TowRearNOT
ALLOWED
NOT
ALLOWED
NOT
ALLOWED
FrontOK OK OK
FlatbedALLBEST
METHOD
BEST
METHOD
BEST
METHOD
Proper towing or lifting equipment is required to prevent damage to your vehicle.Use
only tow bars and other equipment designed for this purpose, following equipment
manufacturer’s instructions.Use of safety chains is mandatory.Attach a tow bar or other
towing device to main structural members of the vehicle, not to bumpers or associated
brackets.State and local laws regarding vehicles under tow must be observed.
WHAT TO DO IN EMERGENCIES
116
Page 128 of 148
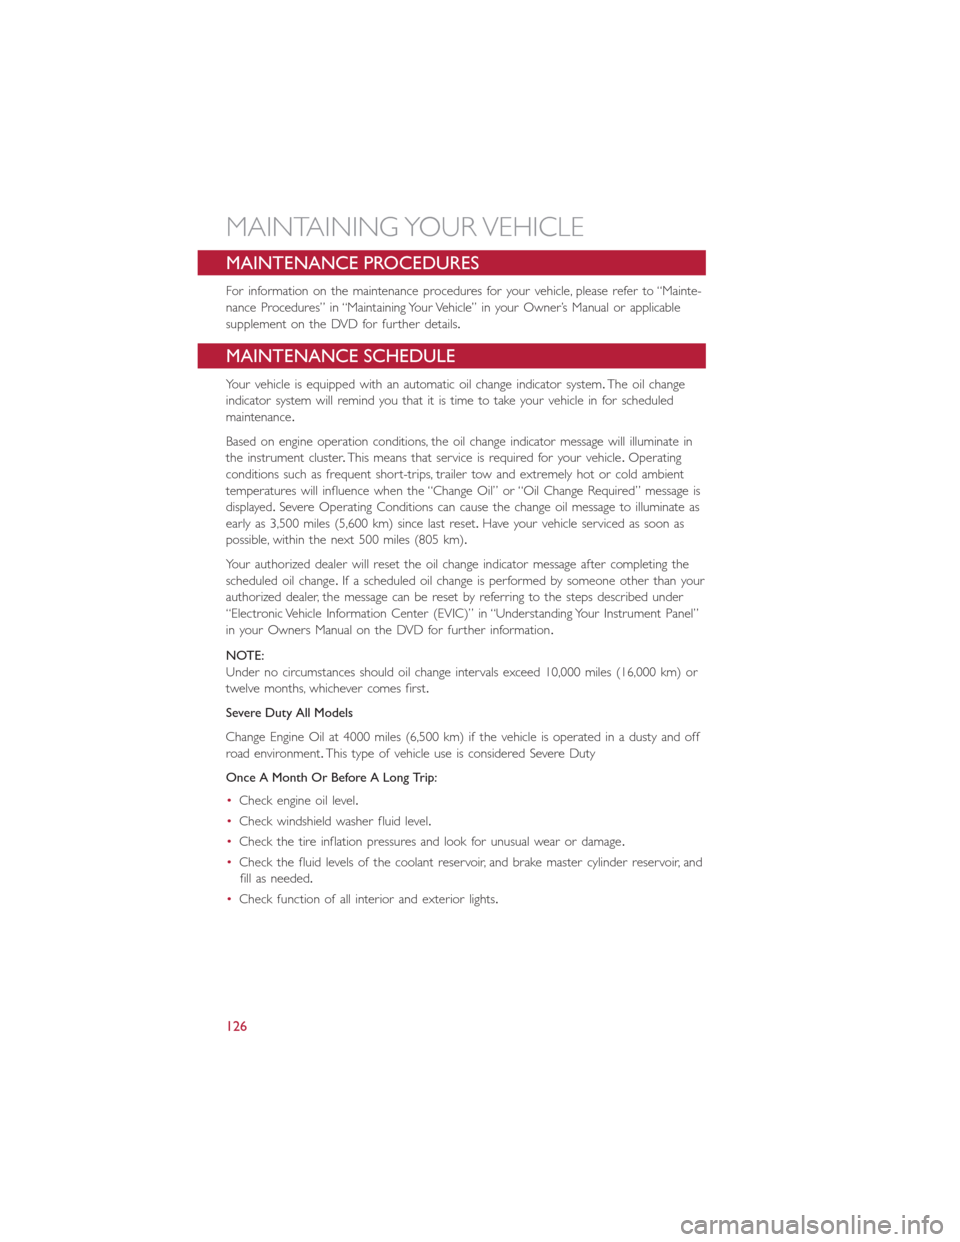
MAINTENANCE PROCEDURES
For information on the maintenance procedures for your vehicle, please refer to “Mainte-
nance Procedures” in “Maintaining Your Vehicle” in your Owner’s Manual or applicable
supplement on the DVD for further details.
MAINTENANCE SCHEDULE
Your vehicle is equipped with an automatic oil change indicator system.The oil change
indicator system will remind you that it is time to take your vehicle in for scheduled
maintenance.
Based on engine operation conditions, the oil change indicator message will illuminate in
the instrument cluster.This means that service is required for your vehicle.Operating
conditions such as frequent short-trips, trailer tow and extremely hot or cold ambient
temperatures will influence when the “Change Oil” or “Oil Change Required” message is
displayed.Severe Operating Conditions can cause the change oil message to illuminate as
early as 3,500 miles (5,600 km) since last reset.Have your vehicle serviced as soon as
possible, within the next 500 miles (805 km).
Your authorized dealer will reset the oil change indicator message after completing the
scheduled oil change.If a scheduled oil change is performed by someone other than your
authorized dealer, the message can be reset by referring to the steps described under
“Electronic Vehicle Information Center (EVIC)” in “Understanding Your Instrument Panel”
in your Owners Manual on the DVD for further information.
NOTE:
Under no circumstances should oil change intervals exceed 10,000 miles (16,000 km) or
twelve months, whichever comes first.
Severe Duty All Models
Change Engine Oil at 4000 miles (6,500 km) if the vehicle is operated in a dusty and off
road environment.This type of vehicle use is considered Severe Duty
Once A Month Or Before A Long Trip:
•Check engine oil level.
•Check windshield washer fluid level.
•Check the tire inflation pressures and look for unusual wear or damage.
•Check the fluid levels of the coolant reservoir, and brake master cylinder reservoir, and
fill as needed.
•Check function of all interior and exterior lights.
MAINTAINING YOUR VEHICLE
126
Page 130 of 148
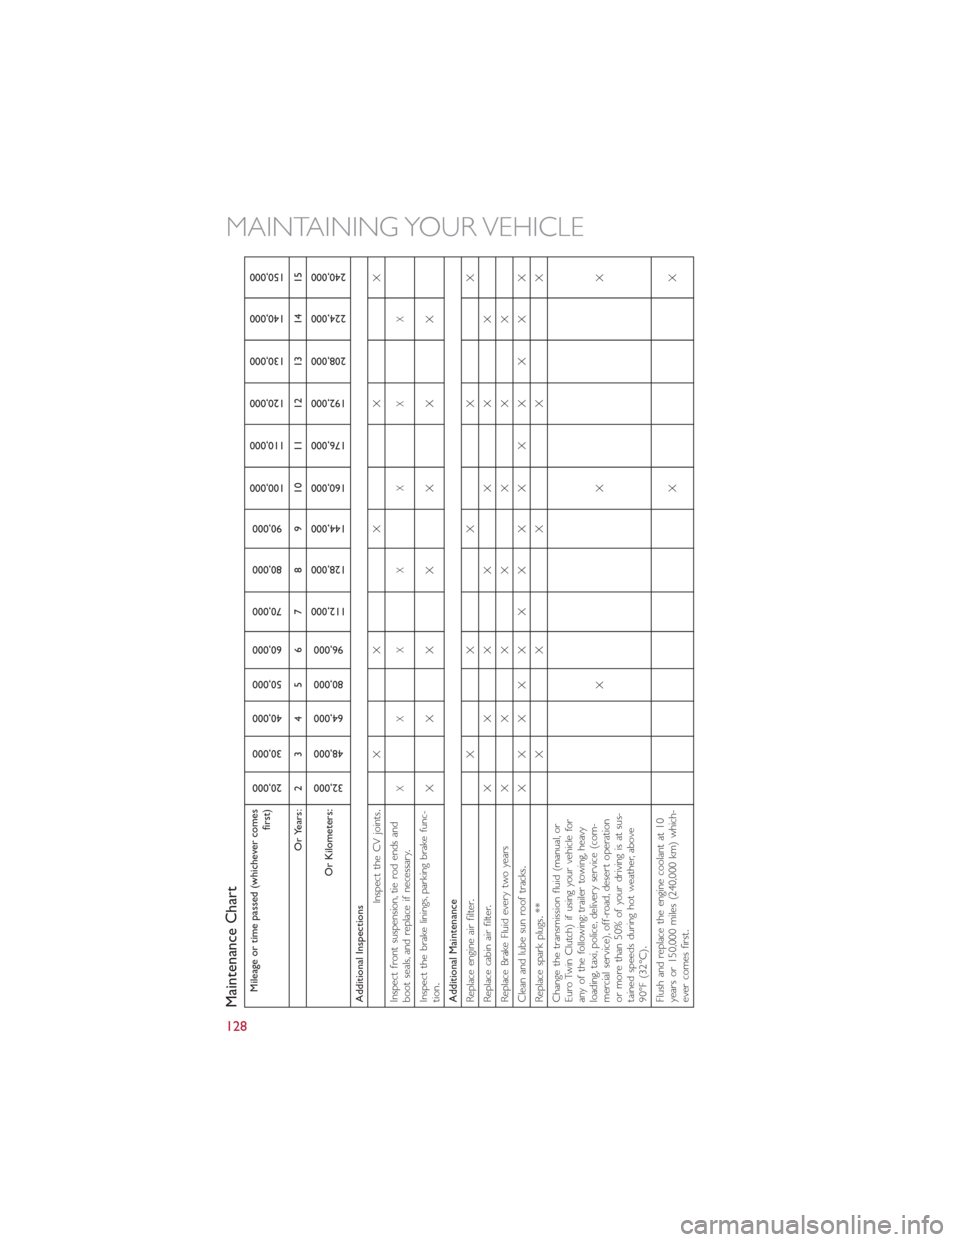
Maintenance ChartMileage or time passed (whichever comes
first)
20,000
30,000
40,000
50,000
60,000
70,000
80,000
90,000
100,000
110,000
120,000
130,000
140,000
150,000
Or Years: 2 3 4 5 6 7 8 9 10 11 12 13 14 15
Or Kilometers:
32,000
48,000
64,000
80,000
96,000
112,000
128,000
144,000
160,000
176,000
192,000
208,000
224,000
240,000
Additional Inspections
Inspect the CV joints
.
XX X X X
Inspect front suspension, tie rod ends andboot seals, and replace if necessary
.
XXX X X X X
Inspect the brake linings, parking brake func-tion
.
XXX X X X X
Additional MaintenanceReplace engine air filter
.
XX X X X
Replace cabin air filter
.
XXX X X X X
Replace Brake Fluid every two years X X X X X X XClean and lube sun roof tracks
.
XX XX X X X X X X X X X X
Replace spark plugs
.** X X X X X
Change the transmission fluid (manual, orEuro Twin Clutch) if using your vehicle forany of the following: trailer towing, heavyloading, taxi, police, delivery service (com-mercial service), off-road, desert operationor more than 50% of your driving is at sus-tained speeds during hot weather, above90°F (32°C)
.
XX X
Flush and replace the engine coolant at 10years or 150,000 miles (240,000 km) which-ever comes first
.
XX
MAINTAINING YOUR VEHICLE
128
Page 131 of 148
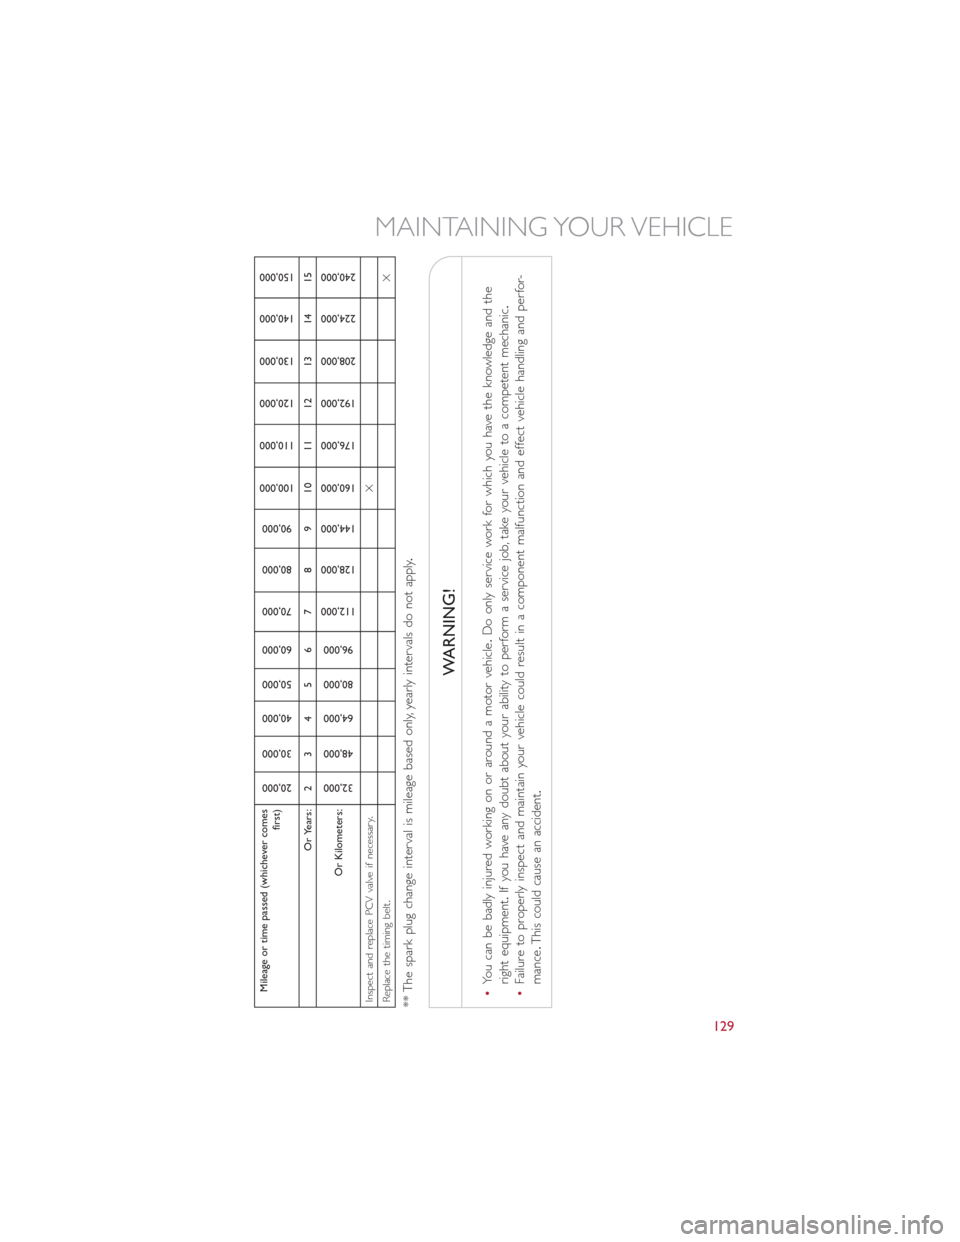
Mileage or time passed (whichever comes
first)
20,000
30,000
40,000
50,000
60,000
70,000
80,000
90,000
100,000
110,000
120,000
130,000
140,000
150,000
Or Years: 2 3 4 5 6 7 8 9 10 11 12 13 14 15
Or Kilometers:
32,000
48,000
64,000
80,000
96,000
112,000
128,000
144,000
160,000
176,000
192,000
208,000
224,000
240,000
Inspect and replace PCV valve if necessary
.
X
Replace the timing belt
.
X
** The spark plug change interval is mileage based only, yearly intervals do not apply
.
WARNING!
•You can be badly injured working on or around a motor vehicle
.Do only service work for which you have the knowledge and the
right equipment
.If you have any doubt about your ability to perform a service job, take your vehicle to a competent mechanic
.
•Failure to properly inspect and maintain your vehicle could result in a component malfunction and effect vehicle handling and perfor-mance
.This could cause an accident
.
MAINTAINING YOUR VEHICLE
129
Page 136 of 148
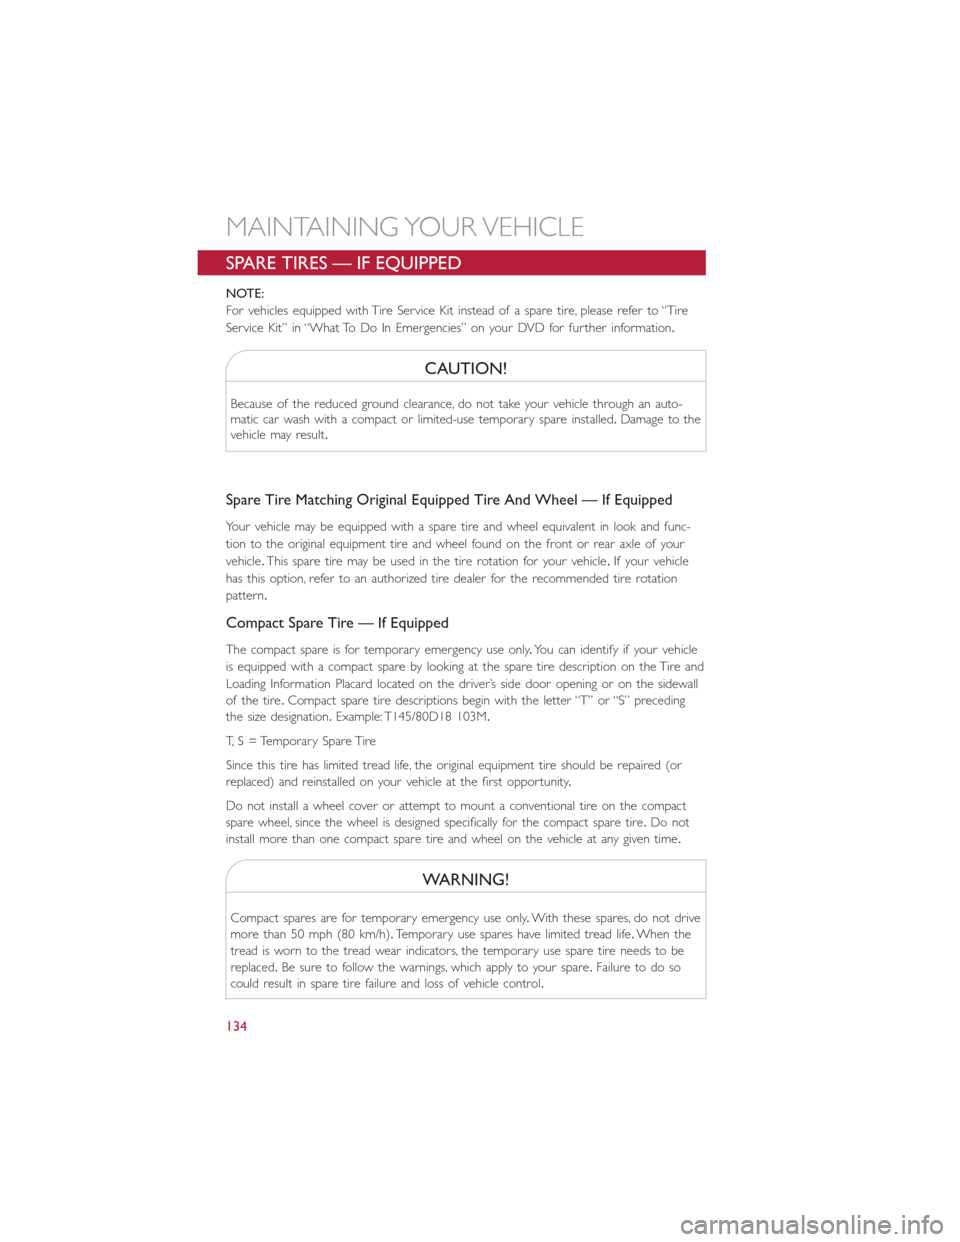
SPARE TIRES — IF EQUIPPED
NOTE:
For vehicles equipped with Tire Service Kit instead of a spare tire, please refer to “Tire
Service Kit” in “What To Do In Emergencies” on your DVD for further information.
CAUTION!
Because of the reduced ground clearance, do not take your vehicle through an auto-matic car wash with a compact or limited-use temporary spare installed.Damage to thevehicle may result.
Spare Tire Matching Original Equipped Tire And Wheel — If Equipped
Your vehicle may be equipped with a spare tire and wheel equivalent in look and func-
tion to the original equipment tire and wheel found on the front or rear axle of your
vehicle.This spare tire may be used in the tire rotation for your vehicle.If your vehicle
has this option, refer to an authorized tire dealer for the recommended tire rotation
pattern.
Compact Spare Tire — If Equipped
The compact spare is for temporary emergency use only.You can identify if your vehicle
is equipped with a compact spare by looking at the spare tire description on the Tire and
Loading Information Placard located on the driver’s side door opening or on the sidewall
of the tire.Compact spare tire descriptions begin with the letter “T” or “S” preceding
the size designation.Example: T145/80D18 103M.
T, S = Temporary Spare Tire
Since this tire has limited tread life, the original equipment tire should be repaired (or
replaced) and reinstalled on your vehicle at the first opportunity.
Do not install a wheel cover or attempt to mount a conventional tire on the compact
spare wheel, since the wheel is designed specifically for the compact spare tire.Do not
install more than one compact spare tire and wheel on the vehicle at any given time.
WARNING!
Compact spares are for temporary emergency use only.With these spares, do not drive
more than 50 mph (80 km/h).Temporary use spares have limited tread life.When the
tread is worn to the tread wear indicators, the temporary use spare tire needs to be
replaced.Be sure to follow the warnings, which apply to your spare.Failure to do so
could result in spare tire failure and loss of vehicle control.
MAINTAINING YOUR VEHICLE
134
Page 138 of 148
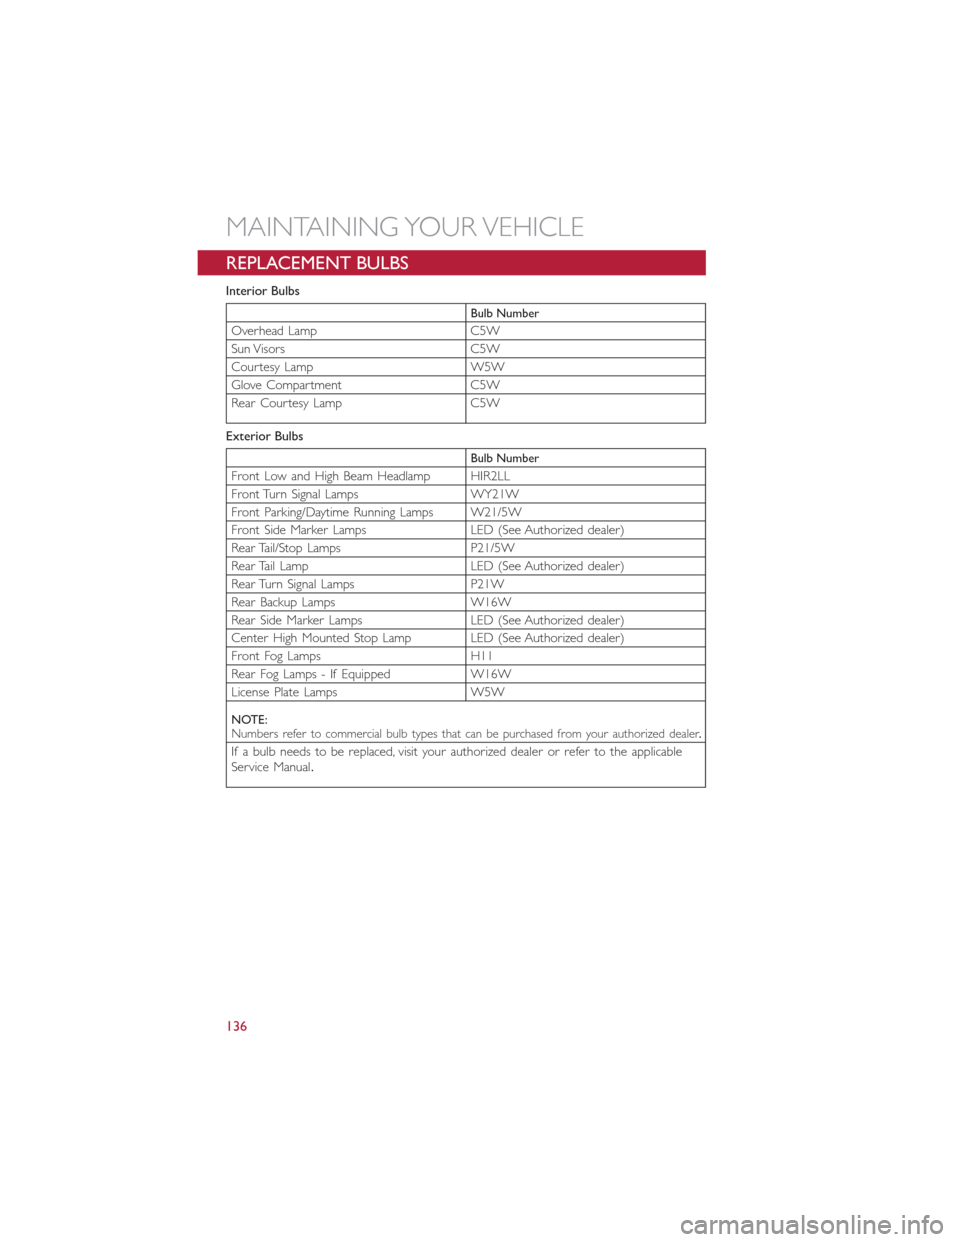
REPLACEMENT BULBS
Interior Bulbs
Bulb Number
Overhead Lamp C5W
Sun Visors C5W
Courtesy Lamp W5W
Glove Compartment C5W
Rear Courtesy Lamp C5W
Exterior Bulbs
Bulb Number
Front Low and High Beam Headlamp HIR2LL
Front Turn Signal Lamps WY21W
Front Parking/Daytime Running Lamps W21/5W
Front Side Marker Lamps LED (See Authorized dealer)
Rear Tail/Stop Lamps P21/5W
Rear Tail Lamp LED (See Authorized dealer)
Rear Turn Signal Lamps P21W
Rear Backup Lamps W16W
Rear Side Marker Lamps LED (See Authorized dealer)
Center High Mounted Stop Lamp LED (See Authorized dealer)
Front Fog Lamps H11
Rear Fog Lamps - If Equipped W16W
License Plate Lamps W5W
NOTE:Numbers refer to commercial bulb types that can be purchased from your authorized dealer.
If a bulb needs to be replaced, visit your authorized dealer or refer to the applicableService Manual.
MAINTAINING YOUR VEHICLE
136