ECO mode FIAT 500L 2015 2.G User Guide
[x] Cancel search | Manufacturer: FIAT, Model Year: 2015, Model line: 500L, Model: FIAT 500L 2015 2.GPages: 148, PDF Size: 3.77 MB
Page 5 of 148
VEHICLES SOLD IN CANADA
With respect to any vehicles sold in Canada, the name FCA US LLC shall be deemed to
be deleted and the name Chrysler Canada Inc.used in substitution (excluding legal lines).
WARNING!
•Pedals that cannot move freely can cause loss of vehicle control and increase the
risk of serious personal injury.
•Always make sure that objects cannot fall into the driver foot well while the ve-
hicle is moving.Objects can become trapped under the brake pedal and accelera-
tor pedal causing a loss of vehicle control.
•Failure to properly follow floor mat installation or mounting can cause interference
with the brake pedal and accelerator pedal operation causing loss of control of
the vehicle.
•Never leave children alone in a vehicle, or with access to an unlocked vehicle.Al-
lowing children to be in a vehicle unattended is dangerous for a number of rea-
sons.A child or others could be seriously or fatally injured.Children should be
warned not to touch the parking brake, brake pedal or the shift lever/transmission
gear selector.
•Do not leave the key fob in or near the vehicle, or in a location accessible to chil-
dren, and do not leave the ignition of a vehicle equipped with Keyless Enter-N-Go
in the ACC or ON/RUN mode.A child could operate power windows, other con-
trols, or move the vehicle.
•Never use the “PARK” position as a substitute for the parking brake.Always apply
the parking brake fully when parked to guard against vehicle movement and pos-
sible injury or damage.
•Refer to your Owner's Manual on the DVD for further details.
Use Of Aftermarket Products (Electronics)
The use of aftermarket devices including cell phones, MP3 players, GPS systems, or char-
gers may affect the performance of on-board wireless features.If you are experiencing
difficulties with any of your wireless features, try disconnecting your aftermarket devices
to see if the situation improves.If your symptoms persist, please see an authorized dealer.
FIAT is a registered trademark of FIAT Group Marketing & Corporate Communication
SpA, used under license by FCA US LLC.
COPYRIGHT ©2014 FCA US LLC
INTRODUCTION/WELCOME
3
Page 19 of 148
2.Attach the lower hooks or connectors of the child restraint to the lower anchorages
in the selected seating position.
3.If the child restraint has a tether strap, connect it to the top tether anchorage.See
below for directions to attach a tether anchor.
4.Tighten all of the straps as you push the child restraint rearward and downward into
the seat.Remove slack in the straps according to the child restraint manufacturer’s
instructions.
5.Test that the child restraint is installed tightly by pulling back and forth on the child
seat at the belt path.It should not move more than 1 inch (25.4 mm) in any direc-
tion.
Installing The Child Restraint Using The Vehicle Seat Belts
The seat belts in the passenger seating positions are equipped with a Switchable Auto-
matic Locking Retractor (ALR) that is designed to keep the lap portion of the seat belt
tight around the child restraint.Any seat belt system will loosen with time, so check the
belt occasionally, and pull it tight if necessary.
Tether Weight Limit
Always use the tether anchor when using the seat belt to install a forward facing child
restraint, up to the recommended weight limit of the child restraint.
To Install A Child Seat Using An ALR:
1.Pull enough of the seat belt webbing from the retractor to pass it through the belt
path of the child restraint.Do not twist the belt webbing in the belt path.
2.Slide the latch plate into the buckle until you hear a “click.”
3.Pull on the webbing to make the lap portion tight against the child seat.
4.To lock the seat belt, pull down on the shoulder part of the belt until you have pulled
all the seat belt webbing out of the retractor.Then, allow the webbing to retract back
into the retractor.As the webbing retracts, you will hear a clicking sound.This means
the seat belt is now in the Automatic Locking mode.
5.Try to pull the webbing out of the retractor.If it is locked, you should not be able to
pull out any webbing.If the retractor is not locked, repeat the last step.
6.Finally, pull up on any extra webbing to tighten the lap portion around the child re-
straint while you push the child restraint rearward and downward into the vehicle
seat.
7.If the child restraint has a top tether strap and the seating position has a top tether
anchorage, connect the tether strap to the anchorage and tighten the tether strap.
See below for directions to attach a tether anchor.
8.Test that the child restraint is installed tightly by pulling back and forth on the child
seat at the belt path.It should not move more than 1 inch (25.4 mm) in any direc-
tion.
GETTING STARTED
17
Page 28 of 148
ENGINE BREAK-IN RECOMMENDATIONS
A long break-in period is not required for the engine and drivetrain (transmission and
axle) in your vehicle.
Drive moderately during the first 300 miles (500 km).After the initial 60 miles (100 km),
speeds up to 50 or 55 mph (80 or 90 km/h) are desirable.
While cruising, brief full-throttle acceleration within the limits of local traffic laws contrib-
utes to a good break-in.Wide-open throttle acceleration in low gear can be detrimental
and should be avoided.
The engine oil installed in the engine at the factory is a high-quality energy conserving
type lubricant.Oil changes should be consistent with anticipated climate conditions under
which vehicle operations will occur.Refer to “Maintaining Your Vehicle”, for the recom-
mended viscosity and quality grades.
NOTE:
A new engine may consume some oil during its first few thousand miles (kilometers) of
operation.This should be considered a normal part of the break-in and not interpreted
as an indication of an engine problem or malfunction.
CAUTION!
Never use Non-Detergent Oil or Straight Mineral Oil in the engine or damage may
result.
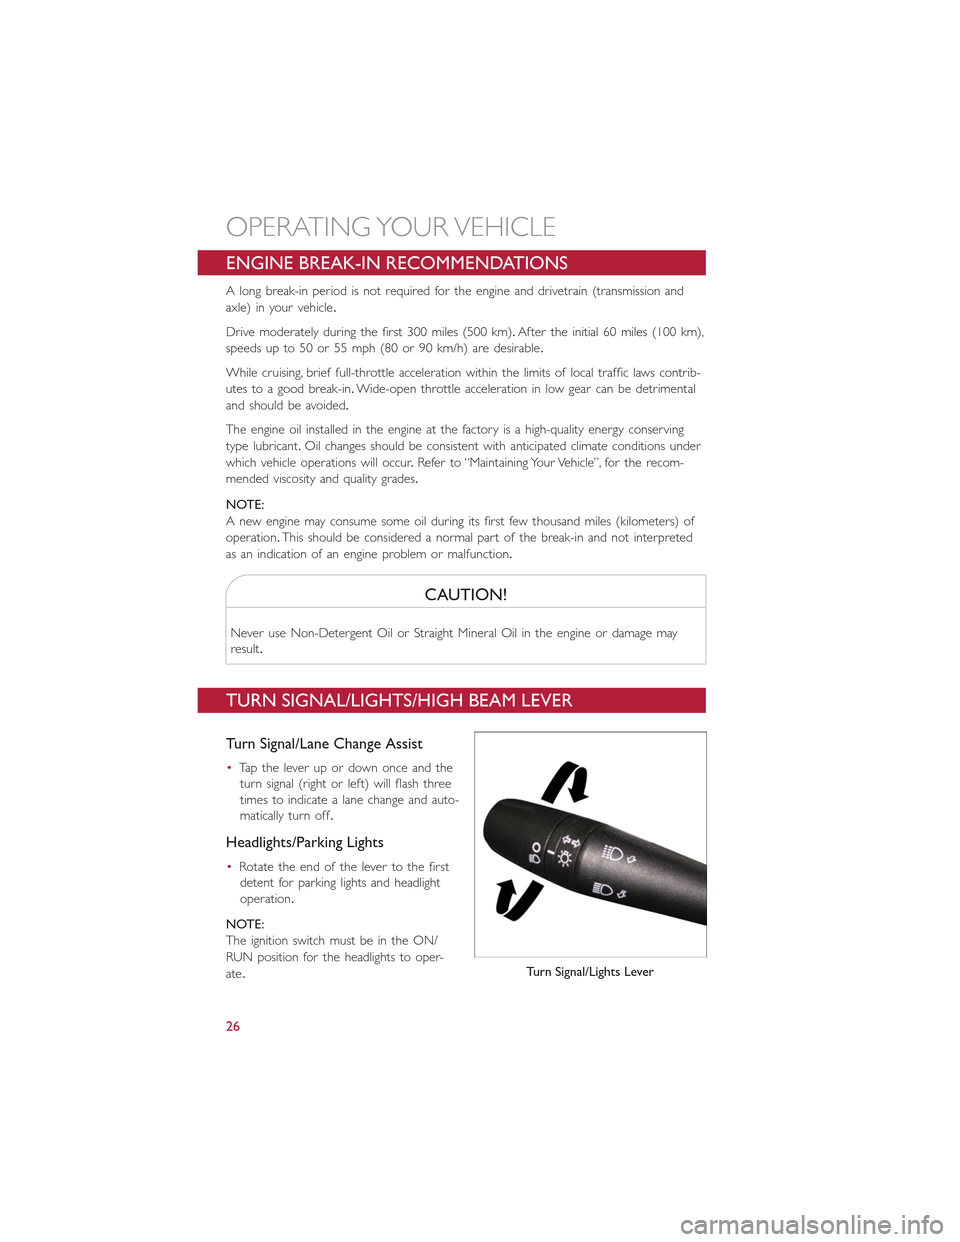
TURN SIGNAL/LIGHTS/HIGH BEAM LEVER
Turn Signal/Lane Change Assist
•Tap the lever up or down once and the
turn signal (right or left) will flash three
times to indicate a lane change and auto-
matically turn off.
Headlights/Parking Lights
•Rotate the end of the lever to the first
detent for parking lights and headlight
operation.
NOTE:
The ignition switch must be in the ON/
RUN position for the headlights to oper-
ate.Turn Signal/Lights Lever
OPERATING YOUR VEHICLE
26
Page 37 of 148
Shifting The Transmission
•The transmission shift lever position (PRND) is displayed both on the shift lever and in
the Electronic Vehicle Information Center (EVIC).
•To drive, depress the brake pedal, press the button on the front of the shift lever and
move the shift lever from PARK or NEUTRAL to the DRIVE position.
•Manual shifts can also be made using the AutoStick shift control.
•This transmission is programmed to prevent shifting from REVERSE to DRIVE or
DRIVE to REVERSE, if vehicle speed is above 6 mph (10 km/h).This safety feature
helps protect your transmission from damage.
NOTE:
•When stopped on an incline, it is recommended that you always hold the vehicle in
place using the brakes.On steep inclines, Hill Start Assist (HSA) will temporarily hold
the car in position when the brake pedal is released.If the accelerator pedal is not
applied after a short time, the car will roll back.Either reapply the brake (to hold the
vehicle) or press the accelerator to climb the hill.
•During acceleration, gear changes will feel smooth compared to a vehicle with a tradi-
tional manual transmission.This is a benefit of the Euro Twin Clutch Transmission de-
sign that avoids power loss during up-shifts.
Instrument Cluster Messages
Messages will be displayed in the instrument cluster to alert the driver when certain un-
usual conditions occur.These messages are described below.
MESSAGE DESCRIPTION
GEAR UNAVAILABLE In AutoStick mode, the gear selected bythe driver is not available due to a faultcondition.See your authorized dealer fordiagnosis and service.
SHIFT NOT ALLOWED The gear position requested by the driveris currently blocked.This occurs if RE-VERSE is requested while moving (at6 mph [10 km/h] or faster), or if DRIVE isrequested while moving backwards (at 6mph [10 km/h] or faster).Make sure thevehicle is stopped before engaging DRIVEor REVERSE.
OPERATING YOUR VEHICLE
35
Page 47 of 148
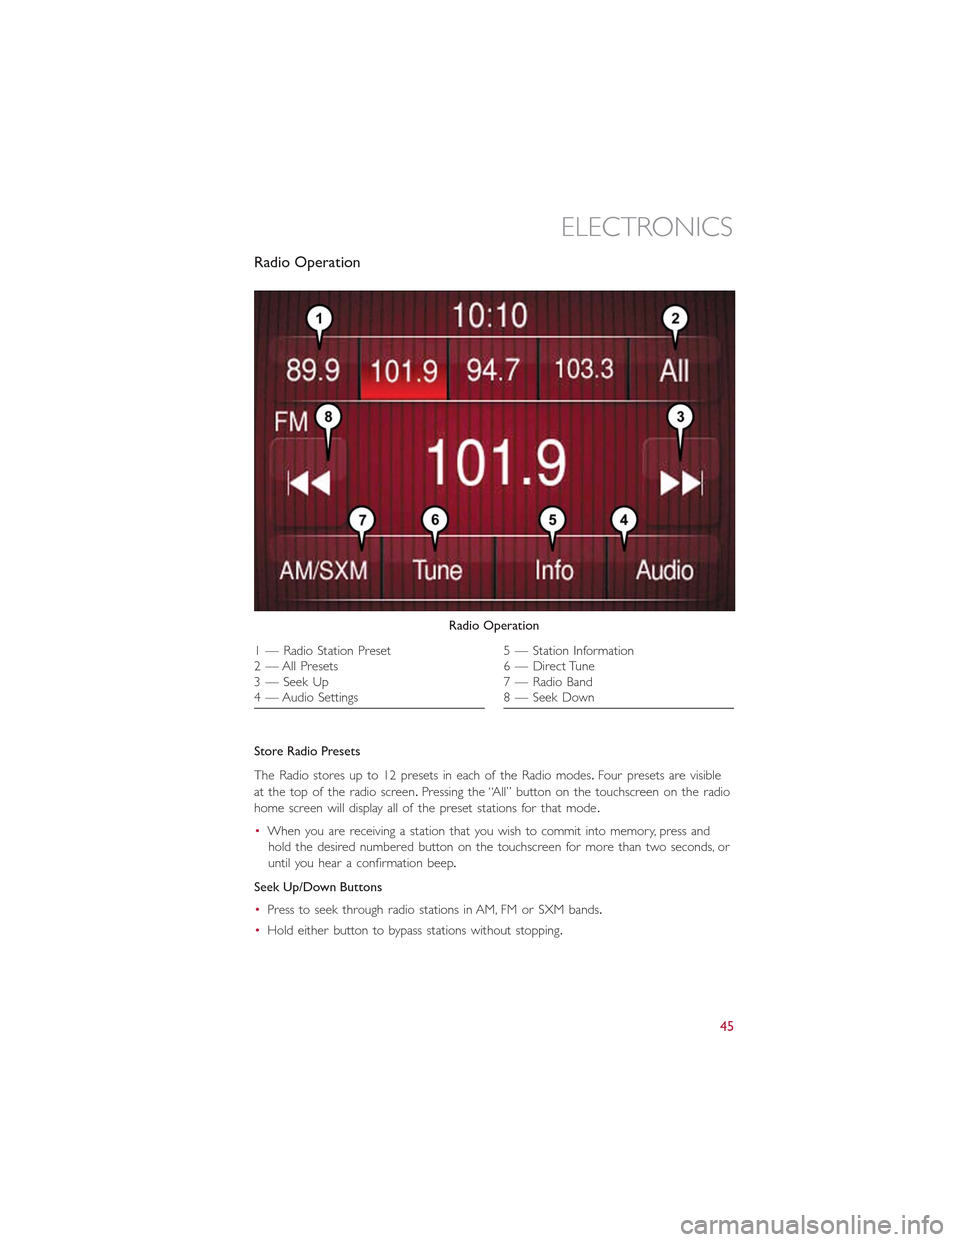
Radio Operation
Store Radio Presets
The Radio stores up to 12 presets in each of the Radio modes.Four presets are visible
at the top of the radio screen.Pressing the “All” button on the touchscreen on the radio
home screen will display all of the preset stations for that mode.
•When you are receiving a station that you wish to commit into memory, press and
hold the desired numbered button on the touchscreen for more than two seconds, or
until you hear a confirmation beep.
Seek Up/Down Buttons
•Press to seek through radio stations in AM, FM or SXM bands.
•Hold either button to bypass stations without stopping.
Radio Operation
1 — Radio Station Preset2—AllPresets3 — Seek Up4 — Audio Settings
5 — Station Information6 — Direct Tune7 — Radio Band8 — Seek Down
ELECTRONICS
45
Page 59 of 148
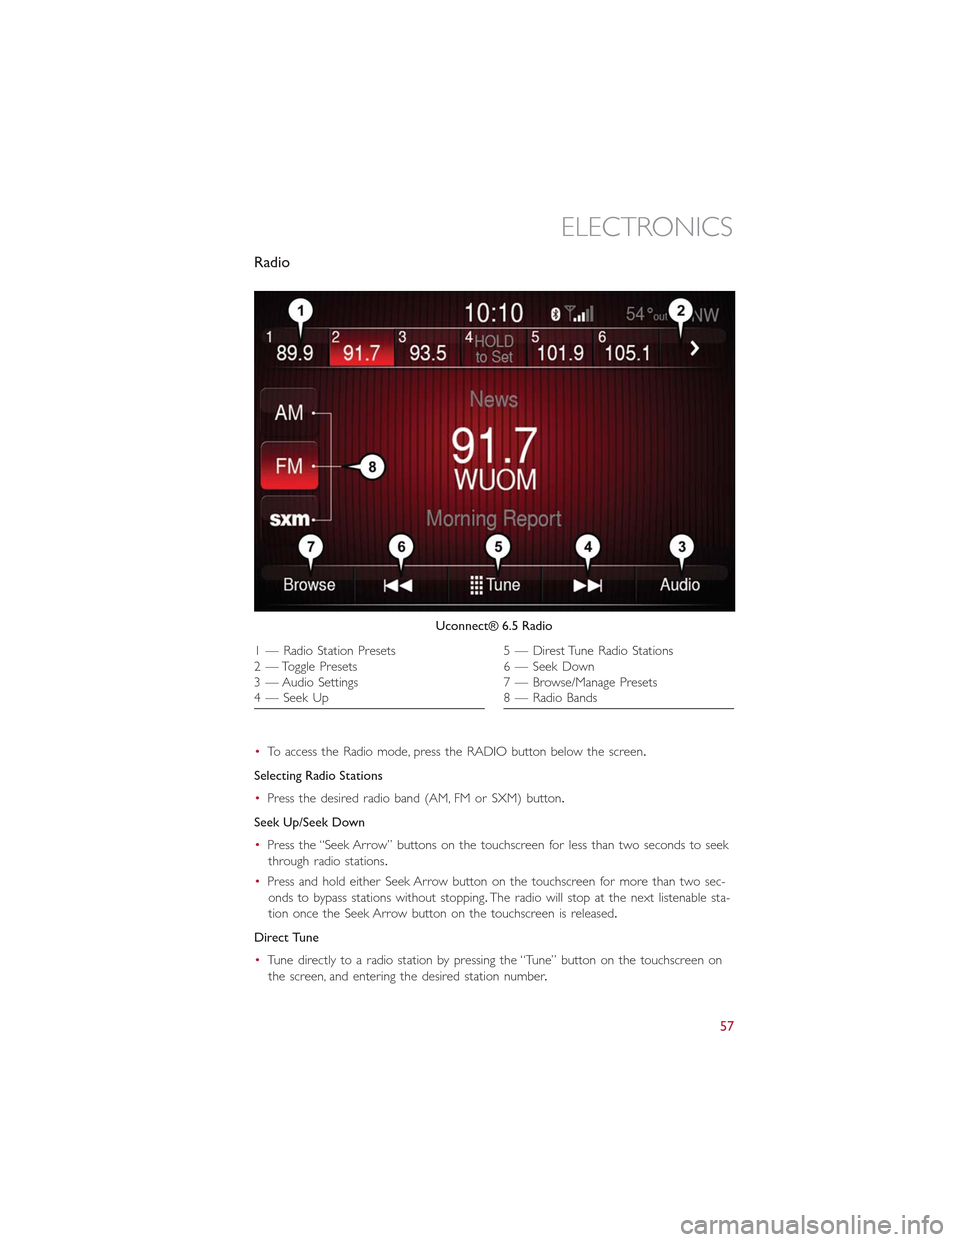
Radio
•To access the Radio mode, press the RADIO button below the screen.
Selecting Radio Stations
•Press the desired radio band (AM, FM or SXM) button.
Seek Up/Seek Down
•Press the “Seek Arrow” buttons on the touchscreen for less than two seconds to seek
through radio stations.
•Press and hold either Seek Arrow button on the touchscreen for more than two sec-
onds to bypass stations without stopping.The radio will stop at the next listenable sta-
tion once the Seek Arrow button on the touchscreen is released.
Direct Tune
•Tune directly to a radio station by pressing the “Tune” button on the touchscreen on
the screen, and entering the desired station number.
Uconnect® 6.5 Radio
1—RadioStationPresets2 — Toggle Presets3 — Audio Settings4 — Seek Up
5 — Direst Tune Radio Stations6 — Seek Down7—Browse/ManagePresets8 — Radio Bands
ELECTRONICS
57
Page 60 of 148
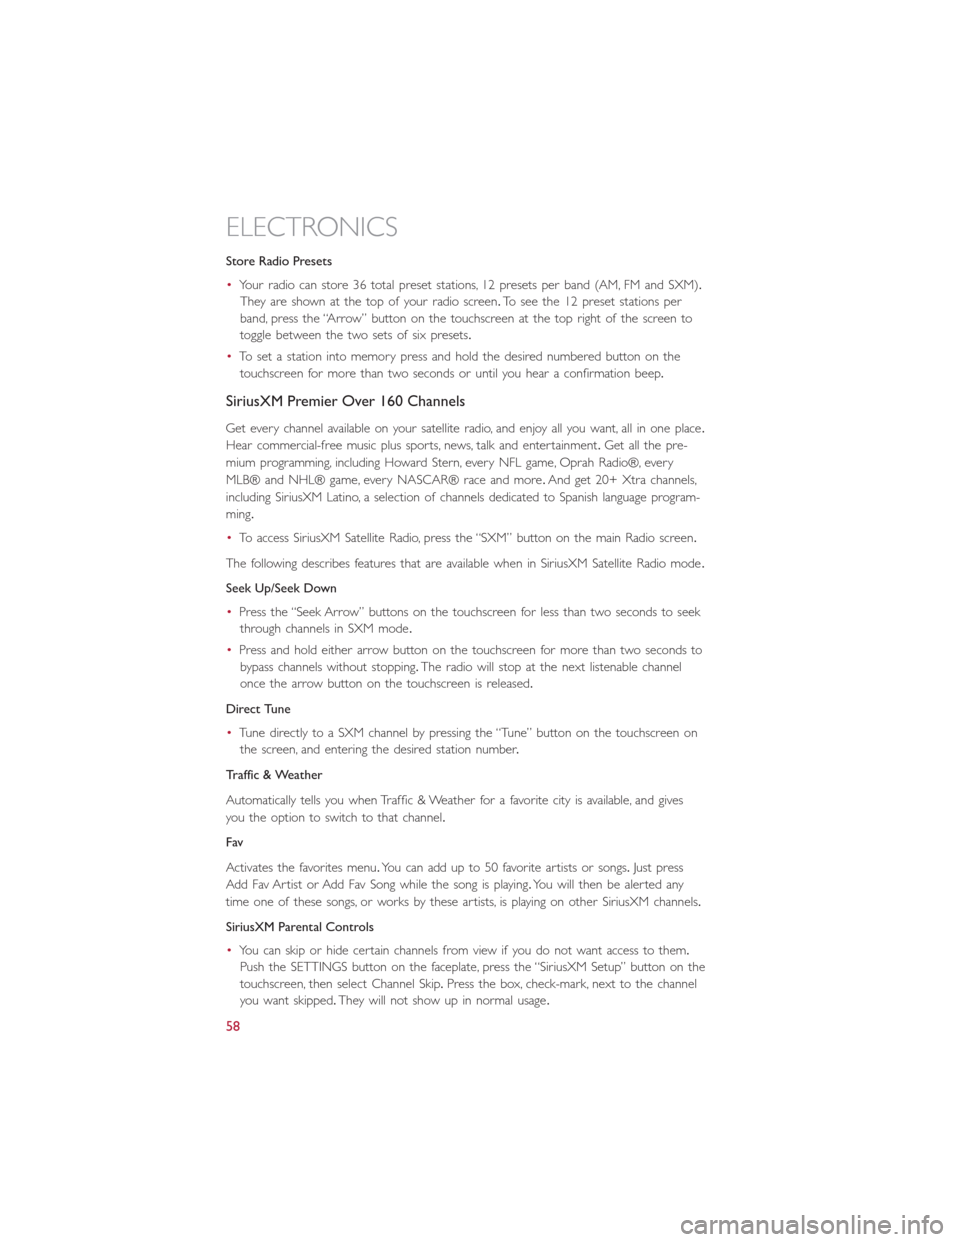
Store Radio Presets
•Your radio can store 36 total preset stations, 12 presets per band (AM, FM and SXM).
They are shown at the top of your radio screen.To see the 12 preset stations per
band, press the “Arrow” button on the touchscreen at the top right of the screen to
toggle between the two sets of six presets.
•To set a station into memory press and hold the desired numbered button on the
touchscreen for more than two seconds or until you hear a confirmation beep.
SiriusXM Premier Over 160 Channels
Get every channel available on your satellite radio, and enjoy all you want, all in one place.
Hear commercial-free music plus sports, news, talk and entertainment.Get all the pre-
mium programming, including Howard Stern, every NFL game, Oprah Radio®, every
MLB® and NHL® game, every NASCAR® race and more.And get 20+ Xtra channels,
including SiriusXM Latino, a selection of channels dedicated to Spanish language program-
ming.
•To access SiriusXM Satellite Radio, press the “SXM” button on the main Radio screen.
The following describes features that are available when in SiriusXM Satellite Radio mode.
Seek Up/Seek Down
•Press the “Seek Arrow” buttons on the touchscreen for less than two seconds to seek
through channels in SXM mode.
•Press and hold either arrow button on the touchscreen for more than two seconds to
bypass channels without stopping.The radio will stop at the next listenable channel
once the arrow button on the touchscreen is released.
Direct Tune
•Tune directly to a SXM channel by pressing the “Tune” button on the touchscreen on
the screen, and entering the desired station number.
Traffic & Weather
Automatically tells you when Traffic & Weather for a favorite city is available, and gives
you the option to switch to that channel.
Fav
Activates the favorites menu.You can add up to 50 favorite artists or songs.Just press
Add Fav Artist or Add Fav Song while the song is playing.You will then be alerted any
time one of these songs, or works by these artists, is playing on other SiriusXM channels.
SiriusXM Parental Controls
•You can skip or hide certain channels from view if you do not want access to them.
Push the SETTINGS button on the faceplate, press the “SiriusXM Setup” button on the
touchscreen, then select Channel Skip.Press the box, check-mark, next to the channel
you want skipped.They will not show up in normal usage.
ELECTRONICS
58
Page 99 of 148
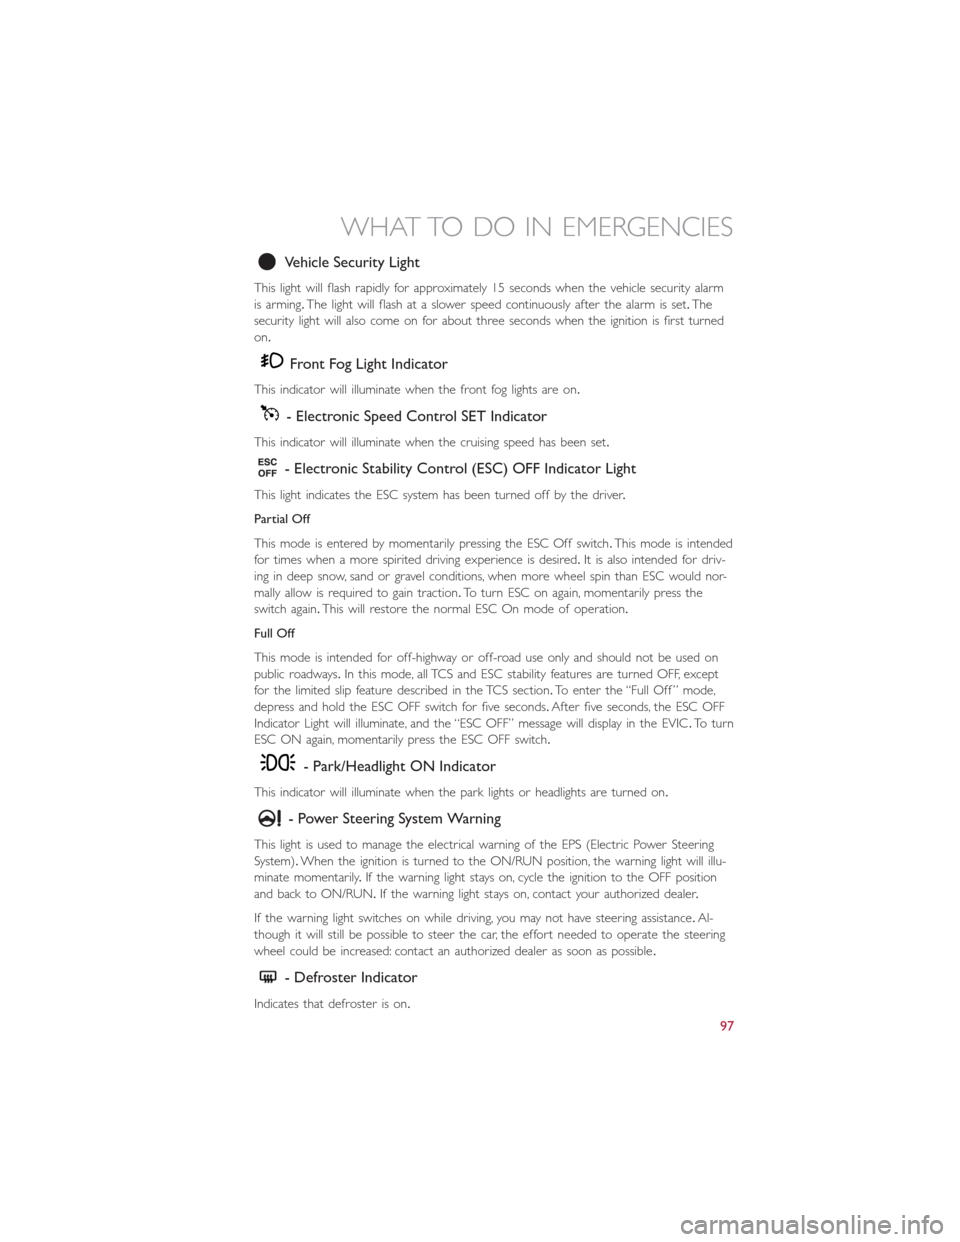
Vehicle Security Light
This light will flash rapidly for approximately 15 seconds when the vehicle security alarm
is arming.The light will flash at a slower speed continuously after the alarm is set.The
security light will also come on for about three seconds when the ignition is first turned
on.
Front Fog Light Indicator
This indicator will illuminate when the front fog lights are on.
- Electronic Speed Control SET Indicator
This indicator will illuminate when the cruising speed has been set.
- Electronic Stability Control (ESC) OFF Indicator Light
This light indicates the ESC system has been turned off by the driver.
Partial Off
This mode is entered by momentarily pressing the ESC Off switch.This mode is intended
for times when a more spirited driving experience is desired.It is also intended for driv-
ing in deep snow, sand or gravel conditions, when more wheel spin than ESC would nor-
mally allow is required to gain traction.To turn ESC on again, momentarily press the
switch again.This will restore the normal ESC On mode of operation.
Full Off
This mode is intended for off-highway or off-road use only and should not be used on
public roadways.In this mode, all TCS and ESC stability features are turned OFF, except
for the limited slip feature described in the TCS section.To enter the “Full Off ” mode,
depress and hold the ESC OFF switch for five seconds.After five seconds, the ESC OFF
Indicator Light will illuminate, and the “ESC OFF” message will display in the EVIC.To turn
ESC ON again, momentarily press the ESC OFF switch.
- Park/Headlight ON Indicator
This indicator will illuminate when the park lights or headlights are turned on.
- Power Steering System Warning
This light is used to manage the electrical warning of the EPS (Electric Power Steering
System).When the ignition is turned to the ON/RUN position, the warning light will illu-
minate momentarily.If the warning light stays on, cycle the ignition to the OFF position
and back to ON/RUN.If the warning light stays on, contact your authorized dealer.
If the warning light switches on while driving, you may not have steering assistance.Al-
though it will still be possible to steer the car, the effort needed to operate the steering
wheel could be increased: contact an authorized dealer as soon as possible.
- Defroster Indicator
Indicates that defroster is on.
WHAT TO DO IN EMERGENCIES
97
Page 100 of 148
Change Engine Oil
•Your vehicle is equipped with an engine oil change indicator system.The “Change En-
gine Oil” message will flash in the EVIC display for approximately 10 seconds after a
single chime has sounded to indicate the next scheduled oil change interval.The engine
oil change indicator system is duty cycle based, which means the engine oil change in-
terval may fluctuate, dependent upon your personal driving style.
•Unless reset, this message will continue to display each time you turn the ignition
switch to the ON/RUN position.To turn off the message temporarily, press and re-
lease theMENUbutton.To reset the oil change indicator system (after performing the
scheduled maintenance), refer to the following procedure:
1.Turn the ignition switch to the ON position.(do not start the engine).
2.Fully depress the accelerator pedal slowly, three times within 10 seconds.
3.Turn the ignition switch to the OFF/LOCK position.
NOTE:
If the indicator message illuminates when you start the vehicle, the oil change indicator
system did not reset.If necessary, repeat this procedure.
IF YOUR ENGINE OVERHEATS
In any of the following situations, you can reduce the potential for overheating by taking
the appropriate action:
•On the highways — slow down.
•In city traffic — while stopped, shift transmission into NEUTRAL, but do not increase
engine idle speed.
NOTE:
There are steps that you can take to slow down an overheat condition:
•If your air conditioner (A/C) is on, turn it off.The A/C system adds heat to the engine
cooling system and turning the A/C off can help remove this heat.
•You can also turn the Temperature control to maximum heat, the Mode control to
floor and the Fan control to high.This allows the heater core to act as a supplement
to the radiator and aids in removing heat from the engine cooling system.
•If the temperature reading does not return to normal, turn the engine off immediately.
•We recommend that you do not operate the vehicle or engine damage will occur.
Have the vehicle serviced immediately.
WHAT TO DO IN EMERGENCIES
98
Page 109 of 148
TIRE SERVICE KIT
Your vehicle may be equipped with a Tire Service Kit.
Small punctures up to 1/4” (6 mm) in the tire tread can be sealed with the Tire Service
Kit.Foreign objects (e.g., screws or nails) should not be removed from the tire.The Tire
Service Kit can be used in outside temperatures down to approximately -4°F (-20°C).
This kit will provide a temporary tire seal, allowing you to drive your vehicle up to 100
miles (160 km) with a maximum speed of 55 mph (90 km/h).
Tire Service Kit Storage
The Tire Service Kit is located in the rear trunk area on the left side.
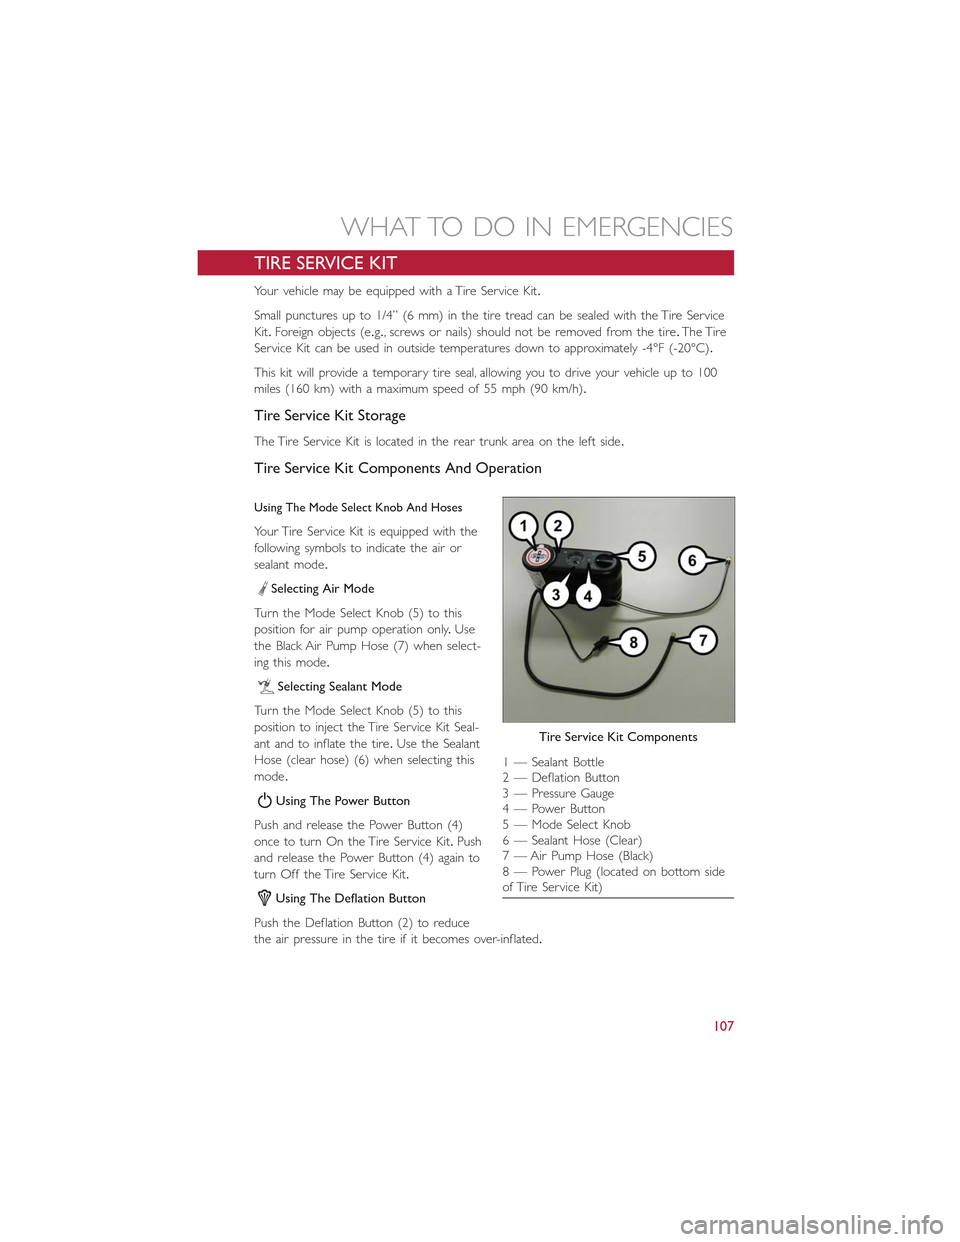
Tire Service Kit Components And Operation
Using The Mode Select Knob And Hoses
Your Tire Service Kit is equipped with the
following symbols to indicate the air or
sealant mode.
Selecting Air Mode
Turn the Mode Select Knob (5) to this
position for air pump operation only.Use
the Black Air Pump Hose (7) when select-
ing this mode.
Selecting Sealant Mode
Turn the Mode Select Knob (5) to this
position to inject the Tire Service Kit Seal-
ant and to inflate the tire.Use the Sealant
Hose (clear hose) (6) when selecting this
mode.
Using The Power Button
Push and release the Power Button (4)
once to turn On the Tire Service Kit.Push
and release the Power Button (4) again to
turn Off the Tire Service Kit.
Using The Deflation Button
Push the Deflation Button (2) to reduce
the air pressure in the tire if it becomes over-inflated.
Tire Service Kit Components
1 — Sealant Bottle2 — Deflation Button3 — Pressure Gauge4 — Power Button5 — Mode Select Knob6 — Sealant Hose (Clear)7 — Air Pump Hose (Black)8 — Power Plug (located on bottom sideof Tire Service Kit)
WHAT TO DO IN EMERGENCIES
107