parking brake FIAT 500L 2015 2.G User Guide
[x] Cancel search | Manufacturer: FIAT, Model Year: 2015, Model line: 500L, Model: FIAT 500L 2015 2.GPages: 148, PDF Size: 3.77 MB
Page 5 of 148
VEHICLES SOLD IN CANADA
With respect to any vehicles sold in Canada, the name FCA US LLC shall be deemed to
be deleted and the name Chrysler Canada Inc.used in substitution (excluding legal lines).
WARNING!
•Pedals that cannot move freely can cause loss of vehicle control and increase the
risk of serious personal injury.
•Always make sure that objects cannot fall into the driver foot well while the ve-
hicle is moving.Objects can become trapped under the brake pedal and accelera-
tor pedal causing a loss of vehicle control.
•Failure to properly follow floor mat installation or mounting can cause interference
with the brake pedal and accelerator pedal operation causing loss of control of
the vehicle.
•Never leave children alone in a vehicle, or with access to an unlocked vehicle.Al-
lowing children to be in a vehicle unattended is dangerous for a number of rea-
sons.A child or others could be seriously or fatally injured.Children should be
warned not to touch the parking brake, brake pedal or the shift lever/transmission
gear selector.
•Do not leave the key fob in or near the vehicle, or in a location accessible to chil-
dren, and do not leave the ignition of a vehicle equipped with Keyless Enter-N-Go
in the ACC or ON/RUN mode.A child could operate power windows, other con-
trols, or move the vehicle.
•Never use the “PARK” position as a substitute for the parking brake.Always apply
the parking brake fully when parked to guard against vehicle movement and pos-
sible injury or damage.
•Refer to your Owner's Manual on the DVD for further details.
Use Of Aftermarket Products (Electronics)
The use of aftermarket devices including cell phones, MP3 players, GPS systems, or char-
gers may affect the performance of on-board wireless features.If you are experiencing
difficulties with any of your wireless features, try disconnecting your aftermarket devices
to see if the situation improves.If your symptoms persist, please see an authorized dealer.
FIAT is a registered trademark of FIAT Group Marketing & Corporate Communication
SpA, used under license by FCA US LLC.
COPYRIGHT ©2014 FCA US LLC
INTRODUCTION/WELCOME
3
Page 10 of 148
KEY FOB
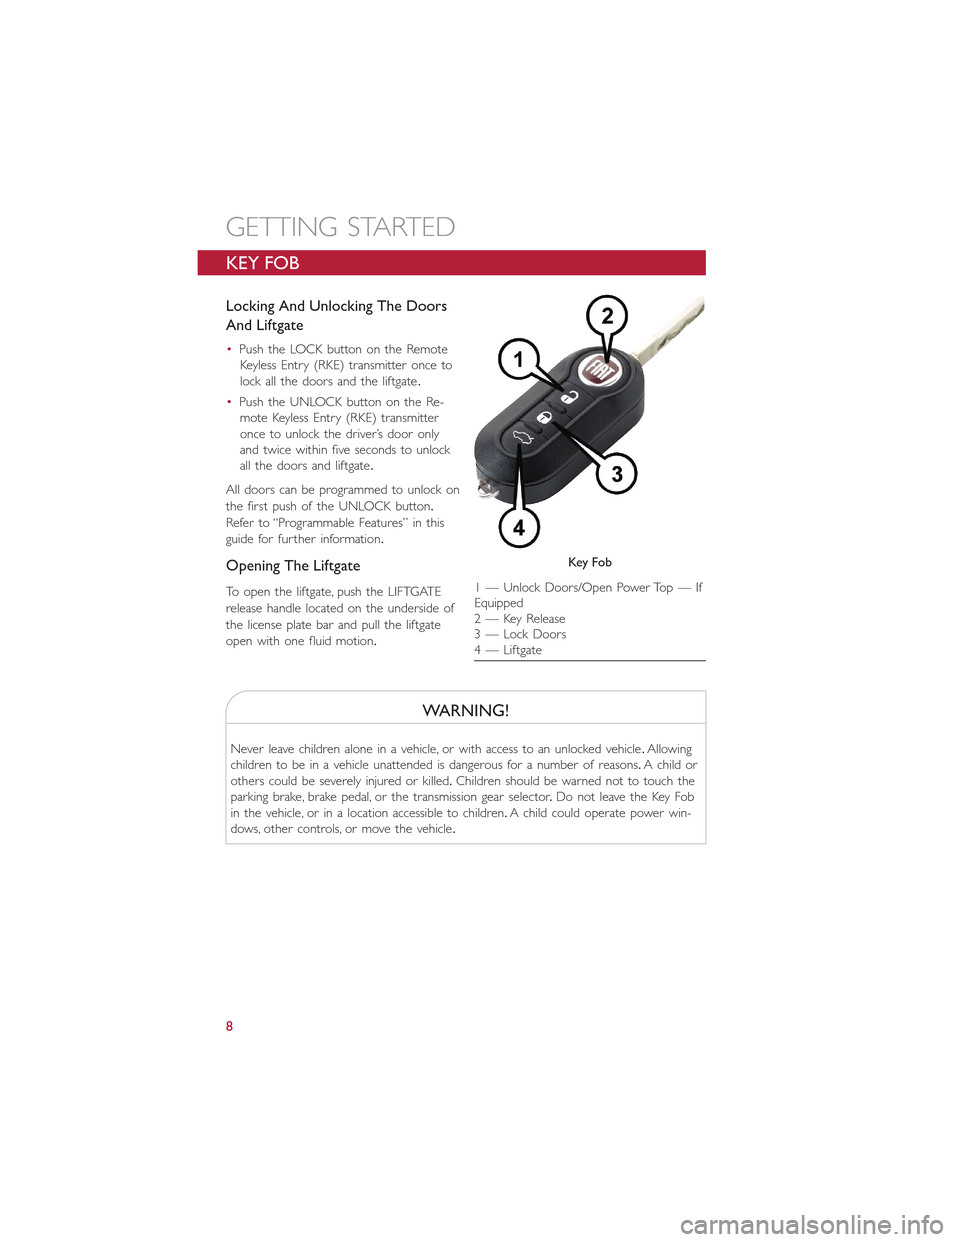
Locking And Unlocking The Doors
And Liftgate
•Push the LOCK button on the Remote
Keyless Entry (RKE) transmitter once to
lock all the doors and the liftgate.
•Push the UNLOCK button on the Re-
mote Keyless Entry (RKE) transmitter
once to unlock the driver’s door only
and twice within five seconds to unlock
all the doors and liftgate.
All doors can be programmed to unlock on
the first push of the UNLOCK button.
Refer to “Programmable Features” in this
guide for further information.
Opening The Liftgate
To open the liftgate, push the LIFTGATE
release handle located on the underside of
the license plate bar and pull the liftgate
open with one fluid motion.
WARNING!
Never leave children alone in a vehicle, or with access to an unlocked vehicle.Allowing
children to be in a vehicle unattended is dangerous for a number of reasons.A child or
others could be severely injured or killed.Children should be warned not to touch the
parking brake, brake pedal, or the transmission gear selector.Do not leave the Key Fob
in the vehicle, or in a location accessible to children.A child could operate power win-
dows, other controls, or move the vehicle.
Key Fob
1 — Unlock Doors/Open Power Top — IfEquipped2 — Key Release3 — Lock Doors4 — Liftgate
GETTING STARTED
8
Page 12 of 148
CAUTION!
An unlocked vehicle is an invitation to thieves.Always remove the key from the ignition
and lock all of the doors when leaving the vehicle unattended.
WARNING!
•Do not leave children or animals inside parked vehicles in hot weather.Interior
heat build-up may cause serious injury or death.
•For personal security and safety in the event of an collision, lock the vehicle doors
as you drive as well as when you park and leave the vehicle.
•Before exiting a vehicle, always turn the vehicle OFF, apply the parking brake, shift
the Euro Twin Clutch transmission into PARK or the manual transmission into RE-
VERSE, and remove the Key Fob from the ignition.When leaving the vehicle, al-
ways lock your vehicle.
•Never leave children alone in a vehicle, or with access to an unlocked vehicle.
•Allowing children to be in a vehicle unattended is dangerous for a number of rea-
sons.A child or others could be seriously or fatally injured.Children should be
warned not to touch the parking brake, brake pedal or the transmission gear se-
lector.
•Do not leave the Key Fob in or near the vehicle, or in a location accessible to
child.A child could operate power windows, other controls, or move the vehicle.
Doors Lock With One Or More Doors Open
•It is possible to lock the vehicle through the RKE, internal button or external key pawl,
or if one or more doors are open.At lock command request, LED is switched ON.At
closing of the last door, the vehicle maintains the central locking status if key is not
inserted in Ignition Device; otherwise the vehicle will be unlocked, and the LED will be
switched OFF.
NOTE:
If the key is not inserted in the ignition switch but is inside the vehicle, the system does
not recognize the presence of the key and after the closing of last door, the vehicle re-
mains locked.
GETTING STARTED
10
Page 38 of 148
MESSAGE DESCRIPTION
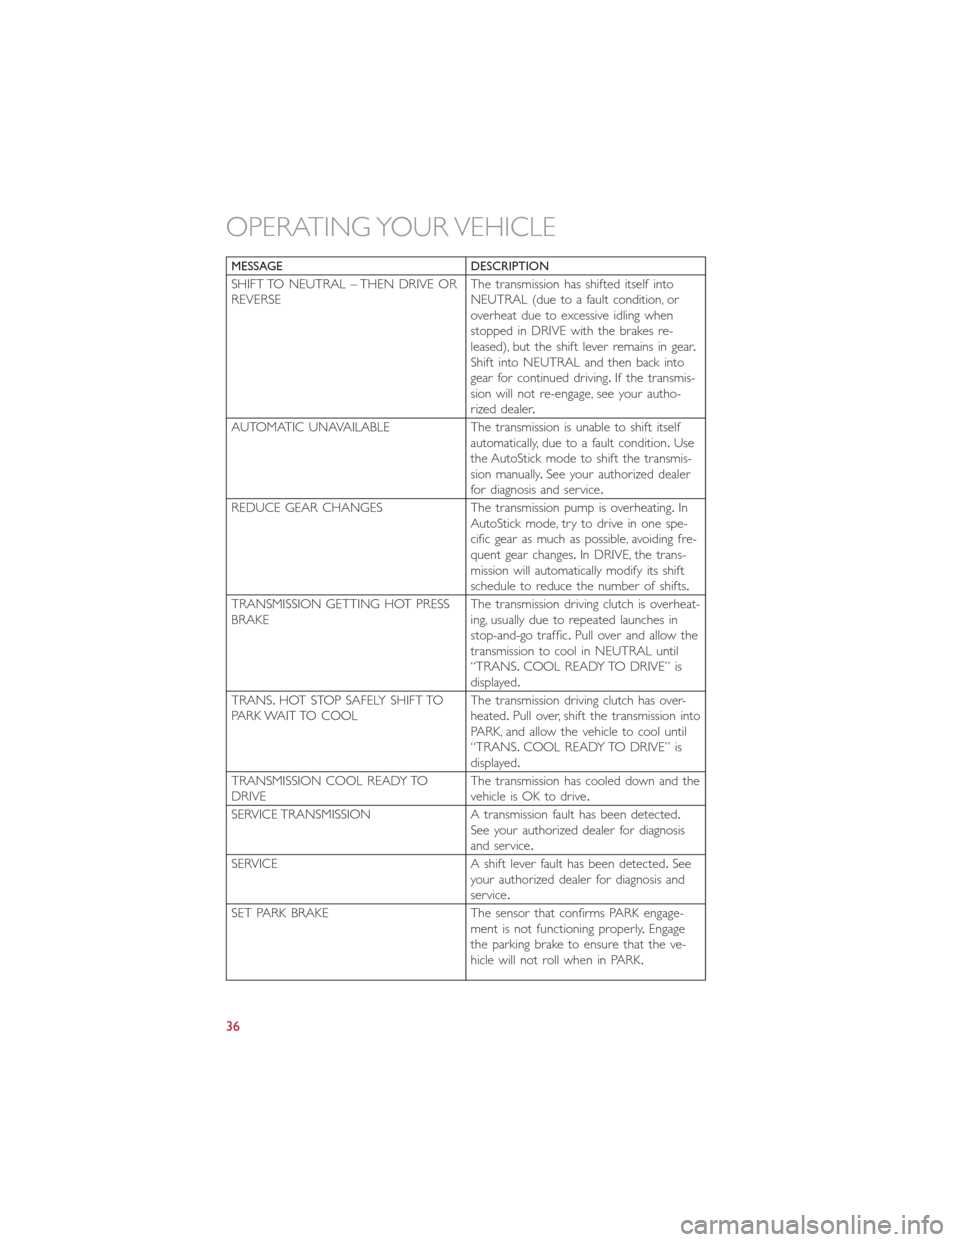
SHIFT TO NEUTRAL – THEN DRIVE ORREVERSEThe transmission has shifted itself intoNEUTRAL (due to a fault condition, oroverheat due to excessive idling whenstopped in DRIVE with the brakes re-leased), but the shift lever remains in gear.Shift into NEUTRAL and then back intogear for continued driving.If the transmis-sion will not re-engage, see your autho-rized dealer.
AUTOMATIC UNAVAILABLE The transmission is unable to shift itselfautomatically, due to a fault condition.Usethe AutoStick mode to shift the transmis-sion manually.See your authorized dealerfor diagnosis and service.
REDUCE GEAR CHANGES The transmission pump is overheating.InAutoStick mode, try to drive in one spe-cific gear as much as possible, avoiding fre-quent gear changes.In DRIVE, the trans-mission will automatically modify its shiftschedule to reduce the number of shifts.
TRANSMISSION GETTING HOT PRESSBRAKEThe transmission driving clutch is overheat-ing, usually due to repeated launches instop-and-go traffic.Pull over and allow thetransmission to cool in NEUTRAL until“TRANS.COOL READY TO DRIVE” isdisplayed.
TRANS.HOT STOP SAFELY SHIFT TOPARK WAIT TO COOLThe transmission driving clutch has over-heated.Pull over, shift the transmission intoPARK, and allow the vehicle to cool until“TRANS.COOL READY TO DRIVE” isdisplayed.
TRANSMISSION COOL READY TODRIVEThe transmission has cooled down and thevehicle is OK to drive.
SERVICE TRANSMISSION A transmission fault has been detected.See your authorized dealer for diagnosisand service.
SERVICE A shift lever fault has been detected.Seeyour authorized dealer for diagnosis andservice.
SET PARK BRAKE The sensor that confirms PARK engage-ment is not functioning properly.Engagethe parking brake to ensure that the ve-hicle will not roll when in PARK.
OPERATING YOUR VEHICLE
36
Page 93 of 148
To place the Euro Twin Clutch transmission in NEUTRAL, follow the procedure below:
1.Turn the key to the ON/RUN position, without starting the engine.
2.Press the brake pedal and shift the transmission to NEUTRAL.
3.Turn the key to the OFF position.The key will remain in the ignition switch (it cannot
be removed, since the transmission is not in PARK).Leave the key in the OFF position
while being towed.
4.Release the brake pedal only when the parking brake is applied, or the vehicle is se-
curely connected to a tow vehicle.
CAUTION!
•DO NOT flat tow any vehicle equipped with a conventional automatic transmis-
sion.Damage to the drivetrain will result.If these vehicles require towing, make
sure all drive wheels are OFF the ground.
•Towing this vehicle in violation of the above requirements can cause severe trans-
mission damage.Damage from improper towing is not covered under the New
Vehicle Limited Warranty.
UTILITY
91
Page 96 of 148
CAUTION!
The TPMS has been optimized for the original equipment tires and wheels.TPMS pres-
sures and warning have been established for the tire size equipped on your vehicle.
Undesirable system operation or sensor damage may result when using replacement
equipment that is not of the same size, type, and/or style.Aftermarket wheels can cause
sensor damage.Do not use tire sealant from a can, or balance beads if your vehicle is
equipped with a TPMS, as damage to the sensors may result.
- Engine Temperature Warning Light
This light warns of an overheated engine condition.
If the light turns on or flashes continuously while driving, safely pull over and stop the
vehicle.If the A/C system is on, turn it off.Also, shift the transmission into NEUTRAL and
idle the vehicle.If the temperature reading does not return to normal, turn the engine
off immediately.
We recommend that you do not operate the vehicle or engine damage will occur.Have
the vehicle serviced immediately.
WARNING!
A hot engine cooling system is dangerous.You or others could be badly burned by
steam or boiling coolant.
- Seat Belt Reminder Light
When the ignition switch is first turned to the ON/RUN position, this light will turn on
for four to eight seconds as a bulb check.During the bulb check, if the driver's seat belt
is unbuckled, a chime will sound.After the bulb check or when driving, if the driver or
front passenger seat belt remains unbuckled, the Seat Belt Indicator Light will flash or
remain on continuously.Refer to “Seat Belt Systems” in “Things To Know Before Starting”
in your Owner’s Manual on the DVD for further information.
Brake Warning Light
This light monitors various brake functions, including brake fluid level and parking brake
application.If the brake light turns on, it may indicate that the parking brake is applied,
that the brake fluid level is low, or that there is a problem with the anti-lock brake sys-
tem reservoir.
If the light remains on when the parking brake has been disengaged, and the fluid level is
at the full mark on the master cylinder reservoir, it indicates a possible brake hydraulic
system malfunction or that a problem with the Brake Booster has been detected by the
WHAT TO DO IN EMERGENCIES
94
Page 97 of 148
Anti-Lock Brake System (ABS)/Electronic Stability Control (ESC) system.In this case, the
light will remain on until the condition has been corrected.If the problem is related to
the brake booster, the ABS pump will run when applying the brake, and a brake pedal
pulsation may be felt during each stop.
The dual brake system provides a reserve braking capacity in the event of a failure to a
portion of the hydraulic system.A leak in either half of the dual brake system is indicated
by the Brake Warning Light, which will turn on when the brake fluid level in the master
cylinder has dropped below a specified level.The light will remain on until the cause is
corrected.
Vehicles equipped with the Anti-Lock Brake System (ABS) are also equipped with Elec-
tronic Brake Force Distribution (EBD).In the event of an EBD failure, the Brake Warning
Light will turn on along with the ABS Light.Immediate repair to the ABS system is re-
quired.
Operation of the Brake Warning Light can be checked by turning the ignition switch from
the OFF position to the ON/RUN position.The light should illuminate for approximately
two seconds.The light should then turn off unless the parking brake is applied or a brake
fault is detected.If the light does not illuminate, have the light inspected by an authorized
dealer.
The light also will turn on when the parking brake is applied with the ignition switch in
the ON/RUN position.
NOTE:
This light shows only that the parking brake is applied.It does not show the degree of
brake application.
WARNING!
Driving a vehicle with the red brake light on is dangerous.Part of the brake system
may have failed.It will take longer to stop the vehicle.You could have a collision.Have
the vehicle checked immediately.
- Malfunction Indicator Light (MIL)
Certain conditions, such as a loose or missing gas cap, poor fuel quality, etc., may illumi-
nate the MIL after engine start.The vehicle should be serviced if the light stays on
through several typical driving cycles.In most situations, the vehicle will drive normally and
not require towing.
If the MIL flashes when the engine is running, serious conditions may exist that could lead
to immediate loss of power or severe catalytic converter damage.We recommend you
do not operate the vehicle.Have the vehicle serviced immediately.
WHAT TO DO IN EMERGENCIES
95
Page 104 of 148
Preparations For Jacking
1.Park the vehicle on a firm level surface, avoiding ice or slippery areas.
2.Turn on the Hazard Warning flashers.
3.Set the parking brake.
4.Place the shift lever in PARK (automatic transmission) or REVERSE (manual transmis-
sion).
5.Turn Off the ignition.
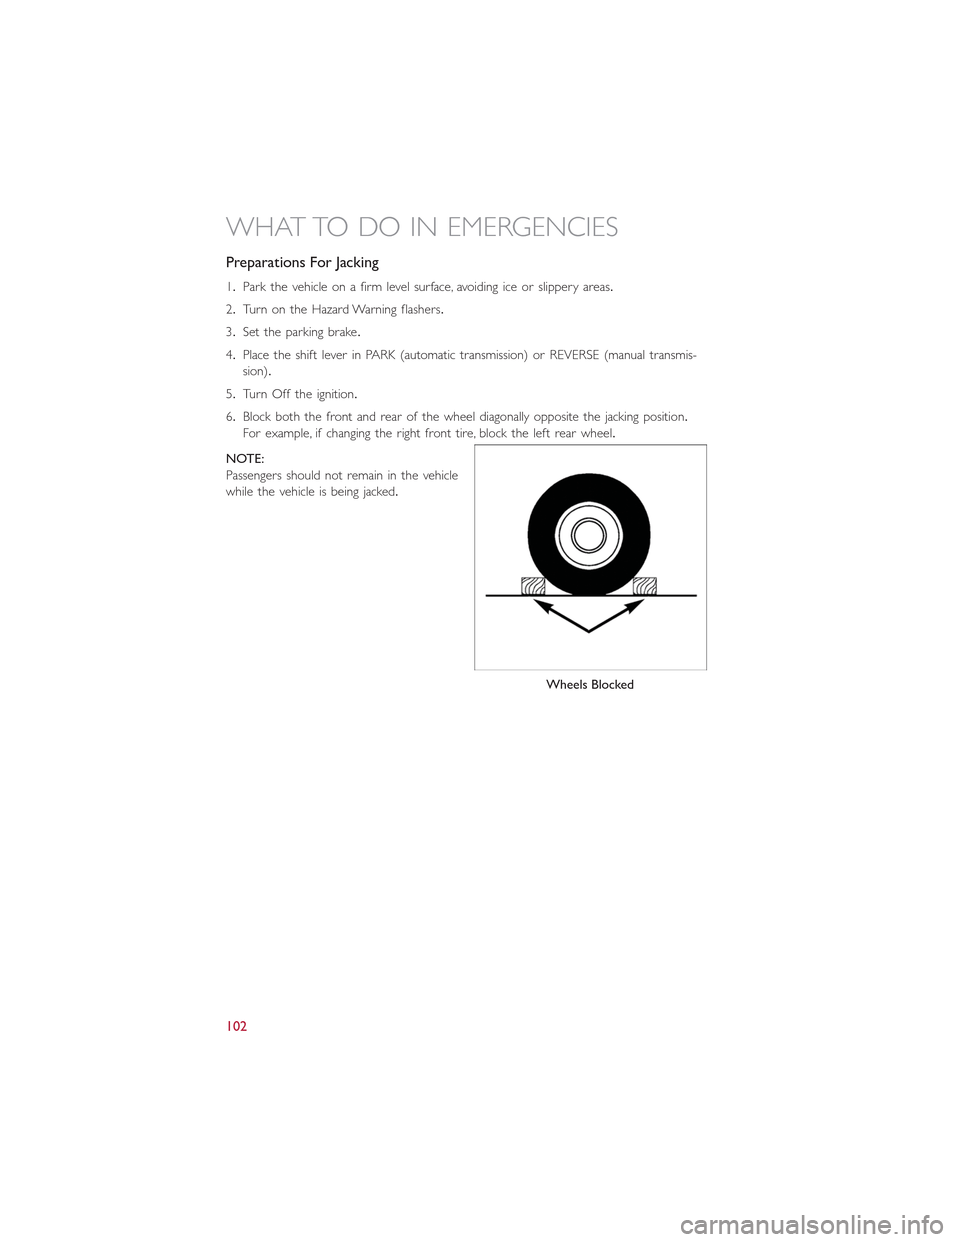
6.Block both the front and rear of the wheel diagonally opposite the jacking position.
For example, if changing the right front tire, block the left rear wheel.
NOTE:
Passengers should not remain in the vehicle
while the vehicle is being jacked.
Wheels Blocked
WHAT TO DO IN EMERGENCIES
102
Page 108 of 148
WARNING!
•Do not attempt to change a tire on the side of the vehicle close to moving traffic.
Pull far enough off the road to avoid the danger of being hit when operating the
jack or changing the wheel.
•Being under a jacked-up vehicle is dangerous.The vehicle could slip off the jack
and fall on you.You could be crushed.Never put any part of your body under a
vehicle that is on a jack.
•Never start or run the engine while the vehicle is on a jack.if you need to get
under a raised vehicle, take it to a authorized dealer where it can be raised on a
lift.
•The jack is designed to use as a tool for changing tires only.The jack should not be
used to lift the vehicle for service purposes.The vehicle should be jacked on a
firm, level surface only.Avoid ice or slippery areas.
•After using the jack and tools, always reinstall them in the original carrier and loca-
tion.While driving you may experience abrupt stopping, rapid acceleration, or
sharp turns.A loose jack, tools, bracket or other objects in the vehicle may move
around with force, resulting in serious injury.
•Carefully follow these tire changing warnings to help prevent personal injury or
damage to your vehicle:
•Always park on a firm, level surface as far from the edge of the roadway as pos-
sible before raising the vehicle.
•Turn on the Hazard Warning flasher.
•Block the wheel diagonally opposite the wheel to be raised.
•Set the parking brake firmly and set an automatic transmission in PARK; a manual
transmission in REVERSE.
•Do not let anyone sit in the vehicle when it is on a jack.
•Do not get under the vehicle when it is on a jack.
•Only use the jack in the positions indicated and for lifting this vehicle during a tire
change.
•If working on or near a roadway, be extremely careful of motor traffic.
•To assure that spare tires, flat or inflated, are securely stowed, spares must be
stowed with the valve stem facing the ground.
•Raising the vehicle higher than necessary can make the vehicle unstable and cause
a collision.It could slip off the jack and hurt someone near it.Raise the vehicle
only enough to remove the tire.
•A loose tire or jack thrown forward in a collision or hard stop could injure some-
one in the vehicle.Always stow the jack parts and the extra tire and wheel in the
places provided.
WHAT TO DO IN EMERGENCIES
106
Page 110 of 148
Tire Service Kit Usage Precautions
•Replace the Tire Service Kit Sealant Bottle (1) and Sealant Hose (6) prior to the expi-
ration date (printed on the bottle label) to assure optimum operation of the system.
Refer to “Sealing A Tire With Tire Service Kit” section (F) “Sealant Bottle and Hose
Replacement.”
•The Sealant Bottle (1) and Sealant Hose (6) are a one tire application use.After each
use, always replace these components immediately at an authorized dealer.
•When the Tire Service Kit sealant is in a liquid form, clean water, and a damp cloth will
remove the material from the vehicle or tire and wheel components.Once the sealant
dries, it can easily be peeled off and properly discarded.
•For optimum performance, make sure the valve stem on the wheel is free of debris
before connecting the Tire Service Kit.
•You can use the Tire Service Kit air pump to inflate bicycle tires.The kit also comes
with two needles, located in the Accessory Storage Compartment (on the bottom of
the air pump) for inflating sport balls, rafts, or similar inflatable items.However, use
only the Air Pump Hose (7) and make sure the Mode Select Knob (5) is in the Air
Mode when inflating such items to avoid injecting sealant into them.The Tire Service
Kit Sealant is only intended to seal punctures less than 1/4 inch (6 mm) diameter in
the tread of your vehicle.
•Do not lift or carry the Tire Service Kit by the hoses.
Sealing A Tire With Tire Service Kit
(A) Whenever You Stop To Use Tire Service Kit:
1.Pull over to a safe location and turn on the vehicle’s Hazard Warning flashers.
2.Verify that the valve stem (on the wheel with the deflated tire) is in a position that is
near to the ground.This will allow the Tire Service Kit Hoses (6) and (7) to reach the
valve stem and keep the Tire Service Kit flat on the ground.This will provide the best
positioning of the kit when injecting the sealant into the deflated tire and running the
air pump.Move the vehicle as necessary to place the valve stem in this position be-
fore proceeding.
3.Place the transmission in PARK (auto transmission) or in Gear (manual transmission)
and cycle the ignition to the OFF position.
4.Set the parking brake.
(B) Setting Up To Use Tire Service Kit:
1.Turn the Mode Select Knob (5) to the Sealant Mode position.
2.Uncoil the Sealant Hose (6) and then remove the cap from the fitting at the end of
the hose.
3.Place the Tire Service Kit flat on the ground next to the deflated tire.
4.Remove the cap from the valve stem and then screw the fitting at the end of the
Sealant Hose (6) onto the valve stem.
WHAT TO DO IN EMERGENCIES
108