recommended oil FIAT 500L 2015 2.G User Guide
[x] Cancel search | Manufacturer: FIAT, Model Year: 2015, Model line: 500L, Model: FIAT 500L 2015 2.GPages: 148, PDF Size: 3.77 MB
Page 111 of 148
5.Uncoil the Power Plug (8) and insert the plug into the vehicle’s 12 Volt power outlet.
6.Do not remove foreign objects (e.g., screws or nails) from the tire.
(C) Injecting Tire Service Kit Sealant Into The Deflated Tire:
Always start the engine before turning ON the Tire Service Kit.
NOTE:
Manual transmission vehicles must have the parking brake engaged and the shift lever in
NEUTRAL.
After pushing the Power Button (4), the sealant (white fluid) will flow from the Sealant
Bottle (1) through the Sealant Hose (6) and into the tire.
NOTE:
Sealant may leak out through the puncture in the tire.
If the sealant (white fluid) does not flow within 0 – 10seconds through the Sealant Hose
(6):
1.Push the Power Button (4) to turn Off the Tire Service Kit.Disconnect the Sealant
Hose (6) from the valve stem.Make sure the valve stem is free of debris.Reconnect
the Sealant Hose (6) to the valve stem.Check that the Mode Select Knob (5) is in
the Sealant Mode position and not Air Mode.Push the Power Button (4) to turn On
the Tire Service Kit.
2.Connect the Power Plug (8) to a different 12 Volt power outlet in your vehicle or
another vehicle, if available.Make sure the engine is running before turning ON the
Tire Service Kit.
3.The Sealant Bottle (1) may be empty due to previous use.Call for assistance.
NOTE:
If the Mode Select Knob (5) is on Air Mode and the pump is operating, air will dispense
from the Air Pump Hose (7) only, not the Sealant Hose (6).
If the sealant (white fluid) does flow through the Sealant Hose (6):
1.Continue to operate the pump until sealant is no longer flowing through the hose
(typically takes 30 - 70 seconds).As the sealant flows through the Sealant Hose (6),
the Pressure Gauge (3) can read as high as 70 psi (4.8 Bar).The Pressure Gauge (3)
will decrease quickly from approximately 70 psi (4.8 Bar) to the actual tire pressure
when the Sealant Bottle (1) is empty.
2.The pump will start to inject air into the tire immediately after the Sealant Bottle (1)
is empty.Continue to operate the pump and inflate the tire to the pressure indicated
on the tire pressure label on the driver-side latch pillar (recommended pressure).
Check the tire pressure by looking at the Pressure Gauge (3).
WHAT TO DO IN EMERGENCIES
109
Page 112 of 148
If the tire does not inflate to at least 26 psi (1.8 Bar) pressure within 15 minutes:
The tire is too badly damaged.Do not attempt to drive the vehicle further.Call for assis-
tance.
NOTE:
If the tire becomes over-inflated, push the Deflation Button to reduce the tire pressure
to the recommended inflation pressure before continuing.
If the tire inflates to the recommended pressure or is at least 26 psi (1.8 Bar) pressure
within 15 minutes:
1.Push the Power Button (4) to turn off the Tire Service Kit.
2.Remove the Speed Limit sticker from the top of the Sealant Bottle (1) and place the
sticker on the instrument panel.
3.Immediately disconnect the Sealant Hose (6) from the valve stem, reinstall the cap on
the fitting at the end of the hose, and place the Tire Service Kit in the vehicle storage
location.Quickly proceed to (D) “Drive Vehicle.”
(D) Drive Vehicle:
Immediately after injecting sealant and inflating the tire, drive the vehicle 5 miles (8 km)
or 10 minutes to ensure distribution of the Tire Service Kit Sealant within the tire.Do
not exceed 55 mph (88 km/h).
(E) After Driving:
Pull over to a safe location.Refer to “Whenever You Stop to Use Tire Service Kit” before
continuing.
1.Turn the Mode Select Knob (5) to the Air Mode position.
2.Uncoil the Air Pump Hose (7) (black in color) and screw the fitting at the end of
hose (7) onto the valve stem.
3.Uncoil the power plug and insert the plug into the vehicles 12 Volt power outlet.
4.Check the pressure in the tire by reading the Pressure Gauge (3).
If tire pressure is less than 19 psi (1.3 Bar), the tire is too badly damaged. Do not at-
tempt to drive the vehicle further. Call for assistance.
If the tire pressure is 19 psi (1.3 Bar) or higher:
1.Push the Power Button (4) to turn on Tire Service Kit and inflate the tire to the pres-
sure indicated on the tire and loading information label on the driver-side door open-
ing.
2.Disconnect the Tire Service Kit from the valve stem, reinstall the cap on the valve
stem and unplug from 12 Volt outlet.
3.Place the Tire Service Kit in its proper storage area in the vehicle.
4.Have the tire inspected and repaired or replaced at the earliest opportunity at an
authorized dealer or tire service center.
WHAT TO DO IN EMERGENCIES
110
Page 113 of 148
5.Remove the Speed Limit sticker from the instrument panel after the tire has been
repaired.
6.Replace the Sealant Bottle (1) and Sealant Hose (6) assembly at your authorized
dealer as soon as possible.Refer to “(F) Sealant Bottle and Hose Replacement.”
NOTE:
•If the tire becomes over-inflated, push the Deflation Button to reduce the tire pressure
to the recommended inflation pressure before continuing.
•When having the tire serviced, advise the authorized dealer or service center that the
tire has been sealed using the Tire Service Kit.
(F) Sealant Bottle And Hose Replacement:
1.Uncoil the Sealant Hose (6) (clear in color).
2.Locate the round Sealant Bottle release button in the recessed area under the sealant
bottle.
3.Push the Sealant Bottle release button.The Sealant Bottle (1) will pop up.Remove the
bottle and dispose of it accordingly.
4.Clean any remaining sealant from the Tire Service Kit housing.
5.Position the new Sealant Bottle (1) in the housing so that the Sealant Hose (6) aligns
with the hose slot in the front of the housing.Push the bottle into the housing.An
audible click will be heard indicating the bottle is locked into place.
6.Verify that the cap is installed on the fitting at the end of the Sealant Hose (6) and
return the hose to its storage area (located on the bottom of the air pump).
7.Return the Tire Service Kit to its storage location in the vehicle.
NOTE:
•The metal end fitting from Power Plug (8) may get hot after use, so it should be
handled carefully.
•Failure to reinstall the cap on the fitting at the end of the Sealant Hose (6) can result
in sealant contacting your skin, clothing, and the vehicle’s interior.It can also result in
sealant contacting internal Tire Service Kit components which may cause permanent
damage to the kit.
WHAT TO DO IN EMERGENCIES
111
Page 126 of 148
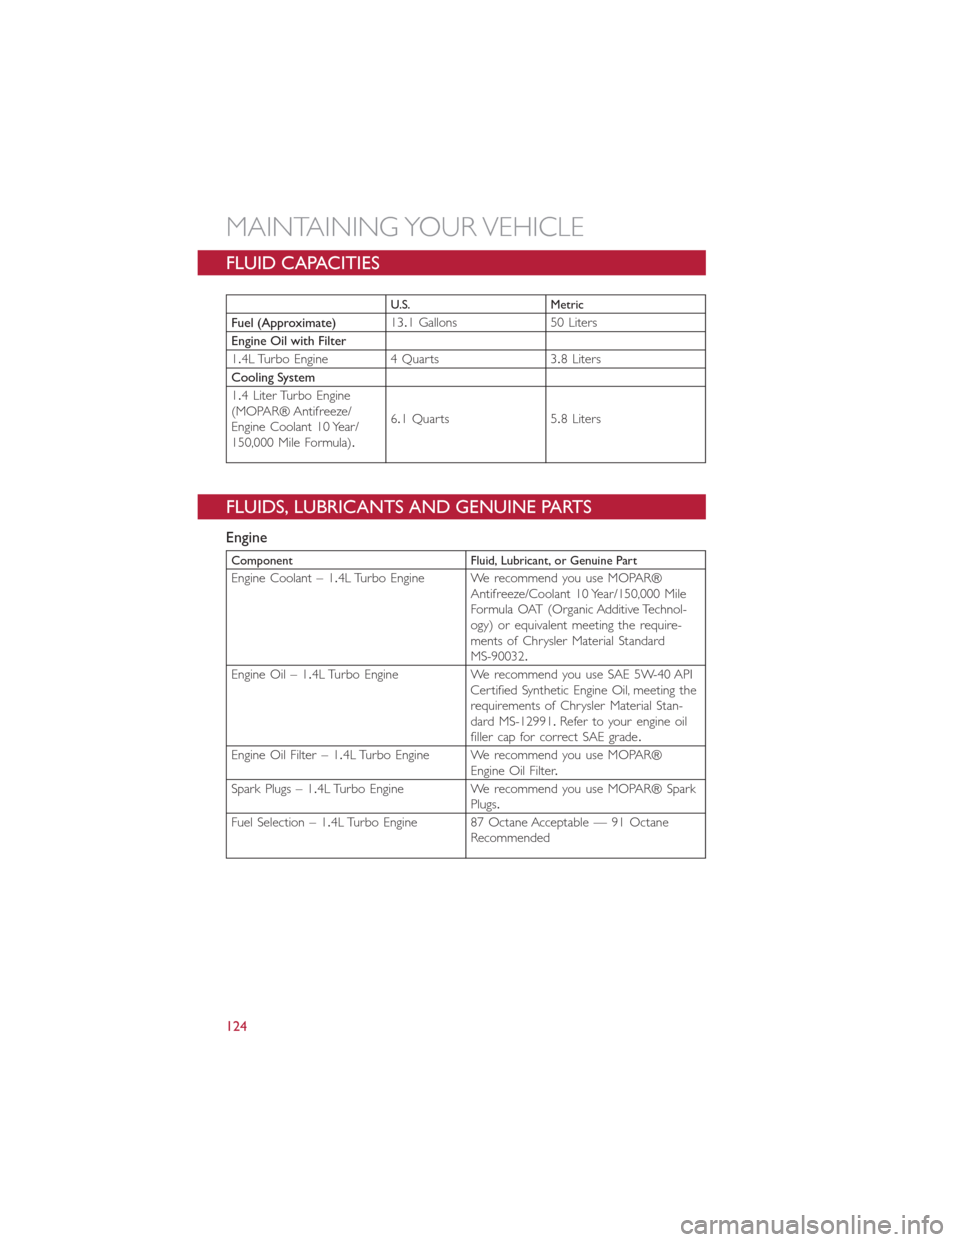
FLUID CAPACITIES
U.S. Metric
Fuel (Approximate)13.1 Gallons 50 Liters
Engine Oil with Filter
1.4L Turbo Engine 4 Quarts 3.8 Liters
Cooling System
1.4 Liter Turbo Engine(MOPAR® Antifreeze/Engine Coolant 10 Year/150,000 Mile Formula).
6.1Quarts 5.8 Liters
FLUIDS, LUBRICANTS AND GENUINE PARTS
Engine
Component Fluid, Lubricant, or Genuine Part
Engine Coolant – 1.4L Turbo Engine We recommend you use MOPAR®Antifreeze/Coolant 10 Year/150,000 MileFormula OAT (Organic Additive Technol-ogy) or equivalent meeting the require-ments of Chrysler Material StandardMS-90032.
Engine Oil – 1.4L Turbo Engine We recommend you use SAE 5W-40 APICertified Synthetic Engine Oil, meeting therequirements of Chrysler Material Stan-dard MS-12991.Refer to your engine oilfiller cap for correct SAE grade.
Engine Oil Filter – 1.4L Turbo Engine We recommend you use MOPAR®Engine Oil Filter.
Spark Plugs – 1.4L Turbo Engine We recommend you use MOPAR® SparkPlugs.
Fuel Selection – 1.4L Turbo Engine 87 Octane Acceptable — 91 OctaneRecommended
MAINTAINING YOUR VEHICLE
124
Page 127 of 148
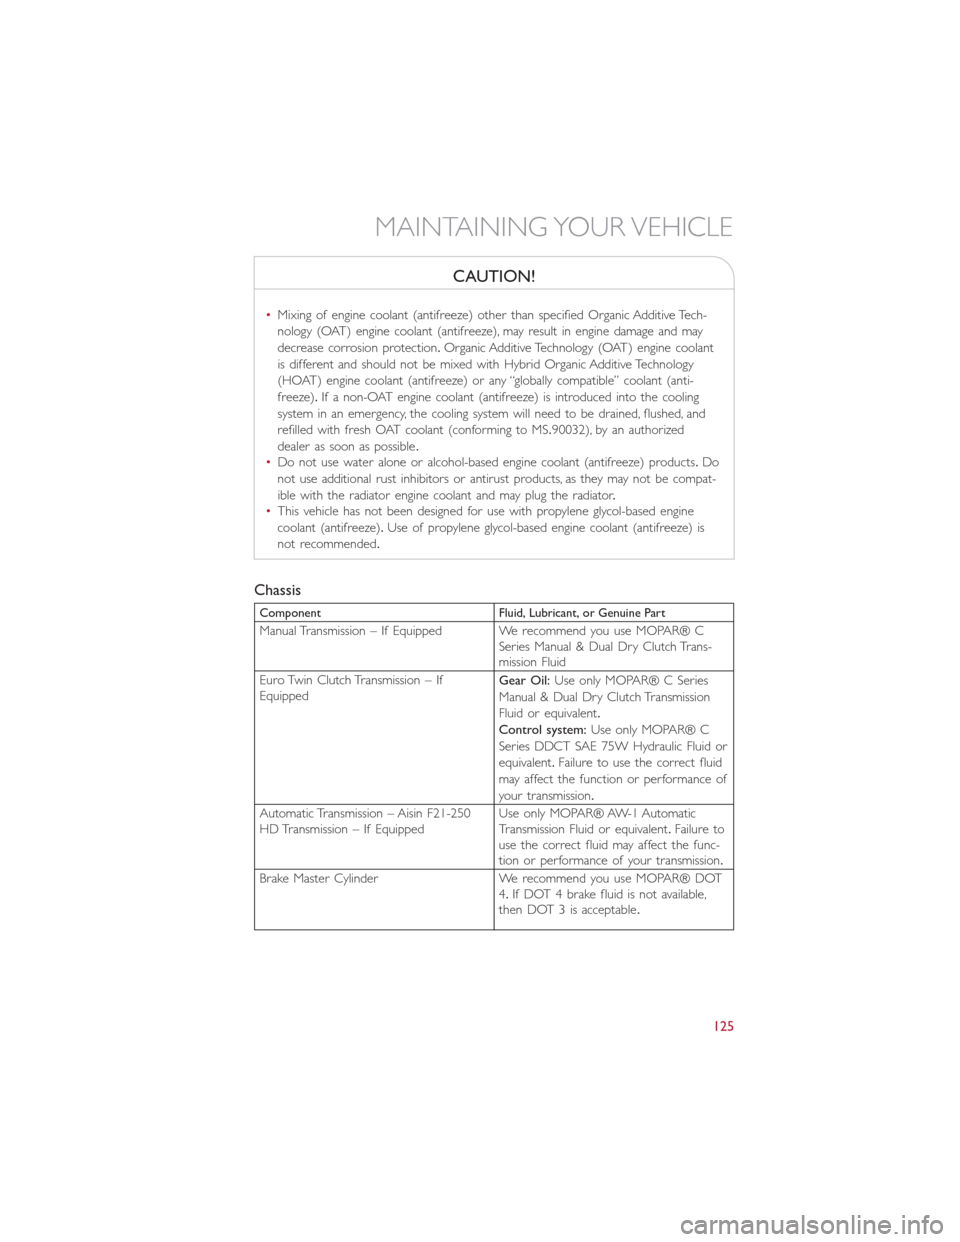
CAUTION!
•Mixing of engine coolant (antifreeze) other than specified Organic Additive Tech-
nology (OAT) engine coolant (antifreeze), may result in engine damage and may
decrease corrosion protection.Organic Additive Technology (OAT) engine coolant
is different and should not be mixed with Hybrid Organic Additive Technology
(HOAT) engine coolant (antifreeze) or any “globally compatible” coolant (anti-
freeze).If a non-OAT engine coolant (antifreeze) is introduced into the cooling
system in an emergency, the cooling system will need to be drained, flushed, and
refilled with fresh OAT coolant (conforming to MS.90032), by an authorized
dealer as soon as possible.
•Do not use water alone or alcohol-based engine coolant (antifreeze) products.Do
not use additional rust inhibitors or antirust products, as they may not be compat-
ible with the radiator engine coolant and may plug the radiator.
•This vehicle has not been designed for use with propylene glycol-based engine
coolant (antifreeze).Use of propylene glycol-based engine coolant (antifreeze) is
not recommended.
Chassis
Component Fluid, Lubricant, or Genuine Part
Manual Transmission – If Equipped We recommend you use MOPAR® CSeries Manual & Dual Dry Clutch Trans-mission Fluid
Euro Twin Clutch Transmission – IfEquippedGear Oil:Use only MOPAR® C Series
Manual & Dual Dry Clutch Transmission
Fluid or equivalent.
Control system:Use only MOPAR® C
Series DDCT SAE 75W Hydraulic Fluid or
equivalent.Failure to use the correct fluid
may affect the function or performance of
your transmission.
Automatic Transmission – Aisin F21-250HD Transmission – If EquippedUse only MOPAR® AW-1 AutomaticTransmission Fluid or equivalent.Failure touse the correct fluid may affect the func-tion or performance of your transmission.
Brake Master Cylinder We recommend you use MOPAR® DOT4.If DOT 4 brake fluid is not available,then DOT 3 is acceptable.
MAINTAINING YOUR VEHICLE
125