tire pressure FIAT 500L 2015 2.G User Guide
[x] Cancel search | Manufacturer: FIAT, Model Year: 2015, Model line: 500L, Model: FIAT 500L 2015 2.GPages: 148, PDF Size: 3.77 MB
Page 3 of 148
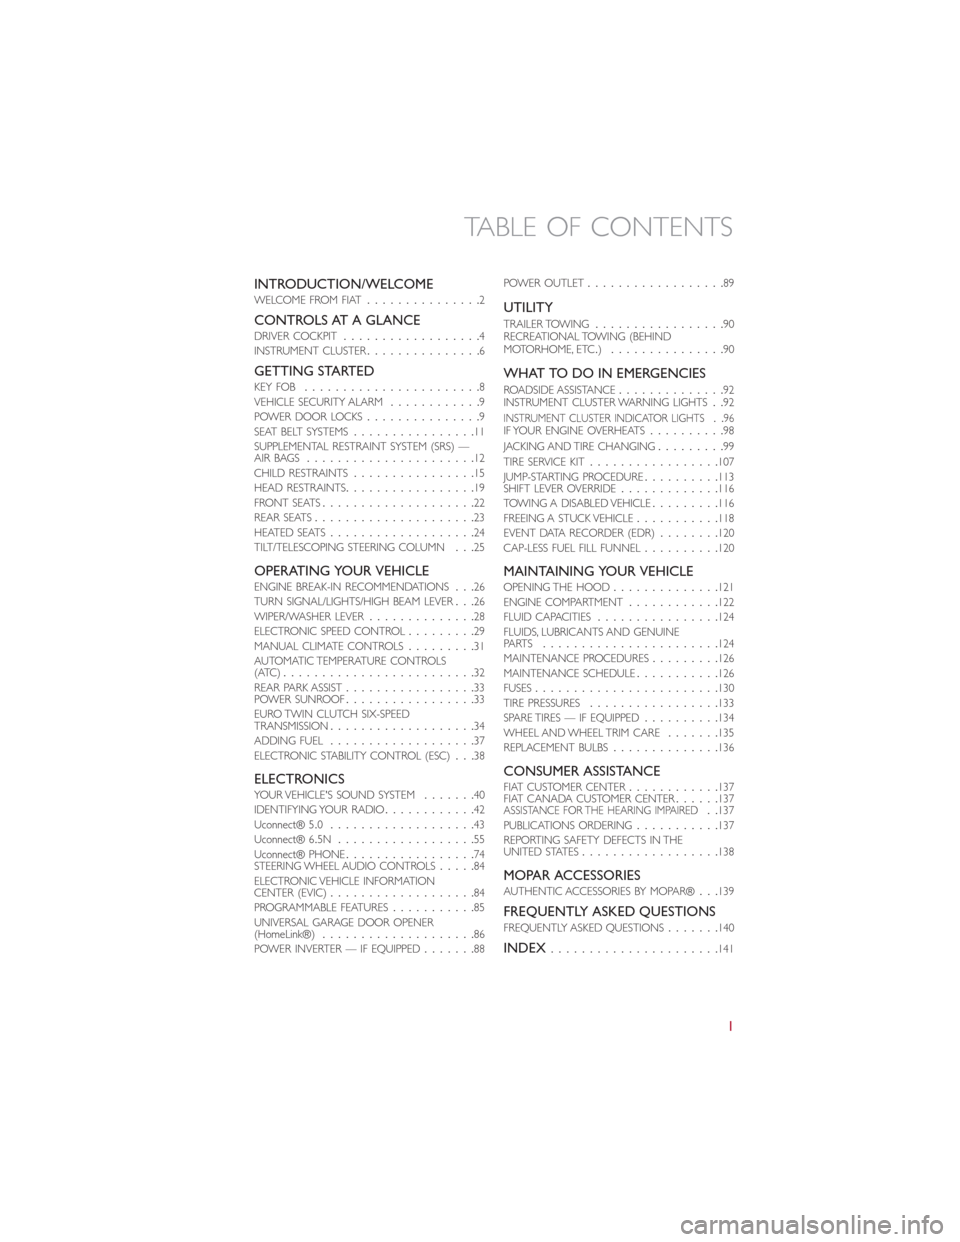
INTRODUCTION/WELCOMEWELCOME FROM FIAT...............2
CONTROLS AT A GLANCEDRIVER COCKPIT..................4INSTRUMENT CLUSTER...............6
GETTING STARTEDKEY FOB.......................8VEHICLE SECURITY ALARM............9POWER DOOR LOCKS...............9SEAT BELT SYSTEMS................11SUPPLEMENTAL RESTRAINT SYSTEM (SRS) —AIR BAGS......................12CHILD RESTRAINTS................15HEAD RESTRAINTS.................19FRONT SEATS....................22REAR SEATS.....................23HEATED SEATS...................24TILT/TELESCOPING STEERING COLUMN...25
OPERATING YOUR VEHICLEENGINE BREAK-IN RECOMMENDATIONS...26TURN SIGNAL/LIGHTS/HIGH BEAM LEVER...26WIPER/WASHER LEVER..............28ELECTRONIC SPEED CONTROL.........29MANUAL CLIMATE CONTROLS.........31AUTOMATIC TEMPERATURE CONTROLS(ATC).........................32REAR PARK ASSIST.................33POWER SUNROOF.................33EURO TWIN CLUTCH SIX-SPEEDTRANSMISSION...................34ADDING FUEL...................37ELECTRONIC STABILITY CONTROL (ESC)...38
ELECTRONICSYO U R V E H I C L E ' S S O U N D S YS T E M.......40IDENTIFYING YOUR RADIO............42Uconnect® 5.0...................43Uconnect® 6.5N..................55Uconnect® PHONE.................74STEERING WHEEL AUDIO CONTROLS.....84ELECTRONIC VEHICLE INFORMATIONCENTER (EVIC)...................84PROGRAMMABLE FEATURES...........85UNIVERSAL GARAGE DOOR OPENER(HomeLink®)....................86POWER INVERTER — IF EQUIPPED.......88
POWER OUTLET..................89
UTILITY
TRAILER TOWING.................90RECREATIONAL TOWING (BEHINDMOTORHOME, ETC.)...............90
WHAT TO DO IN EMERGENCIES
ROADSIDE ASSISTANCE..............92INSTRUMENT CLUSTER WARNING LIGHTS..92INSTRUMENT CLUSTER INDICATOR LIGHTS..96IF YOUR ENGINE OVERHEATS..........98JACKING AND TIRE CHANGING.........99TIRE SERVICE KIT.................107JUMP-STARTING PROCEDURE..........113SHIFT LEVER OVERRIDE.............116TOW I N G A D I S A B L E D V E H I C L E.........116FREEING A STUCK VEHICLE...........118EVENT DATA RECORDER (EDR)........120CAP-LESS FUEL FILL FUNNEL..........120
MAINTAINING YOUR VEHICLEOPENING THE HOOD..............121ENGINE COMPARTMENT............122FLUID CAPACITIES................124FLUIDS, LUBRICANTS AND GENUINEPA RT S.......................124MAINTENANCE PROCEDURES.........126MAINTENANCE SCHEDULE...........126FUSES........................130TIRE PRESSURES.................133SPARE TIRES — IF EQUIPPED..........134WHEEL AND WHEEL TRIM CARE.......135REPLACEMENT BULBS..............136
CONSUMER ASSISTANCEFIAT CUSTOMER CENTER............137FIAT CANADA CUSTOMER CENTER......137ASSISTANCE FOR THE HEARING IMPAIRED..137PUBLICATIONS ORDERING...........137REPORTING SAFETY DEFECTS IN THEUNITED STATES..................138
MOPAR ACCESSORIESAUTHENTIC ACCESSORIES BY MOPAR®...139
FREQUENTLY ASKED QUESTIONSFREQUENTLY ASKED QUESTIONS.......140
INDEX......................141
TABLE OF CONTENTS
1
Page 25 of 148
WARNING!
•Adjusting a seat while the vehicle is moving is dangerous.The sudden movement
of the seat could cause you to lose control.The seat belt might not be properly
adjusted, and you could be severely injured or killed.Only adjust a seat while the
vehicle is parked.
•Actuating the recliner handle will allow the seatback to swing forward.Do not
stand or lean in front of the seatback while actuating the handle.The seatback
may swing forward and strike you, causing injury.To avoid possible injury, place
your hand on the seatback while actuating the recliner handle.
•Do not ride with the seatback reclined so that the seat belt is no longer resting
against your chest.In a collision, you could slide under the seat belt and be se-
verely injured or killed.Use the recliner only when the vehicle is parked.
REAR SEATS
Manual Rear Seat Adjustment
Forward/Rearward
•Lift up on the adjusting handle, located at the front of the seat near the floor, and re-
lease at the desired position.Then, using body pressure, move forward and backward
on the seat to be sure that the seat adjusters have latched.
Recliner
•To recline the seatback, lift up the recline lever, located on the outboard side of the
seat, lean back until the desired position has been reached, and release the lever.
Fold And Tumble Rear Seat
•Be sure that the front seats are fully upright and positioned forward.This will allow the
rear seat to fold down easily.
•Lift the seatback release lever located on the upper outboard side of the seat and fold
the seatback forward.
•To tumble the seat, lift upward on the recliner lever and slowly flip the entire seat
forward.
GETTING STARTED
23
Page 94 of 148
ROADSIDE ASSISTANCE
•If your FIAT 500L requires jump start assistance, out of gas/fuel delivery, tire service,
lockout service or towing due to a defect covered under the Basic Limited Warranty,
dial toll-free 1-888-242-6342 or 1-800-363-4869 for Canadian Residents.See your
Warranty booklet for further details.
•Provide your name, vehicle identification number and license plate number.
•Provide your location, including telephone number, from which you are calling.
•Briefly describe the nature of the problem and answer a few simple questions.
•You will be given the name of the service provider and an estimated time of arrival.If
you feel you are in an “unsafe situation,” please let us know.With your consent, we will
contact local police or safety authorities.
INSTRUMENT CLUSTER WARNING LIGHTS
- Low Fuel Warning Light
This warning light indicates when the fuel level reaches approximately 2.0 gal (7.8 L).This
light will turn on and a single chime will sound.
Charging System Light
This light shows the status of the electrical charging system.If the charging system light
remains on, it means that the vehicle is experiencing a problem with the charging system.
We recommend you do not continue driving if the charging system light is on.Have the
vehicle serviced immediately.
Oil Pressure Warning Light
This light indicates low engine oil pressure.If the light turns on while driving, stop the
vehicle and shut off the engine as soon as possible.A chime will sound when this light
turns on.
We recommend you do not operate the vehicle or engine damage will occur.Have the
vehicle serviced immediately.
Anti-Lock Brake (ABS) Light
This light monitors the Anti-Lock Brake System (ABS).
If the light is not on during starting, stays on or turns on while driving, we recommend
you contact the nearest authorized dealer and have the vehicle serviced immediately.
Air Bag Warning Light
If the light is not on during starting, stays on, or turns on while driving, have the vehicle
serviced by an authorized dealer immediately.
WHAT TO DO IN EMERGENCIES
92
Page 95 of 148
Tire Pressure Monitoring System (TPMS) Light
Each tire, including the spare (if provided), should be checked monthly when cold and
inflated to the inflation pressure recommended by the vehicle manufacturer on the ve-
hicle placard or tire inflation pressure label.(If your vehicle has tires of a different size
than the size indicated on the vehicle placard or tire inflation pressure label, you should
determine the proper tire inflation pressure for those tires).
As an added safety feature, your vehicle has been equipped with a tire pressure monitor-
ing system (TPMS) that illuminates a low tire pressure telltale when one or more of your
tires is significantly under-inflated.Accordingly, when the low tire pressure telltale illumi-
nates, you should stop and check your tires as soon as possible and inflate them to the
proper pressure.Driving on a significantly under-inflated tire causes the tire to overheat
and can lead to tire failure.Under-inflation also reduces fuel efficiency and tire tread life
and may affect the vehicle’s handling and stopping ability.
IF THE LIGHT STARTS FLASHING INDICATING A LOW TIRE PRESSURE, ADJUST
THE AIR PRESSURE IN THE LOW TIRE TO THE AIR PRESSURE SHOWN ON THE
VEHICLE PLACARD OR TIRE INFLATION PRESSURE LABEL LOCATED ON THE
DRIVER'S DOOR.
NOTE:
AFTER INFLATION, THE VEHICLE MAY NEED TO BE DRIVEN FOR 20 MINUTES BE-
FORE THE FLASHING LIGHT WILL TURN OFF.
Please note that the TPMS is not a substitute for proper tire maintenance, and it is the
driver’s responsibility to maintain correct tire pressure, even if under-inflation has not
reached the level to trigger illumination of the TPMS low tire pressure telltale.
Your vehicle has also been equipped with a TPMS malfunction indicator to indicate when
the system is not operating properly.The TPMS malfunction indicator is combined with
the low tire pressure telltale.
When the system detects a malfunction, the telltale will flash for approximately one min-
ute and then remain continuously illuminated.This sequence will continue upon subse-
quent vehicle start-ups as long as the malfunction exists.When the malfunction indicator
is illuminated, the system may not be able to detect or signal low tire pressure as in-
tended.TPMS malfunctions may occur for a variety of reasons, including the installation of
replacement or alternate tires or wheels on the vehicle that prevent the TPMS from
functioning properly.Always check the TPMS malfunction telltale after replacing one or
more tires or wheels on your vehicle to ensure that the replacement or alternate tires
and wheels allow the TPMS to continue to function properly.
NOTE:
Tire pressures change by approximately 1 psi (7 kPa) per 12° F (7° C) of air tempera-
ture change.Keep this in mind when checking tire pressure inside a garage, especially in
the Winter.Example: If garage temperature is 68°F (20°C), and the outside temperature
is 32°F (0°C), then the cold tire inflation pressure should be increased by 3 psi (21 kPa),
which equals 1 psi (7 kPa) for every 12°F (7°C) for this outside temperature condition.
WHAT TO DO IN EMERGENCIES
93
Page 106 of 148
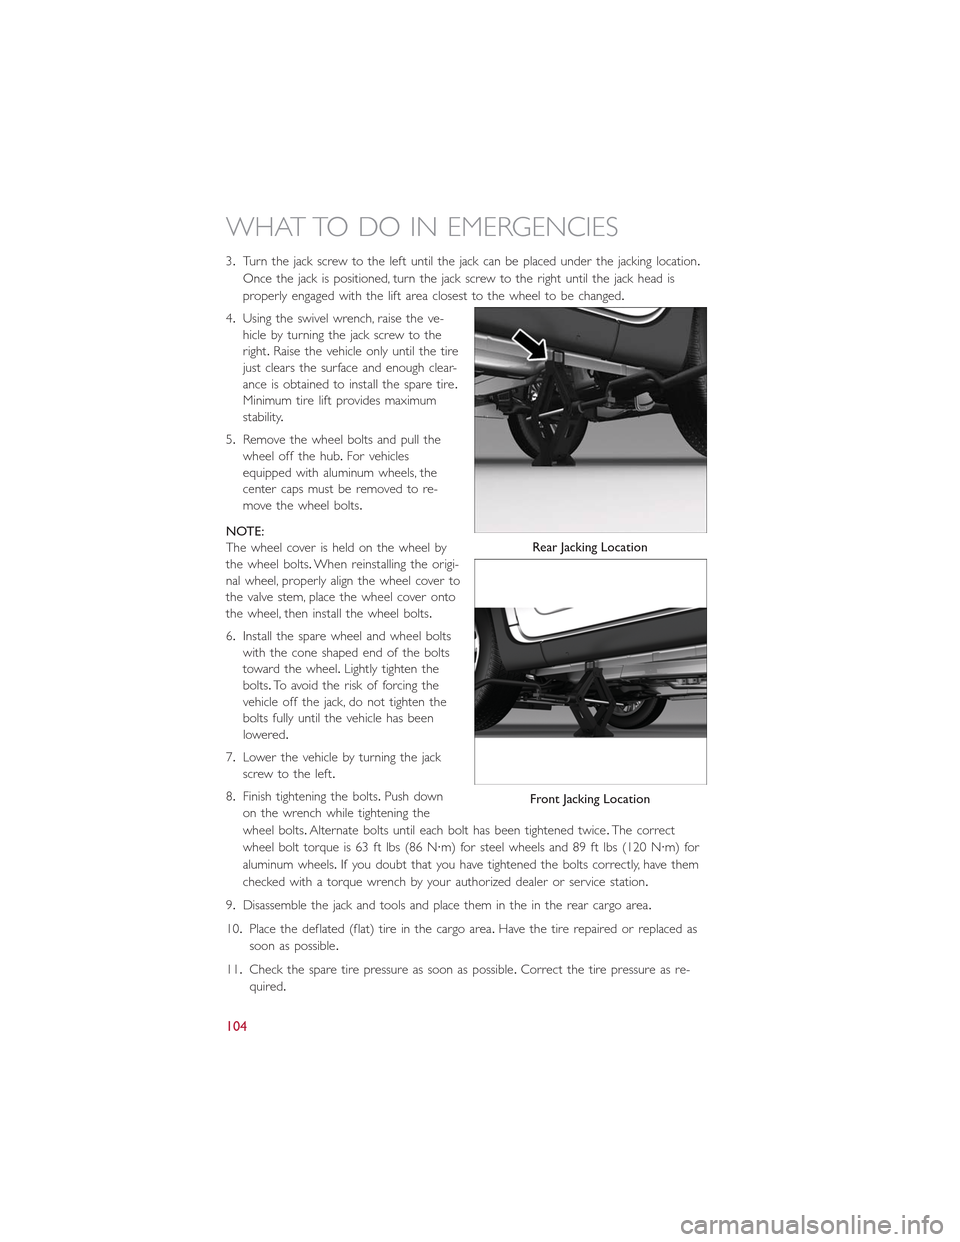
3.Turn the jack screw to the left until the jack can be placed under the jacking location.
Once the jack is positioned, turn the jack screw to the right until the jack head is
properly engaged with the lift area closest to the wheel to be changed.
4.Using the swivel wrench, raise the ve-
hicle by turning the jack screw to the
right.Raise the vehicle only until the tire
just clears the surface and enough clear-
ance is obtained to install the spare tire.
Minimum tire lift provides maximum
stability.
5.Remove the wheel bolts and pull the
wheel off the hub.For vehicles
equipped with aluminum wheels, the
center caps must be removed to re-
move the wheel bolts.
NOTE:
The wheel cover is held on the wheel by
the wheel bolts.When reinstalling the origi-
nal wheel, properly align the wheel cover to
the valve stem, place the wheel cover onto
the wheel, then install the wheel bolts.
6.Install the spare wheel and wheel bolts
with the cone shaped end of the bolts
toward the wheel.Lightly tighten the
bolts.To avoid the risk of forcing the
vehicle off the jack, do not tighten the
bolts fully until the vehicle has been
lowered.
7.Lower the vehicle by turning the jack
screw to the left.
8.Finish tightening the bolts.Push down
on the wrench while tightening the
wheel bolts.Alternate bolts until each bolt has been tightened twice.The correct
wheel bolt torque is 63 ft lbs (86 N·m) for steel wheels and 89 ft lbs (120 N·m) for
aluminum wheels.If you doubt that you have tightened the bolts correctly, have them
checked with a torque wrench by your authorized dealer or service station.
9.Disassemble the jack and tools and place them in the in the rear cargo area.
10.Place the deflated (flat) tire in the cargo area.Have the tire repaired or replaced as
soon as possible.
11.Check the spare tire pressure as soon as possible.Correct the tire pressure as re-
quired.
Rear Jacking Location
Front Jacking Location
WHAT TO DO IN EMERGENCIES
104
Page 109 of 148
TIRE SERVICE KIT
Your vehicle may be equipped with a Tire Service Kit.
Small punctures up to 1/4” (6 mm) in the tire tread can be sealed with the Tire Service
Kit.Foreign objects (e.g., screws or nails) should not be removed from the tire.The Tire
Service Kit can be used in outside temperatures down to approximately -4°F (-20°C).
This kit will provide a temporary tire seal, allowing you to drive your vehicle up to 100
miles (160 km) with a maximum speed of 55 mph (90 km/h).
Tire Service Kit Storage
The Tire Service Kit is located in the rear trunk area on the left side.
Tire Service Kit Components And Operation
Using The Mode Select Knob And Hoses
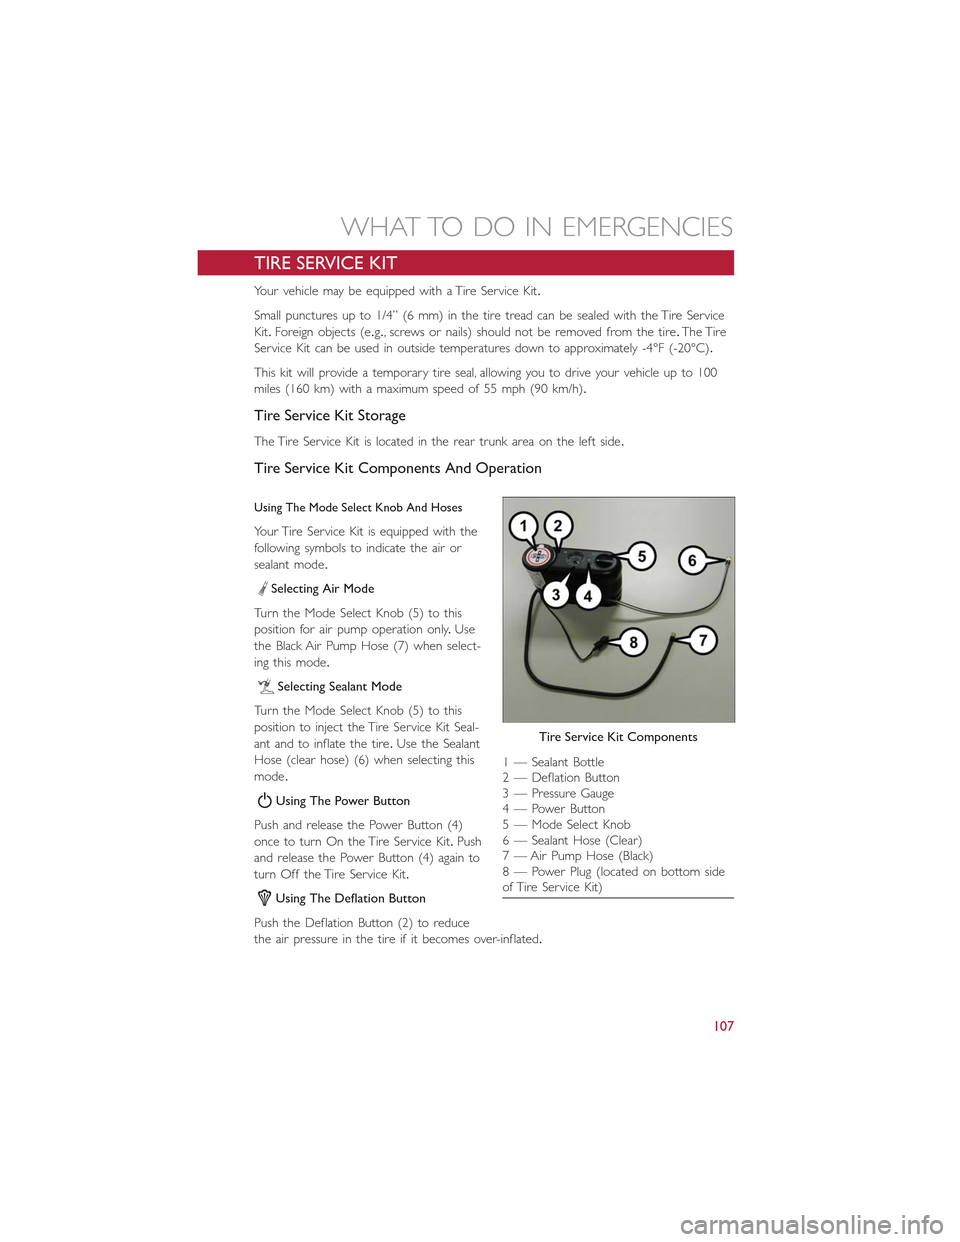
Your Tire Service Kit is equipped with the
following symbols to indicate the air or
sealant mode.
Selecting Air Mode
Turn the Mode Select Knob (5) to this
position for air pump operation only.Use
the Black Air Pump Hose (7) when select-
ing this mode.
Selecting Sealant Mode
Turn the Mode Select Knob (5) to this
position to inject the Tire Service Kit Seal-
ant and to inflate the tire.Use the Sealant
Hose (clear hose) (6) when selecting this
mode.
Using The Power Button
Push and release the Power Button (4)
once to turn On the Tire Service Kit.Push
and release the Power Button (4) again to
turn Off the Tire Service Kit.
Using The Deflation Button
Push the Deflation Button (2) to reduce
the air pressure in the tire if it becomes over-inflated.
Tire Service Kit Components
1 — Sealant Bottle2 — Deflation Button3 — Pressure Gauge4 — Power Button5 — Mode Select Knob6 — Sealant Hose (Clear)7 — Air Pump Hose (Black)8 — Power Plug (located on bottom sideof Tire Service Kit)
WHAT TO DO IN EMERGENCIES
107
Page 111 of 148
5.Uncoil the Power Plug (8) and insert the plug into the vehicle’s 12 Volt power outlet.
6.Do not remove foreign objects (e.g., screws or nails) from the tire.
(C) Injecting Tire Service Kit Sealant Into The Deflated Tire:
Always start the engine before turning ON the Tire Service Kit.
NOTE:
Manual transmission vehicles must have the parking brake engaged and the shift lever in
NEUTRAL.
After pushing the Power Button (4), the sealant (white fluid) will flow from the Sealant
Bottle (1) through the Sealant Hose (6) and into the tire.
NOTE:
Sealant may leak out through the puncture in the tire.
If the sealant (white fluid) does not flow within 0 – 10seconds through the Sealant Hose
(6):
1.Push the Power Button (4) to turn Off the Tire Service Kit.Disconnect the Sealant
Hose (6) from the valve stem.Make sure the valve stem is free of debris.Reconnect
the Sealant Hose (6) to the valve stem.Check that the Mode Select Knob (5) is in
the Sealant Mode position and not Air Mode.Push the Power Button (4) to turn On
the Tire Service Kit.
2.Connect the Power Plug (8) to a different 12 Volt power outlet in your vehicle or
another vehicle, if available.Make sure the engine is running before turning ON the
Tire Service Kit.
3.The Sealant Bottle (1) may be empty due to previous use.Call for assistance.
NOTE:
If the Mode Select Knob (5) is on Air Mode and the pump is operating, air will dispense
from the Air Pump Hose (7) only, not the Sealant Hose (6).
If the sealant (white fluid) does flow through the Sealant Hose (6):
1.Continue to operate the pump until sealant is no longer flowing through the hose
(typically takes 30 - 70 seconds).As the sealant flows through the Sealant Hose (6),
the Pressure Gauge (3) can read as high as 70 psi (4.8 Bar).The Pressure Gauge (3)
will decrease quickly from approximately 70 psi (4.8 Bar) to the actual tire pressure
when the Sealant Bottle (1) is empty.
2.The pump will start to inject air into the tire immediately after the Sealant Bottle (1)
is empty.Continue to operate the pump and inflate the tire to the pressure indicated
on the tire pressure label on the driver-side latch pillar (recommended pressure).
Check the tire pressure by looking at the Pressure Gauge (3).
WHAT TO DO IN EMERGENCIES
109
Page 112 of 148
If the tire does not inflate to at least 26 psi (1.8 Bar) pressure within 15 minutes:
The tire is too badly damaged.Do not attempt to drive the vehicle further.Call for assis-
tance.
NOTE:
If the tire becomes over-inflated, push the Deflation Button to reduce the tire pressure
to the recommended inflation pressure before continuing.
If the tire inflates to the recommended pressure or is at least 26 psi (1.8 Bar) pressure
within 15 minutes:
1.Push the Power Button (4) to turn off the Tire Service Kit.
2.Remove the Speed Limit sticker from the top of the Sealant Bottle (1) and place the
sticker on the instrument panel.
3.Immediately disconnect the Sealant Hose (6) from the valve stem, reinstall the cap on
the fitting at the end of the hose, and place the Tire Service Kit in the vehicle storage
location.Quickly proceed to (D) “Drive Vehicle.”
(D) Drive Vehicle:
Immediately after injecting sealant and inflating the tire, drive the vehicle 5 miles (8 km)
or 10 minutes to ensure distribution of the Tire Service Kit Sealant within the tire.Do
not exceed 55 mph (88 km/h).
(E) After Driving:
Pull over to a safe location.Refer to “Whenever You Stop to Use Tire Service Kit” before
continuing.
1.Turn the Mode Select Knob (5) to the Air Mode position.
2.Uncoil the Air Pump Hose (7) (black in color) and screw the fitting at the end of
hose (7) onto the valve stem.
3.Uncoil the power plug and insert the plug into the vehicles 12 Volt power outlet.
4.Check the pressure in the tire by reading the Pressure Gauge (3).
If tire pressure is less than 19 psi (1.3 Bar), the tire is too badly damaged. Do not at-
tempt to drive the vehicle further. Call for assistance.
If the tire pressure is 19 psi (1.3 Bar) or higher:
1.Push the Power Button (4) to turn on Tire Service Kit and inflate the tire to the pres-
sure indicated on the tire and loading information label on the driver-side door open-
ing.
2.Disconnect the Tire Service Kit from the valve stem, reinstall the cap on the valve
stem and unplug from 12 Volt outlet.
3.Place the Tire Service Kit in its proper storage area in the vehicle.
4.Have the tire inspected and repaired or replaced at the earliest opportunity at an
authorized dealer or tire service center.
WHAT TO DO IN EMERGENCIES
110
Page 113 of 148
5.Remove the Speed Limit sticker from the instrument panel after the tire has been
repaired.
6.Replace the Sealant Bottle (1) and Sealant Hose (6) assembly at your authorized
dealer as soon as possible.Refer to “(F) Sealant Bottle and Hose Replacement.”
NOTE:
•If the tire becomes over-inflated, push the Deflation Button to reduce the tire pressure
to the recommended inflation pressure before continuing.
•When having the tire serviced, advise the authorized dealer or service center that the
tire has been sealed using the Tire Service Kit.
(F) Sealant Bottle And Hose Replacement:
1.Uncoil the Sealant Hose (6) (clear in color).
2.Locate the round Sealant Bottle release button in the recessed area under the sealant
bottle.
3.Push the Sealant Bottle release button.The Sealant Bottle (1) will pop up.Remove the
bottle and dispose of it accordingly.
4.Clean any remaining sealant from the Tire Service Kit housing.
5.Position the new Sealant Bottle (1) in the housing so that the Sealant Hose (6) aligns
with the hose slot in the front of the housing.Push the bottle into the housing.An
audible click will be heard indicating the bottle is locked into place.
6.Verify that the cap is installed on the fitting at the end of the Sealant Hose (6) and
return the hose to its storage area (located on the bottom of the air pump).
7.Return the Tire Service Kit to its storage location in the vehicle.
NOTE:
•The metal end fitting from Power Plug (8) may get hot after use, so it should be
handled carefully.
•Failure to reinstall the cap on the fitting at the end of the Sealant Hose (6) can result
in sealant contacting your skin, clothing, and the vehicle’s interior.It can also result in
sealant contacting internal Tire Service Kit components which may cause permanent
damage to the kit.
WHAT TO DO IN EMERGENCIES
111
Page 114 of 148
WARNING!
•Do not attempt to seal a tire on the side of the vehicle closest to traffic.Pull far
enough off the road to avoid the danger of being hit when using the Tire Service
Kit.
•Do not use the Tire Service Kit or drive the vehicle under the following circum-
stances:
•If the puncture in the tire tread is approximately 1/4”.(6 mm) or larger.
•If the tire has any sidewall damage.
•If the tire has any damage from driving with extremely low tire pressure.
•If the tire has any damage from driving on a flat tire.
•If the wheel has any damage.
•If you are unsure of the condition of the tire or the wheel.
•Keep the Tire Service Kit away from open flames or heat source.
•A loose Tire Service Kit thrown forward in a collision or hard stop could endanger
the occupants of the vehicle.Always stow the Tire Service Kit in the place pro-
vided.Failure to follow these warnings can result in injuries that are serious or
fatal to you, your passengers, and others around you.
•Take care not to allow the contents of the Tire Service Kit to come in contact
with hair, eyes, or clothing.The Tire Service Kit is harmful if inhaled, swallowed, or
absorbed through the skin.It causes skin, eye, and respiratory irritation.Flush im-
mediately with plenty of water if there is any contact with eyes or skin.Change
clothing as soon as possible, if there is any contact with clothing.
•The Tire Service Kit Sealant solution contains latex.In case of an allergic reaction
or rash, consult a physician immediately.Keep the Tire Service Kit out of reach of
children.If swallowed, rinse mouth immediately with plenty of water and drink
plenty of water.Do not induce vomiting! Consult a physician immediately.
•The Tire Service Kit is not a permanent flat tire repair.Have the tire inspected
and repaired or replaced after using the Tire Service Kit.Do not exceed 55 mph
(88 km/h) until the tire is repaired or replaced.Failure to follow this warning can
result in injuries that are serious or fatal to you, your passengers, and others
around you.
WHAT TO DO IN EMERGENCIES
112