tow FIAT 500L 2015 2.G User Guide
[x] Cancel search | Manufacturer: FIAT, Model Year: 2015, Model line: 500L, Model: FIAT 500L 2015 2.GPages: 148, PDF Size: 3.77 MB
Page 3 of 148
INTRODUCTION/WELCOMEWELCOME FROM FIAT...............2
CONTROLS AT A GLANCEDRIVER COCKPIT..................4INSTRUMENT CLUSTER...............6
GETTING STARTEDKEY FOB.......................8VEHICLE SECURITY ALARM............9POWER DOOR LOCKS...............9SEAT BELT SYSTEMS................11SUPPLEMENTAL RESTRAINT SYSTEM (SRS) —AIR BAGS......................12CHILD RESTRAINTS................15HEAD RESTRAINTS.................19FRONT SEATS....................22REAR SEATS.....................23HEATED SEATS...................24TILT/TELESCOPING STEERING COLUMN...25
OPERATING YOUR VEHICLEENGINE BREAK-IN RECOMMENDATIONS...26TURN SIGNAL/LIGHTS/HIGH BEAM LEVER...26WIPER/WASHER LEVER..............28ELECTRONIC SPEED CONTROL.........29MANUAL CLIMATE CONTROLS.........31AUTOMATIC TEMPERATURE CONTROLS(ATC).........................32REAR PARK ASSIST.................33POWER SUNROOF.................33EURO TWIN CLUTCH SIX-SPEEDTRANSMISSION...................34ADDING FUEL...................37ELECTRONIC STABILITY CONTROL (ESC)...38
ELECTRONICSYO U R V E H I C L E ' S S O U N D S YS T E M.......40IDENTIFYING YOUR RADIO............42Uconnect® 5.0...................43Uconnect® 6.5N..................55Uconnect® PHONE.................74STEERING WHEEL AUDIO CONTROLS.....84ELECTRONIC VEHICLE INFORMATIONCENTER (EVIC)...................84PROGRAMMABLE FEATURES...........85UNIVERSAL GARAGE DOOR OPENER(HomeLink®)....................86POWER INVERTER — IF EQUIPPED.......88
POWER OUTLET..................89
UTILITY
TRAILER TOWING.................90RECREATIONAL TOWING (BEHINDMOTORHOME, ETC.)...............90
WHAT TO DO IN EMERGENCIES
ROADSIDE ASSISTANCE..............92INSTRUMENT CLUSTER WARNING LIGHTS..92INSTRUMENT CLUSTER INDICATOR LIGHTS..96IF YOUR ENGINE OVERHEATS..........98JACKING AND TIRE CHANGING.........99TIRE SERVICE KIT.................107JUMP-STARTING PROCEDURE..........113SHIFT LEVER OVERRIDE.............116TOW I N G A D I S A B L E D V E H I C L E.........116FREEING A STUCK VEHICLE...........118EVENT DATA RECORDER (EDR)........120CAP-LESS FUEL FILL FUNNEL..........120
MAINTAINING YOUR VEHICLEOPENING THE HOOD..............121ENGINE COMPARTMENT............122FLUID CAPACITIES................124FLUIDS, LUBRICANTS AND GENUINEPA RT S.......................124MAINTENANCE PROCEDURES.........126MAINTENANCE SCHEDULE...........126FUSES........................130TIRE PRESSURES.................133SPARE TIRES — IF EQUIPPED..........134WHEEL AND WHEEL TRIM CARE.......135REPLACEMENT BULBS..............136
CONSUMER ASSISTANCEFIAT CUSTOMER CENTER............137FIAT CANADA CUSTOMER CENTER......137ASSISTANCE FOR THE HEARING IMPAIRED..137PUBLICATIONS ORDERING...........137REPORTING SAFETY DEFECTS IN THEUNITED STATES..................138
MOPAR ACCESSORIESAUTHENTIC ACCESSORIES BY MOPAR®...139
FREQUENTLY ASKED QUESTIONSFREQUENTLY ASKED QUESTIONS.......140
INDEX......................141
TABLE OF CONTENTS
1
Page 22 of 148
Reactive Head Restraints — Front Seats
The front driver and passenger seats are equipped with Reactive Head Restraints.In the
event of a rear impact the Reactive Head Restraints will automatically extend forward
minimizing the gap between the back of the occupant's head and the Reactive Head Re-
straint.
To raise the head restraint, pull upward on the head restraint.To lower the head re-
straint, push the adjustment button located at the base of the head restraint, and push
downward on the head restraint.
To remove the head restraint, raise it as far as it can go then push the adjustment button,
and the release button at the base of each post while pulling the head restraint up.To
reinstall the head restraint, put the head restraint posts into the holes and push down-
ward.Then adjust it to the appropriate height.
The Reactive Head Restraints will automatically return to their normal position following a
rear impact.If the Reactive Head Restraints do not return to their normal position, see
your authorized dealership immediately.
WARNING!
•A loose head restraint thrown forward in a collision or hard stop could cause seri-
ous injury or death to occupants of the vehicle.Always securely stow removed
head restraints in a location outside the occupant compartment.
•ALL the head restraints MUST be reinstalled in the vehicle to properly protect
the occupants.Follow the re-installation instructions above prior to operating the
vehicle or occupying a seat.
•Do not place items over the top of the Active Head Restraint, such as coats, seat
covers or portable DVD players.These items may interfere with the operation of
the Reactive Head Restraint in the event of a collision and could result in serious
injury or death.
GETTING STARTED
20
Page 23 of 148
Rear Head Restraints
The rear seats are equipped with adjustable head restraints, the outboard head restraints
have two comfort positions, while the central head restraint have to use in the raised
position.When there are no occupants in the center seat, the head restraint can be low-
ered for maximum visibility for the driver.When the center seat is being occupied, the
head restraint has to be in the raised position.
NOTE:
If the center rear head restraints requires removal, see your authorized dealer.
To raise the outboard head restraints, pull upward on the head restraint.To lower the
head restraints, push the adjustment button located at the base of the head restraint, and
push downward on the head restraint.
To remove the outboard head restraints, raise it as far as it can go then push the adjust-
ment button, and the release button at the base of each post while pulling the head re-
straint up.To reinstall the head restraint, put the head restraint posts into the holes and
push downward.Then adjust it to the appropriate height.
WARNING!
A loose head restraint thrown forward in a collision or hard stop could cause serious
injury or death to occupants of the vehicle.Always securely stow removed head re-
straints in a location outside the occupant compartment.
For proper routing of a Child Seat Tether, refer to “Occupant Restraints” in “Things to
Know Before Starting Your Vehicle” in your Owner’s Manual on the DVD for further
details.
WARNING!
ALL the head restraints MUST be reinstalled in the vehicle to properly protect the oc-
cupants.Follow the re-installation instructions above prior to operating the vehicle or
occupying a seat.
GETTING STARTED
21
Page 27 of 148
TILT/TELESCOPING STEERING COLUMN
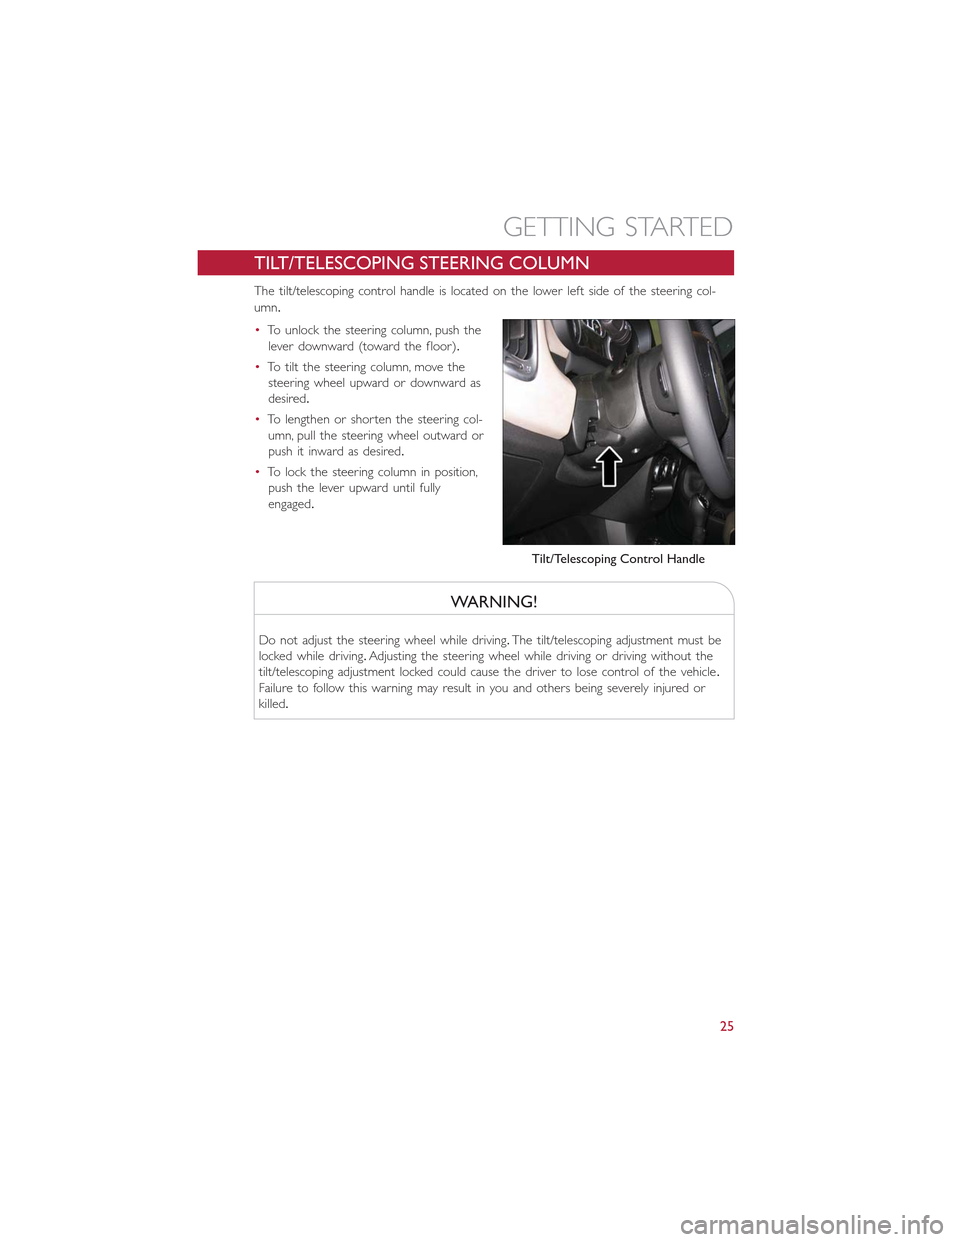
The tilt/telescoping control handle is located on the lower left side of the steering col-
umn.
•To unlock the steering column, push the
lever downward (toward the floor).
•To tilt the steering column, move the
steering wheel upward or downward as
desired.
•To lengthen or shorten the steering col-
umn, pull the steering wheel outward or
push it inward as desired.
•To lock the steering column in position,
push the lever upward until fully
engaged.
WARNING!
Do not adjust the steering wheel while driving.The tilt/telescoping adjustment must be
locked while driving.Adjusting the steering wheel while driving or driving without the
tilt/telescoping adjustment locked could cause the driver to lose control of the vehicle.
Failure to follow this warning may result in you and others being severely injured or
killed.
Tilt/Telescoping Control Handle
GETTING STARTED
25
Page 29 of 148
High Beams
•Pull the lever rearward to activate the high beams.
•A high beam symbol will illuminate in the cluster to indicate the high beams are on.
NOTE:
For safe driving, turn off the high beams when oncoming traffic is present to prevent
headlight glare and as a courtesy to other motorists.
Flash To Pass
•Pull the lever toward you to activate the high beams.The high beams will remain on
until the lever is released.
Headlight Delay (Follow Me Home)
•Within two minutes of the ignition switch being turned to the OFF/LOCK position or
the ignition key being removed from the ignition, pull the turn signal lever toward the
steering wheel.
•Each movement of the lever toward the steering wheel will increase the illumination
period by 30 seconds, up to a maximum of 210 seconds.
•To deactivate, pull the multifunction lever toward the steering wheel and hold it for
more than two seconds.
NOTE:
Activation of Follow Me Home is only enabled once per key cycle and the steps outlined
above must be repeated each time you want to activate it.
Fog Lights
•Push the fog light button, located on the center stack of the instrument panel just be-
low the radio, once to turn on the fog lights.
•Push the button a second time to turn the fog lights off.
OPERATING YOUR VEHICLE
27
Page 30 of 148
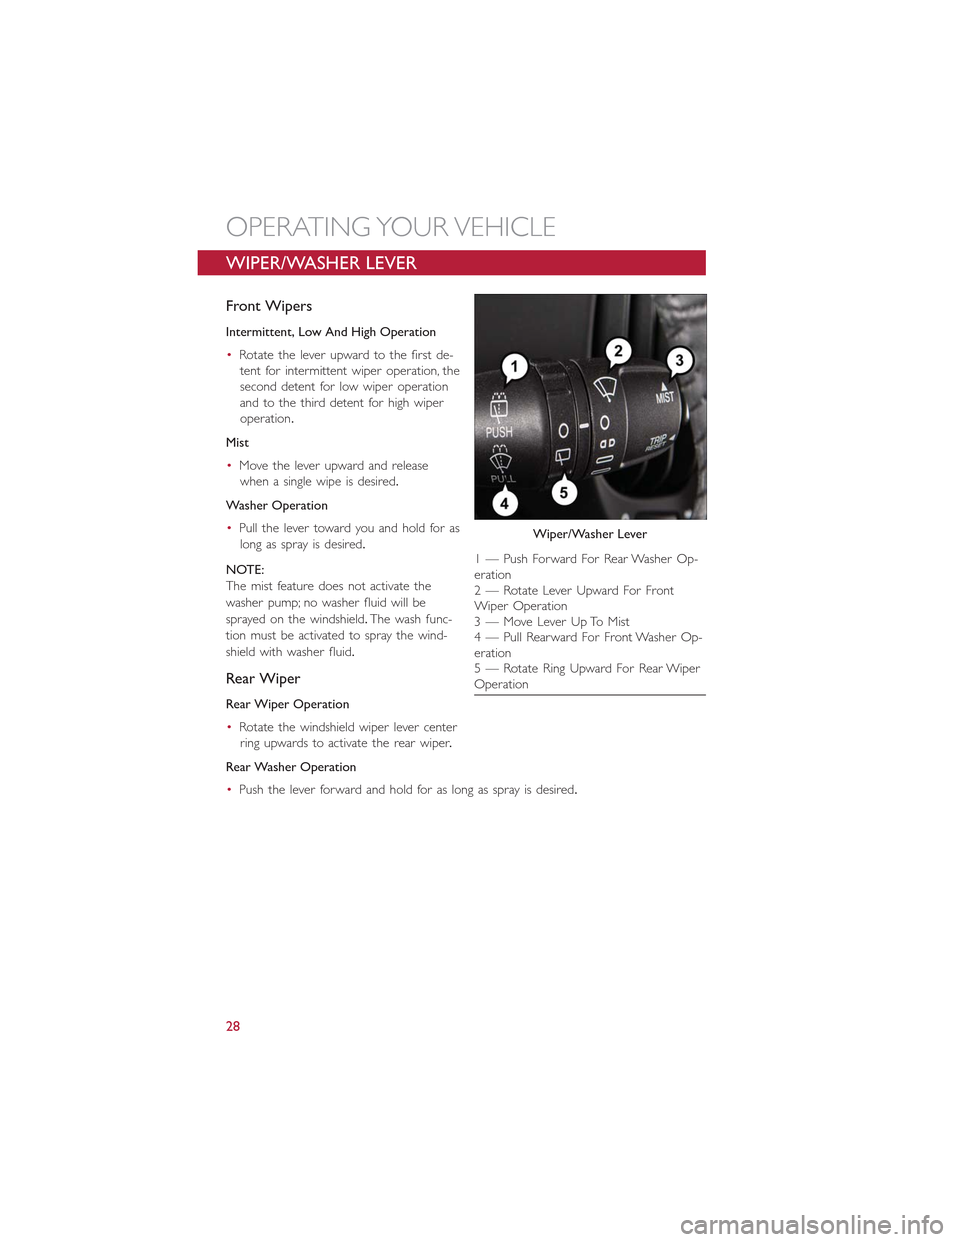
WIPER/WASHER LEVER
Front Wipers
Intermittent, Low And High Operation
•Rotate the lever upward to the first de-
tent for intermittent wiper operation, the
second detent for low wiper operation
and to the third detent for high wiper
operation.
Mist
•Move the lever upward and release
when a single wipe is desired.
Washer Operation
•Pull the lever toward you and hold for as
long as spray is desired.
NOTE:
The mist feature does not activate the
washer pump; no washer fluid will be
sprayed on the windshield.The wash func-
tion must be activated to spray the wind-
shield with washer fluid.
Rear Wiper
Rear Wiper Operation
•Rotate the windshield wiper lever center
ring upwards to activate the rear wiper.
Rear Washer Operation
•Push the lever forward and hold for as long as spray is desired.
Wiper/Washer Lever
1 — Push Forward For Rear Washer Op-eration2 — Rotate Lever Upward For FrontWiper Operation3 — Move Lever Up To Mist4 — Pull Rearward For Front Washer Op-eration5 — Rotate Ring Upward For Rear WiperOperation
OPERATING YOUR VEHICLE
28
Page 36 of 148
To Close
•With the sunroof in the full open position, pull and hold the power sunroof switch for
approximately one second.
NOTE:
During Express close any movement of the sunroof switch will stop the sunroof.
Wind Buffeting
Wind buffeting can be described as the perception of pressure on the ears or a
helicopter-type sound in the ears.Your vehicle may exhibit wind buffeting with the win-
dows down, or the sunroof (if equipped) in certain open or partially open positions.This
is a normal occurrence and can be minimized.If the buffeting occurs with the rear win-
dows open, open the front and rear windows together to minimize the buffeting.If the
buffeting occurs with the sunroof open, adjust the sunroof opening to minimize the buf-
feting or open any window.
Power Sun Blind
•Pull the power sun blind switch and the blind will move towards the rear part of the
car, until it is fully open.
With the blind fully open pull the power sun blind switch and the blind will move to-
wards the front part of the car, until it is fully closed.
NOTE:
During the automatic opening and closing stages, if the power sun blind switch is pulled
again it will stop the blind movement.
EURO TWIN CLUTCH SIX-SPEED TRANSMISSION
•This vehicle may be equipped with a fuel efficient Euro Twin Clutch Six Speed Transmis-
sion.This transmission offers a sportier driving experience with faster AutoStick shifting.
•During low-speed driving conditions in first gear, vehicle momentum changes may feel
exaggerated in response to changes in accelerator pedal position.This behavior is nor-
mal and is similar to vehicles equipped with a manual transmission.
NOTE:
•Very aggressive driving may result in some clutch odor similar to a manual transmission.
An active warning message will display in the Instrument Cluster if cool down actions
are needed.
•The first few shifts on a new vehicle may be somewhat abrupt.This is a normal condi-
tion, and precision shifts will develop within a few hundred miles (kilometers).
•At low speeds you may hear mechanical noises similar to a manual transmission as the
transmission changes gears.These noises are normal and will not damage the transmission.
•Before and after the engine is started, you may hear a hydraulic pump for a short pe-
riod of time.This noise is normal and will not damage the transmission.
OPERATING YOUR VEHICLE
34
Page 92 of 148
TRAILER TOWING
•Trailer towing with this vehicle is not recommended.
RECREATIONAL TOWING (BEHIND MOTORHOME, ETC.)
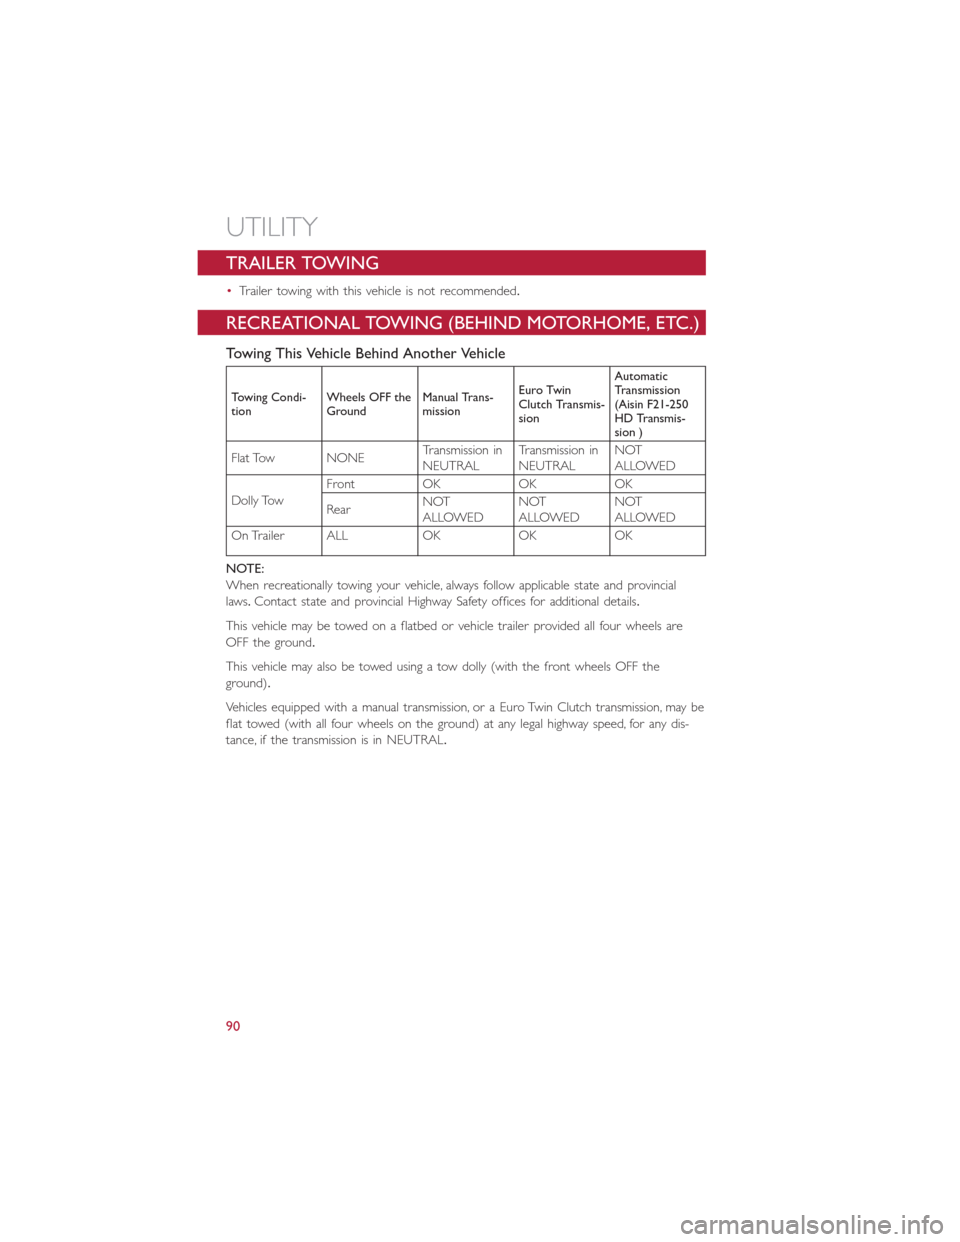
Towing This Vehicle Behind Another Vehicle
Towing Condi-tionWheels OFF theGroundManual Trans-mission
Euro TwinClutch Transmis-sion
AutomaticTransmission(Aisin F21-250HD Transmis-sion )
Flat Tow NONETransmission inNEUTRALTransmission inNEUTRALNOTALLOWED
Dolly Tow
Front OK OK OK
RearNOTALLOWEDNOTALLOWEDNOTALLOWED
On Trailer ALL OK OK OK
NOTE:
When recreationally towing your vehicle, always follow applicable state and provincial
laws.Contact state and provincial Highway Safety offices for additional details.
This vehicle may be towed on a flatbed or vehicle trailer provided all four wheels are
OFF the ground.
This vehicle may also be towed using a tow dolly (with the front wheels OFF the
ground).
Vehicles equipped with a manual transmission, or a Euro Twin Clutch transmission, may be
flat towed (with all four wheels on the ground) at any legal highway speed, for any dis-
tance, if the transmission is in NEUTRAL.
UTILITY
90
Page 93 of 148
To place the Euro Twin Clutch transmission in NEUTRAL, follow the procedure below:
1.Turn the key to the ON/RUN position, without starting the engine.
2.Press the brake pedal and shift the transmission to NEUTRAL.
3.Turn the key to the OFF position.The key will remain in the ignition switch (it cannot
be removed, since the transmission is not in PARK).Leave the key in the OFF position
while being towed.
4.Release the brake pedal only when the parking brake is applied, or the vehicle is se-
curely connected to a tow vehicle.
CAUTION!
•DO NOT flat tow any vehicle equipped with a conventional automatic transmis-
sion.Damage to the drivetrain will result.If these vehicles require towing, make
sure all drive wheels are OFF the ground.
•Towing this vehicle in violation of the above requirements can cause severe trans-
mission damage.Damage from improper towing is not covered under the New
Vehicle Limited Warranty.
UTILITY
91
Page 94 of 148
ROADSIDE ASSISTANCE
•If your FIAT 500L requires jump start assistance, out of gas/fuel delivery, tire service,
lockout service or towing due to a defect covered under the Basic Limited Warranty,
dial toll-free 1-888-242-6342 or 1-800-363-4869 for Canadian Residents.See your
Warranty booklet for further details.
•Provide your name, vehicle identification number and license plate number.
•Provide your location, including telephone number, from which you are calling.
•Briefly describe the nature of the problem and answer a few simple questions.
•You will be given the name of the service provider and an estimated time of arrival.If
you feel you are in an “unsafe situation,” please let us know.With your consent, we will
contact local police or safety authorities.
INSTRUMENT CLUSTER WARNING LIGHTS
- Low Fuel Warning Light
This warning light indicates when the fuel level reaches approximately 2.0 gal (7.8 L).This
light will turn on and a single chime will sound.
Charging System Light
This light shows the status of the electrical charging system.If the charging system light
remains on, it means that the vehicle is experiencing a problem with the charging system.
We recommend you do not continue driving if the charging system light is on.Have the
vehicle serviced immediately.
Oil Pressure Warning Light
This light indicates low engine oil pressure.If the light turns on while driving, stop the
vehicle and shut off the engine as soon as possible.A chime will sound when this light
turns on.
We recommend you do not operate the vehicle or engine damage will occur.Have the
vehicle serviced immediately.
Anti-Lock Brake (ABS) Light
This light monitors the Anti-Lock Brake System (ABS).
If the light is not on during starting, stays on or turns on while driving, we recommend
you contact the nearest authorized dealer and have the vehicle serviced immediately.
Air Bag Warning Light
If the light is not on during starting, stays on, or turns on while driving, have the vehicle
serviced by an authorized dealer immediately.
WHAT TO DO IN EMERGENCIES
92