tow FIAT 500L 2015 2.G Owner's Manual
[x] Cancel search | Manufacturer: FIAT, Model Year: 2015, Model line: 500L, Model: FIAT 500L 2015 2.GPages: 148, PDF Size: 3.77 MB
Page 97 of 148
Anti-Lock Brake System (ABS)/Electronic Stability Control (ESC) system.In this case, the
light will remain on until the condition has been corrected.If the problem is related to
the brake booster, the ABS pump will run when applying the brake, and a brake pedal
pulsation may be felt during each stop.
The dual brake system provides a reserve braking capacity in the event of a failure to a
portion of the hydraulic system.A leak in either half of the dual brake system is indicated
by the Brake Warning Light, which will turn on when the brake fluid level in the master
cylinder has dropped below a specified level.The light will remain on until the cause is
corrected.
Vehicles equipped with the Anti-Lock Brake System (ABS) are also equipped with Elec-
tronic Brake Force Distribution (EBD).In the event of an EBD failure, the Brake Warning
Light will turn on along with the ABS Light.Immediate repair to the ABS system is re-
quired.
Operation of the Brake Warning Light can be checked by turning the ignition switch from
the OFF position to the ON/RUN position.The light should illuminate for approximately
two seconds.The light should then turn off unless the parking brake is applied or a brake
fault is detected.If the light does not illuminate, have the light inspected by an authorized
dealer.
The light also will turn on when the parking brake is applied with the ignition switch in
the ON/RUN position.
NOTE:
This light shows only that the parking brake is applied.It does not show the degree of
brake application.
WARNING!
Driving a vehicle with the red brake light on is dangerous.Part of the brake system
may have failed.It will take longer to stop the vehicle.You could have a collision.Have
the vehicle checked immediately.
- Malfunction Indicator Light (MIL)
Certain conditions, such as a loose or missing gas cap, poor fuel quality, etc., may illumi-
nate the MIL after engine start.The vehicle should be serviced if the light stays on
through several typical driving cycles.In most situations, the vehicle will drive normally and
not require towing.
If the MIL flashes when the engine is running, serious conditions may exist that could lead
to immediate loss of power or severe catalytic converter damage.We recommend you
do not operate the vehicle.Have the vehicle serviced immediately.
WHAT TO DO IN EMERGENCIES
95
Page 98 of 148
- Electronic Stability Control (ESC) Activation / Malfunction
Indicator Light
The “ESC Activation/Malfunction Indicator Light” in the instrument cluster will come on
for four seconds when the ignition switch is turned to the ON/RUN position.If the “ESC
Activation/Malfunction Indicator Light” comes on continuously with the engine running, a
malfunction has been detected in the ESC system.If this light remains on, see your au-
thorized dealer as soon as possible to have the problem diagnosed and corrected.
NOTE:
•The “ESC Off Indicator Light” and the “ESC Activation/Malfunction Indicator Light”
come on momentarily each time the ignition switch is turned to ON/RUN.
•Each time the ignition is turned to ON/RUN, the ESC system will be ON even if it
was turned off previously.
•ESC Activation/Malfunction Light can blink during a ESC or TC intervention.
- Generic Warning Light
The Generic Warning Light will illuminate if any of the following conditions occur: Oil
Change Request, Engine Oil Pressure Sensor Failure, External Light Failure, Fuel Cut-Off
Not Available, Parking Sensor Failure, DST System Failure.
Electronic Throttle Control (ETC) Indicator Light
This light informs you of a problem with the system.
If a problem is detected, the light will come on while the engine is running.Cycle the
ignition when the vehicle has completely stopped and the shift lever is placed in the
PARK position; the light should turn off.
If the light remains lit with the engine running, your vehicle will usually be drivable.How-
ever, see an authorized dealer immediately.If the light is flashing when the engine is run-
ning, immediate service is required, and you may experience reduced performance, an
elevated/rough idle or engine stall, and your vehicle may require towing.
INSTRUMENT CLUSTER INDICATOR LIGHTS
Turn Signal Indicator
The arrows will flash with the exterior turn signals when the turn signal lever is oper-
ated.A tone will chime, and a EVIC message will appear if either turn signal is left on for
more than 1 mile (1.6 km).
NOTE:
If either indicator flashes at a rapid rate, check for a defective outside light bulb.
High Beam Indicator
Indicates that headlights are on high beam.
WHAT TO DO IN EMERGENCIES
96
Page 101 of 148
CAUTION!
Driving with a hot cooling system could damage your vehicle.If the temperature gauge
reads hot, pull over and stop the vehicle.Idle the vehicle with the air conditioner
turned off until the pointer drops back into the normal range.If the pointer remains
on hot, turn the engine off immediately and call for service.
WARNING!
You or others can be badly burned by hot engine coolant (antifreeze) or steam from
your radiator.If you see or hear steam coming from under the hood, do not open the
hood until the radiator has had time to cool.Never try to open a cooling system pres-
sure cap when the radiator or coolant bottle is hot.
JACKING AND TIRE CHANGING
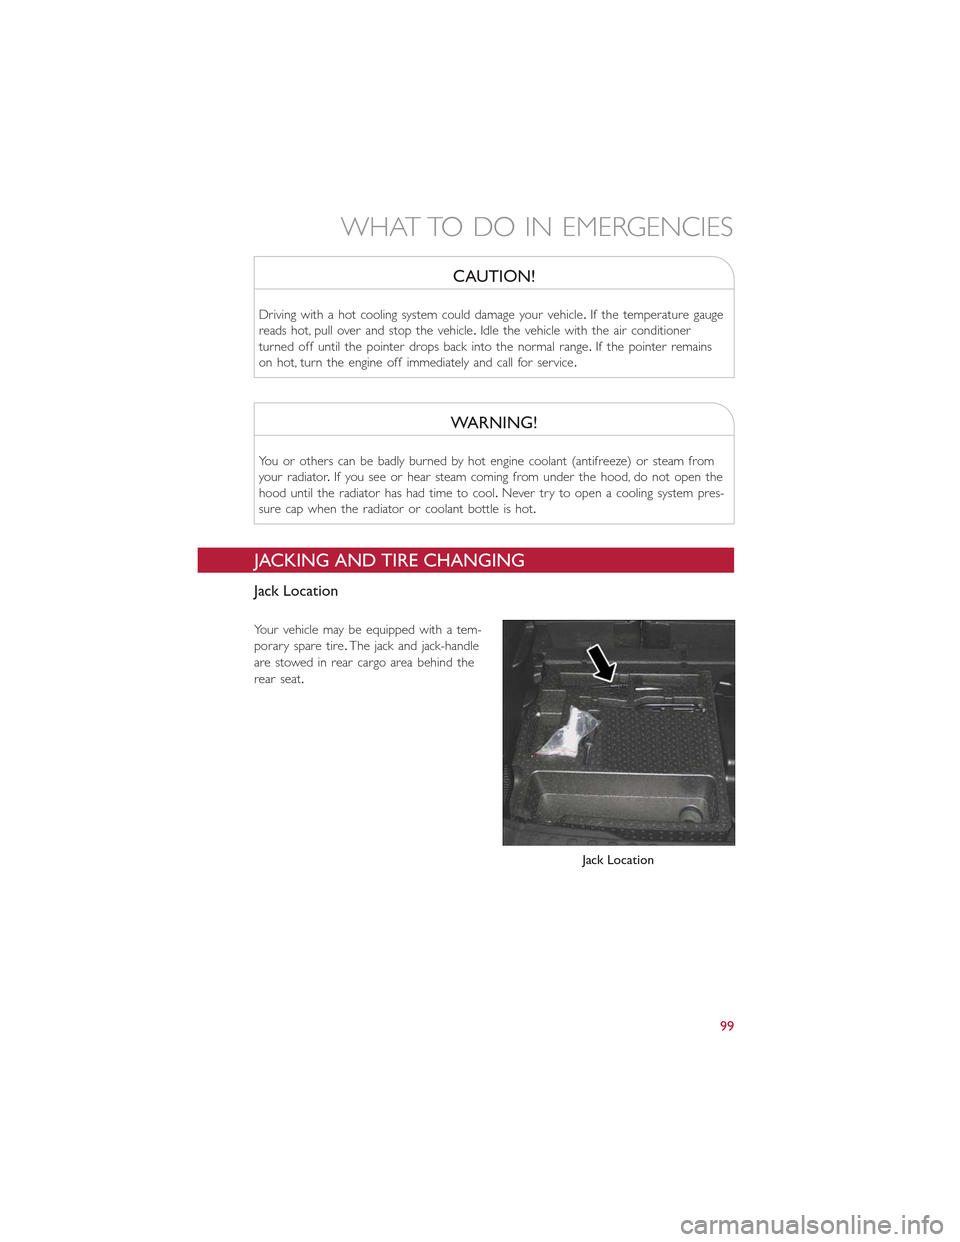
Jack Location
Your vehicle may be equipped with a tem-
porary spare tire.The jack and jack-handle
are stowed in rear cargo area behind the
rear seat.
Jack Location
WHAT TO DO IN EMERGENCIES
99
Page 102 of 148
Spare Tire Removal
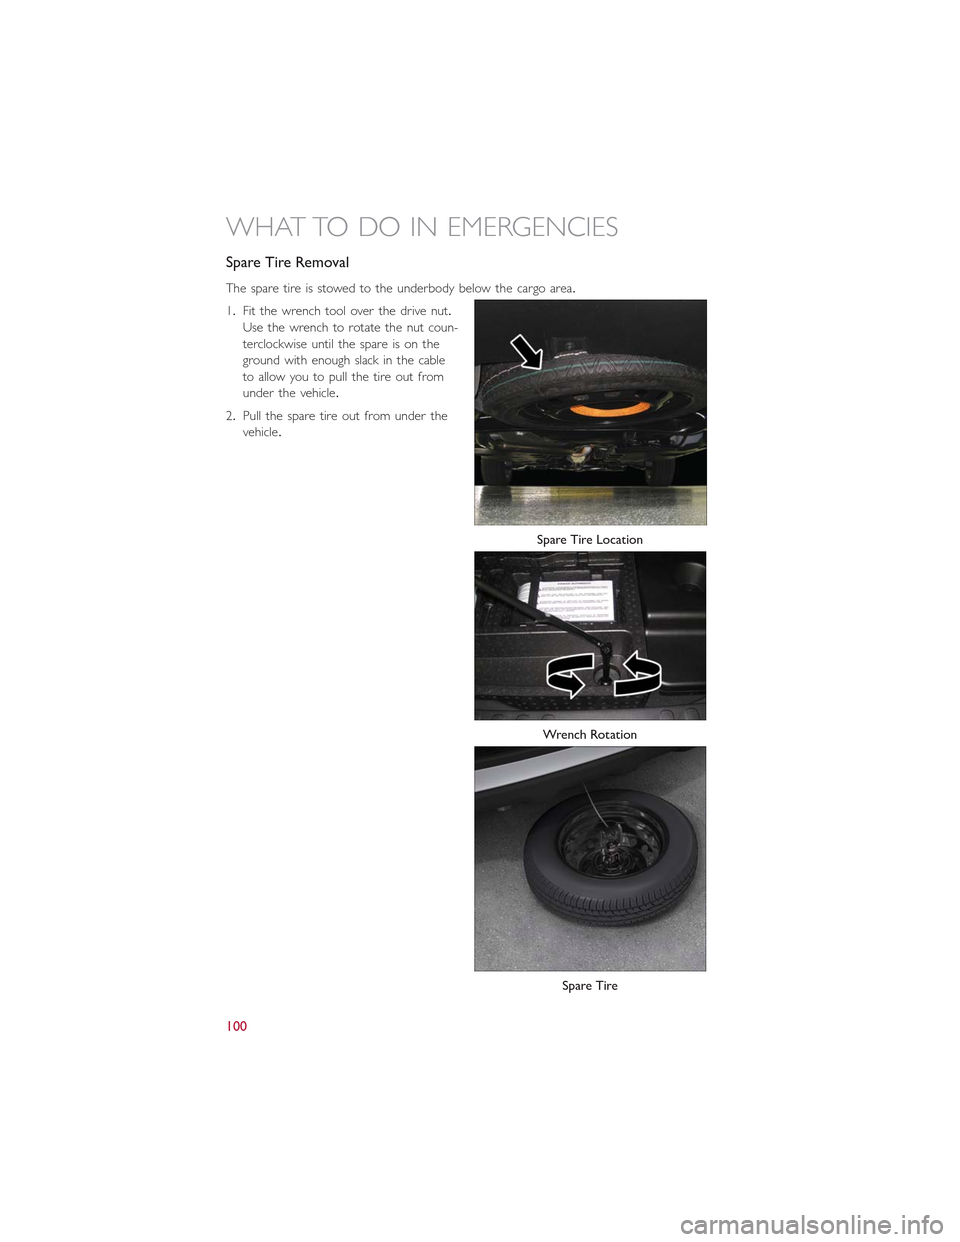
The spare tire is stowed to the underbody below the cargo area.
1.Fit the wrench tool over the drive nut.
Use the wrench to rotate the nut coun-
terclockwise until the spare is on the
ground with enough slack in the cable
to allow you to pull the tire out from
under the vehicle.
2.Pull the spare tire out from under the
vehicle.
Spare Tire Location
Wrench Rotation
Spare Tire
WHAT TO DO IN EMERGENCIES
100
Page 106 of 148
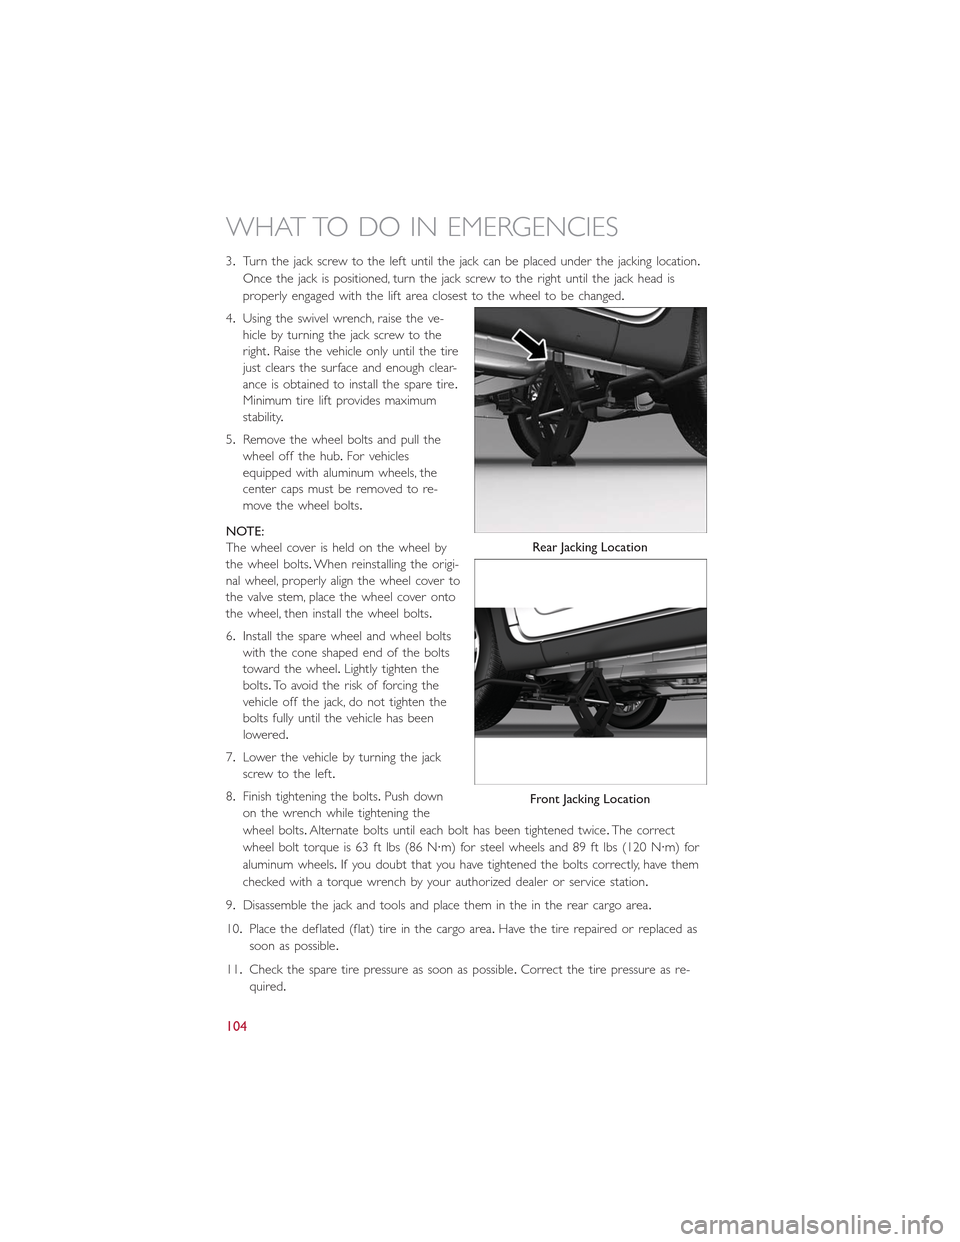
3.Turn the jack screw to the left until the jack can be placed under the jacking location.
Once the jack is positioned, turn the jack screw to the right until the jack head is
properly engaged with the lift area closest to the wheel to be changed.
4.Using the swivel wrench, raise the ve-
hicle by turning the jack screw to the
right.Raise the vehicle only until the tire
just clears the surface and enough clear-
ance is obtained to install the spare tire.
Minimum tire lift provides maximum
stability.
5.Remove the wheel bolts and pull the
wheel off the hub.For vehicles
equipped with aluminum wheels, the
center caps must be removed to re-
move the wheel bolts.
NOTE:
The wheel cover is held on the wheel by
the wheel bolts.When reinstalling the origi-
nal wheel, properly align the wheel cover to
the valve stem, place the wheel cover onto
the wheel, then install the wheel bolts.
6.Install the spare wheel and wheel bolts
with the cone shaped end of the bolts
toward the wheel.Lightly tighten the
bolts.To avoid the risk of forcing the
vehicle off the jack, do not tighten the
bolts fully until the vehicle has been
lowered.
7.Lower the vehicle by turning the jack
screw to the left.
8.Finish tightening the bolts.Push down
on the wrench while tightening the
wheel bolts.Alternate bolts until each bolt has been tightened twice.The correct
wheel bolt torque is 63 ft lbs (86 N·m) for steel wheels and 89 ft lbs (120 N·m) for
aluminum wheels.If you doubt that you have tightened the bolts correctly, have them
checked with a torque wrench by your authorized dealer or service station.
9.Disassemble the jack and tools and place them in the in the rear cargo area.
10.Place the deflated (flat) tire in the cargo area.Have the tire repaired or replaced as
soon as possible.
11.Check the spare tire pressure as soon as possible.Correct the tire pressure as re-
quired.
Rear Jacking Location
Front Jacking Location
WHAT TO DO IN EMERGENCIES
104
Page 107 of 148

Spare Tire Stowage
•Reverse instructions of the spare removal section.
•Rotate the jack wrench tool on the winch drive nut clockwise until effort becomes
heavy and an audible click is heard indicating the spare is properly stowed.
CAUTION!
•The winch mechanism is designed for use with the jack extension tube only.Use
of an air wrench or other power tools is not recommended and they can damage
the winch.
•Do not attempt to raise the vehicle by jacking on locations other than those indi-
cated in the Jacking Instructions for this vehicle.
•Be sure to mount the spare tire with the valve stem facing outward.The vehicle
could be damaged if the spare tire is mounted incorrectly.
WHAT TO DO IN EMERGENCIES
105
Page 108 of 148
WARNING!
•Do not attempt to change a tire on the side of the vehicle close to moving traffic.
Pull far enough off the road to avoid the danger of being hit when operating the
jack or changing the wheel.
•Being under a jacked-up vehicle is dangerous.The vehicle could slip off the jack
and fall on you.You could be crushed.Never put any part of your body under a
vehicle that is on a jack.
•Never start or run the engine while the vehicle is on a jack.if you need to get
under a raised vehicle, take it to a authorized dealer where it can be raised on a
lift.
•The jack is designed to use as a tool for changing tires only.The jack should not be
used to lift the vehicle for service purposes.The vehicle should be jacked on a
firm, level surface only.Avoid ice or slippery areas.
•After using the jack and tools, always reinstall them in the original carrier and loca-
tion.While driving you may experience abrupt stopping, rapid acceleration, or
sharp turns.A loose jack, tools, bracket or other objects in the vehicle may move
around with force, resulting in serious injury.
•Carefully follow these tire changing warnings to help prevent personal injury or
damage to your vehicle:
•Always park on a firm, level surface as far from the edge of the roadway as pos-
sible before raising the vehicle.
•Turn on the Hazard Warning flasher.
•Block the wheel diagonally opposite the wheel to be raised.
•Set the parking brake firmly and set an automatic transmission in PARK; a manual
transmission in REVERSE.
•Do not let anyone sit in the vehicle when it is on a jack.
•Do not get under the vehicle when it is on a jack.
•Only use the jack in the positions indicated and for lifting this vehicle during a tire
change.
•If working on or near a roadway, be extremely careful of motor traffic.
•To assure that spare tires, flat or inflated, are securely stowed, spares must be
stowed with the valve stem facing the ground.
•Raising the vehicle higher than necessary can make the vehicle unstable and cause
a collision.It could slip off the jack and hurt someone near it.Raise the vehicle
only enough to remove the tire.
•A loose tire or jack thrown forward in a collision or hard stop could injure some-
one in the vehicle.Always stow the jack parts and the extra tire and wheel in the
places provided.
WHAT TO DO IN EMERGENCIES
106
Page 114 of 148
WARNING!
•Do not attempt to seal a tire on the side of the vehicle closest to traffic.Pull far
enough off the road to avoid the danger of being hit when using the Tire Service
Kit.
•Do not use the Tire Service Kit or drive the vehicle under the following circum-
stances:
•If the puncture in the tire tread is approximately 1/4”.(6 mm) or larger.
•If the tire has any sidewall damage.
•If the tire has any damage from driving with extremely low tire pressure.
•If the tire has any damage from driving on a flat tire.
•If the wheel has any damage.
•If you are unsure of the condition of the tire or the wheel.
•Keep the Tire Service Kit away from open flames or heat source.
•A loose Tire Service Kit thrown forward in a collision or hard stop could endanger
the occupants of the vehicle.Always stow the Tire Service Kit in the place pro-
vided.Failure to follow these warnings can result in injuries that are serious or
fatal to you, your passengers, and others around you.
•Take care not to allow the contents of the Tire Service Kit to come in contact
with hair, eyes, or clothing.The Tire Service Kit is harmful if inhaled, swallowed, or
absorbed through the skin.It causes skin, eye, and respiratory irritation.Flush im-
mediately with plenty of water if there is any contact with eyes or skin.Change
clothing as soon as possible, if there is any contact with clothing.
•The Tire Service Kit Sealant solution contains latex.In case of an allergic reaction
or rash, consult a physician immediately.Keep the Tire Service Kit out of reach of
children.If swallowed, rinse mouth immediately with plenty of water and drink
plenty of water.Do not induce vomiting! Consult a physician immediately.
•The Tire Service Kit is not a permanent flat tire repair.Have the tire inspected
and repaired or replaced after using the Tire Service Kit.Do not exceed 55 mph
(88 km/h) until the tire is repaired or replaced.Failure to follow this warning can
result in injuries that are serious or fatal to you, your passengers, and others
around you.
WHAT TO DO IN EMERGENCIES
112
Page 118 of 148
SHIFT LEVER OVERRIDE
•If a malfunction occurs and the shift lever cannot be moved out of the PARK position,
you can use the following procedure to temporarily move the shift lever:
•Turn the ignition switch to the OFF position.
•Firmly set the parking brake.
•Remove the rubber storage tray liner from the center console, then lift up the front
of the shift lever bezel, carefully disengage the bezel from the shift lever housing, and
slide it up to the top of the shift lever.
•Push and maintain firm pressure on the brake pedal.
•Insert a small screwdriver or similar tool down into the access slot at the right rear
corner of the shift lever assembly, and push and hold the white override release lever
down.
•Move the shift lever into the NEUTRAL position.
•The vehicle may then be started in NEUTRAL.
•Reinstall the shift lever bezel (use care to avoid pinching the wiring), and the rubber
storage tray liner.
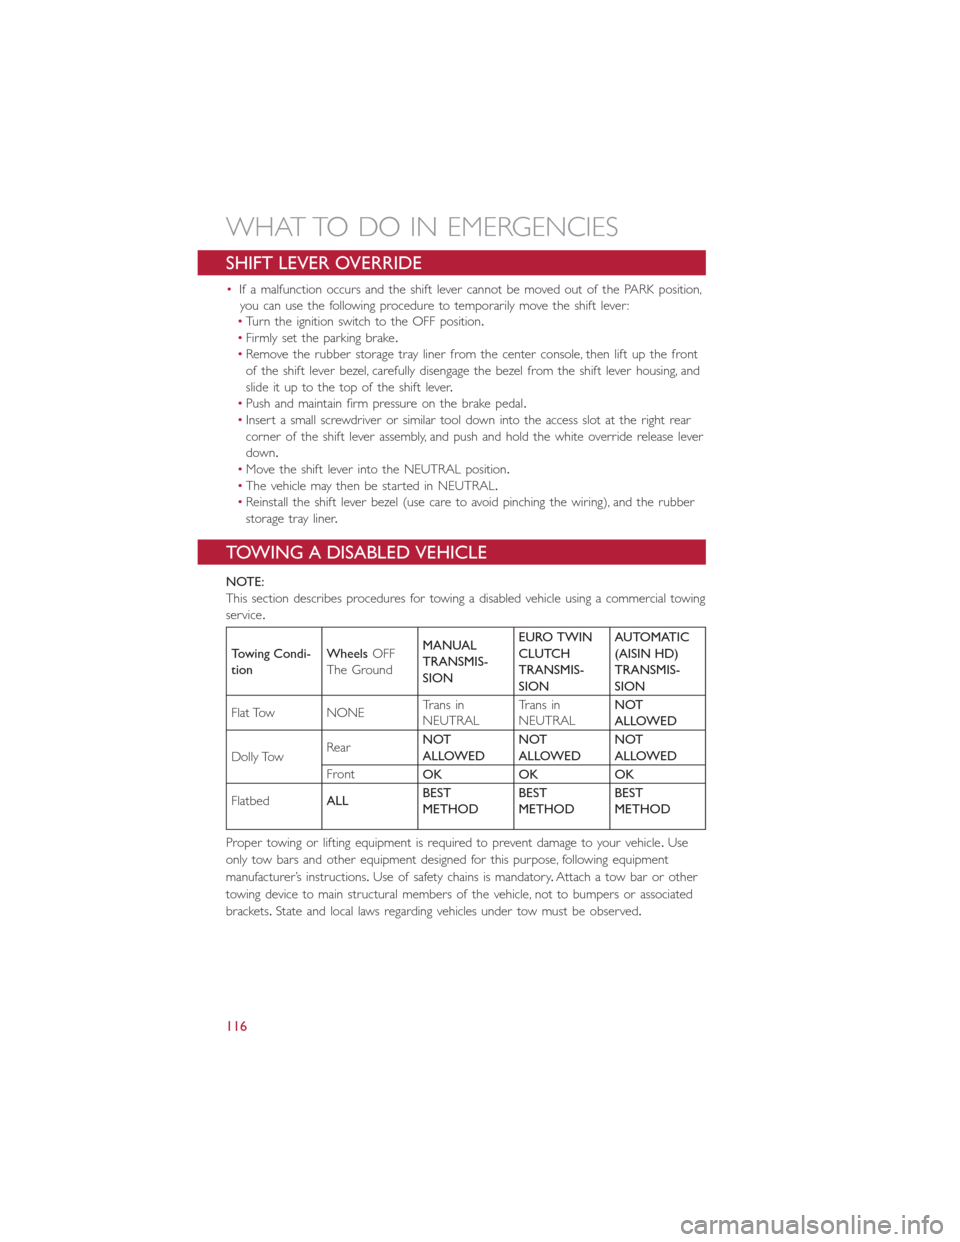
TOWING A DISABLED VEHICLE
NOTE:
This section describes procedures for towing a disabled vehicle using a commercial towing
service.
Towing Condi-
tion
WheelsOFF
The Ground
MANUAL
TRANSMIS-
SION
EURO TWIN
CLUTCH
TRANSMIS-
SION
AUTOMATIC
(AISIN HD)
TRANSMIS-
SION
Flat Tow NONETrans inNEUTRALTrans inNEUTRAL
NOT
ALLOWED
Dolly TowRearNOT
ALLOWED
NOT
ALLOWED
NOT
ALLOWED
FrontOK OK OK
FlatbedALLBEST
METHOD
BEST
METHOD
BEST
METHOD
Proper towing or lifting equipment is required to prevent damage to your vehicle.Use
only tow bars and other equipment designed for this purpose, following equipment
manufacturer’s instructions.Use of safety chains is mandatory.Attach a tow bar or other
towing device to main structural members of the vehicle, not to bumpers or associated
brackets.State and local laws regarding vehicles under tow must be observed.
WHAT TO DO IN EMERGENCIES
116
Page 119 of 148
CAUTION!
•Do not use sling-type equipment when towing.Vehicle damage may occur.
•When securing the vehicle to a flatbed truck, do not attach to front or rear sus-
pension components.Damage to your vehicle may result from improper towing.
If you must use the accessories (wipers, defroster, etc.) while being towed, the key must
be in the ON/RUN position.
Manual Transmission
•Vehicle can be flat towed (all four wheels on the ground) with the transmission in
NEUTRAL.
•Vehicle can be towed with the front wheels elevated.
•Vehicle can be towed on a flatbed truck (all wheels off the ground).
CAUTION!
Towing this vehicle in violation of the above requirements can cause severe engine
and/or transmission damage.Damage from improper towing is not covered under the
New Vehicle Limited Warranty.
Euro Twin Clutch Transmission
•Vehicle can be flat towed (all four wheels on the ground) with the transmission in
NEUTRAL.
•Vehicle can be towed with the front wheels elevated.
•Vehicle can be towed on a flatbed truck (all wheels off the ground).
If the ignition key is unavailable, or the vehicle's battery is discharged, refer to "Shift Lever
Override" in this section for instructions on shifting the transmission out of PARK for
towing.
CAUTION!
•Towing this vehicle in violation of the above requirements can cause severe trans-
mission damage.Damage from improper towing is not covered under the New
Vehicle Limited Warranty.
WHAT TO DO IN EMERGENCIES
117