stop start FIAT 500L 2019 Owner handbook (in English)
[x] Cancel search | Manufacturer: FIAT, Model Year: 2019, Model line: 500L, Model: FIAT 500L 2019Pages: 248, PDF Size: 5.74 MB
Page 120 of 248
Any electric brake (or electric winch,
etc.) should be supplied directly by the
battery through a cable with a section
of at least 2.5 mm
2.
In addition to the electrical branches,
the car electrical system can only
be connected to the supply cable for an
electric brake and to the cable for an
internal light for the trailer, not
exceeding 15 W. For connections, use
the preset control unit with a battery
cable with section not less than 2.5
mm
2.
IMPORTANT The use of auxiliary loads
other than external lights (electric brake,
winch, etc.) must take place with
engine running.
IMPORTANT To install a tow hook
contact a Fiat Dealership.
WARNING
109)The ABS with which the car is
equipped will not control the braking
system of the trailer. Particular caution is
required on slippery roads.
110)Never modify the braking system of
the vehicle to control the trailer brake. The
trailer braking system must be fully
independent of the vehicle’s hydraulic
system.
111)After fitting, screw holes must be
sealed to prevent a exhaust gas inlet.
REFUELLING THE
VEHICLE
112) 113) 114)49)
Before refuelling, make sure that the
fuel type is correct. During refuelling
procedure, switch off the engine,
engage handbrake, rotate the ignition
key to STOP and do not smoke.
PETROL ENGINES
Only use unleaded petrol with a number
of octanes (R.O.N.) not lower than 95
(EN228 specification).
DIESEL ENGINES
Only use Diesel for motor vehicles
(EN590 specification).
When using or parking the car for a
long time in the mountains or cold
areas, it is advisable to refuel using
locally available Diesel. In this case, it is
also advisable to keep the tank over
50% full.
REFUELLING
PROCEDURE
Diesel and petrol versions
Proceed as follows:
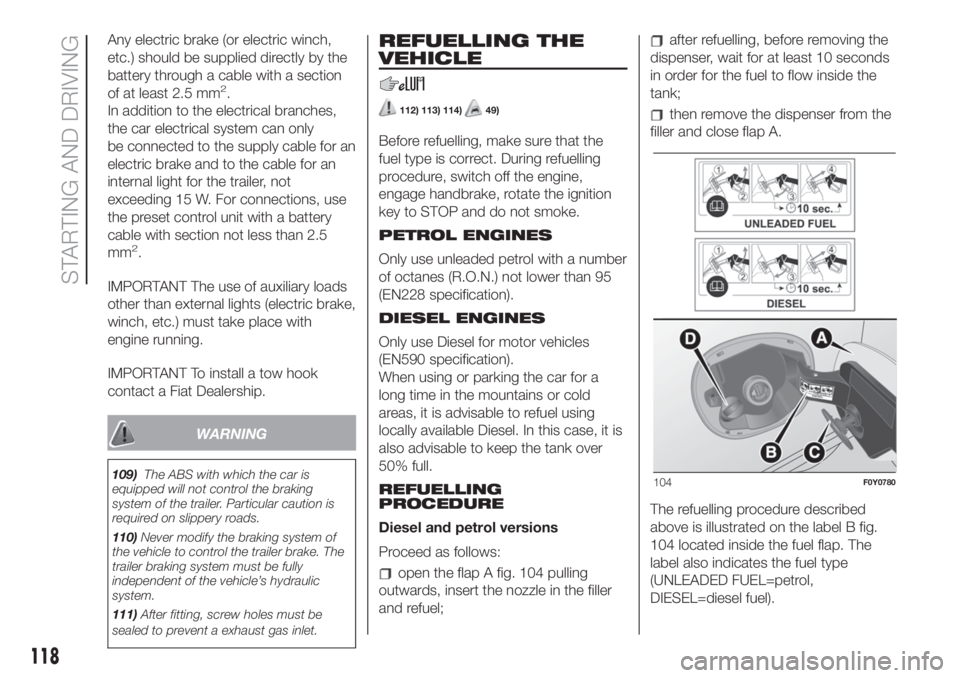
open the flap A fig. 104 pulling
outwards, insert the nozzle in the filler
and refuel;
after refuelling, before removing the
dispenser, wait for at least 10 seconds
in order for the fuel to flow inside the
tank;
then remove the dispenser from the
filler and close flap A.
The refuelling procedure described
above is illustrated on the label B fig.
104 located inside the fuel flap. The
label also indicates the fuel type
(UNLEADED FUEL=petrol,
DIESEL=diesel fuel).
104F0Y0780
118
STARTING AND DRIVING
Page 121 of 248
Flap A is provided with a dust cover
gaiter C fig. 104which prevents
deposits of impurities and dust at the
end of the filler when the flap is closed.
Emergency refuelling
If there is no fuel in the car or the supply
circuit is completely empty, proceed
as follows to reintroduce fuel to the
tank:
open the luggage compartment and
get the adapter, located in the toolbox
or, depending on the versions, in the
Fix&Go Automatic container;
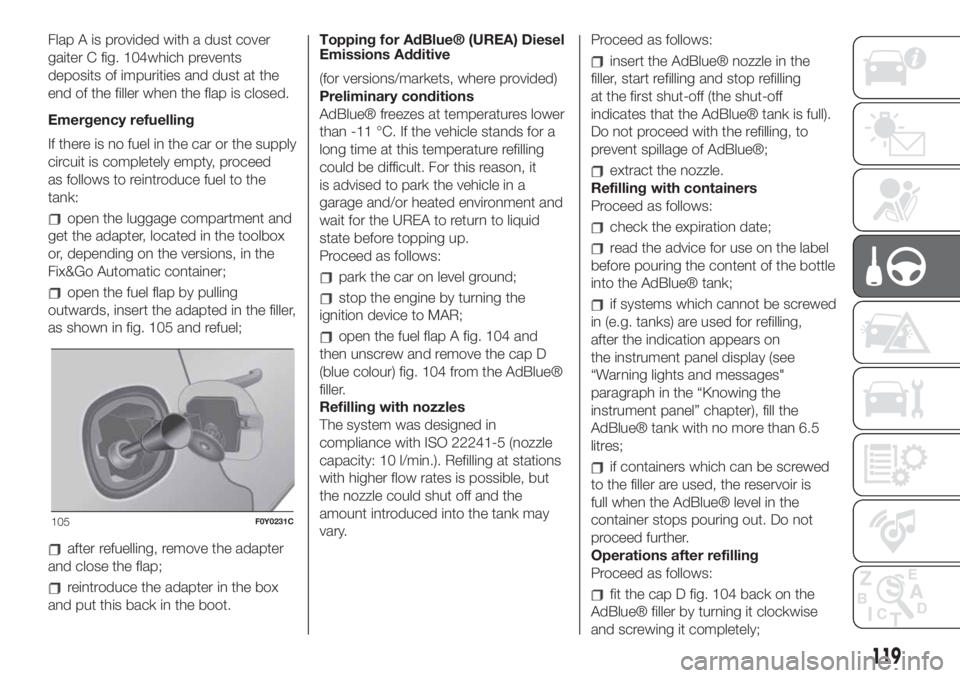
open the fuel flap by pulling
outwards, insert the adapted in the filler,
as shown in fig. 105 and refuel;
after refuelling, remove the adapter
and close the flap;
reintroduce the adapter in the box
and put this back in the boot.Topping for AdBlue® (UREA) Diesel
Emissions Additive
(for versions/markets, where provided)
Preliminary conditions
AdBlue® freezes at temperatures lower
than -11 °C. If the vehicle stands for a
long time at this temperature refilling
could be difficult. For this reason, it
is advised to park the vehicle in a
garage and/or heated environment and
wait for the UREA to return to liquid
state before topping up.
Proceed as follows:
park the car on level ground;
stop the engine by turning the
ignition device to MAR;
open the fuel flap A fig. 104 and
then unscrew and remove the cap D
(blue colour) fig. 104 from the AdBlue®
filler.
Refilling with nozzles
The system was designed in
compliance with ISO 22241-5 (nozzle
capacity: 10 l/min.). Refilling at stations
with higher flow rates is possible, but
the nozzle could shut off and the
amount introduced into the tank may
vary.Proceed as follows:
insert the AdBlue® nozzle in the
filler, start refilling and stop refilling
at the first shut-off (the shut-off
indicates that the AdBlue® tank is full).
Do not proceed with the refilling, to
prevent spillage of AdBlue®;
extract the nozzle.
Refilling with containers
Proceed as follows:
check the expiration date;
read the advice for use on the label
before pouring the content of the bottle
into the AdBlue® tank;
if systems which cannot be screwed
in (e.g. tanks) are used for refilling,
after the indication appears on
the instrument panel display (see
“Warning lights and messages"
paragraph in the “Knowing the
instrument panel” chapter), fill the
AdBlue® tank with no more than 6.5
litres;
if containers which can be screwed
to the filler are used, the reservoir is
full when the AdBlue® level in the
container stops pouring out. Do not
proceed further.
Operations after refilling
Proceed as follows:
fit the cap D fig. 104 back on the
AdBlue® filler by turning it clockwise
and screwing it completely;
105F0Y0231C
119
Page 130 of 248
“Fix&Go Automatic”
KIT
124) 125)52)2)
DESCRIPTION
The Fix&Go Automatic kit is located in
the luggage compartment, inside a
dedicated container. The container is
also equipped with a screwdriver,
the tow hook and the funnel for
refuelling in an emergency. To access
the kit, open the luggage compartment
door, remove the load platform and
lift the covering carpet.
REPAIR PROCEDURE
Proceed as follows:
stop the car in a position that is not
dangerous for oncoming traffic where
you can change the wheel safely. The
car must be stopped in a lay-by,
car-park or parking or service area, and
the ground must be as level as possible
and sufficiently compact;
switch off the engine, pull up the
handbrake and engage the 1stgear or
reverse. Make sure that any passengers
get out of the car and go to a safe
place where they will not obstruct traffic
or be exposed to the risk of injury.
Wear the reflective safety jacket
(compulsory by law) before getting out
of the car;
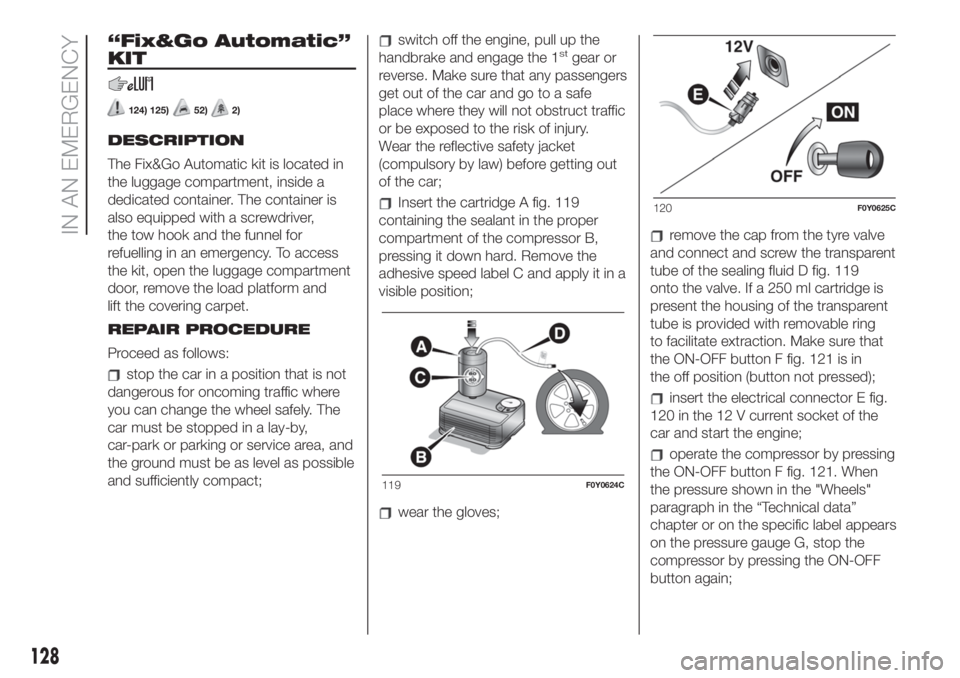
Insert the cartridge A fig. 119
containing the sealant in the proper
compartment of the compressor B,
pressing it down hard. Remove the
adhesive speed label C and apply it in a
visible position;
wear the gloves;
remove the cap from the tyre valve
and connect and screw the transparent
tube of the sealing fluid D fig. 119
onto the valve. If a 250 ml cartridge is
present the housing of the transparent
tube is provided with removable ring
to facilitate extraction. Make sure that
the ON-OFF button F fig. 121 is in
the off position (button not pressed);
insert the electrical connector E fig.
120 in the 12 V current socket of the
car and start the engine;
operate the compressor by pressing
the ON-OFF button F fig. 121. When
the pressure shown in the "Wheels"
paragraph in the “Technical data”
chapter or on the specific label appears
on the pressure gauge G, stop the
compressor by pressing the ON-OFF
button again;
119F0Y0624C
120F0Y0625C
128
IN AN EMERGENCY
Page 131 of 248
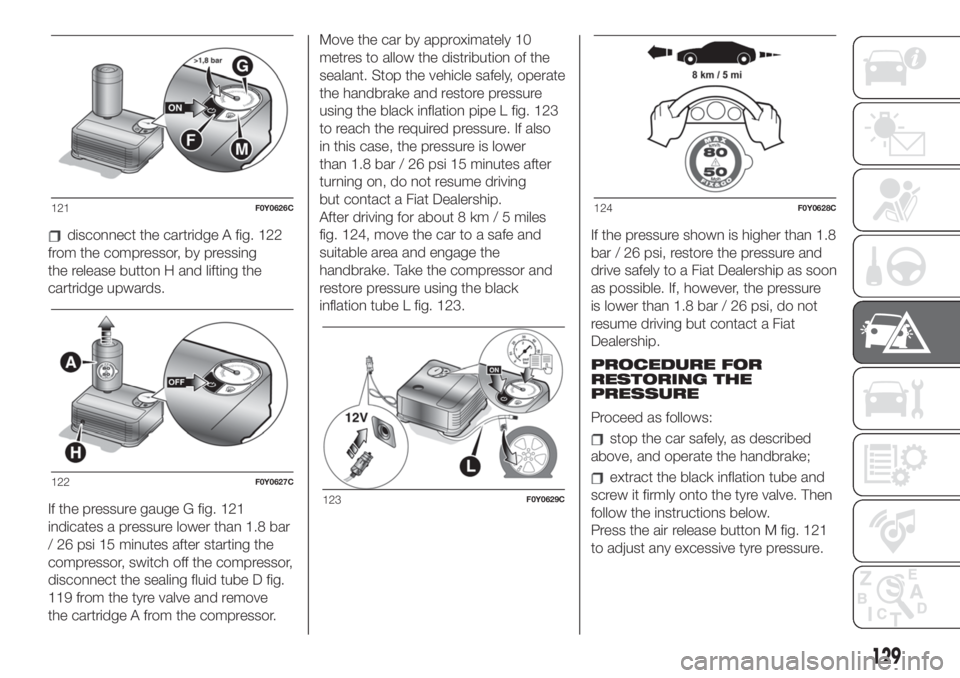
disconnect the cartridge A fig. 122
from the compressor, by pressing
the release button H and lifting the
cartridge upwards.
If the pressure gauge G fig. 121
indicates a pressure lower than 1.8 bar
/ 26 psi 15 minutes after starting the
compressor, switch off the compressor,
disconnect the sealing fluid tube D fig.
119 from the tyre valve and remove
the cartridge A from the compressor.Move the car by approximately 10
metres to allow the distribution of the
sealant. Stop the vehicle safely, operate
the handbrake and restore pressure
using the black inflation pipe L fig. 123
to reach the required pressure. If also
in this case, the pressure is lower
than 1.8 bar / 26 psi 15 minutes after
turning on, do not resume driving
but contact a Fiat Dealership.
After driving for about 8 km / 5 miles
fig. 124, move the car to a safe and
suitable area and engage the
handbrake. Take the compressor and
restore pressure using the black
inflation tube L fig. 123.If the pressure shown is higher than 1.8
bar / 26 psi, restore the pressure and
drive safely to a Fiat Dealership as soon
as possible. If, however, the pressure
is lower than 1.8 bar / 26 psi, do not
resume driving but contact a Fiat
Dealership.
PROCEDURE FOR
RESTORING THE
PRESSURE
Proceed as follows:
stop the car safely, as described
above, and operate the handbrake;
extract the black inflation tube and
screw it firmly onto the tyre valve. Then
follow the instructions below.
Press the air release button M fig. 121
to adjust any excessive tyre pressure.
121F0Y0626C
122F0Y0627C
123F0Y0629C
124F0Y0628C
129
Page 146 of 248
JUMP STARTING
If the battery is flat, a jump starting can
be performed using the battery and
the cables of another car, or using an
auxiliary battery. In all cases, the battery
used must have a capacity equal to or
a little higher than the flat one.
IMPORTANT NOTES
When a booster battery is used, comply
with the utilisation and precaution
instructions specified by the producer.
Do not use the booster battery or
any other source of external supply with
a voltage above 12 V: the battery, the
starter, the alternator and the electrical
system of the vehicle could be
damaged.
Do not attempt jump starting if the
battery is frozen. The battery could
break and explode!
JUMP STARTING
136) 137) 138) 139)56) 57)
IMPORTANT The positive terminal (+) of
the battery is shielded by a protective
cover. Lift the cover to access the
positive terminal.
Proceed as follows:
engage the handbrake, move the
Dualogic gear lever to N (Neutral) or, for
versions with manual gearbox, to
neutral and bring the ignition key to
STOP.
switch off all the other electrical
devices in the car;
if another vehicle is ready for jump
starting, park the vehicle within the
reach of the cables to be used for
starting, operate the handbrake and
make sure that the ignition is
deactivated.
IMPORTANT Avoid contact between
the two vehicles since this could cause
a connection to earth and may result
in serious injury to any people nearby.
IMPORTANT Do not directly connect
the negative terminals of the two
batteries: sparks could ignite explosive
gas released from the battery. If the
auxiliary battery is installed on another
car, prevent accidental contact
between metallic parts of the two cars.
JUMP STARTING
IMPORTANT If the procedure below is
carried out incorrectly, it can cause
severe injury to people or damage the
recharging system of one or both
vehicles. Carefully follow the
instructions given below.Cable connection
Proceed as follows to carry out a jump
starting:
connect one end of the cable used
for positive (+) to the positive terminal
(+) of the car with flat battery;
connect the other end of the cable
used for positive (+) to the positive
terminal (+) of the auxiliary battery;
connect one end of the cable used
for negative (–) to the negative terminal
(–) of the auxiliary battery;
connect the other end of the cable
used for negative (–) to an engine earth
(the visible metal part of the car engine
with flat battery) far from the battery
and the fuel injection system;
start the vehicle engine with the
auxiliary battery, let it run for a few
minutes at idling. Start the engine of the
vehicle with flat battery.
Cable disconnection
Once the engine has been started,
remove the cables proceeding as
follows:
disconnect the end of the cable
used for negative (–) from the engine
earth of the car with flat battery;
144
IN AN EMERGENCY
Page 149 of 248
Versions with Dualogic
transmission
Make sure that the transmission is in
neutral (N) (checking that the car moves
when pushed) and proceed in the
same way as for towing a normal car
with a manual transmission. If the
gearbox cannot be put in neutral, do
not tow the car and contact a Fiat
Dealership.
WARNING
141)Before towing, turn the ignition key to
MAR-ON and then to STOP without
removing it. The steering column
will automatically lock when the key is
removed and the wheels cannot be
steered.
142)Before tightening the ring clean the
threaded housing thoroughly. Make sure
that the ring is fully screwed into the
housing before towing the car.
143)Whilst towing, remember that the
assistance of the brake servo and the
electric power steering is not available,
therefore greater force needs to be exerted
on the brake pedal and more effort is
required on the steering wheel. Do not use
flexible cables when towing and avoid
jerky movements. Make sure not to
damage parts in contact with the car while
towing. When towing the vehicle, you
must comply with all specific traffic
regulations, both in terms of the towing
device and behaviour on the road. Do not
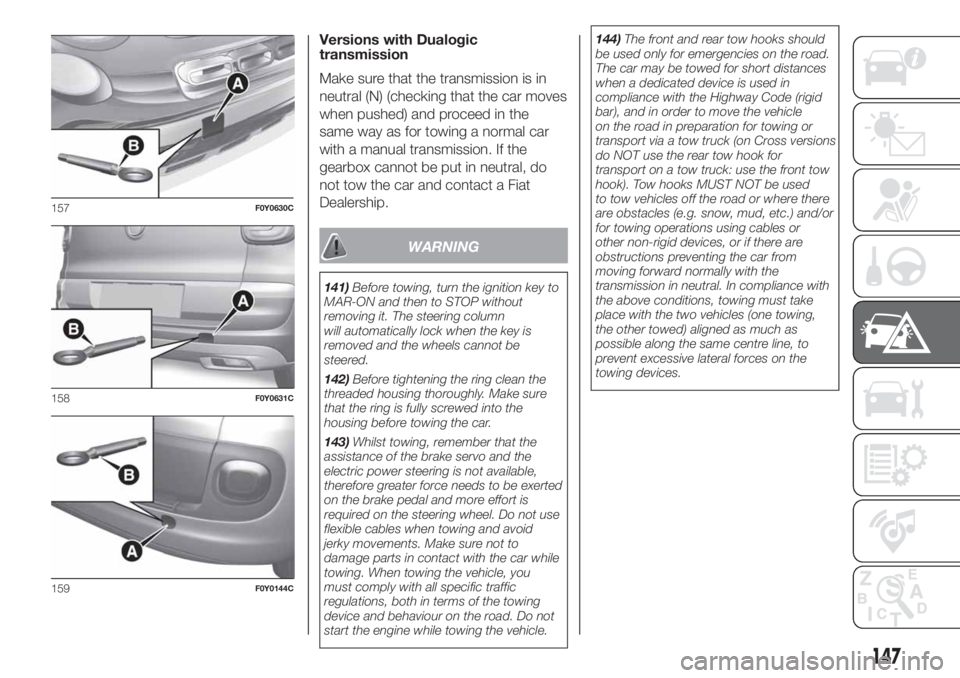
start the engine while towing the vehicle.144)The front and rear tow hooks should
be used only for emergencies on the road.
The car may be towed for short distances
when a dedicated device is used in
compliance with the Highway Code (rigid
bar), and in order to move the vehicle
on the road in preparation for towing or
transport via a tow truck (on Cross versions
do NOT use the rear tow hook for
transport on a tow truck: use the front tow
hook). Tow hooks MUST NOT be used
to tow vehicles off the road or where there
are obstacles (e.g. snow, mud, etc.) and/or
for towing operations using cables or
other non-rigid devices, or if there are
obstructions preventing the car from
moving forward normally with the
transmission in neutral. In compliance with
the above conditions, towing must take
place with the two vehicles (one towing,
the other towed) aligned as much as
possible along the same centre line, to
prevent excessive lateral forces on the
towing devices.
157F0Y0630C
158F0Y0631C
159F0Y0144C
147
Page 166 of 248
5)Batteries contain substances which are
very dangerous for the environment. For
battery replacement, contact a Fiat
Dealership.BATTERY
RECHARGING
158) 159)
IMPORTANT After turning the ignition
key to STOP and having closed the
driver side door, wait at least 1 minute
before disconnecting the electrical
supply from the battery. When
reconnecting the electrical supply to the
battery, make sure that the ignition
device is in the STOP position and the
driver side door is closed.
IMPORTANT Charging should be slow
at a low ampere rating for
approximately 24 hours. Charging for a
longer time may damage the battery.IMPORTANT Make sure that the cables
of the electrical system are correctly
reconnected to the battery: the positive
cable (+) to the positive terminal and
the negative cable (-) to the negative
terminal. The battery terminals are
marked with the positive (+) and
negative (–) symbols, and are shown on
the battery cover. The battery terminals
must also be corrosion-free and firmly
secured to the terminals. If a "quick-
type" battery charger is used with the
battery fitted on the vehicle, before
connecting it disconnect both cables of
the battery itself. Do not use a
"quick-type" battery charger to provide
the starting voltage.
IMPORTANT The battery recharging
procedure is given as information only.
You are advised to contact a Fiat
Dealership to have this operation
carried out.
VERSIONS WITHOUT
Start&Stop SYSTEM
(for versions/markets, where provided)
To recharge, proceed as follows:
disconnect the terminal from the
negative battery pole;
connect the charger cables to the
battery terminals, observing the polarity;
turn on the battery charger;
164
SERVICING AND CARE
Page 167 of 248
when it is recharged, turn the
charger off before disconnecting it from
the battery;
reconnect the terminal to the
negative battery pole.
VERSIONS WITH
Start&Stop SYSTEM
(for versions/markets, where provided)
To recharge, proceed as follows:
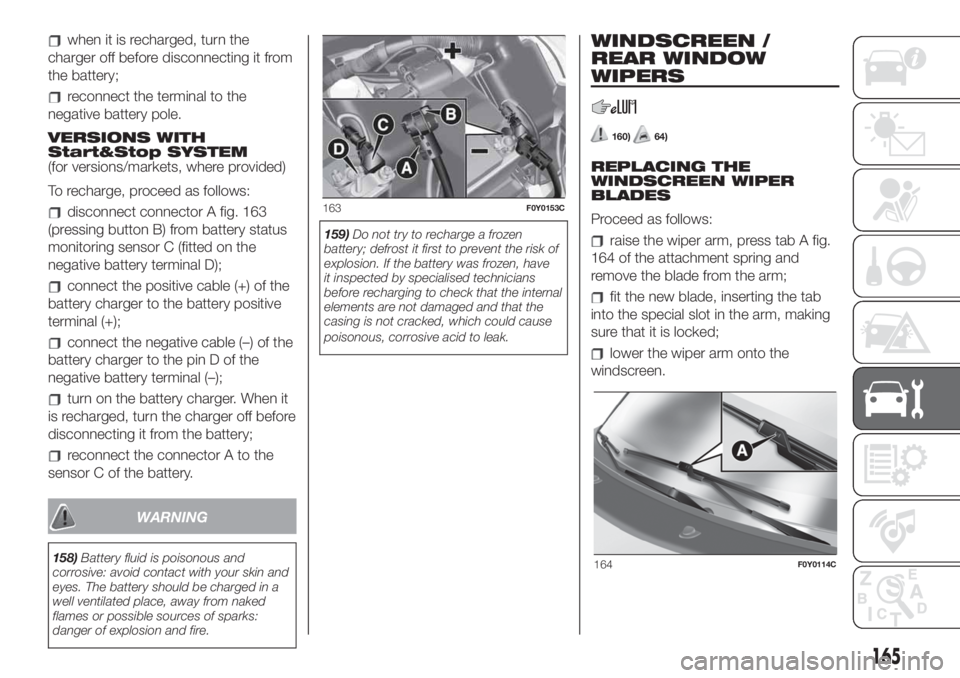
disconnect connector A fig. 163
(pressing button B) from battery status
monitoring sensor C (fitted on the
negative battery terminal D);
connect the positive cable (+) of the
battery charger to the battery positive
terminal (+);
connect the negative cable (–) of the
battery charger to the pin D of the
negative battery terminal (–);
turn on the battery charger. When it
is recharged, turn the charger off before
disconnecting it from the battery;
reconnect the connector A to the
sensor C of the battery.
WARNING
158)Battery fluid is poisonous and
corrosive: avoid contact with your skin and
eyes. The battery should be charged in a
well ventilated place, away from naked
flames or possible sources of sparks:
danger of explosion and fire.159)Do not try to recharge a frozen
battery; defrost it first to prevent the risk of
explosion. If the battery was frozen, have
it inspected by specialised technicians
before recharging to check that the internal
elements are not damaged and that the
casing is not cracked, which could cause
poisonous, corrosive acid to leak.
WINDSCREEN /
REAR WINDOW
WIPERS
160)64)
REPLACING THE
WINDSCREEN WIPER
BLADES
Proceed as follows:
raise the wiper arm, press tab A fig.
164 of the attachment spring and
remove the blade from the arm;
fit the new blade, inserting the tab
into the special slot in the arm, making
sure that it is locked;
lower the wiper arm onto the
windscreen.
163F0Y0153C
164F0Y0114C
165
Page 215 of 248
In the event of extended inactivity the
display will show the average of the
indices until that moment (the "Average
index"), then the indices will be
coloured again in real time as soon as
the vehicle is restarted.
To check the data average of previous
route (the "route" starts when the
ignition key is turned to MAR and stops
when it is turned to STOP), select the
"Previous route" button.
The details of the previous trip can also
be displayed by pressing the "Details"
button to show trip duration (time
and mileage) and average speed.
Trip data storage and transfer
The trip data can be stored in
the system memory and transferred
through a properly configured USB
memory stick or by theUconnect™
LIVE App.
This allows you to display the history of
the collected data, showing the
complete analysis of the trip data and
of your driving style.
For further information visit the
www.driveuconnect.eu websiteIMPORTANT Do not remove the USB
memory stick nor unpair the
smartphone and theUconnect™ LIVE
App before the system has
downloaded the data, since these
could be lost. During the transfer of
data to the devices,Uconnect™
messages may appear on the display
to guide the user correctly through
the operation; follow these instructions.
These messages are only displayed
with the ignition key at STOP and when
a delay in theUconnect™system
switching off is set. The data are
automatically transferred to the devices
when the engine is switched off.
Transferred data will be deleted from
the system memory in this manner. You
can choose to store the trip data or
not, by pressing the "Settings" button
and by setting the storage activation
and the USB or Cloud transfer mode.
When the USB memory stick is full, the
dedicated messages are shown on
theUconnect™system display.
When theeco:Drive™data have not
been transferred to the USB key for
a while, theUconnect™system
internal memory could become
saturated: in this case, follow the
recommendations provided by the
messages on the display.my:Car
my:Car allows you to keep the
"condition" of your car always under
control. my:Car application can detect
faults in real time and inform the driver
on impending service deadlines.
To interact with the application, press
"my:Car" button: a screen will appear
on the display showing the "care:Index"
section which contains detailed
information on car status. Press the
"Active warnings" button to show the
details of any faults on the car which
caused a warning light to switch on.
The car status can be seen both on
www.driveuconnect.eu or through the
Uconnect™ LIVEApp.
"SETTINGS" MENU
"Settings" Menu Display
To access the "Settings" menu press
the
button on the front panel.
As a guideline, the menu includes the
following items:
Language
Display
Units of measurement (for
versions/markets, where provided)
Voice controls
Time and Date
Safety/Driving Assistance (for
versions/markets, where provided)
213
Page 229 of 248
Connected services that can be
accessed on the car
Theeco:Drive™andmy:Car
applications are developed to improve
the customer's driving experience,
therefore they are available in all
markets where theUconnect™ LIVE
services can be accessed.
OnUconnect™7” HD Nav LIVE
versions, the access toUconnect™
LIVEservices enables the use of “LIVE”
services.
eco:Drive™
Theeco:Drive™application allows you
to display your driving behaviour in
real time, in order to help you reach a
more efficient driving style as far as
consumption and emissions are
concerned.
Additionally, data can be saved to a
USB device or by using the
Uconnect™ LIVEApp and processing
data on your computer using the
eco:Drive™application which can be
downloaded from www.fiat.it (for Italy),
www.fiat.com (for other countries), or
www.driveuconnect.eu
Driving style is evaluated by means of
four indices which monitor the following
parameters:
Acceleration
Deceleration
Transmission
Speed
eco:Drive™ display
Press theeco:Drive™button to
interact with the function. A screen will
be displayed showing the 4 indices
described above. These indices are
grey until the system has enough data
to evaluate the driving style.
Once sufficient data are available, the
indices will have 5 colours depending
on the evaluation: dark green (very
good), light green, yellow, orange and
red (very bad).
In the event of extended inactivity the
display will show the average of the
indices up to that moment (“Average
index”) then the indices will be coloured
again in real time as soon as the car is
restarted.
Trip data storage and transfer
The trip data can be stored in
the system memory and transferred
using a suitably configured USB
memory stick or theUconnect™ LIVE
App.
This allows you to display the history of
the collected data, showing the
complete analysis of the trip data and
of your driving style. For further
information visit the
www.driveuconnect.eu websiteIMPORTANT Do not remove the USB
memory stick nor unpair the
smartphone and theUconnect™ LIVE
App before the system has
downloaded the data, since these
could be lost. During the transfer of
data to the devices,Uconnect™
messages may appear on the display
to guide the user correctly through
the operation; follow these instructions.
These messages are only displayed
with the ignition key at STOP and when
a delay in theUconnect™system
switching off is set. The data are
automatically transferred to the devices
when the engine is switched off.
Transferred data will be deleted from
the system memory in this manner. You
can choose to store the trip data or
not, by pressing the "Settings" button
and by setting the storage activation
and the transfer mode (USB or Cloud),
as required.
When the USB memory stick is full, the
dedicated messages are shown on
theUconnect™system display.
When theeco:Drive™data have not
been transferred to the USB key for
a while, theUconnect™system
internal memory could become
saturated: in this case, follow the
recommendations provided by the
messages on the display.
227