light FIAT 500L 2019 Owner handbook (in English)
[x] Cancel search | Manufacturer: FIAT, Model Year: 2019, Model line: 500L, Model: FIAT 500L 2019Pages: 248, PDF Size: 5.74 MB
Page 144 of 248
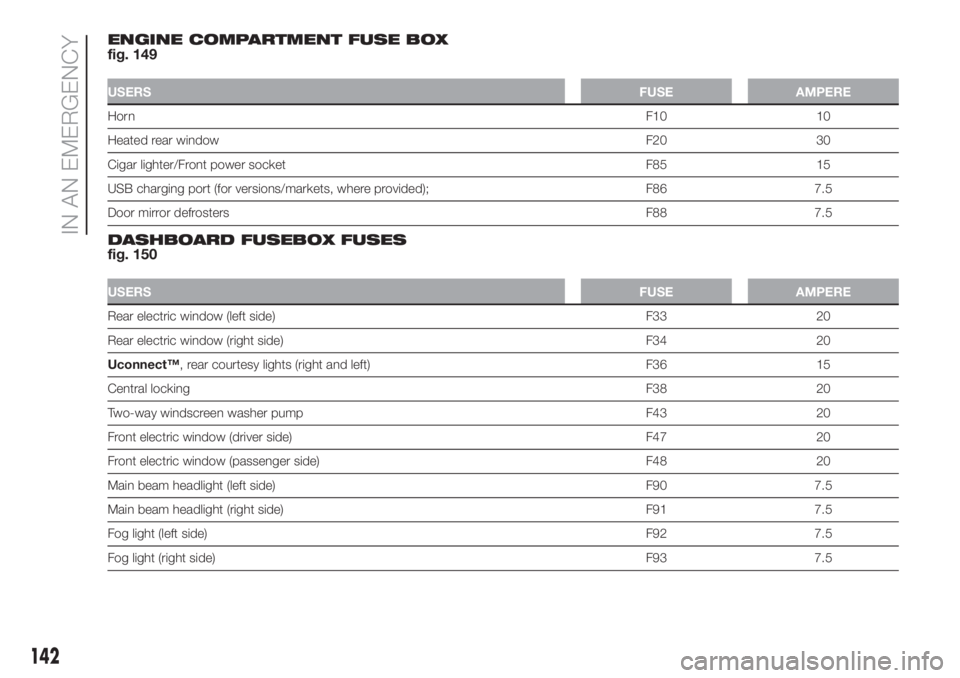
ENGINE COMPARTMENT FUSE BOX
fig. 149
USERSFUSE AMPERE
HornF10 10
Heated rear windowF20 30
Cigar lighter/Front power socket F85 15
USB charging port (for versions/markets, where provided); F86 7.5
Door mirror defrostersF88 7.5
DASHBOARD FUSEBOX FUSES
fig. 150
USERSFUSE AMPERE
Rear electric window (left side) F33 20
Rear electric window (right side) F34 20
Uconnect™, rear courtesy lights (right and left) F36 15
Central lockingF38 20
Two-way windscreen washer pump F43 20
Front electric window (driver side) F47 20
Front electric window (passenger side) F48 20
Main beam headlight (left side) F90 7.5
Main beam headlight (right side) F91 7.5
Fog light (left side)F92 7.5
Fog light (right side)F93 7.5
142
IN AN EMERGENCY
Page 147 of 248
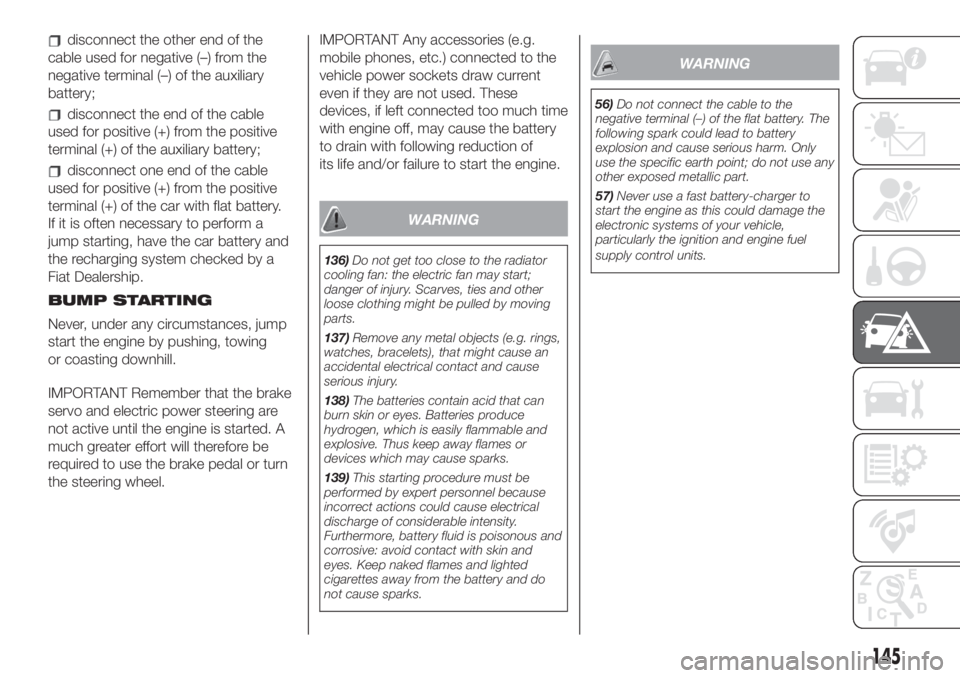
disconnect the other end of the
cable used for negative (–) from the
negative terminal (–) of the auxiliary
battery;
disconnect the end of the cable
used for positive (+) from the positive
terminal (+) of the auxiliary battery;
disconnect one end of the cable
used for positive (+) from the positive
terminal (+) of the car with flat battery.
If it is often necessary to perform a
jump starting, have the car battery and
the recharging system checked by a
Fiat Dealership.
BUMP STARTING
Never, under any circumstances, jump
start the engine by pushing, towing
or coasting downhill.
IMPORTANT Remember that the brake
servo and electric power steering are
not active until the engine is started. A
much greater effort will therefore be
required to use the brake pedal or turn
the steering wheel.IMPORTANT Any accessories (e.g.
mobile phones, etc.) connected to the
vehicle power sockets draw current
even if they are not used. These
devices, if left connected too much time
with engine off, may cause the battery
to drain with following reduction of
its life and/or failure to start the engine.
WARNING
136)Do not get too close to the radiator
cooling fan: the electric fan may start;
danger of injury. Scarves, ties and other
loose clothing might be pulled by moving
parts.
137)Remove any metal objects (e.g. rings,
watches, bracelets), that might cause an
accidental electrical contact and cause
serious injury.
138)The batteries contain acid that can
burn skin or eyes. Batteries produce
hydrogen, which is easily flammable and
explosive. Thus keep away flames or
devices which may cause sparks.
139)This starting procedure must be
performed by expert personnel because
incorrect actions could cause electrical
discharge of considerable intensity.
Furthermore, battery fluid is poisonous and
corrosive: avoid contact with skin and
eyes. Keep naked flames and lighted
cigarettes away from the battery and do
not cause sparks.
WARNING
56)Do not connect the cable to the
negative terminal (–) of the flat battery. The
following spark could lead to battery
explosion and cause serious harm. Only
use the specific earth point; do not use any
other exposed metallic part.
57)Never use a fast battery-charger to
start the engine as this could damage the
electronic systems of your vehicle,
particularly the ignition and engine fuel
supply control units.
145
Page 148 of 248
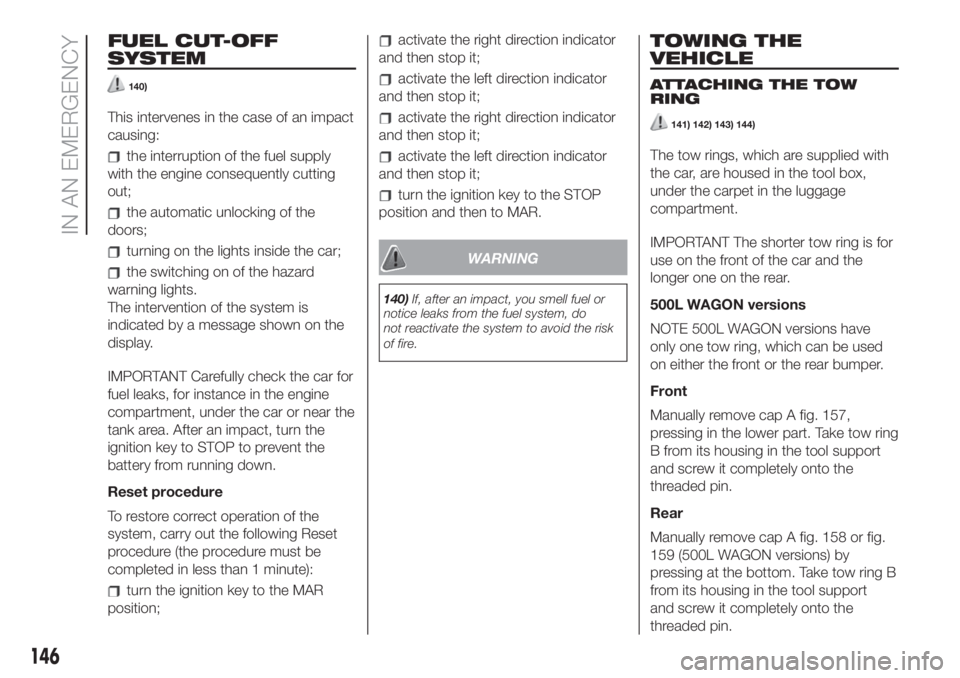
FUEL CUT-OFF
SYSTEM
140)
This intervenes in the case of an impact
causing:
the interruption of the fuel supply
with the engine consequently cutting
out;
the automatic unlocking of the
doors;
turning on the lights inside the car;
the switching on of the hazard
warning lights.
The intervention of the system is
indicated by a message shown on the
display.
IMPORTANT Carefully check the car for
fuel leaks, for instance in the engine
compartment, under the car or near the
tank area. After an impact, turn the
ignition key to STOP to prevent the
battery from running down.
Reset procedure
To restore correct operation of the
system, carry out the following Reset
procedure (the procedure must be
completed in less than 1 minute):
turn the ignition key to the MAR
position;
activate the right direction indicator
and then stop it;
activate the left direction indicator
and then stop it;
activate the right direction indicator
and then stop it;
activate the left direction indicator
and then stop it;
turn the ignition key to the STOP
position and then to MAR.
WARNING
140)If, after an impact, you smell fuel or
notice leaks from the fuel system, do
not reactivate the system to avoid the risk
of fire.
TOWING THE
VEHICLE
ATTACHING THE TOW
RING
141) 142) 143) 144)
The tow rings, which are supplied with
the car, are housed in the tool box,
under the carpet in the luggage
compartment.
IMPORTANT The shorter tow ring is for
use on the front of the car and the
longer one on the rear.
500L WAGON versions
NOTE 500L WAGON versions have
only one tow ring, which can be used
on either the front or the rear bumper.
Front
Manually remove cap A fig. 157,
pressing in the lower part. Take tow ring
B from its housing in the tool support
and screw it completely onto the
threaded pin.
Rear
Manually remove cap A fig. 158 or fig.
159 (500L WAGON versions) by
pressing at the bottom. Take tow ring B
from its housing in the tool support
and screw it completely onto the
threaded pin.
146
IN AN EMERGENCY
Page 151 of 248
SCHEDULED
SERVICING
Correct servicing is crucial for
guaranteeing a long life for the car
under the best conditions. For
this reason, Fiat has planned a series of
checks and services at fixed distance
and/or time intervals, as described
in the Service Schedule.
To keep the car in tip-top conditions, a
few additional checks which should
be carried out more frequently with
respect to the normal service deadlines
are listed in the Scheduled Service
plan on the previous pages.
IMPORTANT Scheduled Servicing
interventions are set out by the
Manufacturer. Failure to have them
carried out may invalidate the warranty.
We advise you to report any doubts
regarding the proper operation of the
car to your Fiat Dealership, before
waiting for the next service deadline.
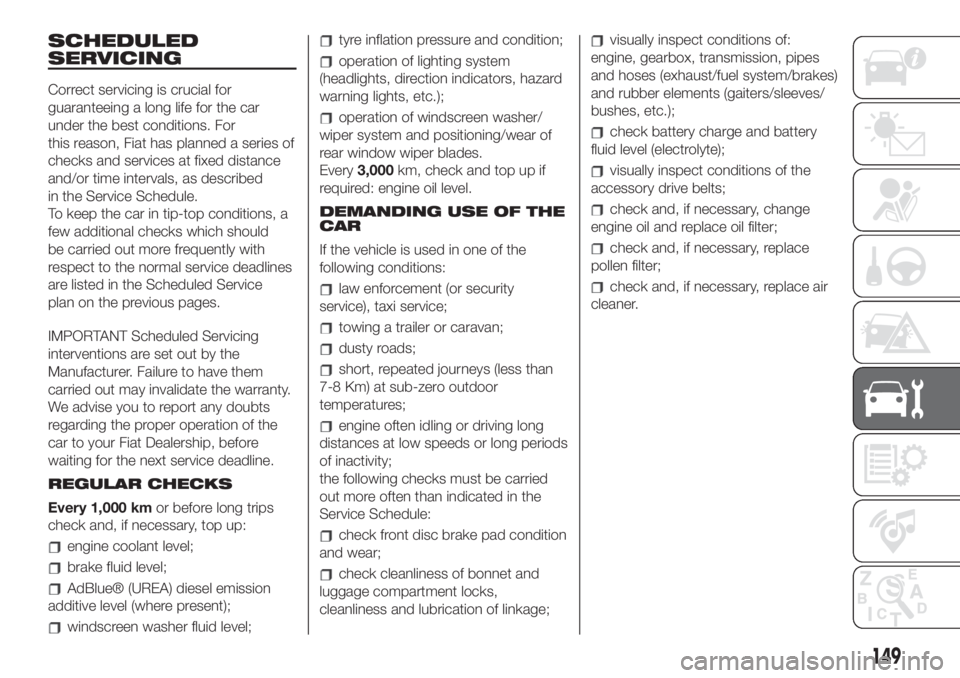
REGULAR CHECKS
Every 1,000 kmor before long trips
check and, if necessary, top up:
engine coolant level;
brake fluid level;
AdBlue® (UREA) diesel emission
additive level (where present);
windscreen washer fluid level;
tyre inflation pressure and condition;
operation of lighting system
(headlights, direction indicators, hazard
warning lights, etc.);
operation of windscreen washer/
wiper system and positioning/wear of
rear window wiper blades.
Every3,000km, check and top up if
required: engine oil level.
DEMANDING USE OF THE
CAR
If the vehicle is used in one of the
following conditions:
law enforcement (or security
service), taxi service;
towing a trailer or caravan;
dusty roads;
short, repeated journeys (less than
7-8 Km) at sub-zero outdoor
temperatures;
engine often idling or driving long
distances at low speeds or long periods
of inactivity;
the following checks must be carried
out more often than indicated in the
Service Schedule:
check front disc brake pad condition
and wear;
check cleanliness of bonnet and
luggage compartment locks,
cleanliness and lubrication of linkage;
visually inspect conditions of:
engine, gearbox, transmission, pipes
and hoses (exhaust/fuel system/brakes)
and rubber elements (gaiters/sleeves/
bushes, etc.);
check battery charge and battery
fluid level (electrolyte);
visually inspect conditions of the
accessory drive belts;
check and, if necessary, change
engine oil and replace oil filter;
check and, if necessary, replace
pollen filter;
check and, if necessary, replace air
cleaner.
149
Page 152 of 248
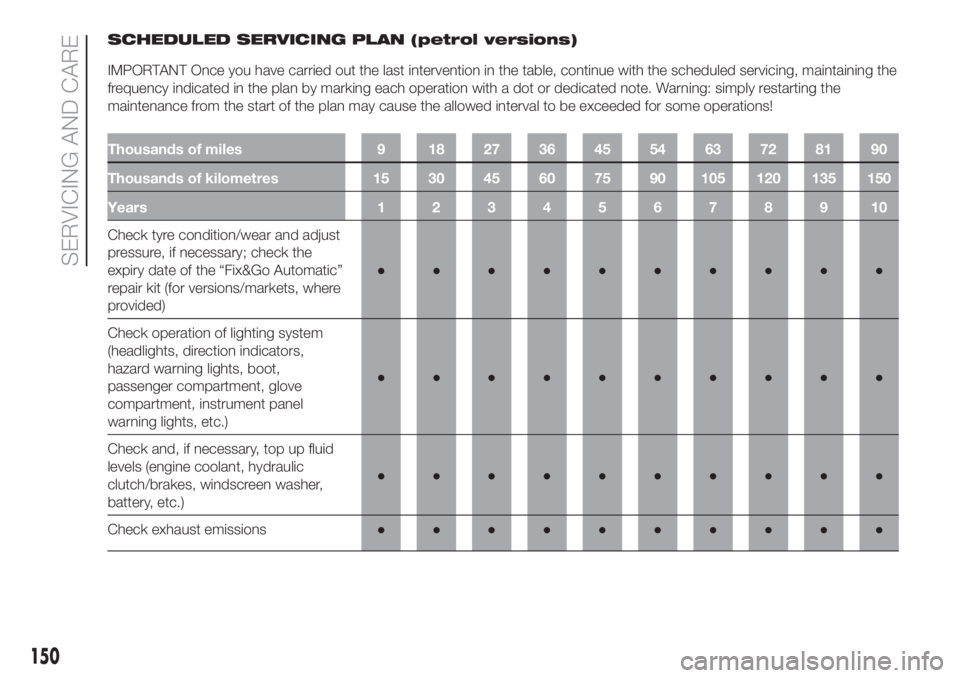
SCHEDULED SERVICING PLAN (petrol versions)
IMPORTANT Once you have carried out the last intervention in the table, continue with the scheduled servicing, maintaining the
frequency indicated in the plan by marking each operation with a dot or dedicated note. Warning: simply restarting the
maintenance from the start of the plan may cause the allowed interval to be exceeded for some operations!
Thousands of miles 9 18 27 36 45 54 63 72 81 90
Thousands of kilometres 15 30 45 60 75 90 105 120 135 150
Years12345678910
Check tyre condition/wear and adjust
pressure, if necessary; check the
expiry date of the “Fix&Go Automatic”
repair kit (for versions/markets, where
provided)●●●●●●●●●●
Check operation of lighting system
(headlights, direction indicators,
hazard warning lights, boot,
passenger compartment, glove
compartment, instrument panel
warning lights, etc.)●●●●●●●●●●
Check and, if necessary, top up fluid
levels (engine coolant, hydraulic
clutch/brakes, windscreen washer,
battery, etc.)●●●●●●●●●●
Check exhaust emissions●●●●●●●●●●
150
SERVICING AND CARE
Page 156 of 248
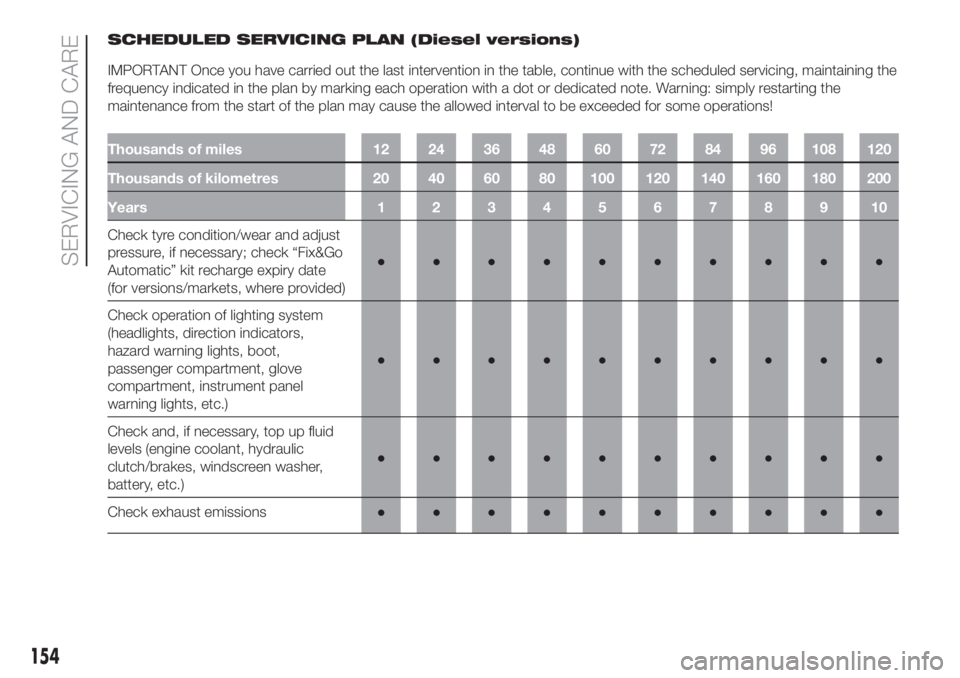
SCHEDULED SERVICING PLAN (Diesel versions)
IMPORTANT Once you have carried out the last intervention in the table, continue with the scheduled servicing, maintaining the
frequency indicated in the plan by marking each operation with a dot or dedicated note. Warning: simply restarting the
maintenance from the start of the plan may cause the allowed interval to be exceeded for some operations!
Thousands of miles 12 24 36 48 60 72 84 96 108 120
Thousands of kilometres 20 40 60 80 100 120 140 160 180 200
Years12345678910
Check tyre condition/wear and adjust
pressure, if necessary; check “Fix&Go
Automatic” kit recharge expiry date
(for versions/markets, where provided)●●●●●●●●●●
Check operation of lighting system
(headlights, direction indicators,
hazard warning lights, boot,
passenger compartment, glove
compartment, instrument panel
warning lights, etc.)●●●●●●●●●●
Check and, if necessary, top up fluid
levels (engine coolant, hydraulic
clutch/brakes, windscreen washer,
battery, etc.)●●●●●●●●●●
Check exhaust emissions●●●●●●●●●●
154
SERVICING AND CARE
Page 159 of 248
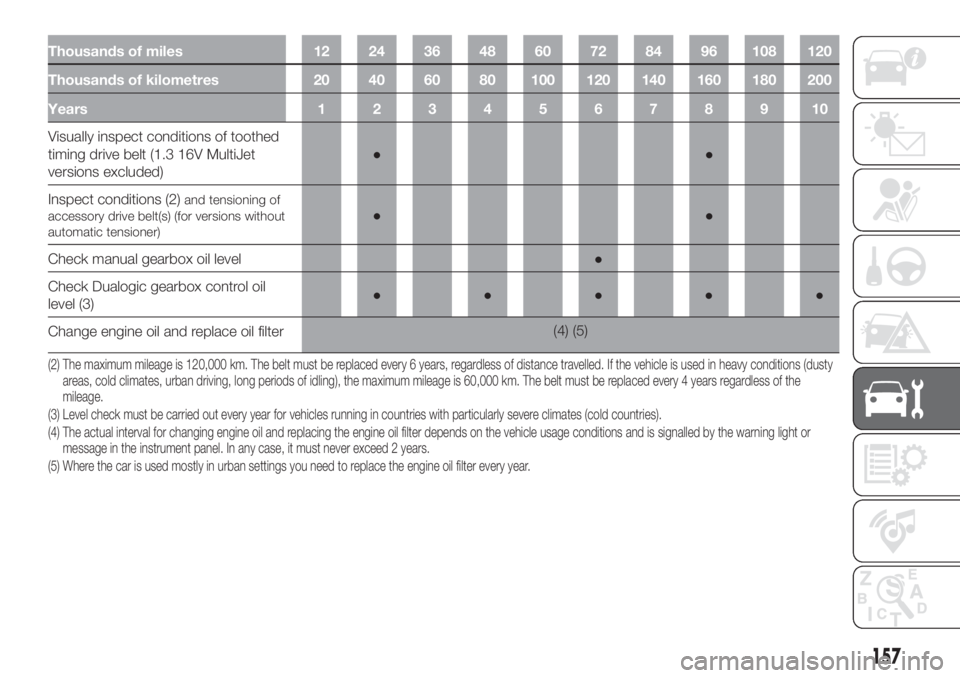
Thousands of miles 12 24 36 48 60 72 84 96 108 120
Thousands of kilometres 20 40 60 80 100 120 140 160 180 200
Years12345678910
Visually inspect conditions of toothed
timing drive belt (1.3 16V MultiJet
versions excluded)●●
Inspect conditions (2)
and tensioning of
accessory drive belt(s) (for versions without
automatic tensioner)●●
Check manual gearbox oil level●
Check Dualogic gearbox control oil
level (3)●●●●●
Change engine oil and replace oil filter(4) (5)
(2) The maximum mileage is 120,000 km. The belt must be replaced every 6 years, regardless of distance travelled. If the vehicle is used in heavy conditions (dusty
areas, cold climates, urban driving, long periods of idling), the maximum mileage is 60,000 km. The belt must be replaced every 4 years regardless of the
mileage.
(3) Level check must be carried out every year for vehicles running in countries with particularly severe climates (cold countries).
(4) The actual interval for changing engine oil and replacing the engine oil filter depends on the vehicle usage conditions and is signalled by the warning light or
message in the instrument panel. In any case, it must never exceed 2 years.
(5) Where the car is used mostly in urban settings you need to replace the engine oil filter every year.
157
Page 164 of 248
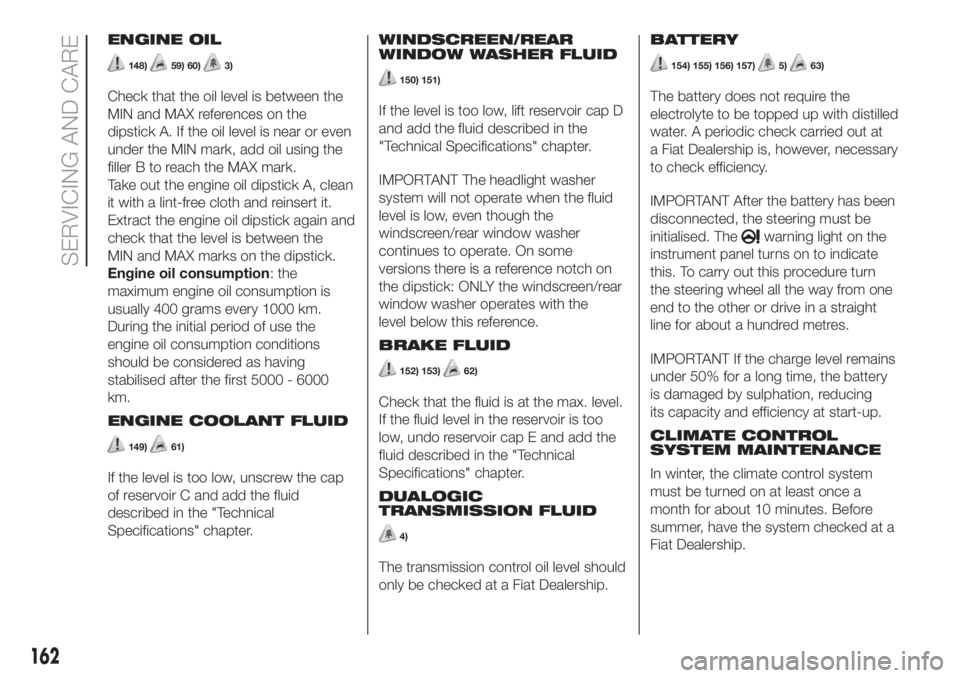
ENGINE OIL
148)59) 60)3)
Check that the oil level is between the
MIN and MAX references on the
dipstick A. If the oil level is near or even
under the MIN mark, add oil using the
filler B to reach the MAX mark.
Take out the engine oil dipstick A, clean
it with a lint-free cloth and reinsert it.
Extract the engine oil dipstick again and
check that the level is between the
MIN and MAX marks on the dipstick.
Engine oil consumption: the
maximum engine oil consumption is
usually 400 grams every 1000 km.
During the initial period of use the
engine oil consumption conditions
should be considered as having
stabilised after the first 5000 - 6000
km.
ENGINE COOLANT FLUID
149)61)
If the level is too low, unscrew the cap
of reservoir C and add the fluid
described in the "Technical
Specifications" chapter.WINDSCREEN/REAR
WINDOW WASHER FLUID
150) 151)
If the level is too low, lift reservoir cap D
and add the fluid described in the
"Technical Specifications" chapter.
IMPORTANT The headlight washer
system will not operate when the fluid
level is low, even though the
windscreen/rear window washer
continues to operate. On some
versions there is a reference notch on
the dipstick: ONLY the windscreen/rear
window washer operates with the
level below this reference.
BRAKE FLUID
152) 153)62)
Check that the fluid is at the max. level.
If the fluid level in the reservoir is too
low, undo reservoir cap E and add the
fluid described in the "Technical
Specifications" chapter.
DUALOGIC
TRANSMISSION FLUID
4)
The transmission control oil level should
only be checked at a Fiat Dealership.BATTERY
154) 155) 156) 157)5)63)
The battery does not require the
electrolyte to be topped up with distilled
water. A periodic check carried out at
a Fiat Dealership is, however, necessary
to check efficiency.
IMPORTANT After the battery has been
disconnected, the steering must be
initialised. The
warning light on the
instrument panel turns on to indicate
this. To carry out this procedure turn
the steering wheel all the way from one
end to the other or drive in a straight
line for about a hundred metres.
IMPORTANT If the charge level remains
under 50% for a long time, the battery
is damaged by sulphation, reducing
its capacity and efficiency at start-up.
CLIMATE CONTROL
SYSTEM MAINTENANCE
In winter, the climate control system
must be turned on at least once a
month for about 10 minutes. Before
summer, have the system checked at a
Fiat Dealership.
162
SERVICING AND CARE
Page 171 of 248
wipe a sponge with a slightly soapy
solution over the bodywork, frequently
rinsing the sponge;
rinse well with water and dry with a
jet of air or a chamois leather.
WARNING
70)In order to preserve the aesthetic
appearance of the paint abrasive products
and/or polishes should not be used for
cleaning the vehicle.
71)Avoid washing with rollers and/or
brushes in washing stations. Wash the car
only by hand using neutral pH detergents;
dry it with a wet chamois leather. Abrasive
products and/or polishes should not be
used for cleaning the car. Bird droppings
must be washed off immediately and
thoroughly as the acid they contain
is particularly aggressive. Avoid (if at all
possible) parking the vehicle under trees;
remove vegetable resins immediately
as, when dried, it may only be possible to
remove them with abrasive products
and/or polishes, which is highly inadvisable
as they could alter the typical opaqueness
of the paint. Do not use pure windscreen
washer fluid for cleaning the front
windscreen and rear window; dilute it min.
50% with water. Only use pure screen
washer fluid when strictly necessary due to
outside temperature conditions.
WARNING
6)Detergents pollute the water. Only wash
your car in areas equipped to collect and
treat wastewater from this type of activity.
169
Page 210 of 248
SYSTEM ON / OFF
The system is switched on/off by
pressing the
(ON/OFF) button/knob.
Turn the button/knob clockwise to
increase the radio volume or
anticlockwise to decrease it.
USB/AUX port (for
versions/markets,
where provided)
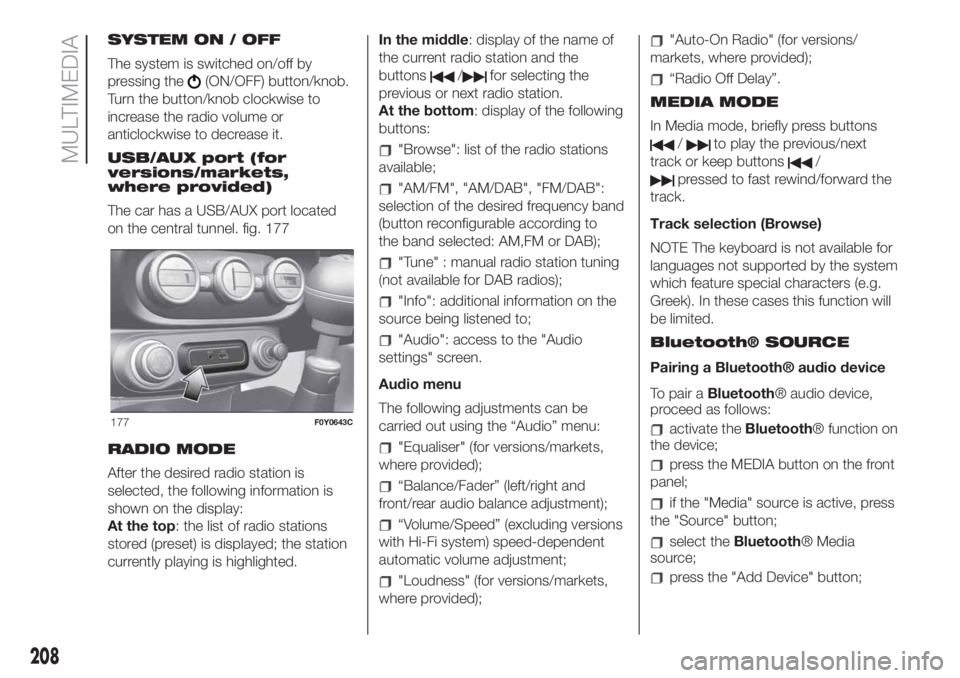
The car has a USB/AUX port located
on the central tunnel. fig. 177
RADIO MODE
After the desired radio station is
selected, the following information is
shown on the display:
At the top: the list of radio stations
stored (preset) is displayed; the station
currently playing is highlighted.In the middle: display of the name of
the current radio station and the
buttons/for selecting the
previous or next radio station.
At the bottom: display of the following
buttons:
"Browse": list of the radio stations
available;
"AM/FM", "AM/DAB", "FM/DAB":
selection of the desired frequency band
(button reconfigurable according to
the band selected: AM,FM or DAB);
"Tune" : manual radio station tuning
(not available for DAB radios);
"Info": additional information on the
source being listened to;
"Audio": access to the "Audio
settings" screen.
Audio menu
The following adjustments can be
carried out using the “Audio” menu:
"Equaliser" (for versions/markets,
where provided);
“Balance/Fader” (left/right and
front/rear audio balance adjustment);
“Volume/Speed” (excluding versions
with Hi-Fi system) speed-dependent
automatic volume adjustment;
"Loudness" (for versions/markets,
where provided);
"Auto-On Radio" (for versions/
markets, where provided);
“Radio Off Delay”.
MEDIA MODE
In Media mode, briefly press buttons
/to play the previous/next
track or keep buttons
/
pressed to fast rewind/forward the
track.
Track selection (Browse)
NOTE The keyboard is not available for
languages not supported by the system
which feature special characters (e.g.
Greek). In these cases this function will
be limited.
Bluetooth® SOURCE
Pairing a Bluetooth® audio device
To pair aBluetooth® audio device,
proceed as follows:
activate theBluetooth® function on
the device;
press the MEDIA button on the front
panel;
if the "Media" source is active, press
the "Source" button;
select theBluetooth® Media
source;
press the "Add Device" button;
177F0Y0643C
208
MULTIMEDIA