rims FIAT 500L LIVING 2015 2.G Owners Manual
[x] Cancel search | Manufacturer: FIAT, Model Year: 2015, Model line: 500L LIVING, Model: FIAT 500L LIVING 2015 2.GPages: 224, PDF Size: 5.92 MB
Page 2 of 224
We really know your car because we invented, designed and built it: we really know every single detail.
At Fiat Service authorised workshopsyou can find technicians directly trained by us,
offering quality and professionalism for all service operations.
Fiat workshops are always close to you for the regular servicing operations, season checks
and practical recommendations by our experts.
With Original Parts distributed by MOPAR
®, you maintain the reliability, comfort
and performance features that you bought your new car for over time.
Always ask for Genuine Parts for the components used on our cars; we recommend them because
they come from our steady commitment in research and development of highly innovative technologies.
For all these reasons: rely on Genuine Parts, because they are the only ones designed
by FCA for your car.
SAFETY:
BRAKING SYSTEMENVIRONMENT: PARTICULATE FILTERS,
CLIMATE CONTROL MAINTENANCECOMFORT: SUSPENSION
AND WINDSCREEN WIPERS PERFORMANCE: SPARK PLUGS,
INJECTORS AND BATTERIESLINEACCESSORI
ROOF RACK BARS, WHEEL RIMS
WHY CHOOSING
GENUINE PARTS
This Owner Handbook is intended to show the vehicle's operating conditions.
For the enthusiast user who wants to have insights, curiosities and detailed information about the characteristics and functions
of the vehicle, Fiat gives the opportunity to consult a dedicated section which is available in electronic format.
ONLINE VEHICLE OWNER HANDBOOK
The following symbol is reported within the text of the Owner Handbook, next to the subjects for which details are provided.
Go to the www.mopar.eu/owner
website and access your personal area.
The “Maintenance and care” page includes all the information about your vehicle and the link to access eLUM, where you will find
all the details of the Owner Handbook.
The eLUMwebsite is free and will allow you, among many other things, to easily consult the on-board documents
of all the other vehicles of the Group.
Have a nice reading and happy motoring!
Cop 500L LUM GB_500 UM ITA 18/11/14 09:31 Pagina 2
Page 92 of 224
SIDE BAGSTo help increase occupants protection
in the event of certain side impact
collisions, the car is equipped with
seat-mounted side bags (for
versions/markets, where provided) and
window bag.Side bags(for versions/markets, where provided)
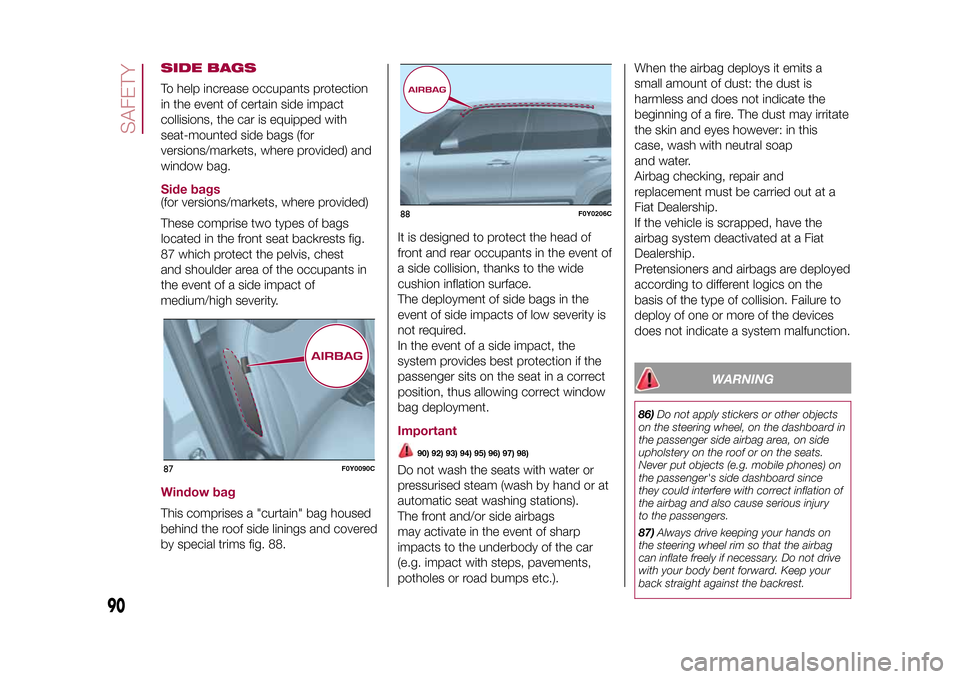
These comprise two types of bags
located in the front seat backrests fig.
87 which protect the pelvis, chest
and shoulder area of the occupants in
the event of a side impact of
medium/high severity.Window bagThis comprises a "curtain" bag housed
behind the roof side linings and covered
by special trims fig. 88.It is designed to protect the head of
front and rear occupants in the event of
a side collision, thanks to the wide
cushion inflation surface.
The deployment of side bags in the
event of side impacts of low severity is
not required.
In the event of a side impact, the
system provides best protection if the
passenger sits on the seat in a correct
position, thus allowing correct window
bag deployment.
Important
90) 92) 93) 94) 95) 96) 97) 98)
Do not wash the seats with water or
pressurised steam (wash by hand or at
automatic seat washing stations).
The front and/or side airbags
may activate in the event of sharp
impacts to the underbody of the car
(e.g. impact with steps, pavements,
potholes or road bumps etc.).When the airbag deploys it emits a
small amount of dust: the dust is
harmless and does not indicate the
beginning of a fire. The dust may irritate
the skin and eyes however: in this
case, wash with neutral soap
and water.
Airbag checking, repair and
replacement must be carried out at a
Fiat Dealership.
If the vehicle is scrapped, have the
airbag system deactivated at a Fiat
Dealership.
Pretensioners and airbags are deployed
according to different logics on the
basis of the type of collision. Failure to
deploy of one or more of the devices
does not indicate a system malfunction.
WARNING
86)Do not apply stickers or other objects
on the steering wheel, on the dashboard in
the passenger side airbag area, on side
upholstery on the roof or on the seats.
Never put objects (e.g. mobile phones) on
the passenger's side dashboard since
they could interfere with correct inflation of
the airbag and also cause serious injury
to the passengers.
87)Always drive keeping your hands on
the steering wheel rim so that the airbag
can inflate freely if necessary. Do not drive
with your body bent forward. Keep your
back straight against the backrest.
87
F0Y0090C
88
F0Y0206C
90
SAFETY
9-1-2015 12:9 Pagina 90
Page 112 of 224
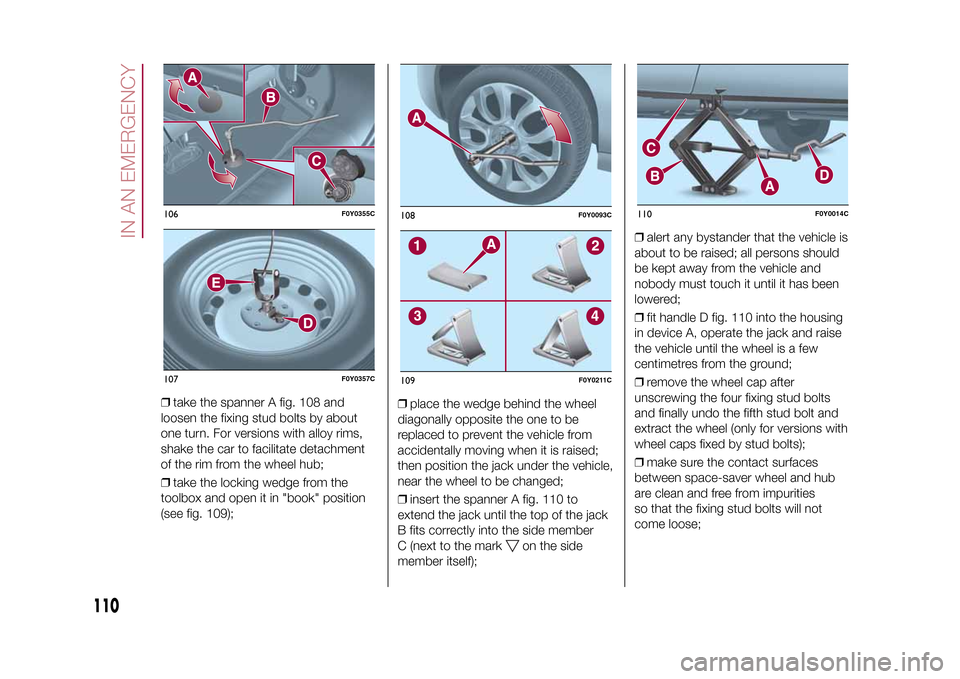
❒take the spanner A fig. 108 and
loosen the fixing stud bolts by about
one turn. For versions with alloy rims,
shake the car to facilitate detachment
of the rim from the wheel hub;
❒take the locking wedge from the
toolbox and open it in "book" position
(see fig. 109);❒place the wedge behind the wheel
diagonally opposite the one to be
replaced to prevent the vehicle from
accidentally moving when it is raised;
then position the jack under the vehicle,
near the wheel to be changed;
❒insert the spanner A fig. 110 to
extend the jack until the top of the jack
B fits correctly into the side member
C (next to the mark
on the side
member itself);❒alert any bystander that the vehicle is
about to be raised; all persons should
be kept away from the vehicle and
nobody must touch it until it has been
lowered;
❒fit handle D fig. 110 into the housing
in device A, operate the jack and raise
the vehicle until the wheel is a few
centimetres from the ground;
❒remove the wheel cap after
unscrewing the four fixing stud bolts
and finally undo the fifth stud bolt and
extract the wheel (only for versions with
wheel caps fixed by stud bolts);
❒make sure the contact surfaces
between space-saver wheel and hub
are clean and free from impurities
so that the fixing stud bolts will not
come loose;
106
F0Y0355C
107
F0Y0357C
108
F0Y0093C
109
F0Y0211C
110
F0Y0014C
110
IN AN EMERGENCY
9-1-2015 12:9 Pagina 110
Page 113 of 224
❒fit the space-saver wheel by inserting
the first stud bolt for two threads into
the hole closest to the valve; then,
tighten the stud bolt by some threads
and proceed in the same way for the
others;
❒take the spanner A fig. 105 and fully
tighten the fixing stud bolts;
❒operate the jack handle D to lower
the car. Then extract the jack;
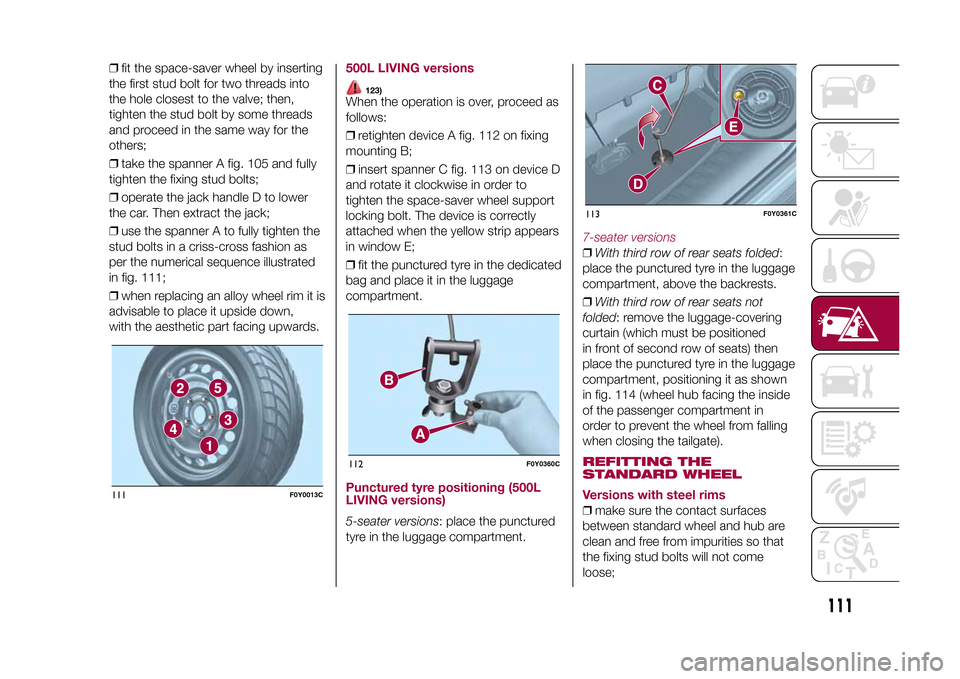
❒use the spanner A to fully tighten the
stud bolts in a criss-cross fashion as
per the numerical sequence illustrated
in fig. 111;
❒when replacing an alloy wheel rim it is
advisable to place it upside down,
with the aesthetic part facing upwards.
500L LIVING versions
123)
When the operation is over, proceed as
follows:
❒retighten device A fig. 112 on fixing
mounting B;
❒insert spanner C fig. 113 on device D
and rotate it clockwise in order to
tighten the space-saver wheel support
locking bolt. The device is correctly
attached when the yellow strip appears
in window E;
❒fit the punctured tyre in the dedicated
bag and place it in the luggage
compartment.Punctured tyre positioning (500L
LIVING versions)5-seater versions: place the punctured
tyre in the luggage compartment.
7-seater versions❒With third row of rear seats folded:
place the punctured tyre in the luggage
compartment, above the backrests.
❒With third row of rear seats not
folded: remove the luggage-covering
curtain (which must be positioned
in front of second row of seats) then
place the punctured tyre in the luggage
compartment, positioning it as shown
in fig. 114 (wheel hub facing the inside
of the passenger compartment in
order to prevent the wheel from falling
when closing the tailgate).REFITTING THE
STANDARD WHEEL
Versions with steel rims❒make sure the contact surfaces
between standard wheel and hub are
clean and free from impurities so that
the fixing stud bolts will not come
loose;
111
F0Y0013C
112
F0Y0360C
113
F0Y0361C
111
9-1-2015 12:9 Pagina 111
Page 159 of 224
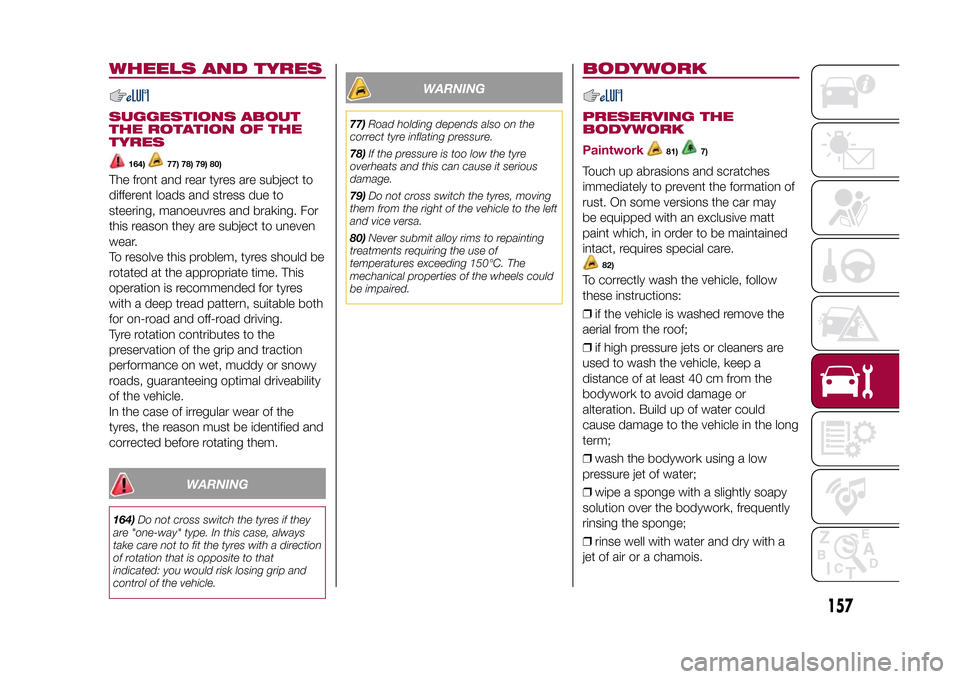
WHEELS AND TYRESSUGGESTIONS ABOUT
THE ROTATION OF THE
TYRES
164)
77) 78) 79) 80)
The front and rear tyres are subject to
different loads and stress due to
steering, manoeuvres and braking. For
this reason they are subject to uneven
wear.
To resolve this problem, tyres should be
rotated at the appropriate time. This
operation is recommended for tyres
with a deep tread pattern, suitable both
for on-road and off-road driving.
Tyre rotation contributes to the
preservation of the grip and traction
performance on wet, muddy or snowy
roads, guaranteeing optimal driveability
of the vehicle.
In the case of irregular wear of the
tyres, the reason must be identified and
corrected before rotating them.
WARNING
164)Do not cross switch the tyres if they
are "one-way" type. In this case, always
take care not to fit the tyres with a direction
of rotation that is opposite to that
indicated: you would risk losing grip and
control of the vehicle.
WARNING
77)Road holding depends also on the
correct tyre inflating pressure.
78)If the pressure is too low the tyre
overheats and this can cause it serious
damage.
79)Do not cross switch the tyres, moving
them from the right of the vehicle to the left
and vice versa.
80)Never submit alloy rims to repainting
treatments requiring the use of
temperatures exceeding 150°C. The
mechanical properties of the wheels could
be impaired.
BODYWORKPRESERVING THE
BODYWORK
Paintwork
81)
7)
Touch up abrasions and scratches
immediately to prevent the formation of
rust. On some versions the car may
be equipped with an exclusive matt
paint which, in order to be maintained
intact, requires special care.
82)
To correctly wash the vehicle, follow
these instructions:
❒if the vehicle is washed remove the
aerial from the roof;
❒if high pressure jets or cleaners are
used to wash the vehicle, keep a
distance of at least 40 cm from the
bodywork to avoid damage or
alteration. Build up of water could
cause damage to the vehicle in the long
term;
❒wash the bodywork using a low
pressure jet of water;
❒wipe a sponge with a slightly soapy
solution over the bodywork, frequently
rinsing the sponge;
❒rinse well with water and dry with a
jet of air or a chamois.
157
9-1-2015 12:9 Pagina 157
Page 166 of 224
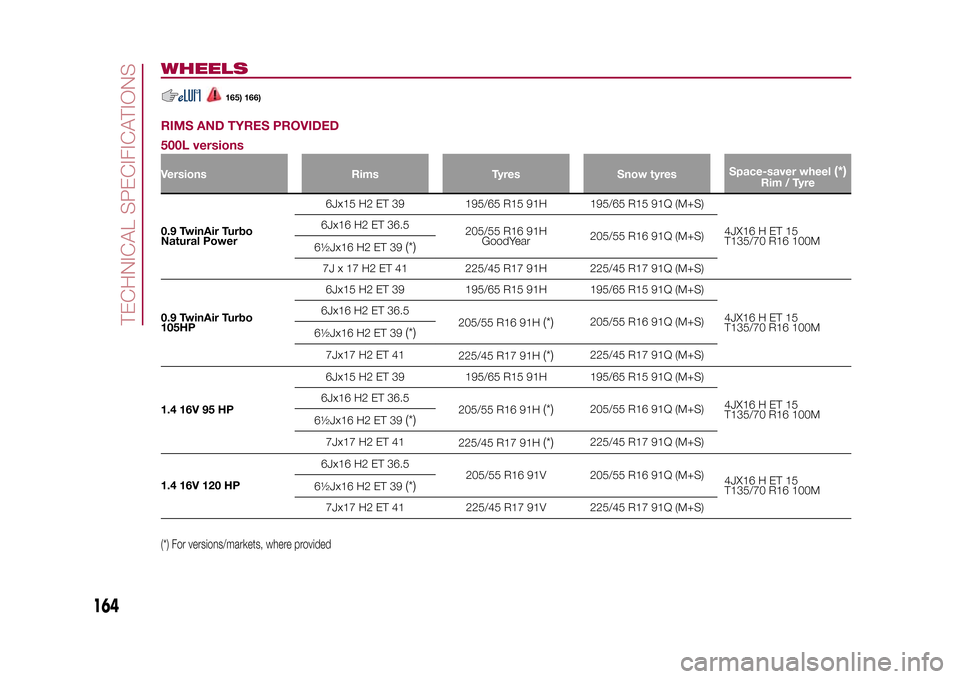
WHEELS
165) 166)
RIMS AND TYRES PROVIDED
500L versionsVersions Rims Tyres Snow tyresSpace-saver wheel
(*)
Rim / Tyre
0.9 TwinAir Turbo
Natural Power6Jx15 H2 ET 39 195/65 R15 91H 195/65 R15 91Q (M+S)
4JX16 H ET 15
T135/70 R16 100M 6Jx16 H2 ET 36.5
205/55 R16 91H
GoodYear205/55 R16 91Q (M+S)
6½Jx16 H2 ET 39
(*)
7J x 17 H2 ET 41 225/45 R17 91H 225/45 R17 91Q (M+S)
0.9 TwinAir Turbo
105HP6Jx15 H2 ET 39 195/65 R15 91H 195/65 R15 91Q (M+S)
4JX16 H ET 15
T135/70 R16 100M 6Jx16 H2 ET 36.5
205/55 R16 91H
(*)
205/55 R16 91Q (M+S)
6½Jx16 H2 ET 39
(*)
7Jx17 H2 ET 41
225/45 R17 91H
(*)
225/45 R17 91Q (M+S)
1.4 16V 95 HP6Jx15 H2 ET 39 195/65 R15 91H 195/65 R15 91Q (M+S)
4JX16 H ET 15
T135/70 R16 100M 6Jx16 H2 ET 36.5
205/55 R16 91H
(*)
205/55 R16 91Q (M+S)
6½Jx16 H2 ET 39
(*)
7Jx17 H2 ET 41
225/45 R17 91H
(*)
225/45 R17 91Q (M+S)
1.4 16V 120 HP6Jx16 H2 ET 36.5
205/55 R16 91V 205/55 R16 91Q (M+S)
4JX16 H ET 15
T135/70 R16 100M 6½Jx16 H2 ET 39
(*)
7Jx17 H2 ET 41 225/45 R17 91V 225/45 R17 91Q (M+S)
(*) For versions/markets, where provided
164
TECHNICAL SPECIFICATIONS
9-1-2015 12:9 Pagina 164
Page 167 of 224
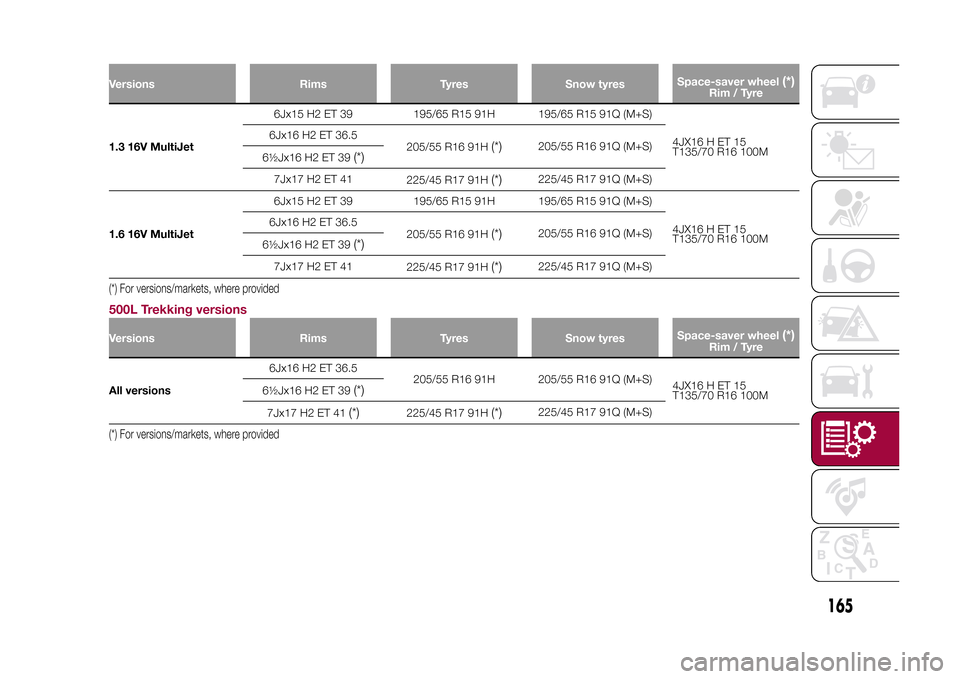
Versions Rims Tyres Snow tyresSpace-saver wheel
(*)
Rim / Tyre
1.3 16V MultiJet6Jx15 H2 ET 39 195/65 R15 91H 195/65 R15 91Q (M+S)
4JX16 H ET 15
T135/70 R16 100M 6Jx16 H2 ET 36.5
205/55 R16 91H
(*)
205/55 R16 91Q (M+S)
6½Jx16 H2 ET 39
(*)
7Jx17 H2 ET 41
225/45 R17 91H
(*)
225/45 R17 91Q (M+S)
1.6 16V MultiJet6Jx15 H2 ET 39 195/65 R15 91H 195/65 R15 91Q (M+S)
4JX16 H ET 15
T135/70 R16 100M 6Jx16 H2 ET 36.5
205/55 R16 91H
(*)
205/55 R16 91Q (M+S)
6½Jx16 H2 ET 39
(*)
7Jx17 H2 ET 41
225/45 R17 91H
(*)
225/45 R17 91Q (M+S)
(*) For versions/markets, where provided500L Trekking versionsVersions Rims Tyres Snow tyresSpace-saver wheel
(*)
Rim / Tyre
All versions6Jx16 H2 ET 36.5
205/55 R16 91H 205/55 R16 91Q (M+S)
4JX16 H ET 15
T135/70 R16 100M 6½Jx16 H2 ET 39
(*)
7Jx17 H2 ET 41
(*)
225/45 R17 91H
(*)
225/45 R17 91Q (M+S)
(*) For versions/markets, where provided
165
9-1-2015 12:9 Pagina 165
Page 168 of 224
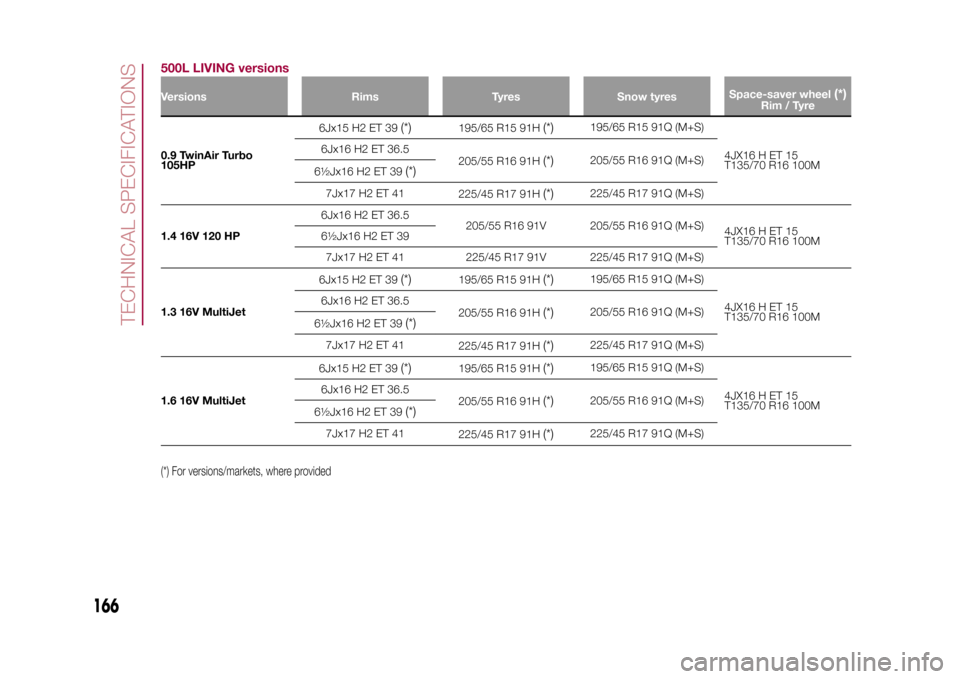
500L LIVING versionsVersions Rims Tyres Snow tyresSpace-saver wheel
(*)
Rim / Tyre
0.9 TwinAir Turbo
105HP6Jx15 H2 ET 39
(*)
195/65 R15 91H
(*)
195/65 R15 91Q (M+S)
4JX16 H ET 15
T135/70 R16 100M 6Jx16 H2 ET 36.5
205/55 R16 91H
(*)
205/55 R16 91Q (M+S)
6½Jx16 H2 ET 39
(*)
7Jx17 H2 ET 41
225/45 R17 91H
(*)
225/45 R17 91Q (M+S)
1.4 16V 120 HP6Jx16 H2 ET 36.5
205/55 R16 91V 205/55 R16 91Q (M+S)
4JX16 H ET 15
T135/70 R16 100M 6½Jx16 H2 ET 39
7Jx17 H2 ET 41 225/45 R17 91V 225/45 R17 91Q (M+S)
1.3 16V MultiJet6Jx15 H2 ET 39
(*)
195/65 R15 91H
(*)
195/65 R15 91Q (M+S)
4JX16 H ET 15
T135/70 R16 100M 6Jx16 H2 ET 36.5
205/55 R16 91H
(*)
205/55 R16 91Q (M+S)
6½Jx16 H2 ET 39
(*)
7Jx17 H2 ET 41
225/45 R17 91H
(*)
225/45 R17 91Q (M+S)
1.6 16V MultiJet6Jx15 H2 ET 39
(*)
195/65 R15 91H
(*)
195/65 R15 91Q (M+S)
4JX16 H ET 15
T135/70 R16 100M 6Jx16 H2 ET 36.5
205/55 R16 91H
(*)
205/55 R16 91Q (M+S)
6½Jx16 H2 ET 39
(*)
7Jx17 H2 ET 41
225/45 R17 91H
(*)
225/45 R17 91Q (M+S)
(*) For versions/markets, where provided
166
TECHNICAL SPECIFICATIONS
9-1-2015 12:9 Pagina 166
Page 172 of 224
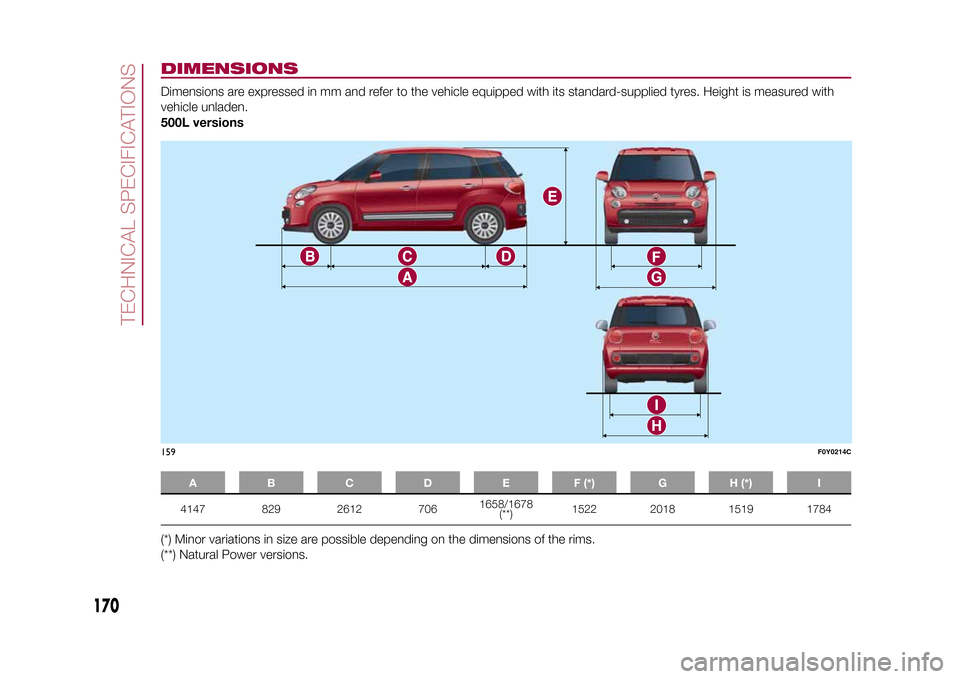
DIMENSIONSDimensions are expressed in mm and refer to the vehicle equipped with its standard-supplied tyres. Height is measured with
vehicle unladen.
500L versions
A B C D E F (*) G H (*) I4147 829 2612 7061658/1678
(**)1522 2018 1519 1784
(*) Minor variations in size are possible depending on the dimensions of the rims.
(**) Natural Power versions.159
F0Y0214C
170
TECHNICAL SPECIFICATIONS
9-1-2015 12:9 Pagina 170
Page 173 of 224
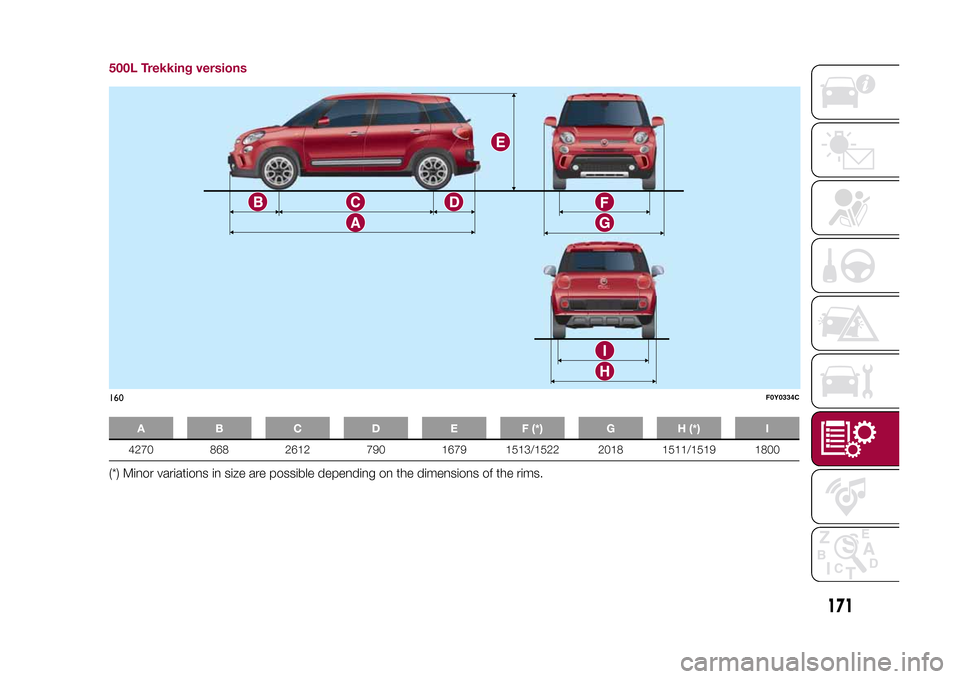
500L Trekking versions
A B C D E F (*) G H (*) I4270 868 2612 790 1679 1513/1522 2018 1511/1519 1800
(*) Minor variations in size are possible depending on the dimensions of the rims.160
F0Y0334C
171
9-1-2015 12:9 Pagina 171